warning light AUDI A6 2017 User Guide
[x] Cancel search | Manufacturer: AUDI, Model Year: 2017, Model line: A6, Model: AUDI A6 2017Pages: 280, PDF Size: 70.24 MB
Page 23 of 280
co
co
.... N
" N .... 0 0 <.,;) 'SI"
Driver information
system
Overview
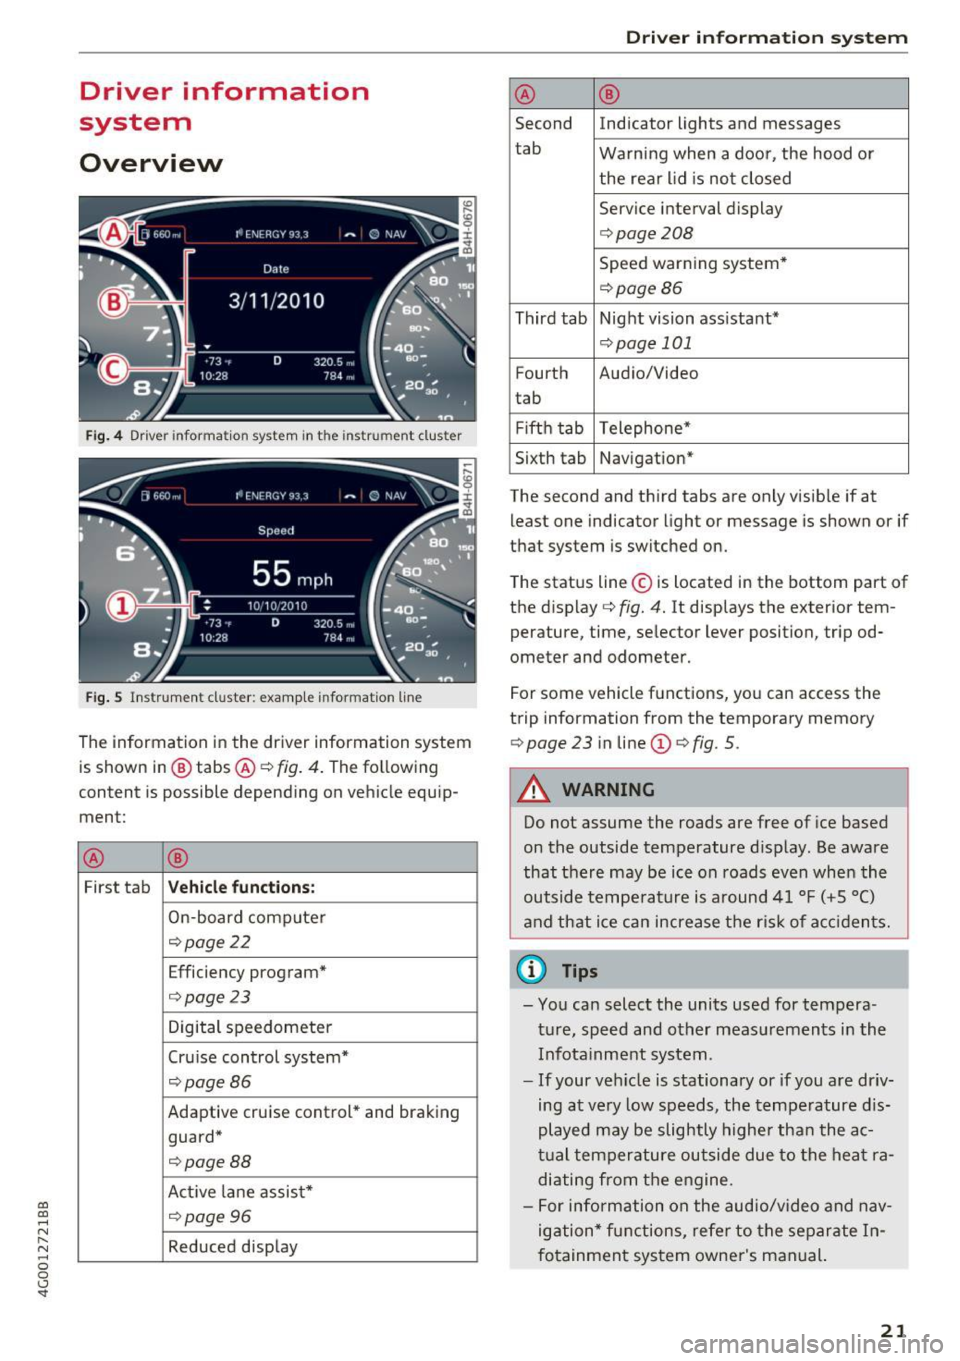
Fig . 4 Dr iver informa tion system in t he inst rum ent clus ter
Fig . S Ins trum ent cl uster: examp le in formation line
The information in the driver information system
is shown in @ tabs @¢
fig. 4. The following
content is possible depending on vehicle equip
ment:
® ®
First tab Vehicle functions :
On-board computer
¢page22
Efficiency program*
¢page 23
Digital speedometer
Cru ise control system*
¢ page86
Adaptive cruise control* and braking
guard*
¢ page88
Act ive lane assist*
¢page96
Reduced display
Driver in forma tion system
® ®
Second Indicator lights and messages
tab Warning when a door, the hood or
the rear lid is not closed
Service interval display
¢ page208
Speed warning system*
¢page86
Third tab Night vision assistant*
¢page 101
Fourth Audio/Video
t ab
Fifth tab Telephone*
Sixth tab Navigation*
The second and third tabs are only visible if at least one indicator light or message is shown or if
that system is switched on.
The status line © is located in the bottom part of
the display ¢
fig. 4. It displays the exterior tem
perature, time, selector lever position, tripod
ometer and odometer.
For some vehicle functions, you can access the
trip information from the temporary memory
¢
page 23 in line @¢ fig. 5 .
A WARNING
Do not assume the roads are free of ice based
on the outside temperature display. Be aware
that there may be ice on roads even when the
outside temperature is around 41 °F ( +5 °C)
and that ice can increase the risk of accidents.
(i} Tips
-You can select the units used for tempera
ture, speed and other measurements in the
Infotainment system .
- If your vehicle is stationary or if you are driv
ing at very low speeds , the temperature dis
played may be slightly higher than the ac
tual temperature outside due to the heat ra
diating from the eng ine.
- For info rmation on the audio/video and nav
igation* functions, refer to the separate In
fotainment system owner's manual.
21
Page 27 of 280
Hea d-u p di spl ay> Head- up di spla y conten ts or
Displ ay brigh tn ess.
Di spla y content
In the Infotainment system, you can specify
which information should be displayed: For ex
ample, th is can include navigation informat ion *,
Adaptive cruise control* or night vision assist*.
The display of certa in info rmation and some of
the red indicator lights cannot be h idden in the
I nfotainment system.
Displ ay brightness
You can adjust the display br ightness in the Info
tainment system. The display brightness decreas
es automatically as the amount of light decreas
es. The backgro und brightness is adjusted with
the instrument il lumination
c::> page 44 .
(D Note
To prevent scratches on the g lass cove ring the
head- up d isplay, do not place any objects in
the projection opening.
(D Tips
- Sunglasses w ith polar izat ion fi lters and u n
favorab le lighting conditions can have a
negative effect on the display.
- An optim um display depends on the seat
pos ition and the height adjustment of the
head -up display.
- A specia l windshield is needed for the head
up display function.
- Fo r information on cleaning, refer to
c::> ta
ble on page 233.
On Board Diagnostic
System (OBD)
Malfunction Indicator Lamp (MIL)
The Malfunction Ind icator Lamp (MIL) a in the
instr ument cluster is part of the On-Board Diag
nostic (OBD II) system.
~ The warning/indicator light i lluminates when the ....
~ ign it ion is switched on and goes ou t after the en-N .... 0 0 <.,;) 'SI"
Driver info rm atio n sys tem
gine starts and the idle has stab ilized. This indi
cates that the MIL is working properly.
If th e light does not go ou t after the eng ine is
sta rted, or i llum inates while you are driving, a
malfunction may exist in the engine system. If
the light illuminates, the catalytic converter
could be damaged.
Cont inue driving
with redu ced p ower (avoiding
sustained high speeds and/or rapid accelera
tions) and have the condition corrected. Contact
your authorized Audi dealer.
If the ligh t illum ina tes, the electronic speed lim
iter may also be malfunctioning. For more infor
mation
c::> page 26, Electronic speed limiter.
An impro perl y close d fuel fi ller cap may al so
ca use the
MIL li g ht to illuminate c::> page 192.
On-Board Diagnostics
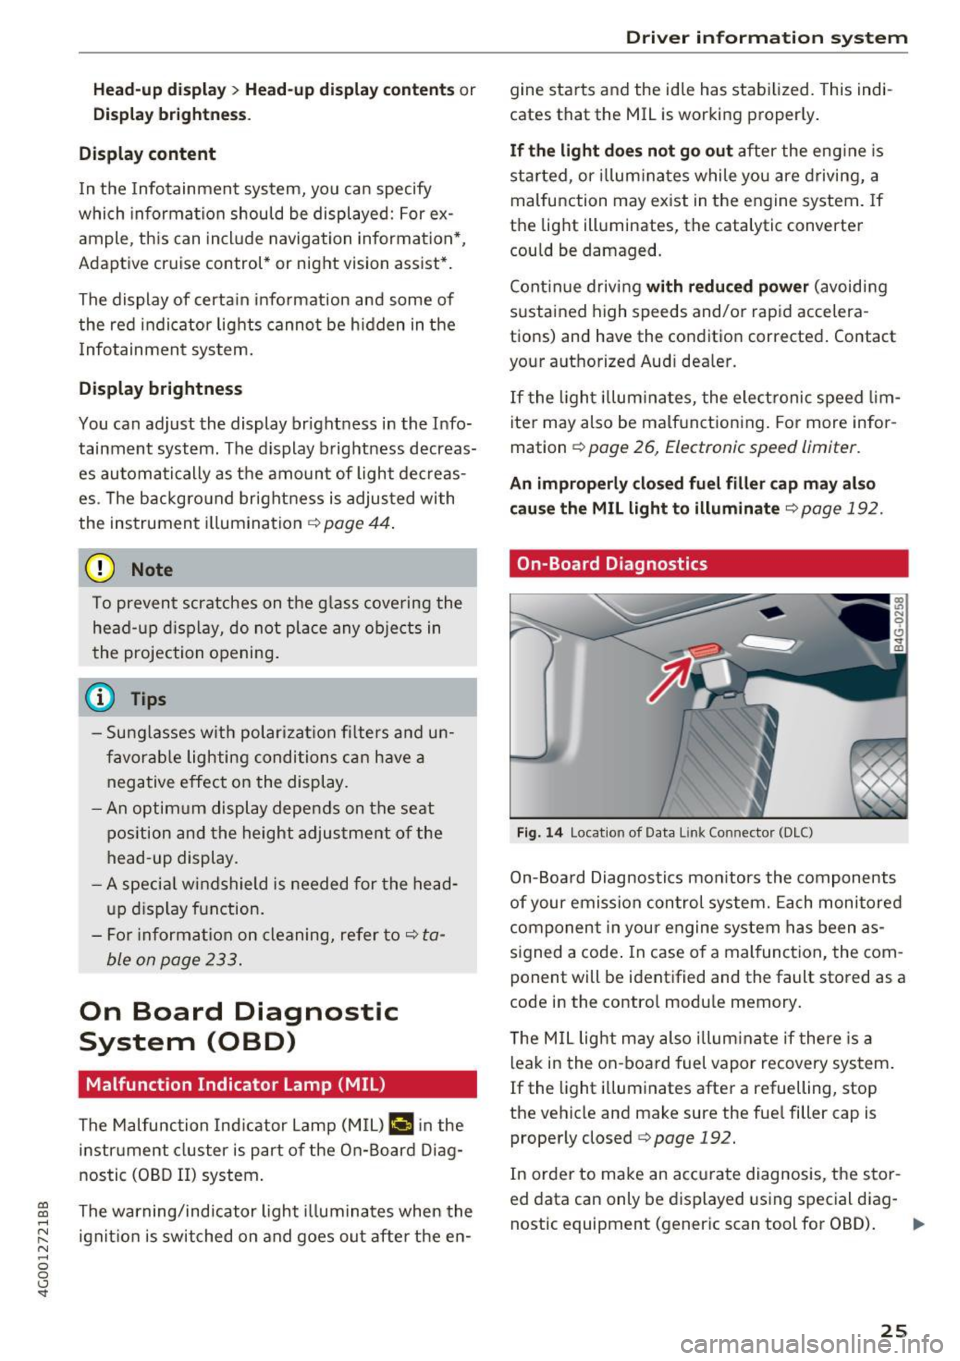
Fig. 14 Locat ion of Data L ink Connector (DLC)
On-Board Diagnostics monitors the components
of your emission control system. Each monitored
component in your engine system has been as
s igned a code . In case of a malfunction, the com
ponent will be identified and the fault stored as a
code in the contro l module memory.
T he M IL light may also illum inate if there is a
leak in the on-board fuel vapor recovery system.
If the light i lluminates after a refuelling, stop
the vehicle and make sure the fue l filler cap is
properly closed
c::> page 192.
In order to make an accurate diagnosis, the stor
ed data can only be displayed using special diag-
nostic equipment (generic scan tool for OBD).
IJI,-
25
Page 29 of 280
Opening and closing
Central locking
Description
You can lock and unlock the veh icle centrally . You
have the following options:
- Remote control key¢
page 30,
-Sensors in the door handles* ¢ page 30,
-Lock cylinder on the driver's door c::> page 32,
or
- Interior central locking switch
c::> page 31.
Turn signals
The turn s ignals flash twice when you unlock the
veh icle and flash once when you lock the veh icle.
If the blinking continues, one of the doors or the
luggage compartment lid/hood is not closed or
the ignition is still switched on.
Auto Lock
The Auto Lock function locks all doors and the
l uggage compartment lid once the speed has ex
ceeded approximately 9 mph (15 km/h).
The vehicle can be unlocked if the opening func
tion in the central locking system sw itch is used
or one of the door handles is pulled.
I n the event of a crash with airbag deployment,
the doors will also automatically unlock to allow
access to the vehicle.
Selective door unlocking
The doors and luggage compartment lid will lock
when they close . You can set in the Infotainment
system whether
only the driver's door or the en
tire vehicle should be unlocked when unlocking
c::> page 32.
Unintentionally locking yourself out
The follow ing cond it ions prevent you from lock
ing your remote control key in the vehicle :
-If the driver's door is open, the vehicle cannot
be locked by pressing the
lil button on the re-
~ mote control key or touching the locking sen-,...,
~ sor* on a door. N .... 0 0 <..:l '
-When locking using the lil button in the central
locking switch, the vehicle will not lock if a door
is open
¢ page 31.
-On vehicles with a convenience key*, the lug
gage compartment lid unlocks again after clos
ing if the most recent ly used key is in the lug
gage compartment. The emergency flashers
blink four times.
Do not lock your vehicle with the remote control
key or convenience key* until all doors and the
luggage compartment lid are closed. This helps
to prevent you from locking yourself out acciden
tally .
Closing aid on the doors*
The vehicle doors are equipped with closing aids.
When closing a door, you only have to let it fall
lightly into the latch. It then closes automatically
c::> &..
A WARNING "----When you lock your vehicle from outs ide,
nobody -especially children -should rema in
inside the vehicle. Remember, when you
lock the vehicle from the outside the win
dows cannot be opened from the inside.
- When you leave the vehicle, always take the
ignit ion key with yo u. This will prevent pas
sengers (children, for examp le) from acci
dentally being locked in the vehicle should
they accidentally press the power locking
switch in the doors.
- Do not leave children inside the vehicle un
supervised. In an emergency it would be im
possible to open the doors from the outside
without the key.
- Applies to vehicles with power side door
closer*:
- When closing a door, make sure nothing
can interfere with the door. Th is could
cause serious personal inj ury.
- You can stop the door from closing at any
time by pulling on the inside or outside
doo r handle.
27
Page 30 of 280
Opening and clo sin g
@ Tips
- Do not leave valuables unattended in the ve
hicle . A locked vehicle is not a safe!
- The LED in the driver 's door rail blinks when
you lock the vehicle . If the LED lights up for
approximately 30 seconds after locking,
there is a ma lfunction in the central locking
system. Have the problem corrected by an
authorized Audi dealer or authorized Audi Service Fac ility.
Key set
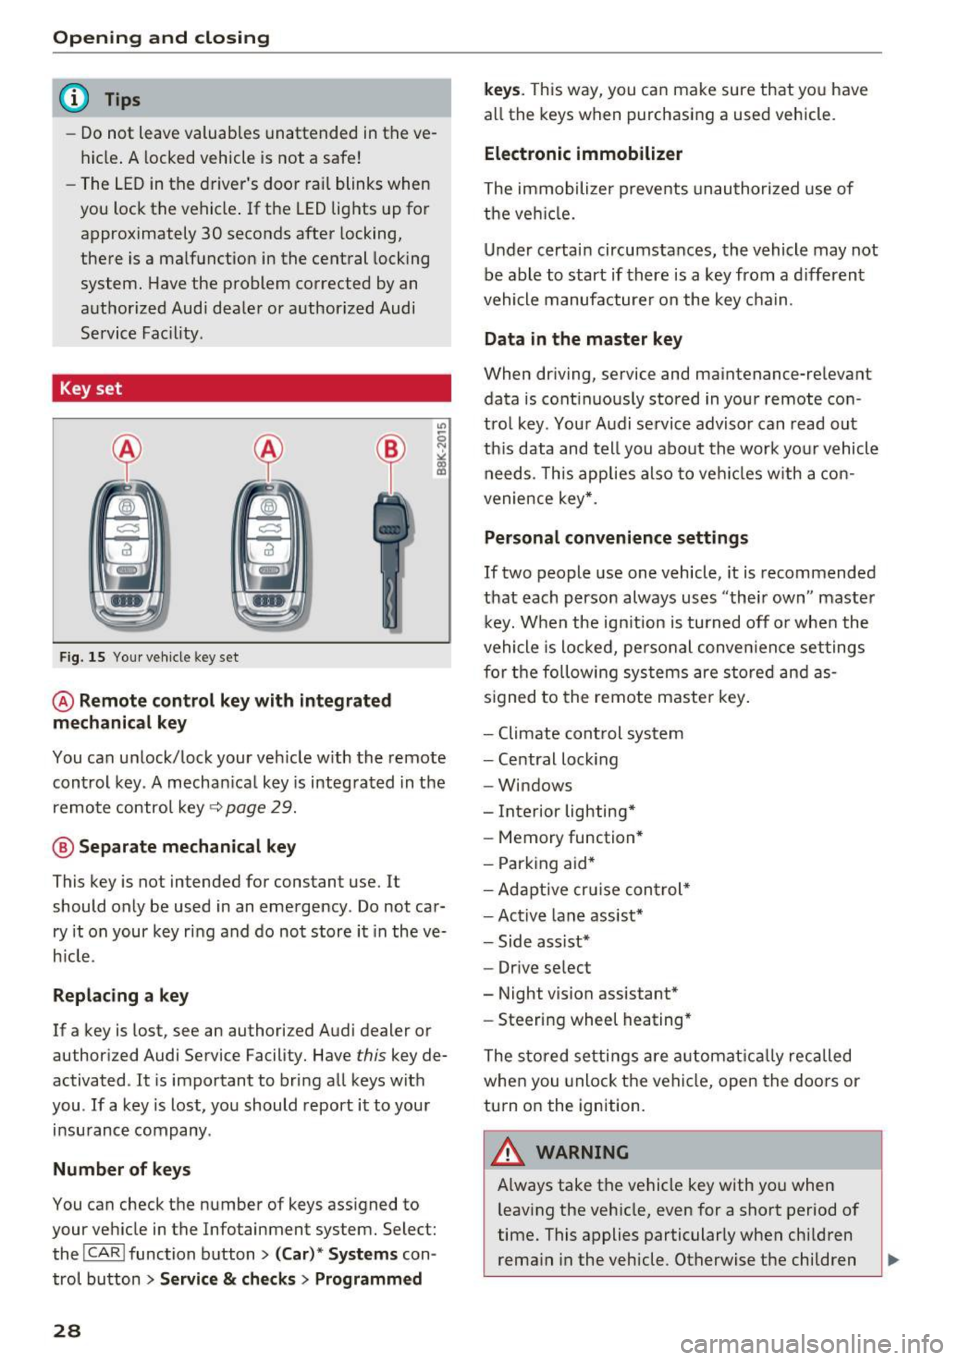
Fig. 15 You r veh icle key set
@ Remote control ke y with integr ated
mechanica l key
You can unlock/lock your veh icle w ith the remote
control key . A mechan ical key is integrated in the
remote control key~
page 29.
@ Separate mechanical ke y
This key is not intended for constant use. It
should only be used in an emergency . Do not car
ry it on your key ring and do not store it in the ve
h icle.
Replacing a ke y
If a key is lost, see an authorized Audi dealer or
authorized Audi Service Facility. Have
this key de
activated . It is important to bring all keys with
you . If a key is lost, you should report it to your
insurance company.
Number of key s
You can check the number of keys ass igned to
your veh icle in the Infotainment system. Select:
the !CAR !function button>
(C ar )* S yst e m s con
trol button
> Service & che cks > Programmed
28
k ey s. T his way, you can make sure that you have
all the keys when purchasing a used vehicle.
El ectronic immobiliz er
The immobilizer p revents unauthorized use of
the ve hicle.
Under certain circumstances, the vehicle may not
be able to start if there is a key from a d ifferent
vehicle manufacturer on the key chain.
Da ta in th e master key
When dr iving, service and maintenance-relevant
data is cont inuous ly stored in your remote con
trol key. Your A udi se rvice advisor can read out
th is data and tell you about the work yo ur vehicle
needs . This applies also to veh icles with a con
venience key *.
Personal convenience sett ings
If two people use one vehicle, it is recommended
that each person always uses "their own" master k ey. When the ign ition is turned off o r whe n the
vehicle is locked, personal conve nience set tings
for the following systems are stored and as
s igned to the remote maste r key .
- Climate cont rol system
- Central lock ing
- Windows
- Interior lighting*
- Memory function*
- Park ing aid*
- Ad aptive cru ise con trol *
- Ac tive lane assist*
- Side ass ist*
- Drive select
- Night vision assistant*
- Steering wheel heating *
The stored settings a re a utomat ica lly recalled
whe n you unlock t he vehi cle, open the doors or
turn on the ignition.
A WARNING
A lways take the vehicle key with you when
leaving the vehicle, even for a short period of
time. This applies particularly when child ren
rema in in the vehicle . Otherwise the children
-
Page 33 of 280
co
co
.... N
" N .... 0 0 <.,;) 'SI"
key is in your jacket pocket or in your briefcase,
for example .
The door ca nnot be opened for a br ief period di
rect ly after loc king it. This way you have the op
portunity to check if the doors locked correctly.
The settings in the Infotainment system deter mine if the entire vehicle or only one of the doors
is unlocked when unlocking the vehicle
¢page 32.
WARNING .1!!!!!!!!!. !!..-
Read and heed a ll WARNINGS ~.& in Descrip
tion on page
2 7.
@ Tips
If your vehicle is left stand ing for a long peri
od of time, note the following:
- The proximity senso r switches off after a
few days to save energy. You then have to
pull once on the door handle to unlock the
vehicle and a second time to open it .
- The energy management system gradually
turns off unnecessary convenience functions
to prevent the vehicle battery from draining
and to maintain the vehicle 's abi lity to start
for as long as possible. You may not be able to unlock your vehicle using the convenience
key.
- For an explanation on conformity with the
FCC regulations in the United States and the
Industry Canada regulations, see
¢page 262.
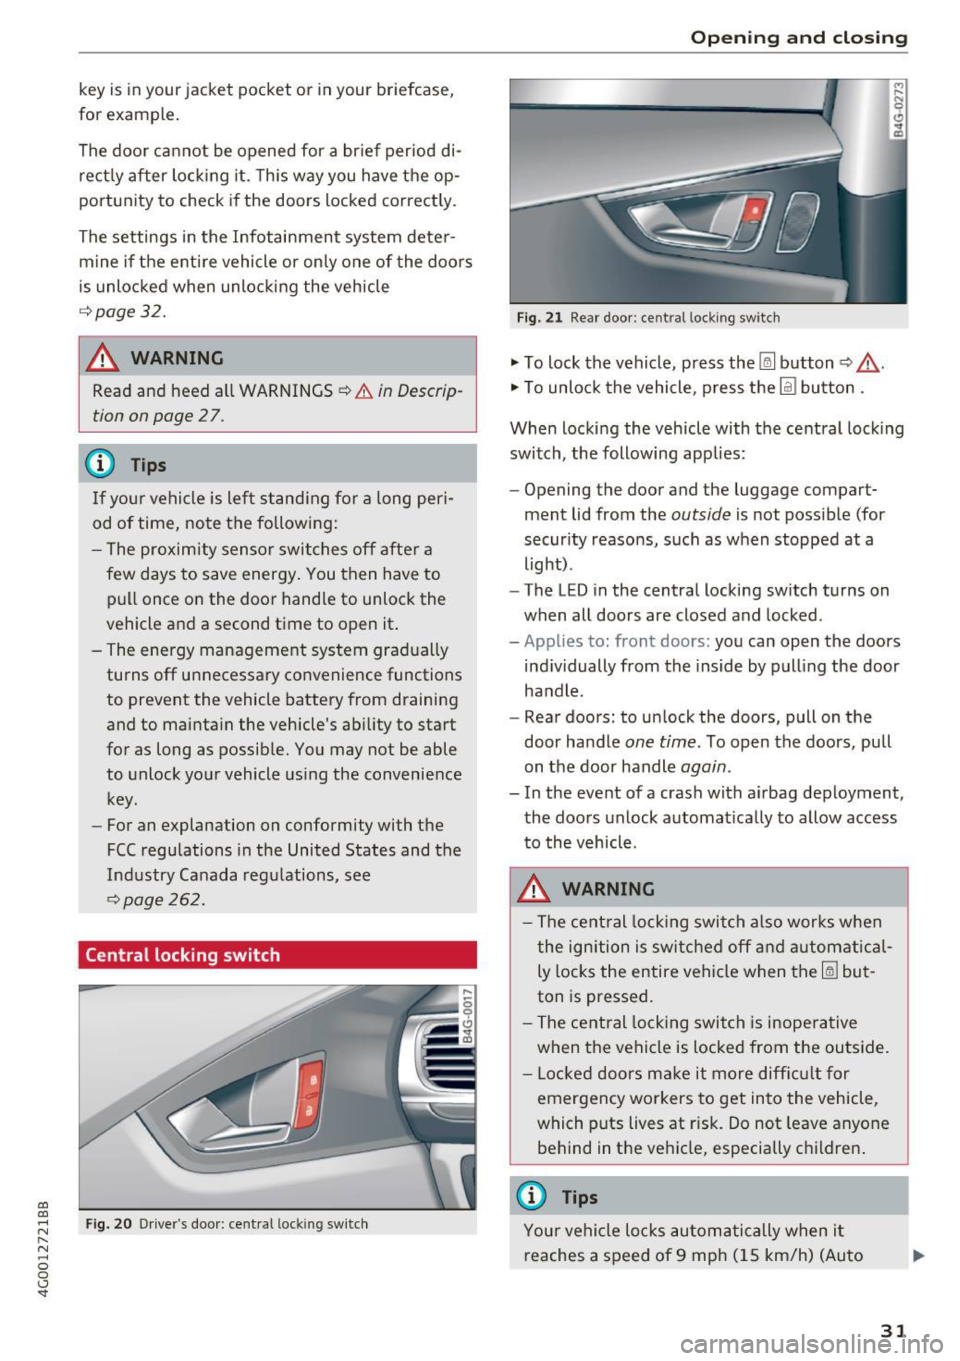
Central locking switch
Fig. 20 Drive r's door: central loc king switch
Open ing and closing
Fig. 21 Rear doo r: ce ntra l locking sw it c h
"' To lock the vehicle, press the~ button ~,&. .
"' To unlock the vehicle, p ress the @l button .
When locking the vehicle with the central locking
switch, the following app lies:
- Opening the door and the luggage compart
ment lid from the
outside is not possible (for
security reasons, such as when stopped at a
light) .
- The L ED in the central locking switch turns on
when all doors are closed and locked.
-Applies to: front doors: you can open the doors
ind ividually from the inside by pulling the door
handle .
- Rear doors: to unlock the doors, pull on the
door ha ndle
one time . To open the doors, pull
on the door handle
again .
- In the event of a crash with a irbag deployment,
the doors unlock automat ically to allow access
to the vehicle.
A WARNING
-The central locking switch also works when
the ignition is switched off and automatical
ly locks the entire vehicle when the~ but
ton is pressed.
- The central locking switch is inoperative
when the vehicle is locked from the outside.
- Locked doors make it more difficult for
emergency workers to get into the vehicle,
which puts lives at r isk. Do not leave anyone
behind in the vehicle, especially c hildren .
@ Tips
Your vehicle locks automatically when it
reaches a speed of 9 mph (15 km/h) (Auto
31
Page 38 of 280
Opening and clo sin g
due to similar movements, such as when you
walk between the rear of th e vehicle and your ga
rage door.
General inform ation
I n some situations, the function may be lim ited
or tempo rar ily unava ilable . This may happen if :
- the luggage compartment lid was closed imme diately before .
-you park close to a hedge and the branches move back and forth under the vehicle for a
long period of time.
- you clean your vehicle , fo r example with a pres
sure washe r or i n a car wash.
- there is heavy rain.
- the bumper is very dirty , for example after driv-
ing on salt-covered roads .
- there is interference to the radio signal from
the ve hicle key, such as from cell phones or re
mote controls .
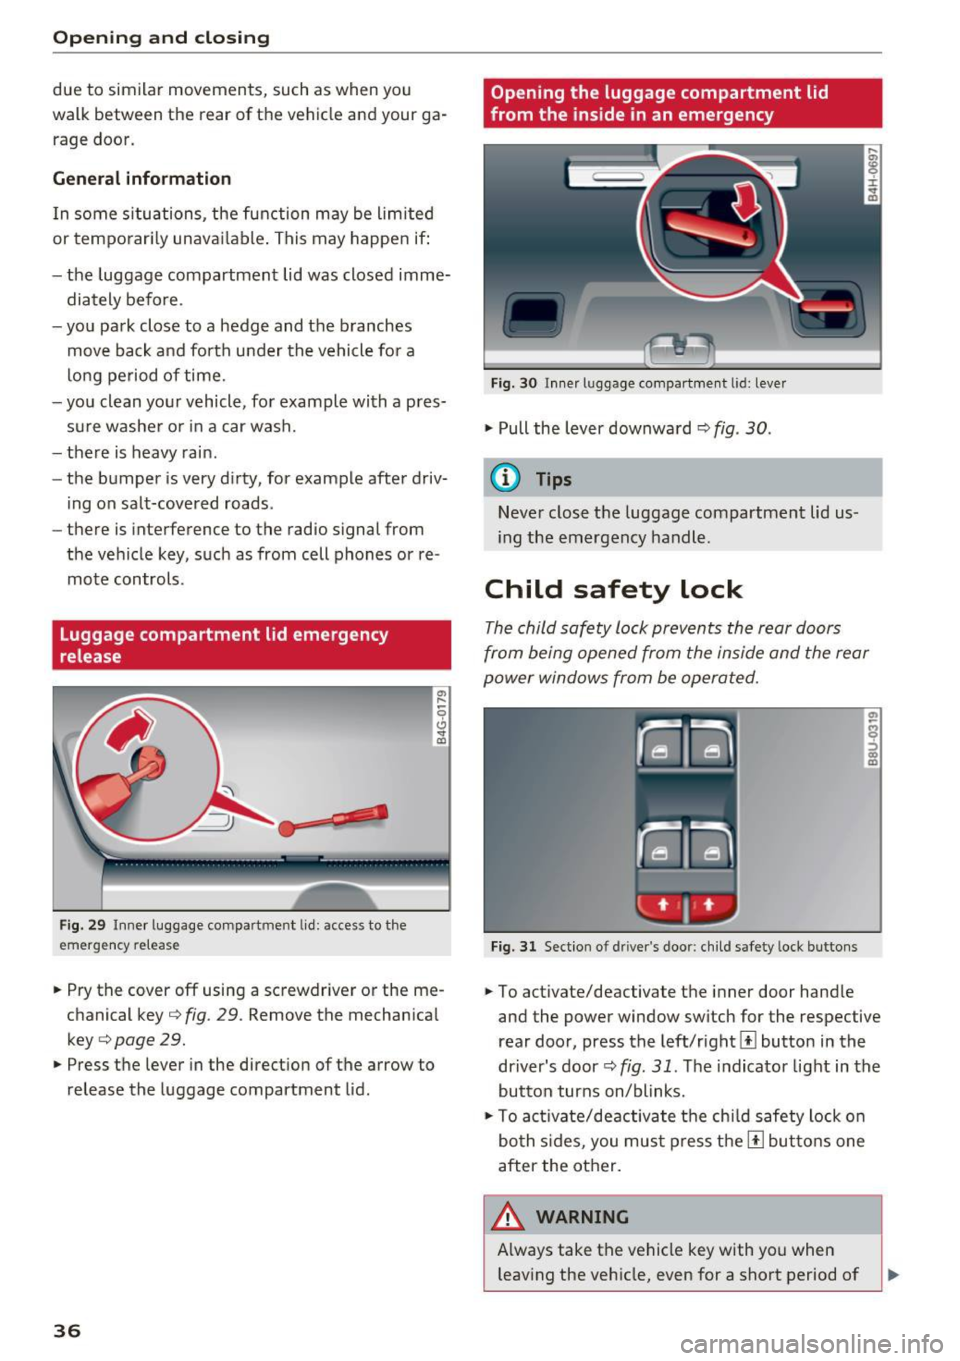
Luggage compartment lid emergency
release
F ig . 29 Inner luggage compart men t lid : access to the
emergen cy re le ase
.,. Pry the cover off using a screwdriver or the me
chan ical key ¢
fig. 29 . Remove the mechan ica l
key ¢
page 29 .
.,. Press the lever in the direct ion of the arrow to
release the luggage compartment lid .
36
Opening the luggage compartment lid
from the ins ide in an emergency
Fig. 30 I nne r luggage compart ment l id : leve r
.,. Pull the lever downward¢ fig. 30 .
(D Tips
Never close t he luggage compartment lid us
i ng the emergency handle .
Child safety lock
The child safety lock prevents the rear doors
from being opened from the inside and the rear
power windows from be operated.
Fig. 31 Sect ion o f dri ver's doo r: ch ild safety loc k bu ttons
.,. To activate/deactivate the inner door hand le
and the power window switch for the respective
rear doo r, press the left/rightl±l button in the
driver's door¢
fig. 31 . The indicator light in the
button turns on/blinks .
.,. To act ivate/deactivate the chi ld safety lock o n
bo th s ides, you mus t press the [!l but tons one
after the other.
A WARNING , ~
A lways take the vehicle key with you when
leaving the veh icle, even for a short period of
Page 41 of 280
Valet Parking function
Applies to: veh icles wit h Valet Parking function
The valet parking function protects the luggage
comportment from unauthorized access .
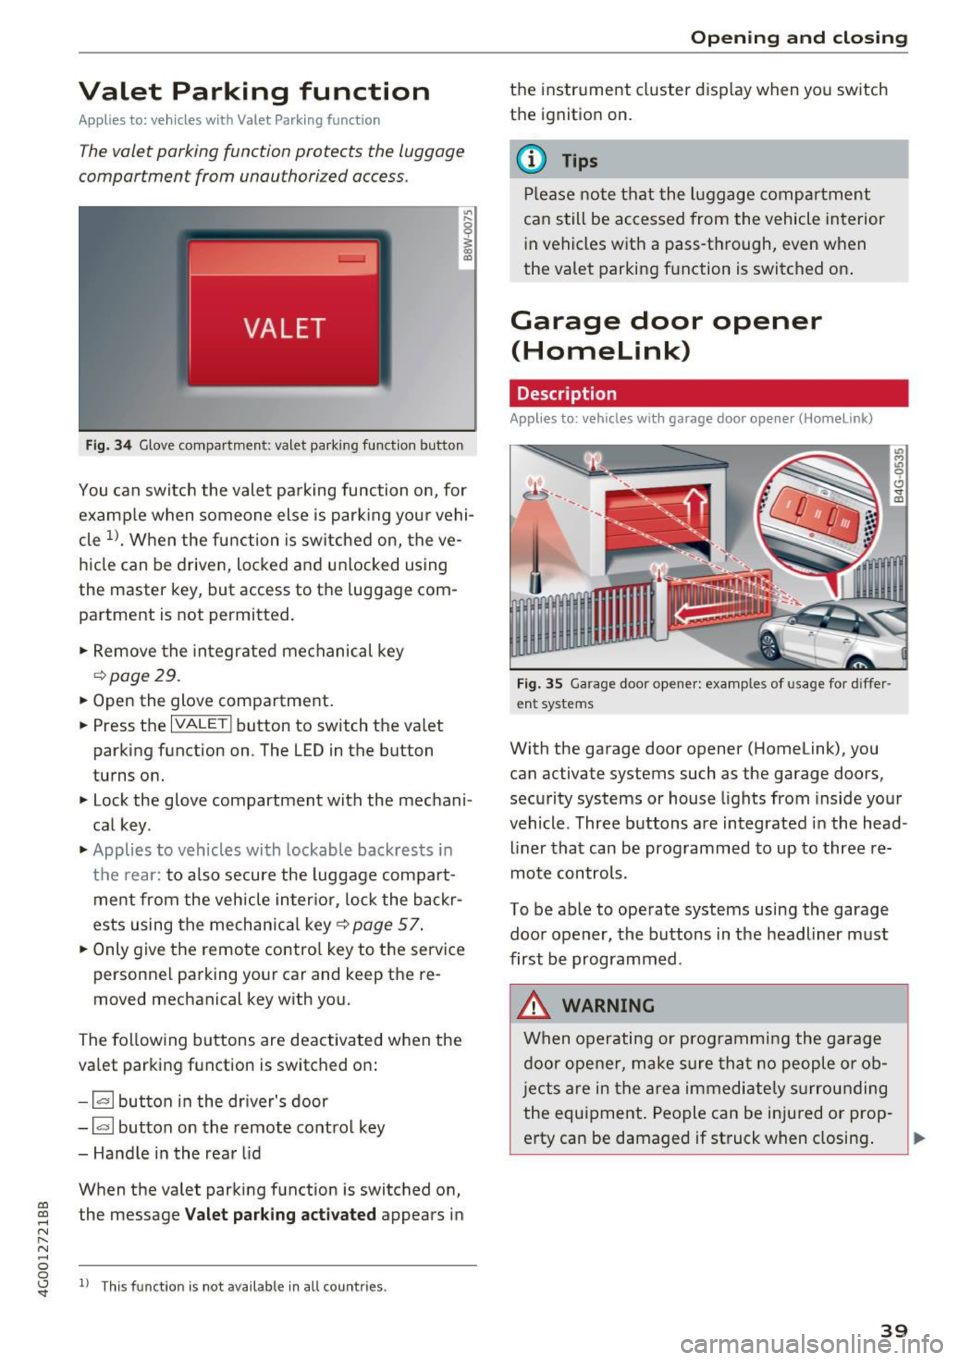
Fig. 34 Glove compartment: valet park ing function button
You can switch the valet parking function on, for
example when someone else is parking your vehi
cle
l)_ When the function is switched on, the ve
hicle can be driven, locked and unlocked using
the master key, but access to the luggage com
partment is not permitted .
.,. Remove the integrated mechanical key
r::!:>poge 29.
.,. Open the glove compartment.
.,. Press the
IVALET I button to switch the valet
parking function on. The LED in the button
turns on.
.,. Lock the glove compartment with the mechani
cal key .
.,. Applies to vehicles with lockable backrests in
t h e rear: to also secure the luggage compart
ment from the vehicle inter ior, lock the backr
ests using the mechanica l key ¢
page 57.
.,. Only giv e the remote control key to the service
personnel parking your car and keep the re
moved mechanical key with you.
The following buttons are deactivated when the
va let parking function is switched on:
- 1""' 1 button in the driver's door
-la l button on the remote control key
- Handle in the rear lid
When the valet parking function is switched on,
co ~ the message Valet parking activated appears in
N
" N .... 0 0
~ ll This func tion is not available in all co untries .
Open ing and closing
the instrument cluster display when you switch
the ignition on.
(D Tips
Please note that the luggage compartment
can still be accessed from the vehicle interior
in vehicles with a pass-through, even when
the valet parking function is switched on .
Garage door opener
(Homelink)
Description
Applies to: veh icles with garage door opener (Home link)
Fig . 35 Garage door opene r: examples of usage for diffe r
ent systems
With the garage door opener (Homelink), you
can activate systems such as the garage doors ,
security systems or house lights from inside your
vehicle. Three buttons a re integrated in the head
liner that can be programmed to up to three re
mote controls.
To be able to operate systems using the garage
door opener, the buttons in the headliner must
first be programmed .
_&. WARNING
When operating or programming the garage
door opener, make sure that no people or ob
j ects are in the area immediate ly surrounding
the equipment. People can be injured or prop-
erty can be damaged if struck when closing. .,.
39
Page 43 of 280
co
co
.... N
" N .... 0 0 <.,;) 'SI"
Lights and Vision
Exterior Lighting
Switching lights on and off
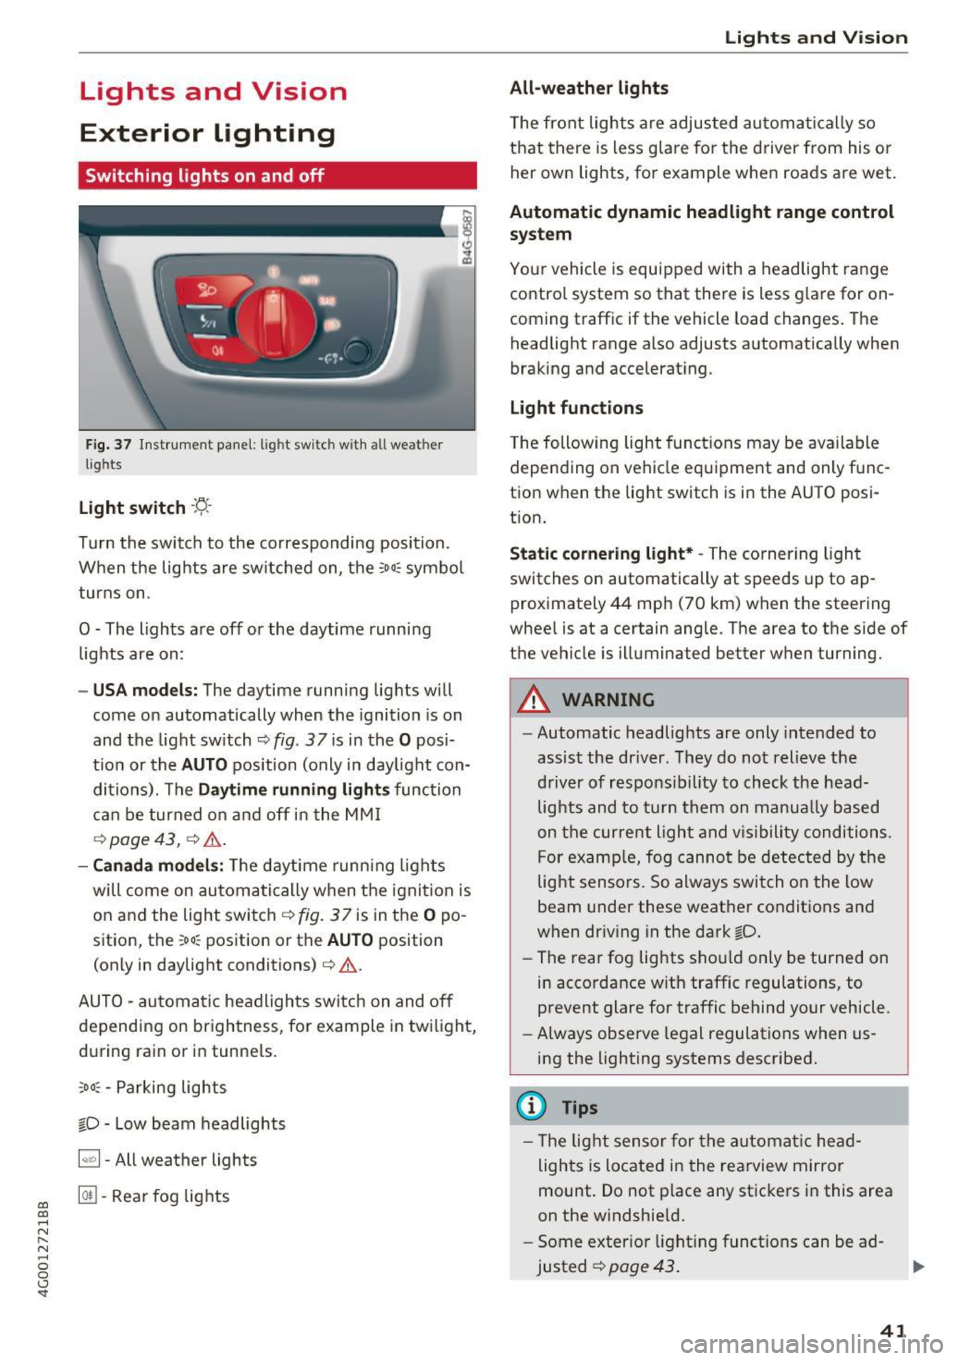
Fig. 37 In strument pane l: l ig ht sw itc h w ith all weather
lights
Light switch -r;..-
T u r n the switch to the co rresponding posi tion.
When the lights are sw itched on, the
:oo: symbo l
turns on.
0 · The lights are off or the daytime running
l ights are on:
- USA models: The daytime running lig hts will
come on automatically when the ignition is on
and the light sw itch
c::> fig . 37 is in the O posi
t io n or the
AUTO pos ition (only i n day light con
di tions). The
Daytime running lights func tion
c an be turned o n and off in the MM I
c::> page 43, ¢ ,&. .
-Canada models : The daytime runn ing ligh ts
will come on au toma tically when t he ig nit ion is
on a nd the light swi tch <=?
fig . 37 is in the O po
sition, the
: oo: position or the AUTO position
(only in daylig ht conditions)
c:> ,&. .
AUTO -au toma tic headligh ts sw itc h on and off
depending on br igh tness, for example in tw ilight,
d ur ing ra in or in tunne ls.
,oo : -Parking lights
io · Low beam headlights
~ -All weather lights
@II -Rea r fo g lig hts
Lights and V ision
All-weather lights
T he front lights a re adju sted au toma tic a lly so
t h at there is less glare for the driver from his o r
her own lights, fo r example whe n roads a re wet.
Automatic dynamic headlight range control
system
Yo ur vehicle is equip ped with a headlight r ange
contro l system so that there is less g lare for on
coming traff ic if the vehicle load changes . The
headlight range also adjusts automatically when
braking and accelerat ing.
Light functions
T he following light funct ions may be ava ilable
depending on vehicle eq uipme nt and only f unc
tion when the lig ht switch is in the AUTO posi
t ion.
Static cornering light* -The corner ing ligh t
switches on automatically at speeds up to ap
prox imately 44 mph (70 km) when the steering
whee l is at a certain ang le. The area to t he side of
the vehicle is illuminated better when turning.
A WARNING
-
- Automatic headlights are only intended to
assist the driver. They do no t relieve t he
d river of respons ibi lity to check the head
light s and to t urn them on manua lly based
o n t he curre nt light and v is ib ility conditi ons .
Fo r examp le, fog canno t be de tec ted by the
light sensors. So always switch o n the low
beam under these weat her co nditions a nd
when driving in the dark
io.
- The rear fog lights s ho ul d only be turned on
i n acco rdance w ith traffic regulations, to
prevent glare for traffic behind your vehicle.
- Always observe le g al regulations when us
i n g the lighting systems desc ribed.
(D Tips
- T he lig ht sensor for the automa tic head
lights is located in the rea rview mirror
mount. Do not p lace a ny st icke rs i n this are a
on the windshie ld .
- Some exter io r l ight ing funct io ns can be ad
justed
c::> page 43 .
41
Page 44 of 280
Lights and Vi sion
- If you turn off the ignition whi le the exterior
lights are on and open the door, a warning
tone sounds.
- In cool or damp weather, the inside of the
headlights, turn signals and tail lights can
fog over due to the temperature d ifference
between the inside and outside. They will
clear shortly after sw itch ing them on. This
does not affect the serv ice life of the light
ing .
Turn signal and h igh beam lever
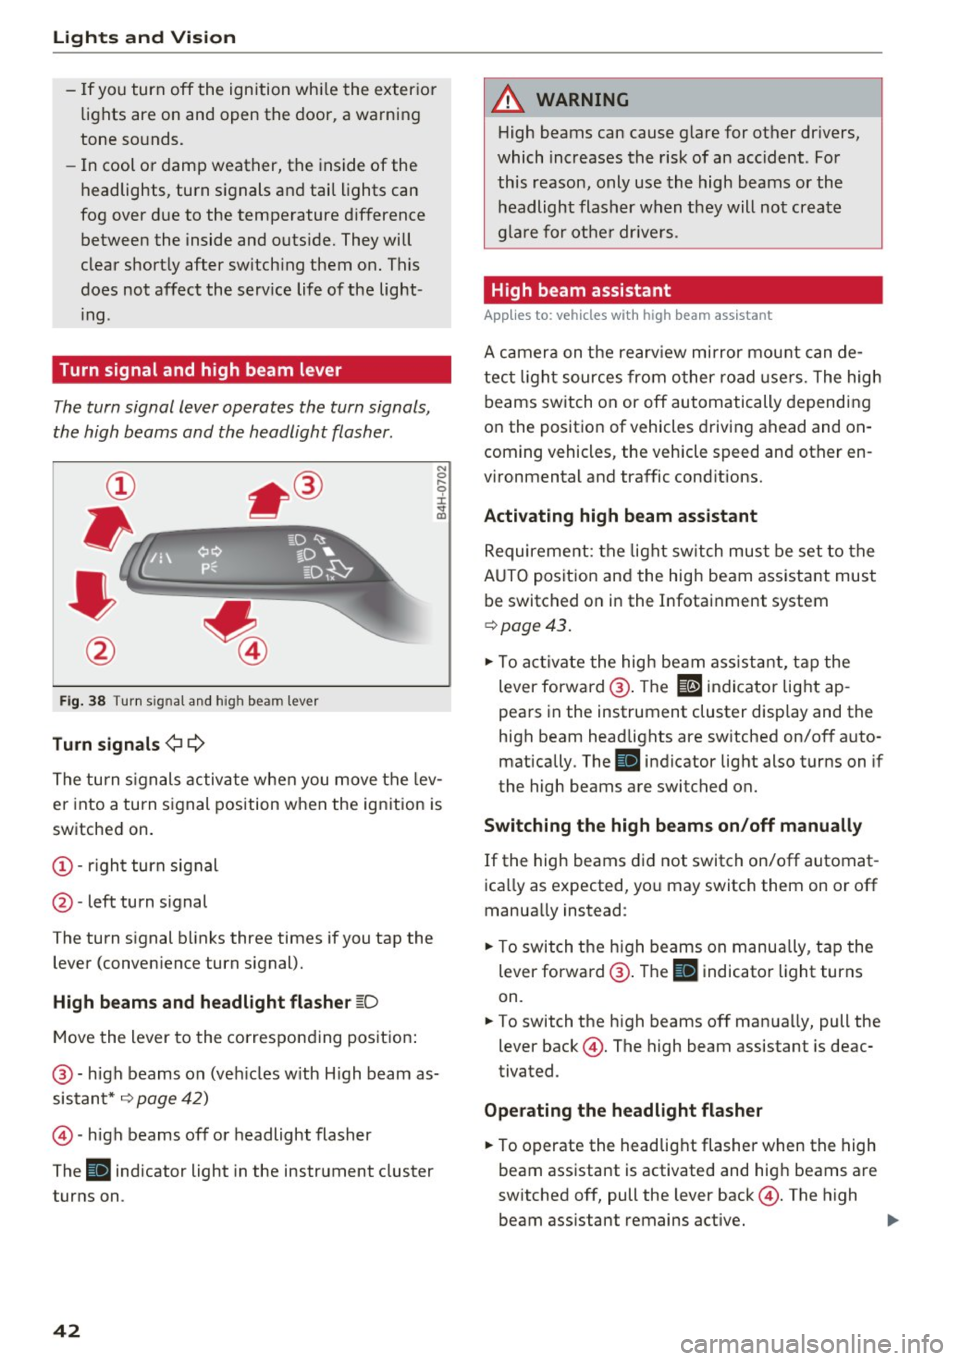
The turn signal lever operates the turn signals,
the high beams and the headlight flasher.
F ig . 38 Turn sig nal and high beam lever
Tu rn signals ¢ Q
N
0 ,.._
9 J:
;;!;
The turn s ignals activate when you move the lev
er into a turn signal position when the ignition is
switched on.
@ -right turn signal
@ -left turn s ignal
The turn signal blinks three times if you tap the lever (conven ience turn signal).
High b eams and h eadlight flasher ~D
Move the lever to the corresponding position :
@ -high beams on (veh icles w ith H igh beam as
sistant*
¢ page 42)
© -high beams off or headlight flasher
The
II indicator light in the instrument cluster
turns on.
42
A WARNING , _
H igh beams can cause glare for other drivers,
which increases the risk of an accident . For
this reason, only use the high beams or the headlight flasher when they will not create
g la re fo r othe r drive rs .
High beam assistant
App lies to: vehicles wi th high beam ass istan t
A camera on the rearv iew mirror mou nt can de
tect light sources from other road use rs. The high
beams switch on or off automatically depending
on the position of vehicles driving ahead and on
coming vehicles, the vehicle speed and other en
vironmental and traffic cond itions.
Activating high beam ass istant
Requirement: the light sw itch must be set to the
A UTO posit ion and the hig h beam ass istant must
be switched on in the Infotai nment system
¢ page 43 .
.,. To act ivate the high beam ass istant, tap the
lever forward @. The
El indicator light ap
pears in the instrument cluster display and the
high beam headlights are sw itched on/off auto
matically . The
II indicator light also turns on if
the high beams are switched on.
Switching the high b eam s on /off manually
If the high beams did not switch on/off automat
ica lly as expected, yo u may switch them on or off
manually instead:
.,. To switch t he h igh beams on manually, tap the
lever forward @. The
II indicator light turns
on.
.,. To switch the h igh beams off manua lly, pull the
lever back@. The high beam assistant is deac
tivated .
Operating the headlight flasher
.,. To operate the headlig ht flasher when the high
beam assistant is activated and hig h beams are
sw itched off, pull the lever back@. The high
beam ass istant remains active.
Page 45 of 280
Messages in the instrument cluster display
Headlight a ssist: System fault !
Drive to an authorized Aud i dealer or a uthorized
Aud i Service Facility immediately to have the
malfunct ion cor rected. You can still switc h the
hi gh beams on or off manually.
Headlight as sis t: Unavailable No camera view
The camera view is blocked, for example by a
sticker or debris.
The sensor is located between the interior rear
v iew mirror and the windshield . Do not p lace any
stickers in this area on the windshield.
A WARNING
H igh beam assistant is only intended to assist
the drive r. The dr iver is still responsible for
con troll ing the headlights a nd sw itch ing
them manually depend ing on light and v is ibil
i t y cond itions .
It may be neces sary to operate
t hem manually in situ at ions such as:
- In adverse weathe r co nd itions s uch as fog,
heavy r ain, b low ing snow o r sp raying wate r.
- On roads whe re oncoming traffic may be
partia lly obs cured, su ch as exp ressways .
- Whe n there are road users that do not have
s ufficient lighting, s uch as bi cycler s or
vehicles wi th dirty ta il lamps .
- In tight cu rv es and on steep hills.
- In poor ly l it areas.
- With strong reflectors, such as s igns.
- If the area of the windsh ield near the sensor
is fogged over, dirty, icy or covered w ith a
st icker.
Adjusting the exterior lighting
The functions ore adjusted in the Infotainment
system.
.,. Se lect : I CARI fu nction button> (Car )* Systems
contro l button > Vehicle setting s> Exterior
lighting .
co Automatic headlights co ....
~ You can adjust the fo llowing settings in the Au-N
8 tomatic headlight s menu: 0 <.,;) 'SI"
Lights and Vision
A cti vation sensitivity -you can adjust if the
headlights switch on
Early , Medium or Late ac
cording to the sensitivity of the light sensor .
Auto-dimming high beams* -yo u can sw itch the
high beam assistant*
On and Off .
Daytime running lights*
USA mode ls:
the daytime running lights can be
swit ched on/off. Select
On or Off .
Canada models:
this function cannot be switched
off . They act ivate automatically each time the ig
ni tion is switched on.
Coming home , Leaving home
The coming home function illuminates the area
outside the vehicle when you turn the ignit ion off
and open the driver 's doo r. To turn the function
o n, select
Light s when leaving car > On .
The leaving home illum inates the area outside
the vehicle when you unlock the vehicle . To turn
the function on, se lect
Li ghts when unlocking
car > On .
The coming home and leav ing home functions
only operate when it is dark and the light switc h
is in the
AUTO pos ition .
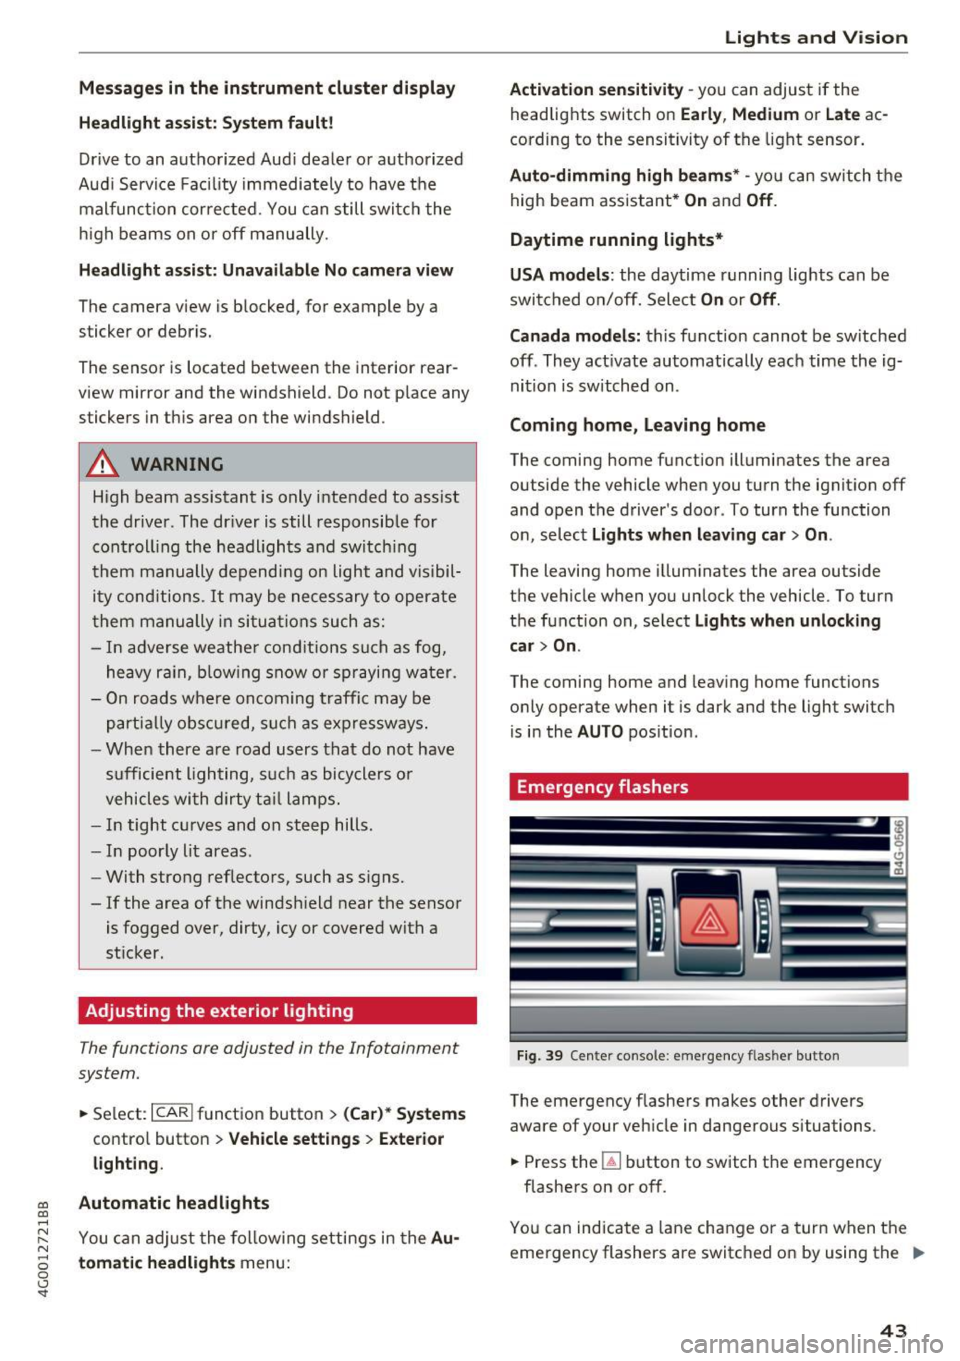
Emergency flashers
Fi9. 39 Cente r console : emergency f las her button
The emergency flashe rs makes other drivers
aware of your vehicle in dangerous situations .
.,. Press the~ button to switch the emergency
flashe rs on or off.
You can indicate a lane change or a turn w hen the
eme rgency flashers are switched on by using the .,.
43