warning AUDI A6 2018 Owner's Manual
[x] Cancel search | Manufacturer: AUDI, Model Year: 2018, Model line: A6, Model: AUDI A6 2018Pages: 266, PDF Size: 41.38 MB
Page 38 of 266
Opening and closing
Valet parking function
Applies to: vehicles w ith valet parking function
The valet parking function protects the luggage
comportment from unauthorized access .
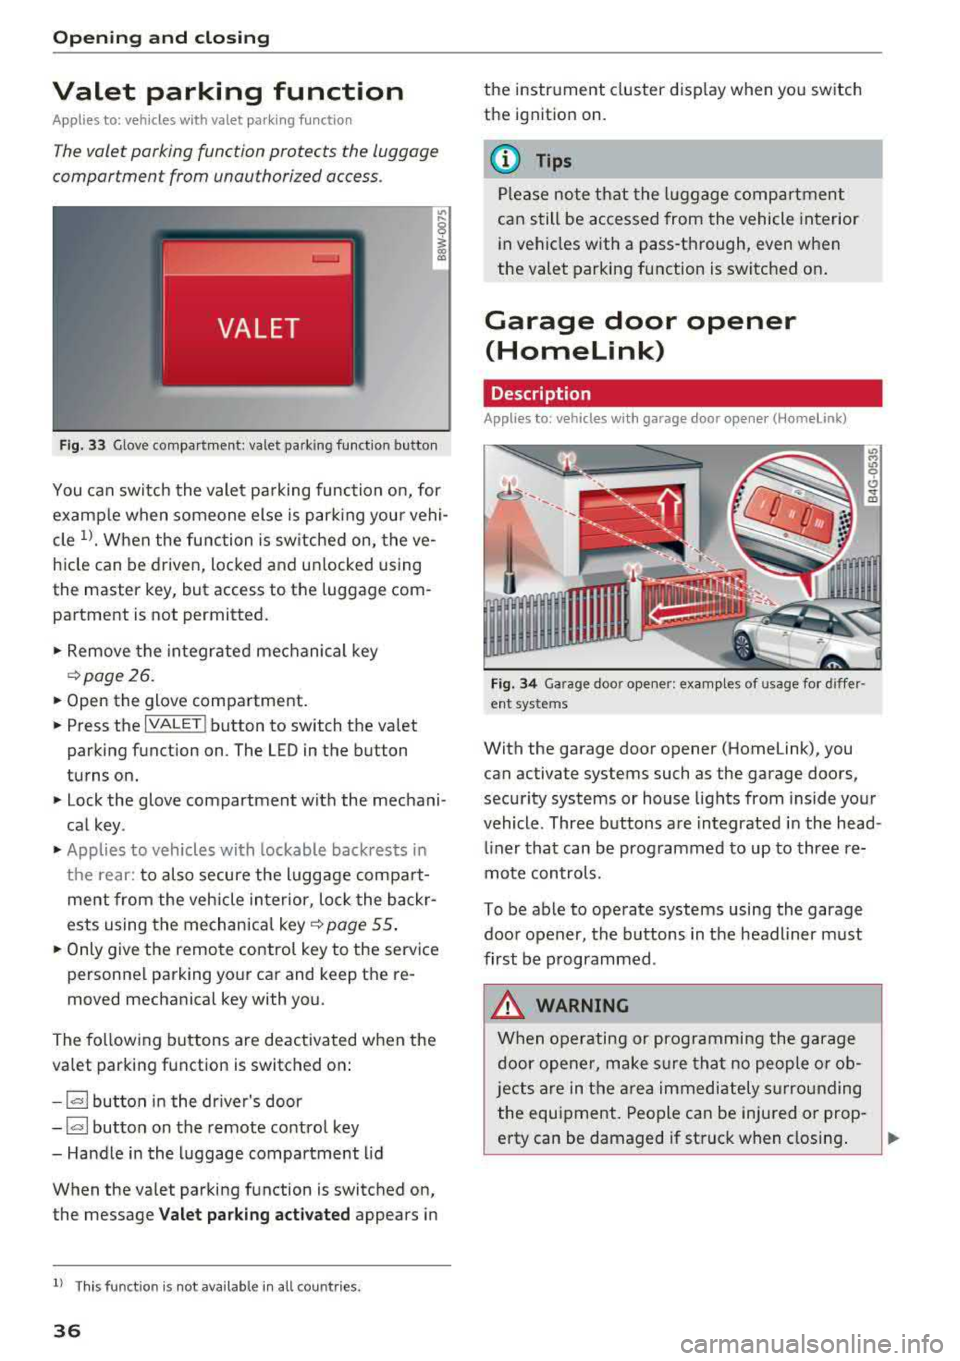
Fig. 33 Glove compartment: valet parking function button
You can switch the valet parking function on, for
example when someone else is parking your vehi
cle
l }_ When the function is switched on, the ve
hicle can be driven, locked and unlocked using
the master key, but access to the luggage com
partment is not permitted .
... Remove the integrated mechanical key
¢page 26.
... Open the glove compartment.
... Press the I VALET I button to switch the va let
parking function on. The LED in the button
turns on.
... lock the glove compartment with the mechani
cal key .
... Applies to vehicles with lockable backrests in
the rear: to also secure the luggage compart
ment from the vehicle interior, lock the backr
ests using the mechanical key ¢
page 55.
... Only give the remote control key to the service
personnel parking your car and keep the re
moved mechanical key with you.
The following buttons are deactivated when the
valet parking function is switched on:
-1""' 1 button in the driver's door
-I a I button on the remote control key
- Handle in the luggage compartment lid
When the valet parking function is switched on,
the message
Valet parking activated appears in
ll This fun ctio n is not availa ble in all c oun tries.
36
the instrument cluster display when yo u switch
the ignition on.
(D Tips
Please note that the luggage compartment
can still be accessed from the vehicle interior
in vehicles w ith a pass-through, even when
the valet parking function is switched on.
Garage door opener
(Homelink)
Description
Applies to: vehicles with garage door opener (Home Link}
Fig. 34 Garage door opener: exa mples of usage fo r d iffer ·
ent syste ms
With the garage door opener (Homelink), you
can activa te systems such as the garage doors ,
security systems or house lights from inside your
vehicle. Three buttons a re integrated in the head
liner that can be prog rammed to up to three re
mote controls.
To be able to operate systems using the garage
door opener, the buttons in the headliner must
first be programmed .
A WARNING
When operating or programming the garage
door opener, make sure that no people or ob
jects are in the area immediately s urrounding
the equipment . People can be injured or prop -
erty can be damaged if struck when closing.
~
Page 40 of 266

Lights and Vision
Lights and Vision
Exterior lighting
Switching lights on and off
F ig. 36 Instrument panel: l ight sw itch w ith all -weather
lights
Light switch · 'A ·
Tur n the switch to the co rresponding position.
W hen the lights are sw itched on, the
:oo: symbo l
tur ns on .
0 - The lights are off or the daytime running lights are on:
- USA mode ls: The daytime running lig hts will
come on automatically when the ignition is on
and the light switch ¢
fig. 36 is in the O posi
t ion or the
AUTO pos ition (only in day light con
ditions). The
Daytime running lights func tion
can be turned o n and off in the MM I
9 page 40, 9 &.
-Canada model s: T he d aytime runn ing lights
will come on automati cally when the ignit io n is
o n and the ligh t switch
9 fig . 36 is in the O po
sition, the
; oo : position or the AU TO position
(on ly in daylight conditions) ¢
&.
AUTO - au toma tic headligh ts switch on and off
depending on br igh tness, for example i n tw ilig ht,
du ring rain or in tunne ls.
::oo : -Parking lights
io -Low beam headlights
~ - All-weather lights
@] -Rear fog lights
38 All-weather lights
The fron
t lights a re adjus ted au tom atica lly so
that there is less g lare fo r the d river from his o r
her own lights, fo r example when roads are wet .
Automatic dynamic headlight range control
system
Yo ur vehicle is equ ipped with a headlight range
contro l system so that there is less g la re for on
coming t raffic if the vehicle load changes. The
headlight range also adjusts automatically when
bra king and accelerat ing .
Light funct ion s
The following light func tions may be ava ila bl e
depe nding on ve hicle equ ipment and only f unc
tion when the lig ht switch is in the AUTO posi
tion.
Static cornering light* -the cornering ligh t
switches on automatically at speeds up to ap
proximately 44 mph (70 km) when th e steering
whee l is at a ce rtain angle. The area to t he side of
the ve hicle is illumina ted be tter when turning.
A WARNING
- Automatic headlig hts are only intended to
assis t the driver. They do not relieve the
driver of responsib ility to check the head
lights and to t urn th em on m anua lly b ased
on t he cur re nt ligh t and vis ib ility conditions.
F or examp le, fog cannot be detec ted by the
light sensors. So always switch on the low
beams under these weather con dit ions and
when driv ing in the dark
io.
- To prevent glare for traffic be hind yo ur vehi
cle, the rear fog lights should only be turned
on in accordance with t raff ic regulat ions.
- Always observe le g al regulations when us
ing the lighting systems described.
(D Tips
- Th e light senso r for the a utomat ic head
lights is locate d in the re arview mirro r
mount . Do not p lace any stic kers i n this area
on the w indshield.
- Some exter ior light ing f unct ions can be ad
justed
¢ page 40 .
Page 41 of 266
a co .... N
" N .... 0 0 \,;J '
lights are on and open the door, a warning
tone sounds.
-In coo l or damp weather, the inside of the
headlights, turn signals and tai l lights can
fog over due to the temperature d ifference
between the inside and outs ide. They will
clear shortly after switch ing them on. This
does not affect the serv ice life of the light
ing .
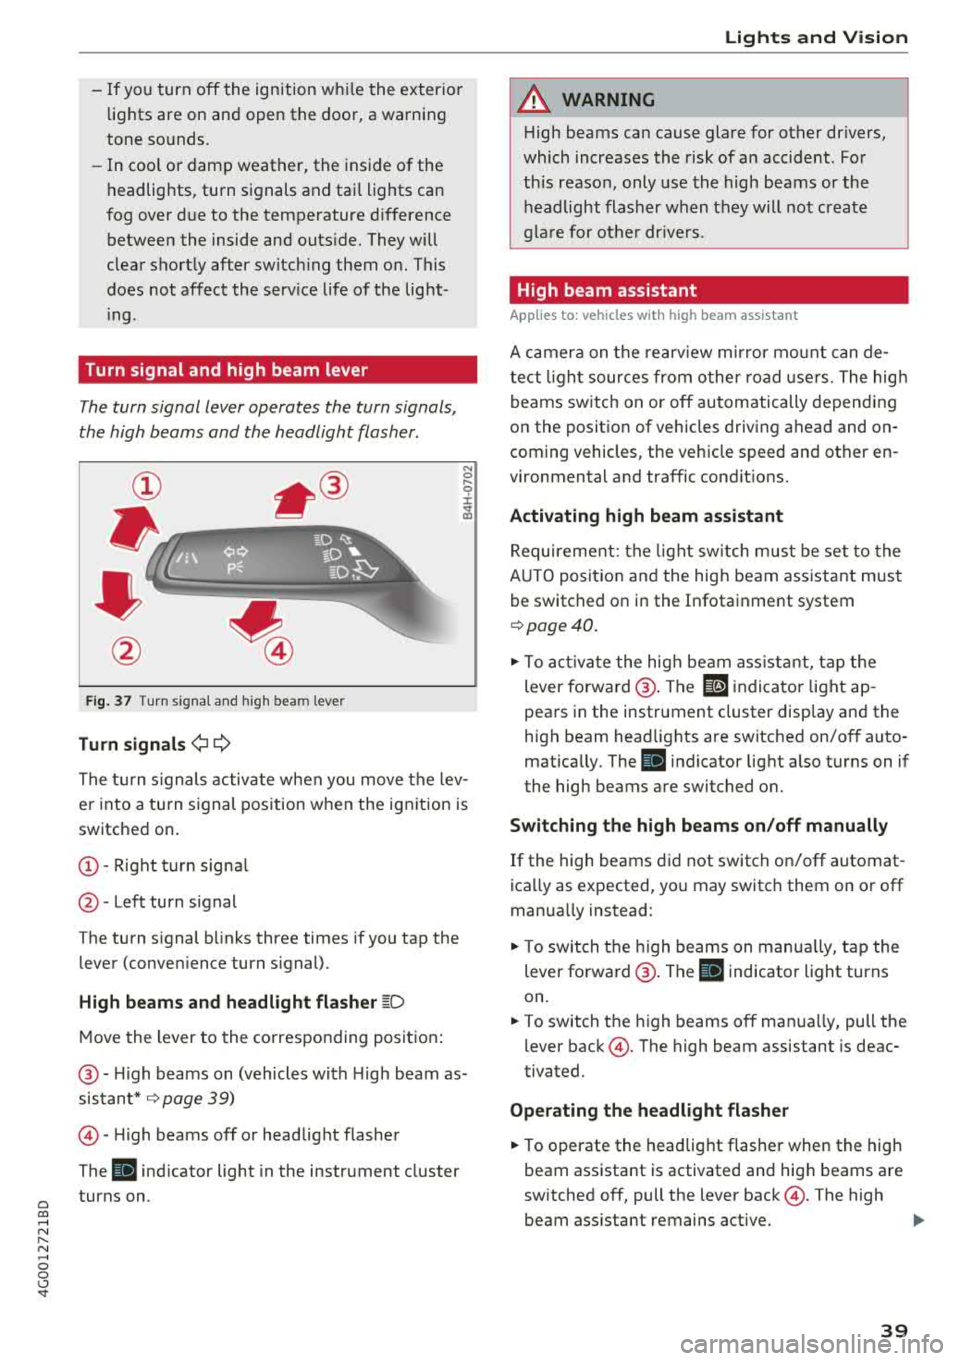
Turn signal and high beam lever
The turn signal lever operates the turn signals,
the high beams and the headlight flasher .
Fig. 37 Turn s ignal and h igh bea m lever
Turn signals ¢¢
N 0 .... 0 ± SI' a,
The turn s ignals activate when you move the lev
e r into a turn signal position w hen the ignition is
switched on.
(D -Right turn signa l
@-Left turn s ignal
The turn signal blinks three times if you tap the lever (conven ience turn s ignal).
High b eams and h eadlight flash er ~D
Move the lever to the co rresponding position :
@-High beams on (vehicles with High beam as
sistant*
9 page 39)
© -High beams off or headlight flasher
The
El indicator light in the instrument cluster
turns on .
Lights and Vision
A WARNING
--
High beams can cause glare for other drivers,
which increases the risk of an accident . For
th is reason, only use the high beams or the
h eadlight flasher when they will not create
g la re for ot her dr ive rs.
High beam assistant
App lies to : vehicles wi th high beam assis tan t
A camera on t he rearv iew m irror mo unt can de
tect ligh t sources from o ther road use rs . The hig h
beams sw itch on or off automatically depending
on the position of vehicles driving ahead and on
coming vehicles, the vehicle speed and other en
vironmental and traffic cond it ions.
Acti vating high beam as sistant
Requirement: the light sw itch mus t be set to the
A UTO posit ion and the high beam ass istant must
be switched on in the Infotainment system
~ page 40 .
.. To act ivate the hig h beam ass istant, tap the
lever forward @. The
El indicator light ap
pears in the instrument cluster display and the
high beam head lights are switched on/off auto
matically . The
El indicator light also turns on if
the high beams are switched on.
Switching the high beam s on /off manuall y
If the high beams did not switch on/off automat
ica lly as expected, yo u may switc h them on or off
manua lly instead:
.. To switch the high beams on manua lly, tap the
lever forward @. The
El indicator light turns
on .
.. To switch the h igh beams off man ua lly, pull the
lever
back @. The high beam assistant is deac
tivated .
Operating the headlight flasher
.. To operate the headlight flasher when the high
beam assistant is activated and hig h beams are
sw itched off, pull the lever
back @. The high
beam ass istant remains active.
Ill>
39
Page 42 of 266

Lights and Vision
Messages in the instrument cluster display
Headlight a ssis t: System fault
D rive to an authorized Aud i dealer or a uthorized
Aud i Serv ice Facility immediately to have the
malfunct io n corre cted. You can still switch the
h igh beams on or off manually.
Headlight as sist: Unavailable No camera view
The camera view is blocked, for example by a
sticker or debris.
The senso r is located between the interior rear
view mirror and the windshield. Do not place any stickers in th is area on the windshield.
A WARNING
H igh beam assistant is only i ntended to assist
the driver . The dr iver is still responsible for
cont ro ll ing the head ligh ts a nd switch ing
t hem manually depend ing o n light and v isibil
i t y condition s.
It may be necessary to operate
th em ma nually i n sit uations such as:
- In adve rse weathe r condit ions such as fog,
heavy ra in, b low ing snow or sp raying wate r.
- On roads whe re oncoming traffi c may be
pa rtiall y o bscu red, s uch as ex pressways.
- W hen there are road users t hat do not have
s ufficient ligh ting, s uch as bicy clers o r
vehicles wi th dirty ta il la mps.
- In tight cu rves and o n steep hills.
- In poorly lit areas .
- With stro ng reflectors, such as signs.
- If the area of the windshield near the senso r
is fogged over, dirty, icy or covered with a
sticker.
Adjusting the exterior lighting
The functions are adjusted in the Infotainment
sys tem.
~ Se lect : I CAR I functio n button> (Car)* Systems
contro l button > Vehicle settings > Exterior
light ing .
Automatic headlights
You can adju st the fo ll ow ing settings in the Au
tomatic headlights
menu:
40
Headlights activation time -you can adjust if the
headlights switch on
Early , Medium or Late ac
cording to the sensit ivity of the light sensor.
Auto-dimming high beams * -yo u can switch t he
high beam assistant *
On and Off .
Daytime running lights*
USA models :
the daytime running lights can be
swi tched on/off. Sele ct
On or Off .
Canada models:
this function cannot be sw itched
off . They act ivate automatically each time the ig
nit ion is switched on .
Coming home, Leaving home
The coming home function illuminates the area
outside the vehicle when you turn the ig nit ion off
and open the d river's doo r. To turn the function
o n, select
Light s when leaving car > On .
The leaving home illum inates the area outside
the vehicle when you unlock the vehicle . To turn
t h e f unction on, se lect
Lights when unlocking
car > On .
The coming home and leav ing home functions
on ly operate when it is dark and the l ight switch
i s in the
AUTO pos ition .
Emergency flashers
------
Fig. 3 8 Cente r conso le : emergency f las her bu tton
The eme rgency flashe rs makes other d rivers
aware of your veh icle in dangerous situations.
~ Press the ~ button to switch the emergency
flashers on or of f.
You can indicate a lane cha nge or a turn w hen the
eme rgency flashers are switched o n by using the
..,.
Page 44 of 266
Lights and Vision
Vision
Adjusting the exterior mirrors
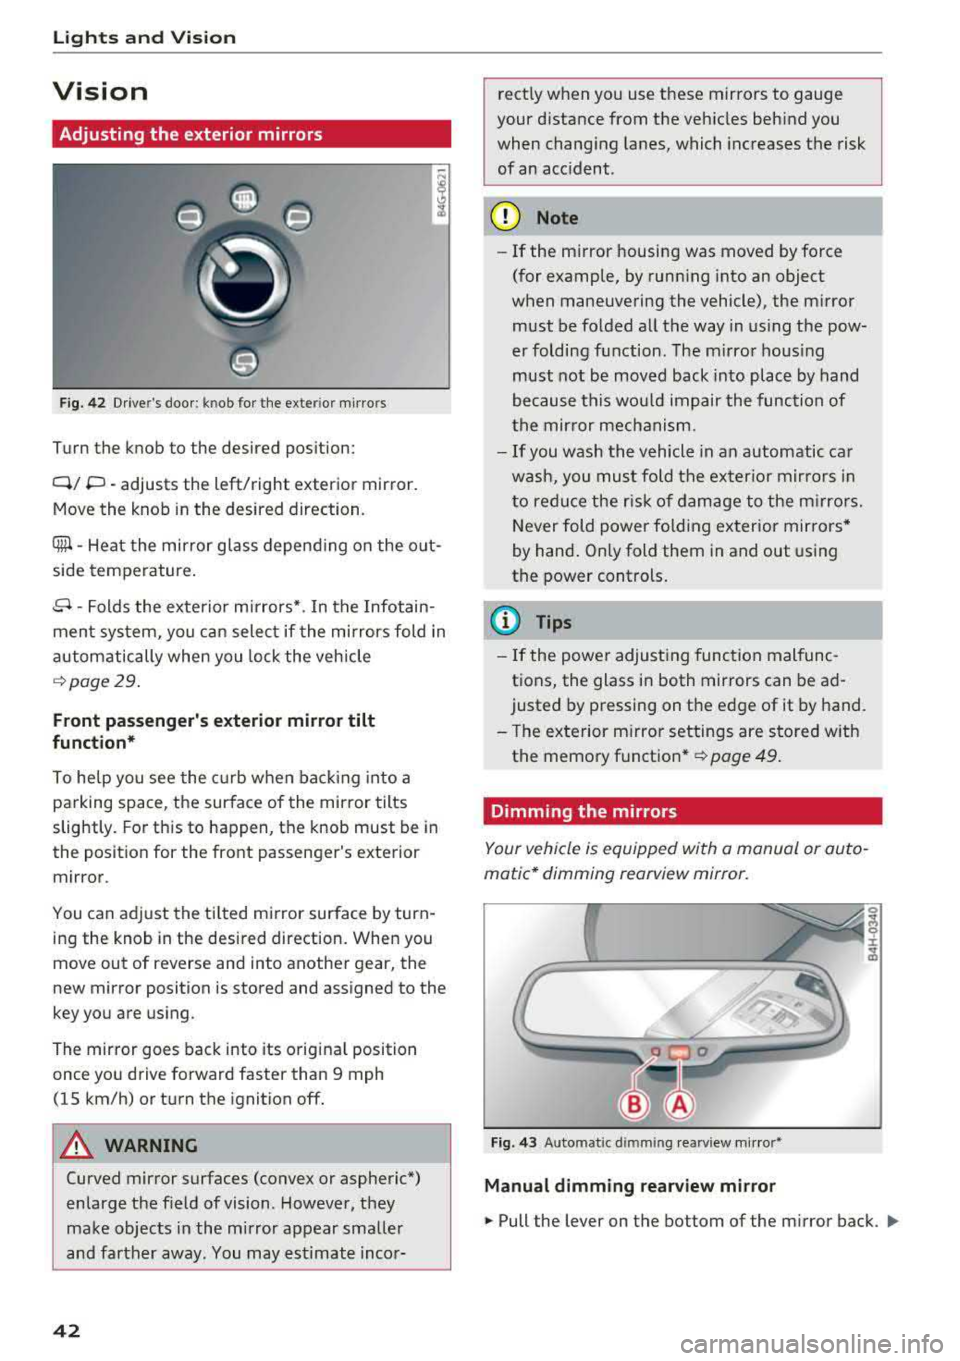
Fig. 42 Driver"s door: knob for the exter ior mirro rs
Turn the knob to the desired position:
Q/ P -adjusts the left/right exterior mirror.
Mov e the knob in the desired direction.
®-Heat the mirror glass depend ing on the out
side temperature.
.9 -Folds the exterior mirrors* . In the Infotain
ment system, you can select if the mirrors fold in
automatically when you lock the vehicle
c::>page29.
Front passenger's exterior mirror tilt
function*
To help you see the curb when back ing into a
parking space, the surface of the mirror tilts
slightly. For this to happen, the knob must be in
the posit ion for the front passenger's exterior
mirror .
You can adjust the tilted mirror surface by turn
ing the knob in the desired direction. When you
move out of reverse and into another gear, the
new mirror position is stored and assigned to the
key you are using.
The mirror goes back into its original position
once you drive forward faster than 9 mph
(15 km/h) or turn the ignition off.
A WARNING
Curved mirror surfaces (convex or aspheric*)
enlarge the field of vision. However, they
make objects in the mirror appear smaller
and farther away. You may estimate incor-
42
rectly when you use these mirrors to gauge
your distance from the vehicles behind you
when changing lanes, which increases the risk
of an accident.
(D Note
- If the mirror housing was moved by force
(for example, by running into an object
when maneuvering the vehicle), the mirror must be folded all the way in using the pow
er folding function. The mirror hous ing
must not be moved back into place by hand
because this would impair the function of
the mirror mechanism.
- If you wash the vehicle in an automatic car
wash, you must fold the exter ior mirrors in
to reduce the risk of damage to the mirrors.
Never fold power fold ing exterior mirrors *
by hand. Only fold them in and out using
the power controls .
(D Tips
-If the power adjusting function malfunc
tions, the glass in both mirrors can be ad
justed by pressing on the edge of it by hand.
- The exterior mirror settings are stored with
the memory function*
c::> page 49.
Dimming the mirrors
Your vehicle is equipped with a manual or auto
matic* dimming rearview mirror.
Fig. 43 Automatic dimming rearview mirror*
Manual dimming rearview mirror
.,. Pull the lever on the bottom of the mirror back . ..,.
Page 45 of 266
a co ,...,
N
" N ,...,
0 0 <..:l '
.,. Press the button @¢ fig. 43. T he ind icator
light @ turns on. Interior and exterior mirrors *
will dim when there is incoming light (such as headlights from the rear) .
A WARNING
If the glass on an automatic dimming mirror
breaks, electrolyte can leak out. This liquid
can irritate the skin, eyes and respiratory sys
tem . If there is contact with the flu id, flush
immediately with plenty of wate r. Consult a
physician if necessary.
- Repeated or long-term exposure to electro
lyte fluid can lead to irritation of the air
ways, especially in people with asthma or
other respiratory conditions. Take deep
breaths immediate ly after leaving the veh i
cle or, if this is not possible, open all of the
doors and windows as wide as possible.
- If electrolyte fluid enters the eyes, flush
them thoroughly with a large amount of
clean water for at least 15 minutes and then
seek medical attention.
- If electrolyte f luid comes into contact with
the skin, flush the affected area with clean
water for at least 15 minutes and then clean
with soap and water and seek med ical at
tent ion . Clean affected cloth ing and shoes
thoroughly before wear ing again .
- If the fluid was swallowed and the person is
conscious, fl ush the mouth with water for at
least 15 minutes. Do not induce vomiting
unless this is recommended by medical pro
fessionals. Seek medical attention immedi
ately .
(D Note
If the glass on an automatic dimming mirror
breaks, e lectrolyte can leak out . This liquid
damages plastic surfaces and paint. Clean
this liquid as quickly as possible, for example
with a wet sponge.
Lights and Vision
(D Tips
-If the light reaching the rearview mirror is
obstructed, the automatic dimming mirror
will not function correctly,
- The automatic dimming mirrors do not dim
when the interior lighting is turned on or
the reverse gear is se lected.
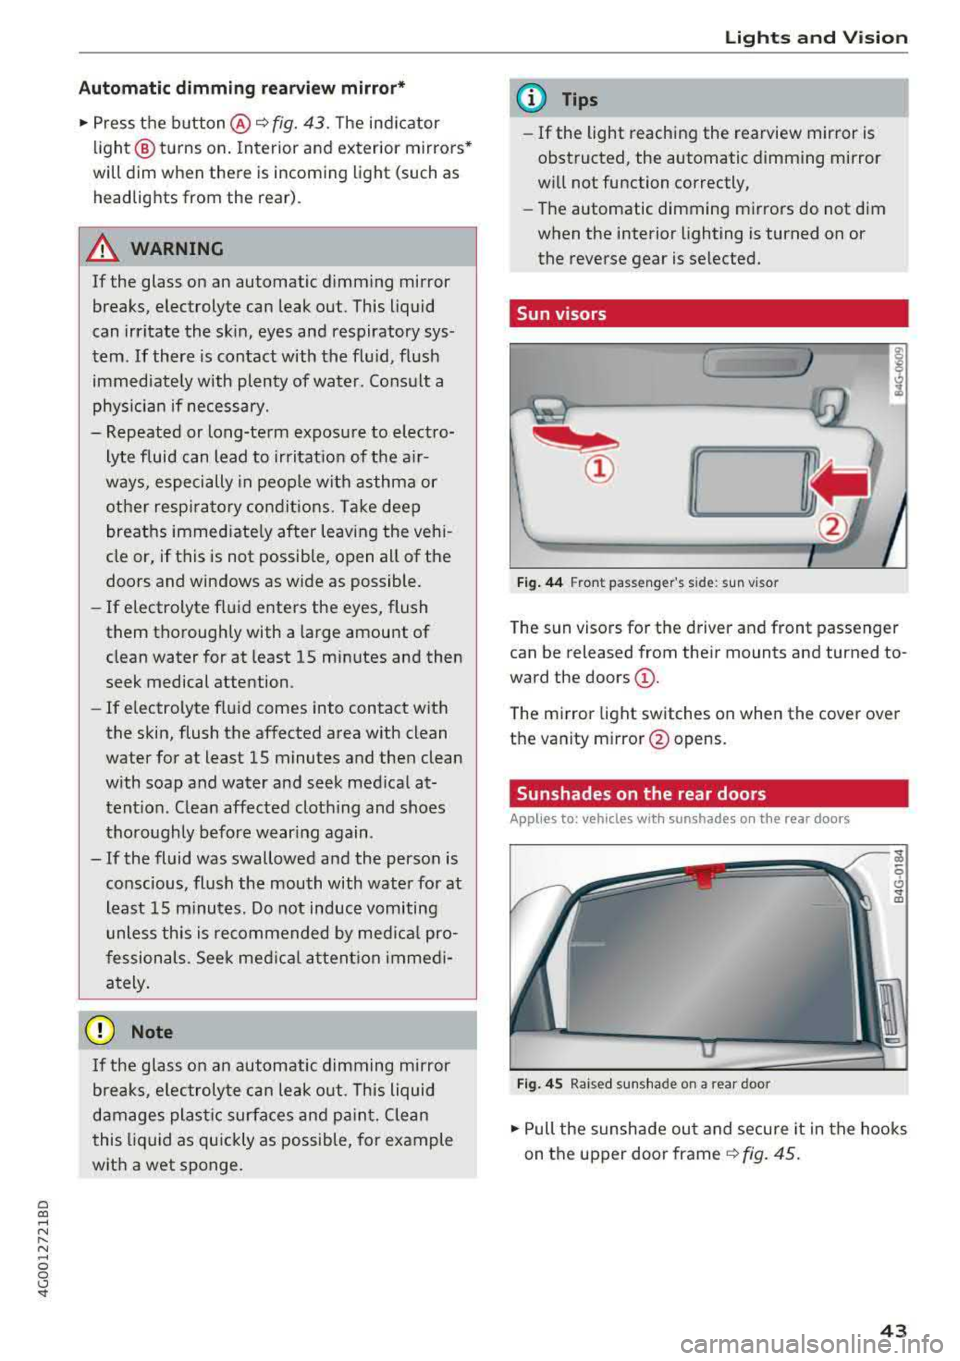
Sun visors
[ }
Fi g. 44 Fr ont pass eng er's s id e: sun vis or
T he sun visors for the driver and front passeng er
can be released from their mounts and tu rned to
ward the
doors @.
The mirror light switches on when the cover over
the vanity m irror @opens.
Sunshades on the rear doors
Applies to: vehicles with sunshades on the rear doors
Fig. 45 Raised sunshade on a rear door
... Pull the sunshade ou t and secure it in the hooks
on the upper door frame
¢ fig. 45.
43
Page 46 of 266

Lights and Vision
Sunshade on the rear window
Applies to: vehicles with a sunshade on the rear window
Applies to: sedan
F ig . 4 6 Ce nte r co nsole: butto n fo r r ea r w indow s unsh ad e
.,. To raise/lower the sunshade, press the ~ but-
ton
¢ fig. 46 in the cockpit.
The rear window sunshade ca n be set so that it
retracts automatically when driving in reverse. To
do this, select: ICARlfu nction button>
(Car )* sys
tem s
contro l button > Vehicle settings > Auto
matic rear blind > On .
The sunshade is extended
again as soon as the vehicle is trave ling forwa rd
at a speed greater than
9 mph (15 km/h) if the
ignit ion has not been switched off in the mean
time.
,& WARNING
-
N ever operate the rear wi ndow su nsh ade
w ithou t paying a ttent io n or in an uncon trol
led manner. Pinching could cause serious inju
r ies .
@ Tips
-Pressing the~ but ton seve ral times in a
r ow can trigge r the ove rload pro tection. The
su nsh ade c an on ly be exten ded/re trac ted
again after a brief waiting period .
-The rea r win dow suns hade o nly functions
whe n the vehicle interior is warmer tha n
14°F (-10°C) .
44
Windshield wipers
Switching the windshield wipers on
Fig. 47 Wind shi eld w iper l eve r
Move the windshie ld w iper lever to the co rre
sponding posit ion:
@ -Windshie ld w ipers o ff
(D -Rain senso r mode. The w indshield w ipers
swi tch on on ce the veh icle speed exceeds a pprox
imately 2 mp h (4 km/h) and it is ra ining . The
higher the sensitivity of the ra in se nsor that is set
(switch @to the rig ht), the ea rlier the wind
shield wipers react to mo isture on the wind
shield . You can deact ivate the ra in sensor mode
i n the Info ta inmen t sys tem, wh ic h sw itches the
i nte rm itte nt mode on . Se lect: ICARI f unct ion but
ton
> (Car) * systems con trol b utton > Driver as
sistan ce > Rain sensor > Off .
In in termi ttent
mode, yo u can adjust the interval time usi ng the
swi tc h @ .
@-Slow w ip ing
@ -Fast w iping
© -Sing le w ipe. If you ho ld the lever in th is posi
tion longer, the wipers switch from slow wiping
to fast wiping.
® -Clean the w indshield . T he wipers w ipe o ne
time a fter several seconds of driving to remove
water droplets. You can sw itch thi s function off
by moving the leve r to posit ion ® within
10 sec
o nds of t he afte rwipe . T he afterwipe fu nction is
r eac tiva ted t he nex t time you sw itch t he ignit io n
on.
Clean the headlight s*. The he adlight washer sys
tem* operates only whe n the low beam head -
li gh ts are on. If you move the leve r to pos it io n
Ill>
Page 47 of 266

a co .... N
" N .... 0 0 \.J '
camera* are cleaned at intervals .
A WARNING
-The rain sensor is only intended to assist the
dr iver. The driver may still be responsible
for manually sw itching the w ipers on based
on v is ibility conditions.
- The windshie ld may not be treated with wa
ter-repell ing windsh ield coating agents . U n
favorable cond itions, such as wetness, dark
ness or low sun, can result in increased
glare, wh ich inc reases the risk of an acc i
dent . W iper b la d e chatter is also poss ible.
- Prope rly funct ion ing windsh ield wiper
blades are required fo r a clear view and safe
dr iv ing¢
page 45, Replacing windshield
wiper blades.
0 Note
- If there is frost, make su re the windsh ie ld
wipe r blades a re not fro zen to the wind
s hi eld. Sw itch ing on the win dsh ield wipe rs
when the blades are frozen to the wind
sh ield can damage the wiper blades.
- The w inds hield wipe r system must be
swi tched off ( lever in pos ition 0) befo re us
ing a car wash. This prevents the wipers
from switching on unintentionally and ca us
i ng damage to the windshie ld w iper system.
(D Tips
- The windshield wipers switch off when the
ignition is switched off . Yo u can activate the
windsh ield wipers after the ign it ion is
switched back on by moving the winds hield
wiper lever to any pos it ion.
- Wo rn o r dirty windshield wipe r blades result
i n streak ing . This can affect the ra in sensor
funct io n. Check yo ur windsh ield wiper
b lades regu larly .
- The was her fluid nozzles fo r th e windshie ld
washer system are heated at low tempera
tures when the ignition is on .
- When stopp ing temporarily, such as at a
traffic l ight, the speed of the windsh ield
wipe rs a utomat ically red uces by one leve l.
Light s and Vision
Cleaning windshield wiper blades
Clean t he wiper b lades when yo u see w iper
st reaks. Use a soft cloth and a g lass cleaner.
"" Place th e w indsh ield w iper arms in the service
position ¢
page 45.
"" Fold the windsh ie ld w iper arms away from t he
w indshie ld.
A WARNING ~ -
D ir ty windshie ld w iper b lades can impa ir vi
sion, w hic h increases the risk of an accident .
Replacing windshield wiper blades
Fig. 48 Remov ing w inds hield w iper b lades
Windshield wiper service position /blade
replacem ent po sit ion
- -M 0 :i:
wiper lever to position @briefly ¢
page 44,
fig. 47.
The windshield wipers move into the
serv ice position .
""To br ing the windshie ld w ipers back to the nor
mal position, switch the ignition on and ho ld
the windshield wiper lever in pos ition
@ unt il
the wi ndsh ield wipers go back to the normal
position , or d rive faster than 8 mph (12 km/ h).
You can also turn the service posit io n on or off in
the Infotainment system:
"" Switch the windsh ield w ipers off (pos it io n @
¢ page 44, fig. 47) .
"" Select: the I CAR ! fu nct io n button > (Car )* Sys
tem s
contro l bu tton > Servi ce & control > Wip -
er change po sition.
> On /Off IJJ,-
45
Page 48 of 266
Lights and Vi sion
Removing th e wip er bl ad e
.,. Fo ld the w indshield wipe r arm away from the
windshield .
.,. Press the locking knob (D ¢ fig. 48 on the wiper
blade . Hold the wiper b lade firmly .
.,. Remove the wiper blade in the direction of the
arrow .
Install ing th e wiper blad e
.,. Insert the new wiper b lade into the mount on
the wiper arm @unti l it clicks into place .
.,. Place the wiper arm back on the windshie ld .
.,. Turn the serv ice position off.
A WARNING -
For safety reasons, the windsh ield w iper
blades should be replaced once or tw ice each
year.
@ Note
- Only fo ld the windshield wipers away when
they are in the serv ice position. Otherwise,
you r isk damaging the paint on the hood or
the w indshield w iper moto r.
- You should not move your vehicle or operate
the w indshield w iper lever when the wiper
a rms are fo lded away from the w indshield .
The w indshield wipe rs would move bac k in
to t heir orig inal position and cou ld damage
the hood and win dshield .
(0 Tips
- You can also use the serv ice position, fo r ex
ample, if yo u want to p ro tect the windsh ie ld
from icing by us ing a cover .
- You canno t activate t he se rvice pos ition
whe n the hood is open.
46
Page 49 of 266
a co ,...,
N
" N ,...,
0 0 \,;J '
General information
A WARNING
-
Refer to c:::> page 125, Driving safety for im
portant information, tips, suggestions and
warnings that you should read and follow for
your own safety and the safety of yo ur pas
senge rs.
Front seats
Power seat adjustment
Applies to vehicles with power adjustable seats
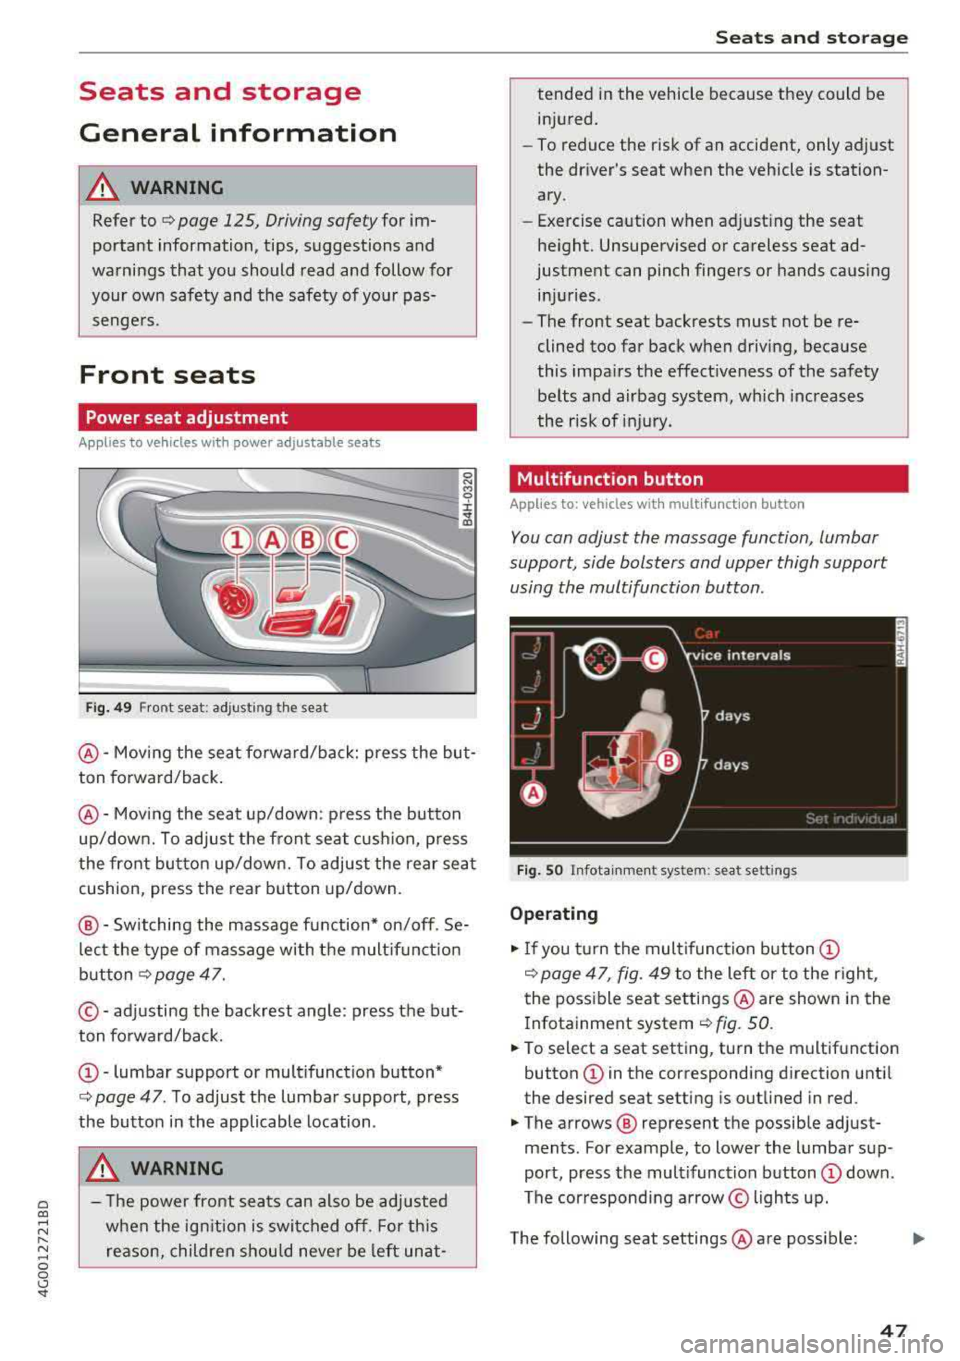
Fig . 49 Front seat: adj usting the seat
0 N M '? ::c .,. a,
@ -Moving the sea t fo rward/back: press the but
ton forward/back .
@-Moving the seat up/down: p ress the button
up/down. To adjust the fron t seat cush ion, p ress
the front button up/down. To adjust the rear sea t
cushion, press the rear button up/down.
@ -Switching the massage function * on/off . Se
l ec t the type of massage with the mult if u nct ion
button
c:::> page 47.
© - adjusting the backrest angle : press the but
ton forward/back.
@ -lumbar support or mult ifunction button*
c> page 47 . To adjust the lumbar support, press
the button in the applicable location .
A WARNING
-The power fron t seats can also be ad justed
when the ig nition is swi tched off. For this
reason, children should never be left unat-
S eats and storag e
tended i n the vehicle because they could be
in jured.
-To reduce the risk of an accident, only adjust
the dr iver's seat when the vehicle is station
ary.
-Exercise caution when adjusting the seat
he ight. Unsupe rvised or careless seat ad
justment can pinch fingers or hands causing inj uries .
-The front seat backrests must not be re
clined too far back when driving, because
this impa irs the effect iveness of the safety
be lts and airbag system, which inc reases
the r isk of inj ury .
Multifunction button
Applies to: vehicles with multifunctio n button
You can adjust the massage function , lumbar
support, side bolsters and upper thigh support
using the multifunction button.
Fig. SO Infota inme nt sys te m : seat sett ings
Operating
"I f you turn the mul tifunction button (D
c> page 47 , fig. 49 to the lef t or to the r ight,
the poss ible seat settings @are show n in the
I nfotainment system
c:::> fig. 50.
" To select a seat setting, turn the multifunction
button
(D in the corresponding direction unti l
the desired seat setting is outlined in red.
" The arrows @ represent the possib le adjust
ments . For example, to lower the lumbar sup
port, press the multifunction button
(D down .
The corresponding a rrow © lights up.
The following seat settings @are poss ible:
IJi,
47