air suspension AUDI A6 2018 Owners Manual
[x] Cancel search | Manufacturer: AUDI, Model Year: 2018, Model line: A6, Model: AUDI A6 2018Pages: 266, PDF Size: 41.38 MB
Page 13 of 266
a co .... N
" N .... 0 0 \.J '
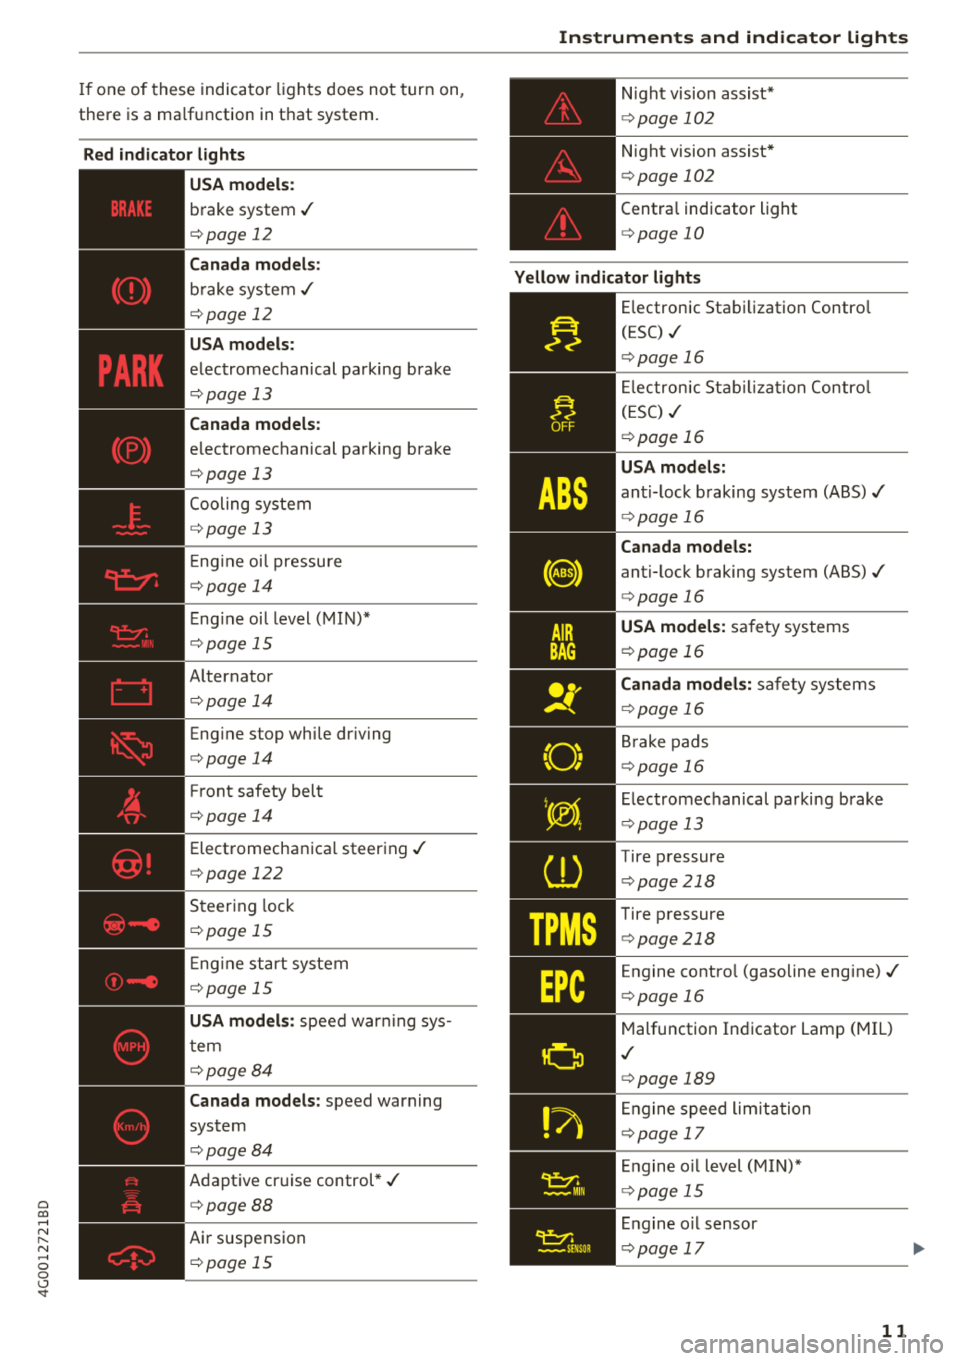
there is a ma lfu nction in t hat system.
Red indicator lights ~..::.._ __________ _
USA models:
b rake system .I
c::> page 12
Canada models:
bra ke sys te m .I
c::> page 12
USA models :
elec tromechanical parking brake
c::> page 13
Canada models:
e lectromechanical pa rking brake
c::> page 13
Cooling sys tem
c::> page 13
E ng ine oi l pressu re
c::> page 1 4
Eng ine oi l level ( MIN )*
c::> pag e 15
A lternator
Eng ine stop wh ile dr iv ing
c::> page 14
F ront safety belt
c::> page 14
Elect romecha nica l steer ing ./
c::> page 122
Steer ing lock
c::> page 1 5
En gine sta rt system
c::> page 15
USA models:
spee d war ning sys
t em
c::> page 8 4
Canada models :
speed warning
system
c::> page 84
Adapt ive cr uise control* ./
c::> page 88
Air suspension
c::> page 15
Instruments and indicator lights
N ight vision assist*
c::> page 10 2
Night vision assist *
c::>page 102
Centra l indicator light
c::> page 10
Yellow indicator lights
~--==-------------:--
E lectronic Sta bilizat ion Contro l
TPMS
(ESC) .I
Elec tron ic St abiliz ati on Contro l
( E SC)
.I
USA models:
an ti-lock b raking system (ABS) ./
Canada models:
anti-lock b raking system (ABS) ./
c::> page 16
USA models:
sa fe ty sys tems
c::> page 16
Canada models:
safe ty sy stems
c::> page 1 6
Br ake pads
c::> page 16
Electromechanical parking brake
c::> pag e 13
Tire p ressure
c::> page 218
Tire p ressure
c::> page 218
Engine co ntro l (gasoline engine) ./
c::> page 16
Malfunction Ind icator Lamp (MIL)
.I
c::> page 189
En gine s peed li mita tio n
c::> page 1 7
En gine o il level (MI N)*
c::> page 15
En gine o il sensor
c::> page 17
11
Page 17 of 266
a co .... N
" N .... 0 0 \,;J '
tor light st ill tu rns on, turn the eng ine
off and
do not continue driving . See an a uth orized Audi
dealer or author ized A udi Se rvice Fac ility for as
s istance .
(D Tips
The oil pressure warning is not an o il level in
dicator. Always check the oil level regu la rly.
'.!2" .. Engine oil level
App lies to: ve hicles wit h oil level warn ing
• Please add oil immed iately .
Add engine oil imme diate ly r=:>poge 192.
II Add oil max . x qt (l). You may continue driv
ing
Add the disp layed amo unt of o il immed iate ly
r=:> page 1 92.
@ -Steering lock
• Do not drive vehicle : Steering defective
There is a malfunc tion in the elec tronic stee ring
l o ck. You ca nnot t urn th e igni tion o n.
Do
not tow your vehicle beca use it ca nnot be
steered . See an au thor ized A udi dealer or au thor
iz ed A udi Service Fac ility for assis tance .
l!llt Steering lock: System fault Please contact
dealer
There is a malfunction in the elect ronic stee ring
l ock .
Dri ve to an autho rize d Aud i dea ler o r a uth o rized
Au di Service Faci lity immediately to have t he
mal funct ion corrected .
A WARNING
Do not tow your veh icle when there is a mal
function in the electronic stee ring lock - this
increases the r isk of an accident.
© -Engine start system
• Engine start system fault. Please contact
dealer
-
Instruments and indicator lights
D o not switch the ignition o ff because you may
not be able to switch it on again .
Dr ive to an au thor ized A udi dealer or au thoriz ed
A udi Se rvice Faci lity immed iate ly to h ave the
malfu nction corrected.
ml Engine start system fault. Please contact
dealer
T he re is a ma lf u nct ion in the engine s ta rting sys
tem .
Drive to an author ized A udi dealer or autho rized
A udi Se rvice Fac ility immed iate ly to have the
malfu nction corrected .
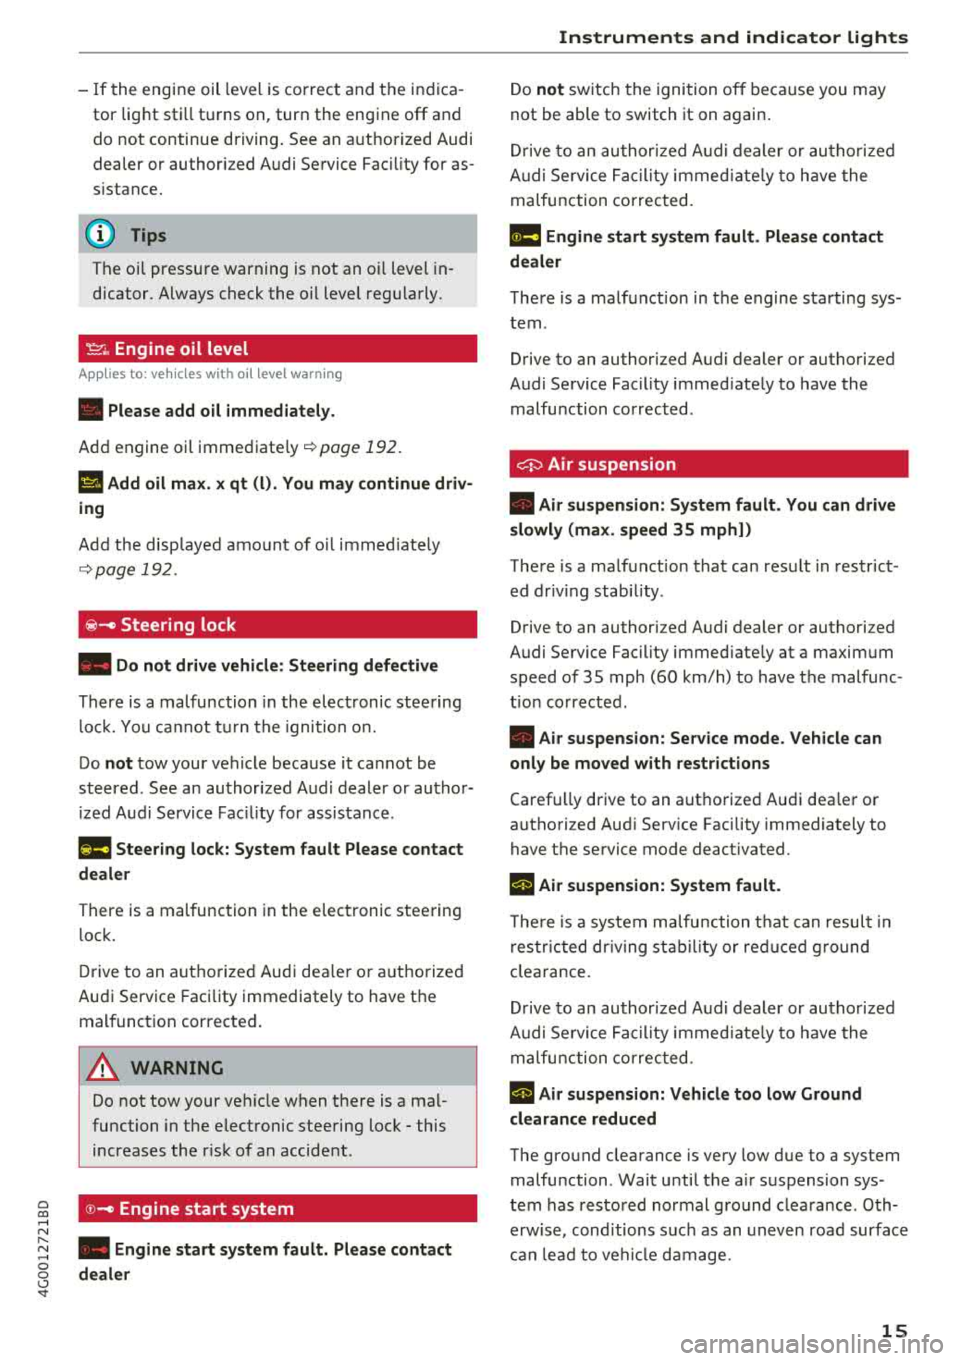
0 Air suspension
• Air suspension: System fault. You can drive
slowly (max . speed 35 mph))
The re is a ma lf u nct ion that can resu lt in restric t
ed dr iving stab ility .
Drive to an author ized A udi dealer or autho rized
Audi Se rvice Facility immed iate ly at a maxim um
speed of 35 mph (60 km/h) to hav e the malfunc
t io n co rrected .
• Air suspension: Service mode . Vehicle can
only be moved with restrictions
Caref ully drive to an aut ho rize d Aud i dea le r o r
autho rize d Aud i Serv ice Facility immediately to
have the service mode deact ivated.
rl Air suspension: System fault.
T he re is a syste m malfu nction t hat can resul t in
r es trict ed dr iv ing stabilit y or reduced grou nd
cl ear ance.
D rive to an author ized A udi dealer or autho riz ed
A udi Se rvice Fac ility i mmed ia te ly to have the
m alfu nction corr ecte d .
rl Air suspension: Vehicle too low Ground
clearance reduced
The ground clearance is ve ry low due to a system
malfu nction . Wait u nti l the a ir su sp ension sys
tem has res to red normal g ro und clea rance . O th
erwise, con ditions s uch as an un even roa d surface
c a n l ead t o ve hicle dam age .
15
Page 84 of 266
Trail er to wing
must attach additiona l exterior mirrors . Adjust
them so you have a sufficient visibility behind
you .
Exterior lighting
Follow the lega l regulat ions regard ing the light
ing eq uipment on your trailer . Conta ct an author
ized Audi dealer or authorized Audi Service Facili
ty for more information.
Before start ing to drive, check a ll l ight ing equip
men t on the hitc hed trailer.
The headlig ht range contro l adjusts automatical
ly to the light range of the headl ights.
Safe ty chain s
Make su re the safety chains are correctly applied
when pulling a trailer . The chains should hang
enough so t hat the trailer can dr ive around
curves. However, they must not touch the
g round .
Air su spension
Applies to: vehicles with air suspension
The air suspension must be at the standard vehi
cle height before you set the tongue weight on
the trailer a nd h itch the trailer ¢@ ,
¢page 106,
Raising/lowering the vehicle .
For ve hicles w ith a factory-installed tra iler hitch,
the air suspension trailer mode will automat ically
sw itch on if you connect the trailer cable to the
socket.
F or ve hicles w ith a retro fitted trailer hitch, you
must switch on the air suspension trailer mode
manually . Select in the Infota inment system:
ICARI function button > ( Car )* s yste m s contro l
button
> V ehicle setting s > Air su spen sion : trail
e r > On .
Switch it off again after tow ing a tra ile r.
You can also switch off tra iler mode ma nually
while driving , for example, when using a bicycle
rac k system .
If you have to drive through difficult road condi
tions , you can raise the vehicle aga in after hitch
ing the t rai ler or after adjust ing the tongue
weight .
82
@ Note
Applies to: vehicles with air suspension
-Changes i n temperature or load can affect
the height of the vehicle .
- Set the air suspension to the standard veh i
cle he ight, otherwise the applicable tongue
we ight no longer appl ies to your veh icle .
(D Tips
-Use chocks when park ing on inclines if the
trai ler is loaded.
- We recommend also hav ing the vehicle in
spected between the inspection intervals if
you are towing a trailer frequently .
- Avoid driv ing with a trai ler dur ing the veh i
cle break-in per iod.
Driving with a trailer
Driving with a trailer requires extra caution.
Sp eed
Adhere to t he lega l speed lim its . Fo llow the legal
regu lat ions
sp ecific to the country.
As the speed increases, the dr iv ing stab il ity of
t h e tra ile r decreases. Therefore you should not
exceed the max imum lega l speed lim it w hen
t h ere are unfavorab le road, weather and/or wind
conditions. This especia lly applies when driving
downh ill.
Yo u m ust always red uce your speed as soon as
you notice even the slightest swinging motion o f
the trai ler . Never try to "straight en out" the trai l
er by acce lerating.
The we ight d istr ibution is very poor if the vehicle
is empty and the trai ler is loaded. However if you
must drive under these circumstances, then drive
especially slowly .
Brakes
B rake in a time ly manner. Downs hift befo re dr iv
i ng down hill so that the engine can assist with
braking ¢&. .
When using a trailer w it h over run bra kes, fi rst
bra ke gently t hen q uick ly. This red uces the r isk of
j erking while braking if the trailer wheels lock up .
IIJJ,,
Page 106 of 266

Assistance systems
Messages
App lies to: ve hicles w ith night v isio n ass ist
Night vision assist: System fault
The system cannot guarantee correct function
and is switched off . See an author ized Audi deal
er or authorized Audi Service Facility for assis
tance .
Night vision assist: Currently unavailable
The system cannot guarantee correct function at
this t ime and is switched off.
Night vision assist: Only available at night with
lights turned on
Night vision assist onl y works when it is dar k out
side and the head lights are on.
Night vision assist: Pedestrian marking current
ly unavailable
The pedestrian and wild animal marking was
sw itched off by the system.
Audi drive select (drive
settings)
Introduction
Drive select makes it possible to experience dif
ferent types of vehicle settings in one vehicle .
The driver can se lect
Comfort , Auto and Dynamic
modes in the Inf ota inme nt system to switch be
tween, for example, a sporty and a comfo rtable
driving mode .
I n the
Individual mode, the sett ings can be ad
justed to your perso nal preferences. This makes
it poss ible to comb ine settings such as a spo rty
engine setting with light steering.
Description
The following systems, among other things, are
influenced by drive select:
Engine and automatic transmission
Depending on the mode , the engine and a uto
mat ic tran smission respond more quickly or in a
mo re balanced manner to accelerator peda l
104 movements
. In the sporty dynamic mode, the
transmission shifts at higher speed ranges.
Adaptive air suspension*
The adaptive a ir suspens ion* is an electron ically
controlled air suspension and damping system.
The adjustment depends on the driving mode se
l ected, steering movements, the driver's braking
and acce leration, and as the road surface, vehicle
speed and load.
The vehicle ground clearance depends on the
mode selected and the speed . When you are in
the
auto mode, the highway setting is activated
when you drive above 75 mph (120 km/h) for
more than 30 seconds. The ground clearance is
i ncreased automatically if the speed drops below
44 mph (70 km/h) for more than 120 seconds .
Steering
The power steering adapts. Indirect steering that
moves easily as in comfort mode is especia lly
su ited to long drives on a highway. The dynamic
mode provides sporty, direct steering.
App lies to: vehicles wit h dynamic steer ing
The steering ratio changes based on vehicle
speed in order to maintain optimum steering ef
fort for the driver at all times. Th is sets the steer
i ng to be less sensitive at h igher speeds in order
to provide improved veh icle control. At reduced
speeds, steering is more direct in o rder to keep
t h e steer ing effort as minimal as possible whe n
the driver is maneuvering the vehicle. At low and
average speeds, dynamic steering* additionally
provides more responsive steering performance.
Sport differential*
As a component of the all whee l dr ive system
(quattro)
~ page 123, the sport differe ntial dis
tributes the driving power to the rear axle de
pending on the situation. The distribution of
power varies from ba lanced (comfort) to sporty
(dynamic) depending on the se lected mode. The
goal is a high level of agility and ability to accel
erate on curves. The vehicle is very responsive to
steering.
IJIJ,
Page 107 of 266

a co .... N
" N .... 0 0 \.J '
The cornering light adapts the high beams to the
direc tion of the curve depending on the speed .
The pivoting action and the lighting also adapt to
the mode .
Adaptive cruise control*
The behav ior when accele rating can be adjusted
from comfortab le to sporty, depen ding on the
drive select mode . Adaptive cr uise cont rol a lso
responds to the driving behavior of the ve hicle
ahead in a more conservative or sporty manner.
Engine sound*
The engine sound adapts to the cur rent mode
an d can be subtle to sporty .
(UJ) Note
Applies to: vehicles with adaptive air suspension
-Make sure the re is eno ugh clearance above
and below t he ve hicle when par king . The
height of the vehicle (ground clearance) can
change once it is pa rked due to tempe rature
fluctuations , changes to the load conditions
and c hanges to the driv ing modes .
-When transport ing the veh icle on a car car
r ier, tra in, sh ip or by other means, only t ie
the veh icle dow n at the runni ng surface of
t h e tires, wh ich is the outer circ umference .
Secur ing the ve hicle at t he a xle co mpo
nen ts, suspe nsio n str uts or tow ing eyes is
not permi tted be cause the p ress ure in the
air sus pension str uts can change during
transport. The vehicle may not be secured
sufficiently if this happens .
Adjusting the Individual mode
Ass istance systems
(D Tips
-In some models, the maximum ve hicle
speed can only be reached in t he auto and
dynamic modes.
-T he S selector lever position automatica lly
engages if the dynamic mode is selected.
- Applies to: vehicles with dynamic steering:
operati ng no ise is heard when sta rting or
stopp ing the engine. T his does not ind icate
a prob lem.
Selecting the driving mode
.. To select the mode, select the follow ing in the
Infota inment:
!CARI function b utton> Comfort ,
Auto , Dynamic or Individual.
You can change the driv ing mode when the veh i
cle is stationary or while driving . If traff ic per
mits , afte r changing modes, briefly take your
foot off the accelerator pedal so t hat the recently
selected mo de is also ac tiva ted fo r th e e ngine.
Comfort -provides a comfort-or iented vehicle
setup a nd is s uited fo r long d rives o n highways .
Auto -provides an ove rall comfortab le yet dy
nam ic dr iving feel and is suited for everyday use .
Dynamic -gives the driver a sporty driving fee l
and is suited to a sporty driving style .
Individual -q page 105.
A WARNING ~ -
Pay attention to traffic w hen ope rating the
d rive select to reduce the r isk o f an accident.
You con adjust the vehicle settings to your personal preferences .
.,. Select : t h e ICARI fu nction bu tton > Set individ
ual
con trol button . Once yo u select the me nu,
yo u wi ll au tomatically drive in t he
Indi vidual
mode.
Afte r you have closed the se tt ings, you will a uto
mat ica lly dr ive i n the
Individual mode . T
he equ ipment in yo ur vehicle will dete rm ine
wh ich se tt ings you can adjust. The fo llow ing ta -
ble g ives an overview o f the characteristics .
.,_
105
Page 108 of 266

Assistance systems
Systems comfort auto dynamic
Engine/transmission
balanced balanced sporty
Air suspension* comfortable balanced sporty
Steering comfortable balanced sporty
Dynamic steering* comfortable/ind i recil: ba lan ced/d irect sporty/direct
Sport differential * balanced
Adaptive cruise control* comfortable
Engine sound * subtle
al Subtle in the selector lever position "D" an d sporty in "S".
(D Tips
Your Individual mode settings are automati
cally stored and assigned to the remote con
trol key being used .
Raising/lowering the vehicle
App lies to: ve hicles w ith a daptive a ir s uspens io n
You can raise your vehicle temporarily , for exam
p le to drive ove r a tall cu rb.
Raising the vehicle
"' Select the following in the Infotainment sys
tem : the
!CARI function button> Raise control
button.
"'W ait for the ar rows or segments in the Info
tainment system display to stop blinking and
the vehicle to reach its fina l position .
Lowering the vehicle
"'To lower the vehicle, select the following in the
Infotainment system: the
! CAR I function button
>
Lower control button.
"' Wait for the arrows or segments in the Info
tainment system display to stop blinking and
the vehicle to lower complete ly .
{LlJ) Note
- Remember that your vehi cle is not suitable
for driving offroad even when it is raised.
There is not enough ground clearance.
- If the vehicle is raised, it wi ll lo wer auto
matically when driving 62 mp h (100 km/h)
or faster.
106
ag ile sporty
ba lan ced sporty
subtle/sportyal sporty
Messages
Applies to: vehicles wi th adap tive a ir suspension
Air suspension: Vehicle is too high. Controlling
level. ..
Air suspension: Vehicle is too low. Controlling
level. ..
The driver message switches off when the leve l
contro l process is comp lete.
Page 160 of 266
Airbag system
must be performed by qualified workshops
only. Make sure that any airbag service ac
tion is entered in your Audi Warranty
&
Maintenance booklet under AIRBAG RE·
PLACEMENT RECORD .
-For safety reasons in severe accidents, the
alternator and starter are separated from
the vehicle battery with a pyrotechn ic circuit
interrupter.
- Work on the pyrotechnic circuit interrupt
er must only be performed by a qualified
technicians who have the experience, in
formation and special tools necessary to
perform the work safely.
- If the vehicle or the circuit interrupter is
scrapped, all applicable safety precautions
must be followed .
@ For the sake of the environment
Undeployed airbag modules and pretension
ers might be classified as Perchlorate Materi
al
-special handling may apply , see
www .dtsc.ca.gov/hazardouswaste/perchlo
rate . When the vehicle or parts of the re
straint system including airbag modules and
safety belts w ith pretensioners are scrapped,
all applicable laws and regulations must be
observed . Your authorized Audi dealer is fa
miliar with these requirements and we recom
mend that you have your dealer perform this
service for you.
Other things that can affect Advanced
Airbag performance
Changing the vehicle's suspension system can
change the way that the Advanced Airbag System
performs in a crash. For example, using tire-rim
comb inations not approved by Audi, lower ing the
vehicle, chang ing the stiffness of the suspension,
including the springs, suspension struts , shock
absorb ers etc . can change the forces that are
measured by the airbag sensors and sent to the
electronic control unit . Some suspension changes
can, for example, increase the force levels meas
ured by the sensors and make the airbag system
deploy in crashes in which it would not deploy if
the changes had not been made. Other kinds of
158
changes may reduce the force levels measured by
the sensors and prevent the airbag from deploy
i ng when it should .
& WARNING
Changing the vehicle's suspension including
use of unapproved tire-rim combinations can
change Advanced Airbag performance and in
crease the risk of serious personal injury in a
crash .
- Never install suspension components that do not have the same performance charac
teristics as the components origina lly instal
led on your vehicle.
- Never use tire-rim combinations that have
not been approved by Aud i.
Knee airbags
Description of knee airbags
Applies to: vehicles with knee airbags
The knee airbag system can provide supplemen
tal protection to properly restrained front seat
occupants.
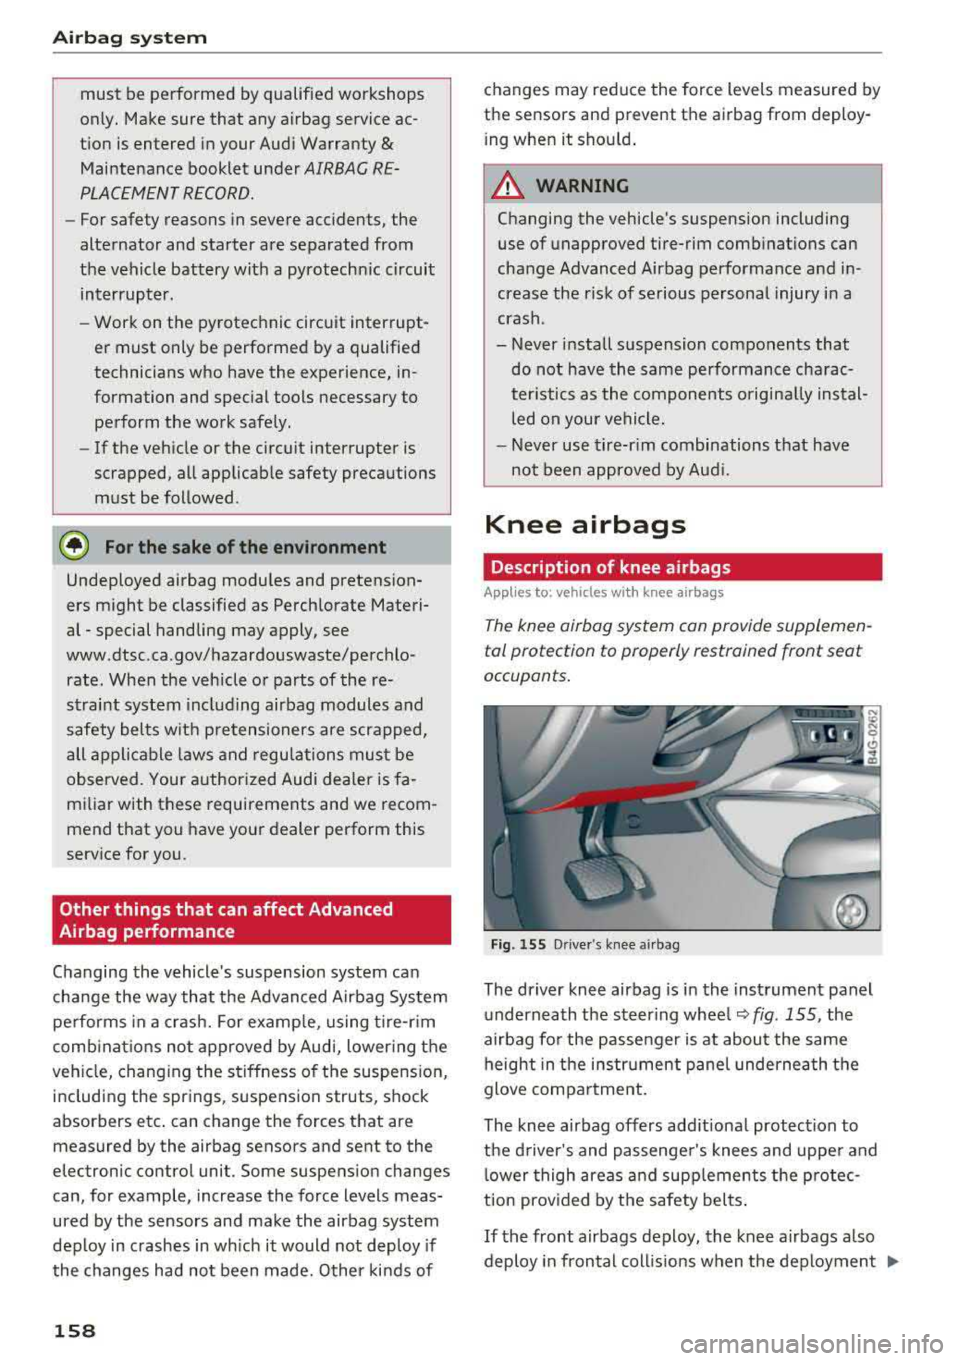
Fig . 155 Driver 's knee airbag
The driver knee airbag is in the instrument panel
underneath the steering wheel ¢
fig. 155, the
airbag for the passenger is at about the same height in the instrument panel underneath the
glove compartment.
The knee airbag offers add itional protect ion to
the driver's and passenger's knees and upper and lower thigh areas and supplements the protec
tion prov ided by the safety belts .
If the front airbags deploy, the knee airbags also
deploy in frontal coll is ions when the deployment
..,.
Page 219 of 266
a co .... N
" N .... 0 0 \,;J '
You can also use all season tires instead of
winter tires . Please note that in some coun
tries where winter tires are required, only
winter tires with
the ~ symbol may be per
mitted.
Snow chains
Snow chains not only improve the driving in win
ter road conditions, but also the braking .
.. Only install snow chains on the front wheels.
This applies also to vehicles with all wheel
drive* .
.. Check and correct the seating of the snow
chains after dr iv in g a few feet, if necessary . Fol
low the instructions from the manufacturer .
.. Note the maximum speed of 30 mph (SO km/
h). Note the loca l regulations.
Use of snow chains is only perm itted with certain
rim/tire combinations due to technical reasons.
Check with an authorized Audi dealer or author
ized Audi Service
Facility to see if you may use
snow chains.
You must remove the snow chains on roads with
out snow. Otherwise, you could impair driving
ability and damage the tires.
A WARNING
Using incorrect snow chains or installing snow
chains incorrectly can result in loss of vehicle
control, which increases the risk of an acci
dent .
{[J) Note
- Snow chains can damage the rims/wheel
covers* if the chains come into direct con
tact with them . Remove the wheel covers*
first . Use coated snow chains.
- Using snow chains that add more than 0.4
inch (10.5 mm) of height can severely dam
age the wheel housings and other vehicle
components.
- Do not install and use snow chains if there is
a malfunction in the air suspension*, be
cause the vehicle height will be very low. If
Wheels
you drive with snow chains anyway, the
wheel housings and other vehicle compo
nents can be severely damaged.
(D Tips
When using snow chains, it may be useful to
switch on sport
mode¢ page 120.
Low-profile tires
Applies to: vehicles with low-profile tires
Compared to other tire/rim combinations, low
profile tires offer a wider tread surface and a
larger rim diameter with shorter tire sidewalls.
This results in an agile driving style . However, it
may reduce the level of comfort and increase
road noise when driving on roads in poor condi
tion.
Low -profile tires can become damaged more
quickly than standard tires when driving over
large bumps, potholes, manhole covers , and
curbs . Therefore, it is particularly important to
maintain the correct tir e pressure
¢ page 211.
To reduce the risk of damage to the tires and
rims, drive very carefully on poor roads.
Check your wheels regularly every 2,000 mi
(3,000 km) for damage . For example, check for
bulges/cracks on the tires or deformations/
cracks on the rims.
After a heavy impact or damage, have the tires
and rims inspected or replaced immediately by
an authorized Audi dealer or authorized Audi
Service Facility.
Low-profile tires can wear out faster than stand
ard tires .
Uniform tire quality grading
-Tread wear
- Traction AA ABC
- Temperature ABC
Quality grades can be found where applicable on
the tire side wall between tread shoulder and maximum section width
¢ page 202, fig. 185 .
217
Page 229 of 266
a co .... N
" N .... 0 0 \.J '
The vehicle jack* in your vehicle is mainte
na nee-free.
Replacing wheels
Before changing a wheel
Observe the following precautions for your own
and your passenger's safety when changing a
wheel .
'"After you experience a tire failure, pull the car
well away from moving traff ic and try to reach
le ve l ground before you stop ¢,&. .
'"All passe ngers should le ave the car and move
to a safe location (for instance, be hind the
guardra il) ¢ ,&. .
.. Engage the parkin g brake to p revent your vehi
cle from rolling
unintentionally ¢,&. .
'"Move selecto r lev er to p osition P ¢ ,&. .
'"If you are towing a trailer, unh itch the trailer
from your veh icle.
'" Take the jac k and the sp are tir e* out of the lug
gage compartment
i::> page 226 .
A WARNING
You or your passengers cou ld be inju red w hile
chang ing a wheel if you do not follow these
safety precautions :
- If you have a flat t ire, move a safe distance
off t he road. Tur n off the engine, t urn the
emergency flashers on and use other warn
ing devices to alert other motorists .
- Make s ure tha t pa ssengers w ait in a sa fe
place away from the vehicle and we ll away
from the road and traffic.
- T o help prevent the vehicle from moving
sudden ly and possibly slipping o ff th e jack,
always fully set the parking brake and b lock
the front and back of the wheel diagonally opposite the wheel be ing changed. When
one front whee l is lifted off the ground,
placing the Automatic Transm ission in P
(Park) w ill
not prevent the veh icle from
moving.
Em ergenc y ass is tanc e
-Before you change a whee l, be sure the
ground is level and firm . If necessary, use a
sturdy board under the jack.
- Always store the vehicle too l kit, the jack
and the replaced tire in the luggage com
partment
¢ page 130.
(D Tips
Before changing the wheel, you must activate
the jacking mode, so that the automatic con
tro ls for the Adaptive Air Suspension* do not
make it more difficult to lift the vehicle with
the
jack ¢ page 229 .
Changing a wheel
When you change a wheel , follow the sequence
described below step-by-step and in exactly that
order .
l. Activate the vehicle jack mode* ¢ page 229.
2. Remove the deco rati ve wheel co ver* or the
wheel bolt c aps *. For more details see also
¢ page 228, Decorative wheel covers or
¢ page 228, Wheels with wheel bolt caps .
3. Loosen the wheel bolt s ¢page 229.
4. Locate t he p roper mount ing point for the
jack and align the jack be low that poin t
¢page 229 .
S. R ais e the car with the jack ¢ page 229 .
6. Remove the wheel with the fl at tir e and then
install
the spare ¢ page 231.
7. Tig hte n all wheel bolts lightly .
8 .
Lower the vehicle with the jack .
9 . Use the wheel bolt wrench and
firml y tighten
all wheel
bo lts ¢ page 229.
10. Replace t he decorat ive wh eel cover * or the
wheel bolt cap s*.
11. Deactivate the vehicle jack mode* in t he
MMI :
ICAR I function button > (Car )* sys tem s
contro l button > Ser vicing & che cks > Air
s usp.: jack mod e> Off.
The vehicle jack mode * switches off automatica l-
ly at speeds abov e 6 mph (10 km/h).
.,.
227
Page 239 of 266

a co .... N
" N .... 0 0 \,;J '
10 Rear seat entertainment
1 2 Rea r spo ile r (Sportbac k), sunroof
Fuse panel © (brown )
N o. Equipm ent
1 Infotainment system
2 Infota inment system
3
Infotainment, automatic dimming interior
rearview mirror
4 Rearview camera/peripheral cameras
5 TV tuner
6 Tank leak detection system
7 Sockets
8 Parking heater
1 0 Lumbar support (front passenger's seat)
11 Emergency
call
1 2 Infotainment system
Fuse panel @ (black )
N o. Equipm ent
Air suspension, adaptive dampers, sport
1 different
ial, electromechanical parking
brake
2 Clutch pedal position sensor/automatic
transmission
3 Seats
4 Rear wiper (Avant)
5 Side assist
6 Engine sound
7 Infotainment/sound amplifier
8 Gateway
9 Sport diffe rential
10 Climate control
system
11 T
ir e pressu re monito ring system, park ing
heate r
12 Start/Stop
system
Fuse panel © (black )
N o. E quipm ent
1 Special purpose vehicles/ rear seats
Fuses
Fuse panel ® (blac k)
N o. Equipm en t
1 Rear w indow defogge r
237