four wheel drive AUDI A6 2018 Owners Manual
[x] Cancel search | Manufacturer: AUDI, Model Year: 2018, Model line: A6, Model: AUDI A6 2018Pages: 266, PDF Size: 41.38 MB
Page 23 of 266
a co ,...,
N
" N ,...,
0 0 \,;J '
memory is not erased automatica lly. You can se
lect the time period for evaluat ing trip informa
tion yourself .
F or some vehicle functions, you can access the
driving information from the short -term memory
in the line
(D c::> page 19, fig. 5.
Fuel consumption
The cu rrent fue l consumption can be shown us
i ng a ba r graph
¢ fig . 8. The average consump
tion stored in the short-term memory is also dis p layed.
If the bar is green, your vehicle is saving
fuel through one of the following functions:
- Recuperation : electrical energy can be stored in
the vehicle battery when the vehicle is coasting or driving downhill. The bar will move toward
0 .
-Cylinder on demand system*: the engine auto
matically switches four cylinders
off when low
er power output is required and other condi
tions are met. This change is not noticeable to
the passengers.
{!) Tips
The date, time of day and time and date for
mat can be set in the Infotainment system
c::> page 22.
Efficiency program
Ap plies to: ve hicles with effic ie ncy p rogram
F ig . 9 Instrument d uster : energy consumers
Driver information system
Fig. 10 Instrument duster: economy tip
The effic iency program can help you to use less
fuel. It shows other consumers that are using
fuel and economy tips give advice on how to drive
efficiently. The efficiency program receives dis
tance and consumption data from the on-board
computer.
To display the efficiency program, open the
Vehi
cle functions
menu and select the Efficiency pro
gram
menu item.
Other consumers
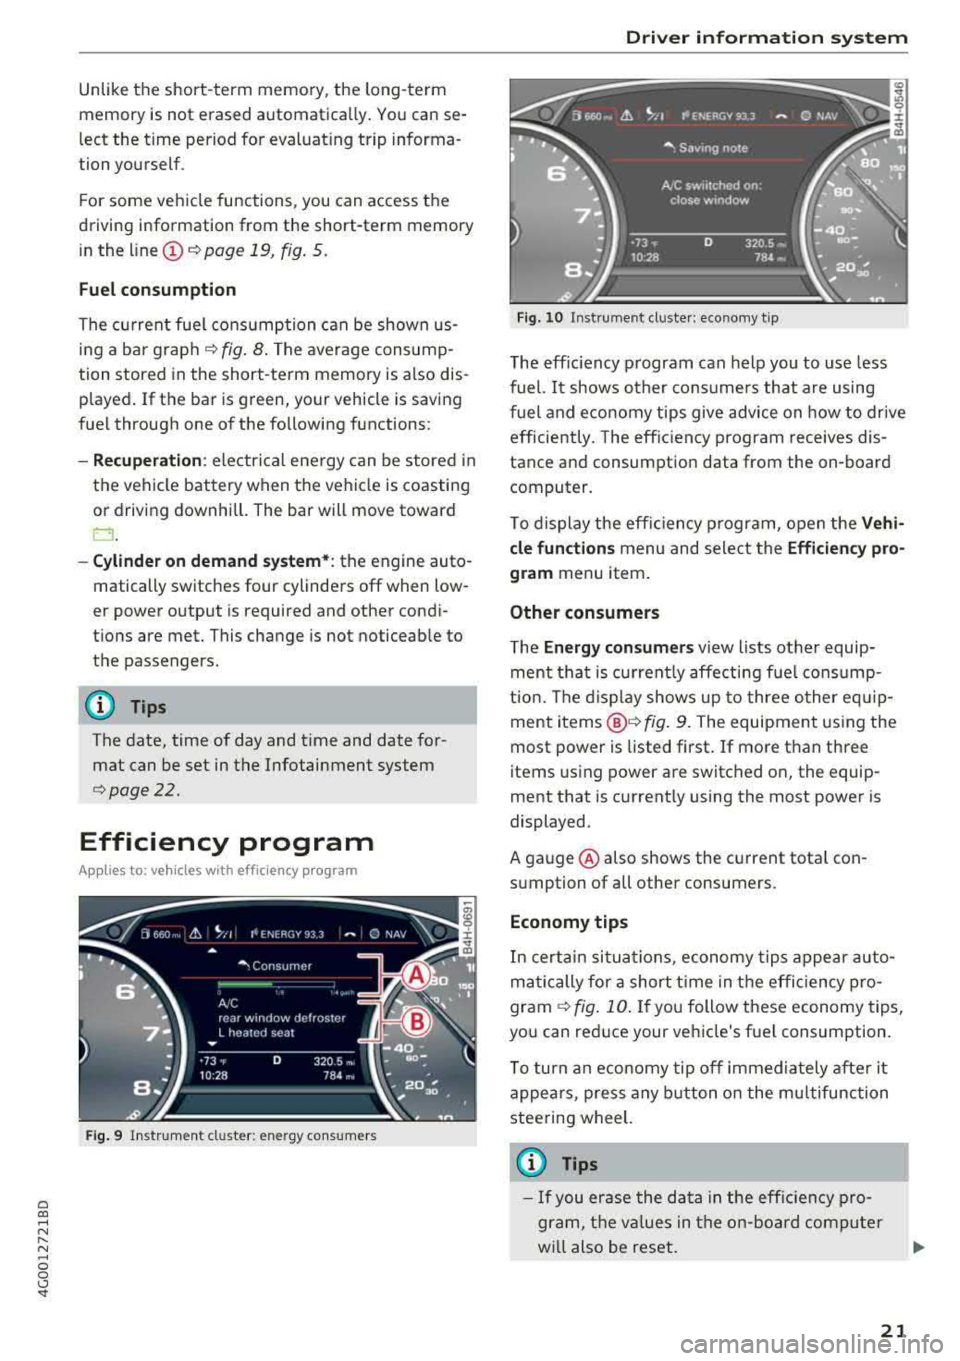
T he Energy consumers view lists other equip
ment that is currently affecting fue l consump
tion. The display shows up to three other equ ip
ment
items @¢ fig. 9. The equipment using the
most power is listed first. If more than three
items using power are switched on, the equip
ment that is current ly using the most power is
displayed.
A gauge @also shows the current tota l con
sumption of all other consumers.
Economy tips
In certain situations, economy tips appear auto
matically for a short t ime in the efficiency pro
gram
c::> fig. 10 . If you follow these economy tips,
you can reduce your vehicle's fuel consumption.
To turn an economy tip off immediately after it
appea rs, p ress any button on the multifunction
steering wheel.
(I) Tips
- If you erase the data in the effic iency pro
gram, the va lues in the on-board computer
wi ll also be reset.
21
Page 75 of 266
a co .... N
" N .... 0 0 \,;J '
Requirement: the driver's door must be closed,
the driver's safety belt must be latched and the
parking brake must be set.
.,. To start driving and release the parking brake
automatically, press the accelerator pedal as
usual.
In addition to releasing the parking brake auto
matically, other convenience and safety functions
are available when you start driving
¢page 74,
Starting to drive.
Preventing the automatic parking brake
release
The vehicle could begin rolling unintentionally,
depending on the hill or if towing a trailer.
.,. To prevent the parking brake from releasing au
tomatically, pull and hold
the(®) switch and
press the accelerator pedal. The parking brake
remains set and prevents the vehicle from roll
ing backward.
.,. You can release the C®l switch again once you
are sure that you are giving enough driving
force to the wheels by pressing the accelerator pedal.
Emergency braking function
You can use the emergency braking function in an
emergency situation, or if the standard brake op
eration malfunctions or is disabled.
.,. Pull and hold the®) switch.
.,. As soon as you release the (®) switch or acceler-
ate, the braking stops.
Pulling and holding the
C®) switch while driving
the vehicle activates the emergency braking func
tion. The vehicle is braked at all four wheels by
activating the hydraulic brake system. The brak ing effect is similar to heavy
braking¢&_ .
To reduce the risk of activating the emergency
braking by mistake, a warning tone (buzzer)
sounds when
the®> switch is pulled. Emergency
braking stops as soon as
the®) switch is released
or the accelerator pedal is pressed.
Parking
.,. Press the brake pedal to stop the vehicle.
Driving
.,. Pull the®> switch to set the parking brake .
.,. Place the selector lever in the P position.
.,. Turn the engine off¢&_ .
.,. Turn the steering wheel when parking on in
clines so that the wheels will roll into the curb
if the vehicle starts moving.
A WARNING
-
- Do not press the accelerator pedal inadver
tently if a gear is selected when the vehicle
is stationary and the engine is running. Oth
erwise, the vehicle will start to move imme
diately and this could result in an accident.
- Emergency braking should only be used in
an emergency, when the normal brake pedal
has failed or the brake pedal is obstructed.
During emergency braking, your vehicle will
brake similar to heavy braking. ESC and the
associated components (ABS, ASR, EDL)
cannot overcome the laws of physics . In cor
ners and when road or weather conditions
are bad, a full brake application can cause
the vehicle to skid or the rear end to swerve,
which
increases the risk of an accident.
- If the power supply fails , you cannot set the
parking brake if it is released . In this case,
park the vehicle on level ground and secure
it by placing the selector lever in the P posi
tion. See an authorized Audi dealer or au
thorized Audi Service Facility for assistance.
- If you leave the vehicle, switch the ignition
off and take the vehicle key with you. This
applies particularly when children remain in
the vehicle. Otherwise children could start
the engine, release the parking brake or op
erate electrical equipment such as power
windows, which increases the risk of an acci
dent.
- No one should remain in the vehicle when it
is locked - especially children . Locked doors
make it more difficult for emergency work
ers to get into the vehicle, which puts lives
at risk.
(D Tips
When stopping at a traffic signal or stopping
in city traffic, you can set the parking brake
manually . The vehicle does not have to be
73
Page 122 of 266
Intelligent Technology
driving too close to objects ahead . The ESC
and its integrated systems cannot always prevent coll isions
-there is still a risk of ac
cidents!
- Press the accelerator pedal carefully when
accelerating on even, slippery surfaces such as ice and snow . The drive wheels can spin
even when these control systems are instal-
Switching on /off
led and this can affect driving stability and
increase the risk of a collision.
(D Tips
-ABS and ASR only function correctly when
all four wheels are equipped with identical
tires. Different tire sizes can lead to a reduc
tion in engine power.
- You may hear noises when the systems de
scribed are working.
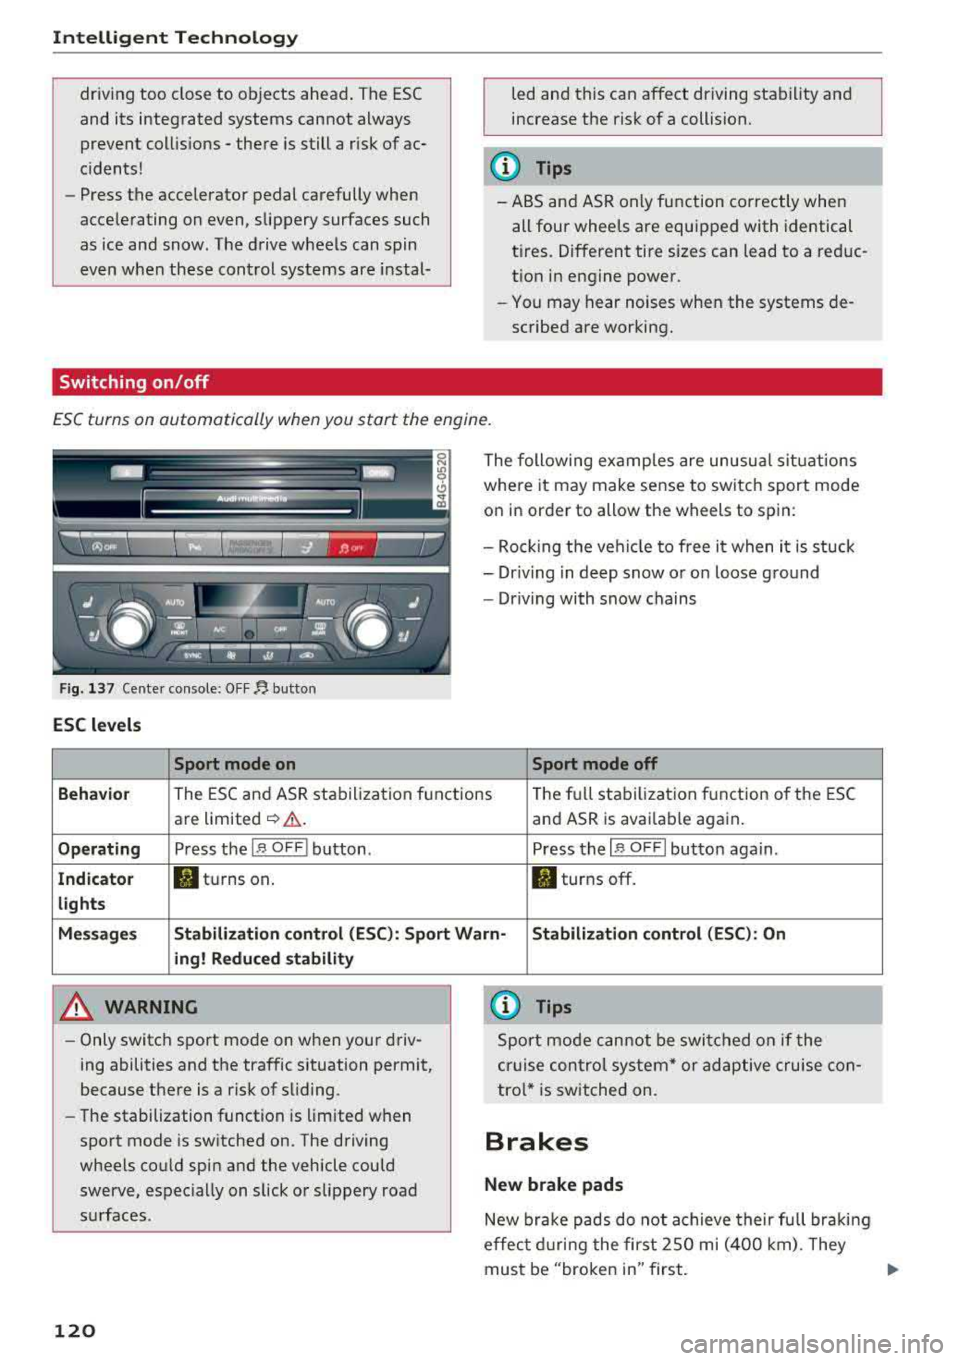
ESC turns on automatically when you start the engine .
Fig. 137 Ce nter con sole: OF F~ button
ESC levels
Sport mode on
The following examples are unusual situations
where it may make sense to switch sport mode
on in order to allow the wheels to spin:
- Rock ing the vehicle to free it when it is stuck
- Dr iving in deep snow or on loose ground
- Driving with snow chains
Sport mode off
Behavior
The ESC and ASR stabilization f unctions Th
e fu ll stabilization f unction of the ESC
are limited
~ &. . and ASR is avai lab le again.
Operating Press the I~ O FF I button . Press the I~ OF F! button again .
Indicator filturns on. . turns off.
lights
Messages Stabilization control (ESC): Sport Warn-Stabilization control (ESC): On
ing! Reduced stability
A WARNING
-Only switch sport mode on when your driv
ing abilities and the traffic situation permit,
because there is a risk of sliding .
- The stabilization function is limited when
sport mode is switched on. The driving
wheels could spin and the vehicle could
swerve, espec ially on slick or slippery road
surfaces .
120
-
{l) Tips
Sport mode cannot be switched on if the
cruise control system* or adaptive cruise con
tro l* is switched on .
Brakes
New brake pads
New brake pads do not achieve their full braki ng
effec t during the first 2SO mi (400 km). They
must be "broken in" first.
Page 125 of 266

a co .... N
" N .... 0 0 \,;J '
Applies to: vehicles wit h all wheel drive
In oil wheel drive, oil four wheels ore powered .
General information
In all wheel drive, the driving power is divided be
tween all four wheels. This happens automatical
l y depending on your driving behavior as well as
the current road conditions. Also see
c:> page 119, Electronic stabilization control
(ESC) .
A center differential distributes the driving power
variab ly to the front and rear axle. It works to
gether with selective wheel torque control, which
activates when driving through curves
c:>poge 119. With the sport differential*, power
distribution to the rear wheels is variable and can
be adjusted w ith drive select
c:> poge 104 .
The all wheel drive concept is designed for high
engine power. Your vehicle is exceptionally pow
erful and has excellent driving characteristics
both under normal driv ing cond itions and on
snow and ice. Always read and fo llow safety pre
cautions
c:> .&, .
Winter tires
By using all wheel drive, your vehicle has good
forward mot ion with standard tires in winter con
ditions . However, in winter we recommend using
winter or all season tires on all four w heels, be
cause this will improve the braking effect.
Snow chains
If there are snow chain laws, snow chains must
also be used on vehicles with all wheel drive
c:> page 217, Snow chains.
Replacing tires
For vehicles with all wheel drive, only wheels with
the same rolling circumference should be used .
Avoid using tires with different tread depths
c:> page 208, New tires or wheels .
Offroad vehicle?
Your Audi is not an offroad vehicle -there is not
enough ground clearance. For this reason, avoid
difficult terrain.
Intelligent Technology
A WARNING
--
- Also, in veh icles with all wheel drive, adapt
your driving style to the current road and
traffic conditions . Do not let the increased
safety provided tempt you into taking risks,
because this increases the risk of an acci
dent.
- The braking ability of your vehicle is limited
to the traction of the wheels. In this way, it
is not different from a two wheel drive vehi
cle. Do not be tempted to accelerate to a
high speed when the road is slippery, be
cause t his increases the risk of an accident .
- Note that on wet streets, the front wheels
can "hydrop lane" if driving at speeds that
are too high. Unlik e front wheel drive
veh icles, the engine does not rev higher sud
denly when the vehicle begins hydroplaning.
For this reason, adapt your speed to the
road conditions to reduce the risk of an acci
dent.
Energy management
Your vehicle is equipped with an intelligent ener
gy management system for distributing electrici
ty . This significantly improves the start ing ability
and increases the vehicle battery life.
(D Tips
- If you dr ive short distances frequently, the
veh icle battery may not charge enough
w hile driving. As a result, convenience func
tions for electr ical equipment may be tem
porarily unavailable.
- Th e vehicle battery w ill gradually drain if
the vehicle is not driven for long periods of
time, or if electrical equipment is used
when the engine is not running. To ensure
that the vehicle can still be started, the
electrical equipment will be reduced or
switched off.
123
Page 210 of 266

Wheels
by the tire manufacturer. This in
formation is used to contact con sumers if a tire defect requires a
recall.
Vehicle capacity weight
means the rated cargo and lug
gage load plus 150 lbs. (68 kilo
grams) times the vehicle's desig nated seating capacity .
Vehicle maximum load on the
tire
means that load on an individual
tire that is determined by distrib
uting to each axle its share of the
maximum loaded vehic le weight
and dividing by two.
Vehicle normal load on the tire
means that load on an individual
tire that is determined by distrib
uting to each axle its share of the
curb weight, accessory weight,
and normal occupant weight (dis
tr ibuted in accordance
with¢ ta
ble on page
2 13) and d ividing by
two .
Occupant loading and distri
bution for vehicle normal load
for various designated seating capacities
Re fer to the tire inflation pres
sure
label¢ page 211, fig. 188
2 08
for the n umbe r of seating posi
tions. Refer to the
table ¢ table
on page
213 for the number of
people tha t correspond to the ve
hicle normal load.
New tires or wheels
Audi recommends having all work
on t ires or wheels performed by
an authorized Audi dealer or au
thorized Audi Service Facility.
These facilities have the proper
know ledge and are eq uipped with
the required too ls and rep lace
ment parts.
... New t ires do not yet have the
optim um gripping properties.
Drive carefully and at moderate
speeds for the first 35 0 m iles
(500 km) with new tires .
... Only use tires with the same de
sign, size ( rolling circumfer
ence) , and as close to t he same
tread pattern as possible on a ll
four wheels .
...
Do not replace tires individually.
At least replace bo th tires on the
same axle at the same time .
... Audi recommends that you use
Audi O riginal Tires. If you would
like to use di fferent tires, please
note that the tires may perform
...
Page 211 of 266

0 0)
-N ,.... N
-0
s ..
differently even if they are the
same
size ¢,&. .
.,,. If you would like to equip your
vehicle with a tire/rim combina
tion that is different from what
was installed at the factory, con
sult with an authorized Audi
dealer or authorized Audi Service
Facility before making a pur
chase¢ ,&..
Because the spare tire* is differ
ent from the regular tires instal
led on the vehicle (such as winter
tires or wide tires), only use the spare tire* temporarily in case of
emergency and drive carefully
while it is in use. It should be re
placed with a regular tire as soon
as possible.
Applies to: vehicles with all wheel drive : all four wheels must be
equipped with tires that are the
same brand and have the same
construction and tread pattern so
that the drive system is not dam aged by different wheel speeds.
For this reason, in case of emer
gency, only use a spare tire* that
is the same circumference as the
regular tires .
Wheels
A WARNING
-Do not use steel rims that are
17 inches or larger. Other
wise, damage to the vehicle and an accident could result.
-Only use tire/rim combina
tions and suitable wheel bolts
that have been approved by
Audi. Otherwise, damage to
the vehicle and an accident
could result.
-For technical reasons, it is not
possible to use tires from oth
er vehicles
-in some cases,
you cannot even use tires from
the same vehicle model.
-Make sure that the tires you
select have enough clearance
to the vehicle. Replacement
tires should not be chosen
simply based on the nominal
size, because tires with a dif
ferent construction can differ
greatly even if they are the
same size. If there is not
enough clearance, the tires or
the vehicle can be damaged
and this can reduce driving
safety and increase the risk of
an accident.
...
209
Page 221 of 266
a co ,...,
N
" N ,...,
0 0 \,;J '
proper tire maintenance, and it is the driver's re
sponsib ility to ma intain correct tire pressure,
even if under-inf lation has not reached the level
to trigger illum ination of the TPMS low tire pres
sure telltale .
Your veh icle has also been equ ipped w ith a TPMS
malfunct ion indicator to indicate when the sys
tem is not operating properly. The TPMS mal
function indicator is combined w ith the low tire
pressure telltale. Whe n the system detects a
malfunct ion, the telltale will flash for approxi
mately one minu te and then remain cont inuous ly
i llum inated. This sequence wi ll continue upon
subseq uen t veh icle start -ups as long as the ma l
function exists.
When the malfunct ion i ndicator is ill uminated,
the system m ay not be ab le to detec t or sig nal
l ow tire press ure as intended. TPMS ma lfunctions
may occur for a var iety of reasons, incl uding the
installation of replacement or alternate tires or
wheels on the vehicle that prevent the TPMS
from functioning properly. Always check the TPMS malfunction telltale after rep lacing one or
more t ires or whee ls on your vehicle to ensu re
that t he replacement or alternate ti res and
wheels allow the TPMS to cont inue to func tion
p roperly.
If the tire pressure monitoring system
indicator appears
A ppl ies to: ve hicles with Tire Pressure Moni toring System in
di cato r
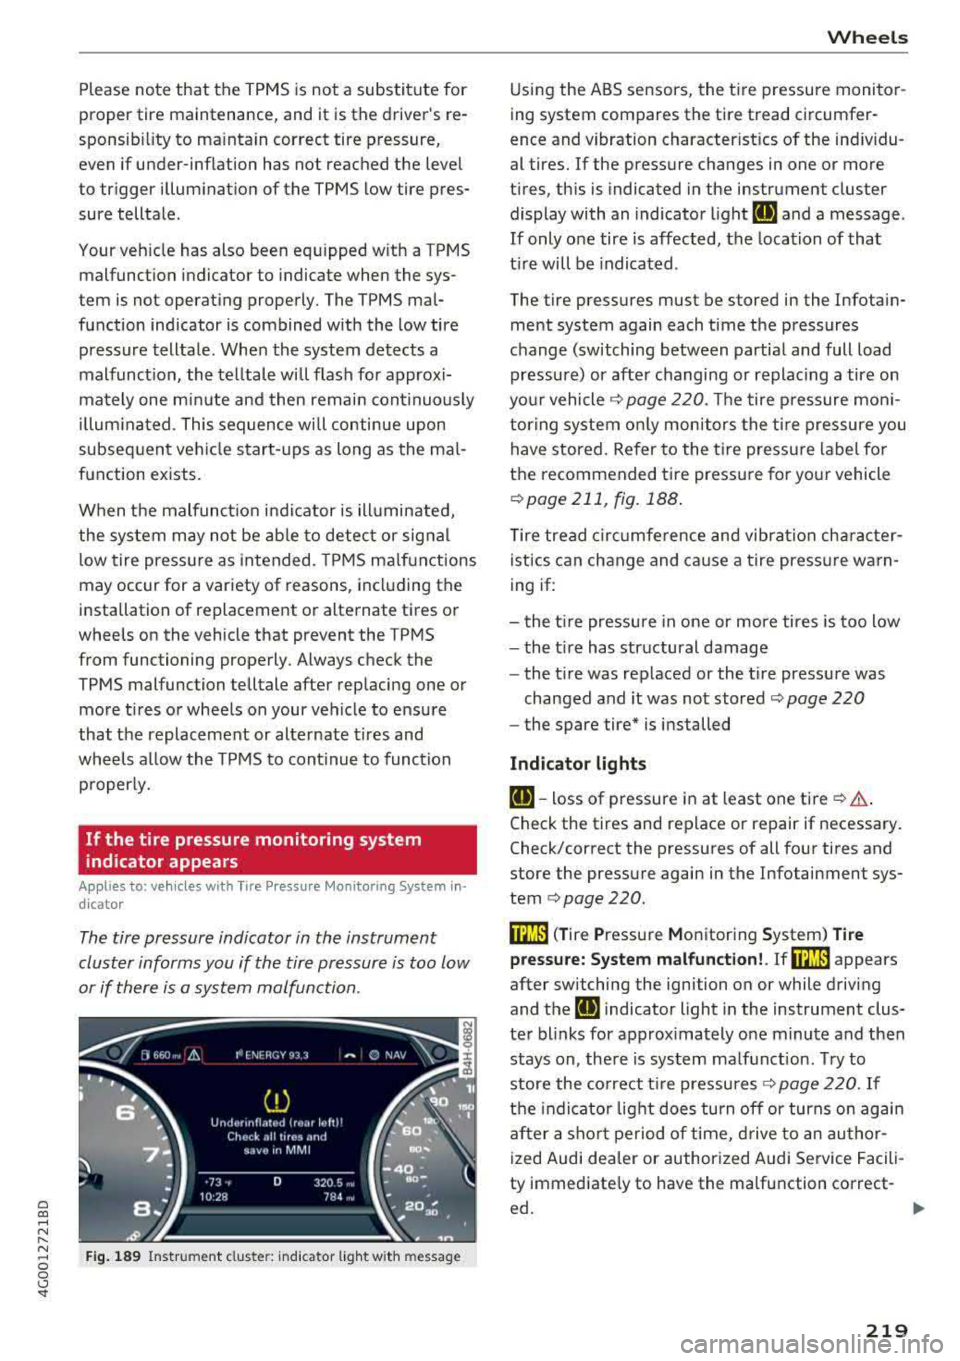
The tire pressure indicator in the instrument
cluster informs you if the tire pressure is too low
or if there is a system malfunction .
Fig. 1 89 Instrument cl uste r: in dicator l ight w it h m essage
Wheels
Using the ABS sensors, the tire pressure monito r
ing system compares the tire tread circumfer
ence and vibration characterist ics of the ind ividu
al tires. If the pressure changes in one or more
t ires, th is is indicated in the instrument cluster
display with an indicator l ight
IE and a message .
If only o ne tire is affected, the location of tha t
t ir e will be indicated .
The tire pressures must be stored in the Infotain ment system again each time the pressures
change (switching between partial and full load
pressure) or afte r changing or replac ing a tire on
yo ur vehicle
Q page 220. The tire p ressure mon i
tor ing system on ly mon itors the t ire pressure you
have stored. Refer to the t ire press ure label fo r
the recommended ti re pressure for yo ur vehicle
Q page 211, fig. 188 .
Tire tread c ircu mfe rence and vibr ation cha racter
istics can change and ca use a tire press ure warn
ing if:
- the t ire pressure in one or more tires is too low
- the t ire has str uctural damage
- the t ire was replaced or the t ire pressure was
changed and it was not stored
Q page 220
- the spare tire* is i nstalled
Indicator light s
IE-toss of pressure in at least one tire Q & .
Check the tires and replace or repair if necessary .
Check/correct the pressures of all four tires and
store the pressu re again in the Infotainment sys
tem
Q page 220.
m ( T ire Pressure Monitoring System) Ti re
pressure: System malfunction!.
If rn:m appears
after switching the ignition on or while driving
and the
IE indicator light in the instrument clus
te r blinks for approx imately one minute and then
stays on, the re is system malf unct ion . Try to
store the co rrect t ire pressu res
Q page 220. If
t h e indicat or light does turn off or turns on agai n
af ter a sho rt pe riod o f time, d rive to an au thor
ized Audi dea ler or authorized Audi Service Facili
ty immediate ly to have the ma lfunction correct-
ed.
~
219
Page 230 of 266
Emergency assistance
A WARNING
Always read and follow all WARNINGS and in
formation
c:> & in Raising the vehicle on
page 230
and c:> page 232.
After changing a wheel
A wheel change is not complete without the do
ing the following .
.. Always store the vehicle tool kit, the jack* and
the replaced tire in the luggage compartment
c:> page 130 .
.. Check the tire pressure on the spare wheel im
med iate ly after mount ing it .
.. As soon as possible, have the tightening tor
ques
on all wheel bolts checked with a torque
wrench. The correct tightening torque is 90 ft
lb s (120 Nm) .
.. Have the flat tire replaced as soon as possible.
@ Tips
-If you notice that the wheel bolts are cor
roded and difficu lt to turn while changing a
tire, they should be replaced before you
check the tightening torque.
-Drive at reduced speed until you have the
tightening torques checked.
-After changing a wheel, the tire pressure in
a ll four tires must be checked/corrected and
the tire pressure monitoring indicator must
be stored in the MMI
<=> page 220.
Decorative wheel covers
App lies to: vehicl es w ith decorative wheel covers
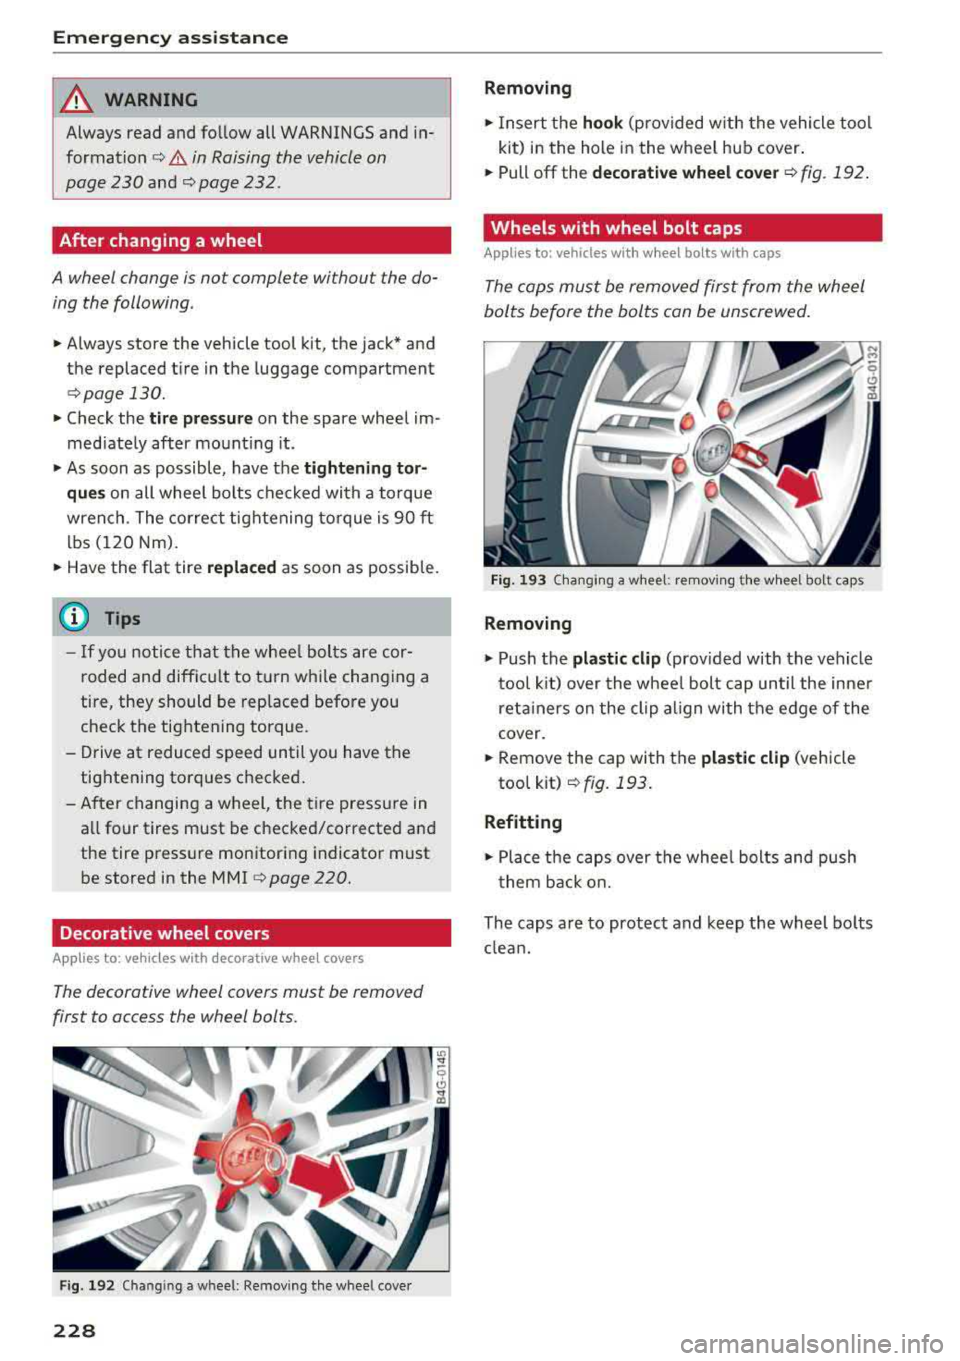
The decorative wheel covers must be removed
first to access the wheel bolts.
Fig. 192 Changing a wheel: Remov in g the whee l cove r
228
Removing
.,. Insert the hook (provided w ith the vehicle tool
kit) in the hole in the wheel hub cover.
.. Pull off the decorative wheel cover c:> fig. 192 .
Wheels with wheel bolt caps
Applies to: vehicles with wheel bolts with caps
The caps must be removed first from the wheel
bolts before the bolts can be unscrewed .
Fig. 193 C hanging a wheel: remov ing the w heel bolt caps
Removing
.,. Push the plastic clip (provided with the vehicle
tool kit) over the whee l bolt cap until the inner
reta iners on the clip align with the edge of the
cover.
.. Remove the cap with the plastic clip (vehicle
tool kit)
c:> fig. 193.
Refitting
.,. Place the caps over the whee l bolts and push
them back on.
The caps are to protect and keep the wheel bo lts
clean.