fuel AUDI A6 2018 Owners Manual
[x] Cancel search | Manufacturer: AUDI, Model Year: 2018, Model line: A6, Model: AUDI A6 2018Pages: 266, PDF Size: 41.38 MB
Page 5 of 266
a co .... N
" N .... 0 0 \,;J '
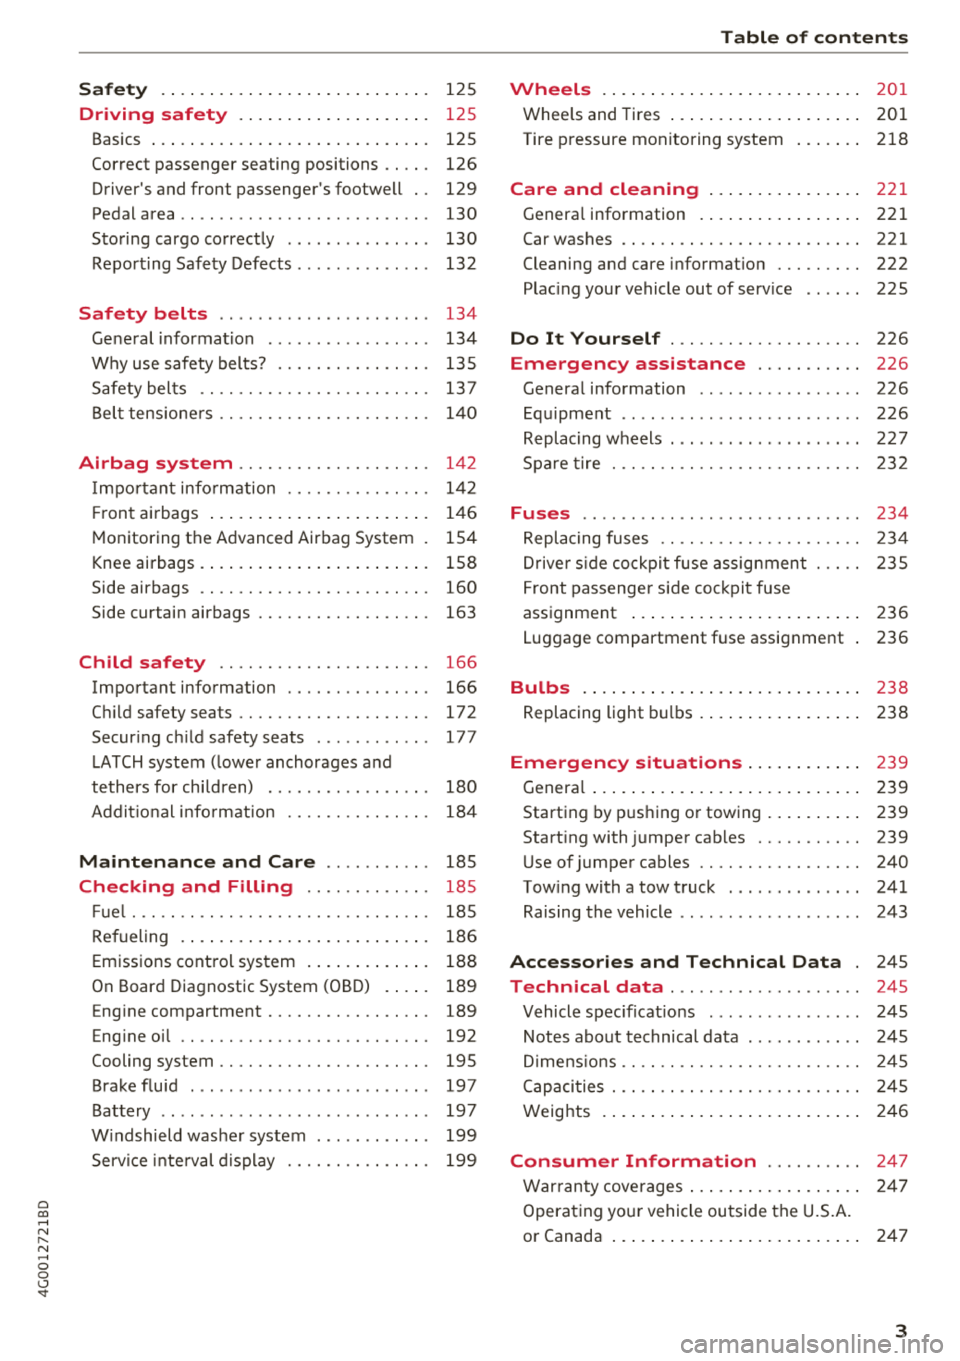
Driving safety . . . . . . . . . . . . . . . . . . . . 125
Basics . . . . . . . . . . . . . . . . . . . . . . . . . . . . . 125
Correct passenger seating positions . . . . . 126
Driver 's and front passenger's footwell . . 129
Pedal area . . . . . . . . . . . . . . . . . . . . . . . . . . 130
Storing cargo correctly . . . . . . . . . . . . . . . 130
Repo rt ing Safety Defects . . . . . . . . . . . . . . 132
Safety belts . . . . . . . . . . . . . . . . . . . . . . 134
Gene ral informat ion . . . . . . . . . . . . . . . . . 134
Why use safety belts? . . . . . . . . . . . . . . . . 135
Safety bel ts . . . . . . . . . . . . . . . . . . . . . . . . 13 7
Belt tens ione rs . . . . . . . . . . . . . . . . . . . . . . 140
Airbag system . . . . . . . . . . . . . . . . . . . . 142
I mportant info rm ation . . . . . . . . . . . . . . . 142
Fr on t ai rbags . . . . . . . . . . . . . . . . . . . . . . . 146
M onitoring the Advanced Airbag System . 154
Knee airbags. . . . . . . . . . . . . . . . . . . . . . . . 158
Side airbags . . . . . . . . . . . . . . . . . . . . . . . . 160
Side curtain airbags . . . . . . . . . . . . . . . . . . 163
Child safety . . . . . . . . . . . . . . . . . . . . . . 166
Important information . . . . . . . . . . . . . . . 166
C hi ld safety seats............. .. .. .. . 172
Secur ing ch ild safety seats . . . . . . . . . . . . 177
L ATCH system (lowe r anchorages a nd
tethers for children) . . . . . . . . . . . . . . . . . 180
Addit io n al i nfo rmat ion . . . . . . . . . . . . . . . 184
Maint enance and Care . . . . . . . . . . . 185
Checking and Filling . . . . . . . . . . . . . 185
Fu el . . . . . . . . . . . . . . . . . . . . . . . . . . . . . . . 185
Refueling . . . . . . . . . . . . . . . . . . . . . . . . . . 186
Emissions control system . . . . . . . . . . . . . 188
On Board Diagnostic System (OBD) . . . . . 189
E ng ine compartment . . . . . . . . . . . . . . . . . 189
Eng ine oil . . . . . . . . . . . . . . . . . . . . . . . . . . 192
Cooling system . . . . . . . . . . . . . . . . . . . . . . 195
Brake fluid . . . . . . . . . . . . . . . . . . . . . . . . . 197
Battery . . . . . . . . . . . . . . . . . . . . . . . . . . . . 197
W indshield was her system . . . . . . . . . . . . 199
Serv ice inte rval d isplay . . . . . . . . . . . . . . . 199
Table of content s
Wheels .. .. .... .. ... .. ..... ... .. ..
20 1
Whee ls and Tires . . . . . . . . . . . . . . . . . . . . 201
Tire pressure monitoring system . . . . . . . 218
Care and cleaning . . . . . . . . . . . . . . . . 2 21
Genera l information . . . . . . . . . . . . . . . . . 221
Car washes . . . . . . . . . . . . . . . . . . . . . . . . . 221
Cleaning and care informat ion . . . . . . . . . 222
Plac ing your vehicle out of serv ice . . . . . . 225
Do It Yourself . . . . . . . . . . . . . . . . . . . . 226
Emergency assistance . . . . . . . . . . . 226
General information . . . . . . . . . . . . . . . . . 226
Eq uipment . . . . . . . . . . . . . . . . . . . . . . . . . 226
Replacing w heels . . . . . . . . . . . . . . . . . . . . 227
Spa re t ire 232
Fuses ........ .. .. ................ . 234
Replacing fuses . . . . . . . . . . . . . . . . . . . . . 234
Dr ive r side cockpit f use assignmen t
F ront passenge r side co ckpit fuse 2
35
assignment . . . . . . . . . . . . . . . . . . . . . . . . 2 36
Luggage compartment fuse assignment 236
Bulbs .. .. .. .... .. ... .. ..... ... .. .. 23 8
Replacing light bu lbs . . . . . . . . . . . . . . . . . 238
Emergency situations . . . . . . . . . . . . 239
Genera l . . . . . . . . . . . . . . . . . . . . . . . . . . . . 239
Starting by p ush ing or towing . . . . . . . . . . 239
Start ing with jumper cab les . . . . . . . . . . . 239
Use of jumper cables . . . . . . . . . . . . . . . . . 240
Tow ing with a tow truck . . . . . . . . . . . . . . 241
Raising the vehicle . . . . . . . . . . . . . . . . . . . 243
Accessories and Technical Data . 245
Technical data . . . . . . . . . . . . . . . . . . . . 245
Vehicle spec if icat io ns . . . . . . . . . . . . . . . . 245
Notes about technical data . . . . . . . . . . . . 245
D imens ions . . . . . . . . . . . . . . . . . . . . . . . . . 245
Capaci ties . . . . . . . . . . . . . . . . . . . . . . . . . . 245
Weig hts . . . . . . . . . . . . . . . . . . . . . . . . . . . 246
Consumer Information . . . . . . . . . . 247
Warranty cove rages . . . . . . . . . . . . . . . . . . 24 7
Operating your vehicle outside the U.S.A.
or Canada . . . . . . . . . . . . . . . . . . . . . . . . . . 247
3
Page 11 of 266
Instruments and indicator ligh ts
Instruments and ind icator lights
Instruments
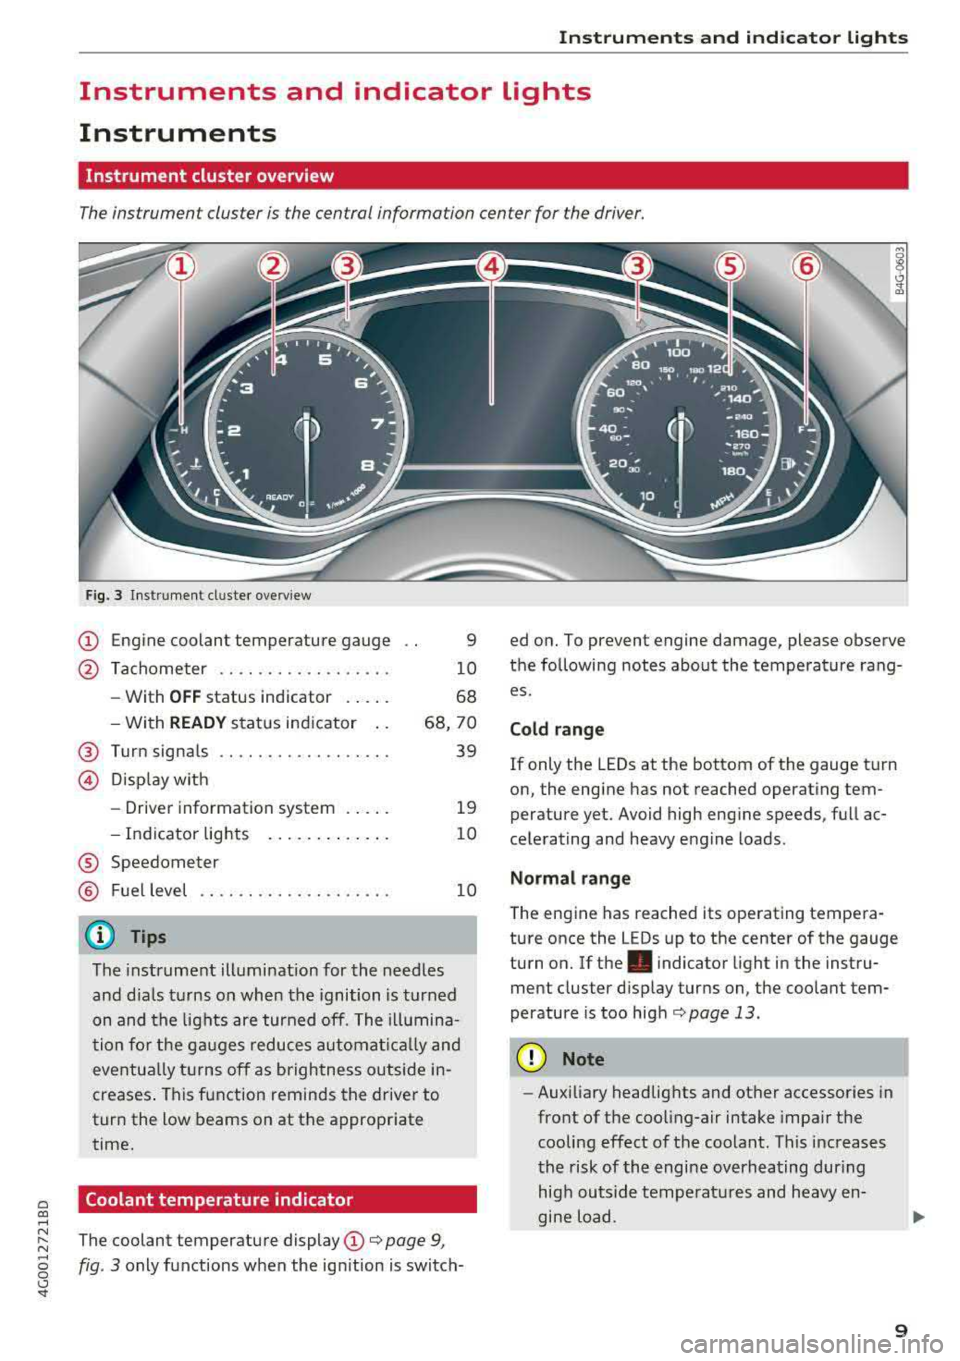
Instrument cluster overview
The instrument cluster is the central information center for the driver.
a co ,...,
F ig. 3 Instrument cl uster overv iew
(D Engine coolant temperature gauge
@ Tachometer .. ............. .. .
- With
OFF status indicator ... . .
- With
READY status ind icator ..
@ Turn signals ............. .... .
@ Disp lay w ith
- Driver information system ... . .
- Indicator lig hts ....... ... .. .
® Speedometer
® Fuel level
@ Tips
9
10
68
68, 70
39
19
10
10
The instrument illumination for the needles
and d ials t urns on when the ignition is turned
on and the lights are turned off. The illumina
tion fo r the ga uges reduces automat ical ly and
eventu ally turns off as brightness outside in
creases . This function reminds the drive r to
turn the low beams on at the appropriate
time.
Coolant temperature indicator
~ The coolant temperature display (D ¢ page 9,
§ fig . 3 only functions when the ignition is switch
<.,:, '
the following notes about the temperature rang
es.
Cold ran ge
If only the LEDs at the bottom of the gauge turn
on, the engine has not reached operating tem
perature yet. Avoid high eng ine speeds, full ac
celerating and heavy eng ine loads.
Normal range
The engine has reached its operating tempera
ture once the LEDs up to the center of the gauge
turn on.
If the . indicator light in the instru
ment cluster d isplay turns on, the coolant tem
perature is too
high ¢ page 13.
@ Note
-Aux iliary headlights and other accessories in
front of the coo ling-air intake impa ir the
cooling effect of the coolant . This increases
the risk of the engine overheating dur ing
high ou tside temperatures and heavy en
gine load.
9
Page 12 of 266
Instrum ent s and ind icat or light s
-The front spoiler also he lps to distribute
cooling air while driving . If the spoiler is
damaged, the cooling effect w ill be im
paired and the r isk of the engine overheat
i ng will increase. See an author ized Audi
dealer or authorized Audi Service Fac ility for
ass istance.
Tachometer
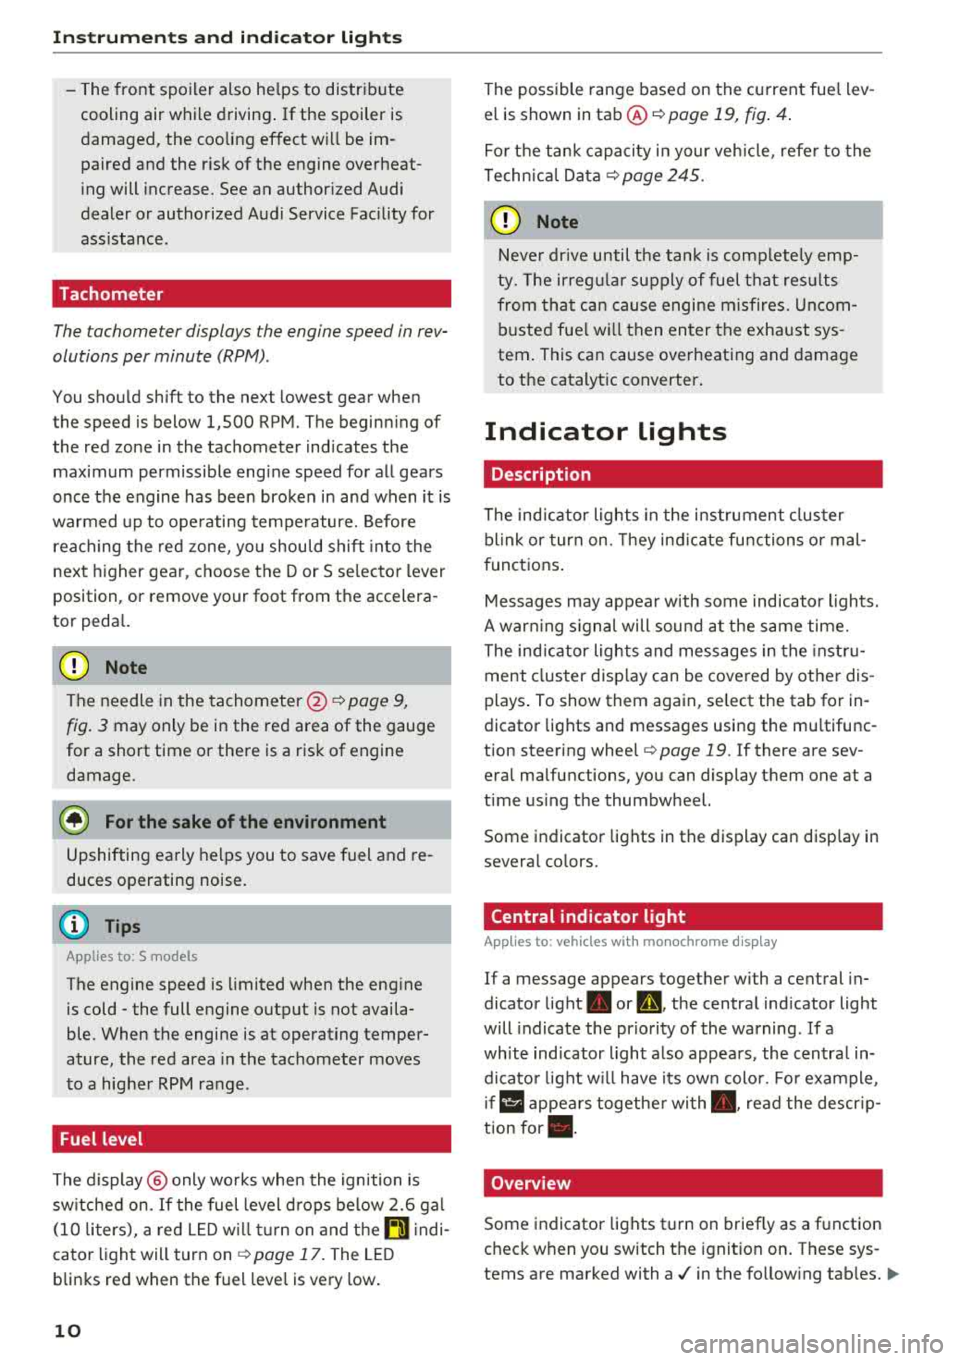
The tachometer displays the engine speed in rev
olutions per minute (RPM) .
You should shift to the next lowest gear when
the speed is below 1,S00 RPM. The beginn ing of
the red zone in the tachometer indicates the maximum permissible engine speed for all gears
once the engine has been broken in and when it is
warmed up to operating temperature. Before
reaching the red zone, yo u should shift into the
next higher gear, choose the Dor S se lector lever
position, or remove your foot from the accelera
tor peda l.
@ Note
The needle in the tachometer @ ¢ page 9,
fig. 3
may only be in the red area of the gauge
for a short time or there is a risk of engine
damage.
@ For the sake of the environment
Upshifting early he lps you to save fuel and re
duces operating noise.
(D Tips
Applies to: S models
The engine speed is limited when the eng ine
is cold - the full engine output is not availa
ble. When the engine is at operating temper
ature, the red area in the tachometer moves
to a hig her RPM range .
Fuel level
The display @ only wo rks when the ignition is
sw itched on. If the fuel level d rops below 2 .6 gal
(10 li ters), a red L ED w ill tur n on and t he
rD indi
cator light will turn
on ¢ page 17. The LED
blinks red when the fuel leve l is very low .
10 The possible range based on the cu
rrent fue l lev
e l is shown in
tab @ ¢page 19 , fig . 4 .
Fo r th e tank capacity i n your veh icle, refe r to the
Techn ica l
Data ¢ poge 245.
@ Note
Never drive until t he tank is comp lete ly emp
ty. The ir reg ular supply of fuel t hat res ults
from tha t ca n cause engine m is fires. Uncom
b usted fue l w ill then enter the exhaust sys
tem . This can cause overheating and damage
to t he catalyt ic converter .
Indicator lights
Description
The indicator lights in the instrument cluster
blink or tur n on. They ind icate functions or mal
functions .
Messages may appear w ith some indicator lights.
A war ning s ignal will sound at the same time.
The ind icator lights and messages in the instr u
ment cluster disp lay can be covered by ot her dis
plays . To show them again, se lect the tab for in
dicator lights and messages using the mu ltifunc
tion steering wheel
¢ page 19 . lfthere are sev
eral malfunctions, you can display them one at a
time us ing the thumbwheel.
Some indicator lights in the display can disp lay in
several colors.
Central indicator light
App lies to : vehicles wit h mo nochrome display
If a message appears together with a central in
dicator light . or
0. the central ind icator light
will indicate the priority of the warning. If a
wh ite ind icator light a lso appears, the centra l in
dicator light w ill have its ow n colo r. Fo r example,
i1' ii ::ippea rs togethe r wi th • • read the descr ip
tion
for • .
Overview
Some indicator lights turn on briefly as a function
check when you switch the ignition on. These sys
tems are marked with
a./ in the fo llow ing tab les. 1111-
Page 16 of 266
Instruments and indicator lights
• Coolant temperature too high! Please let en
gine run with vehicle stationary
Let the engine run at idle for a few minutes to
cool off, until the indicator light turns off.
- If the indicator light does not turn off, do not
continue driving the vehicle. See an authorized
Audi dealer or authorized Audi Service Facility
for assistance.
A WARNING
- Never open the hood if you can see or hear
steam or coolant escaping from the engine
compartment. This increases the risk of
burns. Wait until you no longer see or hear
steam or coolant escaping.
- The engine compartment in any vehicle can be a dangerous area. Stop the engine and
allow it to cool before working in the engine
compartment. Always follow the informa
tion found
in¢ page 189, Working in the
engine compartment.
@ Note
Do not continue driving if the. indicator
light turns on as this increases the risk of en
gine damage.
~ Front safety belt
The. indicator light stays on until the driver's
and front passenger's safety belts are fastened.
Above a certain speed, there will also be a warn
ing tone.
(D Tips
For additional information on safety belts,
see
¢page 134.
0 Alternator/vehicle battery
• Electrical system: malfunction! Battery is
not being charged
There is a malfunction in the alternator or the ve
hicle electrical system.
Drive to an authorized Audi dealer or authorized
Audi Service Facility immediately. Because the ve-
14
hicle battery is discharging, turn off all unneces
sary electrical equipment such as the radio. See
an authorized Audi dealer or authorized Audi
Service Facility if the battery charge level is too
low.
(•) low battery: Battery will be charged while
driving
The starting ability may be impaired.
If this message turns off after a little while, the
vehicle battery charged enough while driving.
If the message does not turn off, have an author
ized Audi dealer or authorized Audi Service Facili
ty repair the malfunction .
~ Engine stop while driving
• Engine stopped: No power steering and
brake support.
There is a malfunction in the engine or in the fuel
supply system.
More force is needed to steer and brake the mov
ing vehicle when the engine is stopped . If the
ve·
hicle is rolling, try to bring it to a stop off to the
side from moving traffic. See an authorized Audi
dealer or authorized Audi Service Facility for as
sistance.
A WARNING
If the engine stops while driving, you will
need to use more force to brake the vehicle.
This increases the risk of an accident. There
will still be power steering if the ignition is
switched on while the vehicle is rolling and
there is sufficient battery charge . Otherwise,
you must use greater force when steering.
~ Engine oil pressure
• Turn off engine and check oil level
Stop the engine and do not continue driving.
Check the engine oil
level¢ page 193.
-
- If the engine oil level is too low, add engine oil
¢ page 194 . Only continue driving once the in-
dicator light turns off.
1111-
Page 19 of 266

a co .... N
" N .... 0 0 \.J '
thorized Audi Service Facility to have the engine
checked.
! ?) Engine speed limitation
Applies to: ve hicles with eng ine speed lim itat ion
Ill Maximum engine speed: XXXX rpm
The engine speed is automatically limited to the
speed displayed in the instrument cluster. This
protects the engine from overheating.
The engine speed limitation deactivates once the
engine is no longer in the critical temperature range and you have released the accelerator ped
a l once.
If the engine speed limitation was activated by
an engine contro l ma lfunction, the
ll:a indicator
light also turns on. Make sure that the speed
does not go above the speed displayed. Drive to
an author ized Audi dealer or authorized Audi
Service Facility immediately to have the malfunc
tion corrected .
Q) Tips
Applies to: S models
The engine speed is limited when the engine
is cold
-the full engine output is not availa
ble. When the engine is at operating temper
ature, the red area in the tach ometer moves
to a highe r RPM range.
~;... Engine oil sensor
• Oil level! Sensor defective
The senso r to check the engine oil level has
fa iled. Drive to an authorized Aud i dealer or a u
thorized Audi Service Facility immediately to have
the ma lfunction corrected .
f Engine warm-up request
0 Please warm up engine
Fuel has en tered the engine oi l, either from low
outside temperatures or frequent short drives. Drive unti l the engine is warm so that the fue l in
the eng ine oil will evaporate. Avoid high engine
Instruments and indicator lights
speeds, full accelerating and heavy engine loads
when doing this.
Bil Tank system
II] Please refuel
If the indicator light turns on for the first time
and the message appears, there are about 2.6
gallons ( 10 liters) of fuel left in the tank.
II] Fuel tank system malfunction! Contact deal
er
T here is a ma lfunct ion in the fuel tank system.
Drive to an authorized Audi dealer or authorized
Audi Service Facility immed iately to have the
malfu nction corrected .
(D Tips
For additional informat io n on refueling, see
c::>page 186 .
.. Washer fluid level
m Please refill washer fluid
Fill the washer fluid for the windsh ie ld washer
system and the headlight washer system* when
the ignit ion is switched off
c::> page 199 .
• Windshield wipers
m Windshield wiper defective
There is a malfunction w ith the windshield wip
ers .
Drive to an authorized Audi dealer or authorized
Audi Service Facility immed iate ly to have the
malfunction corrected.
i§! l0$ Defective light bulb warning
If the 1:1 ind icator light turns o n, a light has
failed . The message indicates the location of the
lig ht. If the
IJ indicato r light also turns on, then
a rear fog light has failed. The position of the in
dicator light corresponds with the location on the
vehicle.
..,.
17
Page 22 of 266
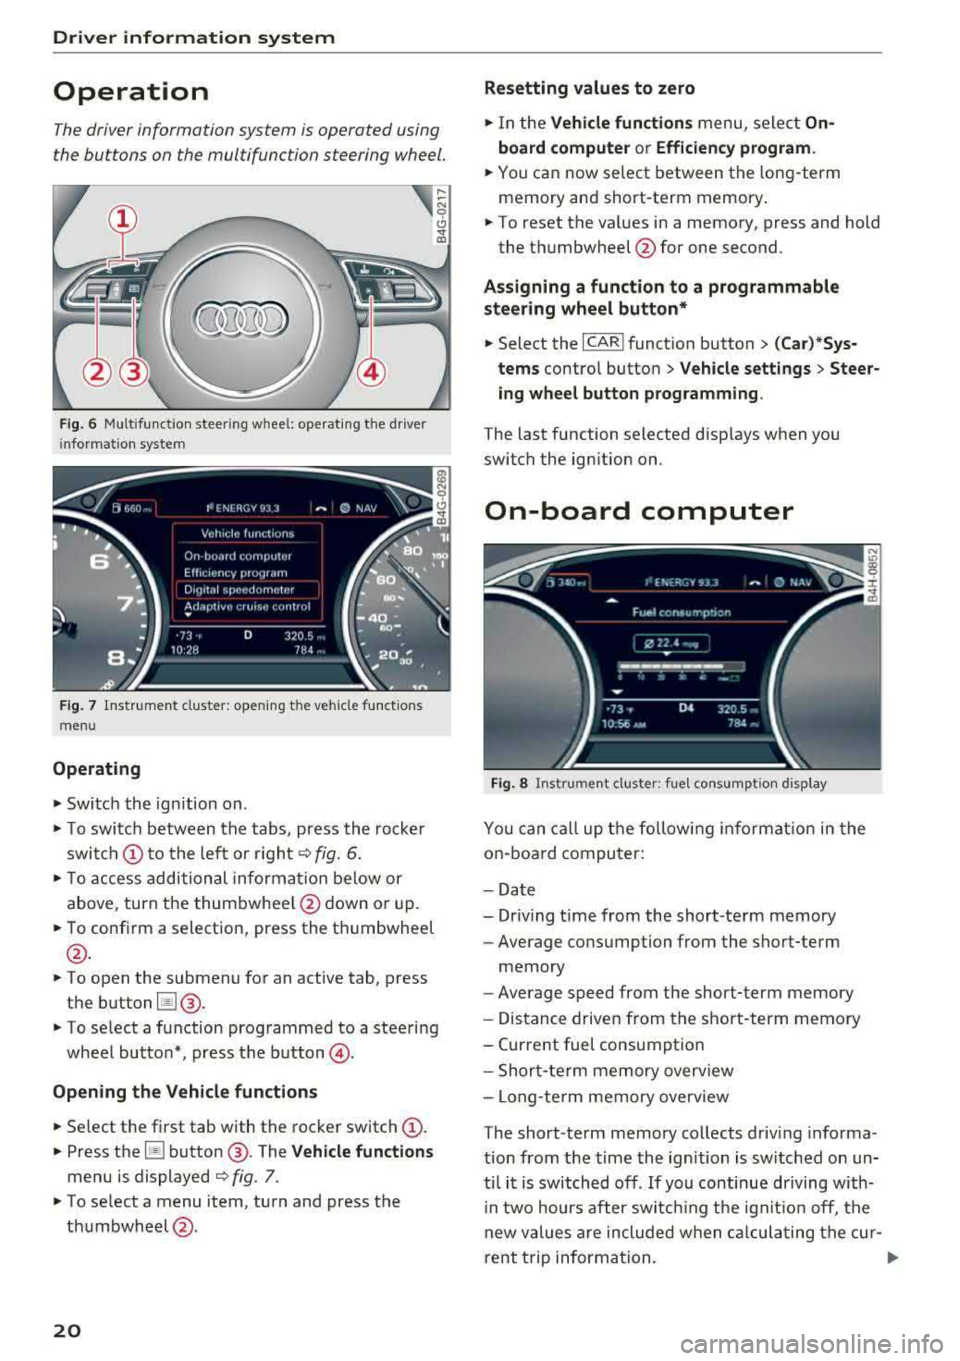
Driver information system
Operation
The driver information system is operated using
the buttons on the multifunction steering wheel.
Fig. 6 Mult ifunction steering wheel: operating the driver
i nfor mation system
Fig. 7 Ins trumen t cluster: open ing the vehicle functions
menu
Operating
• Switch the ignition on.
• To switch between the tabs, press the rocker
switch
@ to the left or r ight Q fig. 6.
• T o access additional information below or
above, turn the thumbwheel@down or up.
• To confirm a selection, press the thumbwheel
@.
• To open the submenu for an active tab, press
the button
l:il @.
• To se lect a function programmed to a steering
wheel butto n*, press the
button @.
Opening the Vehicle functions
• Select the f irst tab with the rocker switch @.
• Press the [ii button @. The Vehicle functions
menu is displayed Q fig. 7.
• To select a menu item, turn and press the
th umbwheel @.
20
Resetting values to zero
• In the Vehicle functions menu, select On
board computer or Efficiency program.
• You can now select between the long-term
memory and short-term memory .
• To reset the va lues in a memory, press and hold
the thumbwheel @for one second.
Assigning a function to a programmable
steering wheel button*
.,. Select the I CAR! function button > (Car)*Sys
tems
contro l button > Vehicle settings > Steer
ing wheel button programming .
The last function selected disp lays when you
switch the ignition on.
On-board computer
Fig. 8 Instrument cluster: fuel consu mption display
You can call up the following informat ion in the
on -bo ard computer:
- Date
- Driv ing t ime from the short-term memory
- Average consumption from the short-term
memory
- Average speed from the short-term memory
- Distance driven from the short-term memory
- Current fuel consumption
- Short-term memory overv iew
- Long-te rm memory overview
The short-term memory collects driving informa
tion from the time the ignition is switched on un
til it is switched off . If you continue driving with
i n two hours after switching the ignition off, the
new values are included w hen calculating the cur-
rent trip information.
Ill>
Page 23 of 266
a co ,...,
N
" N ,...,
0 0 \,;J '
memory is not erased automatica lly. You can se
lect the time period for evaluat ing trip informa
tion yourself .
F or some vehicle functions, you can access the
driving information from the short -term memory
in the line
(D c::> page 19, fig. 5.
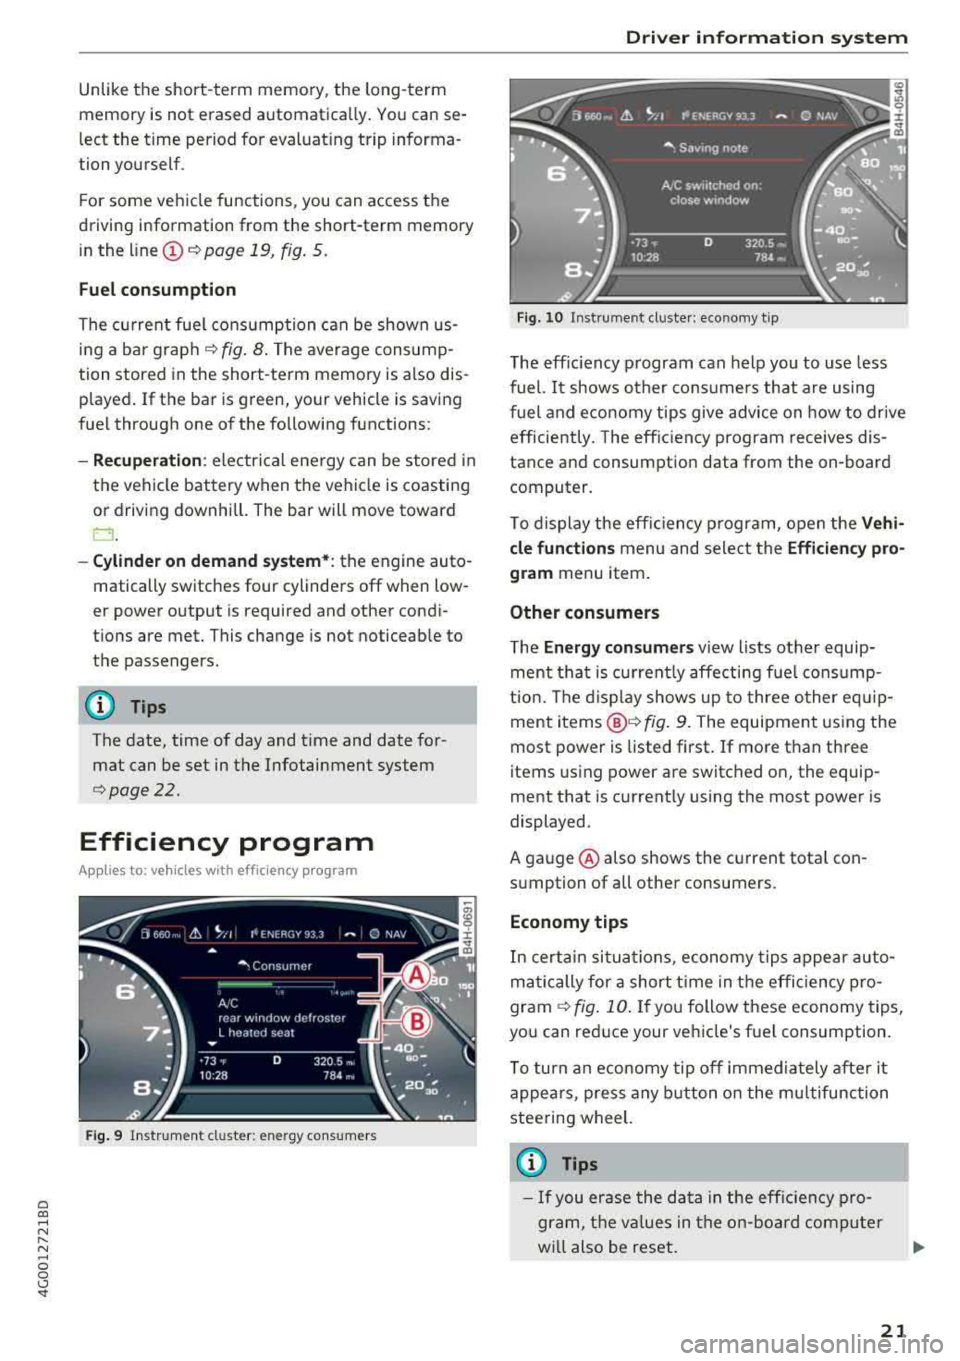
Fuel consumption
The cu rrent fue l consumption can be shown us
i ng a ba r graph
¢ fig . 8. The average consump
tion stored in the short-term memory is also dis p layed.
If the bar is green, your vehicle is saving
fuel through one of the following functions:
- Recuperation : electrical energy can be stored in
the vehicle battery when the vehicle is coasting or driving downhill. The bar will move toward
0 .
-Cylinder on demand system*: the engine auto
matically switches four cylinders
off when low
er power output is required and other condi
tions are met. This change is not noticeable to
the passengers.
{!) Tips
The date, time of day and time and date for
mat can be set in the Infotainment system
c::> page 22.
Efficiency program
Ap plies to: ve hicles with effic ie ncy p rogram
F ig . 9 Instrument d uster : energy consumers
Driver information system
Fig. 10 Instrument duster: economy tip
The effic iency program can help you to use less
fuel. It shows other consumers that are using
fuel and economy tips give advice on how to drive
efficiently. The efficiency program receives dis
tance and consumption data from the on-board
computer.
To display the efficiency program, open the
Vehi
cle functions
menu and select the Efficiency pro
gram
menu item.
Other consumers
T he Energy consumers view lists other equip
ment that is currently affecting fue l consump
tion. The display shows up to three other equ ip
ment
items @¢ fig. 9. The equipment using the
most power is listed first. If more than three
items using power are switched on, the equip
ment that is current ly using the most power is
displayed.
A gauge @also shows the current tota l con
sumption of all other consumers.
Economy tips
In certain situations, economy tips appear auto
matically for a short t ime in the efficiency pro
gram
c::> fig. 10 . If you follow these economy tips,
you can reduce your vehicle's fuel consumption.
To turn an economy tip off immediately after it
appea rs, p ress any button on the multifunction
steering wheel.
(I) Tips
- If you erase the data in the effic iency pro
gram, the va lues in the on-board computer
wi ll also be reset.
21
Page 56 of 266
Seats and stor age
with proper deployment of the side curtain
airbags in an accident.
-Do not hang heavy objects on the coat
hooks, as they could cause personal injury in
a sudden stop .
CD Note
Objects on the rear shelf that rub against the
rear window can damage the rear window
heating wires.
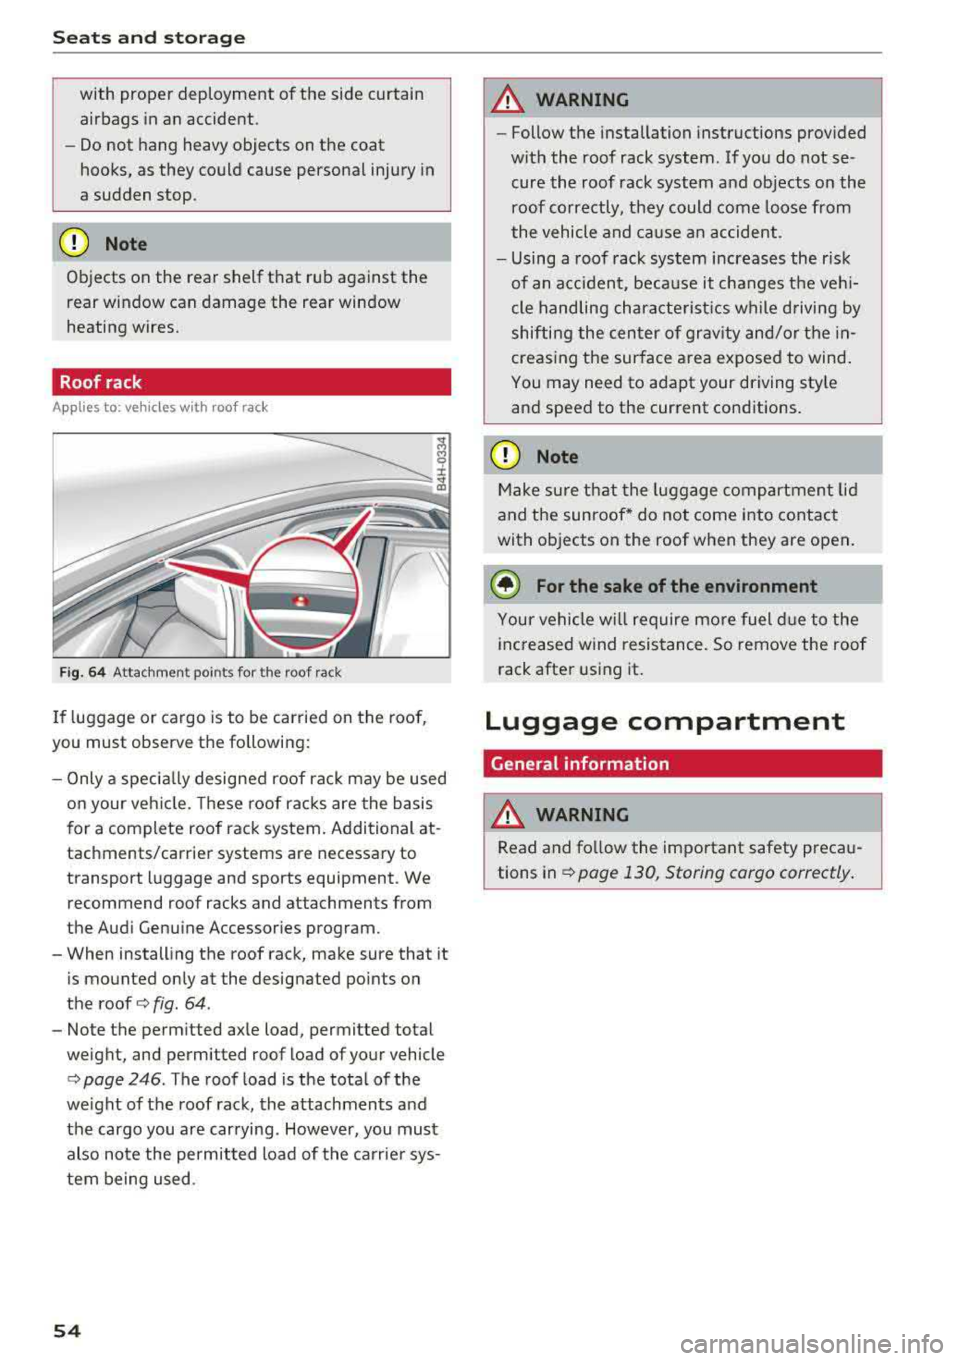
Roof rack
A pp lies to: ve hicles w ith roo f rac k
-
r~
Fig . 64 Attachment poi nts for the roof rack
If luggage or cargo is to be carried on the roof,
you must observe the following:
-Only a specia lly designed roof ra ck may be used
o n your veh icle. These roof racks are the basis
for a complete roof rack system. Additional at
tachments/carrier systems are necessary to
transport luggage and sports equipment. We
recommend roof racks and attachments from
the Audi Genu ine Accessor ies program.
-When installing the roof rack, make sure that it
is mounted only at the designated points on
the roof
i:> fig. 64 .
-Note the perm itted axle load, permitted total
weight, and permitted roof load of your vehicle
<=> page 246. The roof load is the tota l of the
weight of t he roof rack, the attachments and
the cargo you are carrying. However, you must
also note the permitted load of the carrier sys
tem being used .
54
A WARNING
,-
-Follow the installation instructions provided
w it h the roof rack system. If you do not se
cure the roof rack system and objects on the
roof correctly, they could come loose from
the vehicle and ca use an accident .
-Using a roof rack system increases the r isk
of an accident, because it changes the ve hi
cle handling characte rist ics wh ile driving by
shifting the center of grav ity and/or the in
creasing the sur face area exposed to wind .
You may need to adapt your driving sty le
and speed to the current conditions.
CD Note
Make sure that the luggage compartment lid
and the sunroof* do not come into contact
with objects on the roof when they are open .
@ For the sake of the environment
Your vehi cle will require mo re fuel d ue to the
increased wind resistance. So remove the roof
rack after using it.
Luggage compartment
General information
A WARNING
Read and fo llow the important safety precau
tions
in¢ page 130, Storing cargo correctly .
-
Page 67 of 266
a co .... N
" N
-Keep in mind that oncoming vehicles may
create waves that raise the water level and
make it too deep for your vehicle to drive
through safely.
-Avoid driving through salt water, because
this can cause corrosion.
Economical and environmentally-friendly
driving
The amount of fuel consumption, the environ
mental impact and the wear to the engine,
brakes and tires depends mostly on your driving
style. With an anticipatory and economic driving
style, fuel consumption can be reduced by ap
proximately 10-15%. The following tips will help
you conserve the environment and your money at the same time.
Anticipatory driving
A vehicle uses the most fuel when accelerating.
When you drive with anticipation, you do not
need to brake as often and so you accelerate less.
When possible, let your vehicle coast with a
gear
engaged, for example, when you notice that the
next traffic light is red. This produces an engine
braking effect, which helps to protect the brakes
and tires and reduces the emissions and fuel con
sumption to zero (fuel shut-off during decelera
tion) .
Shift efficiently
Upshifting earlier is an effective way to save fuel.
Staying in a gear too long uses fuel unnecessari
ly .
Press down on the accelerator pedal slowly and
avoid "kick-down".
Avoid full acceleration
You should rarely travel at the maximum vehicle
speed. High speeds cause a disproportionately
high increase in fuel consumption, emissions and
traffic noise. Slower driving saves fuel.
Reduce idling time
The Start/Stop system* helps to reduce the idling
time automatically. In vehicles without the Start/
8 Stop system*, it is efficient to switch the engine 0 \.J '
off when stopped at railroad crossings and long
red lights. Stopping the engine for 30-40 sec
onds already saves more fuel than the amount of
extra fuel needed to restart the engine.
It takes a very long time in idle to warm the en
gine up to operating temperature. Wear and
emissions are especially high in the warm-up
phase. Therefore, you should begin driving im
mediately after starting the engine. Avoid high
RPMs while doing this .
Have maintenance performed regularly
By having maintenance performed regularly on
your vehicle, you can help to reduce fuel con
sumption before you even start to drive. The maintenance condition of your vehicle not only
affects traffic safety and long-term value but al
so impacts
fuel consumption . A poorly main
tained engine can lead to fuel consumption that
is 10% higher than normal.
Avoid short trips
The engine and emissions control system must
reach their optimal operating temperature to ef
fectively reduce consumption and emissions .
A cold engine uses a disproportionately high amount of fuel. The engine reaches operating
temperature and consumption normalizes only
after approximately
2 .5 miles (4 km) .
Check the tire pressure
To save fuel, make sure the tires are always in
flated to the correct pressure
Q page 211. The
fuel consumption can increase by S% if the pres
sure is only 0.5 bar too low . Due to the increased
rolling resistance, low tire pressures will also
lead to greater tire
wear and will affect driving
behavior.
Do not drive on
winter tires year -round, as this
will consume up to 10% more fuel.
Eliminate unnecessary weight
Since every pound of extra weight increases fuel
consumption, a quick inspection of the luggage
compartment may be worth it to avoid unneces -
sary weight.
.,.
65
Page 68 of 266
Driving
When not being used, a roof rack should be removed to decrease the wind resistance of the ve
hicle. You will save approximately 12% of your
fuel when at speeds from 62- 7 5 mph
(100-120 km/h) .
Save energy
The engine drives the generator, which generates
electricity ; the fuel consumption also increases
with the demand for electricity. Therefore, switch electrical equipment off when you no longer
need it. Examples of equipment that uses a lot of
energy are air blowers at a high setting, the rear
window defogger and seat heating* .
@ Note
Do not leave engine idling unattended after
starting. If warning lights should come on to
ind icate improper operation, they would go
unheeded. Extended idling also produces
heat, which could result in overheating or
other damage to the vehicle or other proper-
ty.
@ Note
- Have your vehicle maintained properly and
in accordance with the service recommenda
tions in your Warranty
& Maintenance book
let. Lack of proper maintenance as well as
improper use of the vehicle will impair the
function of the emission control system and
could lead to damage.
- Do not alter or remove any component of
the Emission Control System unless ap proved by the manufacturer .
- Do not alter or remove any device , such as
heat shields, switches, ignition wires,
valves, which are designed to protect your
vehicle's Emission Control System and other important vehicle components .
@ Tips
The consumption estimates as published by
ENVIRONMENTAL PROTECTION AGENCY (EPA) and Transport Canada may not corre
spond to your actual consumption on the
road, which will vary depending upon vehicle
66
load and speed, road and weather conditions ,
trip length, etc.
Steering
Manual steering wheel position adjustment
Applies to: vehicles with manual steering wheel adjustment
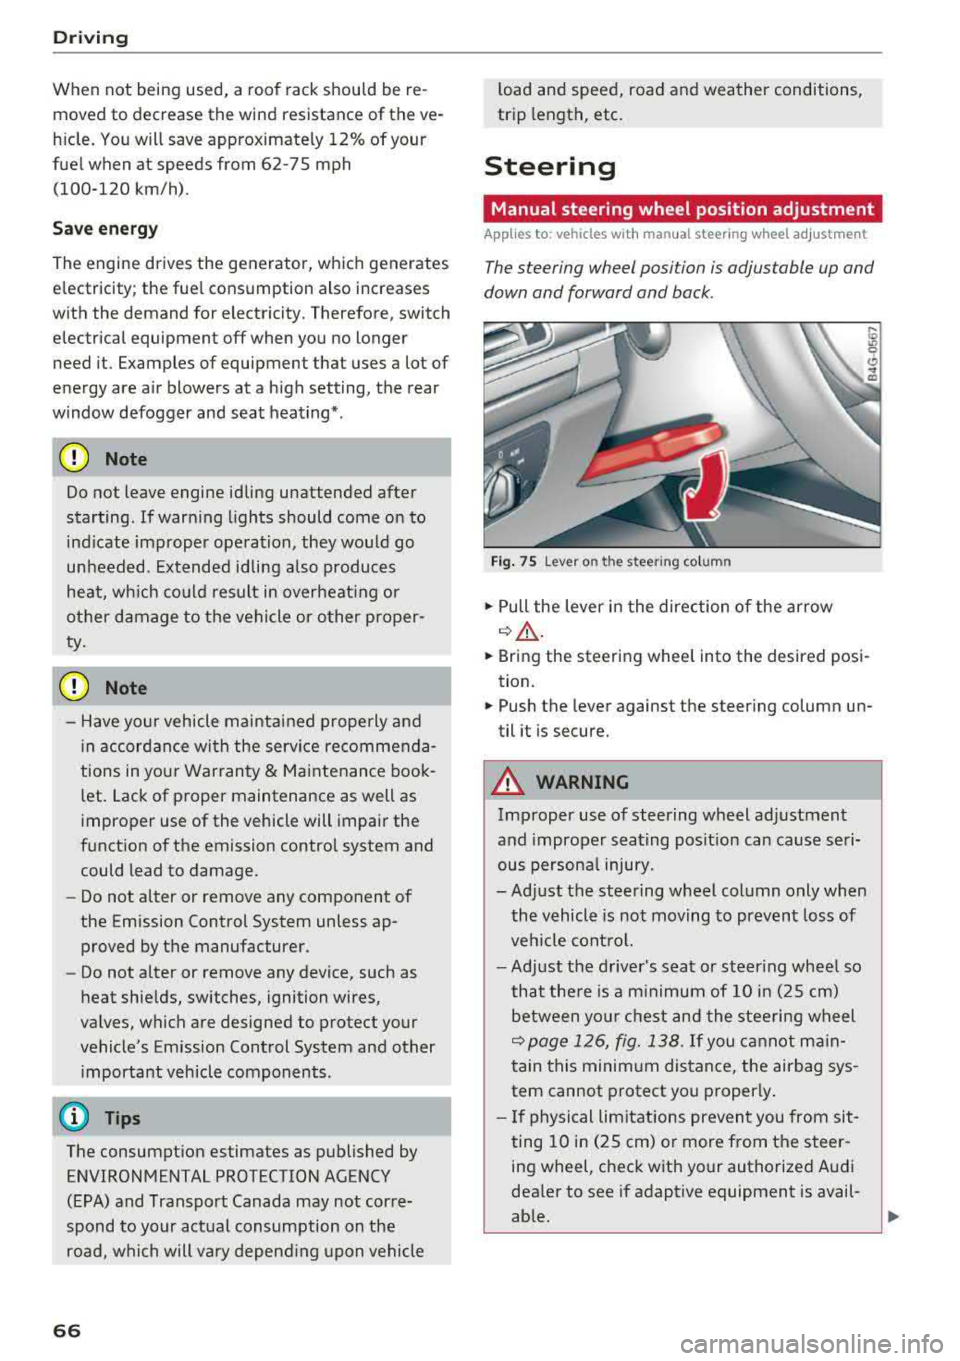
The steering wheel posi tion is adjustable up and
down and forward and back .
Fig. 75 Lever on th e stee ring column
.,. Pull the lever in the direction of the arrow
~A -
... Bring the steering wheel into the desired posi
tion .
.,. Push the lever against the steering column un
til it is secure.
A WARNING
Improper use of steering wheel adjustment
and improper seating position can cause seri
ous personal injury.
-Adjust the steering wheel column only when
the vehicle is not moving to prevent loss of
vehicle control.
-Adjust the driver's seat or steering wheel so
that there is a minimum of 10 in (25 cm)
between your chest and the steering wheel
~page 126, fig. 138. If you cannot main
tain this minimum distance, the airbag sys
tem cannot protect you properly .
- If physical limitations prevent you from sit
ting 10 in (25 cm) or more from the steer
ing wheel, check with your authorized Audi
dealer to see if adaptive equipment is avail-
able.
.,.