display AUDI A6 2020 Service Manual
[x] Cancel search | Manufacturer: AUDI, Model Year: 2020, Model line: A6, Model: AUDI A6 2020Pages: 316, PDF Size: 86.41 MB
Page 98 of 316
Driving
—To skip a gear (for example, move from “D” to
“R”), move the selector lever past the pressure
point in the desired direction.
— The label next to the selector lever for the se-
lected gear will light up.
“N” (Neutral) gear
In the “N” gear, power is not transmitted to the
driving wheels. Use the “N” gear in a car wash
(with conveyor belts), for example.
If you unintentionally select “N” while driving
(faster than 1 mph (2 km/h)), you can also shift
back to “D” without pressing the brake pedal.
For safety reasons, the vehicle cannot be locked
when the transmission is in the "N” gear.
“Pp” (Park) gear
Requirement: the ignition must be switched on.
The vehicle is secured from rolling away by the
parking lock when in the “P” gear.
— Bring the vehicle to a full stop and press the
brake pedal.
— Press the “P” button (2) on the selector lever.
—The “P” next to the selector lever will light up.
“P” engages automatically if you switch the en-
gine off while the “D” or “R” gear is selected. If
you switch the engine off in “N”, “P” will engage
automatically after approximately 30 minutes.
Applies to: vehicles with S tronic transmission: If
you want to shift from “P” to “D” or “R”, the en-
gine must be running.
Applies
to: vehicles with tiptronic transmission:
If you want to switch to another gear from “P”,
the engine must be running.
If you cannot shift out of “P”, for example be-
cause the vehicle has no power, you may need to
use the emergency release for the parking lock
=> page 98.
Selecting the driving program
Various driving programs can be selected when in
the “D” gear. The programs influence when the
transmission shifts and how the accelerator ped-
al responds.
96
The selected driving program is displayed in the
instrument cluster.
—D (Drive): normal driving mode
—S (Sport): sporty driving mode
If you select the Dynamic mode in Audi drive se-
lect*, the “S” driving program will be activated.
When the ignition is switched off, the driving pro-
gram may be reset to “D”.
To switch between the current driving program
and “S”, push the selector lever toward the rear.
ZA\ WARNING
— Before starting to drive, check if the desired
gear is displayed next to the selector lever.
— Always secure your vehicle from rolling
away. Press the brake pedal or shift to “P”.
When leaving the vehicle, also set the park-
ing brake.
— Power is still transmitted to the wheels
when the engine is running at idle. To pre-
vent the vehicle from “creeping”, you must
keep your foot on the brake in all selector
lever positions (except "P" and "N") when
the engine is running.
—To reduce the risk of an accident, do not
press the accelerator pedal when changing
gears if the vehicle is stationary and the en-
gine is running.
— Never select the “R" or "P” gears while driv-
ing. Doing so could cause an accident.
— The vehicle can roll even if the ignition is
switched off.
G@) Tips
If you shift between “D” and “R” within one
second, you do not need to press the brake
pedal. This makes it possible to “rock” if it is
stuck, for example.
Page 99 of 316

4K0012721BD
Driving
Manual shi
RAZ-0411
Fig. 87 Center console: shifting manually with the selector
lever
RAZ-0003
——
Fig. 88 Steering wheel: shift paddles*
You can shift the gears manually when in “D”
mode. The transmission must be in tiptronic
mode.
Shifting with the selector lever
You can shift into manual shifting mode while the
vehicle is stationary or while driving.
> To switch to manual shifting mode, tilt the se-
lector lever toward the front passenger's side
> fig. 87. “M” will be displayed in the instru-
ment cluster.
> Upshifting: push the selector lever forward @).
> Downshifting: push the selector lever toward
the rear ©).
> To switch back to automatic mode, tilt the se-
lector lever toward the driver's side.
Shifting with the shift paddles
Applies to: vehicles with shift paddles
> Upshifting: press the @) shift paddle > fig. 88.
> Downshifting: press the ©) shift paddle.
> Applies to: vehicles with tiptronic transmission:
To engage the lowest possible gear for maxi-
mum acceleration, press and hold the © shift
paddle.
> To switch back to automatic mode, press and
hold the (4) shift paddle or push the selector
lever toward the rear.
If you stop using the shift paddles temporarily,
the transmission will switch back to automatic
mode. To keep shifting manually, tilt the selector
lever toward the front passenger's side.
G) Tips
—The transmission only allows manual shift-
ing when the engine speed is within the per-
mitted range.
— The transmission automatically shifts up or
down before critical engine speed is
reached.
Accelerator pedal
You can accelerate the vehicle using the accelera-
tor pedal.
Depending on the equipment, you may be able to
adjust the haptic feedback for the accelerator
pedal in the MMI.
— Select on the home screen: VEHICLE > (Charg-
ing & Efficiency) > Efficiency assist > (Interac-
tive accelerator).
Accelerator pedal feedback / predictive
messages
Haptic feedback in the accelerator pedal indi-
cates when you should take your foot off the ac-
celerator pedal to drive more efficiently.
Maximum acceleration
If you press the accelerator pedal all the way
down, the motor’s full power will be used and
you will reach maximum acceleration, also called
“kick-down”.
ZA WARNING
The driving wheels could spin and the vehicle
could swerve on slick or slippery road surfaces
when using kick-down, which increases the
risk of an accident.
97
Page 106 of 316
Driving
Brake booster: deactivated. See owner's manual
The brake booster remains active for a brief peri-
od of time after switching off the ignition. Secure
the vehicle from rolling by setting the parking
brake and select the “P” gear.
Other indicator lights
When you switch the ignition on, the indicator
light EG Zz @ turns on briefly to check the
function. If the indicator light does not turn on,
there is a system malfunction.
If Bile / B® stays on, there is a malfunction in
the brake system.
If is displayed when there is a malfunction,
the brakes were under heavy load. Follow the in-
structions in the message to utilize the engine
braking effect and to relieve the brakes.
ZA\ WARNING
If a malfunction occurs in the ABS, ESC, and
braking distribution, interventions that stabi-
lize the vehicle will no longer be available.
This could cause the vehicle to swerve, which
increases the risk that the vehicle will slide.
Do not continue driving. See an authorized
Audi dealer or authorized Audi Service Facility
for assistance.
Electromechanical
parking brake
Operating the parking brake
The electromechanical parking brake is used to
secure the vehicle from rolling away unintention-
ally.
The ©) switch is located under the selector lever
in the center console. It turns on when the park-
ing brake is set. You can release the parking brake
manually or automatically when you start to
drive.
Setting and releasing the parking brake
> Setting: pull the ©) switch.
> 1¢ a / o appears, the parking brake is hold-
ing the vehicle. You can remove your foot from
the brake pedal.
104
> Releasing: when the ignition is switched on,
press and hold the brake pedal and press the ©)
button.
If the red indicator light flashes, the braking
force has not built up enough or it has decreased.
You can also secure the vehicle by selecting the
“P” gear or pressing the brake pedal. Make sure
the indicator light is off before you start driving.
Automatically releasing the parking brake
when starting to drive
Requirement: the driver's door must be closed
and the driver’s safety belt must be fastened.
> Press the accelerator pedal to start to drive.
ZA\ WARNING
—To reduce the risk of an accident, always
make sure the vehicle is situated safely
while stationary.
— If the parking brake is set, it can release au-
tomatically when the accelerator pedal is
pressed. To reduce the risk of an accident,
do not inadvertently press the accelerator
pedal and always shift into “P” when the ve-
hicle is stopped.
— If the power supply fails, you cannot set the
parking brake once it is released, or release
it if it is set. In this case, park the vehicle on
level ground and secure it by engaging the
"P” gear. Contact an authorized Audi dealer
or authorized Audi Service Facility for assis-
tance.
G) Tips
— On steep inclines, especially when in trailer
mode, the vehicle may roll backwards unin-
tentionally when starting to drive. To re-
duces the risk of this happening, pull and
hold the ©) switch while pressing the accel-
erator pedal. If enough drive power has
built up at the wheels and the vehicle does
not roll backwards, then release the switch
to start to drive.
— If you leave the vehicle when “D” or “R” are
engaged, the parking brake will be set auto-
matically.
Page 108 of 316
Driving
— Utilize the engine braking effect when driving
downhill by selecting the “S” driving program
=> page 96. This especially applies when towing
a trailer. This reduces the load on the brakes.
— Brake in intervals and do not press the brake
pedal continuously.
— Use the hill descent assist if necessary
=> page 107
Inclinometer
Applies to: vehicles with a tilt angle display
You can display the vehicle's sideways angle and
lengthwise angle in relation to the horizon.
— Applies to: MMI: Select on the home screen:
VEHICLE > Vehicle data.
— You may need to scroll down to the Inclinome-
ter display.
The sideways angle of your vehicle should not ex-
ceed the yellow range in the gauge. If it reaches
the red range, there is a risk that the vehicle
might tip.
The steering wheel angle, the elevation, the com-
pass direction, and the geo-coordinates of the
current vehicle position are displayed in addition
to the current vehicle angle. You will also receive
information about the maximum sideways and
lengthwise angle that was reached in the current
driving cycle. These values are reset when the ig-
nition is switched off.
Note that the accuracy of the display depends on
the driving situation.
ZA WARNING
— Only drive on inclines that your vehicle is de-
signed to handle. Do not exceed the hill
climbing ability of your vehicle. Your vehicle
could tip or slide.
— Do not drive at an angle on steep inclines
and hills. If your vehicle is about to tip, you
must immediately start steering in the di-
rection of the downward slope to reduce the
risk of an accident.
— Always be ready to brake when using the hill
descent control function.
106
— Applies to: vehicles with an inclinometer: Do
not rely only on the inclinometer when as-
sessing the driving situation.
Cola Tcer-\ Rs Lal)
Applies to: allroad
Your vehicle is not an offroad vehicle. Note the
following points when driving offroad:
— Drive slowly and carefully.
—To reduce the risk of underbody damage, pay
attention to the vehicle's ground clearance and
drive across raised areas of the ground with the
wheels on one side of the vehicle, instead of al-
lowing the center of the vehicle to pass over the
raised areas.
—To reduce the risk of becoming stuck, drive
through sandy or swampy areas at a steady
speed and without stopping, if possible.
If necessary, use the following functions:
— Audi drive select* Offroad mode > page 108
— Hill descent assist* > page 107
—Inclinometer* > page 106
— Raising the vehicle > page 109
— Limit ESC > page 113
Z\ WARNING
Only drive in terrain that is suitable for the ve-
hicle and your driving ability.
@) For the sake of the environment
Avoid actions that are damaging to the envi-
ronment. Show respect for the natural envi-
ronment and remain on marked routes.
G@) Tips
Clean your vehicle after driving offroad. Dirt
and stones falling off your vehicle can affect
other road users.
Driving through water
If you must drive through water, follow these in-
structions:
— Check the stability of the ground, the current,
and the water depth. If the ground is unstable, >
Page 109 of 316

4K0012721BD
Driving
there is a strong current, or there are waves,
the water must only reach up to the lower edge
of the body at the most.
— Deactivate the Start/Stop system.
— Drive carefully and no faster than at walking
speeds to prevent the front of the vehicle from
creating waves, because they could splash
above the lower edge of the body. Oncoming
vehicles could also create waves.
— Do not stop the vehicle while in the water.
— Drive in reverse.
— Do not turn the engine off.
ZA WARNING
After driving through water, press the brake
pedal carefully to dry the brakes so that the
full braking effect will be restored.
@) Note
Vehicle components such as the engine, drive
system, suspension, or electrical system, can
be severely damaged by driving through wa-
Lele
G) Tips
If possible, avoid driving through salt water
because it increases the risk of corrosion. Use
fresh water to clean any vehicle components
that come into contact with salt water.
Hill descent assist
Applies to: vehicles with hill hold assist
The “& button is located in the function bar on
the lower display. It lights up when the system is
turned on.
Hill descent assist can assist you when driving
down hills by maintaining a constant vehicle
speed by automatically braking all four wheels.
You can adjust the speed using the accelerator
and brake pedals. The regulation depends on the
hill and the vehicle speed.
> Switching on: press “2.
> Switching off: press “2 again.
Active regulation
Regulation begins shortly after you start driving
and is possible at speeds up to approximately 19
mph (30 km/h) and on hills that have an approxi-
mately 6-60% grade. If these conditions are met,
regulation will be activated and the Ba indicator
light will turn on.
Ready mode
If one of the requirements for active regulation is
not met, the system will be in ready mode. The
indicator
light will turn on. Once the require-
ments are met again, the system will be able to
provide active regulation again.
ZA WARNING
— Be ready to apply the brakes at all times
when using the hill hold assist.
— Always adjust the speed to the visibility,
weather, road, and traffic conditions. The
system cannot replace the driver's atten-
tion.
— The system cannot maintain a constant vehi-
cle speed in all situations, for example when
on smooth or slippery ground. This can in-
crease the risk of an accident.
@) Tips
If you select the Audi drive select* offroad
mode, hill descent assist will switch on.
107
Page 111 of 316

4K0012721BD
Driving dynamic
The vehicle ground clearance is adjusted by the
air suspension* based on the setting.
Engine sound
The engine sound adapts and can be subtle to
sporty.
Suspension
Adaptive dampers
Applies to: vehicles with suspension control
The adaptive dampers are an electronically-con-
trolled damping system. The firmness of the sus-
pension will adapt to the driving conditions and
the driving situation. The settings depend on the
selected Audi drive select* mode.
Air suspension
Applies to: vehicles with air suspension
The air suspension is an electronically-controlled
suspension and leveling system. The firmness of
the suspension will adapt to the driving condi-
tions and the driving situation. The system balan-
ces out changes in load. The vehicle level will also
adapt gradually to the vehicle speed in order to
reduce the wind resistance at high speeds and in-
crease the ground clearance at low speeds. The
settings depend on the selected Audi drive se-
lect* mode.
Displaying the vehicle level
> Applies to: MMI: Select on the home screen:
VEHICLE > Audi drive select.
The filled-in boxes represent the current vehicle
level. The more boxes that are filled in, the high-
er the ground clearance. The box that corre-
sponds with the current vehicle level will flash
while the vehicle is lifting or lowering. The target
level is indicated by a red outline.
Raising the vehicle
> Applies to: MMI: Select on the home screen:
VEHICLE > Audi drive select.
> Press Raise to reach the highest vehicle level
and thus the maximum ground clearance.
> Press Lower to lower the vehicle down again.
The Audi drive select* mode will be changed if
necessary when the vehicle is raised.
The vehicle will lower when at speeds of approxi-
mately 22 mph (35 km/h) and lower. This func-
tion may only be used temporarily when in-
creased ground clearance is necessary. It is not
intended for long drives.
C) Note
— Also refer to the information about ground
clearance > page 109.
— When transporting the vehicle on a road
carrier, rail carrier, ship carrier, or other car-
rier, it may only be secured at the running
surfaces of the tires (circumference). Secur-
ing the vehicle at the axle components, sus-
pension struts, or towing eyes is not permit-
ted because the pressure in the air suspen-
sion struts can change during transport. The
vehicle might not be secured sufficiently if
this happens.
Ground clearance
The vehicle height and clearance can be influ-
enced by the following factors:
— Change in temperature
— Change in load
— Change to the Audi drive select* mode
— Lifting and lowering via the air suspension*
ZA\ WARNING
To reduce the risk of injury, make sure no one
gets pinched when the vehicle level is chang-
ing, for example when cleaning the under-
body or the wheel housings.
@) Note
Always make sure there is enough clearance
above and below the vehicle. This is especially
important for entrances with height restric-
tions, for example, before driving into under-
ground garages. You could also scrape the
ground when driving over the edges of curbs
or on steep ramps, which could damage your
vehicle.
109
Page 113 of 316
4K0012721BD
Driving dynamic
the vehicle, and the turning radius may be much
larger. Slow down immediately, and stop your ve-
hicle as soon as possible in a safe location with
enough space at the sides of the vehicle. Do not
continue driving. See an authorized Audi dealer
or authorized Audi Service Facility for assistance.
2 —<| Steering: malfunction! Please stop vehicle
There is a malfunction in the electronic steering
lock. You cannot turn the ignition on. Do not tow
your vehicle because it cannot be steered. See an
authorized Audi dealer or authorized Audi Service
Facility for assistance.
El steering: malfunction! You can continue
driving
There is a malfunction in the steering system.
Steering may be more difficult or more sensitive.
Adapt your driving style. Have the steering sys-
tem checked immediately by an authorized Audi
dealer or authorized Audi Service Facility. Please
note that the red indicator light may turn on af-
ter restarting the engine. Do not continue driving
if it does.
& Steering: malfunction! Adapt driving style.
Larger turning radius
The rear axle steering may have failed. The vehi-
cle will have a larger turning radius, and the sta-
bility when driving around curves will be compa-
rable to a vehicle without rear axle steering. Drive
carefully to an authorized Audi dealer or author-
ized Audi Service Facility to have the malfunction
corrected.
|e —o| Steering lock: malfunction! Please contact
Service
There is a malfunction in the electronic steering
lock. Drive immediately to an authorized Audi
dealer or authorized Audi Service Facility to have
the malfunction repaired.
Dynamic steering: correcting steering wheel
position
The steering is reinitializing. The steering wheel
will move easily after starting the vehicle. Reiniti-
alization might be necessary if the steering wheel
was moved while the engine was switched off.
The display turns off if the initialization was suc-
cessful.
ZA\ WARNING
Do not tow your vehicle if there is a malfunc-
tion in the electronic steering lock because
this increases the risk of an accident.
@) Tips
—If there is a malfunction, the steering wheel
may be crooked when driving straight.
—Ifthe a or a indicator light only stays on
for a short time, you may continue driving.
All wheel drive (quattro)
Applies to: vehicles with all wheel drive
The all-wheel drive system distributes the driving
power variably to the front and rear axle to im-
prove the driving characteristics. It works togeth-
er with selective wheel torque control, which can
activate when driving through curves
=> page 113.
Applies to: vehicles with quattro ultra: If the driv-
ing situation does not require all wheel drive,
then the rear section of the drivetrain will decou-
ple to save fuel. The system constantly deter-
mines and anticipates if all wheel drive is needed.
This allows the rear drivetrain to recouple shortly
before it is needed.
The all-wheel drive system is designed for high
engine power. Your vehicle is exceptionally pow-
erful and has excellent driving characteristics
both under normal driving conditions and on
snow and ice. Always read and follow safety pre-
cautions > A\.
ZA\ WARNING
— Even in vehicles with all wheel drive, you
should adapt your driving style to the cur-
rent road and traffic conditions to reduce
the risk of an accident.
— The braking ability of your vehicle is limited
to the traction of the wheels. In this way, it
is not different from a two wheel drive >
111
Page 119 of 316
4K0012721BD
Trailer towing
there are unfavorable road, weather, and/or wind
conditions. This especially applies when driving
downhill.
Hill
When you start driving uphill or downhill, trailers
may tilt or sway sooner than when driving ona
level surface. If small swaying movements have
already occurred, you can stabilize the trailer by
firmly braking immediately. Never attempt to
“straighten out” the trailer by accelerating.
Downshift before driving on hills to utilize the en-
gine braking effect > A\.
Brakes
When using a trailer with overrun brakes, first
brake gently then quickly. This reduces the risk of
jerking while braking if the trailer wheels lock up.
Engine coolant temperature
Pay attention specifically to the coolant tempera-
ture display when there are high outside temper-
atures, and when driving on long inclines
=> page 14. Shift to a higher gear in a timely man-
ner.
ZX WARNING
Constant braking causes the brakes to over-
heat and can substantially reduce braking per-
formance, increase braking distance, or cause
complete failure of the brake system.
117
Page 120 of 316

Assist systems
Assist systems
General information
Safety precautions
ZA WARNING
— As the driver, you are always completely re-
sponsible for all driving tasks. The assist
systems cannot replace the driver's atten-
tion. Give your full attention to driving the
vehicle, and be ready to intervene in the
traffic situation at all times.
— Activate the assist systems only if the sur-
rounding conditions permit it. Always adapt
your driving style to the current visual,
weather, road, and traffic conditions.
— Loose objects can be thrown around the ve-
hicle interior during sudden driving or brak-
ing maneuvers, which increases the risk of
an accident. Store objects securely while
driving.
— For the assist systems to be able to react
correctly, the function of the sensors and
cameras must not be restricted. Note the in-
formation on sensors and cameras
=>page 119.
@ Tips
— Pay attention to applicable local regulations
relating to driving tasks, leaving space for
emergency vehicles, vehicle distance, speed,
parking location, wheel placement, etc. The
driver is always responsible for following
the laws that are applicable in the location
where the vehicle is being operated.
— You can cancel a steering or braking inter-
vention by the system, by braking or accel-
erating noticeably, steering, or deactivating
the respective assist system.
— Always check the assist systems settings be-
fore driving. The settings could have been
changed, for example, by other drivers or if
another personal profile was used.
118
System limitations
ZA\ WARNING
— The use of an assist system cannot over-
come the natural laws of physics. A collision
cannot be prevented in certain circumstan-
ces.
— Warnings, messages, or indicator lights may
not be displayed or initiated on time or cor-
rectly, for example, if vehicles are approach-
ing very fast.
— Corrective interventions by the assist sys-
tems, such as steering or braking interven-
tions, may not be sufficient or they may not
occur. Always be ready to intervene.
G) Tips
— Due to the system limitations when detect-
ing the surrounding area, the systems may
warn or intervene unexpectedly or too late
in certain situations. The assist systems may
also interpret a driving maneuver incorrectly
and then warn the driver unexpectedly.
— The systems may not function as expected
in unusual driving situations, such as driving
offroad, on unpaved roads, on loose ground,
on inclines, or on grooves in the road.
— The systems may not function correctly in
unclear traffic situations, such as turning
lanes, exit ramps, construction zones, rises
or dips that obstruct visibility, intersections,
toll stations, or city traffic.
— The detection of the surrounding area can
be limited, for example by vehicles driving
ahead or by rain, snow, heavy spray, or light
shining into the camera.
— If accessories have been mounted on the
steering wheel, the ability for the steering
systems to react may be limited.
Page 121 of 316
4K0012721BD
Assist systems
Surrounding area Radar sensors
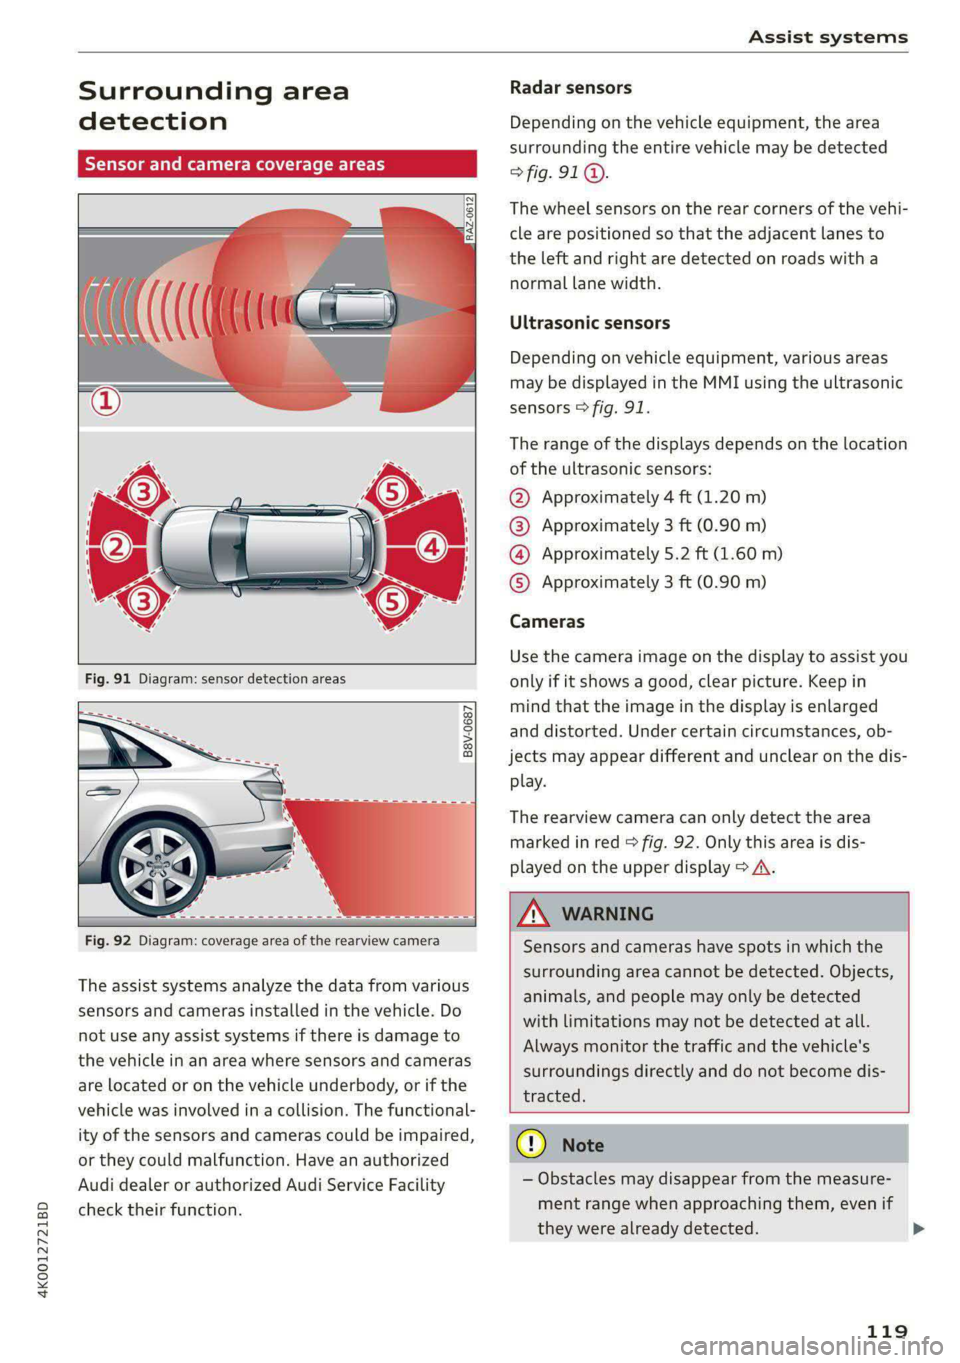
detection Depending on the vehicle equipment, the area
surrounding the entire vehicle may be detected
fig. 91.
The wheel sensors on the rear corners of the vehi-
cle are positioned so that the adjacent lanes to
the left and right are detected on roads with a
normal lane width.
RAZ-0612
Ultrasonic sensors
Depending on vehicle equipment, various areas
may be displayed in the MMI using the ultrasonic
sensors > fig. 91.
The range of the displays depends on the location
of the ultrasonic sensors:
@ Approximately 4 ft (1.20 m)
@® Approximately 3 ft (0.90 m)
@® Approximately 5.2 ft (1.60 m)
© Approximately 3 ft (0.90 m)
Cameras
Use the camera image on the display to assist you
only if it shows a good, clear picture. Keep in
mind that the image in the display is enlarged
and distorted. Under certain circumstances, ob-
jects may appear different and unclear on the dis-
play.
B8V-0687
The rearview camera can only detect the area
marked in red > fig. 92. Only this area is dis-
played on the upper display > A\.
| A WARNING
Fig. 92 Diagram: coverage area of the rearview camera Sensors and cameras have spots in which the
surrounding area cannot be detected. Objects,
animals, and people may only be detected
with limitations may not be detected at all.
Always monitor the traffic and the vehicle's
surroundings directly and do not become dis-
tracted.
The assist systems analyze the data from various
sensors and cameras installed in the vehicle. Do
not use any assist systems if there is damage to
the vehicle in an area where sensors and cameras
are located or on the vehicle underbody, or if the
vehicle was involved in a collision. The functional-
ity of the sensors and cameras could be impaired, @) Note
or they could malfunction. Have an authorized :
Audi dealer or authorized Audi Service Facility ~ Obstacles may disappear from the measure-
check their function. ment range when approaching them, even if
they were already detected. >
119