key battery AUDI A6 2021 Owner´s Manual
[x] Cancel search | Manufacturer: AUDI, Model Year: 2021, Model line: A6, Model: AUDI A6 2021Pages: 332, PDF Size: 119.45 MB
Page 11 of 332
4K0012721BE
Quick access
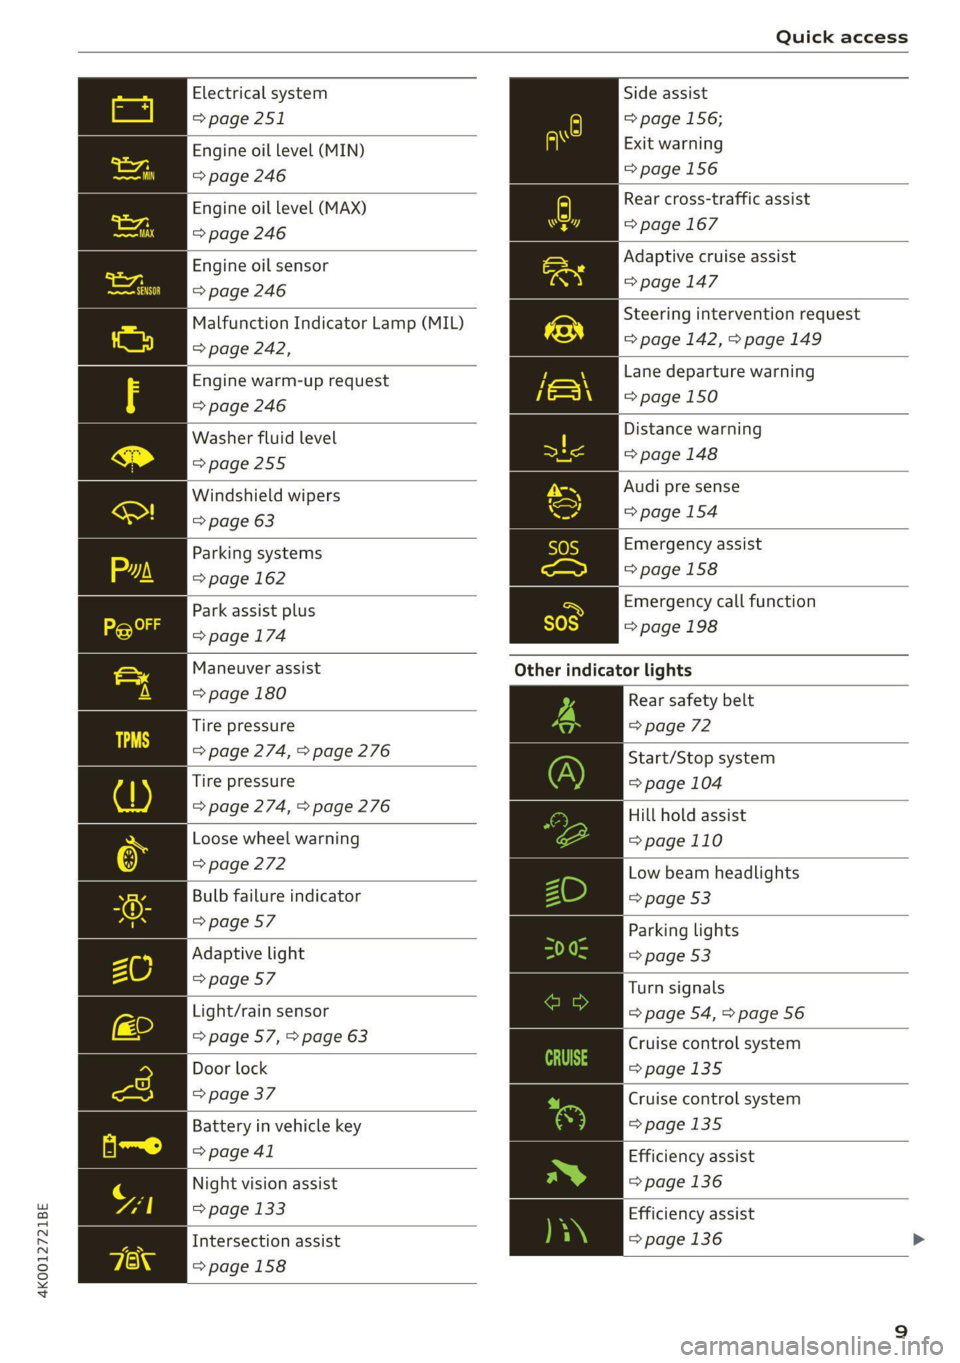
Electrical system
=> page 251
Engine oil level (MIN)
=> page 246
Engine oil level (MAX)
=> page 246
Engine oil sensor
=> page 246
Malfunction Indicator Lamp (MIL)
> page 242,
Engine warm-up request
=> page 246
Washer fluid level
=>page 255
Windshield wipers
=> page 63
Parking systems
=> page 162
Park assist plus
=> page 174
Maneuver assist
=> page 180
Tire pressure
=> page 274, > page 276
Tire pressure
=> page 274, > page 276
Loose wheel warning
=> page 272
Bulb failure indicator
=> page 57
Adaptive light
=> page 57
Light/rain sensor
=> page 57, > page 63
Door lock
=> page 37
Battery in vehicle key
> page 41
Night vision assist
=> page 133
Intersection assist
=>page 158
Side assist
=> page 156;
Exit warning
=> page 156
Rear cross-traffic assist
=> page 167
Adaptive cruise assist
> page 147
Steering intervention request
=> page 142, > page 149
Lane departure warning
=>page 150
Distance warning
=> page 148
Audi pre sense
>page 154
Emergency assist
=>page 158
Emergency call function
=>page 198
Other
indicator lights
Rear safety belt
=> page 72
Start/Stop system
= page 104
Hill hold assist
=>page 110
Low beam headlights
=> page 53
Parking lights
=> page 53
Turn signals
=> page 54, > page 56
Cruise control system
=>page
135
Cruise control system
=>page
135
Efficiency assist
=> page 136
Efficiency assist
=>page 136 >
Page 43 of 332
4K0012721BE
Opening and closing
Unlocking and locking with the Audi connect
vehicle control service)’
Applies to: vehicles with Audi connect vehicle control
Requirement: Audi connect vehicle control serv-
ices must be set up > page 194, Audi connect ve-
hicle control services. The vehicle must be park-
ing and the ignition must be switched off.
ZA WARNING
Observe the safety precautions > page 35.
@) Tips
— Only use the vehicle key when you can see
the
vehicle.
— The vehicle can only be locked when the "P”
selector lever position is engaged.
— Do not use the vehicle key to lock and un-
lock when you are inside the vehicle. Other-
wise, you could trigger the anti-theft
alarm*. If this happens, press the @ unlock
button.
@) Tips
Applies to: vehicles with convenience key
— When unlocking or locking the vehicle, the
convenience key cannot be more than ap-
proximately 4 feet (1.5 m) away from the
door handle or luggage compartment.
— Unlocking with the convenience key (keyless
access) can be deactivated in the MMI sys-
tem > page 36.
—To prevent the vehicle battery from dis-
charging, the energy management gradual-
ly switches off convenience functions that
are not needed. You then may no longer be
able to unlock your vehicle with the sensors.
D In certain countries.
BS Tey ae-e am al a BC
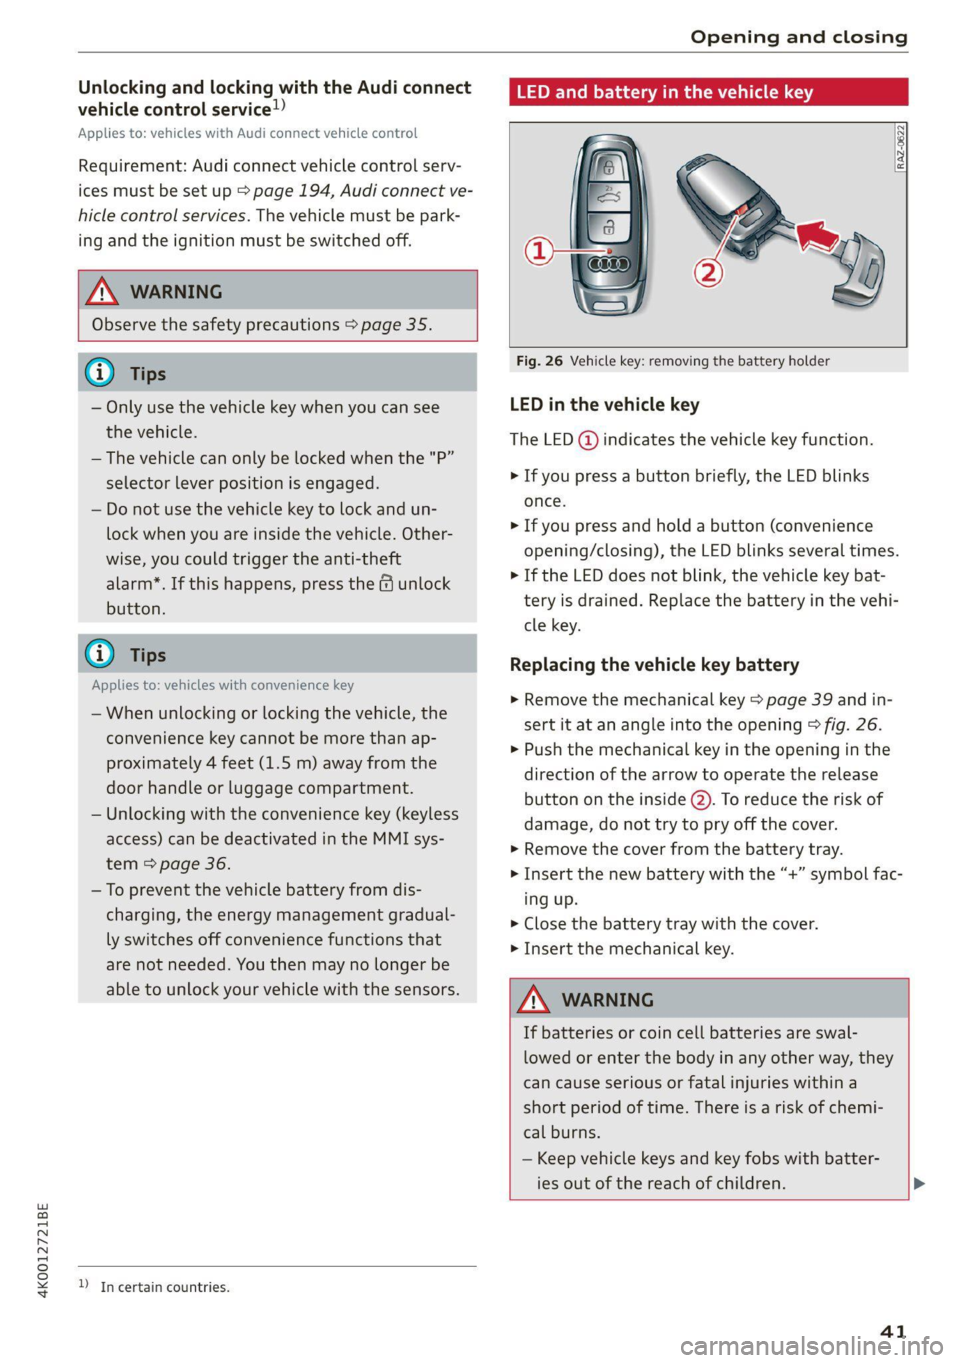
Fig. 26 Vehicle key: removing the battery holder
LED in the vehicle key
The LED (@) indicates the vehicle key function.
> If you press a button briefly, the LED blinks
once.
> If you press and hold a button (convenience
opening/closing), the LED blinks several times.
>» If the LED does not blink, the vehicle key bat-
tery is drained. Replace the battery in the vehi-
cle key.
Replacing the vehicle key battery
> Remove the mechanical key > page 39 and in-
sert it at an angle into the opening > fig. 26.
> Push the mechanical key in the opening in the
direction of the arrow to operate the release
button on the inside @). To reduce the risk of
damage, do not try to pry off the cover.
> Remove the cover from the battery tray.
> Insert the new battery with the “+” symbol fac-
ing up.
> Close the battery tray with the cover.
> Insert the mechanical key.
Z\ WARNING
If batteries or coin cell batteries are swal-
lowed or enter the body in any other way, they
can cause serious or fatal injuries within a
short period of time. There is a risk of chemi-
cal burns.
— Keep vehicle keys and key fobs with batter-
ies out of the reach of children. >
41
Page 44 of 332
Opening and closing
— Keep new or used batteries away from chil-
dren.
— If the battery compartment on a vehicle key
does not close securely, stop using the key
and keep it away from children.
— Seek medical attention immediately if you
suspect that a battery was swallowed or has
entered the body in any other way.
@ For the sake of the environment
Discharged batteries must be disposed of us-
ing
methods that will not harm the environ-
ment. Do not dispose of them in household
trash.
@ Tips
Replacement batteries for the vehicle key
must meet the same specifications as the
original battery.
Luggage compartment
lid
General information
— After closing the luggage compartment lid,
make sure that it is latched. The luggage
compartment lid could open suddenly while
driving, which would increase the risk of an
accident.
— Never drive with the luggage compartment
lid ajar or open, because poisonous gases
from the surrounding area can enter the ve-
hicle interior and increase the risk of asphyx-
iation.
— If there is a luggage rack (such as a bicycle
rack) on the luggage compartment lid, the
luggage compartment lid may not open
completely under certain circumstances or it
could close by itself if open due to the extra
weight. Therefore, the open luggage com-
partment lid must be given additional sup-
port or the cargo must first be removed
from the luggage rack.
— Applies to vehicles with power-operated or
sensor-controlled luggage compartment lid:
Pay careful attention when closing the lug-
gage compartment lid. Otherwise, you could
cause serious injury to yourself or others de-
spite the pinch protection.
ZA\ WARNING
— Applies to vehicles with anti-theft alarm sys-
tem: When the vehicle is locked from the
outside, no one - especially children - should
remain in the vehicle, because the windows
can no longer open from the inside
= page 38. Locked doors make it more diffi-
cult for emergency workers to enter the ve-
hicle, which puts lives at risk.
— Always close and lock the luggage compart-
ment lid and the doors when the vehicle is
not in use. Otherwise someone such as a
child could enter the vehicle through the
luggage compartment and become locked
inside it. To reduce the risk of injury, do not
allow children to play in or around the vehi-
cle.
— To reduce the risk of injuries by pinching,
make sure that no one is in the operating
area of the luggage compartment lid, in-
cluding the hinge areas and the upper and
lower edge of the luggage compartment lid.
42
@) Note
The luggage compartment lid can bump into
objects such as the garage ceiling when open-
ing and become damaged.
G) Tips
— When the vehicle is locked, the luggage
compartment lid can be unlocked separately
by pressing the “s button twice on the vehi-
cle key. The luggage compartment lid locks
automatically when it is closed again.
— The ability to open the luggage compart-
ment lid using the handle can be deactivat-
ed or activated in the MMI > page 36.
— Applies to: vehicles with fixed rear backr-
ests: The luggage compartment lid can be
unlocked from the inside in an emergency
=> page 46.
Page 46 of 332

Opening and closing
> Press the <3 button in the luggage compart-
ment lid. Or
» Applies to vehicles with convenience key: When
the ignition is switched off, press the s/f}
button in the luggage compartment lid. The ve-
hicle key must not be more than approximately
4 feet (1.5 m) away from the luggage compart-
ment and it must not be inside the vehicle. If
you press the (* button, then the vehicle will
lock.
Storing the luggage compartment lid
opening position
Applies to: Avant/allroad
The position must be at a certain height or higher
to store.
> Bring the luggage compartment lid into the de-
sired open position. If you want to move the
luggage compartment lid to a lower position,
move it slowly in small increments; otherwise,
the luggage compartment lid will close auto-
matically.
> Press and hold the <3 button in the luggage
compartment lid for at least four seconds to
store the new opening position. A visual and
audio signal will follow.
> To set a higher open position, wait at least five
seconds and then carefully press the luggage
compartment lid upward.
> Press and hold the <3 button again for at least
four seconds to store the desired opening posi-
tion.
The automatic opening or closing will stop if:
— You press the < button or press the handle in
the luggage compartment lid again Or
— If something blocks the luggage compartment
lid or makes it difficult for the lid to move.
If you press the << button or press the handle in
the luggage compartment lid again, the luggage
compartment lid will open again.
@ Tips
The luggage compartment lid can be operat-
ed manually if the vehicle battery is low. It is
necessary to use more force when doing this.
Move the lid slowly to reduce the amount of
force needed.
Opening and closing the luggage
compartment lid with foot motion (kicking
movement)
Applies to: vehicles with sensor-controlled luggage compart-
ment lid
re a So
S
Fig. 29 Vehicle rear: foot motion (example)
The luggage compartment lid can be opened and
closed automatically 1) > A\ in General informa-
tion on page 42.
Requirements: you must be carrying your conven-
ience key* with you. The ignition must be switch-
ed off. You must be standing at the center behind
the luggage compartment lid.
> Move your foot back and forth under the bump-
er one time > fig. 29. Do not touch the bumper.
Make sure you have firm footing. The luggage
compartment lid will open or close ) once the
system detects the movement. The automatic
opening or closing will be canceled if you re-
peat one of the movements described.
/\ WARNING
Observe the safety precautions > page 42. >
ZA WARNING
Observe the safety precautions > page 42.
)) The closing function applies to vehicles that also have au-
tomatic luggage compartment lid operation.
44
Page 86 of 332

Storage and convenience
Storage and convenience
Power sources
When the ignition is switched on, you may be
able to use multiple power sources for external
devices, depending on the vehicle equipment.
12 volt sockets
You can connect electrical accessories to the 12
volt sockets. The power usage from the sockets
must not exceed a total of 120 watts. Do not
connect multiple devices to the sockets in the ve-
hicle at the same time.
The 12 volt sockets are labeled with the 12V
symbol. They are located in the front center con-
sole, in the rear* and on the side trim panel in the
luggage compartment”*.
USB ports
Applies to: vehicles with USB port
You can charge mobile devices using the USB
ports. The USB ports are labeled with the «> or
[4 symbol or CHARGE ONLY.
Z\ WARNING
— To reduce the risk of fatal injury, store all
connected devices securely when driving so
that they do not move around inside the ve-
hicle when braking or in the event of an acci-
dent.
— Incorrect usage can lead to serious injuries
or burns. To reduce the risk of injuries, never
leave children unattended in the vehicle
with the vehicle key.
® Note
— Read the operating manuals for the con-
nected devices.
—To reduce the risk of damage to the vehicle
electrical system, never attempt to charge
the vehicle battery by connecting accesso-
ries that provide power to the power sour-
ces.
— Do not connect any device whose network
class (voltage) does not match the network
class designed for the socket.
84
— Disconnect the connectors from the power
sources carefully to reduce the risk of dam-
aging them.
@ Tips
Do not connect any other devices to the sock-
ets when using the compressor* provided by
the factory > page 286. The power consump-
tion in the sockets may be temporarily ex-
ceeded when using the compressor*.
Cup holders
Applies to: vehicles with cup holders
[RAzZ-0745
Fig. 69 Rear center armrest*: cup holders
Cup holders in the front center console
> The cup holder @ may be under a cover. To
open the cup holder, tap on the strip on the
cover.
Cup holders in the rear center armrest*
> Fold the center armrest* downward.
> To open the cup holders @), tap on the strip on
the cover.
> To close the cup holders, slide them back and
push the top of the cover down. >
Page 98 of 332
Driving
Driving
Starting the vehicle
pyre d | ola eda)
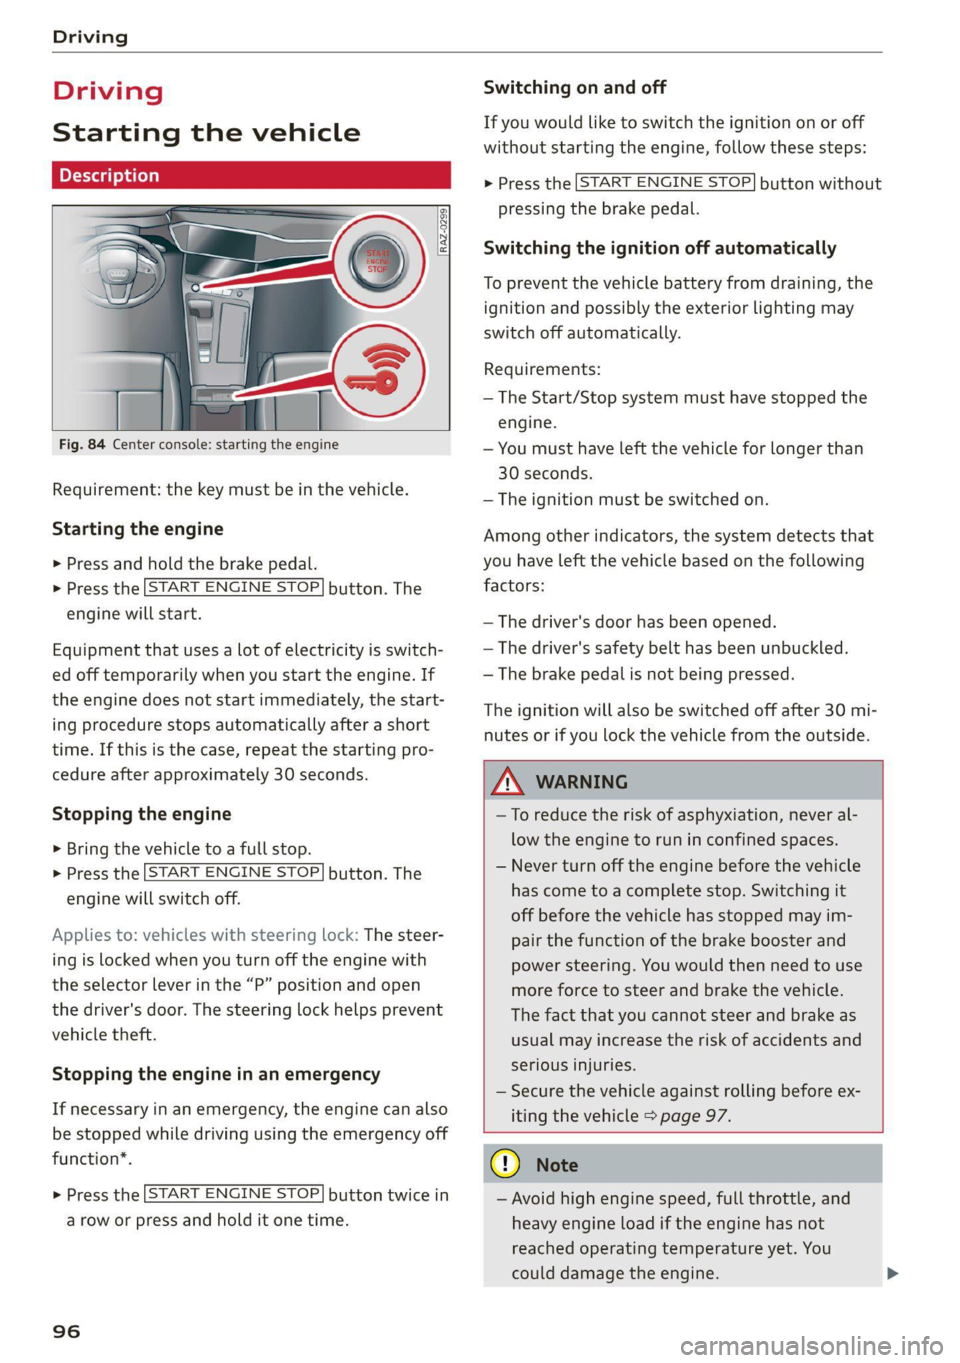
Fig. 84 Center console: starting the engine
Requirement: the key must be in the vehicle.
Starting the engine
> Press and hold the brake pedal.
> Press the [START ENGINE STOP] button. The
engine will start.
Equipment that uses a lot of electricity is switch-
ed off temporarily when you start the engine. If
the engine does not start immediately, the start-
ing procedure stops automatically after a short
time. If this is the case, repeat the starting pro-
cedure after approximately 30 seconds.
Stopping the engine
> Bring the vehicle to a full stop.
> Press the [START ENGINE STOP] button. The
engine will switch off.
Applies to: vehicles with steering lock: The steer-
ing is locked when you turn off the engine with
the selector lever in the “P” position and open
the driver's door. The steering lock helps prevent
vehicle theft.
Stopping the engine in an emergency
If necessary in an emergency, the engine can also
be stopped while driving using the emergency off
function*.
> Press the [START ENGINE STOP] button twice in
a row or press and hold it one time.
96
Switching on and off
If you would like to switch the ignition on or off
without starting the engine, follow these steps:
> Press the [START ENGINE STOP] button without
pressing the brake pedal.
Switching the ignition off automatically
To prevent the vehicle battery from draining, the
ignition and possibly the exterior lighting may
switch off automatically.
Requirements:
— The Start/Stop system must have stopped the
engine.
— You must have left the vehicle for longer than
30 seconds.
— The ignition must be switched on.
Among other indicators, the system detects that
you have left the vehicle based on the following
factors:
— The driver's door has been opened.
— The driver's safety belt has been unbuckled.
— The brake pedal is not being pressed.
The ignition will also be switched off after 30 mi-
nutes or if you lock the vehicle from the outside.
Z\ WARNING
—To reduce the risk of asphyxiation, never al-
low the engine to run in confined spaces.
— Never turn off the engine before the vehicle
has come to a complete stop. Switching it
off before the vehicle has stopped may im-
pair the function of the brake booster and
power steering. You would then need to use
more force to steer and brake the vehicle.
The fact that you cannot steer and brake as
usual may increase the risk of accidents and
serious injuries.
— Secure the vehicle against rolling before ex-
iting the vehicle > page 97.
@) Note
— Avoid high engine speed, full throttle, and
heavy engine load if the engine has not
reached operating temperature yet. You
could damage the engine.
Page 99 of 332
4K0012721BE
Driving
— If the engine has been under heavy load for
an extended period of time, heat builds up
in the engine compartment after the engine
is switched off and there is a risk of damag-
ing the engine. For this reason, let the en-
gine run at idle for approximately two mi-
nutes before shutting it off.
G) Tips
— Brief noises are normal when starting and
stopping the vehicle and are no cause for
concern.
—For up to 10 minutes after stopping the en-
gine, the radiator fan may turn on again au-
tomatically or it may continue to run, even if
the ignition is switched off.
— It may not be possible to start the vehicle in
extremely low temperatures.
— Power will be fully available once the engine
is at operating temperature.
WE Tel
= Engine start system: malfunction! Please
contact Service
Do not switch the ignition off because you may
not be able to switch it on again. Drive to an au-
thorized Audi dealer or authorized Audi Service
Facility immediately to have the malfunction cor-
rected.
EJ Engine start system: malfunction! Please
contact Service
There is a malfunction in the engine start system.
Drive immediately to an authorized Audi dealer
or authorized Audi Service Facility to have the
malfunction repaired.
2 Remote control key: key not detected. Is the
key
still in the vehicle?
The vehicle key was removed from the vehicle
while the engine is running. If the vehicle key is
no longer in the vehicle, you cannot switch the ig-
nition on or start the engine once you stop it. You
also cannot lock the vehicle from the outside.
Remote control key: hold back of key
against the designated area. See owner's man-
ual
The battery in the vehicle key may be drained or
there may be a malfunction. To start the vehicle,
you must also hold the vehicle key against the lo-
cation shown ?) > page 96, fig. 84.
If the malfunction remains, drive immediately to
an authorized Audi dealer or authorized Audi
Service Facility to have the malfunction correct-
ed.
When driving
Starting to drive, stopping, and parking
Starting from a stop
> Press and hold the brake pedal.
> Start the engine.
> Select a gear.
> Release the parking brake.
> Release the brake pedal. The vehicle may roll.
> Press the accelerator pedal to accelerate.
Securing the vehicle against rolling
Secure your vehicle to prevent it from rolling be-
fore exiting the vehicle.
> Set the parking brake.
> Select the “P” selector lever position.
> If parking on a steep road, turn the steering
wheel so that your vehicle will roll against the
curb in case it should start to move.
If one of these measures is not possible, for ex-
ample because there is no vehicle power, you
must secure your vehicle against rolling using ad-
ditional measures.
> Only park the vehicle on a level surface.
> Use suitable objects to block the front and rear
wheels.
Set the parking brake before selecting the “P” se-
lector lever position. This prevents too much
stress from being placed on the locking mecha-
nism when parking on a steep surface.
ZA WARNING
— Always set the parking brake when leaving
your vehicle, even if for a short period of >
97
Page 177 of 332

4K0012721BE
Parking and maneuvering
the vehicle is too far. Make sure the connec-
tion is sufficient, and when in doubt, resume
parking the vehicle yourself.
— Blocking notifications, tones, and vibrations
increase the risk of an accident. The myAudi
app can only warn you if dangers are detect-
ed if you make sure that your mobile device
allows all notifications, tones, and vibra-
tions for the myAudi app.
@) Note
— Do not use remote controlled parking when
transporting cargo that projects outside of
the vehicle or when snow chains are mount-
ed.
— Remote controlled parking may guide the
vehicle either away from curbs or onto them
if other vehicles are parked on the curb.
Make sure that your vehicle's tires and rims
are not damaged. Resume control of the ve-
hicle in time or stop the parking process if
needed to prevent damage.
— In parking spaces without curbs, maintain a
distance of at least 19 inches (50 cm) from
walls and buildings in order to reduce the
risk of vehicle damage.
@) Tips
— Follow the legal regulations in the country
where you are operating the vehicle when
using remote controlled parking. Remote
controlled parking may be prohibited in
some countries. The system may be unavail-
able in countries where it has been deacti-
vated in order to comply with legal regula-
tions. Data will not be transmitted to Audi.
The driver is always responsible for adhering
to the regulations applicable in the country
where the vehicle is being operated.
— Any individual that uses the mobile device
for remote controlled parking is considered
the driver and is participating in traffic. The
driver is always responsible for adhering to
the regulations for using remote controlled
)_ System availability may be limited depending on the mar-
ket.
2) In preparation at the time of printing.
parking that are applicable in the country
where the vehicle is being operated.
— Do not endanger any other road users when
using remote controlled parking. Testing re-
mote controlled parking in a parking lot
with minimal traffic is recommended.
— Your mobile device should have a sufficient
battery charge level. If necessary, charge
the mobile device before starting to drive.
— Do not use the remote controlled parking
function with devices that are faulty or dam-
aged or whose function is impaired. Only
use the operating systems approved by the
mobile device manufacturer.
— When using remote controlled parking, al-
ways pay attention to the areas where your
vehicle can be accessed. Check that no one
can enter your vehicle and if the vehicle has
been locked after parking is completed.
Take the vehicle key with you when leaving
the vehicle.
Applies to: vehicles with remote park assist plus
The following steps must be completed before
using for the first time:
> Create a myAudi account by registering in the
myAudi app or at my.audi.com, depending on
your country.
> Add your vehicle to your myAudi account.
>» Set the key user > page 32.
> Install the myAudi app on your mobile device
and log in with your access information.
Device compatibility
The mobile device will be checked at the start of
a parking procedure. If an incompatibility is de-
tected, it will be displayed in the myAudi app.
Audi does not recommend using the function if
an incompatibility is detected > A\.
A selection of supported Bluetooth devices can
be found in the database for tested mobile devi-
ces at www.audi.com/bluetooth. Compatibility
175
>
Page 197 of 332
4K0012721BE
Audi connect
ZA WARNING
— Always follow the information found in > AA
in General information on page 192.
— Driver messages, text messages, and illumi-
nated warning and indicator lights in the ve-
hicle always take priority over information
from the Audi connect services. The infor-
mation displayed by the Audi connect serv-
ices should not cause you to take safety
risks. This can result in the vehicle breaking
down in traffic and to serious injuries or ac-
cidents.
@) Tips
— Accessing specific data or controlling func-
tions remotely depends on the charge level
of the vehicle battery. Therefore, these
functions only have limited availability after
switching off the ignition.
— An eSIM card establishes the Internet con-
nection for Audi connect vehicle control
services. The costs for this are included in
the price of Audi connect vehicle control
services. The cell phone network, for exam-
ple, must be available to use these services.
Applies to: vehicles with Audi connect vehicle control
Create a myAudi account by registering in the
myAudi app or at my.audi.com, depending on
your country.
>» Set the key user > page 32.
> Install the myAudi app on your mobile device
and log in with your access information.
@) Tips
Some services require you to enter a 4-digit
PIN that you set up during registration.
Settings
Applies to: vehicles with Wi-Fi hotspot
Requirement: the ignition must be switched on.
> Applies to: MMI: Select on the home screen:
SETTINGS > Connection settings > Wi-Fi
Depending on the country and the vehicle equip-
ment, the following functions may be available:
Wi-Fi
When the function is switched on, the MMI's Wi-
Fi hotspot is active and Wi-Fi devices can be con-
nected to the hotspot.
Wi-Fi hotspot settings
The Wi-Fi connection between the MMI and your
Wi-Fi device is encrypted. You can change the fol-
lowing information if needed.
— Access point (SSID): name of the Wi-Fi hot-
spot.
— Password: an initial password was set at the
factory in the MMI. Audi recommends changing
the initial password. Only use secure passwords
that conform to the general guidelines for se-
cure passwords. For more information, refer to
reputable and current sources on password se-
curity.
Allow data connection through Wi-Fi
When the function is switched on, mobile devices
can use the Internet connection through the Wi-
Fi hotspot. A data plan is needed to do this.
Z\ WARNING
Always follow the information found in > AV
in General information on page 192.
@) Note
Always follow the information found in >@ in
General information on page 192.
195
Page 318 of 332

Blowers + cssios «0 cneaene a & comeaus we soem vw teow = 92
Bluetooth
Audio player............000 2000 e ee eee 221
Connecting adevice...............006- 235
Connecting a mobile phone............ 181
Deleting adevice......... cee eee eee eee 236
Device overview............2..2.0000- 235
Disconnecting adevice................ 235
Displaying profiles..................0. 236
Selecting adevice.............0.-.00. 235
Specifying a favorite................0. 236
BOOSts: « 2 sews « @ stews & 2 sews Fe eee ge ee ce 16
Boost pressure indicator................. 16
Brake fluid
Checking the brake fluid level........... 251
Brak@Siecs ¢ ¢ ees ¢ o aes 2 eee ae eee eo oe 105
Brake:fluids « « sone eo eae oo enw vv cow 251
Emergency braking function............ 108
HOtars: x 2 syne: 5 ames § eee ox me 2 oe 109
New brake pads .......6. 0: es eeee eens 106
Bravidsis » sauvs y © squme 9 © eigen =o Renee «Been 237
Break-in security feature................. 38
Breaking in
New brake pads............ ee eee eee 106
Newtires. 2.2... 0.0... c eee ee eee eee 263
Browser
refer to Mediacenter..............-00- 224
Bulb replacement..................-00- 302
Business address...........00-.000e eee 206
C
California Proposition 65 Warning........ 243
Battery specific.......... 0.0 e eee ae 253
Calllist. 0... eee eee eee eee eee 185
Cameras... 2... eee eee 123
LOCAUIONS wx ¢ s aan ¢ ¢ Sees » ¥ Saewe 2 ¢ Saree 124
Capacities
Fuel tank’, = css ¢ s meme 2s news so ees eee 314
Washer fluid reservoir...............0. 314
Cargo MOf in cs coas 2 2 wm oe ewes oe wen oe 89
Gargo nets ss sees « wesw v women 5 v were 6 3 Co 88
Carwashis < con s+ goes ve sees 2p Rew a ee 280
Catalytic converter.............--00000- 241
Cell phone
refer to Telephone...........-.0ee000 181
316
Cell phone compartment
refer to Audi phone box.............4. 183
Central
locking......... 0.0.0. c eee ee eee 35
AUTO LOCK: 5 sacs s ana. s aaam & § Suid G 3 Have 35
Convenience key............0 0c ee eee 40
Convenience opening and closing......... 48
Luggage compartment lid............... 43
Mechanically unlocking and locking....... 38
MESSAGES « snc 5 0 smones @ a seme 3 3 aemene osname 37
Remote control key............--.00005 40
SGttiNnGs s x cewp » x eee £2 REE Fo wR F 8 oe 36
Vehicle key sccm « « svsnoue =o weenme = stonene i 3 omens 40
Central locking switch..............00.0. 37
Ceramic DrakeSeovic. x a eins we seesam o o ceca ¥ os 106
Certificationts, s 2 acws s « saun + ¢ suas 2 ¢ eee 311
Changing light bulbs................... 302
Charging
refer to Power sourceS...........-.00-05 84
Charging the battery
Mobilesdevicesis « « ssisin 6 seine sw aysene 2 as 222
USB... eee 184
Wirelessis « « saups ¢ © sees x 2 emus xe ees gb 184
Child safety lock
Climate control system controls in the rear. 46
Power windows...........0000e eee eeee 46
REAMrdGGrSisc + s saan sa wae a Ales s aeeR GS 46
Child safety seats... ..... cece cece eee 78
Securing to the top tether anchor........ 82
Securing with asafety belt... co. 6 6 cows s 81
Securing with LATCH...............2--. 80
Cleaning... ... cece eee eee ee 280
Cleaning Alcantara...............000005 283
Cleaning artificialleather............... 283
Cleaning carbon components........ 282, 283
Gleaning controls’. « sees «esse « e saws x eo 283
Cleaning decorative parts andtrim........ 282
Cleaning exhaust tail pipes.............. 282
Cleaning plastic parts................0. 282
Cleaning textiles................0.000. 283
Climate control system...........--..0-- 91
Climate control system controls in the rear
Child safety lock................000000. 46
Closing
Automatic luggage compartment lid...... 43
Convenience closing.............+-+04- 48
Hood ...... eee ee eee ee 243
Luggage compartment lid............... 43