tow AUDI A6 2021 Owner´s Manual
[x] Cancel search | Manufacturer: AUDI, Model Year: 2021, Model line: A6, Model: AUDI A6 2021Pages: 332, PDF Size: 119.45 MB
Page 6 of 332
Table of contents
Supported media and file formats...... 228
Troubleshooting..............000eeee 229
Audi smartphone interface...... 231:
Setup... .. 0... eee eee eee 231
Troubleshooting «cx «sess se eee s 3 ves 232
Additional settings.............. 233
System settingS..............e ee eee 233
Software update: « ccs ss e054 een ee ve 234
Connected devices............00.0 00s 235
Legalinformation................... 236
Additional information.......... 237
Brands and licenses..........-...0-5- 237
Maintenance and Care........... 238
Checking and Filling............. 238
FilClae « ¢ agisu @ & maven 2 e SINS BE SePeE YE ee 238
RePUCLINGiecs + 2 mein oo een eae ¥ wer 239
Emissions control system............. 241
Engine compartment................. 242
EMGine Oils: seas 2 = wave = ¢ eoume 5 y couse 6 2g 245
Cooling systeM...........00 0-2 ee eee 249
Brake fllid. 0.2... eee eee eee ee 251
ElectricalsysteM esa. ecw + y pews se ee 251
Battenyis « o masse © o cxasane «a sincere « a averse © ere 252
Windshield washer system...........- 254
Service interval display............... 255
Wheels .......... 66. cece eee eee eee 256
Whieelsiaind Tires « caus « « cara sv eee eo 9 256
Tire pressure monitoring system....... 274
Tire pressure monitoring system....... 276
Care and cleaning................ 280
General information 0... ..c.6 eee 280
Car washes....................0000. 280
Cleaning and care information......... 281
Taking your vehicle out of service....... 285
DoOuUlt YOuUrSELT ios «pases s yas ss eRe 286
Emergency assistance........... 286
Generalinformation................. 286
EQUIPITIONE sce + & wswu + wowe xe eee a ee 286
Tire MObILity Kit esses se seceoe a x oneivens ea ares 286
Replacing wheels..............000005 288
Space-saving spare tire............... 292
Collapsible spare tire...............-. 292
Jump starting ......... 0... cee ee eee 293
TOWING ¢ aoves « & wees ¢ 2 eG 4 2 eee Fe 295
Fuses and bulbs.................. 298
FUSES sccs so das oo eee ERG PeeG TE? 298
BULBS eves ic = sonsess oo couse oo wooo e ReREN He 302
Customer information........... 303
Data PNivacyc. « « sean ss wows ac eos oe 303
Privacy NOEICE «ssw
Image recording..............0e-000 303
DataiMemnioniess: < s omy: s x wee ¢ ¢ eee a ee 303
Transmitted information.............. 305
Accessories and technical
CNGIGESS: « csccs 6 5 scans & 3 senses yo eve 2 308
Warranty... 00... cee ee eee 308
Audi Literature Shop................. 308
Driving in other countries............. 308
Maintenance, repairs, and technical
TROCITICAUONS & cass « 1 een 4 § caren 3 ewes 308
Accessories and parts................ 310
Reporting Safety Defects.............. 310
Declaration of compliance for
telecommunications equipment and
electronic systems...........2.-.0005 3It.
Technical data. « « 2s.6 + ngs sens 313
Identification data................0.. 313
Vehicle data...............00220000. 313
Tindle@xtie. 5 cviuss ae onsen ao meen ae omer oo 315
Page 21 of 332

4K0012721BE
Touch displays
tating
Applies to: touch displays
Fig. 11 Touch display: rotating
Rotating the view or perspective
> Rotate the item using two fingers.
gging
Applies to: touch displays
Fig. 12 Touch display: @ dragging with one finger, @
dragging with two fingers
Scrolling or browsing through menus/lists
> To scroll through menus and lists, swipe up-
ward or downward with one finger.
> To browse through menus and lists, swipe to
the right or left with one finger.
Tilting 3D displays
> Drag upward or downward with two fingers.
Dragging away from/toward the edge of
the screen
Applies to: touch displays
Fig. 13 Touch display: dragging away from the edge of the
screen
Opening hidden menus
The E=] symbol indicates that there is a hidden
menu.
> Use your finger to drag inward from the upper
or lower edge of the screen, or
> Press the =] button.
Closing hidden menus
> Press within the menu and drag it toward the
upper or lower edge of the screen.
nformation about menu paths
This guide shows you at a glance the paths for
opening a desired menu and its settings and
functions.
Example of a path
> Applies to: MMI: Select on the home screen:
SETTINGS > General > Date & time.
Following the path
> First, determine in which display the path
should be entered. In this example, it is the
MMI display.
>» Applies to MMI: To open the home screen,
press ().
> If the SETTINGS button is not displayed, use
your finger to swipe to the left or right until it
appears.
> Press the SETTINGS button.
19
Page 22 of 332
Touch displays
> If the General button is not displayed, swipe
toward the left or right with one finger until it
appears.
>» Press the General button.
> If the Date & time button is not displayed,
swipe upward or downward with one finger un-
tilit appears.
> Press the Date & time button.
@) Tips
If a menu or symbol is in parentheses in the
path, for example, (General) or (423), then it is
an optional menu item that does not need to
be used in every system.
You can adjust or turn off the MMI touch display
feedback.
> Applies to MMI: Select on the home screen:
SETTINGS > Display & Brightness > MMI.
Possible settings:
— Brightness
— Touchscreen feedback
Multi Media Interface
Traffic safety information
Audi recommends performing certain Infotain-
ment system functions, such as entering a desti-
nation, only when the vehicle is stationary. Al-
ways be prepared to stop operating the Infotain-
ment system in the interest of your safety and
the safety of other road users.
ZA\ WARNING
Only use the Infotainment system when road,
traffic, weather, and visibility conditions per-
mit and always in a way that allows you to
maintain complete control over your vehicle.
@ Tips
Certain functions are not available while driv-
ing.
20
Wiis mela mel mela
Switching the MMI on or off
> To switch the MMI off, press and hold the
On/Off knob > page 31, fig. 20 until the up-
per
display and all Infotainment system func-
tions are switched off.
> To switch the MMI on, press the On/Off knob.
Restarting the MMI
>» Press and hold the On/Off knob for at least 10
seconds.
Switching displays on or off
> To switch the upper display off, press [oJ on the
lower display.
> To switch the upper display on, touch the upper
display or press (Jon the lower display.
> To switch both displays on or off, press and hold
Co] on the lower display.
Introduction
You can display and operate Infotainment system
and vehicle functions using both of the Multi Me-
dia Interface (MMI) touch displays.
Configuration wizard
After starting for the first time, the configuration
wizard helps you to set up the vehicle, for exam-
ple to set the desired system language and con-
nect a telephone.
> Follow the instructions in the display.
> Applies to: MMI: To access the configuration
wizard at a later time, select on the home
screen: HELP > Configuration wizard.
Tool tips
You can have tool tips displayed if necessary.
They introduce various MMI functions to you.
> Applies to: MMI: To open the tool tips, select on
the home screen: HELP > Tool tips > Basic in-
formation or Expert information.
> Follow the instructions in the display.
Page 26 of 332
Touch displays
notification center, you can view these notifica-
tions @) > fig. 16 and apply quick settings @.
Using the notification center
> To open the notification center, pull the status
bar downward, or
>» Press the E=] button on the status bar.
> To apply quick settings, press the respective
symbol (4).
> To obtain additional information about a notifi-
cation, press it.
> To delete a notification, pull it toward the right
edge of the screen.
> If there are more than four notifications in the
notification center, the older notifications will
be hidden. To display the older notifications,
drag your finger upward on the screen.
Setting which content is displayed
You can set whether some notifications should be
displayed.
> To set the displayed content, press &&, or
> Applies to MMI: Select on the home screen:
SETTINGS > Notifications.
> Select and confirm which notifications should
be displayed.
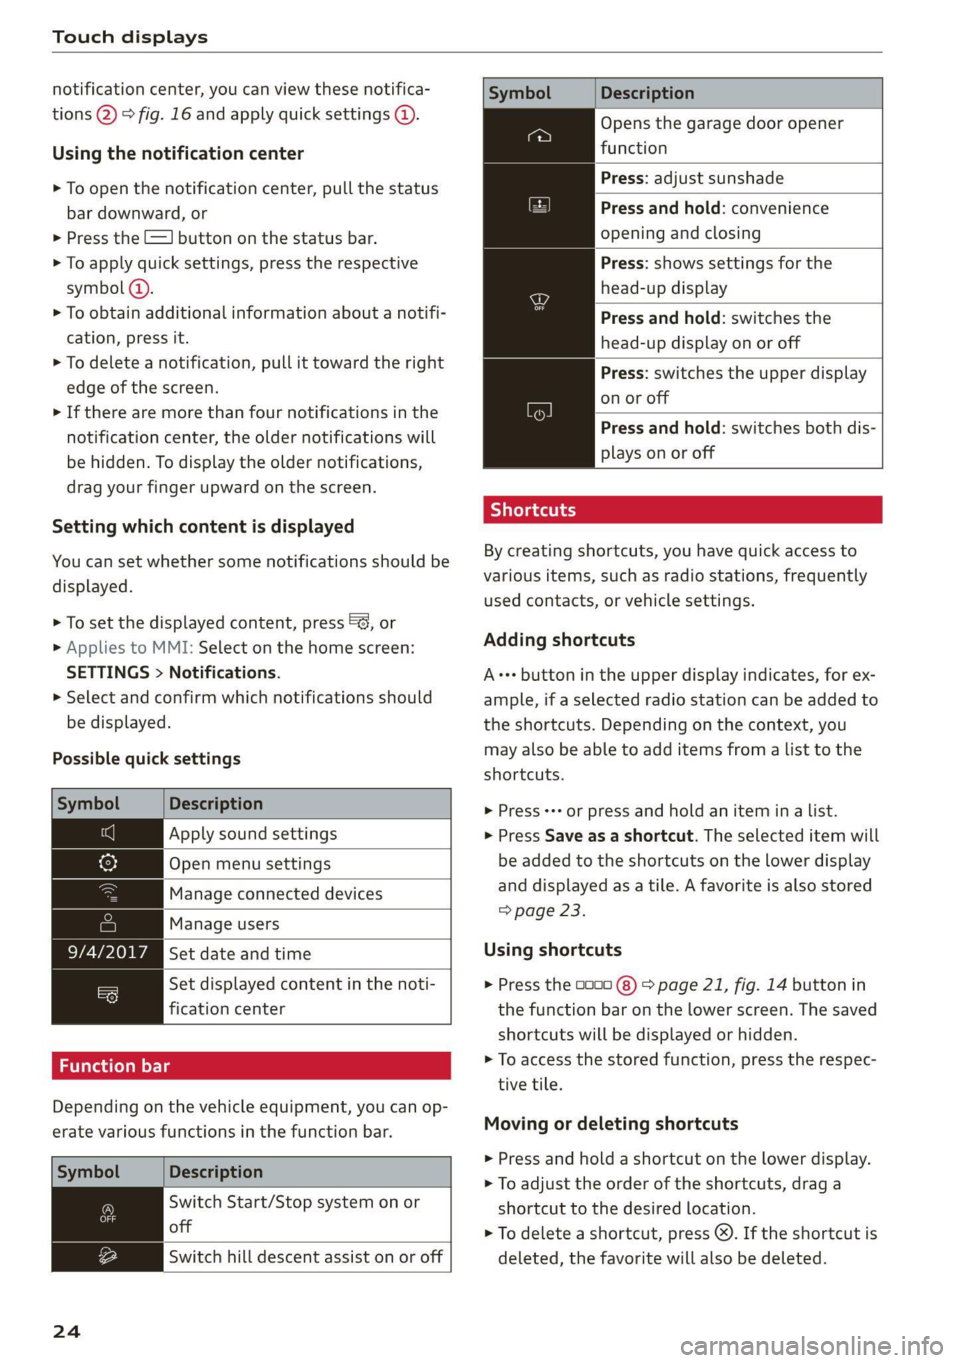
Possible quick settings
Description
Apply sound settings
Open menu settings
Manage connected devices
Manage users
Set date and time
Set displayed content in the noti-
fication center
Depending on the vehicle equipment, you can op-
erate various functions in the function bar.
Description
Switch Start/Stop system on or
off
Switch hill descent assist on or off
24
Symbol
Description
Opens the garage door opener
function
Press: adjust sunshade
Press and hold: convenience
opening and closing
Press: shows settings for the
head-up display
Press and hold: switches the
head-up display on or off
Press: switches the upper display
on or off
Press and hold: switches both dis-
plays on or off
Shortcuts
By creating shortcuts, you have quick access to
various items, such as radio stations, frequently
used contacts, or vehicle settings.
Adding shortcuts
A+++ button in the upper display indicates, for ex-
ample, if a selected radio station can be added to
the shortcuts. Depending on the context, you
may also be able to add items from a list to the
shortcuts.
> Press «++ or press and hold an item ina list.
> Press Save as a shortcut. The selected item will
be added to the shortcuts on the lower display
and
displayed as a tile. A favorite is also stored
=> page 23.
Using shortcuts
> Press the 0000 (8) > page 21, fig. 14 button in
the function bar on the lower screen. The saved
shortcuts will be displayed or hidden.
> To access the stored function, press the respec-
tive tile.
Moving or deleting shortcuts
> Press and hold a shortcut on the lower display.
> To adjust the order of the shortcuts, drag a
shortcut to the desired location.
> To delete a shortcut, press ®. If the shortcut is
deleted, the favorite will also be deleted.
Page 30 of 332
Voice recognition system
Voice recognition system
General information
Applies to: vehicles with voice recognition system
You can operate many functions in the vehicle
easily using voice commands.
Using the voice recognition system optimally
> Speak clearly and distinctly at a normal volume.
Speak louder when driving faster.
> Emphasize the words in the commands evenly
and do not leave long pauses.
> Close the doors, the windows, and the sunroof*
to reduce background noise. Make sure that
passengers are not speaking when you are giv-
ing a voice command.
> Do not direct the vents toward the hands-free
microphone, which is in the roof headliner near
the front interior lights.
> Only the driver should speak to the system, be-
cause the handsfree microphone is aimed to-
ward this seating position.
ZA\ WARNING
— Direct your full attention to driving. As the
driver, you have complete responsibility for
safety in traffic. Only use the functions in
such a way that you always maintain com-
plete control over your vehicle in all traffic
situations.
— Do not use the voice recognition system in
emergencies because your voice may change
in stressful situations. The system may take
longer to dial the number or may not be
able to dial it at all. Dial the emergency
number manually.
G) Tips
There are no voice guidance* prompts when a
dialog is active.
28
Description
Operating the voice recognition system
Applies to: vehicles with voice recognition system
iS] (2) ie
>| |
STEN
Daa) re
Neer) a
Connect 5
Pre)
oy c a
ey
Cesc >
coy
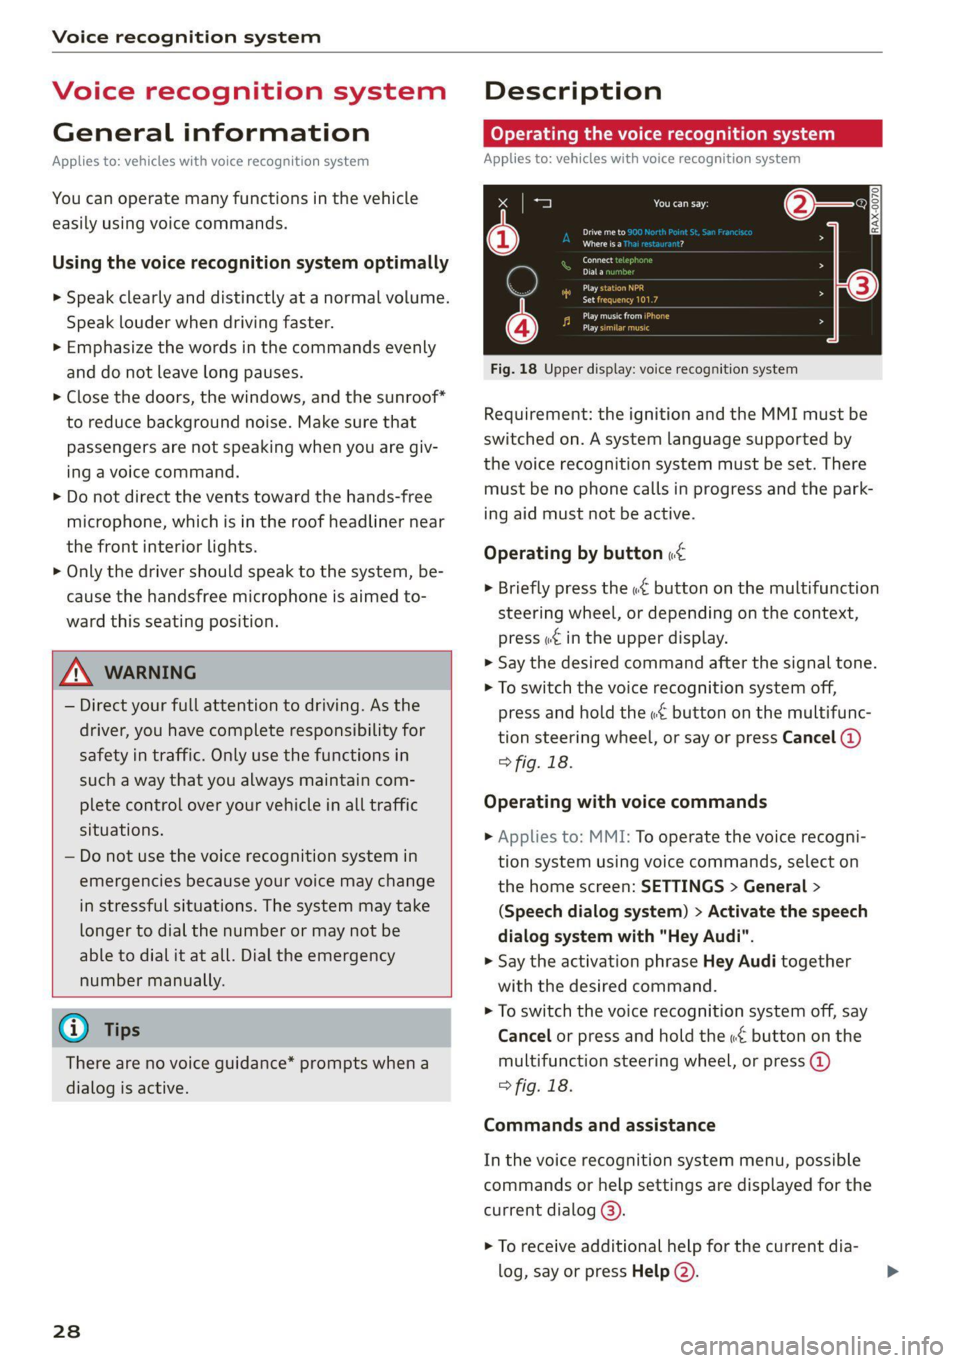
Fig. 18 Upper display: voice recognition system
Requirement: the ignition and the MMI must be
switched on. A system language supported by
the voice recognition system must be set. There
must be no phone calls in progress and the park-
ing aid must not be active.
Operating by button «¢
> Briefly press the «€ button on the multifunction
steering wheel, or depending on the context,
press we in the upper display.
> Say the desired command after the signal tone.
> To switch the voice recognition system off,
press and hold the «€ button on the multifunc-
tion steering wheel, or say or press Cancel (@)
> fig. 18.
Operating with voice commands
> Applies to: MMI: To operate the voice recogni-
tion system using voice commands, select on
the home screen: SETTINGS > General >
(Speech dialog system) > Activate the speech
dialog system with "Hey Audi".
> Say the activation phrase Hey Audi together
with the desired command.
> To switch the voice recognition system off, say
Cancel or press and hold the «£ button on the
multifunction steering wheel, or press @)
> fig. 18.
Commands and assistance
In the voice recognition system menu, possible
commands or help settings are displayed for the
current dialog @).
> To receive additional help for the current dia-
log, say or press Help (2).
Page 41 of 332
4K0012721BE
Opening and closing
Interior/towing protection monitor
The alarm will be triggered if there are move-
ments detected in the vehicle interior (for exam-
ple, by animals) or if there is a change in the vehi-
cle angle (for example, when the vehicle is being
towed).
You can prevent the alarm from being triggered
by deactivating the interior/towing protection
monitor.
Deactivating the interior/towing protection
monitor
There are the following options for deactivating
the interior/towing protection monitor:
> Press the @ button on the vehicle key a second
time within two seconds. Or
» Applies to: vehicles with convenience key:
Touch the sensor on the door handle a second
time within two seconds. Or
> Turn the mechanical key in the door lock to the
close position a second time within two sec-
onds.
> Applies to: vehicles with MMI: Select on the
home screen: VEHICLE > Settings & Service >
Interior monitoring.
If you lock the vehicle, then the interior/towing
protection monitor will stay off until the next
time the vehicle is unlocked.
ZA\ WARNING
No one, especially children, should stay in the
vehicle when it is locked from the outside, be-
cause the windows can no longer be opened
from the inside. Locked doors make it more
difficult for emergency workers to enter the
vehicle, which puts lives at risk.
@) Tips
The interior/towing protection monitor only
functions correctly when the windows and the
panorama glass roof* are closed.
RAZ-0621
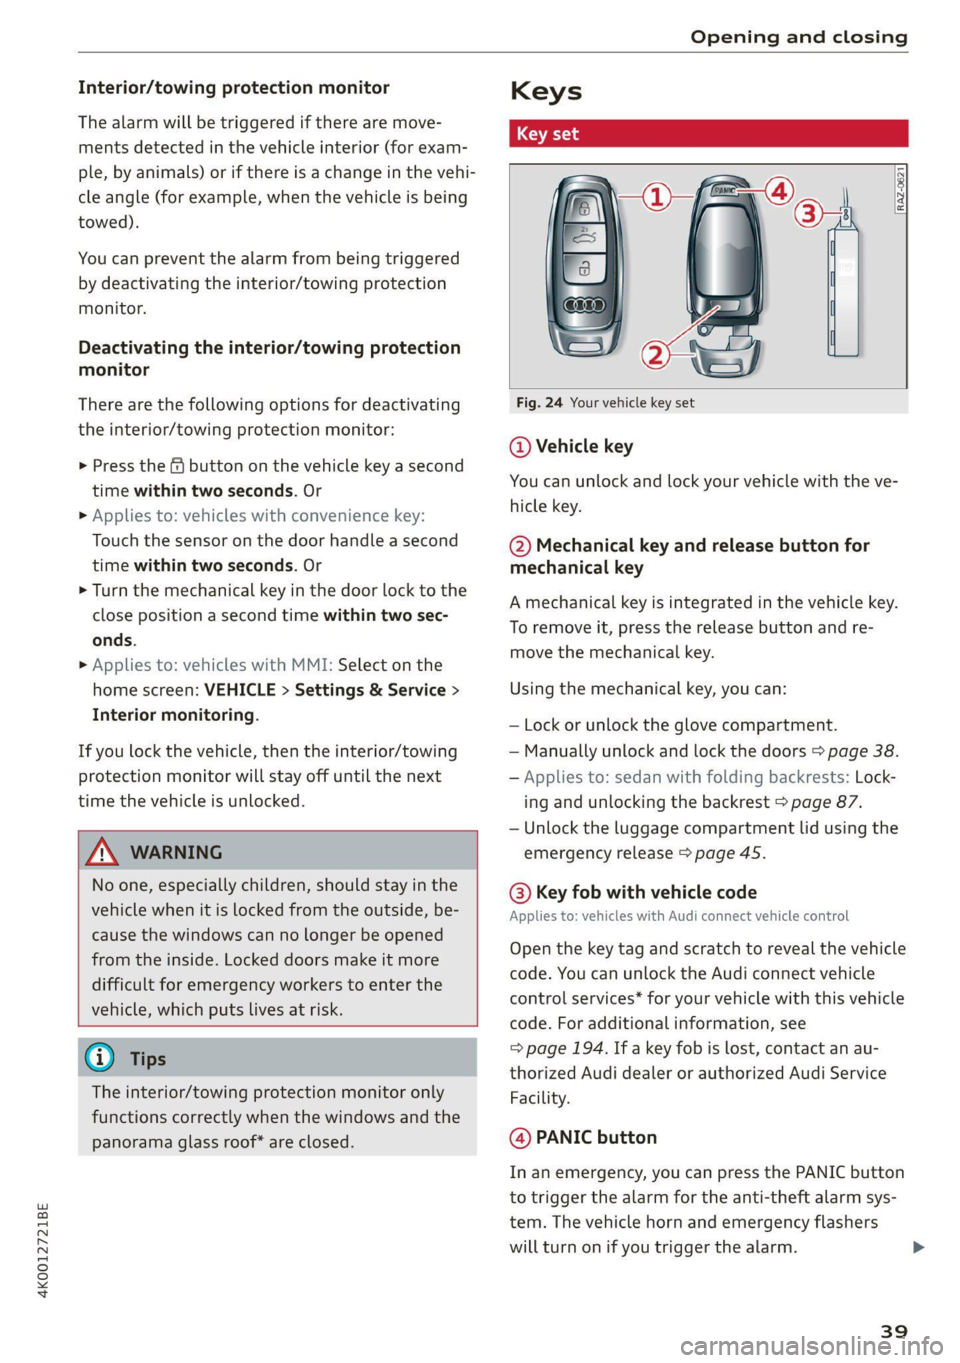
Fig. 24 Your vehicle key set
@ Vehicle key
You can unlock and lock your vehicle with the ve-
hicle key.
@ Mechanical key and release button for
mechanical key
A mechanical key is integrated in the vehicle key.
To remove it, press the release button and re-
move the mechanical key.
Using the mechanical key, you can:
— Lock or unlock the glove compartment.
— Manually unlock and lock the doors > page 38.
— Applies to: sedan with folding backrests: Lock-
ing and unlocking the backrest > page 87.
— Unlock the luggage compartment lid using the
emergency release > page 45.
@® Key fob with vehicle code
Applies to: vehicles with Audi connect vehicle control
Open the key tag and scratch to reveal the vehicle
code. You can unlock the Audi connect vehicle
control services* for your vehicle with this vehicle
code. For additional information, see
=> page 194. If a key fob is lost, contact an au-
thorized Audi dealer or authorized Audi Service
Facility.
@ PANIC button
In an emergency, you can press the PANIC button
to trigger the alarm for the anti-theft alarm sys-
tem. The vehicle horn and emergency flashers
will turn on if you trigger the alarm.
39
Page 50 of 332

Opening and closing
Convenience opening and closing
Applies to: vehicles with convenience key
Convenience opening or closing the windows
or panoramic glass roof*
You can set in the MMI if all windows or the roof*
should open or close all at once > page 36, Set-
ting the central locking system.
> Press and hold the & or & button on the vehicle
key until all windows and the roof* have
reached the desired position > /\.
> Touch the sensor* on the door handle until all
of the windows and the roof* are closed. Do not
place your hand in the door handle when doing
this.
When all of the windows and the roof* are
closed, the turn signals will flash once.
ZX WARNING
— Never close the windows or panoramic glass
roof* carelessly or in an uncontrolled man-
ner, because this increases the risk of injury.
— For security reasons, the windows and the
panoramic glass roof* can only be opened
and closed with the vehicle key at a maxi-
mum distance of approximately 6.5 feet
(2 m) from the vehicle. Always pay attention
when using the & button to close the win-
dows and the panoramic glass roof* so that
no one is pinched. The closing process will
stop immediately when the f button is re-
leased.
D) The sedan only has a sunshade in the front, and the
Avant/allroad has sunshades in the front and rear.
48
Panoramic glass roof
Operating the panoramic glass roof and
eked mel ad ar- Vel)
Applies to: vehicles with panoramic glass roof and roof sun-
shade
Fig. 35 Headliner: panoramic glass roof and sunshade*
buttons (shown on the Avant/allroad as an example)
The control buttons are equipped with a two-
stage function.
When tilting or opening the roof, the roof sun-
shade will open partially or completely if the sun-
shade is closed.
Operating the front!) roof sunshade
The roof sunshade cannot be closed completely if
the roof is open.
> Opening and closing the sunshade: push the
SD switch in the headliner @) briefly toward
the rear or forward to the second level.
> Partially opening the sunshade: press the >
switch to the first level until the sunshade
reaches the desired position.
Operating the rear roof sunshade*
Applies to: Avant/allroad
> Opening and closing the sunshade: push the *
switch in the headliner (@) forward or toward
the rear to the second level.
> Partially opening the sunshade: press the -&&
switch to the first level until the sunshade
reaches the desired position.
Page 59 of 332

4K0012721BE
Lights and Vision
The emergency flashers help to make other driv-
ers aware of your vehicle in dangerous situations.
» Press the A @ button to switch the emergency
flashers on or off.
When the emergency flashers are turned on, the
|<] and B indicator lights will flash at the same
time.
You can indicate a lane change or a turn when the
emergency flashers are switched on by using the
turn signal lever. The emergency flashers stop
temporarily.
The emergency flashers also work when the igni-
tion is turned off.
@ Tips
You should switch the emergency flashers on
ifs
— you are the last car in a traffic jam so that
all other vehicles approaching from behind
can see your vehicle
— your vehicle has broken down or you are
having an emergency
— your vehicle is being towed or if you are tow-
ing another vehicle
Messages
If the 8, indicator light turns on, a bulb has
failed. The displayed message indicates the cause
and possible solutions. If one of the messages re-
mains on, drive immediately to an authorized
Audi dealer or authorized Audi Service Facility to
have the malfunction repaired.
Bg Audi adaptive light: malfunction! See own-
er's manual
Adaptive light* is not working. The headlights
still function. Drive immediately to an authorized
Audi dealer or authorized Audi Service Facility to
have the malfunction repaired.
High beam assistant: malfunction! See own-
er's manual
You can still switch the high beams on or off
manually. Drive immediately to an authorized
Audi dealer or authorized Audi Service Facility to
have the malfunction repaired.
High beam assistant: currently unavailable.
Camera view limited due to surroundings. See
owner's manual
This message appears if the camera's visual field
is blocked. The system will switch itself off. Try
switching the systems on later.
a Automatic headlights: malfunction! See
owner's manual
The light/rain sensor is malfunctioning. When
the AUTO light function is on, the low beams will
remain switched on at all times for safety rea-
sons. Drive immediately to an authorized Audi
dealer or authorized Audi Service Facility to have
the malfunction repaired.
Interior lighting
Fig. 40 Headliner: interior lighting
Interior lighting buttons
ax* — Interior lighting on/off
4 - Door contact switch on/off. The interior light-
ing is controlled automatically.
Touch-sensitive reading lights
> To turn a reading light on or off, touch the sur-
face @ briefly.
> To activate the manual dimming function,
touch the surface @) when the light is switched
off and keep touching it until the desired
brightness is reached.
57
Page 62 of 332

Lights and Vision
Cee
Applies to: vehicles with manual sunshade
If the glass on an automatic dimming mirror
breaks, electrolyte can leak out. This liquid
damages plastic surfaces and paint. Clean
this liquid as quickly as possible, for example
with a wet sponge.
@ Tips
— If the light reaching the rearview mirror is
obstructed, the automatic dimming mirror
will not function correctly,
— The automatic dimming mirrors do not dim
when the interior lighting is turned on or
the reverse gear is selected.
Fig. 44 Rear door: sunshade
Rear door sunshade
> Pull the sunshade out and attach it to the re-
Se tainer on the upper door frame.
Windshield wipers
Switching the windshield wipers on
Fig. 43 Roof headliner: sun visor
Sun visor
The sun visors can be moved out of their brackets
and turned toward the doors (4).
They can also be moved back and forth length-
wise in this position.
Vanity mirror
The mirror light switches on when the cover over
the
vanity mirror @) opens.
Fig. 46 Lever: rear window wiper (Avant/allroad)
> Move the windshield wiper lever S7 to the cor-
responding position:
© Windshield wipers off
@ Rain sensor/intermittent mode. The wind-
shield wipers switch on once the vehicle speed >
60
Page 71 of 332

4K0012721BE
Sitting correctly and safely
> To move the steering wheel forward or back-
ward, press the switch forward or backward.
The steering wheel can also be adjusted when the
ignition is switched off.
Head restraints
General information
Applies to: vehicles with adjustable head restraints
B4G-0454
Fig. 54 Correctly-adjusted head restraint
Make sure that:
— The upper edge of the head restraint is as even
as possible with the top of your head
— The head restraint is as close as possible to the
back of the head
— The head restraints on the occupied rear seats
are positioned as high as possible.
ZA WARNING
— There is one head restraint for each seat. All
vehicle occupants must adjust the head re-
straint correctly before every trip. Having
head restraints that are not adjusted cor-
rectly or not installed in the vehicle increas-
es the risk of a neck injury during sudden or
unexpected driving or braking maneuvers or
ina collision.
— Only remove the rear seat head restraints if
it
is necessary to install a child safety seat
= page 78. Stow the removed head re-
straints securely, for example in the luggage
compartment. Reinstall the head restraints
immediately once the child safety seat has
been removed. Driving without head re-
straints increases the risk of serious neck in-
juries.
Front head restraints
Applies to: vehicles with adjustable head restraints
[RAZ-0683]
Fig. 55 Front seat: adjusting the head restraint
Adjusting the head restraints
> To adjust the head restraint upward or forward,
slide it until it locks into place.
> To adjust the head restraint downward or back-
ward, press the button on the side and slide the
head restraint. Release the button and slide the
head restraint farther until it locks into place.
Rear head restraints
Applies to: vehicles with adjustable head restraints
Fig. 56 Rear seat: adjusting or removing the head restraint
Adjusting the head restraints
Applies to: vehicles with manually adjustable head restraints
> To adjust the head restraint upward, slide it un-
til it locks into place.
> To adjust the head restraint downward, press
the button @) and slide the head restraint. Re-
lease the button and slide the head restraint
farther until it locks into place.
Removing the headrests
Applies to: vehicles with removable head restraints
> Applies to: vehicles with folding backrests: Fold
the backrest forward slightly. See > page 87.
69
>