check engine AUDI A7 2013 User Guide
[x] Cancel search | Manufacturer: AUDI, Model Year: 2013, Model line: A7, Model: AUDI A7 2013Pages: 310, PDF Size: 77.45 MB
Page 43 of 310
@ Passenger's door
© Left rear door
@ Right rea r doo r
_& WARNING
-When you leave your veh icle -even if on
ly briefly -always take the ignition key
with you . This applies partic ularly when
children remain in the vehicle . Otherwise
the ch ildren could start the engine or op
erate electrical equ ipment (e.g. power
windows). The power windows are func
t ional until the driver's door or passeng
er's door has been opened .
- Be careful when closing the wi ndows .
Check to see that no one is in the way, or
serious injury could result!
- When locking the veh icle from outs ide,
the vehicle must be unoccu pied s ince the
windows ca n no longer be opened i n an
eme rgency .
(0 Tips
- When you ope n the doors, the w indows
a utomat ica lly low er about 10 mm .
- When the window in the dr iver's or pas
senger's door is completely open, it will
r aise approximate ly 25 mm when the
door is opened. The w indow will lower
again w hen you close the doo r.
- After the ignition has been switched off,
t h e windows can still be opened o r
closed for abou t 10 minu tes. The powe r
windows are not swi tched off un til the
drive r's door or passenge r's door has
been opened .
What to do after a malfunction
The one-touch open and close function must
be reactivated if the battery hos been discon
nected.
.. Pull and hold the power w indow switch un
t il the window is fully closed .
.. Re lease the switch and then p ull it again for
at least one second .
Opening and clo sin g 41
Valet parking
The valet parking feature protects the lug
gage compor tment from unauthori zed access
from the outside.
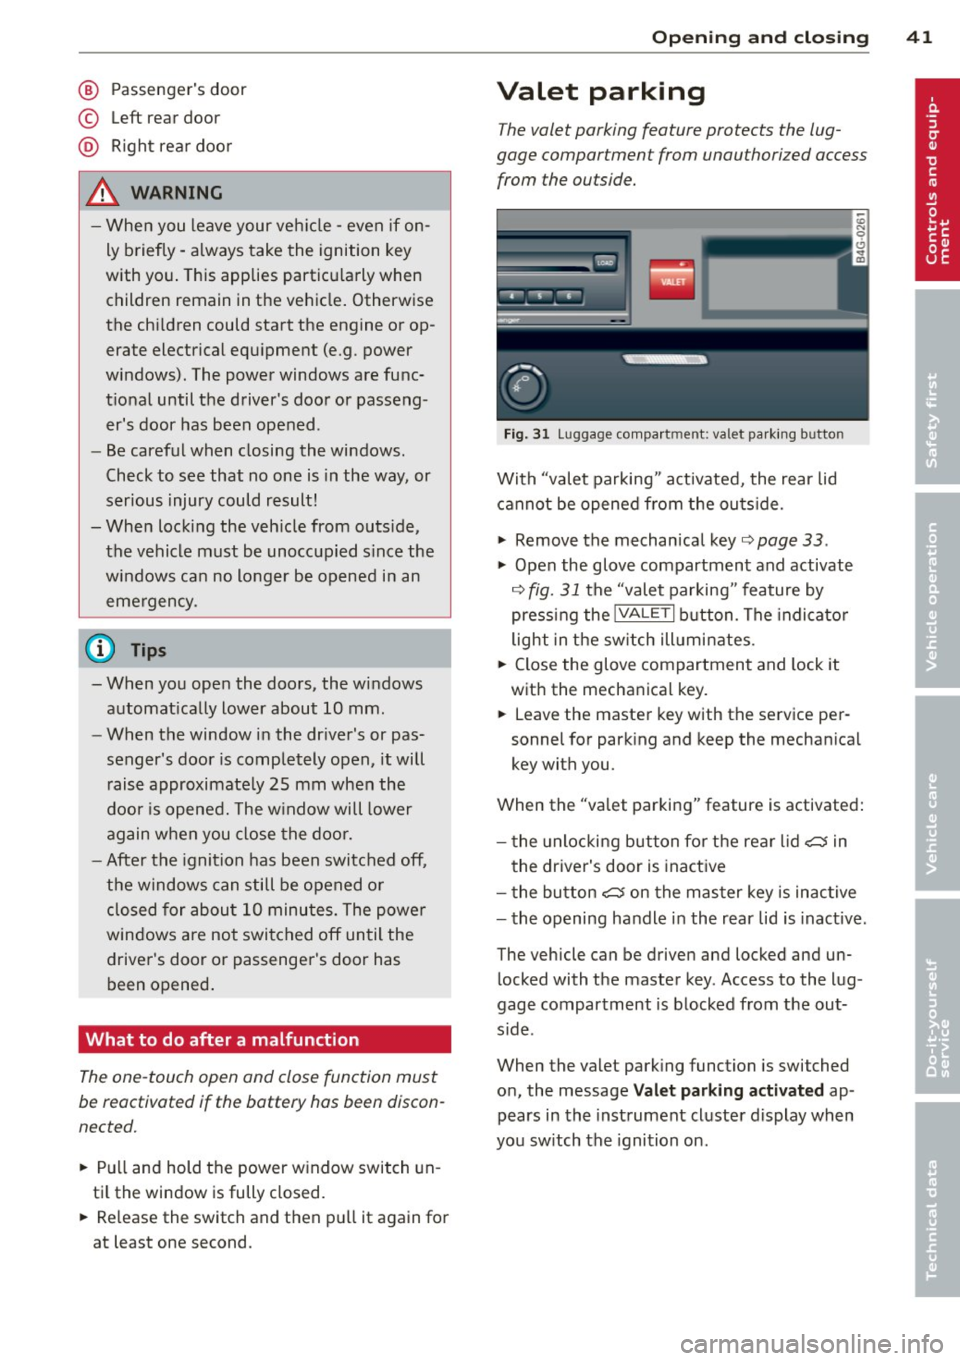
Fig . 3 1 Luggage compa rt m en t: va let pa rk in g b utto n
With "valet parking " act ivated, the rear lid
cannot be opened from the ou tside.
.. Remove the mechan ical key ¢
page 33 .
.,. Open the glove compartment and activate
¢
fig. 31 the "valet parking " feature by
press ing the
lVALE TI button . The indi cat o r
light in the sw itch ill umi nates .
.. Close the glove compartment and lock it
with the mechanica l key.
.. Leave the master key with the se rvice per
sonne l for park ing and keep the mechanica l
key with you.
When the "va let parking" feature is activated:
- t he unlocki ng but ton fo r th e rear lid
~ in
t he driver's door is inact ive
- t he button
~ on the mas ter key is inac tive
- the opening handle in the rear lid is inact ive .
The vehicle can be driven and locked and un l ocked with t he master key . Access to the lug
gage compar tment is b locked from the out
s ide .
When the valet park ing function is switched
o n, the message
Valet parking activated ap
pears in the inst rument cluste r display wh en
you sw itch the ignition on .
Page 77 of 310

steering column will continue moving as long as you are pressing the switch.
There must be at least
10 inches (25 cm) be
tween your chest and the cente r of the steer
ing wheel. If you cannot sit more than
10 in
ches (25 cm) from the steering wheel, see if
adaptive equipment is available to help you
reach the pedals and increase the distance
from the steer ing wheel.
F or detailed information on how to adjust the
driver's seat, see
r::> page 53 .
In vehicles with the memory f unction* , the
steering column settings are stored together
with the seat position.
A WARNING
Improper use of steering wheel adjust
ment and improper seating position can
cause serious personal injury .
- Adjust the steering wheel column only
when the vehicle is not moving to pre
vent loss of veh icle control.
-
- Adjust the driver's seat or steering wheel
so that there is a min imum of
10 inches
(25 cm) between your chest and the
steering wheel ¢
fig. 147. If you cannot
mainta in this min imum d istance, the a ir
bag system cannot protect you properly.
- If physica l limitations prevent you from
sitting
10 i nches (25 cm) or more from
the steering wheel, check with yo ur au
thorized Aud i dea ler to see if adaptive
equipment is availab le.
- If the steering wheel is aligned with you r
f ace, the supp lemental driver's airbag
cannot provide as much protection in an
accident. A lways make sure that the
steering wheel is aligned with your
chest.
- Always hold the steering wheel with your
hands at the 9 o'clock and 3 o'clock posi
t ions to reduce the risk of personal injury
if the driver's airbag deploys.
- Never hold the steering wheel at the 12
o'clock posit ion or with your hands inside
the steering wheel rim or on the steer ing
On th e road 7 5
wheel hub. Holding the steering wheel
the wrong way can cause serious injuries
to the hands, arms and head if the driv
er's airbag deploys.
Easy entry feature
App lies to vehicles: with electrically adj ustable steer ing
wheel
The easy entry feature makes it easier to en
ter and exit the vehicle by automatically ad
justing the steering wheel.
.,. Select in the MMI: ICAR lfunction bu tton>
(C ar)* sys tems control button > Vehicle set
t ing s > Se ats
> Drive r's sea t > Easy entry >
On.
When the easy entry feature is turned on, the
steering wheel moves up to the park position
when you switch off the ignition . After you en
ter the vehicle, the steering wheel moves to
the stored posit ion as soon as you switch on
the ignition.
Starting and stopping
the engine
Starting the engine
This button switches on the ignition and
starts the engine.
F ig. 78 Center console: S TART ENGINE S TOP button
.,. Step on the brake pedal and move the selec
tor lever to
P or N ¢ £..
.,. Press on the ...., , s=T ""'A --=R=T ,..., E= N~ G-::,I N:-:-= E-=s= T::-::0 :-:: Pc-i l button
c::> fig. 78 -the engine will start. ..,.
Page 84 of 310

82 On the road
@ Tips
When you stop and the start-stop-system
turns the engine off, the ignition remains
on. Make sure that the ignition is switched
off before exiting the vehicle.
General information
Applies to vehicles: with S tart-Stop -System
The standard Start-Stop-mode can be cancel
led for different system-related reasons .
Fig. 82 Instrument cluster: eng ine-Stop tempo rar ily
unavai lable
Engine will not switch off
Before each stop phase, the system checks if
certain conditions have been met. For exam
p le, the engine will
not be switched off in the
following situations:
- The engine has not reached the minimum
r equired temperature for Start-Stop -mode .
- T he interior temperature selected by the A/C
system has not been reached .
- T he outs ide temperature is extremely h igh/
low .
- T he w indshield is being defrosted
9page 70, 9page 72.
- The pa rking system* is switched on.
- The battery charge level is too low .
- The steering wheel is sharply turned or there is a steering movement.
- After engaging the reverse gear.
- On sharp inclines .
The
r,J indicator light appears in the informa
tion line in the instrument cluster disp lay
9 fig. 82.
Engine automatically restarts
The stop phase is interrupted in the following
situations, for example. The engine restarts
without any action by the driver.
- The inte rior temperature varies from the
temperature selected in the A/C system.
- The windsh ield is being defrosted
9 page 70, 9page 72.
-The brake pedal is pressed severa l times in a
row.
- The battery charge level becomes too low .
- High power consumption .
@ Tips
If you shift into the D, Nor S posit ions af
ter shifting into reverse, the vehicle must
be driven faster than 6 mph (10 km/h) in
o rd er for the engine to switch off aga in.
Switching the Start-Stop-System on/off
manually
Appl ies to vehicles : wi th Start-S top-Sys te m
If you do not wish to use the system, you can
switch it off manually.
Fig. 83 Center console: Start-Stop-System button
.,. To switch the Start-Stop -System off/on
manually, press the
! iiil ~·I button. The LED in
the button turns on when the system is
switched off.
(D Tips
If you switch the system off during a stop
phase, the engine will start again auto
matically.
Page 201 of 310
Manual mod e
-Manua l dep loyment: Tapping b riefly on the
switch
¢ fig. 182 dep loys the rear spoiler.
- Manua l retraction: A t speeds up to abo ut
10 mph (20 km/h) , ret ract the rear spoiler
by pressing and holding the switch
¢ fig. 182 . At speeds between 10 mph (20
km/h) and 80 mph (130 km/h), retract the
rear spoiler by tapping on the switch
¢ fig . 182.
In dicat or light s
rJ /. R ea r spoiler: system m alfun ct io n!
The rear spoiler may not have extended due to
a ma lf u nction. This could change the vehicle 's
driving characteristics at high speeds . Do not
exceed 85 mph (140 km/h). Drive to your au
thorized Audi dealer immed iate ly to have the
malfunction corrected. The co lor of the indica
tor light depends on the vehicle speed.
A WARNING
Dr iv ing at higher speeds w ithout the rear
spoiler dep loyed can impair handling char
acteristics, making the veh icle harde r to
cont ro l.
- Always make sure that the spoiler is de
ployed when driving at speeds over
85 mph (140 km/h). If the rear spoiler
warning/ind icator light in the i nstr u
ment cluster comes on, the rear spoiler
may not have dep loyed .
- Never drive at speeds higher than
85 mph (140 km/h) if the spoiler is not
deployed. Have the spoiler inspected as
soon as possible by an authorized A udi
dealer or qualif ied workshop.
- Always obey speed limits and other traf
fic laws.
A WARNING
Improper operation of the rear spoiler can
cause crushing injuries.
- Always make sure that nobody, especially
children, is in the way when the rear
spoiler is deployed or retracted.
Int ellig ent technolog y 199
@ Note
-Never push the vehicle or apply force to
the rear spoiler -it could be damaged.
- Only operate the rear spoiler manua lly
when the rear lid is closed . Otherwise,
damage cou ld occur.
(D Tips
C lean the spoiler compa rtment every 2 to
3 months. The spoiler compartment must
a lways be free of ice, snow, leaves or other
debris .
Braking
General information
What affects braking efficiency?
Operating condition s and dri ving h abit s
The brakes on today's automobiles are still
subject to wear, depending largely on operat
ing condit ions and driving habits ¢.&, . On
vehicles that are either driven mostly in stop
and-go c ity traff ic or are dr iven hard, the
brake pads should be checked by your author
ized Audi dea ler more often th an specified in
the
Warran ty & Maintenan ce boo kle t. Failure
to have you r brake pads inspected can result
in reduced brake performance .
On steep slopes, you sho uld use the braking
effect o f the engine . This way, you prevent un
necessary wear on the b rake system. If you
must use your brakes, do not hold the brakes
down cont inuous ly. Pump the brakes at inter
vals.
Mo istur e or road salt
U nder certain conditions , for example, when
driving through water or very heavy rain , or
even after washing your vehicle, the braking
effect can be reduced due to moisture (or in
free zing cond itions ice) on the brake pads. A
few carefu l brake applications should dry off
the brake pads or remove any ice coatings .
When you are driving at higher speeds with
the windshield w ipers on, the brake pads will
Ill-
•
•
Page 202 of 310
200 Intellig ent technol ogy
briefly touch the brake d iscs in regular inter
va ls so as to improve reaction time when brak
ing on wet surfaces. You the driver wi ll not no
tice anything.
The effectiveness of the brakes can be reduced
when the vehicle is driven on a salt-covered road and the brakes are not used . Here too,
you should clean off accumu lated salt coating
from brake discs and pads with a few careful
applicat ions of the brake¢,& .
Co rrosion
There may be a tendency for dirt to bui ld up
on the brake pads and corrosion to form on
the discs if the car is not dr iven regularly or
only for short trips with little use of the
brakes .
If the brakes are not used frequently, or if cor rosion has formed on the discs, it is advisable
to clean off the pads and discs by braking
firmly a few times from a moderately high
speed <=>,& .
Fa ul ts in th e brak e sys te m
If you should notice a sudden increase in
brake pedal travel, then one of the two brake
circu its may have failed¢,& .
Low b rak e flu id l evel
Malfunctions can occur in the brake system if
the brake fl uid level is too low. The brake fluid
level is monitored electronically .
Brake booster
The brake booster wor ks w ith vacuum pres
sure which is created only when the engine is running
c> ,& .
Brake lining wear st atu s
Brake lining wea r may be checked by visual in
spection of the condition of the brake pads
through the openings in the whee l. If neces
sary, the wheel may be removed for this in
spection ¢ page 269, Changing a wheel .
_& WARNING
-You should perform braking maneuvers
for the purpose of cleaning the brake
system only if road conditions permit .
Other road users must not be put at risk -
you may ca use an accident!
- Before descend ing a steep grade, reduce
speed and sh ift transmission into a lower
gear o r lower dr iving range. Do not ride
the br akes or ho ld the pedal down too
long o r too often . T his could cause the
brakes to get hot and diminish braking
efficiency .
- Do not "ride the brakes" by resting your foot on the pedal when you do not intend
to brake. This may cause the brakes to
overheat, premature wear and increased
stopping distance.
- Under certain climatic and operat ing
conditions such as passing through wa
ter, dr iving in heavy rain or after washing
the vehicle, the effectiveness of the brakes can be reduced . In winte r, ice can
accumu late on the bra ke pads, lin ings,
d iscs and drums. Carefully app ly bra kes
for a test. Brakes will dry and ice coa t
ings wi ll be cleaned off after a few care
fu l brake applicat ions.
- Driving for an extended period of t ime on
salt -covered roads without using your
brakes can a lso affect braking efficiency .
Clean off accum ulated salt coating from
brake discs and pads with a few careful
brake applications.
- If you damage the front spoiler, or if you
install a different spoiler, be sure the a ir
f low to the front brakes is not obstruct
ed. Otherwise the brake system could
overheat reducing the effective ness of
the entire brake system.
- Failure of one brake circuit will impa ir
the braking capab ility result ing in an in
creased stopping distance . Avoid driving
the vehicle and have it towed to the near
est A udi dealer or qualified workshop .
- Never let the vehi cle roll to a s top with
the eng ine shut off.
Page 208 of 310

206 Driving and en vir onm ent
Driving through water
on roads
Note the following to avoid vehicle damage
when driving thro ugh water, for example on
flooded roads:
- The wate r must not be any higher than the
bottom of t he vehicle body.
- Do not drive faster than wa lking speed.
A WARNING
After driving through wate r, mud, slush,
etc., the brakes may be slow to take effect
because of wet brake rotors and pads. Dry
the brakes first by braking carefully to re
sto re the full braking effect.
@) Note
- Vehicle components such as the eng ine,
transmission, suspension or electr ical
system can be severely damaged by driv i ng th rough water.
- Always switc h off the Start-Stop-System
when driving through water~
page 80 .
(1) Tips
-Check the depth of the water before dr iv
i ng th rough it.
- Do not stop the ve hicle, dr ive in reverse
or switch the engine off whe n driving
t hr ough water .
- Keep in mind that oncoming vehicles
may create waves that raise the water
level and make it too deep fo r you r vehi
cl e to drive th rough safely.
- Avoid dr iving through salt water because
i t can cause corrosion.
Operate your vehicle
economically and
minimize pollution
General
Your personal style of driving will determine
the economy of your vehicle, as well as ex
haust and noise levels.
Fuel economy, environmenta l impact, and
wear on your engine, brakes and tires largely
depend on three factors:
- your personal driving style
- oper ating conditions
- technical limitat ions
If you ant ic ipate what you need to do next and
drive economica lly, you can easily cut your
fuel consumpt ion by 10-15 percent . This sec
t ion w ill give you some tips on how you can
help the env ironment and your pocketbook.
@ Tips
The consumption estimates as published
by ENVIRON MEN TAL PROTEC TION AG ENCY
( EP A) and Transpo rt Canada may no t corre
spond to your actual consump tion on the
r oad, which will va ry depending upon vehi
cle load and speed, road and weather con
ditions, trip length, etc.
Drive smoothly and keep a lookout
ahead
Vehicles use the most fuel when they are ac
celerating.
.,. Avoid unnecessary accelerating and braking.
Vehicles use the mos t fu el when they are ac
ce le rat ing. If yo u ant icipate what is going to
happen next, you will need to brake less and,
t hu s, acce le rate less . Let the vehicle coast
whenever possible -for examp le when you see
t h at the next traff ic light is red.
Page 211 of 310
Trailer towing Driving with a trailer
General information
Your Audi was designed primarily for passen
ger transportation .
If you plan to tow a tra iler, p lease remember
that the addit ional load will affect durab ility,
economy and performance .
Trailer towing not on ly places more stress on
the vehicle, it also calls for more concentra
tion from the driver.
F or this reason, a lways fo llow the operating
and driving instructions provided and use
common sense.
(D Note
If you are going to tow a trai ler, you must
ac tivate the trailer operation mode
c::> page 209, Operating instructions.
Technical requirements
Traile r hitch
Use a weig ht-carrying hitch conforming to the
gross trailer we ight. The hitch must be suita
b le for your veh icle and trailer and must be
mounted securely on t he ve hicle's chassis at a
technically sound location . Use only a trail er
hi tch w ith a removab le ball moun t. A lways
check wi th t he tra ile r hi tch man ufa ctur er to
make sure that you are using the cor rect
h itch.
Do not us e a bumper hitch .
The hitch m ust be installed in such a way that
i t does not interfe re with the impac t-absorb
i ng bumper syst em. No mod ificat ions should
b e made to the vehi cle e xhaus t and br ake sys
tems . From t ime to time, check th at a ll hitc h
mo unt ing bo lts rem ain securely fas tened.
When you are not towing a trail er, remove the
tra ile r hi tch ball moun t. T h is prevents the
hi tch from causing damage sho uld your ve hi
cle be str uck from behind~ .&.
Trailer towin g 209
Trailer brakes
If your trailer is equippe d wi th a bra king sys
tem, check to be s ure that i t conforms to all
regulations .
T he trailer hyd ra u lic bra ke sys tem mus t not be
d irec tly connec ted to the vehicle's hydraulic
brake system .
Safety chains
Always use safety chains be tween your ve hicle
and t he tra ile r.
Trailer lights
Trai ler lights must meet all reg ulations. Be
su re to c heck with your Audi dea ler for correct
wir ing, switches and relays .
Mirrors
If you a re unable to see the traffic behind you
u sing the regula r outside mirrors, then you
must insta ll extended mir rors. It is important
t h at you
always have clea r vis io n to the rear.
_&. WARNING
-
Afte r removi ng the trailer hitch , do no t
s tor e i t in yo ur v ehicl e. In case of sudden
b raki ng, the hi tch co uld fly forwar d and in
j ur e you o r yo ur pass enge rs.
Operating instructions
Maximum trailer weight
A tra ile r fo r you r vehi cle is l imited to a typi cal
cla ss 1 o r class 2 tr ailer.
Trailer load distribution
Be sure the load in the tra ile r is held secure ly
in place to p revent it from shift ing fo rward,
ba ckward or sideways.
Never allow a passenger to ride in a trailer
c::> .& in Driving instructions on page 211 .
Engine cooling sy stem
Towing a t railer ma kes the engine wor k hard
er . It is impo rtant that the cooling system's
performance is up to the additional load.
•
•
Page 232 of 310
230 Checking and filling
Checking and filling Engine hood
Releasing the engine hood
The engine hood is released from inside the
vehicle .
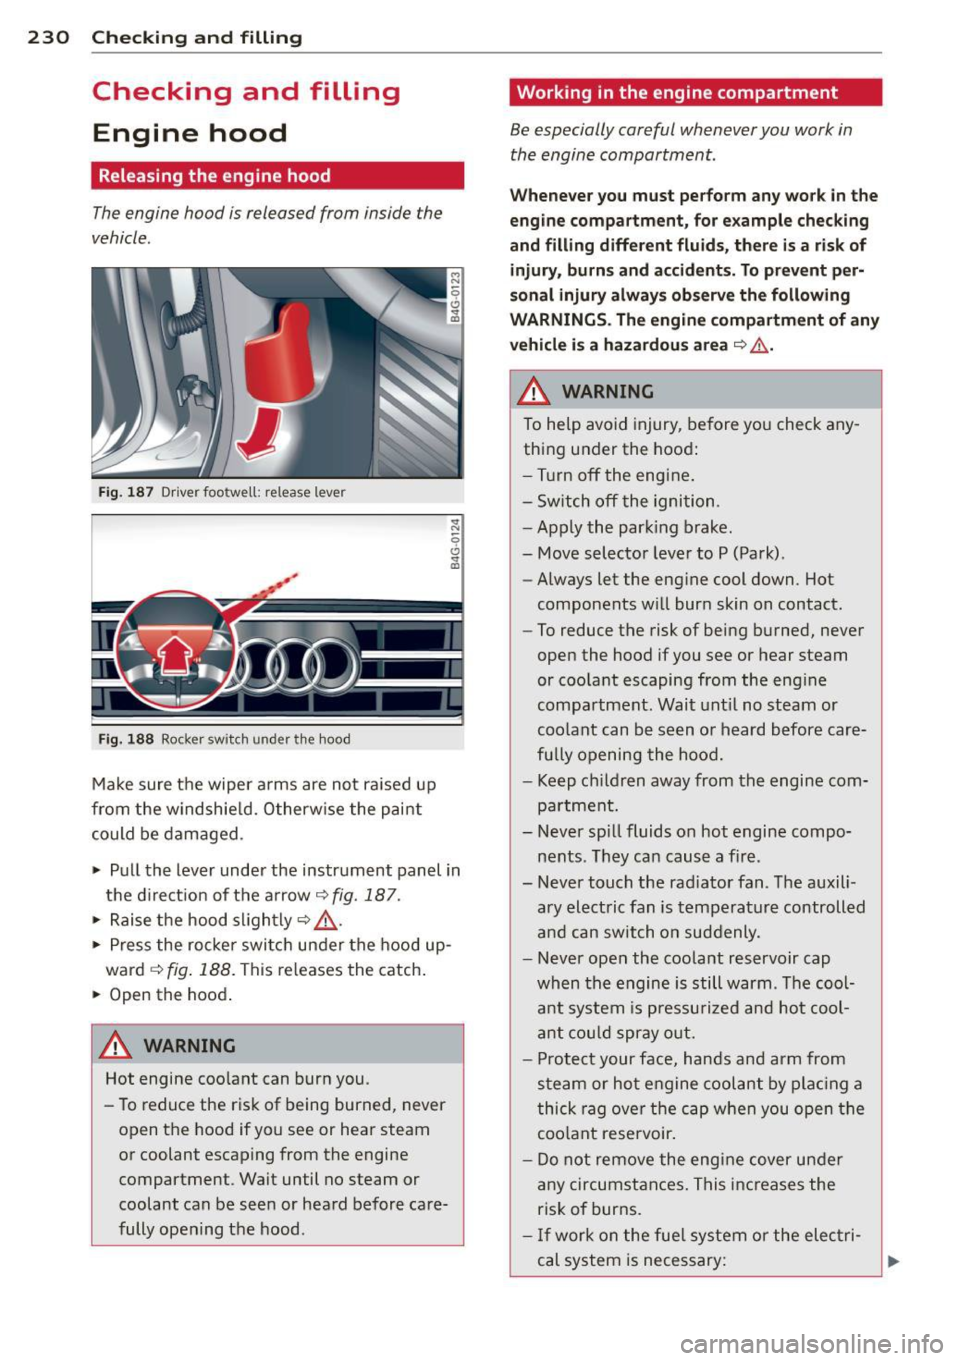
Fig. 187 Driver foo twell: release lever
Fig. 188 Rocker switch un der the hood
Make sure the wiper arms are not raised up
from the windshield. Otherwise the paint
could be damaged .
.,. Pull the lever under the instrument panel in
the direction of the arrow
~ fig. 187.
.,. Raise the hood slightly~,&. .
... Press the rocker switch under the hood up
ward
~ fig. 188. This releases th e catch.
... Open the hood.
&_ WARNING
Hot engine coolant can burn you.
- To reduce the risk of being burned, never
open the hood if you see or hear steam
or coolant escaping from the engine compartment . Wait until no steam or
coolant can be seen or heard before care
fully opening the hood .
'Working in the engine compartment
Be especially careful whenever you work in
the engine compartment.
Whenever you must perform any work in the
engine compartment, for example checking
and filling different fluids, there is a risk of injury, burns and accidents. To prevent per
sonal injury always observe the following
WARNINGS. The engine compartment of any
vehicle is a hazardous area
~ ,&. .
A WARNING
To help avoid injury, before you check any
thing under the hood:
- Turn off the engine.
- Switch off the ignition .
- Apply the parking brake.
- Move selector lever to P (Park).
- Always let the engine cool down. Hot
components will burn skin on contact.
- To reduce the risk of being burned, never
open the hood if you see or hear steam
or coolant escaping from the engine
compartment. Wait until no steam or
coolant can be seen or heard before care
fully opening the hood.
- Keep children away from the engine com
partment.
- Never spill fluids on hot engine compo
nents . They can cause a fire .
- Never touch the radiator fan. The auxili
ary electric fan is temperature controlled
and can switch on suddenly .
- Never open the coolant reservoir cap
when the engine is still warm . The cool
ant system is pressurized and hot cool
ant could spray out.
- Protect your face, hands and arm from
steam or hot engine coolant by placing a
thick rag over the cap when you open the
coolant reservoir.
- Do not remove the engine cover under
any circumstances. This increases the
risk of burns.
- If work on the fuel system or the electri
cal system is necessary:
Page 233 of 310

-Always disconnect the battery.
- Never smoke or work near heaters or open flames. Fluids in the engine com
partment could start a fire.
- Keep an approved fire extinguisher im
mediately available.
- To avoid electrical shock and personal in
jury while the engine is running or being
started, never touch :
- Ignition cables
- Other components of the high voltage
electronic ignition system.
- If you must perform a check or repair
with the engine running:
- First, fully apply the parking brake,
move selector lever to P (Park).
- Always use extreme caution to prevent
clothing, jewelry, or long hair from get
ting caught in the radiator fan, V-belts
or other moving parts, or from contact ing hot parts. Tie back hair before
starting, and do not wear clothing that
will hang or droop into the engine.
- Minimize exposure to emission and
chemical ha zards c:::> & .
A WARNING
California Proposition 65 Warning:
- Engine exhaust, some of its constituents,
and certain vehicle components contain
or emit chemicals known to the State of
California to cause cancer and birth de
fects and reproductive harm. In addition ,
certain fluids contained in vehicles and
certain products of component wear con
tain or emit chemicals known to the
State of California to cause cancer and
birth defects or other reproductive harm .
Checking and filling 231
-Battery posts, terminals and related ac
cessories contain lead and lead com
pounds, chemicals known to the State of
California to cause cancer and reproduc
tive harms. Wash hands after handling.
(D Note
When adding fluids, always make sure that
they are poured into the proper container
or filler opening, otherwise serious dam
age to vehicle systems will occur.
(® For the sake of the environment
To detect leaks in time, inspect the vehicle
floor pan from underneath regularly . If
you see spots from oil or other vehicle flu ids, have your vehicle inspected by an au
thorized Audi dealer.
Closing the engine hood
.,. Pull the hood down until the pressure from
the struts is reduced.
.,. Let the hood
drop down and latch in place.
Do not try to push it shut; it may fail to en
gage
c:::> ,A .
A WARNING
-
A hood that is not completely latched
could fly up and block your view while driv
ing .
- When you close the engine hood, check it
to make sure the safety catch has proper ly engaged. The hood should be flush
with the surrounding vehicle body parts.
- If you notice while driving that the hood
is not secured properly , stop at once and
close it. •
•
Page 234 of 310
232 Checking and filling
Engine compartment
Engine compartment overview
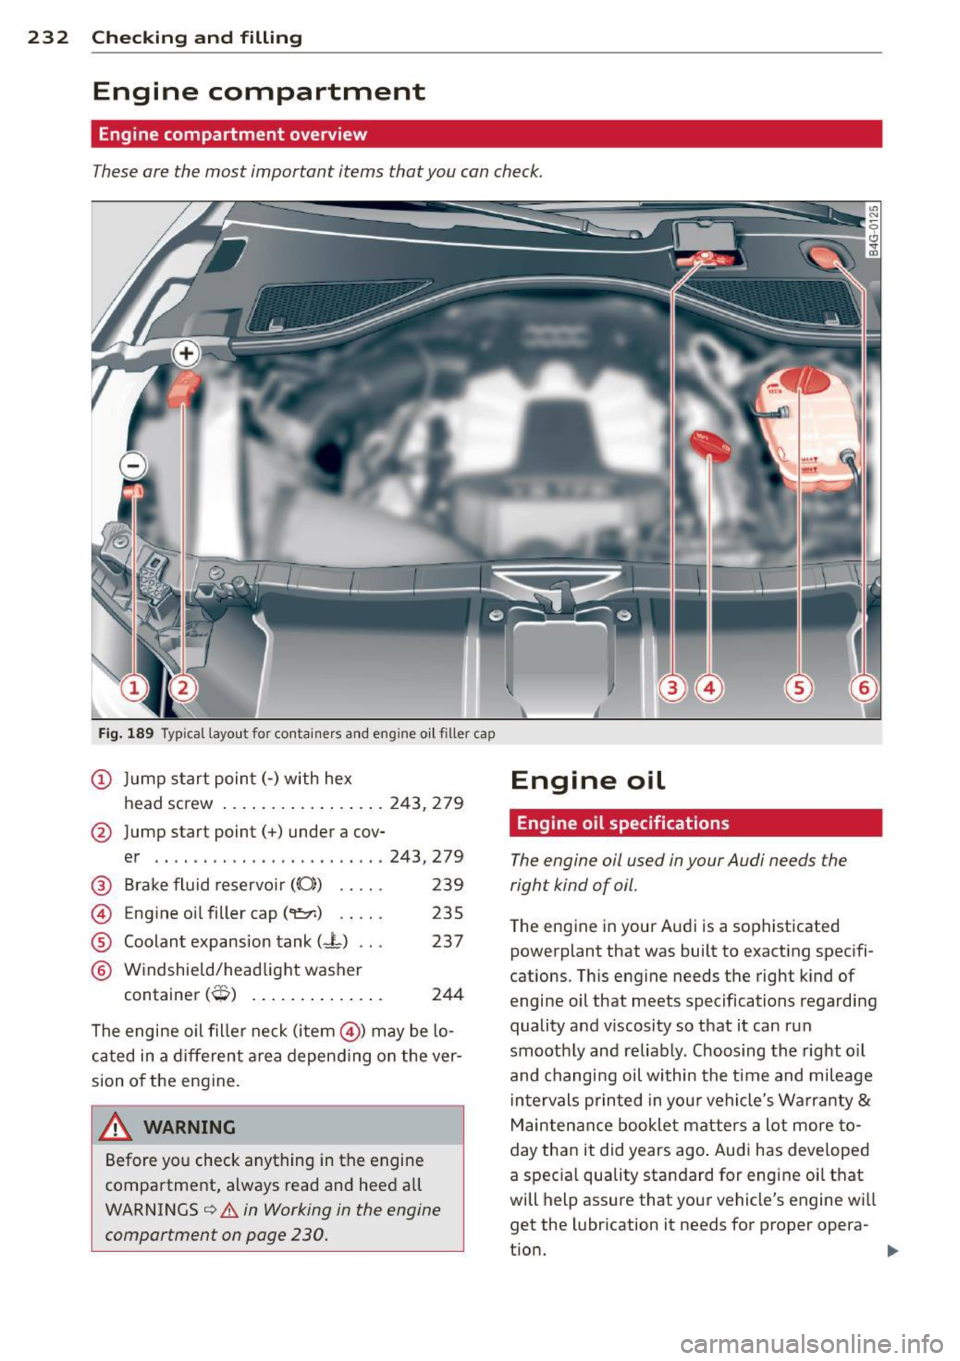
These are the most important items that you can check.
Fig. 189 Typ ical layout for contai ners and eng ine o il filler cap
(D Jump start point(-) with hex
head screw .... .............
243, 279
@ Jump start point(+) under a cov-
er .. .. ............... .... .
243,279
®
©
®
®
Brake fluid reservoir ((0)) . . . . . 239
Engine oil filler cap (
(-L) ...
Windshield/headlight washer
237
t . (.'R) con ainer ,,.., ............ . . 244
The engine oil filler neck (item @) may be lo
cated in a different area depending on the ver
sion of the engine.
~ WARNING
Before you check anything in the engine
compartment, always read and heed all
WARNINGS
¢ &. in Working in the engine
compartment on page 230.
-
Engine oil
Engine oil specifications
The engine oil used in your Audi needs the
right kind of oil.
The engine in your Audi is a sophisticated
powerplant that was built to exacting specifi
cations . This engine needs the right kind of
engine oil that meets specifications regarding
quality and viscosity so that it can run
smoothly and reliably . Choosing the right oil
and changing oil within the time and mileage
intervals printed in you r vehicle's Warranty
&
Maintenance booklet matters a lot more to
day than it did years ago . Audi has developed
a special quality standard for engine oil that
will help assure that your vehicle's engine wi ll
get the lubrication it needs for proper opera-
tion. ..,.