display AUDI A7 2013 Workshop Manual
[x] Cancel search | Manufacturer: AUDI, Model Year: 2013, Model line: A7, Model: AUDI A7 2013Pages: 310, PDF Size: 77.45 MB
Page 126 of 310
124 Parking systems
the vehicle at the latest when the red orien
tation line* borders an object
c::> A in Gener
al information on page 121.
Rear
Applies to vehicles: with park ing system plus and rear
mode
Fig. 139 Infotainment: rear mode
This view assists you for example, in using the
full maneuvering range behind the vehicle .
The area behind the vehicle is displayed. The
vehicle surroundings are shown in the left
area of the display. You can switch between
optical display and camera image*
c::>page 123.
• Se lect the @symbol with the control knob.
You can choose between three different views in this mode .
• To cross park, parallel park, or position the
vehicle in front of a tra iler, press the® con
t rol button on the unit repeatedly until the
symbol fo r the desired mode is selected.
Cross parking
Applies to vehicles: wit h parking system pl us and rear
mo de
This view may be used when parking in a ga
rage or in a parking space.
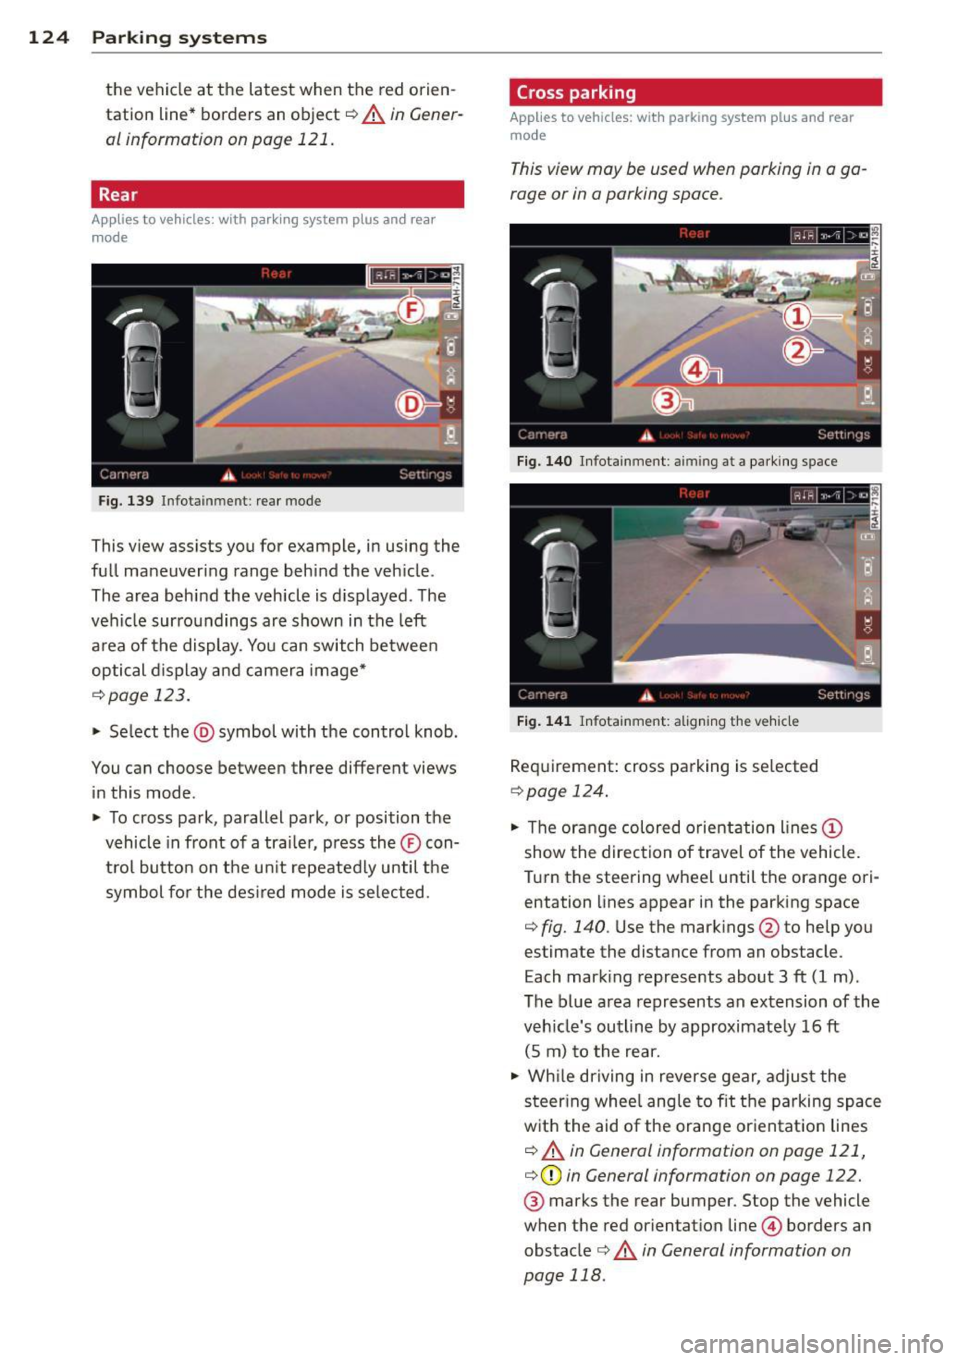
Fig . 140 Infotainment : aiming at a park ing space
Fig. 141 Infotainment: aligning the vehicle
Requirement: cross parking is se lected
c::> page 124.
• Th e orange colored orientation lines (D
show the direction of travel of the vehicle.
Turn the steering wheel until the orange ori entation lines appear in the parking space
c::> fig. 140 . Use the mark ings @to help you
estimate the distance from an obstacle.
Each marking represents about 3 ft (1 m).
The blue area represents an extension of the
veh icle's outline by approximately 16 ft
(5 m) to the rear.
• While driving in reverse gear, adjust the
steer ing whee l angle to fit the parking space
with the aid of the orange orientat ion lines
c::> A in General information on page 121,
c::>(D in General information on page 122.
® marks the rear bumper. Stop the vehicle
when the red orientation line© borders an
obstacle
c::> &. in General information on
page 118.
Page 127 of 310

Parallel parking
Applies to vehicles: with parking system plus and rear
mode
This view may be used when parallel parking
along the side of a street.
F ig. 1 42 Infot ainme nt: bl ue su rfaces aligned in th e
park ing space
Fig . 14 3 Infota inmen t: co ntact of the blue curved line
with t he curb
Parking on the right is described he re. It is
ident ical when parki ng on the left .
I f there is an obstacle next to the park ing
space (such as a wall), refer to information for
"Parking nex t to obstacles" ¢
page 125.
~ Activate the turn s ignal.
~ Position your vehicle next to a parked vehi
cle in front of the desired parking space . T he
distance to th is vehicle should be approxi
mately 3 ft (1 m).
~ Turn the Infotainment on and shift into re
verse gear. The parking system is turned on
and the
parallel parking indicator is dis
played .
~ Press the@¢ fig. 130 control button on
the Infotainment un it repeatedly until the
cross parking view is displayed .
~ Back up and align your vehicle so the b lue
area @ borders on the rear end of the vehi-
Parking systems 125
cle or on the parking space line¢ A in Gen
eral information on page 121 , ¢ (Din Gen
eral information on page 122.
The b lue area
represent s an extens ion of the vehicle 's out
line by approximately 16 ft (5 m) to the rear.
The long side of the blue area should be on
the curb . The entire blue area must fit into
th e parking space .
~ With the vehicle s topped, tu rn the steering
wheel to t he righ t as fa r as it will go.
~ Back into the parking space until t he bl ue
curve ¢
fig. 131 touches the curb¢ A in
General information on page 121,
¢ (I) in
General information on page 122 .
Stop the
veh icle .
~ With the vehicle stopped, turn the steering
wheel to the left as far as it w ill go.
~ Cont inue to back into the parking space un
til the vehicle is parked parallel to the curb
¢ ..&. in General information on page 121,
¢ (Din General information on page 122.
@ marks the rear bumper. Stop the vehicle,
at the latest, when the red or ientation line
@ borders an object . Keep an eye on the
front of your vehicle while do ing this .
Parking next to obstacles
When there is an obstacle (such as a w all)
next to the parking space, choose a space with
more space on the sides . Positio n the long
side of the blue area so that there is suff icient
space from the curb. The area must not be on
the curb. You will a lso need to start turning
the steering wheel much earlier . T here should
be a sufficient amount of space between the
c ur b and the bl ue curve, and t he b lue curve
¢
fig . 131 must n ot touc h the curb.
@ Tips
The left o r right orientation lines and su r
faces w ill be disp layed, depending on the
turn s ignal being used .
Page 128 of 310
126 Parking systems
Trailer view
Ap plies to vehicles: with par king system p lus and tra iler
hitch
This view assists you in positioning the vehicle
in front of a trailer.
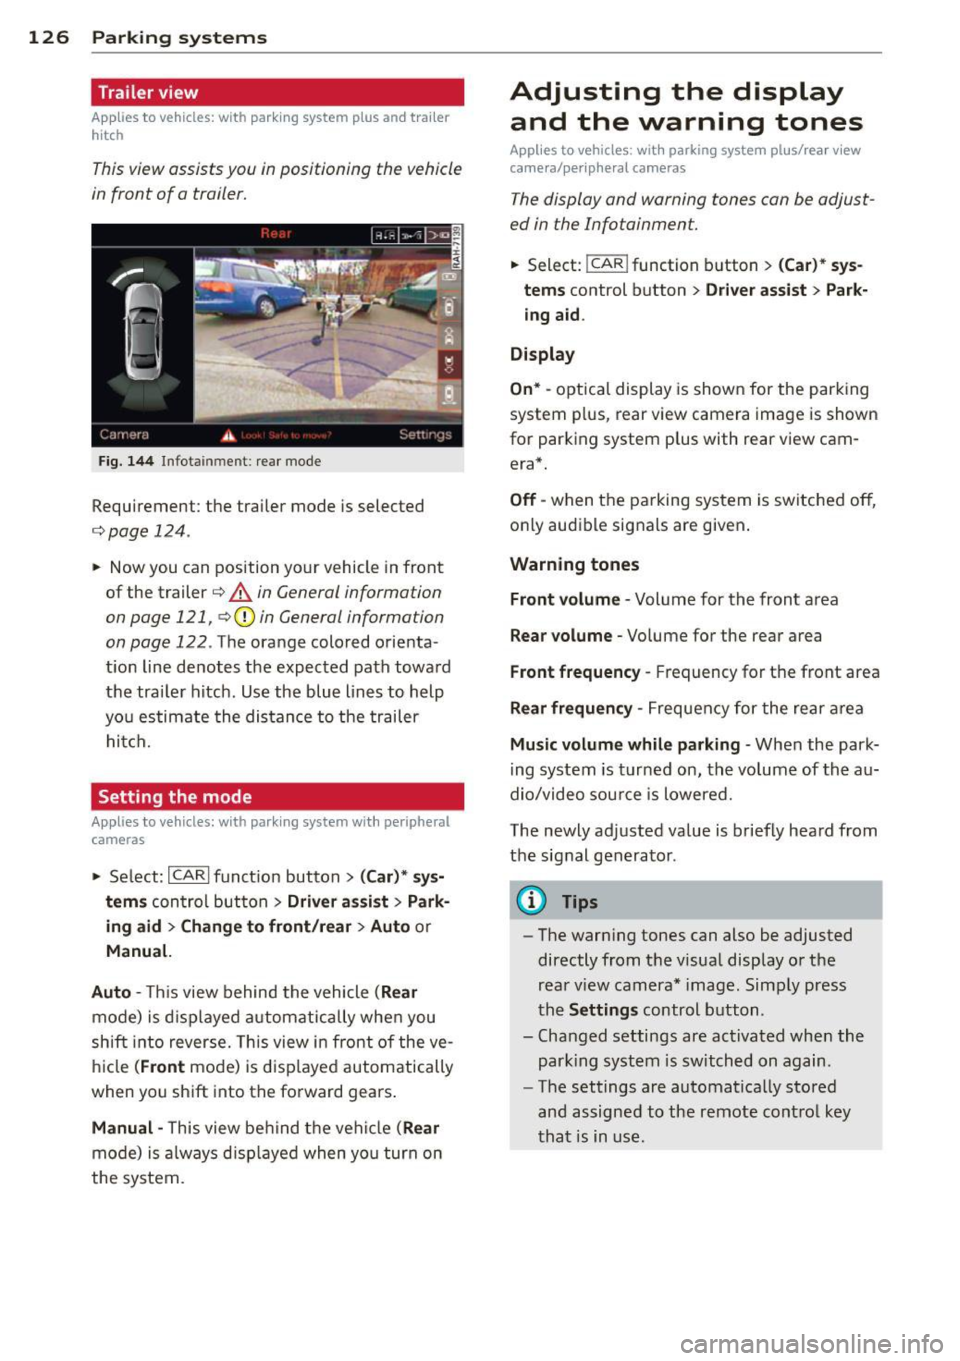
F ig. 1 44 Infotai nment: rea r mode
Requirement: the trai ler mode is selected
c:;, page 124.
.. Now you can position yo ur vehicle in front
of the trailer
c:;, .&. in General information
on page 121, c:;,(j) in General information
on page 122 .
The orange colo red orienta
t ion line denotes the expected path toward
the tra iler hitch . Use the blue lines to help
yo u estimate the distan ce to the trailer
hi tc h.
Setting the mode
Ap plies to veh icles: with par king system wi th peripheral
cameras
.. Select: ICARI funct ion button > ( Car )* sy s
tem s
control button > Driv er a ssis t > Park
ing aid > Ch ange to front /rear > Auto
or
Manual.
Auto -
This view behind the vehicle ( Rear
mode) is d isplayed a utomatically when you
shift into reverse. This view in front of the ve
h icle
(Front mode) is d isp layed automatically
when you sh ift into the forward gears .
Manual -This view be hind the vehicle (Rear
mode) is a lways d isp layed when yo u turn on
the system.
Adjusting the display and the warning tones
Applies to vehicles: wit h parking syste m plus/ rea r view
came ra/ peri pheral cameras
The display and warning tones can be adjust
ed in the Infotainment.
.. Select: !CAR ! function b utton > (Ca r) * s ys
tems
control button > Dri ver ass ist > Par k
i n g a id .
Display
On * -
optica l display is shown for the parking
system p lus, rear view camera image is shown
for parking system plus with rear view cam era*.
Off -when the parking system is switche d off,
o nly aud ible signa ls are given .
Warning tones
Front volume -
Volume for the front area
Rear volume -Volume for the rear area
Front frequency -Frequency for the front area
Rear frequen cy -Frequency for the rear area
Mu sic volum e while parking -When the park
ing system is turned on, the vo lume of the au
dio/video sou rce is lowered.
The newly adjusted value is briefly hea rd from
the signal generator .
@ Tips
-The warn ing tones can also be adjusted
directly from t he visua l display o r the
rea r view camera* image. Simp ly press
the
Setting s control button .
- Changed settings are act ivated when the
par king system is switched on again.
- The settings are automa tica lly stored
and assigned to the remote cont rol key
t ha t is in use .
Page 129 of 310
Error messages
Applies to vehicles: with parking system plus/rear view
camera/per ipheral cameras
There is an e rror in the system if the LED in
the
p, qA button is blinking and you hear a con
tinuous alarm for a few seconds afte r switch
ing on the parking system or when the park
ing system is already activated. If the error is
not corrected before you switch off the igni
tion, the LED in the
Pw.6. button will blink the
next time you switch on the parking system by
shifting into reverse.
Parking system plus
If a sensor is faulty, the~ symbol will appear
in front of/behind the vehicle in the Infotain
ment display. If a rear sensor is fau lty, only
obstacles that are in areas @ and @ are
shown
c:> fig. 121 . If a front sensor is fau lty,
only obstacles that are in areas © and @are
shown .
Peripheral cameras*
There is also a system error if:
- the
'(:8:)• • symbol appears in the display and
the corresponding display area is shown in
blue. The camera is not working in this area.
- all segments around the vehicles are red or
if no segments are displayed.
Drive to your authorized Aud i dea ler o r au
thorized repair fac ility immediately to have
the ma lfunction corrected.
Trailer hitch
Appl ies to vehicles: with parking system plus/rear view
camera/per ipheral cameras and trailer hitch
For vehicles using the tra iler socket, the park
ing system rear senso rs do not turn on when
you shift into reverse gear or when yo u press
the P
01A button. This resu lts in the following re
strictions:
Parking system plus*
There is no distance wa rning for the rear. The
front sensors rema in activated. The visual dis
play switches to the trailer towing mode.
Parking systems 127
Parking system plus and rear view
camera* /Peripheral cameras*
There is no distance warning for the rear. The
front sensors remain activated. The visual dis
play sw itches to the trailer towing mode. The
rear view camera image will not show the ori
entation lines and the blue surfaces .
{D Tips
Trailer hitches that are not installed at the
factory may cause the park ing system to
malfunction or they may restr ict its func
tion.
Page 131 of 310
@ Tips
To open the garage door, press the button,
but do not press it for longer ten seconds
or the Homelink modu le w ill switch to
programming mode .
Programming the transmitter
Applies to vehicles : with Home Link
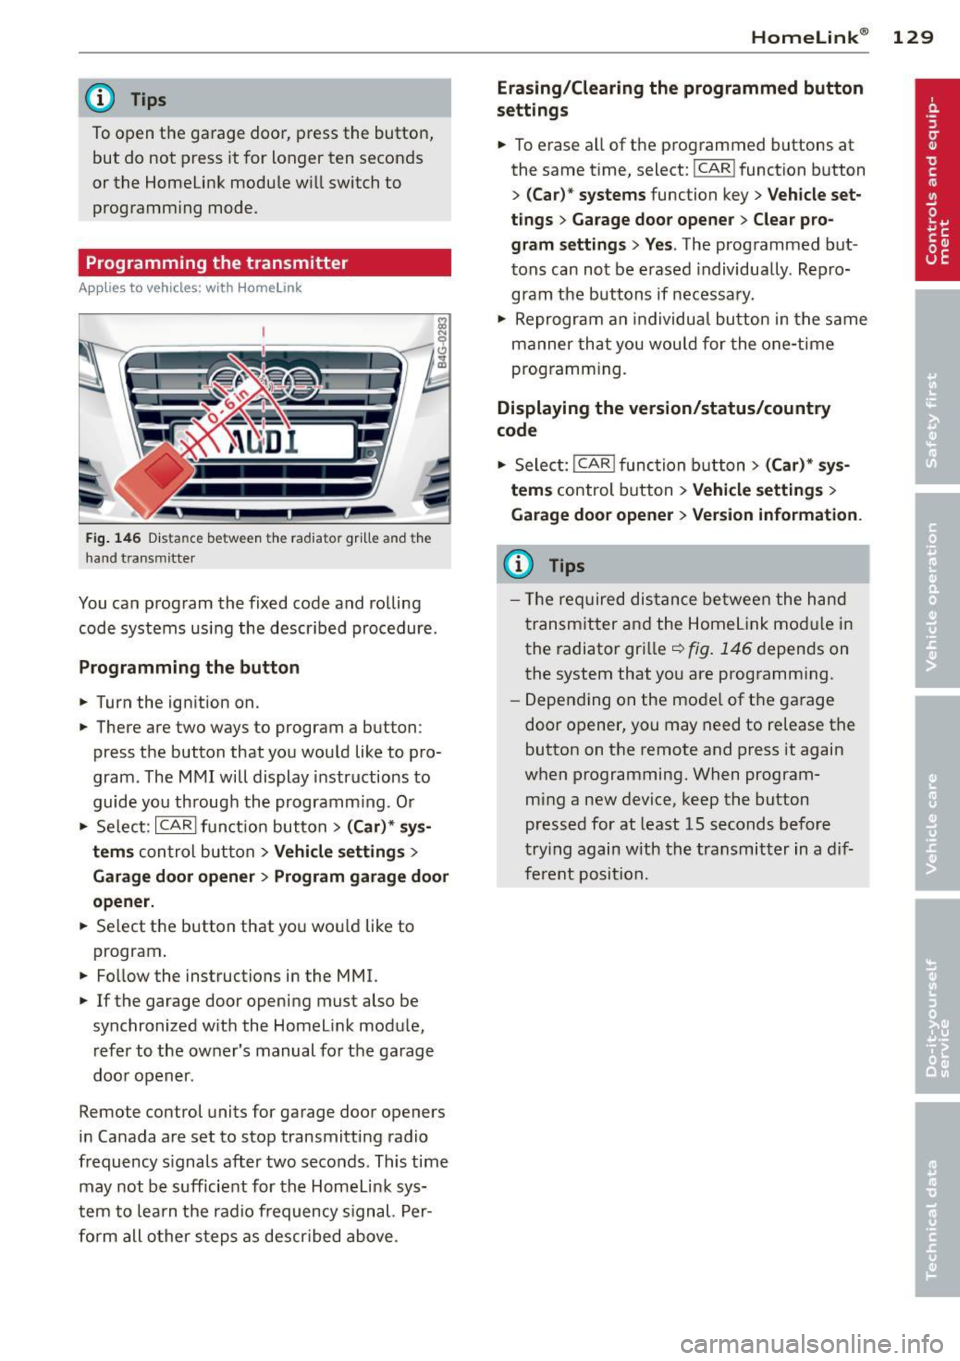
Fig. 146 Dist an ce be tween the ra diato r gr ille a nd the
hand t ransm itter
You can program the fixed code and rolling
code systems using the described procedure.
Programming the button
.. Turn the ignition on.
.. There are two ways to program a button:
press the button that you would like to pro
gram . The MMI will display instructions to
guide you through the programm ing . O r
.. Se lect: ICARlfunction button>
( Car) * sys
tems
con trol button > Vehicle settings >
Garage door opener > Program garage door
opener .
.. Se lect the button that you wou ld like to
program .
.. Fo llow the instructions in the MMI.
.. If the garage door opening must also be
synchronized with the Homelink module,
refer to the owner's manual for the garage
door opener .
Remote control units for garage door openers
in Canada are set to stop transmitting radio
frequency s ignals after two seconds . This time
may not be sufficient for the Homelink sys
tem to learn the radio frequency signal. Per
form all other steps as descr ibed above .
Homelink ® 129
Erasing/Clearing the programmed button
settings
.. To erase all of the programmed buttons at
the same time, select: !CAR ! function button
>
(Car)* systems function key> Vehicle set
tings
> Garage door opener > Clear pro
gram settings> Yes .
The programmed but
tons can not be erased individua lly . Repro
gram the buttons if necessary .
.. Reprogram an individual button in the same
manner that you wou ld for the one-time
programming.
Displaying the version/status/country
code
.. Select: I CAR I function button > (Car)* sys
tems
control button > Vehicle settings >
Garage door opener > Version information .
(D Tips
- The required distance between the hand
transmitter and the Homelink mod ule in
the radiator grille~
fig. 146 depends on
the system that you are programm ing .
- Depending on the mode l of the garage
door opener, you may need to release the
button on the remote and press it again
when programming. When program
ming a new device, keep the button
pressed for at least 15 seconds before
trying again with the transmitter in a dif
ferent position.
Page 154 of 310
152 Airbag sys te m
If the front passenger airbag is turned off, the
PASSENGER AIR BAG OFF light comes on in
the instrument cluster and stays on.
I f the front passenger airbag deploys, the
F ederal Standard requires the airbag to meet
the " low risk" deployment criteria to reduce
the r isk of injury through interaction with the
a irbag. "Low risk" deployment occurs in those
crashes that take place at lower decelerations
as defined in the electronic control unit
c::> page 162, PASSENGER AIR BAG OFF light.
A lways remember, a chi ld seat or infant carri
er installed on the front seat may be struck
and knocked out of position by the rap idly in
flating passenger's a irbag in a frontal colli
sion . The airbag could greatly reduce the ef
fectiveness of the ch ild restraint and even se
rio usly inju re the child during inflat ion.
For this reason, and because the back seat is
the safest place for chi ldren - when properly
restra ined accord ing to their age and size - we
strongly recommend that children always sit in the back seat
c::> page 175, Child Safety .
& WARNING
-
A child in a rearward-facing child seat in
stalled on the front passenger seat will be
ser iously injured and can be killed if the
front airbag inflates - even with an Ad
vanced Airbag System.
- The inflating a irbag will hit the child seat
or infant carrier with great force and w ill
smash the ch ild seat and child against
the backrest, center armrest, door or roof.
- Always install rear-facing child seats on
the rear seat.
- If you must install a rearward facing
child seat on the front passenge r seat
because of except iona l circumstances
and the
PASSENGER AIR BAG OFF light
does not come on and stay on, immedi
ately install the rear-f acing chi ld seat in a
rear seating position and have the ai rbag
system inspected by your Aud i dealer. -
Forward-facing child seats installed on
the front passenger's seat may interfere
with the deployment of the a irbag and
cause serious persona l injury to the
child.
& WARNING
-If, in except ional circumstances, you must
i nstall a forward-facing child restraint on
the front passenge r's seat:
- Always make sure the forward-facing
seat has been designed and certified by
its manufacture r fo r use on a fron t seat
with a passenger fron t and s ide a irbag.
- Never p ut the fo rward -facing child re
s tra int up agains t or very near the instru
men t panel.
- Always move the passenge r seat into its
rearmost pos ition in the seat's fore and
aft ad justment range, as fa r away from
the airbag as possible before installing
the forward-facing ch ild restra int . The
backrest must be ad justed to an upright
position.
- Make sure that the
PASSENGER AIR BAG
OFF
li ght comes on and stays on all the
time whenever the ignition is switched on .
& WARNING
-To reduce the risk of serious injury, make
sure that the
PASSENGER AIR BAG OFF
light w ill be displayed whenever a child re
straint is installed on the front passenger
sea t and the ignition is sw itche d on .
- If the
PASSENGER AIR BAG OFF light
does no t stay on, perform the checks de
scribed
<>page 161, Monitoring the Ad
vanced Airbag System.
- Ta ke t he chi ld restraint off the front pas
senger sea t and install it prope rly at one
of the rear seat positions i f the
PASSEN
GER AIR BAG OFF
light does not stay on.
- Have the airbag system inspected by
your Aud i dea le r i mmediately.
Page 205 of 310
Vehicle stands for an extended period
If you do not drive you r vehicle over a period
of several days or weeks, electrical compo
nents are grad ually cut back or switched off.
This reduces energy consumption and main
tains starting capabi lity over a longer period.
Some of the convenience functions may not
operate, such as the inter ior lights or the
power seat adjustment . The conven ience
functions will be ava ilable again when you
switch on the ignit io n and start the engine.
With the engine turned off
If you listen to the radio, for example, with
the engine turned off or use other MMI func
tions, the battery is being discharged .
If starting capability is jeopardized due to en
ergy consumpt ion, the following warning ap
pears in the MMI display:
Please start the engine soon or the system
will be turned off.
The warning indicates that the system will be
turned off automatically after 3 minutes. If
you wish to continue using the functions, you
have to start the engine.
With the engine running
Although electrical energy is genera ted when
the vehicle is being driven, the battery can be
come discharged. This happens mostly when
litt le energy is being generated and a great
deal consumed and the battery's state of
charge is not optimal.
To bring the energy balance back into equili
brium, consumers which require especially
large amounts of energy are temporarily cut
back or switched off. Heating systems in par
ticular requ ire a great deal of energy. If you
notice, for example, that the heated seats* or
the heated rear window are not heating, they
have been temporarily cut back or switched
off. These systems will be ava ilabl e again as
soon as the energy ba lance has been restored .
You will also notice that engine idle speed has
been increased slightly. This is normal and not
a cause for concern . By increasing engine idle
Intelligent technology 203
speed the additional energy required is gener
ated and the battery is charged.
•
•
Page 213 of 310
Always apply brakes early. When driving
downhill, shift into a lower gear to use the en
g ine braking effect to slow the vehicle . Use of
the brakes a lone can cause them to overheat
and fail.
Coolant temperature
The coolant temperature gauge ¢ page 11
must be observed carefully. The coo lant tem
perature can increase if you drive on long in
clines in a low gear at high engine speeds. Re
duce your speed immediately if the LEDs in
the top part of the display turn on .
For more information about indicator lights,
refer to.
c> page 16.
A WARNING
Anyone not properly restrained in a mov
ing vehicle is at a much greater risk in an
accident . Never let anyone r ide in your car
who is not properly wearing the restra ints
provided by Aud i.
Trailer towing tips
Important to know
Your vehicle hand les different ly when towing
-
a trailer because of the additional weight and
d ifferent weight distribution . Safety, perform
ance and economy w ill greatly depend on how
carefully you load your trailer and operate
your rig .
Before you actually tow your trailer, practice
turning, stopp ing and backing up in an area
away from traffic . Keep practicing until you
have become completely familiar with the way
your veh icle-trailer comb ination behaves and
responds .
Backing up is diff icult and requires practice .
Backing up with a tra iler genera lly requires
steer ing action opposite to that when backing
up your vehicle without a trailer.
Maintain a greater distance between your ve
hicle and the one in front of you. You will need
more room to stop. To compensate for the
Trailer towing 211
trailer, you wi ll need a larger than normal
turning radius.
When passing, remember that you cannot ac
ce lerate as fast as you norma lly would be
cause of the added load. Make sure you have
enough room to pass. After passing, allow
plenty of room for your trailer before chang
ing lanes again.
Avoid jerky starts, sharp turns or rapid lane
changes.
(0 Tips
- Do not tow a trailer during the break-in
period of your vehicle.
- If you tow a trailer, your Audi may re
quire more frequent maintenance due to
the extra load¢
page 289.
Parking on a slope
Do not pork on a slope with a trailer . If it can
not be avoided, do so only after doing the fol
lowing:
When parking:
"' App ly the foot brake .
.,. Have someo ne p lace chocks under both the
veh icle and the trailer wheels.
"' With chocks in place, slowly release the
brakes until the wheel chocks absorb the
load .
.,. Turn the wheels towards the curb .
.,. Apply the parking brake.
.,. Select the P selector lever posit ion .
When restarting after parking:
.,. Apply the foot brake.
.,. Start the engine .
.,. Select the D/S se lector lever position .
.,. Release the parking brake and slowly pull
out and away from the wheel chocks.
.,. Stop and have someone retr ieve the wheel
chocks .
111>
•
•
Page 221 of 310
To preserve the decorative appearance of the
cast a lloy whee ls , some specia l care is neces
sary. In add it ion to road dirt and sa lt, brake
dust is also corros ive. If left on for too long,
brake dust can cause pitting.
Use only specia l
acid-free cleaners formulated
for a lloy rims. Safe products are available at
your Aud i dealer. Never leave the cleaner on
t he r ims longer than spec ified on the label. If
not rinsed off promptly, the acid conta ined in
some cleaners can attack the threads on the
wheel bo lts.
Never use abras ive or metal polishing clean
ing agents . If the protective coat ing has been
chipped, e .g . by k icked up road d irt, touch it
up as soon as possib le.
.8, WARNING
- Moist ure and ice on brakes may affect
braking efficiency
r::!;> page 199, General
information .
Test the brakes caref ully
each time you wash the vehicle.
- Alw ays read and hee d all WARN INGS and
other information ¢
page 213 .
-
Body cavity sealing
The body cavity sealing does not need to be
checked.
All body cavities wh ich could be affected by
corrosion have been thoroughly p rotected at
the facto ry.
This sea ling does not require any inspection or
addit ional treatment . If any wax should seep
out of the cav ity w hen the ambient tempera
ture is high, it can be removed wit h a plastic
scrape r and a su itab le solvent.
.8, WARNING
So lvents can be dangerous.
- Benzine is flammable and toxic.
If you
u se benzine for removing the wax, keep
sparks, flame and lighted c igarettes
away. Never dump benzine on t he
ground, into open streams or down sew
age drains .
Cleaning and protec tion 219
- Be s ure to observe all safety and environ
mental reg ulations . Follow all instruc
tions on the container.
- Always read and heed a ll WARNINGS and
other information
r::!;> page 213.
Chassis
Have the undercoating checked for damage
from time to time .
The lower body shell of your Aud i is also thor
oughly protected against corrosion .
A ny damage to the unde rcoa ting caused by
road hazards sho uld be repaired prompt ly.
.8, WARNING ,.____
T oo much undercoating in the wrong p la
ces can cause a fire.
- Do not app ly addition al u nder coati ng or
r u stp roof ing on or nea r the exhaust
manifold, exhaust pipes, catalytic con
verter or heat shields . While driving, the
substance used for undercoating could
overheat and cause a fire.
- Always read and heed a ll WARNINGS and
other information
r::!;> page 213.
Exhaust tail pipes
Road salt and other corrosive materials will
damage the material in the exhaust tail pipes
if they are not clea ned regular ly . Do not clea n
the tail pipes with w heel cleaner, pa int polish,
c hr ome polish or other ab ras ive clea ne rs.
C lean t he tail pipes with ca r c are products
that are suitable for stainless steel.
Your authorized Audi dea ler ca n provide clean
ing products that have been tested and ap
proved for yo ur vehicle .
Care of interior
Infotainment components
The MMI/RSE* display may be cleaned w it h a
soft clot h and commercia lly-available "LCD
cleaner" . T he cloth should be coated lightly .,..
•
•
Page 222 of 310
220 Cleaning and protec tio n
when the cleaning so lution when cleaning the
display .
The MMI/RS E* contro ls must be cleaned first
with a brush so that d irt does not enter the
unit or enter between the buttons and the
housing . Then wiping the controls with a cloth
dampened with dish detergent and water is
recommended.
- To avoid scratching the disp lay, you
shou ld never clean it dry.
- To prevent damage, make sure fl uids do
not enter the controls .
Head-up Display
Applies to vehicles: with Head-up Display
The Head-up Display may be cleaned with a
damp cloth. The cloth should be free from
dust and lint, like a m icrofiber cloth for exam
ple .
Q) Note
-To prevent scratches, do not clean the
display when it is dry.
- To prevent damage, make sure that flu
i ds do not enter the disp lay.
Aluminum trim
Use only n eutral -pH products to remove spots
and depos its from alum inum surfaces .
Ch rome ca re products and alkaline cleaners
will attack alum inum s urfaces and can dam
age them over time.
A WARNING
Always read and heed a ll WARNINGS and
other information ¢
page 213.
Fabrics and fabric coverings
Fabrics and fabric coverings (e .g. seats, door
tr im panels, etc.) should be cleaned at reg ular
intervals with a vacuum cleaner . This removes
surface dirt particles which could become em bedded in the fabr ic through use . Steam cleaners should not be
used, because the
steam tends to p ush the dirt deeper into the
fabric and lock it there.
Normal cl eaning
Genera lly, we recommend using a soft sponge
o r a lint-free microfiber cloth to the clean fab
ric. Brushes shou ld only be used for carpets
and floor mats, since other fabric surfaces cou ld be harmed by brushes.
Normal s urface stains can be cleaned using a
commercially availab le foam cleaner . Spread
the foam on the surface of the fabric with a soft sponge and work it in gently . Do not satu
rate the fabric. Then pat the foam dry us ing
absorbent, dry cloths (e.g. m icrofiber cloth)
and vacuum it after it has dried completely.
Cle aning stains
Stains caused by beverages (e .g. coffee, fruit
juice, etc .) can be treated with a mild deter
gent solution. Apply the detergent solution
wi th a sponge. In the case of stubborn s tains,
a detergent paste can be applied directly to
the stain and worked i nto the fabric . After
wards, use copious amounts of clean water to
remove the rema ining deterge nt. Apply the
water with a damp cloth or sponge a nd pat
the fabr ic dry with an absorbent, dry cloth .
Stai ns from choco late or makeup should have
detergent paste (e.g. ox-gall soap) rubbed in
to them. Afterwa rds, remove the soap with
water (damp sponge) .
Alcohol can be used to treat stains from grease, o il , lipstick or a ballpoint pen . Melted
gre ase or dye mus t be patted
off using ab
sorbent material. It may be necessary to re
treat the areas with detergent paste and wa
ter.
In the case of general soiling of the upho ls
te ry and cover material, we recommend hiring
a specia list that has the equipment to clean
the seat covers and other fabric surfac es by
shampooing and spray extraction.