roof AUDI A7 2013 Owners Manual
[x] Cancel search | Manufacturer: AUDI, Model Year: 2013, Model line: A7, Model: AUDI A7 2013Pages: 310, PDF Size: 77.45 MB
Page 4 of 310
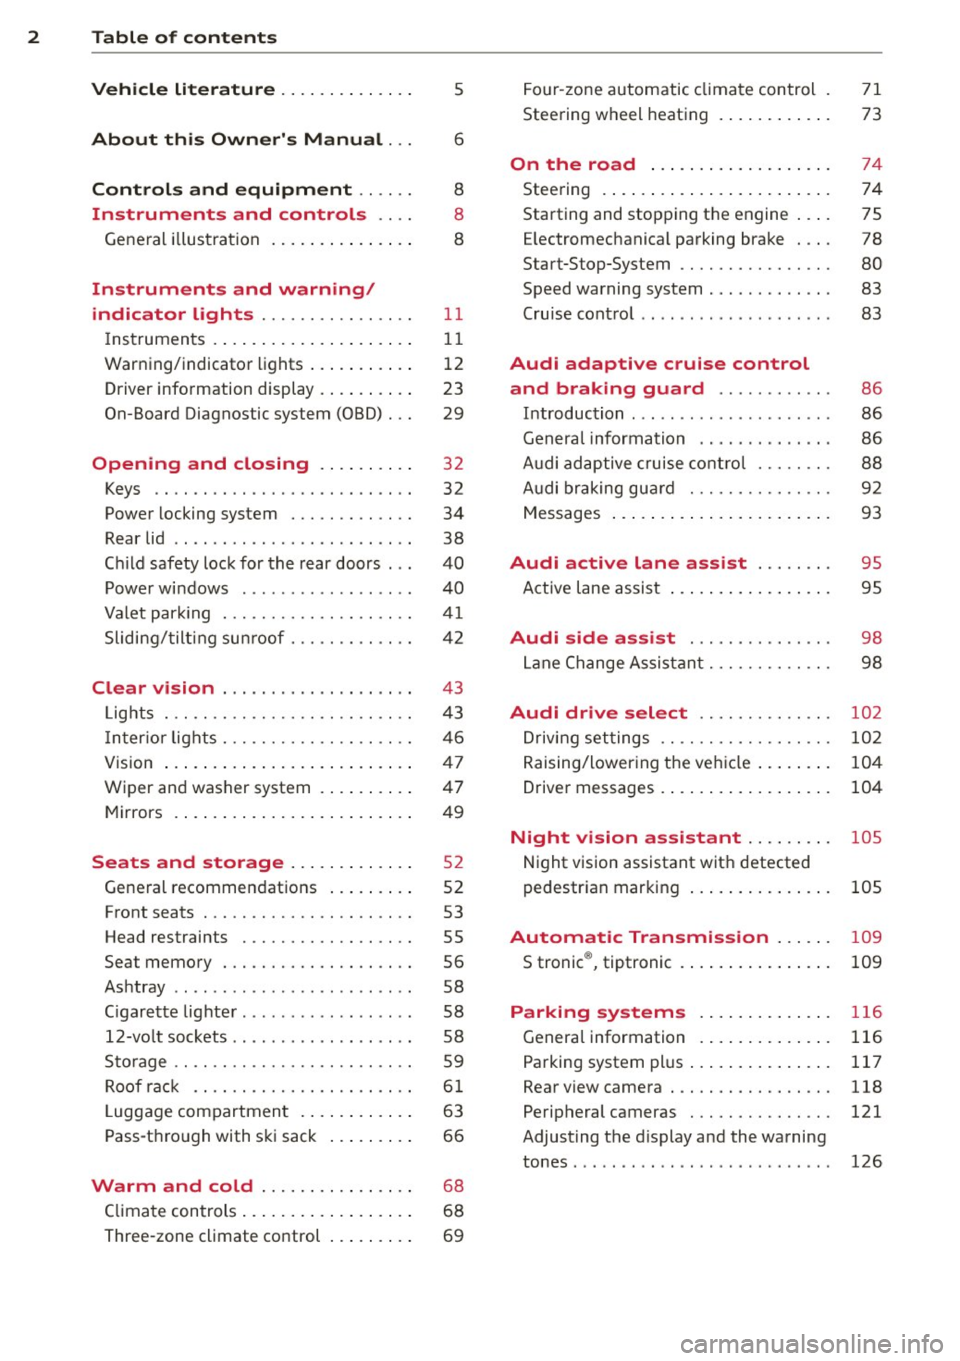
2 Table of contents Vehicle literature .. .. .. .. .. ... .
5
About this Owner's Manual . . . 6
Controls and equipment .. ... .
Instruments and controls .. . .
General illustration ......... .. ... .
Instruments and warning/
indicator lights ........ .. .. .. . .
Instruments ............ ... .. ... .
Warning/indicator lights .......... .
Driver information display .. .. .. ... .
On-Board Diagnostic system (OBD) . . .
Opening and closing .. .. .... . .
Keys .. ...... ........... .. .. ... .
Power locking system ..... .. .. .. . .
Rear lid .. .. ........ ..... .. ..... .
Child safety lock for the rear doors .. .
Power windows . .......... ... .. . .
Valet park ing . ........... .. .. ... .
Sliding/tilting sun roof ... .. .. .. .. . .
Clear vision .. ....... ... .. .. ... .
Lights . .. .. .. . .......... .. .. .. . .
I nter ior lights ............ .. .. .. . .
V1s 1on .......... ......... ... ... .
Wiper and washer system ... .... .. . 8
8
8
11
11
12
23
29
32
32
34
38
40
40
41
42
43
43
46
47
47
Mirrors . . . . . . . . . . . . . . . . . . . . . . . . . 49
Seats and storage ......... ... .
General recommendations ... .... . .
Front seats .............. .. .. ... .
Head restraints .............. ... .
Seat memory . ........... .... ... .
Ashtray .. .. ... .... ...... .. .. .. . .
C igarette lighter .............. .. . .
12-vo lt sockets ... ..... ... .. .. .. . .
Storage ................. .. .. ... .
Roof rack ............... .. .. .. . .
L uggage compartment ........... .
Pass-through with ski sack ... .. ... . 52
52
53
55
56
58
58
58
59
61
63
66
Warm and cold . . . . . . . . . . . . . . . . 68
Climate controls . . . . . . . . . . . . . . . . . . 68
Three-zone climate control . . . . . . . . . 69 Four-zone
automatic climate control
Steering wheel heating ........... . 71
73
On the road
. . . . . . . . . . . . . . . . . . . 74
Steering . . . . . . . . . . . . . . . . . . . . . . . . 74
Starting and stopping the engine . . . . 75
E lectromechanical parking brake . . . . 78
Start-Stop-System . . . . . . . . . . . . . . . . 80
Speed warning system . . . . . . . . . . . . . 83
Cruise control . . . . . . . . . . . . . . . . . . . . 83
Audi adaptive cruise control
and braking guard . . . . . . . . . . . .
86
Introduction . . . . . . . . . . . . . . . . . . . . . 86
Genera l information . . . . . . . . . . . . . . 86
Audi adaptive cruise control . . . . . . . . 88
Audi braking gua rd . . . . . . . . . . . . . . . 92
Messages . . . . . . . . . . . . . . . . . . . . . . . 93
Audi active lane assist . . . . . . . . 95
Active lane assist . . . . . . . . . . . . . . . . . 95
Audi side assist . . . . . . . . . . . . . . . 98
Lane Change Assistant. . . . . . . . . . . . . 98
Audi drive select . . . . . . . . . . . . . . 102
Driving settings . . . . . . . . . . . . . . . . . . 102
Raising/lowering the vehicle . . . . . . . . 104
Driver messages . . . . . . . . . . . . . . . . . . 104
Night vision assistant . . . . . . . . . 105
Night vision assistant with detected
pedestrian marking . . . . . . . . . . . . . . . 105
Automatic Transmission . . . . . . 109
S tronic ®, tiptronic . . . . . . . . . . . . . . . . 109
Parking systems . . . . . . . . . . . . . . 116
General information . . . . . . . . . . . . . . 116
Parking system plus . . . . . . . . . . . . . . . 117
Rear view camera . . . . . . . . . . . . . . . . . 118
Peripheral cameras . . . . . . . . . . . . . . . 121
Adjusting the d isplay and the warning
tones. . . . . . . . . . . . . . . . . . . . . . . . . . . 126
Page 35 of 310
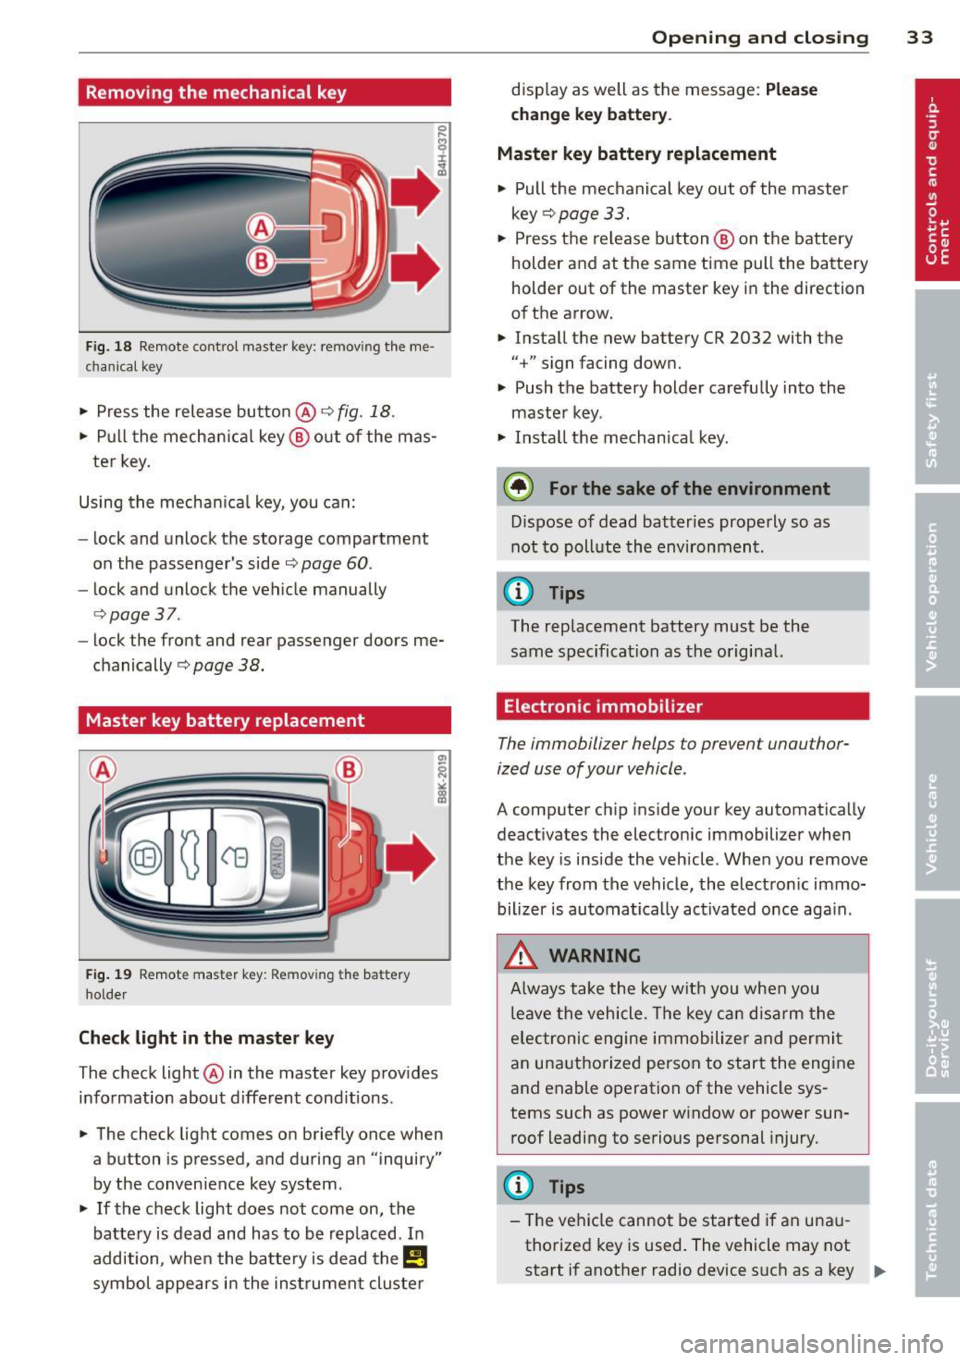
Removing the mechanical key
Fig. 18 Remote control maste r key : re mov ing the me
c han ical key
• Press the release button @ r=> fig. 18.
• Pull the mechanica l key @ out of the mas
ter key.
Using the mechan ica l key, you can:
- lock and unlock the storage compartment
on the passenger's side
c::> page 60 .
-lock and unlock the vehicle manually
c::>page 37 .
-lock the front and rear passenger doors me
chanically
c:> page 38.
Master key battery replacement
Fig . 19 Remote master key : Re mov ing the ba ttery
holde r
Check light in the master key
The check light @ in the master key provides
information about different cond itions .
• The check light comes on briefly once when
a button is pressed, and during an "inquiry"
by the conven ience key system .
• If the check light does not come on, the
battery is dead and has to be replaced. In
addition, when the battery is dead the
E!!
symbol appears in the instrument cluster
Opening and closing 33
display as well as the message: Please
change key battery .
Master key battery replacement
• Pull the mechanical key out of the master
key
c::> page 33.
• Press the release button @ on the battery
holder and at the same time pull the battery
holder out of the master key in the direction
of the arrow.
• Install the new battery CR 2032 with the
"+ " sign facing down.
• Push the battery holder carefully into the
maste r key .
• Install the mechanical key.
@ For the sake of the environment
Dispose of dead batteries properly so as
not to pollute the environment .
(D Tips
The replacement battery must be the
same specification as the original.
, Electronic immobilizer
The immobilizer helps to prevent unauthor
ized use of your vehicle .
A computer chip inside your key automatically
deactivates the electronic immobilizer when
the key is inside the vehicle. When you remove
the key from the vehicle, the electronic immo
bilizer is automatically activated once again .
A WARNING
-
Always take the key with you when you
leave the vehicle. The key can disarm the
e lectronic engine immobilizer and permit
an unauthorized person to start the engine
and enable operation of the vehicle sys
tems such as power window or power sun
roof leading to serious personal injury.
(D Tips
- Th e vehicle cannot be started if an una u
thorized key is used. The vehicle may not
start if another radio device such as a key
Ill>
Page 44 of 310

42 Opening and clo sing
Sliding/tilting sunroof
Operation
Fig . 32 Sectio n of th e he adliner: Slid ing/t iltin g sunroo f
b u tto n
@ Tiltin g and sliding
.,. To tilt the sunroof completely, press the
switch briefly to the second leve l briefly .
.,. To close the sunroof complete ly, pull the
switch briefly to the second leve l
c::> &,..
.,. To select an intermed iate position, press/
pull the switch to the first leve l until the de
sired position is reached.
® Opening /sliding (version 1 )
.,. To move the roof into the reduced wind
no ise position, press the button bac k briefly
to the second level. The roof w ill open all
the way if you press the button back to the
second leve l again .
.,. To close the sunroof completely, press the
switch forward briefly to the second level
r::> &,. .
.,. To select an i ntermed iate position, press/
pull the switch forward/back to the fi rst lev
el unti l the des ired pos it ion is reached .
@ Opening/sliding (version 2)
.,. To open the sunroof completely, press the
switch back to just before the second level.
.,. To close the sunroof completely, press the
switch fo rward br iefly to the second level
c::> .,&. .
.,. To selec t an intermed iate position, press/
pull the switch forward/back to the f irst lev
el u ntil the des ired pos ition is reached.
The sun shade can be opened an d closed by
h a nd when the s unroo f is closed . The solar protection opens automat
ica lly when the sun
roof opens.
You can still close or open the sunroof for up
to ten minutes a fter you have swi tched the ig
nition off . The sw itch is deactivated once the
driver 's or front passenger's door is opened.
A WARNING
-
Pay careful attention when closing the
sliding/tilting sunroof - otherwise serious in jury c ould result! Always take t he key
with you w hen leav ing the ve hicle.
(D Note
-
Always close your sliding/tilting sunroof
when leaving your veh icle. S udden rain can
cause damage to the interior equ ipment of
your vehicle, pa rticularly the e lectronic
equipment .
(D Tips
The sliding/t ilting sunroof will on ly open
at tempe ratu res above -4°F (-20°().
Emergency closing of the sliding/tilting
sunroof
If the s unroof detects an object in its path
when it is clos ing, it w ill open again automati
ca lly. I n this case, you can close the roof with
t h e power emergency closing function.
.,. Within five seconds after the sunroo f opens
automatically, p ull the switc h until the roof
closes.
Page 62 of 310
60 Seats and st o rage
vehicle movement, hot liqu id could spill,
causing scalding burns. Spilled hot liqu id
can also cause an accident and personal
injury .
- Use only soft cups in the cupholder. Hard
cups and glasses can cause inju ry in an
acc ident .
- Never use the cupholder or adapter as an
ashtray- risk of fire.
([) Note
Only drink containers with lids should be
carried in the cupho lder. Liqu id could spill
out and damage your veh icle's e lectronic
equ ipment or stain the upholste ry, etc.
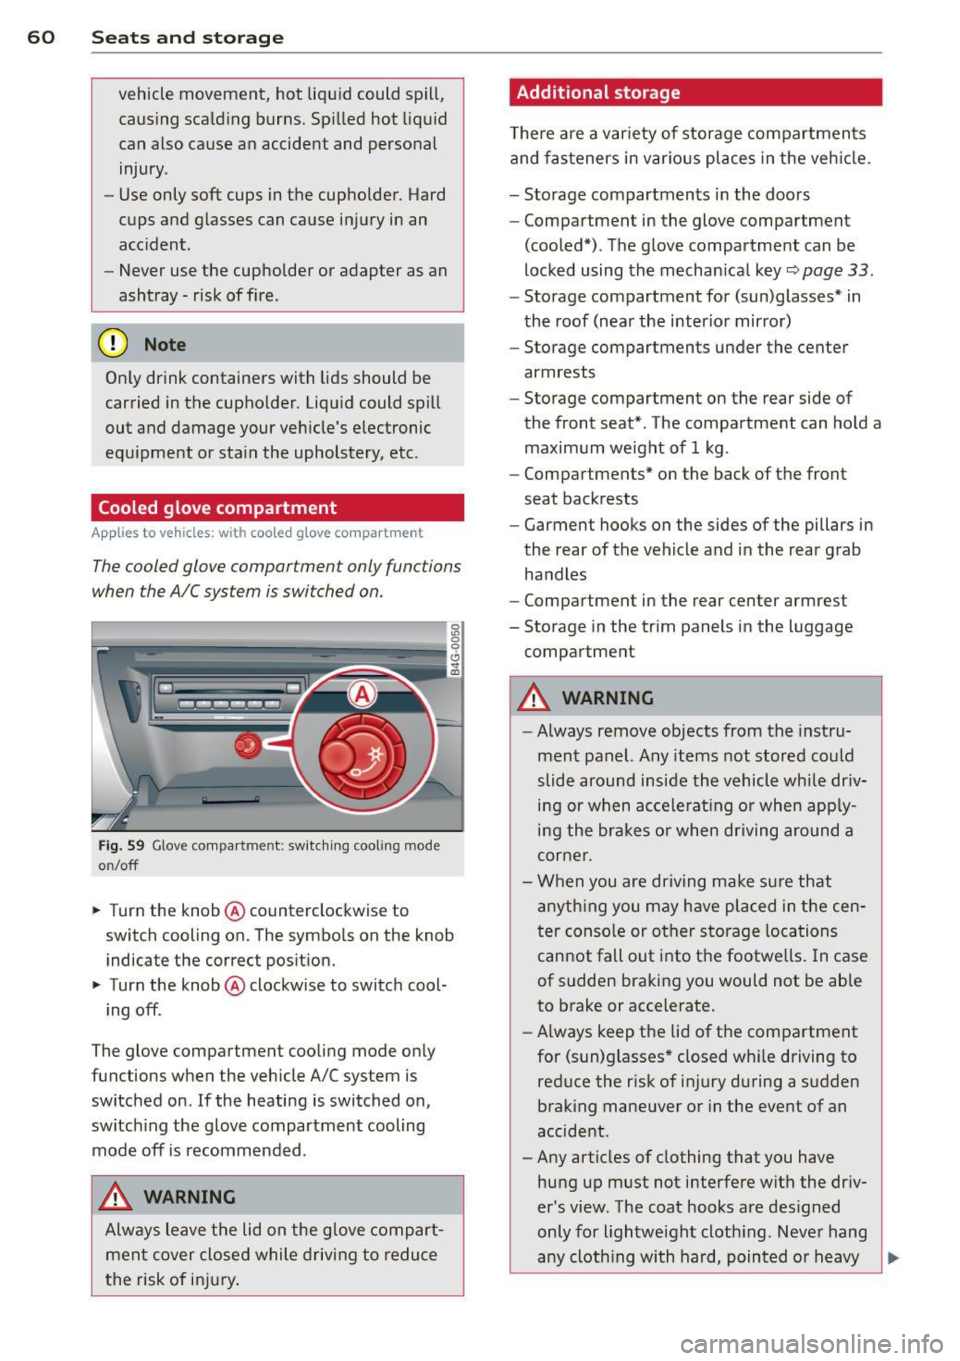
Cooled glove compartment
Ap plies to vehicles: with coole d glove compa rtm ent
The cooled glove compartment only functions
when the AIC system is switched on.
Fig. 59 Glove compa rtment: switc hin g cooling mode
o n/off
~ Turn the knob@ counterclockwise to
switch cooling on. The symbols on the knob
indicate the correct pos ition.
~ Turn the knob @ clockwise to switch cool-
ing off .
The glove compartment cooli ng mode only
functions when the vehicle A/C system is
switched on .
If the heating is switched on,
switch ing the glove compartment cooling
mode off is recommended .
_& WARNING
Always leave the lid on the glove compart
men t cover close d while driving to reduce
t he risk of in jury.
Additional storage
The re are a var iety of storage compartmen ts
and fas teners in various pl aces in the veh icle.
- Storage compartments in the doors
- Compartment in the glove compartment
(coo led*) . The glove compartment can be
locked using the mechan ical key
r::;, page 33.
- Storage compartment for (sun)glasses* in
the roof (near the interior mirro r)
- Storage compartments under the center
armrests
- Storage compartment on the rear side of
the front seat* . The compartment can hold a
maximum weight of 1 kg .
- Compartments* on the back of the front
seat backrests
- Garment hooks on the sides of the pillars in
the rear of the vehicle and in the rear grab
handles
- Compartment in the rear center armrest
- Storage in the trim panels in the luggage
compartment
_& WARNING
-
- Always remove objects from the instru
ment panel. Any items not stored could
slide around inside the vehicle while dr iv
ing or when acce le rat ing or whe n app ly
ing the brakes o r when driving around a
corne r.
- When you are driving make su re that
anyth ing you may have placed in the cen
t er conso le or other storage locations
cannot fall out into the footwe lls . I n case
of sudden braki ng you would not be able
to brake or accelerate.
- Always keep the lid of the compartment
for (sun)glasses" closed wh ile driving to
reduce the risk of i njury during a su dden
braking maneuver or in the event of an
accident .
- Any articles of clothing that you have
hung up must not interfere with the driv
er's view. The coat hooks are des igned
only for lightwe ight cloth ing. Neve r hang
-
any cloth ing with hard, pointed or heavy ..,_
Page 63 of 310
objects in the pockets on the coat hooks.
During sudden braking or in an accident -
especially if the airbag is deployed -
these objects could injure any passen
gers inside the vehicle .
- To reduce the risk of personal injury in an
accident or sudden stop, always keep the
glove compartment closed while driv ing .
- Read and fo llow all WARNINGS
Q page 171, Important safety instruc
tions on the side airbag system .
- Hang clothes in such a way that they do
not impair the dr iver's v is ion .
- The coat hooks must only be used for
lightwe ight cloth ing. Do not leave any
heavy o r sharp edged objects in the pock
ets which may interfere with the side cur
tain a irbag deployment and can cause
persona l injury in a cras h.
- Do not use coat hangers for hanging
clothing on the coat hooks as this can in
terfere with proper deployment of the
side curtain airbags in an accident .
- Do not hang heavy objects on the coat hooks, as they cou ld cause persona l in
jury in a sudden stop.
(D Note
Ob je cts located on the rear shelf that rub
aga inst the rear w indow cou ld damage the
heating wires for the rear window defog
ger .
Sea ts a nd s to rage 61
Roof rack
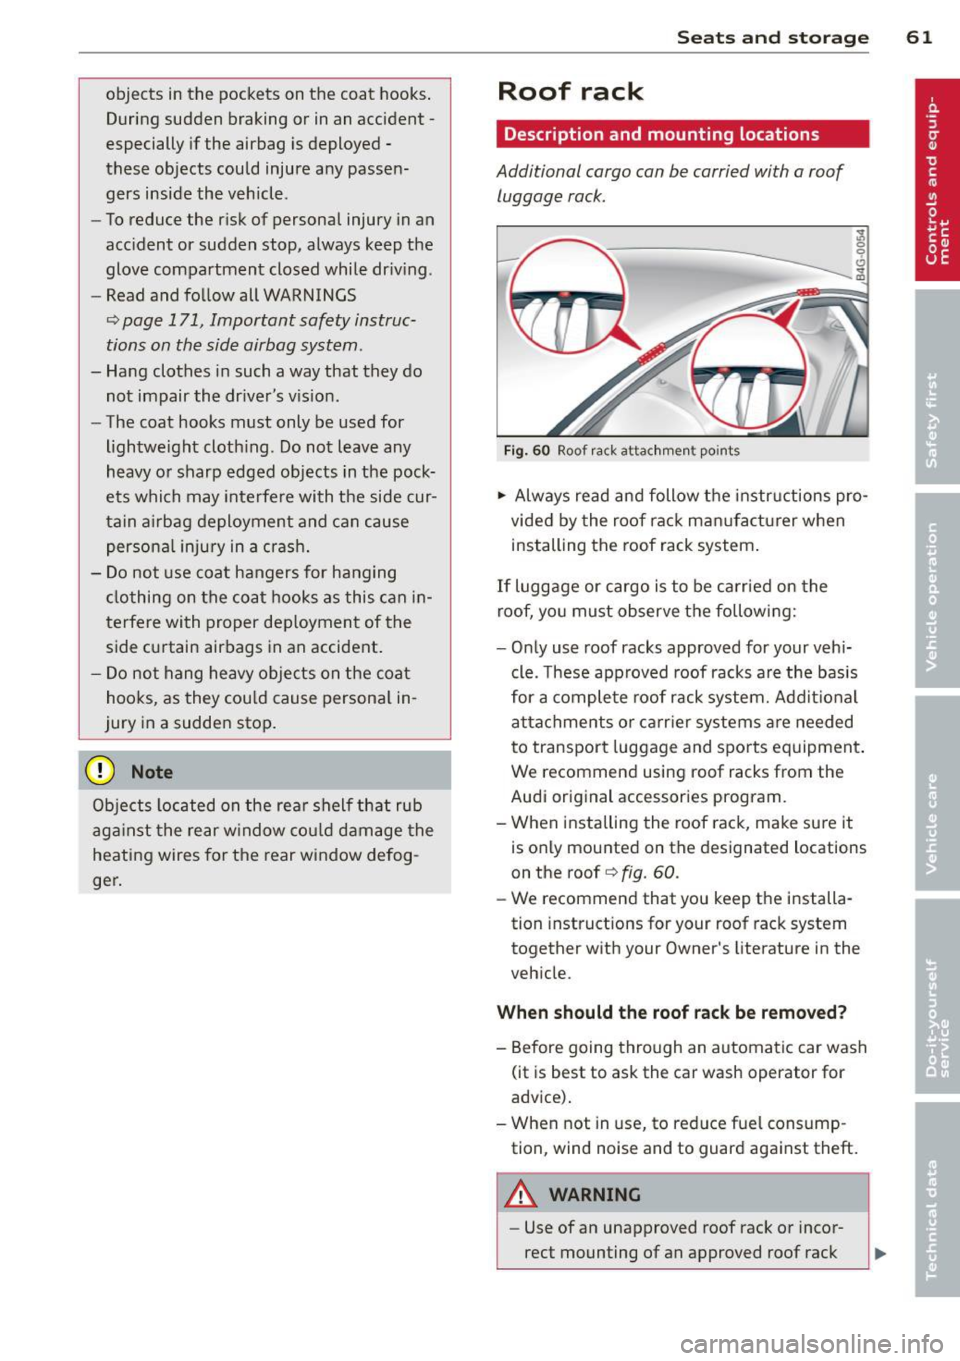
Description and mounting locations
Additional cargo can be carried with a roof
luggage rack.
Fi g. 60 Roof r ack attac hmen t po ints
.,. Always read and follow the instructions pro
vided by the roof rack man ufacturer when
installing the roof rack system .
If Luggage or cargo is to be carried on the
roof, yo u must observe the following:
- Only use roof racks approved for your vehi
cle. These approved roof racks a re the basis
for a complete roof rack system. Add it ional
attachments or ca rr ier systems a re needed
to transport luggage and sports equipment .
We recommend using roof racks from the
Audi original accessories program.
- When installing the roof rack, make sure it is only mounted on the designated locations
on the roof
Q fig. 60.
- We recommend that you keep the installa
tion instructions for your roof rack system
together with your Owner's literature in the
veh icle.
When should th e roof rack be removed?
- Before going through an automatic car wash
(it is best to ask the car wash operator for
advice).
- When not in use, to reduce fuel consump tion, wind noise and to guard aga inst theft.
A WARNING
- Use of an unapproved roof rack or incor
rect mounting of an approved roof rack
Page 64 of 310
62 Seat s a nd s tor ag e
can cause the roof rack or the items at
tached to it to fall off the roof onto the road .
- Objects falling from the roof of a vehicle
can cause a crash and personal injury .
- Only mount the roof rack on the desig
nated locations on the roof
c> fig. 60.
-The roof rack system must be insta lled
exactly according to the instructions pro
vided.
- When driving with a roof rack system,
changes to the center of gravity and wind
resistance can change the veh icle han
dling and lead to a collision . Always
adapt your driv ing and your speed to the
cu rrent conditions .
@ Note
-Your vehicle warranty does not cover any
damages to the veh icle caused by using
r oof racks or mount ing structures not
approved by Audi for your vehicle . The
same applies to damage resulti ng from
i n co rrec t roof rack installation .
- Always check the roof rack mountings
and hardware before each t rip and dur
i ng a tr ip to make sure eve rything is se
cu rely tightened . If necessary, retighten
the mo untings and check the entire sys
tem from time to time.
- After mounting a roof rack system, or when you transport objects on the roof
of your ve hicle, the height of the vehicle
i s natura lly increased. Be careful when
driving under low br idges or i n parking
garages for examp le . This could cause
damage to the load and even the vehicle i tse lf.
- Make sure the open rear lid and the sun
r oof* do not come into contact with the
r oof rack .
Loading the roof rack
Always distribute loads evenly. Make sure
anything on the roof rack is securely tied
down .
.. Always distribu te the loads on the roof rack
eve nly .
.. Always attach items to the roof rack sec ure-
ly before yo u drive off.
The maximum permissible roof weight is
2 20 lb (100 kg ). The roof we ight is the total
of the we ight of the roof rack, t he attach
ments and the cargo you a re ca rrying. You
must also not exceed the max imum load
weight for the roof rack yo u are using .
When using a roof rack system which has a lower load ca rrying capaci ty, you must not use
u p the tot al maxim um permiss ible load car ry
ing capacity specif ied above . Ins tead, you
sho uld load the roof rack system only to the
maximum capacity specified by the manufac
turer of the roof rack system .
A WARNING
-Weak, damaged or improper straps used
to secure items to the roof rack can fail
during hard braking or in a coll is io n and
cause ser ious personal inju ry .
- Make sure the roof rack is installed exact
ly
as specified above i:> page 61.
-Always use su itable mount ing straps for
secur ing items to the roof rack to help
p revent items from sh ifting or flying for
ward .
- Items on the roof rack must always be securely mounted .
- The use of a roof rack can negatively af
fect the way a veh icle hand les . Cargo
that is large, heavy, bulky, long or flat
will h ave a greater negat ive i nfl uence on
t he vehicle's aerodynamics, center of
grav ity and overall handling . Always
drive s lowly, avoid sudden braking and
maneuvers when t ransporting cargo on
the roof of your vehicle .
ll>-
Page 65 of 310
-Never exceed the maximum permissible
load carry ing capacity of the roof of your
vehicle, the perm issible axle weights and
the permiss ible total weight of your veh i
cle
c;, page 285, Weights.
@ For the sake of the environment
As a result of the increased wind resist ance created by a roof rack, your vehicle is
using fue l unnecessarily. So remove the
roof rack after using it.
Luggage compartment
Loading luggage compartment
Luggage items must be stowed securely.
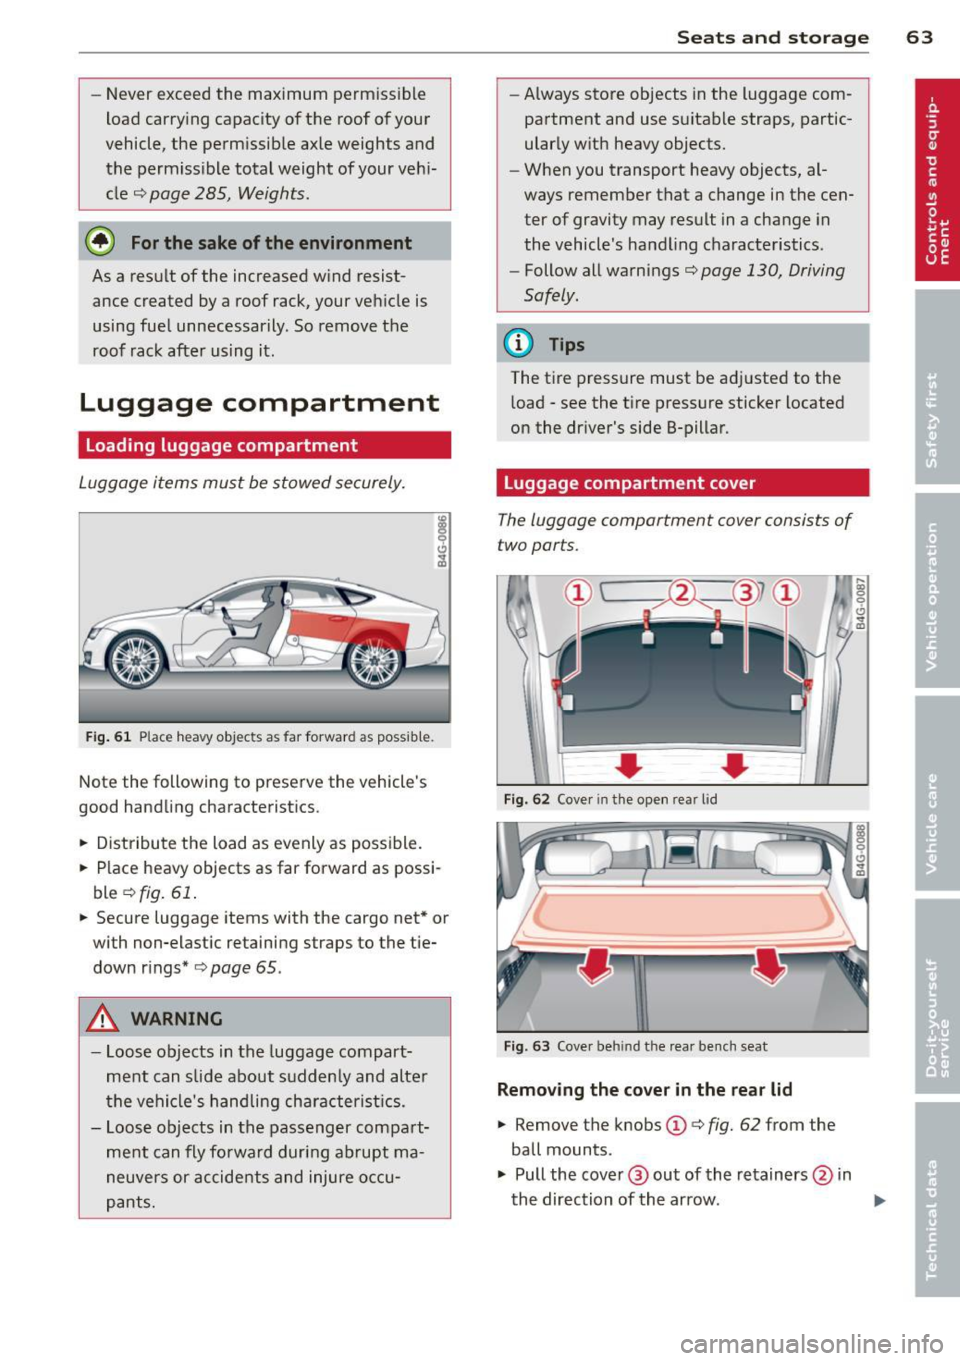
Fig . 61 Place heavy objects as far forward as possib le.
Not e the following to preserve the vehicle's
good handling characterist ics .
.. Distribute the load as evenly as possible .
.. Place heavy objects as far forward as possi
ble
c;, fig. 61 .
.. Secure luggage items with the cargo net* or
with non-elastic retaining straps to the tie
down rings*
c;, page 65.
A WARNING
-Loose objects in the luggage compart
ment can slide about suddenly and alter
the vehicle's handling characterist ics.
- Loose objects in the passenger compart
ment can fly forward during abrupt ma
neuvers or accidents and injure occu
pants.
Seats and storage 63
-Always store objects in the luggage com
partment and use suitable straps, partic
ularly with heavy objects.
- When you transport heavy objects, al
ways remember that a change in the cen
ter of gravity may result in a change in
the vehicle's handling characteristics.
- Follow all warnings
c;, page 130, Driving
Safely.
(D Tips
The tire pressure must be adjusted to the
load - see the tir e pressure sticker located
on the driver's side 8-pillar.
Luggage compartment cover
The luggage compartment cover consists of
two parts.
... ...
Fig. 62 Cover in the open rear lid
Fig. 63 Cove r behind the rear bench seat
Removing the cover in the rear lid
.. Remove the knobs (D c;, fig. 62 from the
ball mounts .
.. Pull the cover @ out of the retainers @ in
the direction of the arrow.
~
Page 70 of 310
68 Warm and cold
Warm and cold Climate controls
Description
A pplies to vehicles: with three-zone cl imate cont ro l or
four-zone a uto mat ic climate contro l
The climate control system warms, cools and
adds humidity to the a ir in the ve hicle interior.
It is the most effect ive when the windows and
sun roof * are closed .
If the tempe rature i nside
the par ked veh icle becomes very warm, open
i ng the w indow br ie fly will speed up the cool
ing process.
I n all heating mode f unctio ns except
defrost,
the blower on ly sw itches to a h ighe r speed
once the engine coo lan t has reached a ce rtain
temperature.
Condensat ion from the cooling system can
d rip and form a puddle of wate r under the ve
h icle. This is normal and does no t mean there
is a lea k.
Pollutant filter
The pollutant filte r removes pollutants such
as dust and po llen from the air.
The air pollutants filter must be changed at
the intervals spec ified in you r Warranty
&
Maintenance boo klet, so that the air condi
tioner can prope rly work .
If you drive your vehicle in an area with h igh
a ir po llution, the fi lter may need to be
changed more freq uently than specified in
your Aud i Wa rranty & Ma intenance booklet. If
i n doubt, as k your author ized A udi Se rvice Ad
visor for adv ice.
K ey coded settings
Three-zone climate control: T he b lower set
ting and air distribution are stored automati
cally and ass igned to the remote control key
that is i n use.
Four-zone automatic climate control: The cli
mate control settings are automat ica lly stor
ed and assigned to the remote control key
that is i n use.
A WARNING
Reduced visibility is dangerous and can
cause accidents.
-
- For safe driving it is very important that
all windows be free of ice, snow and con
densat ion .
- Comp lete ly fam iliarize yourse lf with the
proper use and funct ion of the heat ing
and ve nti lation system and especially
how to defog and defrost the w indows.
- Never use the windshield wiper/washer system in freez ing weathe r unt il you
have wa rmed the windshie ld first, using
the heating and ventilation system. The
washer sol ution may freeze o n the w ind
shie ld and re duce visib ility.
(D Note
- If you suspect that the air conditioner
has been damaged, sw itch the sys tem
off to avoid further d amage and have i t
inspected by a q uali fied dealership .
- Repairs to the Audi air conditioner re
quire speci al technical know ledge and
special tools. Contact an autho rized Audi
dea ler fo r ass istance.
@ For the sake of the environment
B y reducing the amou nt of f uel you use,
you also red uce the amount of pollutants
emitted into the air.
(D Tips
- Keep the air intake s lo ts (in front o f the
windshield) free from ice, snow and de
br is in order to maintain the proper func
tion of the climate control system.
- The energy management system may
switch the seat heating* or rear window
defroster off temporar ily. These systems
are available again as soon as the energy
balance has been restored .
-Air escapes through vents under the rear window. When plac ing items of cloth ing
on the luggage compartment cover, en
sure that the openings are no t covered.
Page 139 of 310
A WARNING ,~
To help prevent poisonous exhaust gas
from being drawn into the vehicle, always
keep the rear lid closed while driving .
- Never transport objects larger than
those fitting completely into the luggage
area because the rear lid cannot be fully
closed.
- If you absolutely must drive with the rear
lid open, observe the following notes to
reduce the risk of poisoning:
- Close all windows,
- Close the power roof*,
- Open all air outlets in the instrument
panel,
- Switch off the air recirculation,
- Set the fresh air fan to the highest
speed.
A WARNING
Always make sure that the doors, all win dows, the power roof* and the rear lid are
securely closed and locked to reduce the
risk of injury when the vehicle is not being
used.
- After closing the rear lid, always make
sure that it is properly closed and locked.
- Never leave your vehicle unattended es
pecially with the rear lid left open. A
child could crawl into the vehicle through
the luggage compartment and close the
rear lid becoming trapped and unable to
get out. Being trapped in a vehicle can
lead to serious personal injury.
- Never let children play in or around the
vehicle .
- Never let passengers ride in the luggage
compartment. Vehicle occupants must
always be properly restrained in one of
the vehicle's seating positions.
Gj) Tips
-Air circulation helps to reduce window fogging. Stale air escapes to the outside
through vents in the trim panel. Be sure
to keep these slots free and open .
-
Driving Safely 137
-The tire pressure must correspond to the
load. The tire pressure is shown on the
tire pressure label. The tire pressure la
bel is located on the driver's side B-pillar.
The tire pressure label lists the recom
mended cold tire inflation pressures for
the vehicle at its maximum capacity
weight and the tires that were on your
vehicle at the time it was manufactured. For recommended tire pressures for nor
mal load conditions, please see chapter
r:!)page250.
Tie-downs
The luggage compartment is equipped with
four tie-downs to secure luggage and other
items.
Use the tie-downs to secure your cargo prop
erly<>
page 136, Loading the luggage com
partment.
In a collision, the laws of physics mean that
even smaller items that are loose in the vehi
cle will become heavy missiles that can cause
serious injury. Items in the vehicle possess en
ergy which vary with vehicle speed and the
weight of the item. Vehicle speed is the most
significant factor.
For example , in a frontal collision at a speed
of 30 mph (48 km/h), the forces acting on a 10-lb (4.5 kg) object are about 20 times the
normal weight of the item. This means that
the weight of the item would suddenly be about 200 lbs. (90 kg) . You can imagine the
injuries that a 200 lbs . (90 kg) item flying
freely through the passenger compartment
could cause in a collision like this.
A WARNING
Weak, damaged or improper straps used
to secure items to tie-downs can fail dur
ing hard braking or in a collision and cause
serious personal injury.
-Always use suitable mounting straps and properly secure items to the tie-downs in
'
•
•
Page 154 of 310
152 Airbag sys te m
If the front passenger airbag is turned off, the
PASSENGER AIR BAG OFF light comes on in
the instrument cluster and stays on.
I f the front passenger airbag deploys, the
F ederal Standard requires the airbag to meet
the " low risk" deployment criteria to reduce
the r isk of injury through interaction with the
a irbag. "Low risk" deployment occurs in those
crashes that take place at lower decelerations
as defined in the electronic control unit
c::> page 162, PASSENGER AIR BAG OFF light.
A lways remember, a chi ld seat or infant carri
er installed on the front seat may be struck
and knocked out of position by the rap idly in
flating passenger's a irbag in a frontal colli
sion . The airbag could greatly reduce the ef
fectiveness of the ch ild restraint and even se
rio usly inju re the child during inflat ion.
For this reason, and because the back seat is
the safest place for chi ldren - when properly
restra ined accord ing to their age and size - we
strongly recommend that children always sit in the back seat
c::> page 175, Child Safety .
& WARNING
-
A child in a rearward-facing child seat in
stalled on the front passenger seat will be
ser iously injured and can be killed if the
front airbag inflates - even with an Ad
vanced Airbag System.
- The inflating a irbag will hit the child seat
or infant carrier with great force and w ill
smash the ch ild seat and child against
the backrest, center armrest, door or roof.
- Always install rear-facing child seats on
the rear seat.
- If you must install a rearward facing
child seat on the front passenge r seat
because of except iona l circumstances
and the
PASSENGER AIR BAG OFF light
does not come on and stay on, immedi
ately install the rear-f acing chi ld seat in a
rear seating position and have the ai rbag
system inspected by your Aud i dealer. -
Forward-facing child seats installed on
the front passenger's seat may interfere
with the deployment of the a irbag and
cause serious persona l injury to the
child.
& WARNING
-If, in except ional circumstances, you must
i nstall a forward-facing child restraint on
the front passenge r's seat:
- Always make sure the forward-facing
seat has been designed and certified by
its manufacture r fo r use on a fron t seat
with a passenger fron t and s ide a irbag.
- Never p ut the fo rward -facing child re
s tra int up agains t or very near the instru
men t panel.
- Always move the passenge r seat into its
rearmost pos ition in the seat's fore and
aft ad justment range, as fa r away from
the airbag as possible before installing
the forward-facing ch ild restra int . The
backrest must be ad justed to an upright
position.
- Make sure that the
PASSENGER AIR BAG
OFF
li ght comes on and stays on all the
time whenever the ignition is switched on .
& WARNING
-To reduce the risk of serious injury, make
sure that the
PASSENGER AIR BAG OFF
light w ill be displayed whenever a child re
straint is installed on the front passenger
sea t and the ignition is sw itche d on .
- If the
PASSENGER AIR BAG OFF light
does no t stay on, perform the checks de
scribed
<>page 161, Monitoring the Ad
vanced Airbag System.
- Ta ke t he chi ld restraint off the front pas
senger sea t and install it prope rly at one
of the rear seat positions i f the
PASSEN
GER AIR BAG OFF
light does not stay on.
- Have the airbag system inspected by
your Aud i dea le r i mmediately.