child lock AUDI A7 2015 Owners Manual
[x] Cancel search | Manufacturer: AUDI, Model Year: 2015, Model line: A7, Model: AUDI A7 2015Pages: 316, PDF Size: 78.09 MB
Page 4 of 316
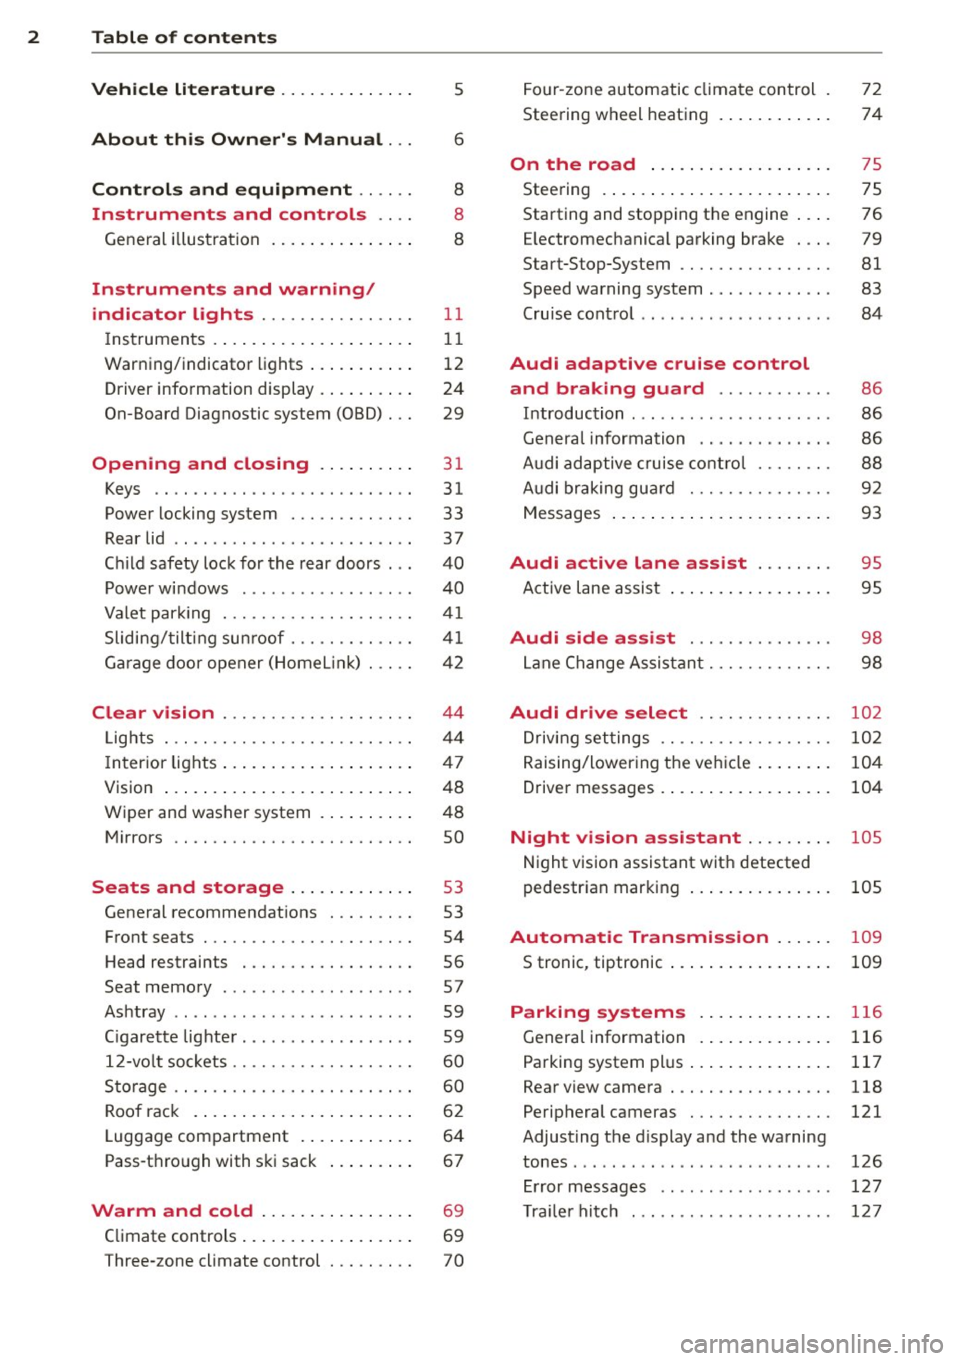
2 Table of content s
Vehicle lite ratu re .. .. .. .. .. ... .
5
About thi s Owner' s Manual . . . 6
C ontr ols and equi pm ent .. ... .
Ins truments and controls .. . .
General illustration ...... ... .. ... .
Instruments and warning /
indicator lights ........ .. .. .. . .
Instruments ............ ... .. ... .
Warning/indicator lights .. ... ... .. .
Driver information display .... .. ... .
On-Board Diagnostic system (OBD) . . .
Opening and closing .. .. .... . .
Keys .. ...... ........... .. .. ... .
Power locking system ..... .. .. .. . .
Rear lid .. .. ........ ........ .... .
Child safety lock for the rear doors .. .
Power windows ............... .. .
Valet park ing . ........... .. .. ... .
Sliding/tilting sun roof ... .. .. .. .. . .
Garage door opener (HomeL in k) . ... .
Clear vision .. ........ .. .. .. .. . .
Lights . .. .. ............. .. .. .. . .
I nterior lights .... ....... ... .. ... .
V1s1on ..... ... . ........ .... .... .
Wiper and washer system . ... .. .. . .
Mirrors ................. .. .. ... .
Seat s and storage ... .. .. .... . .
General recommendations . .. .. .. . .
Front seats .................. ... .
H ead restraints .......... .... ... .
Seat memory .. .... ........ .. .. . .
Ashtray .. .. ................ ... . .
C igarette lighter ................. .
12-vo lt sockets ........... .. .. ... .
Sto rage .. ............... .. .. .. . .
Roof rack . .... . ...... ... ... .... .
Luggage compartment . ... .. .. ... .
Pass-through with ski sack ... .... . .
Warm and cold ..... ... .. .. ... .
Climate controls .. ..... ... .. .. ... . 8
8
8
11
1 1
1 2
24
29
31
31
33
37
40
40
4 1
41
42
44
44
4 7
48
48
so
53
53
54
56 57
59
59
60
60
62
64
67
69
69
Three-zone climate control . . . . . . . . . 70 Four
-zone automatic climate control .
Steering wheel heating . ..... ... .. . 72
74
On the road
. . . . . . . . . . . . . . . . . . . 75
Steering . . . . . . . . . . . . . . . . . . . . . . . . 75
Starting and stopping the engine . . . . 76
E lectromechanical parking brake . . . . 79
Start-Stop-System . . . . . . . . . . . . . . . . 81
Speed warning system . . . . . . . . . . . . . 83
Cruise control . . . . . . . . . . . . . . . . . . . . 84
Audi adaptive cruise control
and braking guard . . . . . . . . . . . .
86
Introduction . . . . . . . . . . . . . . . . . . . . . 86
Genera l information . . . . . . . . . . . . . . 86
Audi adaptive cruise cont rol . . . . . . . . 88
Audi braking gua rd . . . . . . . . . . . . . . . 92
Messages . . . . . . . . . . . . . . . . . . . . . . . 93
Audi active lane assist . . . . . . . . 95
Active lane assist . . . . . . . . . . . . . . . . . 95
Audi side assist . . . . . . . . . . . . . . . 98
Lane Change Assistant. . . . . . . . . . . . . 98
Audi drive select . . . . . . . . . . . . . . 102
Driv ing settings . . . . . . . . . . . . . . . . . . 102
Raising/lowering the vehicle . . . . . . . . 104
Driver messages . . . . . . . . . . . . . . . . . . 104
Night vision assistant . . . . . . . . . 105
Night vision assistant with detected
pedestr ian marking . . . . . . . . . . . . . . . 105
Automatic Transmission . . . . . . 109
S tronic, tiptronic . . . . . . . . . . . . . . . . . 109
Parking systems . . . . . . . . . . . . . . 116
General information . . . . . . . . . . . . . . 116
Parking system plus . . . . . . . . . . . . . . . 117
Rear view camera . . . . . . . . . . . . . . . . . 118
Peripheral cameras . . . . . . . . . . . . . . . 121
Adjusting the d isplay a nd the warning
tones. . . . . . . . . . . . . . . . . . . . . . . . . . . 126
Error messages . . . . . . . . . . . . . . . . . . 12 7
T ra ile r hitch . . . . . . . . . . . . . . . . . . . . . 127
Page 33 of 316
M N <( I.J "". rl I.O
"' rl
"' rl
Opening and closing Keys
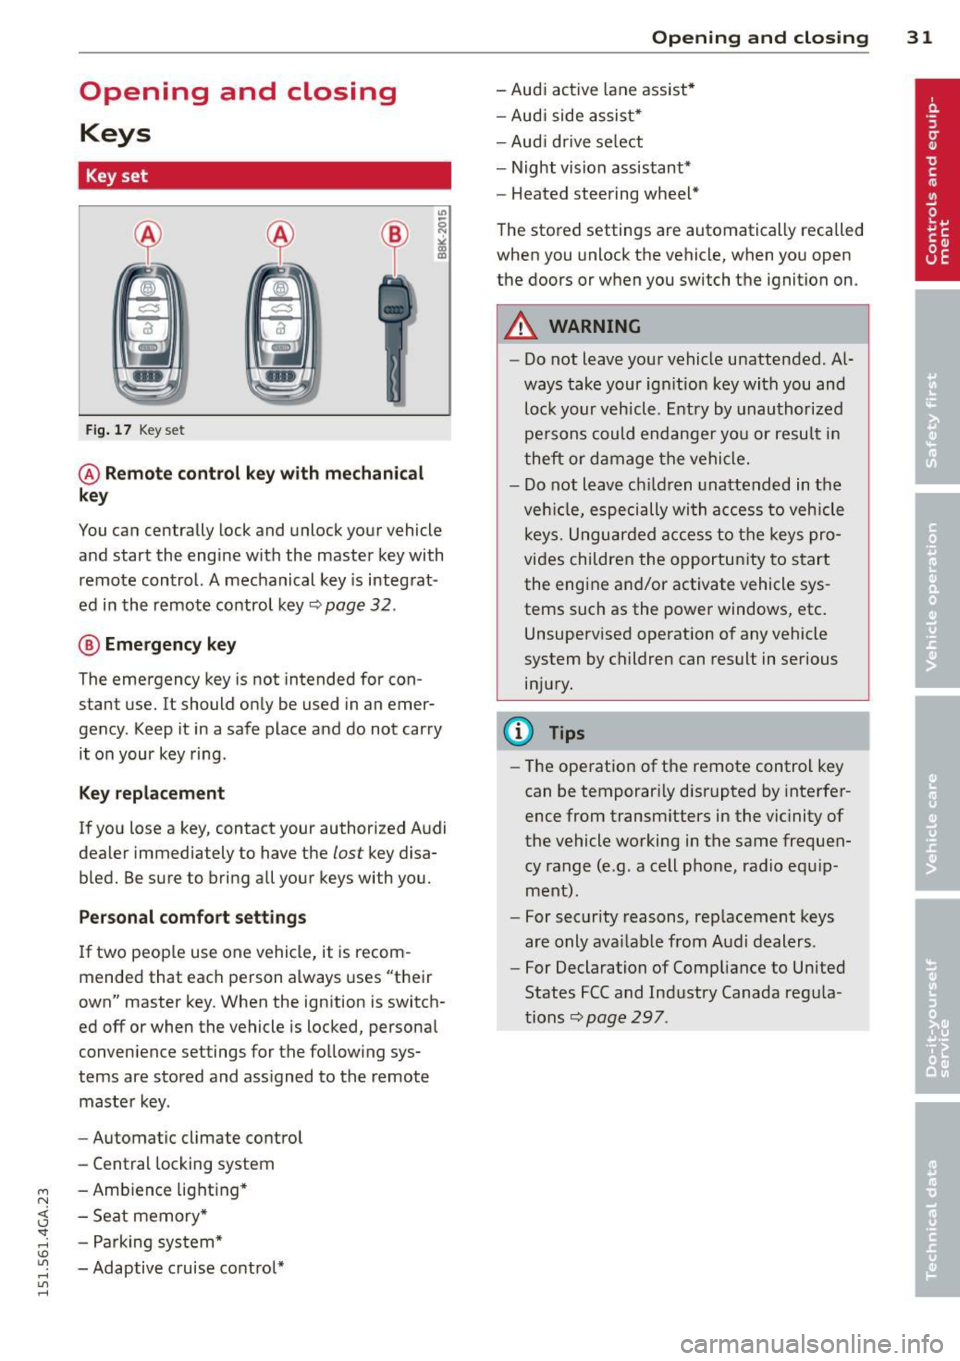
Key set
F ig. 17 Key set
@ Remote control k ey with mechanical
key
You can centrally lock and unlock your vehicle
and start the engi ne with the master key with
remote control. A mechanical key is integ rat
ed in the remote co ntrol key~ page
32 .
® Emergency key
The emergency key is not intended for con
stant use.
It should on ly be used in an emer
gency. Keep it in a safe place and do not car ry
it on your key ring .
Key replacement
If you lose a key, contact your authorized A udi
dealer immediately to have the
lost key disa
b led. Be s ure to bring all your keys with you.
Personal comfort settings
If two peop le use one vehicle, it is recom
mended that each person always uses "t heir
own" master key . When the ignition is switch
ed off or when the vehicle is locked, persona l
conven ience settings for the follow ing sys
tems are stored and ass igned to the remote
maste r key.
- Automatic cl imate contro l
- Central locking system
- Amb ience lig hting *
- Seat memory *
- P arking sys tem*
- Adaptive c ruise control*
Opening and clo sin g 31
- Audi ac tive lane assist *
- Au di side as sis t*
- Aud i drive se lect
- Night vision assistant*
- Heated stee ring wheel*
The stored settings are automatically recalled
when you unlock the vehicle, when you open
the doors or w hen you switch t he ignition on.
A WARNING
- Do not leave you r vehicle unattended. A l
ways take your ig nition key wi th you and
loc k your v ehicle. Entry by unau th or ize d
pe rsons could endanger yo u or resul t in
theft or d amage t he vehi cle.
- D o not leave c hildren una ttended in t he
veh icle, especi ally wi th a ccess to vehicle
key s. U ngu ard ed a ccess to t he keys pro
vi des childre n the o pportu nity to s tart
the eng ine a nd/or activate vehicle sys
tems such as the power windows, etc .
Unsupervised operation o f any vehicle
system by c hildren can result in serious
in ju ry .
(D Tips
- Th e ope ration of t he remote control key
can be temporar ily disrupted by inte rfer
ence fr om transm itters in the vic inity of
the vehicle working in the same fr equen
cy range (e.g. a cell p hone, radio e quip
m ent).
- Fo r security reasons, r eplacement keys
are only ava ilable from Audi dealers.
- For Declaration of C omp liance to Un ited
States FCC and Ind ustry Canada reg ula
tions~ page
297.
Page 35 of 316
M N <( (.J
'SI: ,...., \!) ..,.,
,...., ..,., ,....,
for another vehicle or a transponder is
l ocated on the key ring.
- For Decla ration of Compliance to United
States FCC and Industry Canada regula
tions
¢ page 297.
Power locking system
General description
The power locking system locks or unlocks all
doors and the rear lid simultaneously.
You can lock and un lock the vehicle centrally.
You have the following choices:
- Remote master key¢
page 34,
-Door handles with convenience key*
¢page 35 ,
-Lock cylinder at the driver's door
¢ page 36, or
- Power locking switch inside¢
page 36.
Selective unlocking
When you lock the vehicle, the power locking
system w ill lock the doors and the rear lid.
When unlocking, you can set in the M MI
whether only the driver 's doo r or the entire
vehicle should be unlocked
¢ page 34.
Automatic locking
The automat ic locking feature locks all the ve
hicle doors and the rear lid when you drive
faster than 9 mph ( 1S km/h).
T he car is unlocked again, when the opening
function in the power lock ing system sw itch
or at one of the door levers is actuated . Th e
Auto Lock function can be turned on and off in
the MMI
¢page 34.
Anti-theft alarm warning system
If the anti-theft alarm warning system de
tects a break- in into the vehicle, acoustic and
visua l warning signals are triggered.
The anti-theft warning system is activated au
tomatically when you lock the vehicle . It is de
activated when u nlocking using the remote
key, with the mechanical key, and when you
switch the ignition o n.
Opening and clo sin g 33
The alarm also turns off when the a larm cycle
has expired.
Turn signals
When you unlock the veh icle, the turn s ignals
flash twice. When you lock the veh icle the
tu rn s ignals flash once. If they do not flash,
one of the doors, the rear lid or the hood is
not locked.
Unintentionally locking yourself out
In the follow ing cases there safeguards to
prevent yo u lock ing your remote master key in
the vehicle:
- The vehicle does not lock w ith the central
locking switch¢
page 36 if the driver's
door is open.
- On veh icles with convenience key*, if the
most recently used maste r key is in the lug
gage compartment, the rear lid is a utomat i
cally un locked again after it is closed.
Do not lock your veh icle w ith the
remote mas
ter key or convenience key*
unti l all doors
and the rear lid are closed . In this way you
avoid locking yoursel f out accidentally .
Power side door closer*
The vehicle doors are equipped w ith a power
s ide door closer . When closing a door, you on
ly have to let it fall light ly into the latch. The
door will then automatically close by itself
¢_&. .
A WARNING
-When you lock your vehicle from outside,
nobody -especia lly children -shou ld re
main inside the vehicle. Remember,
when you lock the vehicle from the out side the windows cannot be opened from
the inside.
- When you leave the veh icle, always take
the ignition key w ith you . Th is w ill pre
vent passengers (children, for example)
from accidentally being locked in the ve
hicle should they accidentally press the
power locking sw itch in the doors. .,.
Page 36 of 316
34 Openin g and clo sing
- Do not leave children inside the veh icle
unsupervised. In an emergency it would
be impossible to open the doors from
the outside without the key.
- Applies to vehicles with power side door
closer*:
- When closing a doo r, make sure noth
i ng can interfere w ith the door. This
could cause ser ious personal injury .
- You c an stop the door from closing at
any time by pulling on the inside or
outside door handle.
(DJ Tips
- In the event of a c rash with airbag de
ployment al l locked doors will be auto
matically un locked to g ive access to t he
vehicle occupants from t he outside.
- If the power lock ing system should ma l
function, you can lock the driver's door
u sing the mechanical key ¢
page 3 7.
- If the power loc king system should fail,
you can st ill open the fue l tank flap in an
emergency ¢
page 221.
-You are well advised no t to keep valua
bles inside an unattended vehicle, visib le
or not. Even a properly locked vehicle
cannot provide the security of a safe.
- If the LED in the upper edge of the driv
er's door panel comes on for abo ut
30
seconds afte r the vehicle is locked, the re
i s a malfunction in the power locking or
the anti-theft warning system . Have the
malfunction corrected by an author ized
Audi dealersh ip or qua lified repai r fac ili
ty.
Setting power locking
The driver can determine the functions for
power locking in the MMI.
.. Select : I CARI funct io n button> (Car )* sy s
tem s
control button > V ehicle settings >
( Central lo ck ing) *.
Lo ck when dr iving -
If you se lec t On , the vehi
cle locks automatically when d riving. All of
the doors and rear lid lock .
Central locking
Unlock door s -
You can dec ide if All doors or
o nly the
Driv er shou ld unlock . The rear lid al
so unlocks when
All is selected . If you select
Driver in a vehicle with a convenience key*,
only the door whose hand le you pu ll will un
lock.
If you se lect
Driver , all the doors and rear lid
will unlock if you press them button on the re
mote control master key twice .
Lo ck exterior trunk handle -If you select On ,
the rear lid handle is locked . In this case the
rear lid can be opened with the b utton
c:s on
the master key or with the
c:s button in the
driver' s door . In veh icles with a convenience
key* , you can still open the rear lid using the
handle if an authorized master key is near the
proxim ity sensor .
Fold mirrors * -If yo u select On , the exterior
rearview mirrors fold in automatically when
you press the
{f) button on the remote control
master key or touch the sensor* in the handle.
Tone when lock ing -When you select On, a
confirmat io n tone sounds when you lock the
vehicle .
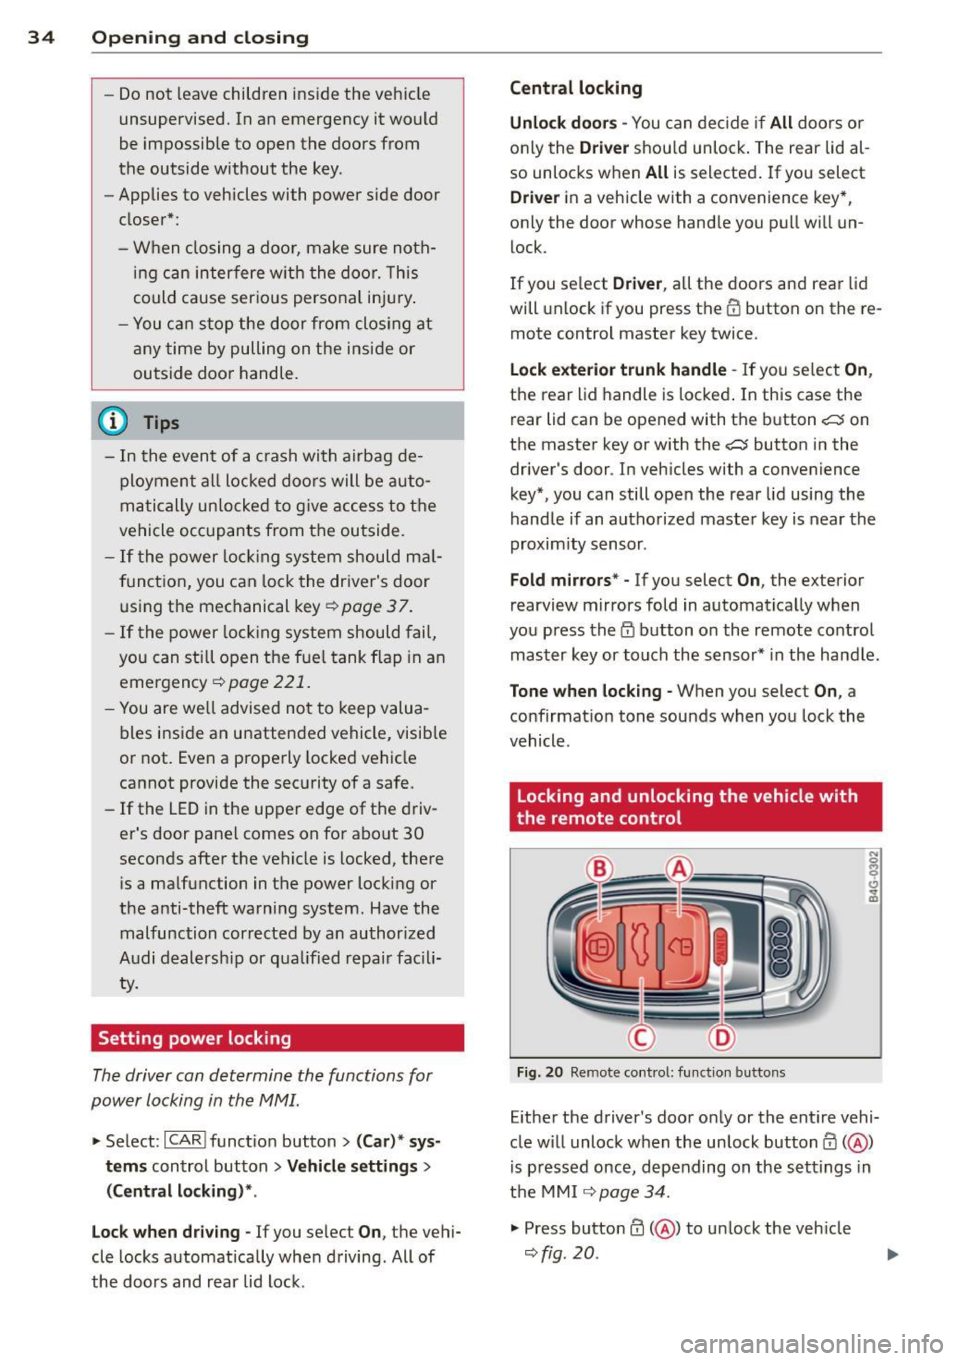
Locking and unlocking the vehicle with
, the remote control
Fi g. 20 Re mote co ntro l: fu nct io n buttons
N 0 q
Cl
~
E ither the driver's door only or the entire vehi
cle w ill unlock when the unlock button
0 ( @ )
is p ressed once, depending on the settings in
the MMI
¢ page 34 .
.. Press butto n 0 (@ ) to un lock the veh icle
¢fig. 20 .
Page 39 of 316
M N <( I.J "". rl I.O
"' rl
"' rl
-On a vehicle locked from the outside the
power locking system switch is inopera
t ive.
- Locked doors make it more difficult for
emergency workers to get into the vehi
cle, which puts lives at risk . Do not leave
anyone behind in the vehicle, especially
children.
(D Tips
Your vehicle is locked automatically at a speed of 9 mph (15 km/h) ¢ page 33 . You
can unlock the vehicle again using the
open ing funct ion in the power lock ing sys
tem switch.
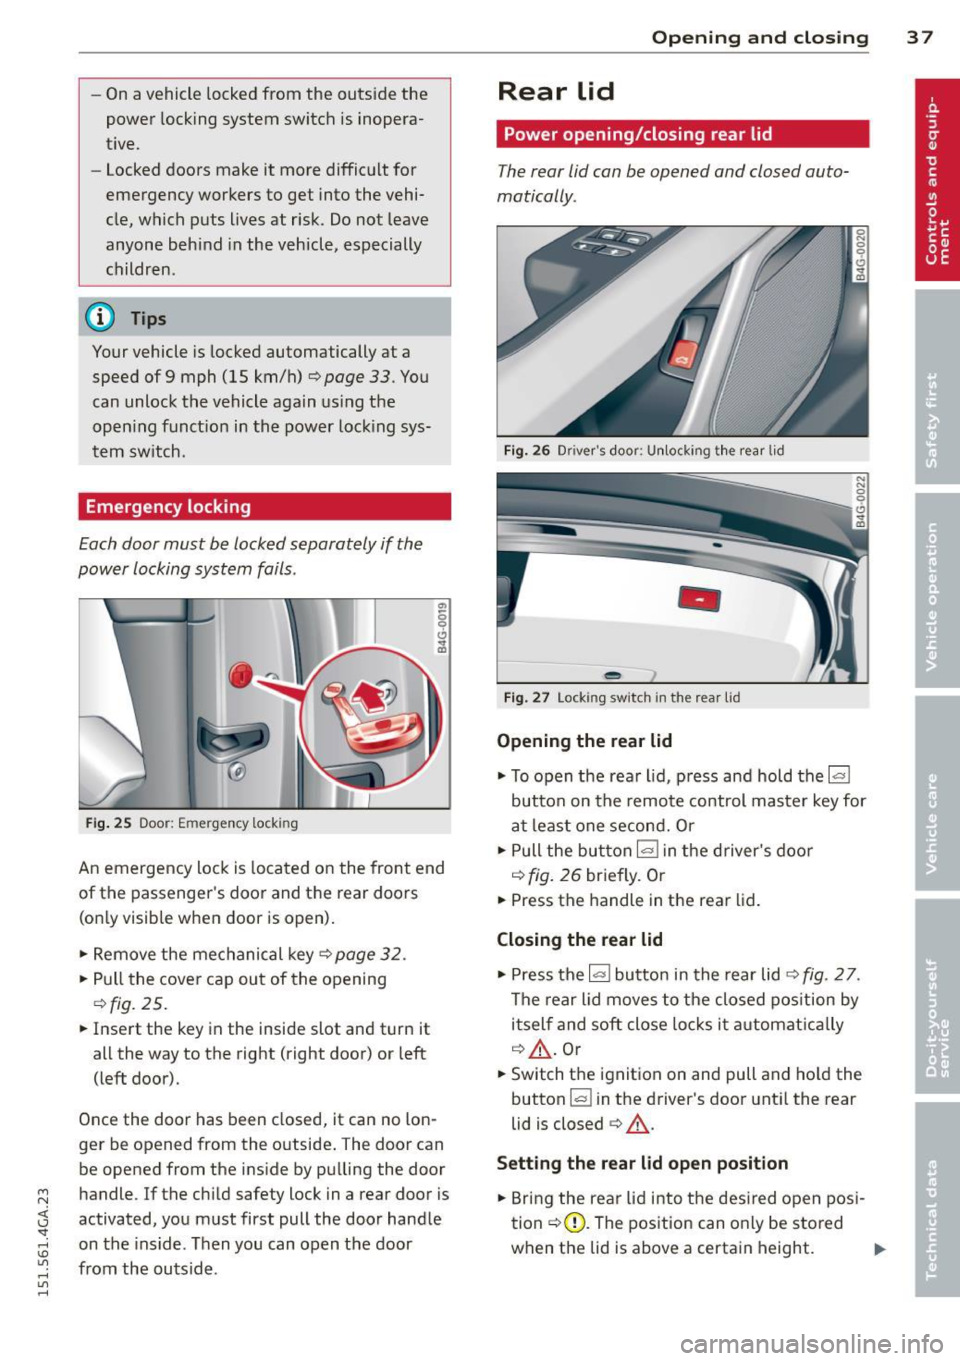
Emergency locking
Each door must be locked separately if the
power locking system fails .
Fig. 25 Doo r: E merg enc y lock ing
An emergency lock is located on the front end
of the passenger's door and the rear doors
(only visible when door is open).
.,. Remove the mechanical key¢ page 32 .
.,. Pull the cover cap out of the opening
<=> fig. 25.
.,. Insert the key in the inside slot and turn it
all the way to the right (right door) or left
(left door).
Once the door has been closed, it can no lon
ger be opened from the outside . The door can
be opened from the inside by pulling the door
handle. If the child safety lock in a rear door is
activated, you must first pull the door handle
on the inside . Then you can open the door
from the outs ide .
Opening and closing 3 7
Rear lid
Power opening/closing rear lid
The rear lid can be opened and closed auto
matically .
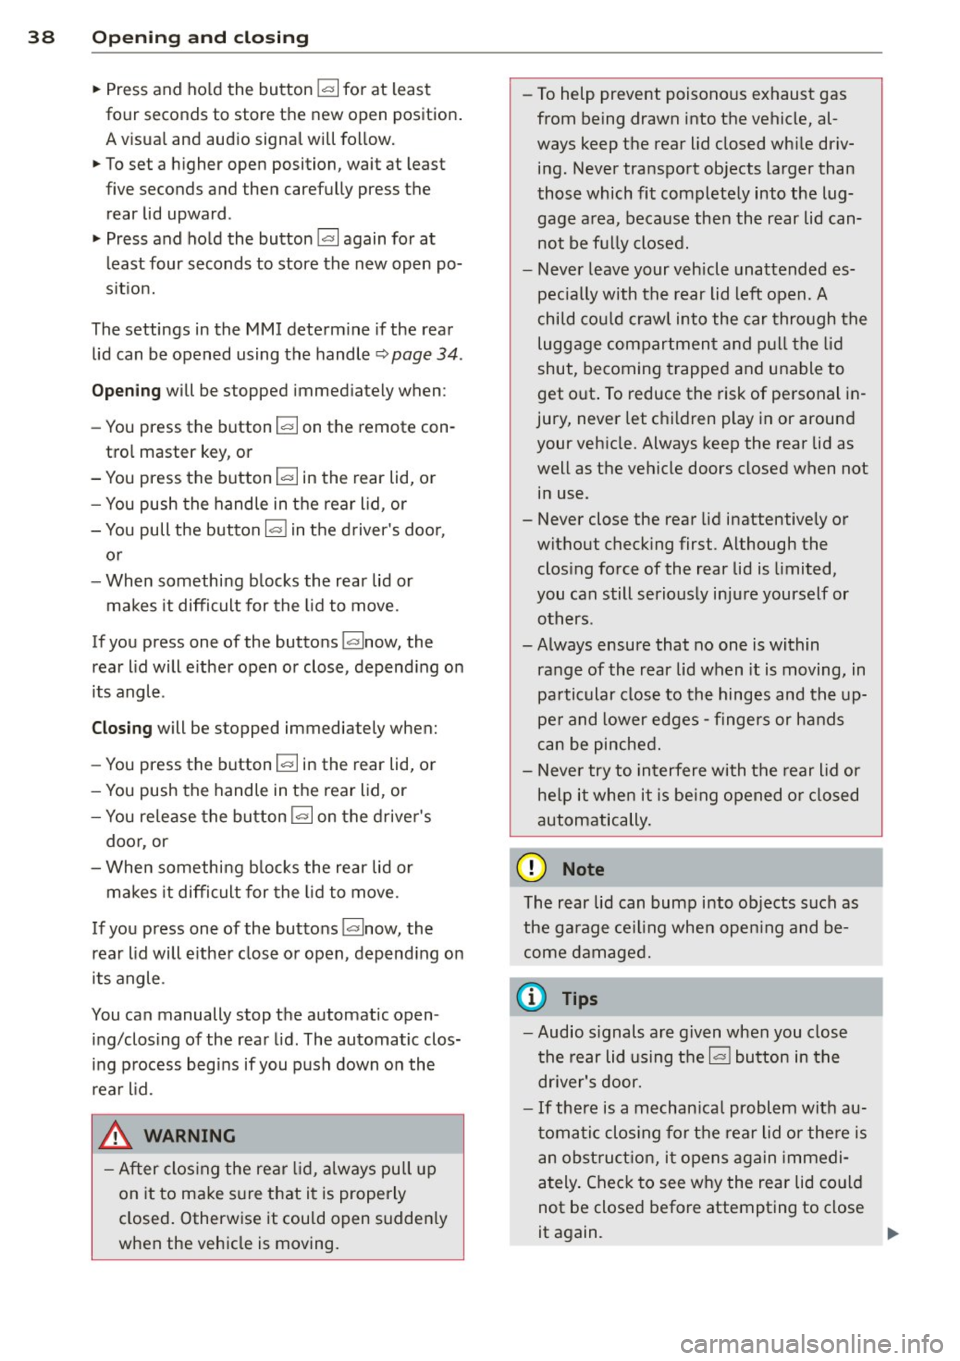
Fig. 26 Driver 's doo r: Un locki ng th e rear lid
-
Fig. 27 L ock ing switch in the rear lid
Opening the rear lid
.,. To open the rear l id, press and hold the la!
button on the remote control master key for
at least one second. Or
.,. Pull the button
lo<::>l in the driver's door
¢ fig. 26 briefly. O r
.,. Press the handle in the rear l id.
Closing the rear lid
.,. Press the lasl button in the rear lid <=> fig. 2 7 .
The rear lid moves to the closed position by
itself and soft close locks it automatica lly
¢ .&, . Or
.,. Switch the ignition on and pull and ho ld the
button
l a l in the driver's door until the rear
lid is closed
a:> .&, .
Setting the rear lid open position
.,. Bring the rear lid into the desired open posi
tion ¢(!). The position can only be stored
when the lid is above a certa in height.
IJJ,,-
Page 40 of 316
38 Opening and closing
• Press and hold the button~ for at least
four seconds to store the new open position.
A visual and audio signal will follow.
• To set a higher open position, wait at least
five seconds and then carefully press the
rear lid upward .
• Press and hold the button~ again for at
least four seconds to store the new open po
sition.
The settings in the MMI determine if the rear
lid can be opened using the handle
~ page 34 .
Opening will be stopped immediately when :
- You press the button
l"" I on the remote con-
trol master key , or
- You press the button
l"" I in the rear lid, or
- You push the handle in the rear lid, or
- You pull the button
I""! in the driver's door,
or
- When something blocks the rear lid or
makes it difficult for the lid to move.
If you press one of the buttons ~now, the
rear lid will either open or close , depending on
its angle .
Closing will be stopped immediately when:
- You press the button
l"" I in the rear lid, or
- You push the handle in the rear lid, or
- You release the button
lal on the driver's
door, or
- When something blocks the rear lid or
makes it difficult for the lid to move.
If you press one of the buttons ~now, the
rear lid will either close or open , depending on
its angle .
You can manually stop the automatic open
ing/closing of the rear lid. The automatic clos
ing process begins if you push down on the
rear lid.
A WARNING
-After closing the rear lid, always pull up
on it to make sure that it is properly
closed. Otherwise it could open suddenly
when the vehicle is moving. -
To help prevent poisonous exhaust gas
from being drawn into the vehicle, al
ways keep the rear lid closed while driv ing. Never transport objects larger than
those which fit completely into the lug
gage area, because then the rear lid can
not be fully closed.
- Never leave your vehicle unattended es
pecially with the rear lid left open. A
child could crawl into the car through the
luggage compartment and pull the lid
shut, becoming trapped and unable to
get out. To reduce the risk of personal in
jury, never let children play in or around
your vehicle. Always keep the rear lid as
well as the vehicle doors closed when not in use .
- Never close the rear lid inattentively or
without checking first. Although the
closing force of the rear lid is limited,
you can still seriously injure yourself or
others.
- Always ensure that no one is within
range of the rear lid when it is moving, in
particular close to the hinges and the up
per and lower edges - fingers or hands
can be pinched.
- Never try to interfere with the rear lid or
help it when it is being opened or closed
automatically.
@ Note
The rear lid can bump into objects such as
the garage ceiling when opening and be
come damaged.
(D Tips
-Audio signals are given when you close
the rear lid using the
las! button in the
driver's door.
- If there is a mechanical problem with au
tomatic closing for the rear lid or there is
an obstruction, it opens again immedi
ately. Check to see why the rear lid could
not be closed before attempting to close
it again. ...
Page 42 of 316
40 Opening and clo sing
Child safety lock for
the rear doors
The power child safety lock locks the rear win
dows and prevent the rear doors from being
opened from the inside.
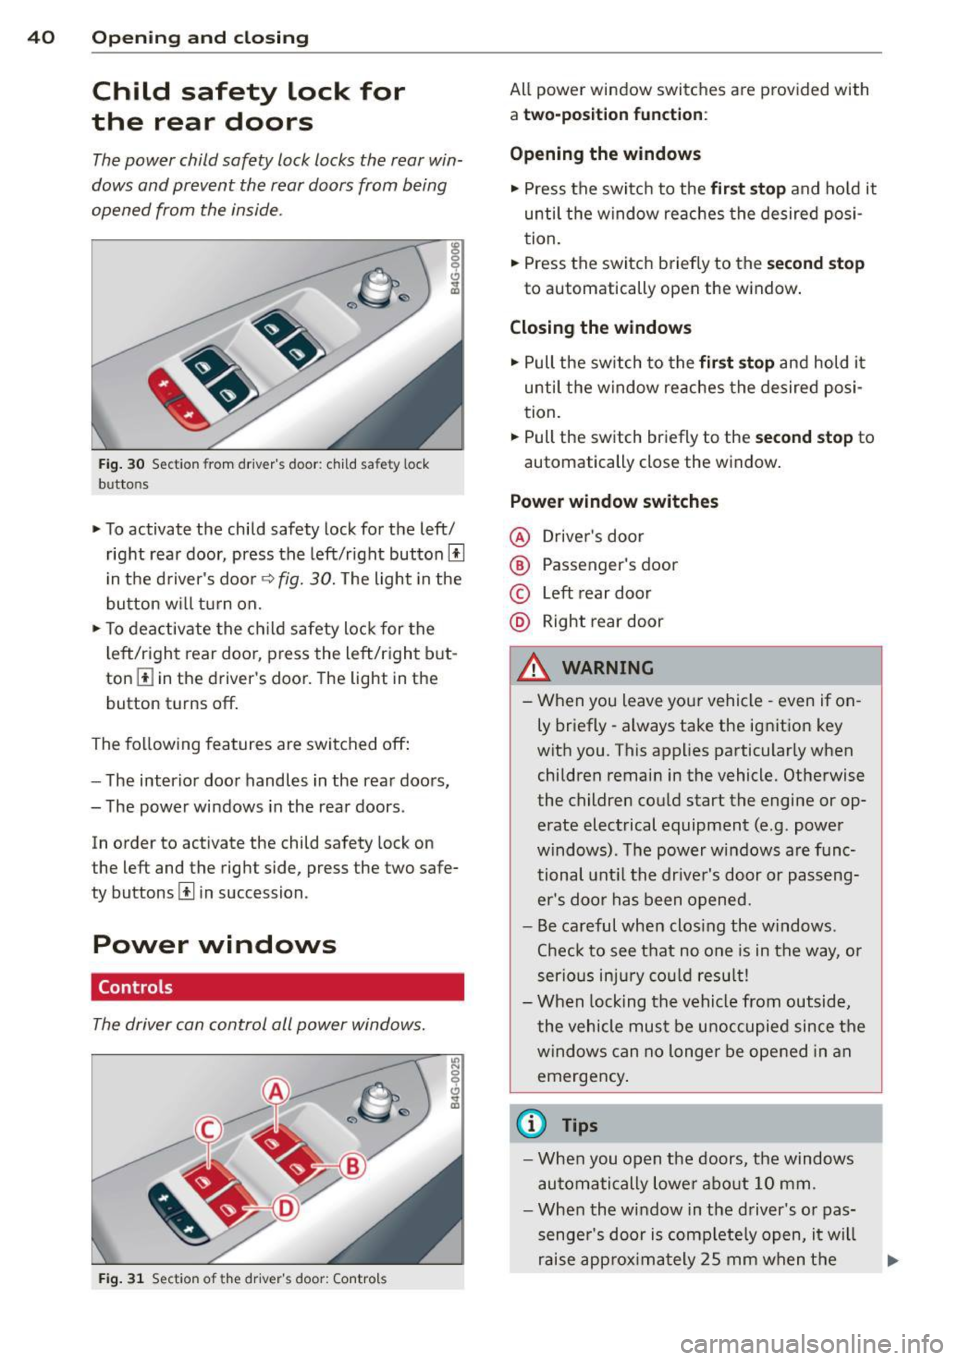
Fig. 30 Section from driver's door: child safety lock
buttons
• To activate the child safety lock for the left/
right rear door, press the left/right button[!]
i n the d river's door
q fig. 30. The light in the
button w ill turn on.
• To deactivate the ch ild safety lock for the
l eft/right rear door, press the left/right b ut
ton
III in the driver's door. The light in the
button turns off.
The following features are switched off:
- The interior door handles in the rear doors,
- The power windows in the rear doors .
In order to activate the child safety lock on
the left and the right side, press the two safe
ty buttons[!] in succession.
Power windows
Controls
The driver can control all power windows.
Fig . 31 Section of the driver's door: Controls
All power window switches are provided with
a two-po sition function :
Opening the windows
• Press the switc h to the fir st sto p and hold it
until the window re aches the desired posi
tion.
• Press the switch briefly to the
second stop
to automatically open the window .
Closing the windows
• Pull the sw itch to the fir st stop and hold it
until the window reaches the desired posi
tion .
.. Pull the switch br iefly to the
s e cond stop to
automatically close the window.
Power window switches
@ Drive r's door
® Passenger's door
© Left rear door
@ Right rear door
& WARNING
- When you leave you r vehicle -even if on
ly briefly -always take the ignition key
wit h you . This applies particularly when
children remain in the vehicle. Otherwise
the children could start the engine or op
erate electrical equipment (e.g. power
windows). The power windows are func
tional unt il the drive r's door or passeng
er 's doo r ha s been opened.
- Be careful when clos ing the w indows .
Chec k to see that no o ne is in the way, or
serio us inju ry co uld resu lt!
- When lock ing the vehicle from outside,
the vehicle mu st be u noccupied since the
windows can no longer be opened in an
emergency .
{1) Tips
-When you open the doors, the windows
au tomati cally lower abo ut 10 mm .
- When the window in the driver's or pas
senge r's door is complete ly open, it will
raise app rox ima tely 25 mm when t he
Page 59 of 316
M N <( I.J "". rl I.O
"' rl
"' rl
Rear head restraints
/
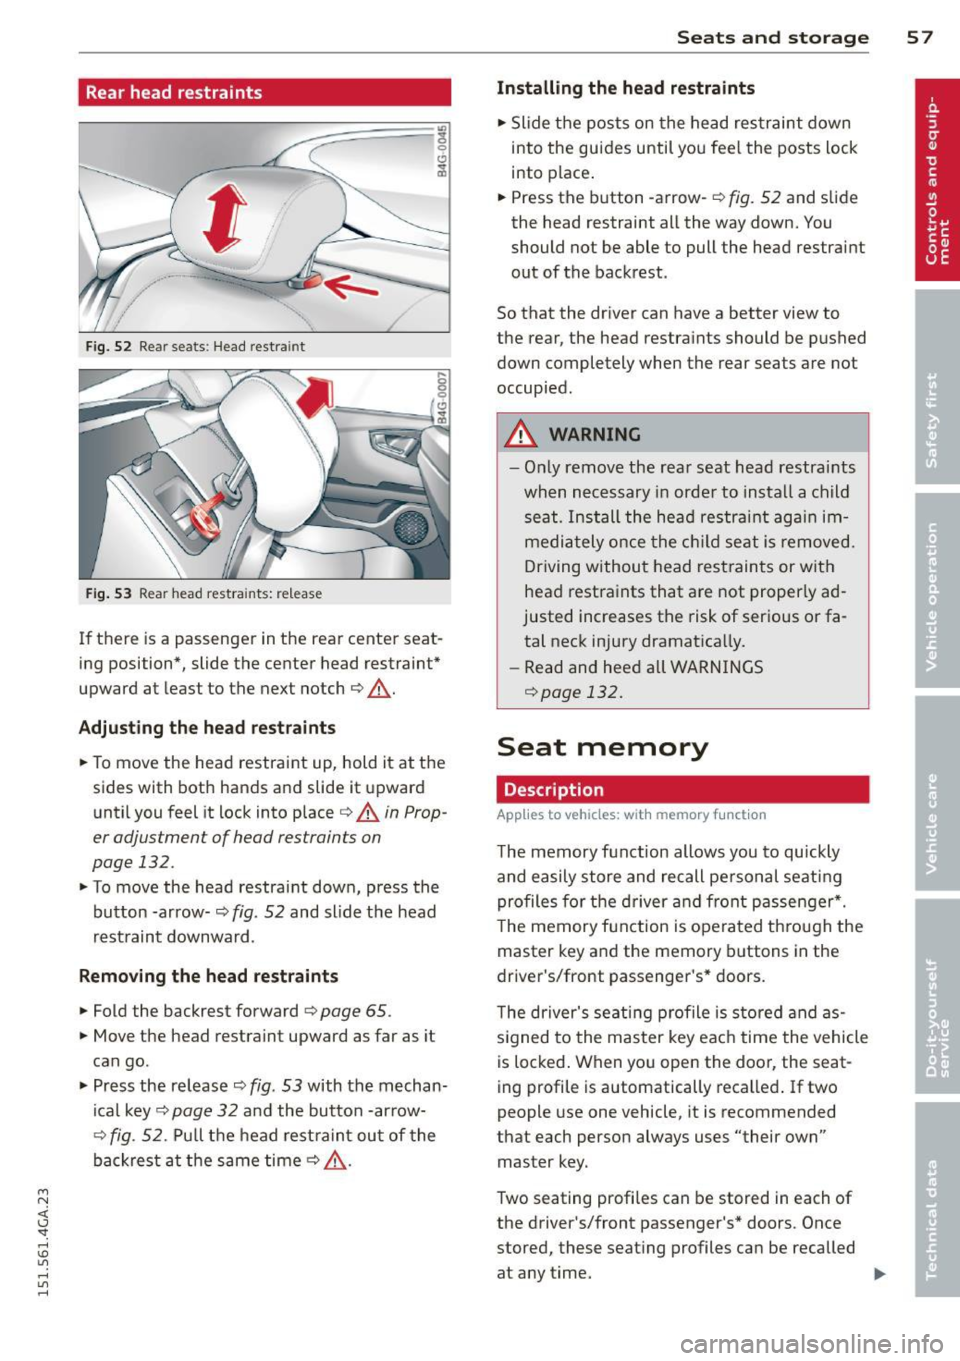
Fig. 52 Rear seats : Head restra int
Fig. 53 Rear head restra ints: re lease
If there is a passenger in the rear center seat
ing position*, slide the center head restraint*
upward at least to the next notch
Q ,&..
Adjusting the head restraints
.. To move the head restraint up, hold it at the
sides with both hands and slide it upward
until you feel it lock into place
Q .&. in Prop
er adjustment of head restraints on
page 132.
.. To move the head restraint down, press the
button -arrow-
Q fig. 52 and sl ide the head
restraint downward .
Removing the head restraints
.. Fold the backrest forward Q page 65 .
.. Move the head restraint upward as far as it
can go .
.,. Press the release
Q fig. 53 with the mechan
ical key
9 page 32 and the button -arrow-
9 fig. 52. Pull the head restraint out of the
backrest at the same time
9 ,&..
Seats and storage 57
Installing the head restraints
.. Slide the posts on the head restraint down
into the guides until you feel the posts lock
into place .
.. Press the button -arrow-
Q fig. 52 and slide
the head restraint all the way down. You
should not be able to pull the head restraint
out of the backrest.
So that the driver can have a better view to
the rear, the head restraints should be pushed down completely when the rear seats are not
occupied.
A WARNING
- Only remove the rear seat head restraints
when necessary in order to install a child
seat. Install the head restra int again im
mediately once the child seat is removed.
Driving without head restraints or with
head restraints that are not properly ad
justed increases the risk of serious or fa
tal neck injury dramat ica lly.
- Read and heed all WARNINGS
¢page 132.
Seat memory
Description
Applies to veh icles: w ith memory f unction
The memory function allows you to quickly
and easily store and recall personal seating profiles for the driver and front passenger*.
T he memory function is operated through the
master key and the memory buttons in the
driver's/front passenger's* doors.
The driver's seating profile is stored and as
s ig ned to the master key each time the vehicle
is locked. When you open the door, the seat
ing profile is automatically recalled. If two
people use one vehicle, it is recommended
that each person always uses "their own"
master key .
Two seating profiles can be stored in each of
the driver's/front passenger's* doors. Once
stored, these seat ing profiles can be recalled
at any time.
IIJ,,
Page 61 of 316
M N <( I.J "". rl I.O
"' rl
"' rl
.. You can now adjust the front passenger seat
using the buttons on the driver 's seat
e::> page 54, fig. 48.
M atching th e positi on of the driver' s seat
.. To adj ust the front passenger sea t to match
the driver 's seat settings, select the
I CAR I
function button > (C ar) * sys te m s control
button
> Vehicle setting s > Seats> Front
p ass enge r seat > Sym met ry to d riv e r s eat .
.. Press and hold the control knob until the ad
justment process is complete.
(D Tips
When matching seat settings, the settings
for the lumbar support and seating sur
face will not transfer to the front passeng
er 's seat.
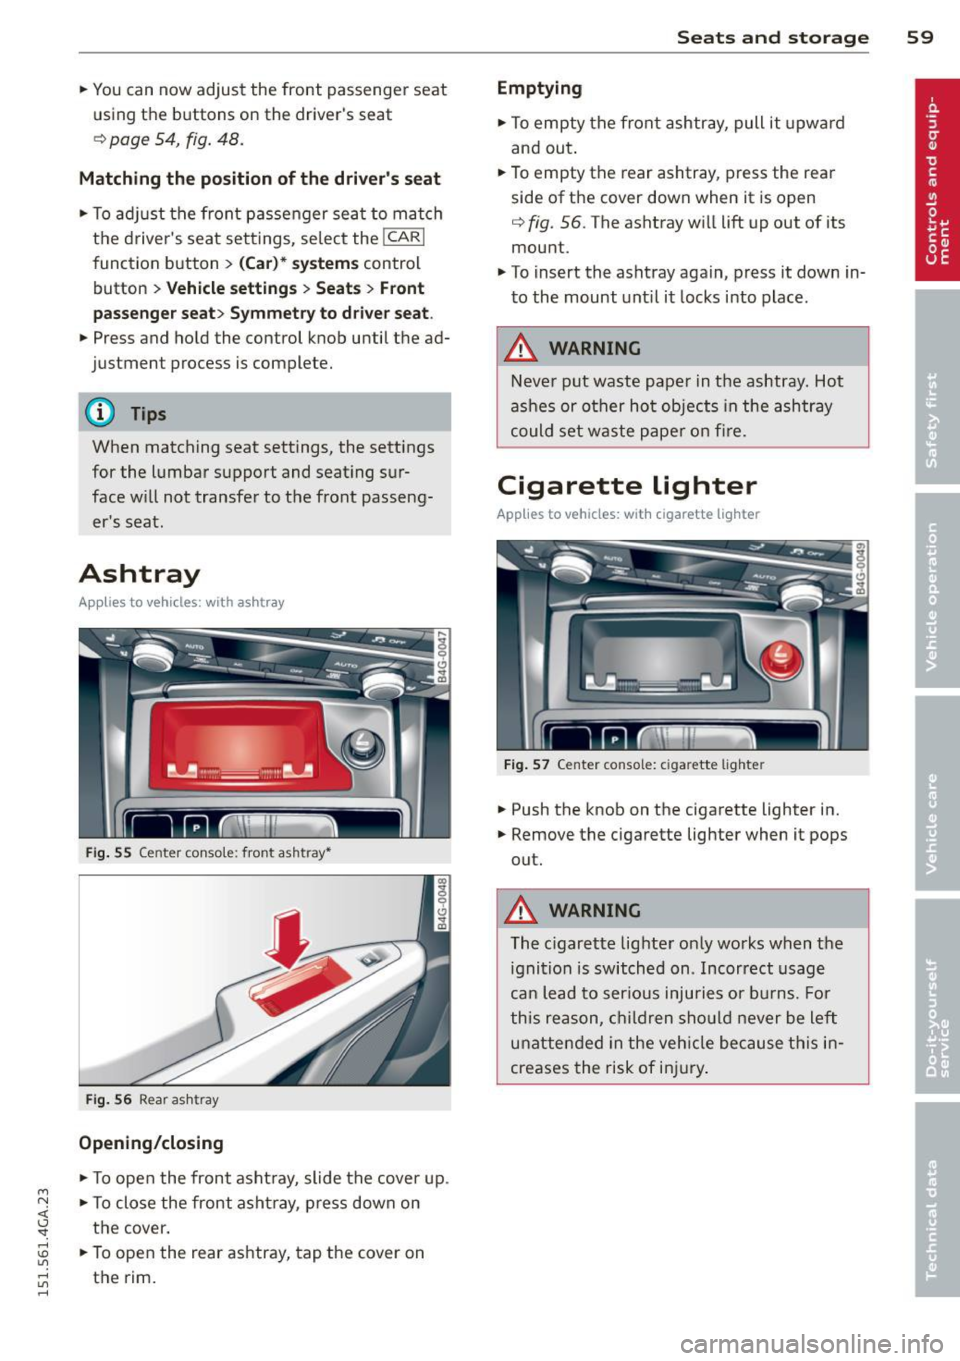
Ashtray
Applies to vehicles: with ashtray
Fig . 55 Center conso le: front ashtray•
Fig. 56 Rear as htr ay
Opening /closing
.. To open the front ashtray, slide the cover up .
.. To close the front ashtray, press down on
the cover.
.. To open the rear ashtray, tap the cover on
the rim.
Sea ts a nd s to rage 59
Emptying
.. To empty the front ashtray, pull it upwa rd
and out .
.. To empty the rear ashtray, press the rear
side of the cover down when it is open
¢ fig. 56. The ashtray will lift up out of its
mount.
.. To insert the ashtray again, press it down in
to the mount unt il it locks into place.
A WARNING
Neve r put waste paper in the ashtray. Hot
ashes or other ho t objects in the ashtray
could set waste pape r on fi re.
Cigarette lighter
Applies to vehicles: with cigarette lighter
Fig . 5 7 Center console: cigarette lighter
.. Push the knob on the cigarette lighter in .
.. Remove the cigarette lighter when it pops
out.
A WARNING
The cigarette lighter only works when the
ignition is switched on . Incorrect usage
can lead to ser ious inju ries or bu rns. For
this reason, children sho uld never be left
unatte nded in the veh icle because this in
creases the risk of inj ury.
Page 82 of 316

80 On the road
& WARNING
-When you leave your vehi cle -even if on
ly brief ly -always take the ignition key
with yo u. This applies par ticu larly when
children remain in the veh icle. Otherw ise
the ch ildren could start the engine, re
lease the parking brake or operate elec
trical equipment (e.g. power windows) .
There is the risk of an accident.
- When the vehicle is locked, no one -par
t icularly not children should remain in
the vehicle. Loc ked doors make it more
difficult for emergency wor kers to get in
to the vehicle - putt ing lives at risk.
Starting from rest
The starting assist function ensures that the
parking brake is released automatically upon starting.
Stopping and applying parking brake
" Pull the switch ID to apply the park ing
brake.
St arting and automa tically relea sing the
parking brake
.. When you start to drive as usua l, the park
ing brake is automatically released and you r
vehicle begins to move.
When stopp ing at a traff ic signa l or stopp ing
in city traffic, the parking brake can be ap
plied . The veh icle does not have to be held
with the footbrake. The par king brake elimi
nates the tendency to c reep with a drive range
engaged. As soon as you dr ive
off as usua l,
the park ing brake is released automatically
and the vehicle starts to move.
Starting on slopes
When sta rt ing on in cl ines, the starting ass ist
p revents the veh icle from uninten tionally ro ll
ing bac k. The braking force o f the parking
brake is not released un til sufficient dr iving
force has been b uilt up at the whee ls.
(D Tips
For safety reasons, the parking bra ke is re
l eased automatically only when the driv
er's safety belt is engaged in the buckle.
Starting off with a trailer
To prevent rolling back unintentionally on an
incline, do the following:
.. Keep the sw itch(®) pulled and depress the
accelerator. The pa rking bra ke stays applied
and prevents the vehicle from roll ing back
ward.
" You can release the switch© once you are
sure that you are developing enough for
wa rd momentum at the wheels as you de
press the acce lerator.
Depend ing on the we ight of the rig (vehicle
and trailer) and the severity of the incline, you
may roll backwards as you start. You can p re
vent rolling backwa rds by holdi ng the par king
brake switch (®) pulled o ut and ac celera ting -
j u st as you wou ld w hen s tarti ng on a hill wi th
a conventiona l hand brake.
Emergency braking
In the event that the conven tional brake sys
tem fails or locks.
"I n an emergency, pull the switch(®) and
cont inue to pull it to slow your ve hicl e down
w ith the par king b rake.
" As soon as you re lease the swi tch (®) or ac -
celerate, the braking process stops.
If you p ull the swi tc h (®) a nd hold it above a
speed of about 5 mph (8 km/h), the emergen
cy braking f unction is initiated. The ve hicle is
braked at all four whee ls by activating the hy
draulic brake system. The brake performance
is similar to making an emergency stop¢&..
In order not to activate the emergency brak-
ing by mistake, an audib le warning tone (buz
zer) sounds when the switch(®) is pulled. As ..,.