display AUDI A7 2020 Owners Manual
[x] Cancel search | Manufacturer: AUDI, Model Year: 2020, Model line: A7, Model: AUDI A7 2020Pages: 310, PDF Size: 81.29 MB
Page 168 of 310
Telephone
Managing favorites
Applies to: vehicles with telephone
You can store the desired number for a contact as
a shortcut in the favorites list.
Accessing favorites
> Applies to: MMI: Select on the home screen:
PHONE > Favorites.
Storing an existing phone number as a
favorite:
> Press Call list.
> Press and hold a contact in the list until the Op-
tions menu appears.
> Press Store as favorite. The favorite has been
stored. will appear briefly.
Deleting stored favorites
> Select: Favorites > Z > one or multiple favor-
ites or Select all > Delete > (Done).
@) Tips
If there are multiple mobile devices, you can
create separate favorites in the MMI for each
mobile device.
Opening contacts
Applies to: vehicles with telephone
(enced)
eu os ;
or
Business ©=
0049841123456
PMU esac}
Poeanect
ones Reel)
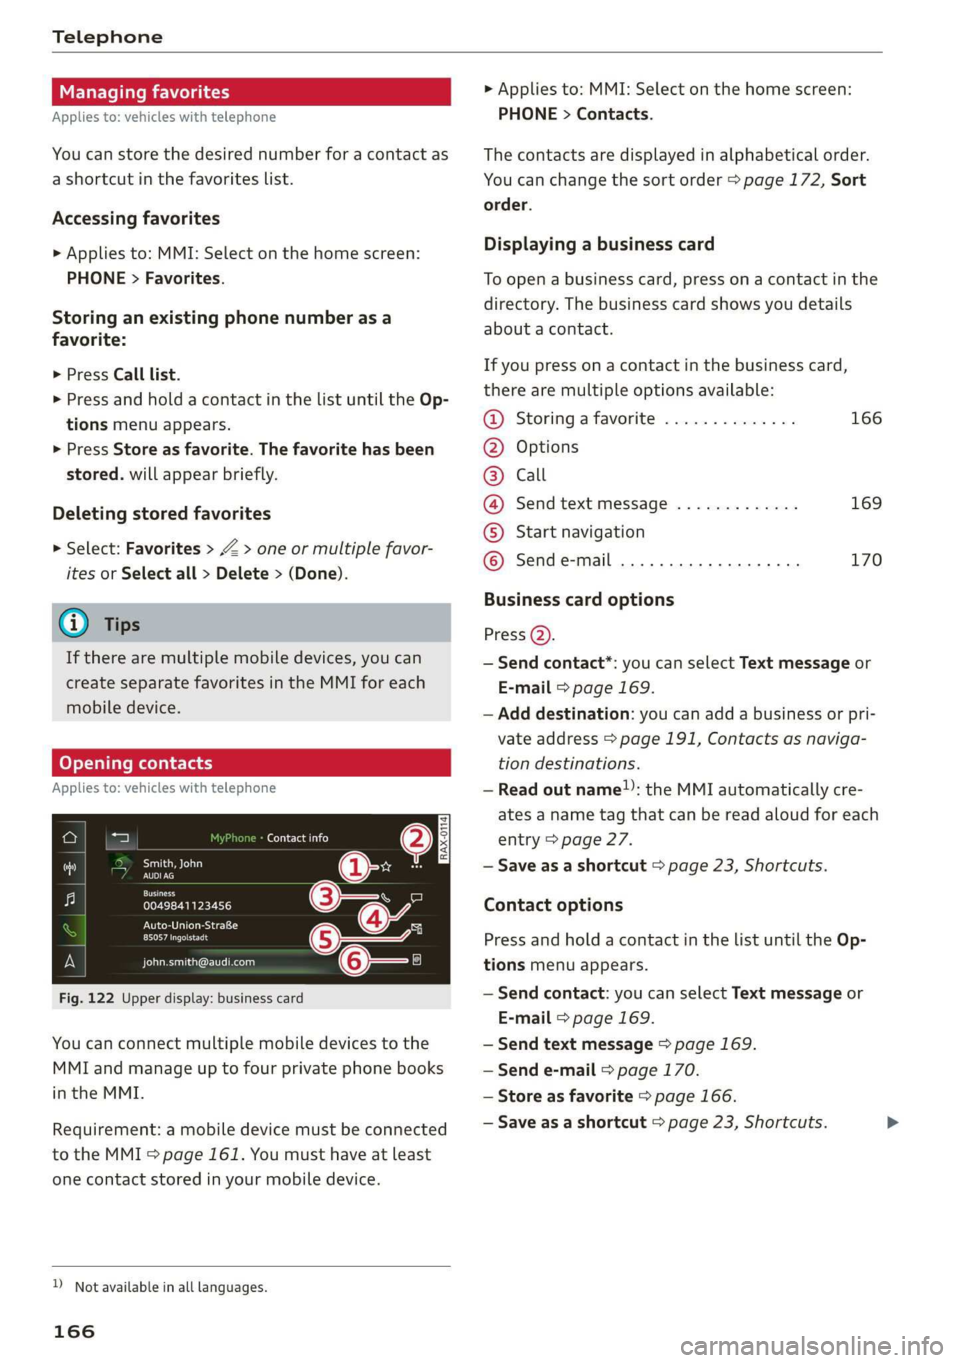
Fig. 122 Upper display: business card
You can connect multiple mobile devices to the
MMI and manage up to four private phone books
in the MMI.
Requirement: a mobile device must be connected
to the MMI > page 161. You must have at least
one contact stored in your mobile device.
) Not available in all languages.
166
> Applies to: MMI: Select on the home screen:
PHONE > Contacts.
The contacts are displayed in alphabetical order.
You can change the sort order > page 172, Sort
order.
Displaying a business card
To open a business card, press on a contact in the
directory. The business card shows you details
about a contact.
If you press on a contact in the business card,
there are multiple options available:
@ Storinga favorite .............. 166
@® Options
© call
@ Send text message ............. 169
© Start navigation
© Sende-mail ..............2000. 170
Business card options
Press Q).
— Send contact*: you can select Text message or
E-mail > page 169.
— Add destination: you can add a business or pri-
vate address > page 191, Contacts as naviga-
tion destinations.
— Read out name: the MMI automatically cre-
ates a name tag that can be read aloud for each
entry > page 27.
— Save as a shortcut > page 23, Shortcuts.
Contact options
Press and hold a contact in the list until the Op-
tions menu appears.
— Send contact: you can select Text message or
E-mail > page 169.
— Send text message > page 169.
— Send e-mail > page 170.
— Store as favorite > page 166.
— Save as a shortcut > page 23, Shortcuts.
Page 169 of 310
4K8012721BC
Telephone
Deleting contacts
— Deleting all contacts: select: Contacts > Z >
Delete all. All contacts are deleted only in the
MMI.
— Deleting imported contacts: requirement: you
must have imported at least one contact. Se-
lect: Contacts > Z > one or more contacts, or
Select all > Delete imported contacts > Done.
The imported contacts are deleted.
@ Tips
— Pay attention to any synchronization
prompts on your mobile device when down-
loading contacts.
— Only the contacts of the mobile device being
actively used are displayed.
— The contacts from the mobile device may
not be transferred in alphabetical order. If
there are too many entries, contacts with
different first letters may be missing in the
MMI.
— If contacts are loaded from the mobile de-
vice into the MMI, the contacts on the SIM
card will no longer be displayed in the MMI.
— The contacts in the local MMI memory are
always visible and can be accessed by other
users.
— After switching off the ignition and exiting
the vehicle, the mobile device directory will
be loaded when the MMI is started again if
the mobile device is within range and the
Bluetooth function is switched on in the mo-
bile device and the MMI.
— Only the contacts in the local MMI memory
can be deleted.
eS Tale mem LL
Applies to: vehicles with telephone
>» Applies to: MMI: Select on the home screen:
PHONE > Voicemail.
Requirement: there must be no voicemail num-
ber stored.
> Entering the voicemail number: enter the de-
sired number. Press OK.
Requirement: a voicemail number must be stor-
ed.
> Dialing the voicemail number: press Voice-
mail. The call begins immediately.
@) Tips
This service must be set up and activated in
advance by the cell phone service provider.
Dialing a phone number
Applies to: vehicles with telephone
Depending on the vehicle equipment, you may
have the following options for dialing a phone
number:
— Using text input in the MMI > page 24.
— Using voice operation > page 27.
Making an emergency call
Applies to: vehicles with telephone
Requirement: a mobile device must be connected
to the MMI via Bluetooth.
> Applies to: MMI: Select on the home screen:
PHONE > Dial number > the emergency call
number specific to the country (for example,
911) > Dial.
ZA\ WARNING
— Because your phone works with radio sig-
nals, a connection cannot be guaranteed un-
der all circumstances. Do not rely on only
your phone when it comes to essential com-
munication (such as during a medical emer-
gency).
— Always follow the instructions given by the
emergency personnel during an emergency
call and only end the call when they instruct
you to do so.
Answering/ending a call
Applies to: vehicles with telephone
> To accept or end a call, press the @ button on
the multifunction steering wheel. Operating
> page 13.
You can use the following options on the MMI
when there is an incoming call:
> Answering an incoming call: press Answer.
167
Page 171 of 310
4K8012721BC
Telephone
Messages
Text messages
Applies to: vehicles with telephone
Depending on the mobile device being used and
the mobile network contract, you may be able to
receive and send text messages using the MMI.
Requirement: your mobile device must be con-
nected to the MMI via Bluetooth Message Access
Profile (Bluetooth MAP) > page 161.
> Applies to: MMI: Select on the home screen:
MESSAGES > (=) > Text message (SIM card)*/
text message (phone 1)/text message (phone
2)*,
Inboxes
— New text message: press on a template in the
list or dictate a text message. Press Add and
select one or more recipients from your con-
tacts. To remove a recipient, press Delete. Press
Send.
— Inbox: displays all received text messages.
— Sent: displays all sent text messages.
— Outbox": displays all text messages to be sent.
— Drafts*: text messages that have not been sent
yet by the mobile device are displayed on the
MMI.
— Deleted*: deleted text messages are displayed.
— User-defined*: folders defined by the user are
transferred from your mobile device.
Message options
The following options are available when you se-
lect a text message:
— Read out* the text message).
— Reply: a reply can be sent to the selected mes-
sage in the Inbox.
— To switch to the previous or the next message,
press < or >.
— More: options
D_ Not available in all languages.
2) Function is not supported on all mobile devices.
When you press More, the following options are
available:
— Call: Requirement: a number must be stored.
You
can call the contact.
— Forward: the selected text message can be for-
warded to other recipients. Text can also be
added before sending.
— Navigate: Requirement: the contact must have
a navigation address stored with it in the direc-
tory. You can start route guidance.
— Extract numbers: Requirement: the message
must contain a number. You can extract a num-
ber from a text message.
— Send again: Requirement: the text message
must be in the Outbox. The selected text mes-
sage can be resent.
Press
and hold an entry in the Inbox until the Op-
tions menu appears.
— Reply: a reply can be sent to the selected mes-
sage in the Inbox.
— Forward: the selected text message can be for-
warded to other recipients. Text can also be
added before sending.
Settings
Press ©},
— Automatically forward text message to mobile
device*2): when this function is switched on,
text messages will also be automatically stored
on your mobile device.
— New text message notification: when this
function is switched on, you will be notified
when new text messages are received. New text
messages are indicated with an envelope Min
the MMI status bar.
— Text message center*: the number for the text
message center of your cell phone service pro-
vider is displayed. If no number has been stor-
ed yet, you can enter the text message center
number.
— Delete text messages from SIM card”: if the
memory capacity on the SIM card is full, an en-
velope with a line through it is displayed in the
MMI status bar. You can continue to send text >
169
Page 172 of 310
Telephone
messages, but you cannot receive new text
messages. To delete all sent text messages
from the SIM card, select All sent messages. To
delete all read text messages from the SIM
card, select All read messages.
Delete text message
Select: a mailbox > Z > one or more text mes-
sages > Delete > Done.
@ Tips
— Please note that you may have to activate
the receiving and sending of text messages
depending on the SIM card being used (for
example, when using a multi-SIM).
— Messages that are deleted in the MMI are
also deleted in the mobile device automati-
cally.
— Only new received messages may be dis-
played depending on your mobile device.
Applies to: vehicles with telephone
Depending on the type of mobile device being
used, you may be able to receive and send e-
mails through the MMI.
Requirement: your mobile device must be con-
nected to the MMI via Bluetooth Message Access
Profile (Bluetooth MAP) > page 161.
> Applies to: MMI: Select on the home screen:
MESSAGES > (:=) > e-mail (phone 1)/e-mail
(phone 2)*.
Inboxes
— New e-mail: press on a template in the list.
Press Add and select one or more recipients
from your contacts. To remove one or all recipi-
ents, press Delete. Press Send.
— Inbox: displays all received e-mails. To update
the list, press OQ.
— Sent: displays all sent e-mails.
— Outbox: displays all e-mails to be sent.
— Drafts: e-mails that have not been sent yet are
displayed.
) Not available in all languages.
170
— Deleted*: deleted e-mails are displayed.
— User-defined*: folders defined by the user are
transferred from your mobile device.
Message options
The following options are available when you se-
lect an e-mail:
— Read out* the e-mail).
— Reply: a reply can be sent to the selected e-mail
in the Inbox.
— To switch to the previous or the next message,
press or >.
— More: options
When you press More, the following options may
be displayed depending on your mobile device
and the applicable mail folder:
— Call: Requirement: a number must be stored.
You can call the contact.
— Forward: the selected e-mail can be forwarded
to other recipients. Text can also be added be-
fore sending.
— Extract e-mail add.: you can extract the e-mail
address from an e-mail.
— Navigate: Requirement: the contact must have
a navigation address stored with it in the direc-
tory. You can start route guidance.
— Extract numbers: Requirement: the text in the
e-mail must contain a number. You can extract
a number from an e-mail.
— Show all recipients*: you can display the recipi-
ents of an e-mail.
— Show attachmts.”: you can display a list of at-
tachments to an e-mail.
— Send again: the selected e-mail in the Outbox
and Sent mailboxes can be sent again.
Press and hold an entry in the Inbox until the Op-
tions menu appears.
— Reply: a reply can be sent to the selected e-
mail.
— Reply all: a reply can be sent for the selected e-
mail and it will be sent to all of the entered re-
cipients.
— Forward: the selected e-mail can be forwarded
to different recipients.
Page 173 of 310
4K8012721BC
Telephone
Settings
Press €.
— New e-mail notification: when this function is
switched on, you will be notified when new e-
mails are received. New e-mails are indicated
with an envelope & in the MMI status bar.
Deleting e-mails
Select: a mailbox > Z > one or more e-mails >
Delete > (Done).
©) Note
Read the information about Audi connect, and
be sure to note the connectivity costs section
=>page 174.
Settings
Phone settings
Applies to: vehicles with telephone
> Applies to: MMI: Select on the home screen:
PHONE > ©}.
Switching between two mobile devices
Requirement: phone 1 and phone 2 must be con-
nected to the MMI.
Switch telephones: the device name of the avail-
able mobile device is displayed. You can switch
the phone by pressing the button.
Declining a call with a text message*
When this function is switched on, you can de-
cline an incoming call with a text message.
Call options*
The following options may be available depend-
ing on the mobile device:
— Call forwarding: you can switch the forwarding
of incoming calls to your voicemail or to anoth-
er phone number on and off. You can check if
the function is activated or deactivated with
Status.
— Call waiting: you will be alerted to an incoming
call during a phone call when the function is
switched on. You can check if the function is ac-
tivated or deactivated with Status.
— Send own number: sending your phone num-
ber with an outgoing call can be switched on
and off. With the Net.-depen. setting, the set-
ting listed in the contract with the cell phone
service provider is used. The settings only apply
to the PHONE menu in the MMI. Please note
that the settings on your mobile device will ap-
ply after disconnecting the Bluetooth connec-
tion. You can determine which setting is active
with Status.
Ringtone and volume settings
— Ringtone and message volume: you can adjust
the volume of the selected ringtone and the no-
tification volume when a message is received by
moving the position of the slider.
— Ringtone*: available ringtones are played using
the Ringtone function. Press on an entry in the
list.
— Microphone input level: you can adjust the mi-
crophone input level using the slider.
Turn on car phone or data module
Applies to: vehicles with car phone/data module
When this function is switched on, you can use
the
car phone or data module.
As long as the car phone was not turned off sepa-
rately the last time it was used, it will turn on au-
tomatically when the ignition is switched on.
Edit voicemail number
You can change your voicemail number.
Enable VoLTE
When this function is switched on, Voice over
LTE* will be supported.
Network settings
— Login to mobile phone network: select to log
into your cell phone service provider network
automatically or manually.
— Network selection: Requirement: the data
module must be switched on and Login to mo-
bile phone network must be set to Manual. Se-
lect a network manually from the list of availa-
ble networks at the present location.
171
>
Page 174 of 310
Telephone
Car phone serial number (IMEI):
Applies to: vehicles with car phone
The serial number (IMEI) of your car phone is dis-
played.
@ Tips
— Several mobile devices can be paired with
the MMI, but only two* mobile devices can
be actively connected.
—To delete all paired Bluetooth devices, the
Bluetooth function can be reset to the fac-
tory default settings > page 220.
Directory settings
Applies to: vehicles with telephone
> Applies to: MMI: Select on the home screen:
PHONE > Contacts > >.
Switching between two mobile devices
Requirement: telephone 1 and telephone 2 must
be connected.
Switch telephones: the device name of the avail-
able mobile device is displayed. You can switch
the phone by pressing the button.
The directory for the selected phone will be dis-
played.
Hide grayed-out contacts
When this function is switched on, contacts that
have no phone numbers stored for them will be
hidden.
Sort order
You can sort the contacts in alphabetical order by
Last name or First name.
Download contacts
Requirement: a mobile device must be connected
to the MMI.
To update the contacts in the MMI, you can man-
ually download your mobile device contacts. De-
pending on the mobile device, you may need to
disconnect and reconnect the Bluetooth connec-
tion to update the contacts.
172
Memory capacity
You can manage up to 23,000 contacts. You can
also download up to 5,000 contacts from maxi-
mum four mobile devices. You can also import up
to 3,000 contacts from a storage medium.
Importing and exporting contacts
Requirement: an SD card must be in the SD card
reader* > page 205 or a USB storage device must
be connected to the Audi music interface
= page 208.
Contacts in vCard format (.vcf) can be imported
or exported from the MMI.
— Applies to: MMI: Importing contacts from a
storage medium: Select: Import contacts >
Search for import data > SD card 1 or USB de-
vice 1/USB device 2 > desired contacts or Se-
lect all contacts > Start import.
— Applies to: MMI: Exporting contacts to a stor-
age device: Requirement: Only previously im-
ported contacts can be exported. Select: Export
contacts > Find source for exporting > SD card
1 or USB device 1/USB device 2 > desired con-
tacts or Select all contacts > Start export.
G@) Tips
— For more information about the myAudi ac-
count, visit my.audi.com.
— The imported contacts are stored in the lo-
cal MMI memory.
— Contacts that were downloaded from a mo-
bile device cannot be exported.
— There should be no other files or folders on
the storage medium containing the contacts
to be imported.
— Apple devices and MTP devices (such as
smartphones) are not recognized as USB
storage devices.
Mobile phone network settings
Applies to: vehicles with telephone
> Applies to: MMI: Select on the home screen:
SETTINGS > Connection settings > Mobile
phone network.
Page 175 of 310
![AUDI A7 2020 Owners Manual 4K8012721BC
Telephone
Switching the car phone or data module on > Press the [=] button.
Applies to: vehicles with car phone/data module
See > page 171.
Instrument cluster
Telephone
Applies t AUDI A7 2020 Owners Manual 4K8012721BC
Telephone
Switching the car phone or data module on > Press the [=] button.
Applies to: vehicles with car phone/data module
See > page 171.
Instrument cluster
Telephone
Applies t](/img/6/57597/w960_57597-174.png)
4K8012721BC
Telephone
Switching the car phone or data module on > Press the [=] button.
Applies to: vehicles with car phone/data module
See > page 171.
Instrument cluster
Telephone
Applies to: vehicles with multifunction steering wheel and
telephone
In the instrument cluster display, you can control
the MMI functions with the multifunction steer-
Possible options:
— Call list: Requirement: the call list must con-
tain a phone number.
— Favorites: Requirement: favorites must be stor-
ed in the MMI.
— Switch telephones: Requirement: two cell
phones must be connected to the MMI.
— Back to call: Requirement: there must be a call
in progress.
ing wheel. Operating > page 13 and page 29,
Additional function buttons.
Requirement: the Telephone tab must be select-
ed in the instrument cluster.
Troubleshooting
Applies to: vehicles with telephone
(i) Tips
Depending on the selected function, it may be
necessary to use the MMI.
The information that follows lists some trouble-
shooting options. They depend on the equip-
ment.
Problem Solution
Pairing the mobile device to the
MMI failed.
Make sure the requirements for connecting a cell phone have been
met > page 161, or
make sure you did not accidentally decline the PIN for establishing
a connection on your cell phone. If necessary, repeat the pairing
process > page 161.
After pairing, not all contacts or
no contacts have been loaded in-
to the MMI.
Avoid using special characters in names.
Avoid using contact groups on your cell phone.
Check for prompts on your mobile device when connecting via
Bluetooth.
Certain telephone functions are
grayed out or not available.
The telephone functions depend on the mobile device service pro-
vider and the mobile device you are using.
Some telephone functions may
be switched off or not available,
even though the mobile device is
supported.
Check if the Bluetooth settings on your cell phone are limited or
individual Bluetooth settings are deactivated. This may be the
case with business cell phones.
Wireless cell phone charging is
not working or is interrupted.
Check if wireless charging with the Audi phone box is switched on.
Check if your mobile device is Qi-capable.
Check if your mobile device is positioned correctly in the Audi
phone box > page 163 and no other objects are between them.
The MESSAGES menu is not avail-
able.
Check if the Show messages option is on your mobile device and it
is enabled.
173
Page 176 of 310
Audi connect
Audi connect
General information
Depending on the country and the vehicle equip-
ment, the following functions may be available:
— Audi connect Infotainment
— Audi connect vehicle control
You can also find more information on Audi con-
nect
online at www.audi.com.
ZA\ WARNING
—To reduce the risk of an accident, only use
Audi connect services and the Wi-Fi hotspot
only if the traffic situation permits it. Read
and follow the guidelines provided in
= page 20, Traffic safety information.
— It is only safe to use tablets, laptops, mobile
devices and other similar devices when the
vehicle is stationary because, like all loose
objects, they could be thrown around the in-
side of the vehicle in a crash and cause seri-
ous injuries. Store these types of devices se-
curely while driving. Also read the warnings
in the chapter > page 68, General informa-
tion.
@) Note
— Applies to: embedded SIM card usage: The
connection costs for Audi connect Infotain-
ment services are included in the price of
Audi connect Infotainment during the sub-
scription period with some exceptions.
Please note that there may be additional
charges when using some services. For ex-
ample, this applies to online radio/
podcasts, additional online data, or for In-
ternet connections and services that use the
Wi-Fi hotspot, such as online media sour-
ces. Depending on the country, data plans
may need to be purchased for these services
= page 179. For additional information, see
my.audi.com.
— In certain situations, the Wi-Fi hotspot data
connection may be established as a replace-
ment for the SIM card on your Wi-Fi device.
This feature depends on the configuration
174
of your Wi-Fi device and operating system.
This could result in fees depending on your
cell phone service provider, especially if you
are using this feature while abroad. A flat
rate data plan is strongly recommended. For
more information, contact your cell phone
service provider or refer to the owner's man-
ual for your Wi-Fi device.
— You are responsible for all precautions taken
for data protection, anti-virus protection,
and protection against loss of data on mo-
bile devices that are used, for example, to
access the Internet through the Wi-Fi hot-
spot.
— In areas with poor GPS reception or outside
the coverage range of the respective cell
phone service provider, some functions
and/or services may not be available, it may
not be possible to send or receive data, or
functionality may be limited.
@ Tips
— The availability of services depends on the
subscription.
— AUDI AG provides access to services from
third party providers. Permanent availability
cannot be guaranteed, because that de-
pends on the third party provider.
— Use of the most up-to-date mobile network
standard is not available in every country.
Contact an authorized Audi dealer or au-
thorized Audi Service Facility or your cell
phone service provider for additional infor-
mation.
— Availability, scope, providers, screen display,
and costs of services may vary depending on
the country, model, model year, end device
and rates.
Audi connect
Infotainment
Applies to: vehicles with Audi connect Infotainment
With Audi connect Infotainment services, online
information is transmitted directly to the vehicle. >
Page 177 of 310
4K8012721BC
Audi connect
An Internet connection is required to use Audi
connect Infotainment. Depending on the country
and the vehicle equipment, the following options
may be available:
— Embedded SIM card
Z\ WARNING
Always follow the information found in > AA
in General information on page 174.
@) Note
Always follow the information found in >@ in
General information on page 174.
Embedded SIM card
Applies to: vehicles with Audi connect Infotainment and an
embedded SIM card
The data connection for Audi connect Infotain-
ment services is made through an embedded SIM
card (eSIM card) that is installed in the vehicle.
You can use the Audi connect Infotainment serv-
ices immediately.
@) Note
Always follow the information found in >@ in
General information on page 174.
Using a Wi-Fi hotspot
Applies to: vehicles with Wi-Fi hotspot
You can connect up to eight Wi-Fi devices (such
as smartphones) with the MMI Wi-Fi hotspot. If
the MMI is connected to the Internet
=> page 174, the connected Wi-Fi devices can also
use the MMI’s Internet connection.
Requirement: the ignition must be switched on.
> Applies to: MMI: Select on the home screen:
SETTINGS > Connection settings > Wi-Fi
Switch on the Wi-Fi hotspot.
> Applies to: MMI: Select on the home screen:
SETTINGS > Connection settings > Wi-Fi > Wi-
Fi hotspot settings. The access data for the Wi-
Fi hotspot is displayed. Switch on the visibility
of the Wi-Fi hotspot if necessary.
> Switch the Wi-Fi function on in your mobile de-
vice and connect it to the MMI Wi-Fi hotspot
using the authentication data that is shown.
> Follow any additional system prompts on your
Wi-Fi device if necessary.
Your device is successfully connected with the
MMI's Wi-Fi hotspot.
ZA\ WARNING
Always follow the information found in > A\
in General information on page 174.
® Note
Always follow the information found in >@ in
General information on page 174.
G) Tips
For an explanation on conformity with the
FCC regulations in the United States and the
Industry Canada regulations, see > page 289.
Audi connect
Infotainment services
Configuration
Applies to: vehicles with Audi connect Infotainment
Some Audi connect Infotainment services must
be configured through your personal myAudi ac-
count at my.audi.com before using them for the
first time.
@) Tips
— For some Audi connect Infotainment serv-
ices, you may also have to enter your myAu-
di access information when accessing serv-
ices in the MMI.
— Some Audi connect Infotainment services
must be activated at my.audi.com.
— Regardless of the key user and additional
users, you can only connect one myAudi ac-
count to your vehicle.
— Depending on the country, you may be able
to use the myAudi app or my.audi.com.
— For detailed information on configuration,
visit my.audi.com.
175
Page 178 of 310
Audi connect
Applies to: vehicles with Audi connect Infotainment
Depending on the country and the vehicle equip-
ment, the following services may be available:
Weather information
Applies to: MMI
> Press WEATHER on the home screen.
Editing settings: Select: WEATHER > 43.
Adding a location: select: In a new city > enter
the desired location.
> To permanently set weather for a location,
press on a location.
> To always show the weather based on the vehi-
cle position, press on the crosshairs.
Requirement: route guidance must be active.
> To show the weather at the destination, press
on B.
Removing a location: select: Z > one or more lo-
cations or Select all > Delete.
Online news
> Applies to: MMI: Select on the home screen:
NEwWs.
If you logged in to myAudi in your vehicle
= page 30, personalized newsfeeds can be dis-
played.
Access to Twitter
Requirement: you must have connected your ve-
hicle with myAudi > page 30. You must have con-
nected your myAudi account with Twitter.
You can only connect one Twitter account with
your myAudi account. Not all settings can be ad-
justed in the MMI. Some can only be adjusted
through the Twitter website.
> Applies to: MMI: Select on the home screen:
NEWS > GG. Press ona Twitter entry in the list.
Access to the calendar
Requirement: the myAudi app must be installed
and open on your mobile device. Access to your
)) Depends on the country and equipment. These services
are available for a limited time.
176
calendar must be enabled on your mobile device.
You must be logged into the myAudi app with
your myAudi login data and you must have select-
ed your vehicle. The Wi-Fi function on your mo-
bile device and the MMI must be enabled and
your mobile device must be paired to the MMI
Wi-Fi hotspot > page 175.
You can display the your mobile device calendar
on the MMI.
> Applies to: MMI: Select on the home screen:
CALENDAR.
Z\ WarNING
Always follow the information found in > AV
in General information on page 174.
@) Note
Always follow the information found in >@ in
General information on page 174.
Audi connect vehicle
control services
Applies to: vehicles with Audi connect vehicle control
With Audi connect vehicle control services )), you
can utilize various services using the myAudi app
or online at my.audi.com.
ZA WARNING
Always follow the information found in > AV
in General information on page 174.
@) Tips
— Accessing specific data or controlling func-
tions remotely depends on the charge level
of the vehicle battery. Therefore, these
functions only have limited availability after
switching off the ignition.
— An eSIM card establishes the Internet con-
nection for Audi connect vehicle control
services. The costs for this are included in
the price of Audi connect vehicle control
>