infotainment AUDI A7 2020 Owners Manual
[x] Cancel search | Manufacturer: AUDI, Model Year: 2020, Model line: A7, Model: AUDI A7 2020Pages: 310, PDF Size: 81.29 MB
Page 5 of 310
4K8012721BC
Table of contents
Assist systems...................
Assist systems...................
General informationiie: « . cies. ene es
Surrounding area detection............
Switching the systems on and off.......
Driving information..............
Speed warning system..............-.
Camera-based traffic sign recognition...
Traffic light information..............
LEP SEUIME Pins 5 5 sarc % w esenwes 0 0 sxeene 4 6 cece
Night vision assist..............000..
Driver assistance.................
Cruise control system.............0--
EfTClenGyOSSISt saws « « cawe « x caw « « aaw
Adaptive cruise assist................
Distance warning.................0-5
Lane departure warning...............
Audi pressense « swiss se seca « seuve » srevese
Side assist... 0.0... cece eee ee eee
Exit WarKING sees 5 x meus 5 2 eee 5 oe eee es
Intersection assistant................
Emergency assist.............0..0...
Parking and maneuvering.......
TinErOGUGHION s & awames « a saswese « = smossen a w asians
Parking system plus..............0005
Rearview camera and peripheral cameras .
Rear cross=traffieassist. « cnc x nea s «x
Infotainment system............
Telephone)... « - cseswis ss eee oo eave 6 vee
Introduction................ 0.00 eee
Using the Audi phone box.............
Using the telephone..................
M@SSaQ@S ans = : eenu sy eRe ys aeeS so ees
SOttinG Sica sa aus oe seca + warems ¥ wee
Instrument cluster...............000.
Troubleshooting sass ss eee ss ees ss ees
PIC P-COM TE CG occ. 5 5 soseeee 6 5 serie oo eee
Generalinformation.................
Audi connect Infotainment............
Using a Wi-Fi hotspot................
Audi connect Infotainment services.....
Audi connect vehicle control services. ...
SOPGINGS sacs +o aeowens w evewens a x euswoe a» eemeoe 178
Troubleshooting..............2.ee eee 179
Errengenieycalls: « «ec i vais sean s 180
Overview... .. 02... eee eee eee 180
Emergency call «is. .cesess eesu es reese 180
Online roadside assistance............ 181
Navigation................0 eee eee 182
Opening navigation.................. 182
myAudi navigation................04. 182
Entering adestination................ 183
Stopping route guidance.............. 187
Ma picwsns s % suweave a & sumcous ¥ & semeaus wo canes a a ona 188
Personal route assistance............. 190
Alternative routes’. << ses << eee + + verre 190
Additional functions................. 191
Satellite map............... 02 eee 192
Map Update: « eves 2» exaw ¢ » eee cv cea 193
Traffic informationies « ¢ osc +o eee sv ewe 194
Options and settings...............0. 195
Troubleshooting «<< = neces s yews sp es 197
Radio... .... ieee 198
Opening the radio................... 198
Radio functions ses. s ease ss eeen es veo 199
Options and settings................. 203
Troubleshooting............+-eeee eee 204
PS weiicse os aviesse ss aoawous aw sues © oreniKe 205
General information................. 205
SD card reader's = esas < ¢ cows < eae s x Hee 205
DYD:diive « ssc: © 2 sence © o couwoe wo evenene © oe 205
Bluetooth audio player............... 206
Online Media : : eves se sees se eeen te oes 207
AmazoniAlex@ios: « cim «2 en se wns a 2 207
Multimedia connections.............. 208
Playing ti@dia:s ss swe: so agus 5 o eeu ss oe 209
Options and settings...............0. 213
Supported media and file formats...... 215
Troubleshooting ...........0eeceeneee 216
Page 15 of 310
4K8012721BC
Instrument cluster
@) Tips
— The following pages primarily show illustra-
tions of the Audi virtual cockpit*. The ap-
pearance or the location of the items shown
may differ in an analog instrument cluster.
— You can select the units used for tempera-
ture, speed, and other measurements in the
Infotainment system > page 219.
— Speeds are displayed in mph (miles per
hour) or km/h (kilometers per hour).
— If there is a malfunction in the instrument
cluster, DEF will appear in the trip odometer
display. Have the malfunction corrected as
soon as possible.
— Certain instrument cluster content can also
be displayed in the head-up display*
=> page 26.
— Certain settings are stored automatically in
the active personal profile.
— Applies to: vehicles with analog instrument
cluster: When the lights are switched off
and the ignition is switched on, the instru-
ment illumination (needles and gauges) will
switch on. The illumination for the gauges
reduces automatically and eventually turns
off as brightness outside increases. This
function reminds the driver to turn the low
beams on at the appropriate time.
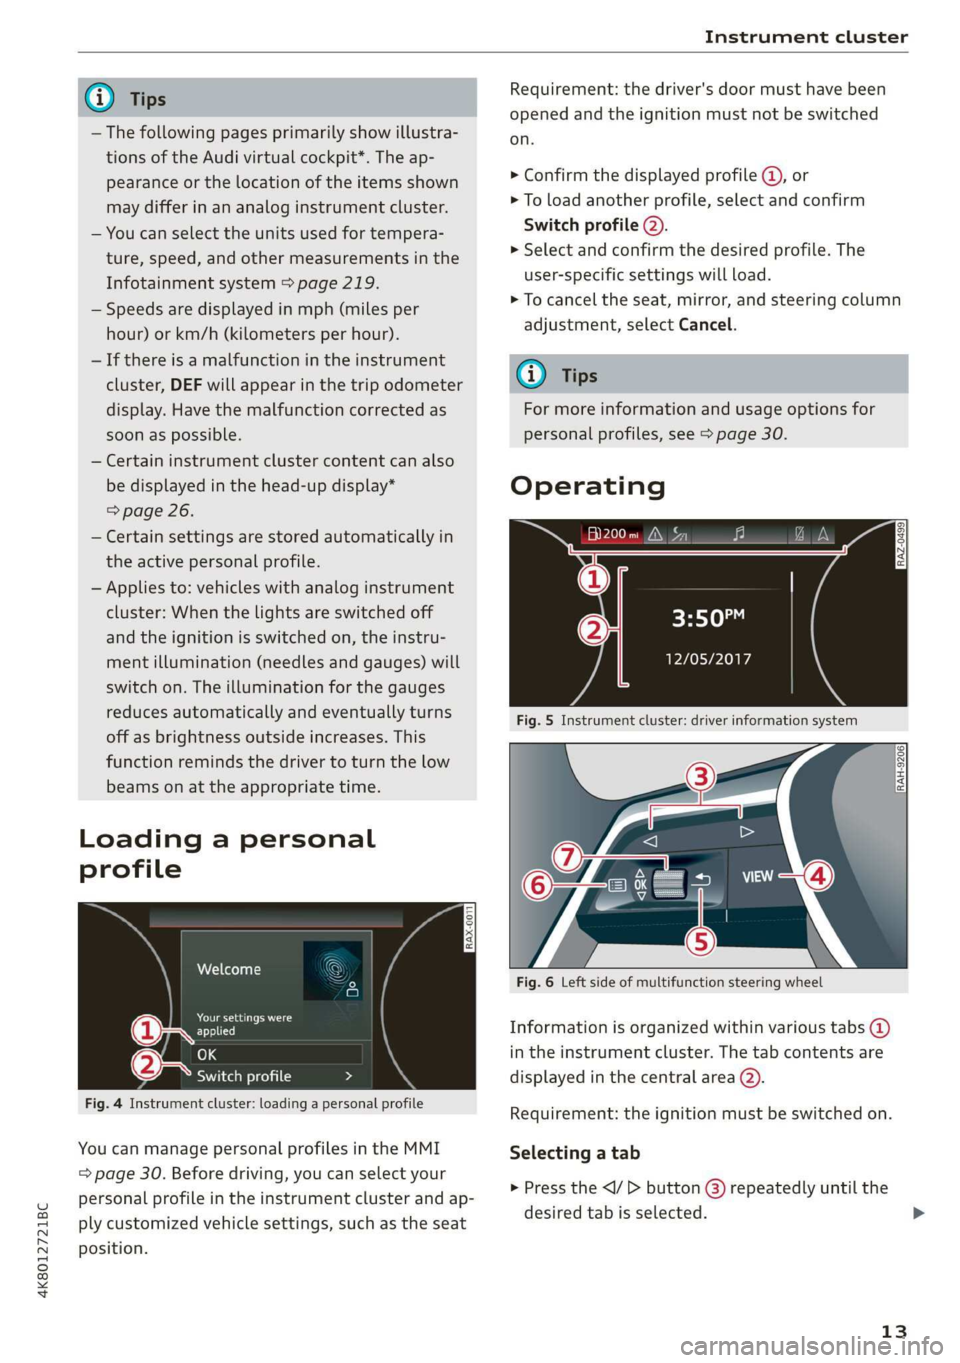
Loading a personal
profile
Welcome
See eI
Elie)
OK
SOT ceam cel ti C=y
Fig. 4 Instrument cluster: loading a personal profile
You can manage personal profiles in the MMI
= page 30. Before driving, you can select your
personal profile in the instrument cluster and ap-
ply customized vehicle settings, such as the seat
position.
Requirement: the driver's door must have been
opened and the ignition must not be switched
on.
> Confirm the displayed profile @, or
> To load another profile, select and confirm
Switch profile (2).
> Select and confirm the desired profile. The
user-specific settings will load.
> To cancel the seat, mirror, and steering column
adjustment, select Cancel.
G) Tips
For more information and usage options for
personal profiles, see > page 30.
Operating
al 3]
ig hea IN iz fa
3:50™
PTL Plh
Fig. 5 Instrument cluster: driver information system
RAH-9206|
Fig. 6 Left side of multifunction steering wheel
Information is organized within various tabs @)
in the instrument cluster. The tab contents are
displayed in the central area (2).
Requirement: the ignition must be switched on.
Selecting a tab
> Press the button () repeatedly until the
desired tab is selected.
13
>
Page 19 of 310

4K8012721BC
Instrument cluster
Average consumption
The current consumption can be shown using a
bar graph. The average consumption stored in
the short-term memory is also displayed. If the
bar is green, your vehicle is saving energy (for ex-
ample, using recuperation).
Energy consumers
The Energy consumers view lists other equip-
ment that is currently affecting fuel consump-
tion. The display shows up to three equipment
items. The equipment using the most power is
listed first. If more than three items using power
are switched on, the equipment that is currently
using the most power is displayed. A gauge also
shows the current total consumption of all other
equipment.
@) Tips
The date, time of day, and time and date for-
mat can be set in the Infotainment system
=> page 219.
17
Page 22 of 310
Touch displays
> If the General button is not displayed, swipe
toward the left or right with one finger until it
appears.
>» Press the General button.
> If the Date & time button is not displayed,
swipe upward or downward with one finger un-
tilit appears.
> Press the Date & time button.
@) Tips
If a menu or symbol is in parentheses in the
path, for example, (General) or (423), then it is
an optional menu item that does not need to
be used in every system.
You can adjust or turn off the MMI touch display
feedback.
> Applies to MMI: Select on the home screen:
SETTINGS > Display & brightness > MMI.
Possible settings:
— Brightness
— Touchscreen Feedback
Multi Media Interface
Airlie lia acoder)
Audi recommends performing certain Infotain-
ment system functions, such as entering a desti-
nation, only when the vehicle is stationary. Al-
ways be prepared to stop operating the Infotain-
ment system in the interest of your safety and
the safety of other road users.
ZA\ WARNING
Only use the Infotainment system when road,
traffic, weather, and visibility conditions per-
mit and always in a way that allows you to
maintain complete control over your vehicle.
@ Tips
Certain functions are not available while driv-
ing.
20
Wine mela mel mela
Switching the MMI on or off
> To switch the MMI off, press and hold the
On/Off knob > page 29, fig. 21 until the up-
per display and all Infotainment system func-
tions are switched off.
> To switch the MMI on, press the On/Off knob.
Restarting the MMI
>» Press and hold the On/Off knob for at least 10
seconds.
Switching displays on or off
> To switch the upper display off, press [Jon the
lower display.
> To switch the upper display on, touch the upper
display or press [Jon the lower display.
> To switch both displays on or off, press and hold
Co] on the lower display.
Introduction
You can display and operate Infotainment system
and vehicle functions using both of the Multi Me-
dia Interface (MMI) touch displays.
Configuration wizard
After starting for the first time, the configuration
wizard helps you to set up the vehicle, for exam-
ple to set the desired system language and con-
nect a telephone.
> Follow the instructions in the display.
> Applies to: MMI: To access the configuration
wizard at a later time, select on the home
screen: HELP > Configuration wizard.
Tool tips
Tool tips are displayed on the upper display after
starting for the first time. They introduce various
MMI functions to you.
> Follow the instructions in the display.
> Applies to: MMI: To access the tool tips at a lat-
er time, select on the home screen: SETTINGS
> Help > Show tool tips.
> Applies to: MMI: To receive additional tool tips,
select on the home screen: HELP > Tool tips >
Basic information or Expert information.
Page 28 of 310
Head-up display
Head-up display
Description
Applies to: vehicles with head-up display
The head-up display projects certain warnings or
selected information from the assist systems on
the windshield. The display appears within the
driver's field of vision.
Switching on and off
The Y button is located in the function bar on
the lower display > page 21.
> To switch the head-up display on or off, press
and hold the Y button.
Settings in the Infotainment system
> Applies to: MMI: Select on the home screen:
SETTINGS > Display & brightness > Head-up
display, or
> Press the Y button.
Possible settings:
— Picture rotation
— Brightness
— Display height: you can adjust the height of the
display. Sit in the correct seating position
=> page 59 and adjust the head-up display.
— Display contents: you can set which informa-
tion should be displayed. The display of certain
information and some of the red indicator
lights cannot be hidden.
® Note
To reduce the risk of scratches on the glass
covering the head-up display, do not place any
objects in the projection opening.
@ Tips
— Sunglasses with polarization filters and un-
favorable lighting conditions can impair visi-
bility of the display.
— An optimal display depends on the seat po-
sition and the height adjustment of the
head-up display.
—A special windshield is needed for the head-
up display function.
26
— For information on cleaning, see > table In-
terior cleaning on page 263.
— Certain settings are stored automatically in
the active personal profile.
Page 32 of 310
Personalization
Personalization
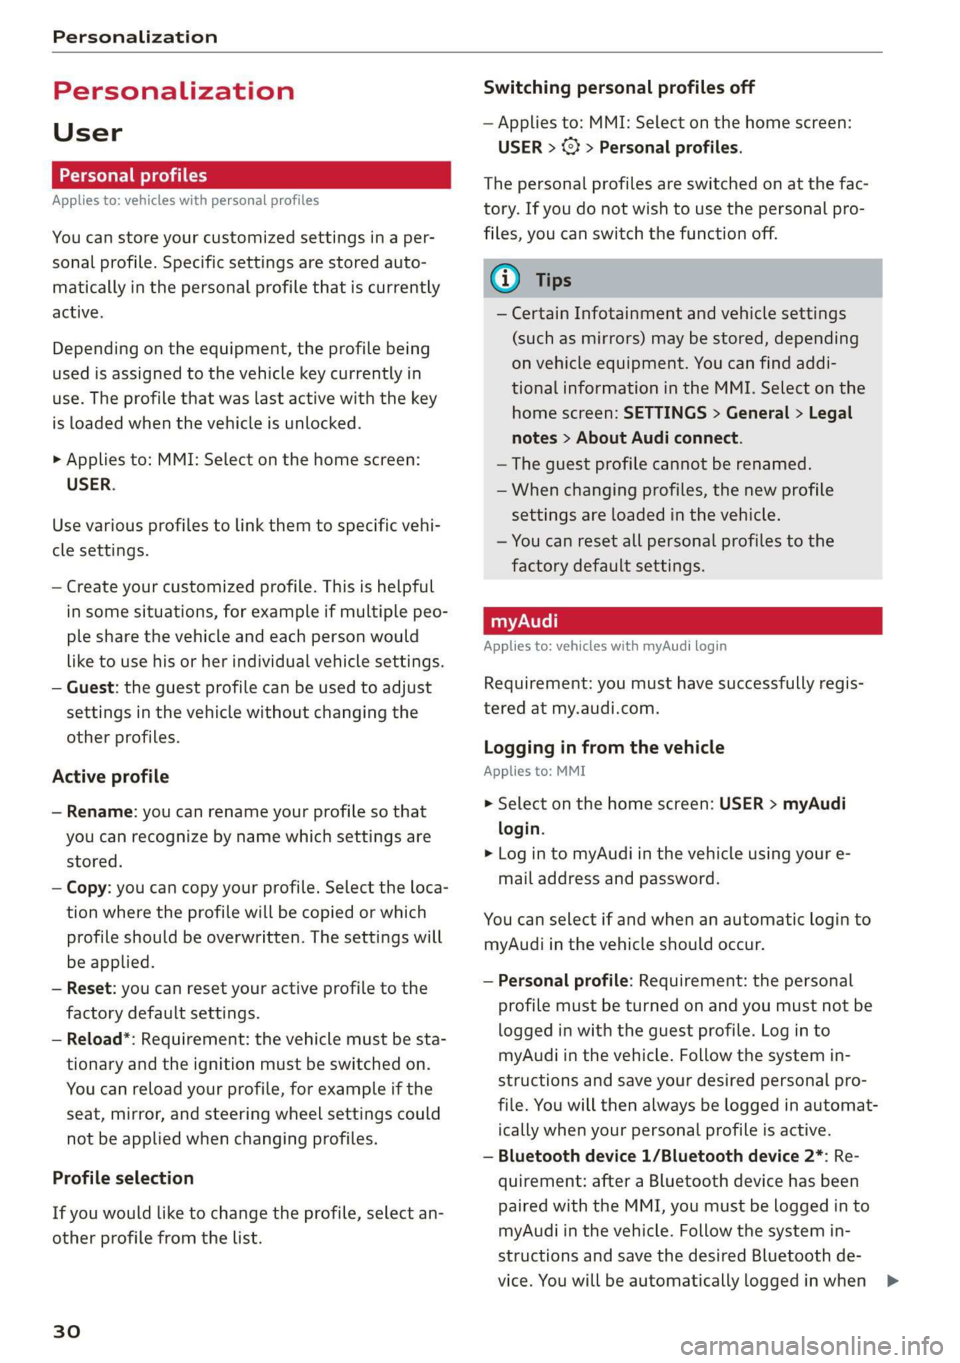
User
oeCC le Ky
Applies to: vehicles with personal profiles
You can store your customized settings in a per-
sonal profile. Specific settings are stored auto-
matically in the personal profile that is currently
active.
Depending on the equipment, the profile being
used is assigned to the vehicle key currently in
use. The profile that was last active with the key
is loaded when the vehicle is unlocked.
> Applies to: MMI: Select on the home screen:
USER.
Use various profiles to link them to specific vehi-
cle settings.
— Create your customized profile. This is helpful
in some situations, for example if multiple peo-
ple share the vehicle and each person would
like to use his or her individual vehicle settings.
— Guest: the guest profile can be used to adjust
settings in the vehicle without changing the
other profiles.
Active profile
— Rename: you can rename your profile so that
you can recognize by name which settings are
stored.
— Copy: you can copy your profile. Select the loca-
tion where the profile will be copied or which
profile should be overwritten. The settings will
be applied.
— Reset: you can reset your active profile to the
factory default settings.
— Reload*: Requirement: the vehicle must be sta-
tionary and the ignition must be switched on.
You can reload your profile, for example if the
seat, mirror, and steering wheel settings could
not be applied when changing profiles.
Profile selection
If you would like to change the profile, select an-
other profile from the list.
30
Switching personal profiles off
— Applies to: MMI: Select on the home screen:
USER > © > Personal profiles.
The personal profiles are switched on at the fac-
tory. If you do not wish to use the personal pro-
files, you can switch the function off.
G) Tips
— Certain Infotainment and vehicle settings
(such as mirrors) may be stored, depending
on vehicle equipment. You can find addi-
tional information in the MMI. Select on the
home screen: SETTINGS > General > Legal
notes > About Audi connect.
—The guest profile cannot be renamed.
— When changing profiles, the new profile
settings are loaded in the vehicle.
— You can reset all personal profiles to the
factory default settings.
Applies to: vehicles with myAudi login
Requirement: you must have successfully regis-
tered at my.audi.com.
Logging in from the vehicle
Applies to: MMI
> Select on the home screen: USER > myAudi
login.
> Log in to myAudi in the vehicle using your e-
mail address and password.
You can select if and when an automatic login to
myAudi in the vehicle should occur.
— Personal profile: Requirement: the personal
profile must be turned on and you must not be
logged in with the guest profile. Log in to
myAudi in the vehicle. Follow the system in-
structions and save your desired personal pro-
file. You will then always be logged in automat-
ically when your personal profile is active.
— Bluetooth device 1/Bluetooth device 2*: Re-
quirement: after a Bluetooth device has been
paired with the MMI, you must be logged in to
myAudi in the vehicle. Follow the system in-
structions and save the desired Bluetooth de-
vice. You will be automatically logged in when >
Page 33 of 310
4K8012721BC
Personalization
your Bluetooth device is connected to the MMI,
and automatically logged out when the Blue-
tooth connection to your mobile device is dis-
connected.
To transfer existing destinations from the MMI to
your myAudi account one time, confirm the sys-
tem prompts with Yes.
G) Tips
— For some Audi connect Infotainment serv-
ices, you may also have to enter your myAu-
di access information when accessing serv-
ices in the MMI.
— Regardless of the key user and additional
users, you can only connect one myAudi ac-
count to your vehicle.
User management
Applies to: vehicles with user management
The vehicle owner must be set up as the key user
for some Audi connect vehicle control services,
which depend on the vehicle equipment.
Setting the key user
Requirement: a key user must not be set yet.
> To set a key user for the vehicle, you will need a
myAudi account. Register at my.audi.com.
> Add your vehicle at my.audi.com and then veri-
fy your myAudi account using the verification
process that is provided.
> Applies to MMI: Select on the home screen:
USER > User management > (Key user) > Set
key user.
> Applies to: MMI: Follow the system instructions
and enter the 10-digit vehicle code > page 36.
The key user is set. You have the rights to use
the
Audi connect vehicle control services
= page 176 that depend on vehicle equipment
as well as the ability to manage other vehicle
functions and any other users.
Managing additional users
Depending on the vehicle equipment, you can
grant authorization for additional users to use
Audi connect vehicle control services at my.audi.
com.
Removing the key user
If you remove the key user, all other users and
their authorizations will be deleted. It will no
longer be possible to use the Audi connect vehi-
cle control services, depending on the vehicle
equipment.
Requirement: a key user must be set.
> Applies to: MMI: Select on the home screen:
USER > User management > (Key user) > Re-
move key user.
@) Tips
— Depending on the country, you may be able
to use the myAudi app or my.audi.com.
— Depending on the vehicle equipment, you
may be able to reset specific functions to
the factory default settings.
— Depending on the vehicle equipment, log-
ging into myAudi in the vehicle may not be
required to use Audi connect vehicle control
services.
— If you sell your vehicle, remove the key user
and reset all settings to the factory set-
tings.
— Store the vehicle code in a secure place. It
may be necessary to re-enter the vehicle
code.
— Pay attention to upper- and lower-case let-
ters when entering the vehicle code.
— If you do not have the 10-digit vehicle code,
contact an authorized Audi dealer or author-
ized Audi Service Facility.
31
Page 153 of 310

4K8012721BC
Driver assistance
as well as the vehicle's surroundings with di-
rect eye contact.
— The system may not react if vehicles are ap-
proaching very fast.
@ Tips
For an explanation on conformity with the
FCC regulations in the United States and the
Industry Canada regulations, see > page 289.
Emergency assist
Applies to: vehicles with emergency assist
General information
Within the limits of the system, the emergency
assist detects if the driver is inactive. In these in-
stances, the system warns the driver, assumes
control of the vehicle if necessary, and brings the
vehicle automatically to a stop in the lane.
Regardless of the speed, the emergency assist is
automatically available when the adaptive cruise
assist* is activated. When the adaptive cruise as-
sist* is deactivated, the system is only active at
speeds higher than approximately 40 mph
(65 km/h).
Emergency assist functions
Within the limits of the system, the emergency
assist monitors the driver’s steering, accelerator,
and brake pedal activity. Depending on the se-
verity of the situation, it may initiate visual, au-
dio, and haptic warnings in stages:
— Reduces the speed
— Messages
— Lowers the volume of the Infotainment system
— Audible warning
— Tightening of the safety belt
—A brief application of the brakes
D_ This function is not available in every market and on all ve-
hicle equipment levels.
If the driver remains inactive despite the warn-
ings, the emergency assist controls the vehicle
within the limits of the system:
— The Audi pre sense preemptive safety measures
are triggered > page 143.
— The vehicle will stay in the lane and will be
braked to a stop.
— As soon as the vehicle comes to a full stop, the
emergency flashers are activated and the vehi-
cle prepares for the vehicle passengers to be
rescued. The parking brake is set, “P” gear is
engaged, the doors are unlocked, and the inte-
rior lighting is activated. If there is no move-
ment for several seconds, the emergency call ))
will be made if necessary.
Overriding the emergency assist
You can override the emergency assist > A\:
— Move the steering wheel. Or
— Press the brake pedal. Or
— Press the accelerator pedal distinctly.
When stationary, you can end the emergency as-
sist by leaving the "P" position or releasing the
parking brake > page 101.
Switching the emergency assist on and off
The system can be switched on and off in the
MMI & page 118.
Messages
If Bor s displayed when there is a malfunc-
tion, the emergency assist functions may be un-
available or may be limited.
A message that indicates the cause and possible
solution may appear with some displays. The
weather conditions may be too poor or a sensor
may be covered. Clean the area in front of the
sensors > page 117 and try to turn on the sys-
tems again later.
If the malfunction remains, drive to an author-
ized Audi dealer or authorized Audi Service Facili-
ty immediately to have the malfunction correct-
ed.
151
>
Page 176 of 310
Audi connect
Audi connect
General information
Depending on the country and the vehicle equip-
ment, the following functions may be available:
— Audi connect Infotainment
— Audi connect vehicle control
You can also find more information on Audi con-
nect
online at www.audi.com.
ZA\ WARNING
—To reduce the risk of an accident, only use
Audi connect services and the Wi-Fi hotspot
only if the traffic situation permits it. Read
and follow the guidelines provided in
= page 20, Traffic safety information.
— It is only safe to use tablets, laptops, mobile
devices and other similar devices when the
vehicle is stationary because, like all loose
objects, they could be thrown around the in-
side of the vehicle in a crash and cause seri-
ous injuries. Store these types of devices se-
curely while driving. Also read the warnings
in the chapter > page 68, General informa-
tion.
@) Note
— Applies to: embedded SIM card usage: The
connection costs for Audi connect Infotain-
ment services are included in the price of
Audi connect Infotainment during the sub-
scription period with some exceptions.
Please note that there may be additional
charges when using some services. For ex-
ample, this applies to online radio/
podcasts, additional online data, or for In-
ternet connections and services that use the
Wi-Fi hotspot, such as online media sour-
ces. Depending on the country, data plans
may need to be purchased for these services
= page 179. For additional information, see
my.audi.com.
— In certain situations, the Wi-Fi hotspot data
connection may be established as a replace-
ment for the SIM card on your Wi-Fi device.
This feature depends on the configuration
174
of your Wi-Fi device and operating system.
This could result in fees depending on your
cell phone service provider, especially if you
are using this feature while abroad. A flat
rate data plan is strongly recommended. For
more information, contact your cell phone
service provider or refer to the owner's man-
ual for your Wi-Fi device.
— You are responsible for all precautions taken
for data protection, anti-virus protection,
and protection against loss of data on mo-
bile devices that are used, for example, to
access the Internet through the Wi-Fi hot-
spot.
— In areas with poor GPS reception or outside
the coverage range of the respective cell
phone service provider, some functions
and/or services may not be available, it may
not be possible to send or receive data, or
functionality may be limited.
@ Tips
— The availability of services depends on the
subscription.
— AUDI AG provides access to services from
third party providers. Permanent availability
cannot be guaranteed, because that de-
pends on the third party provider.
— Use of the most up-to-date mobile network
standard is not available in every country.
Contact an authorized Audi dealer or au-
thorized Audi Service Facility or your cell
phone service provider for additional infor-
mation.
— Availability, scope, providers, screen display,
and costs of services may vary depending on
the country, model, model year, end device
and rates.
Audi connect
Infotainment
Applies to: vehicles with Audi connect Infotainment
With Audi connect Infotainment services, online
information is transmitted directly to the vehicle. >
Page 177 of 310
4K8012721BC
Audi connect
An Internet connection is required to use Audi
connect Infotainment. Depending on the country
and the vehicle equipment, the following options
may be available:
— Embedded SIM card
Z\ WARNING
Always follow the information found in > AA
in General information on page 174.
@) Note
Always follow the information found in >@ in
General information on page 174.
Embedded SIM card
Applies to: vehicles with Audi connect Infotainment and an
embedded SIM card
The data connection for Audi connect Infotain-
ment services is made through an embedded SIM
card (eSIM card) that is installed in the vehicle.
You can use the Audi connect Infotainment serv-
ices immediately.
@) Note
Always follow the information found in >@ in
General information on page 174.
Using a Wi-Fi hotspot
Applies to: vehicles with Wi-Fi hotspot
You can connect up to eight Wi-Fi devices (such
as smartphones) with the MMI Wi-Fi hotspot. If
the MMI is connected to the Internet
=> page 174, the connected Wi-Fi devices can also
use the MMI’s Internet connection.
Requirement: the ignition must be switched on.
> Applies to: MMI: Select on the home screen:
SETTINGS > Connection settings > Wi-Fi
Switch on the Wi-Fi hotspot.
> Applies to: MMI: Select on the home screen:
SETTINGS > Connection settings > Wi-Fi > Wi-
Fi hotspot settings. The access data for the Wi-
Fi hotspot is displayed. Switch on the visibility
of the Wi-Fi hotspot if necessary.
> Switch the Wi-Fi function on in your mobile de-
vice and connect it to the MMI Wi-Fi hotspot
using the authentication data that is shown.
> Follow any additional system prompts on your
Wi-Fi device if necessary.
Your device is successfully connected with the
MMI's Wi-Fi hotspot.
ZA\ WARNING
Always follow the information found in > A\
in General information on page 174.
® Note
Always follow the information found in >@ in
General information on page 174.
G) Tips
For an explanation on conformity with the
FCC regulations in the United States and the
Industry Canada regulations, see > page 289.
Audi connect
Infotainment services
Configuration
Applies to: vehicles with Audi connect Infotainment
Some Audi connect Infotainment services must
be configured through your personal myAudi ac-
count at my.audi.com before using them for the
first time.
@) Tips
— For some Audi connect Infotainment serv-
ices, you may also have to enter your myAu-
di access information when accessing serv-
ices in the MMI.
— Some Audi connect Infotainment services
must be activated at my.audi.com.
— Regardless of the key user and additional
users, you can only connect one myAudi ac-
count to your vehicle.
— Depending on the country, you may be able
to use the myAudi app or my.audi.com.
— For detailed information on configuration,
visit my.audi.com.
175