warning lights AUDI A7 2020 Owners Manual
[x] Cancel search | Manufacturer: AUDI, Model Year: 2020, Model line: A7, Model: AUDI A7 2020Pages: 310, PDF Size: 81.29 MB
Page 9 of 310
4K8012721BC
Quick access
— Vehicle key holder
@_ Depending on equipment:
— Starting the engine when there is
@ MalfUNGHON, « s cess oc worms « vase 91
— Audi musicinterface .......... 208
— Audi phone box ............... 163
HSDicardireader’ « « swesiis sv canes ¥ ave 205
@9 Electromechanical parking brake
BUtEON sssccws oa aves 0 x wasnt x x secu Y 101
@) Automatic transmission selector
LOVER arcane oo cevenes man comme ow eens oe 92
@ START ENGINE STOP} button .... 90
@3) Steering wheel adjustment ...... 63
@4 Lever for:
— Cruise control system ......... 127
— Adaptive cruise assist .......... 131
@5) Data link connector for On Board
Diagnostic System (OBD) ........ 282
@8 Buttons for:
-Lights ...............2..000. 48
—All-weather lights ............ 48
—Rear fog lights ............... 48
@) Hood release ...........0...0.. 229
Button for:
— Luggage compartment lid ...... 39
@9) Exterior mirror adjustment ...... 53
69 Buttons for:
— Power windows .............. 42
—Child safety lock .............. 42
@) Tips
Some the equipment listed here is only instal-
led in certain models or is available as an op-
tion.
Indicator lights overview
The indicator lights in the instrument cluster
blink or turn on. They indicate functions or mal-
functions.
With some indicator lights, messages may ap-
pear and warning signals may sound. The indica-
tor lights and messages may be covered by other
displays. To show them again, select the second
tab for messages with the multifunction steering
wheel > page 13.
Some indicator lights in the display can display in
several colors.
OMe ella Lins
If the AN or A indicator light turns on, check
the message in the instrument cluster.
Some indicator lights turn on briefly as a function
check when you switch the ignition on. These sys-
tems are marked with a V in the following tables.
If one of these indicator lights does not turn on,
there is a malfunction in that system.
The following indicator lights may be available,
depending on the vehicle equipment:
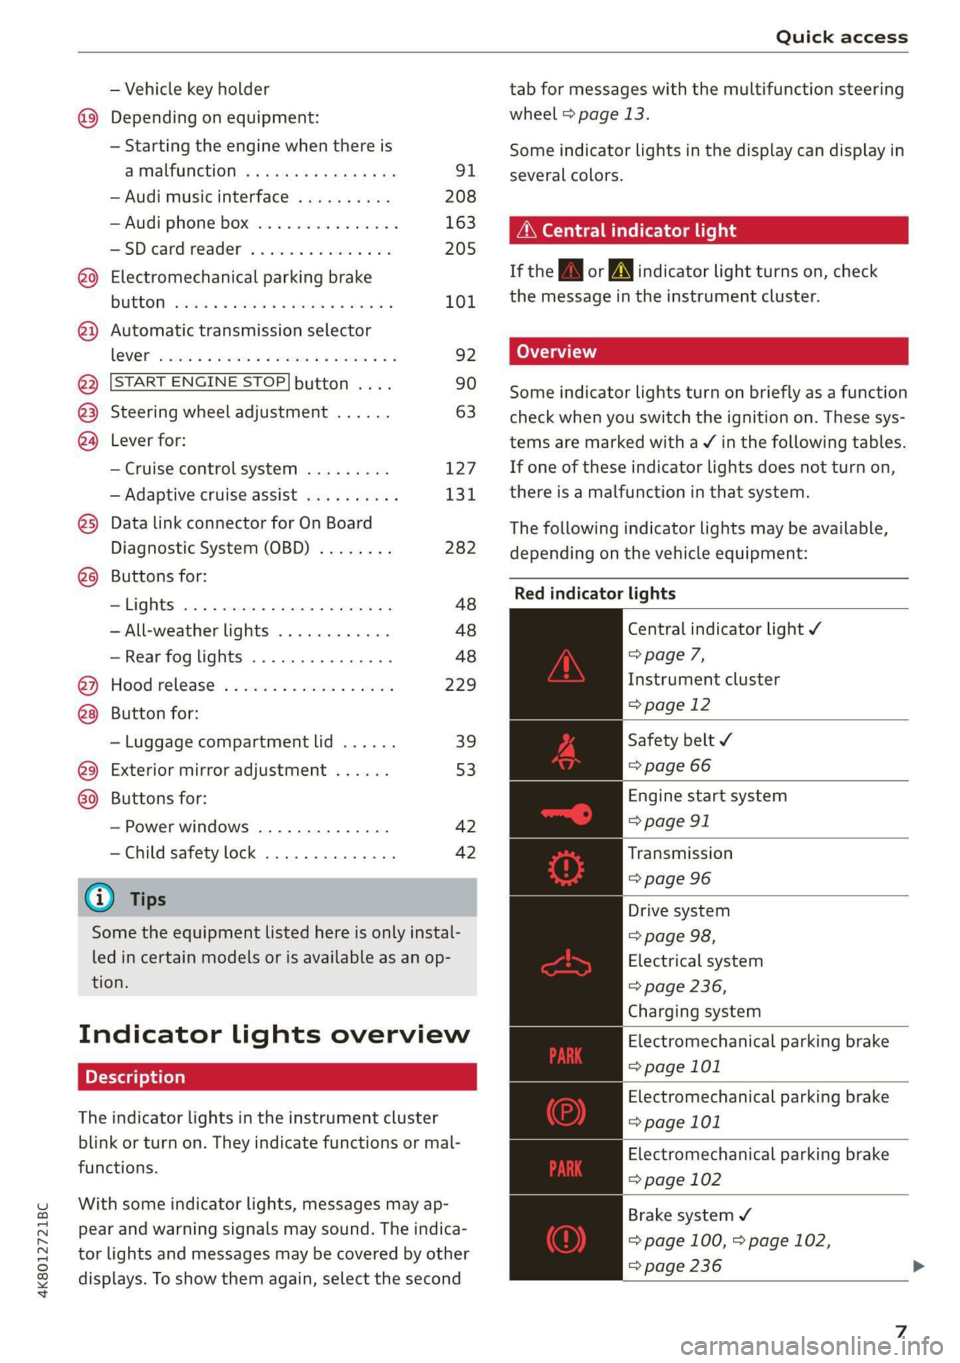
Red indicator lights
Central indicator light ¥
> page 7,
Instrument cluster
=> page 12
Safety belt ¥
=> page 66
Engine start system
=> page 91
Transmission
=> page 96
Drive system
=> page 98,
Electrical system
=> page 236,
Charging system
Electromechanical parking brake
=> page 101
Electromechanical parking brake
=> page 101
Electromechanical parking brake
=> page 102
Brake system ¥
= page 100, > page 102,
=> page 236
Page 10 of 310
Quick access
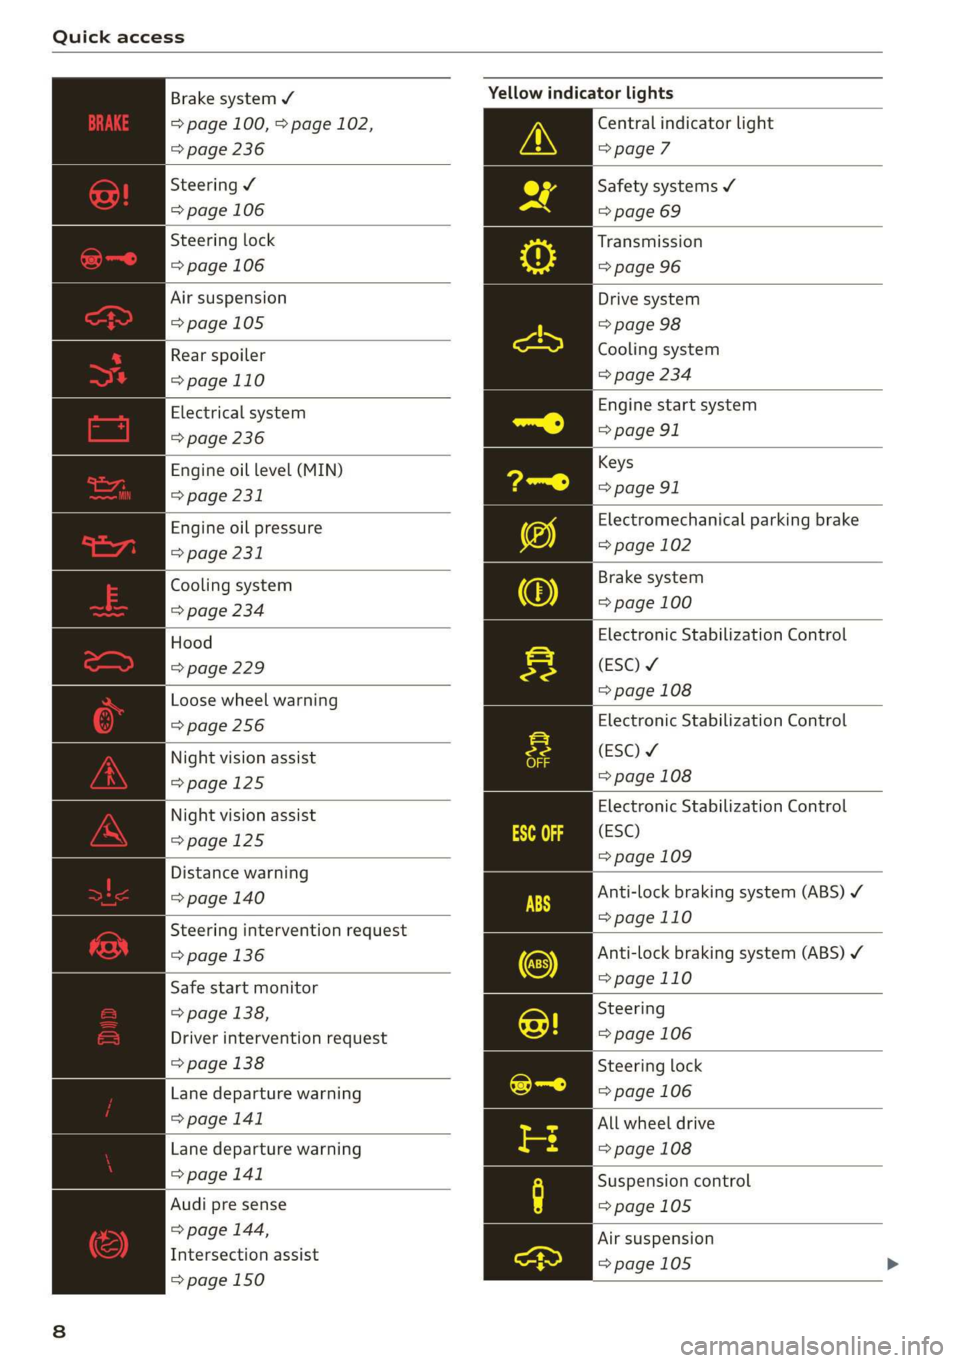
Brake system ¥
=> page 100, > page 102,
=> page 236
Steering ¥
=> page 106
Steering lock
=> page 106
Air suspension
=> page 105
Rear spoiler
=>page 110
Electrical system
=> page 236
Engine oil level (MIN)
=> page 231
Engine oil pressure
=> page 231
Cooling system
=> page 234
Hood
=> page 229
Loose wheel warning
=> page 256
Night vision assist
=>page 125
Night vision assist
=>page 125
Distance warning
=> page 140
Steering intervention request
=> page 136
Safe start monitor
=> page 138,
Driver intervention request
=> page 138
Lane departure warning
> page 141
Lane departure warning
=> page 141
Audi pre sense
=> page 144,
Intersection assist
=> page 150
Yellow indicator lights
Central indicator light
=> page 7
Safety systems ¥
=> page 69
Transmission
=> page 96
Drive system
= page 98
Cooling system
=> page 234
Engine start system
=> page 91
Keys
=> page 91
Electromechanical parking brake
=> page 102
Brake system
= page 100
Electronic Stabilization Control
(ESC) ¥
=> page 108
Electronic Stabilization Control
(ESC) ¥
=> page 108
Electronic Stabilization Control
(ESC)
=> page 109
Anti-lock braking system (ABS) ¥
=>page 110
Anti-lock braking system (ABS) ¥
=>page 110
Steering
=> page 106
Steering lock
=> page 106
All wheel drive
=> page 108
Suspension control
=>page 105
Air suspension
=>page 105
Page 11 of 310
4K8012721BC
Quick access
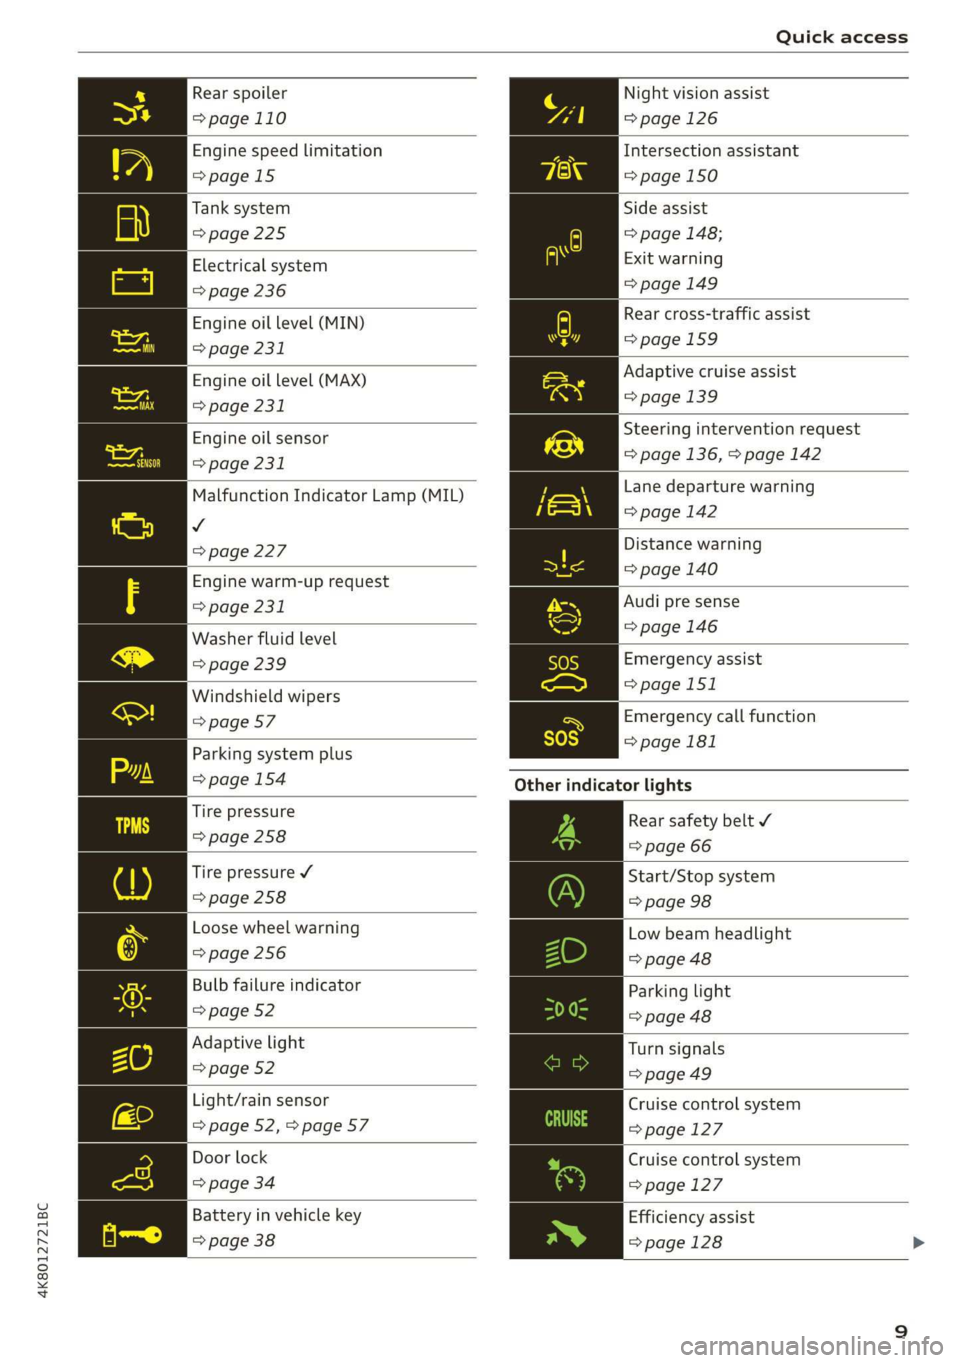
Rear spoiler
=>page 110
Engine speed limitation
>page 15
Tank system
=>page 225
Electrical system
=> page 236
Engine oil level (MIN)
=> page 231
Engine oil level (MAX)
> page 231
Engine oil sensor
=> page 231
Malfunction Indicator Lamp (MIL)
v
=>page 227
Engine warm-up request
=> page 231
Washer fluid level
=> page 239
Windshield wipers
=> page 57
Parking system plus
=> page 154
Tire pressure
=> page 258
Tire pressure ¥
> page 258
Loose wheel warning
=> page 256
Bulb failure indicator
=> page 52
Adaptive light
=> page 52
Light/rain sensor
=> page 52, > page 57
Door lock
> page 34
Battery in vehicle key
> page 38
Night vision assist
=> page 126
Intersection assistant
=> page 150
Side assist
=> page 148;
Exit warning
=> page 149
Rear cross-traffic assist
=>page 159
Adaptive cruise assist
=>page 139
Steering intervention request
=> page 136, > page 142
Lane departure warning
=> page 142
Distance warning
=> page 140
Audi pre sense
=>page 146
Emergency assist
=>page 151
Emergency call function
=> page 181
Other indicator lights
Rear safety belt ¥
=> page 66
Start/Stop system
=> page 98
Low beam headlight
=> page 48
Parking light
=> page 48
Turn signals
=> page 49
Cruise control system
=>page
127
Cruise control system
=>page
127
Efficiency assist
=>page 128
Page 12 of 310
Quick access
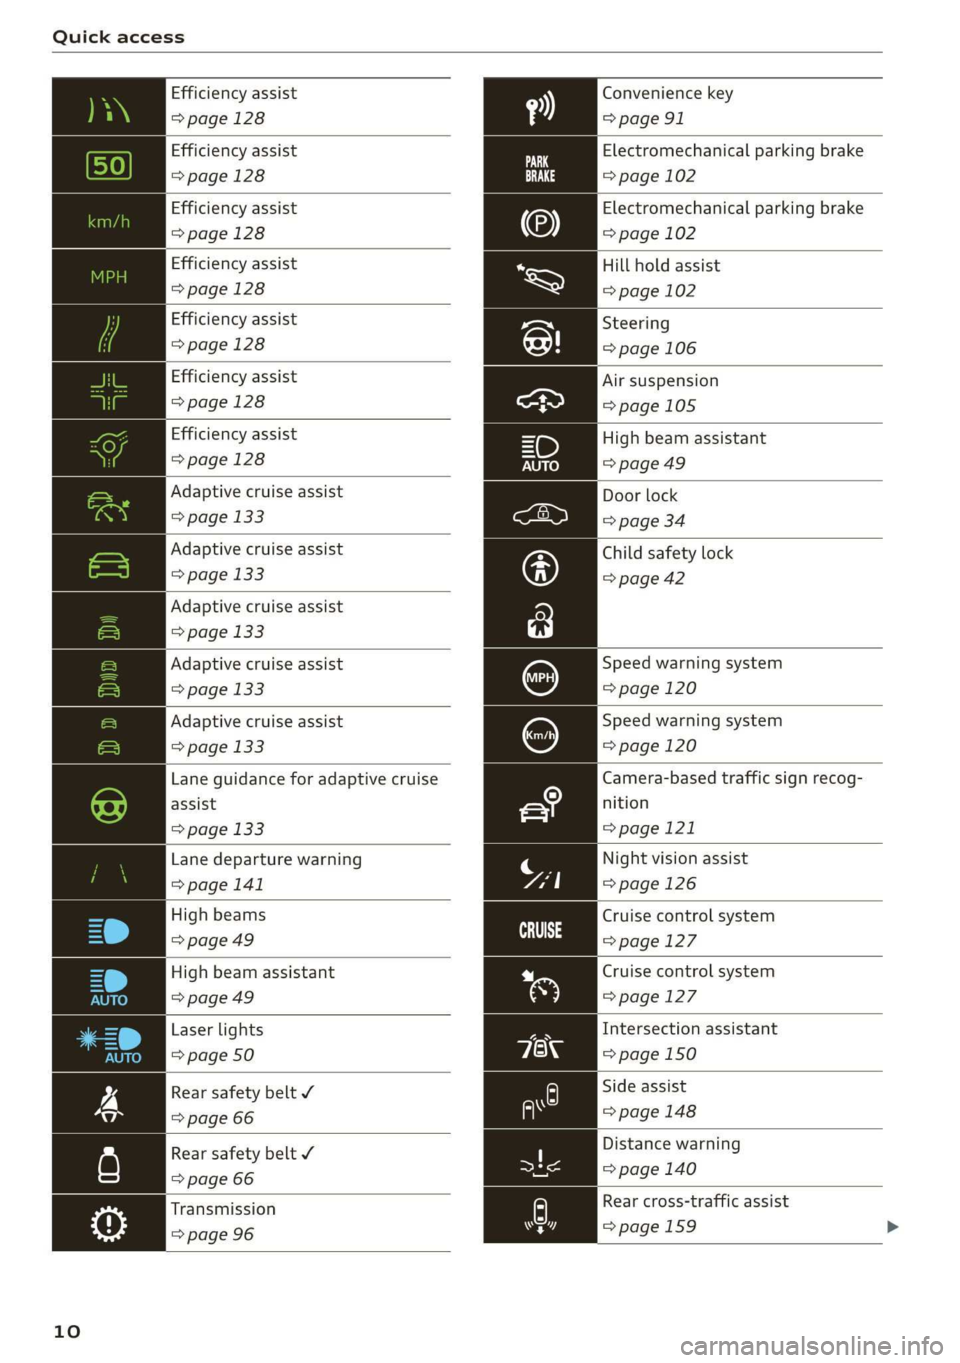
Efficiency assist
=>page 128
Efficiency assist
> page 128
Efficiency assist
=>page 128
Efficiency assist
> page 128
Efficiency assist
> page 128
Efficiency assist
>page 128
Adaptive cruise assist
=> page 133
Adaptive cruise assist
> page 133
Adaptive cruise assist
=> page 133
Adaptive cruise assist
=> page 133
Lane guidance for adaptive cruise
assist
=> page 133
Lane departure warning
=> page 141
High beams
> page 49
High beam assistant
=> page 49
Laser lights
=> page 50
Rear safety belt
=> page 66
Rear safety belt ¥
=> page 66
10
Efficiency assist
> page 128
Adaptive cruise assist
> page 133
Convenience key
=> page 91
Electromechanical parking brake
=> page 102
Electromechanical parking brake
=> page 102
Hill hold assist
=> page 102
Steering
=> page 106
Air suspension
=>page 105
High beam assistant
=> page 49
Door lock
=> page 34
Child safety lock
=> page 42
Speed warning system
=> page 120
Speed warning system
=> page 120
Camera-based traffic sign recog-
nition
=> page 121
Night vision assist
=> page 126
Cruise control system
CS age 127
Cruise control system
=>page 127
Intersection assistant
=> page 150
Side assist
> page 148
Distance warning
=> page 140
A) Rear cross-traffic assist
rsd => page 159
Page 17 of 310

4K8012721BC
Instrument cluster
turn on. If the E| indicator light in the instru-
ment cluster display turns on, the coolant tem-
perature is too high > page 234.
@ Note
— Auxiliary headlights and other accessories in
front of the air intake impair the cooling ef-
fect of the coolant. This increases the risk of
the engine overheating during high outside
temperatures and heavy engine load.
— The front spoiler also helps to distribute
cooling air correctly while driving. If the
spoiler is damaged, the cooling effect will
be impaired and the risk of the engine over-
heating will increase. See an authorized
Audi dealer or authorized Audi Service Fa-
cility for assistance.
Tachometer
The tachometer (@) 9 page 12 displays the engine
speed in revolutions per minute (RPM). The be-
ginning of the red zone in the tachometer indi-
cates the maximum permissible engine speed for
all gears once the engine has been broken in. Be-
fore reaching the red zone, you should shift into
the next higher gear, select the "D" or "S" selec-
tor lever position, or remove your foot from the
accelerator pedal.
Engine speed limitation
If the By indicator light turns on, the engine will
be automatically limited to the RPM displayed in
the instrument cluster. This will protect the en-
gine components, for example during a cold start
or from overheating.
The engine speed limitation will be deactivated
once the engine has reached its normal operating
temperature and you have released the accelera-
tor pedal.
If the engine speed limitation was activated by
an engine control malfunction, the B indicator
light also turns on. Make sure the engine speed
does not go above the speed displayed, for exam-
ple when downshifting. Drive to an authorized
Audi dealer or authorized Audi Service Facility im-
mediately to have the malfunction corrected.
CG) Note
The needle in the tachometer may only be in
the red area of the gauge for a short period of
time before there is a risk of damaging the
engine. The location where the red zone be-
gins varies depending on the engine.
Odometer
The trip odometer and odometer are displayed in
the status line ©) > page 12.
The trip odometer shows the distance driven
since it was last reset. It can be used to measure
short distances. The odometer shows the total
distance that the vehicle has been driven.
Resetting the trip odometer
> Select on the instrument cluster: vehicle func-
tions tab > EJ button > Reset mi.
(i) Tips
Distances are displayed in mi (miles) or km
(kilometers).
Outside temperature
display
The outside temperature is displayed in the sta-
tus line ©) > page 12.
If your vehicle is stationary or if you are driving at
very low speeds, the temperature displayed in
the instrument cluster may be slightly higher
than the actual temperature outside due to heat
radiating from the engine.
At temperatures below 41 °F (+5 °C), a snowflake
symbol appears in front of the temperature dis-
play > A.
Z\ WARNING
Do not assume the roads are free of ice based
on the outside temperature display. Be aware
that there may be ice on roads even when the
outside temperature is around 41 °F (+5 °C)
and that ice can increase the risk of accidents.
15
Page 28 of 310
Head-up display
Head-up display
Description
Applies to: vehicles with head-up display
The head-up display projects certain warnings or
selected information from the assist systems on
the windshield. The display appears within the
driver's field of vision.
Switching on and off
The Y button is located in the function bar on
the lower display > page 21.
> To switch the head-up display on or off, press
and hold the Y button.
Settings in the Infotainment system
> Applies to: MMI: Select on the home screen:
SETTINGS > Display & brightness > Head-up
display, or
> Press the Y button.
Possible settings:
— Picture rotation
— Brightness
— Display height: you can adjust the height of the
display. Sit in the correct seating position
=> page 59 and adjust the head-up display.
— Display contents: you can set which informa-
tion should be displayed. The display of certain
information and some of the red indicator
lights cannot be hidden.
® Note
To reduce the risk of scratches on the glass
covering the head-up display, do not place any
objects in the projection opening.
@ Tips
— Sunglasses with polarization filters and un-
favorable lighting conditions can impair visi-
bility of the display.
— An optimal display depends on the seat po-
sition and the height adjustment of the
head-up display.
—A special windshield is needed for the head-
up display function.
26
— For information on cleaning, see > table In-
terior cleaning on page 263.
— Certain settings are stored automatically in
the active personal profile.
Page 29 of 310
4K8012721BC
Voice recognition system
Voice recognition system
General information
Applies to: vehicles with voice recognition system
You can operate many functions in the vehicle
easily using voice commands.
Using the voice recognition system optimally
> Speak clearly and distinctly at a normal volume.
Speak louder when driving faster.
» Emphasize the words in the commands evenly
and do not leave long pauses.
> Close the doors, the windows, and the sunroof*
to reduce background noise. Make sure that
passengers are not speaking when you are giv-
ing a voice command.
> Do not direct the vents toward the hands-free
microphone, which is in the roof headliner near
the front interior lights.
> Only the driver should speak to the system, be-
cause the handsfree microphone is aimed to-
ward this seating position.
ZA WARNING
— Direct your full attention to driving. As the
driver, you have complete responsibility for
safety in traffic. Only use the functions in
such a way that you always maintain com-
plete control over your vehicle in all traffic
situations.
— Do not use the voice recognition system in
emergencies because your voice may change
in stressful situations. The system may take
longer to dial the number or may not be
able to dial it at all. Dial the emergency
number manually.
G) Tips
There are no voice guidance* prompts when a
dialog is active.
Operating
Applies to: vehicles with voice recognition system
(2 ELE
Pat) 5 ce
Where is a
Connect >
Diala
coy n
ey
Os 4
Cog
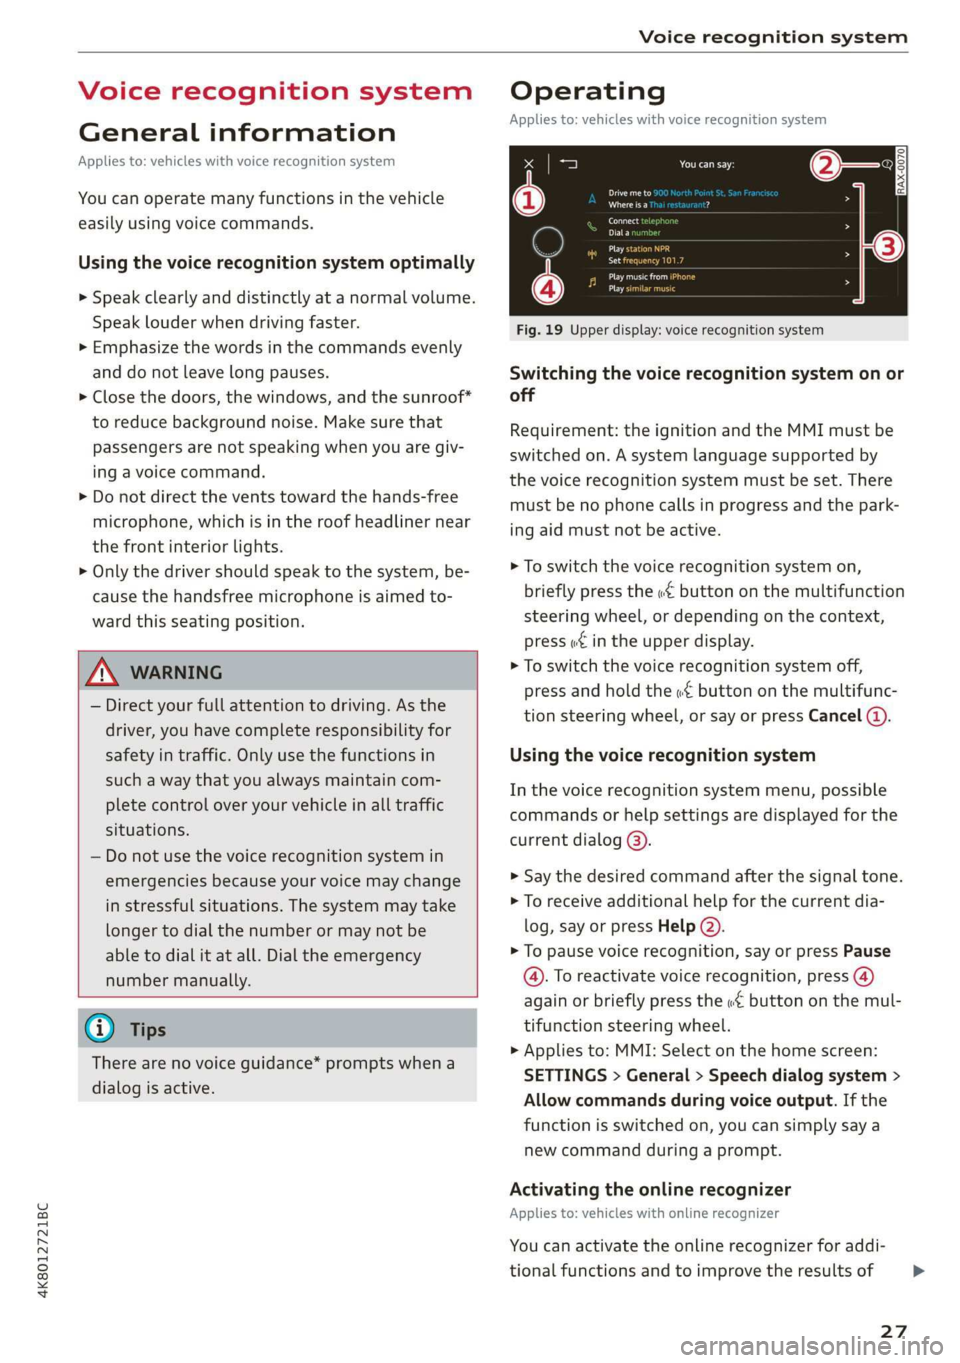
Fig. 19 Upper display: voice recognition system
Switching the voice recognition system on or
off
Requirement: the ignition and the MMI must be
switched on. A system language supported by
the voice recognition system must be set. There
must be no phone calls in progress and the park-
ing aid must not be active.
> To switch the voice recognition system on,
briefly press the «€ button on the multifunction
steering wheel, or depending on the context,
press w¢ in the upper display.
> To switch the voice recognition system off,
press and hold the « button on the multifunc-
tion steering wheel, or say or press Cancel (a).
Using the voice recognition system
In the voice recognition system menu, possible
commands or help settings are displayed for the
current dialog @).
> Say the desired command after the signal tone.
> To receive additional help for the current dia-
log, say or press Help (2).
> To pause voice recognition, say or press Pause
@. To reactivate voice recognition, press @)
again or briefly press the «€ button on the mul-
tifunction steering wheel.
> Applies to: MMI: Select on the home screen:
SETTINGS > General > Speech dialog system >
Allow commands during voice output. If the
function is switched on, you can simply say a
new command during a prompt.
Activating the online recognizer
Applies to: vehicles with online recognizer
You can activate the online recognizer for addi-
tional functions and to improve the results of
27
>
Page 47 of 310
4K8012721BC
Opening and closing
Garage door opener
Applies to: vehicles with garage door opener
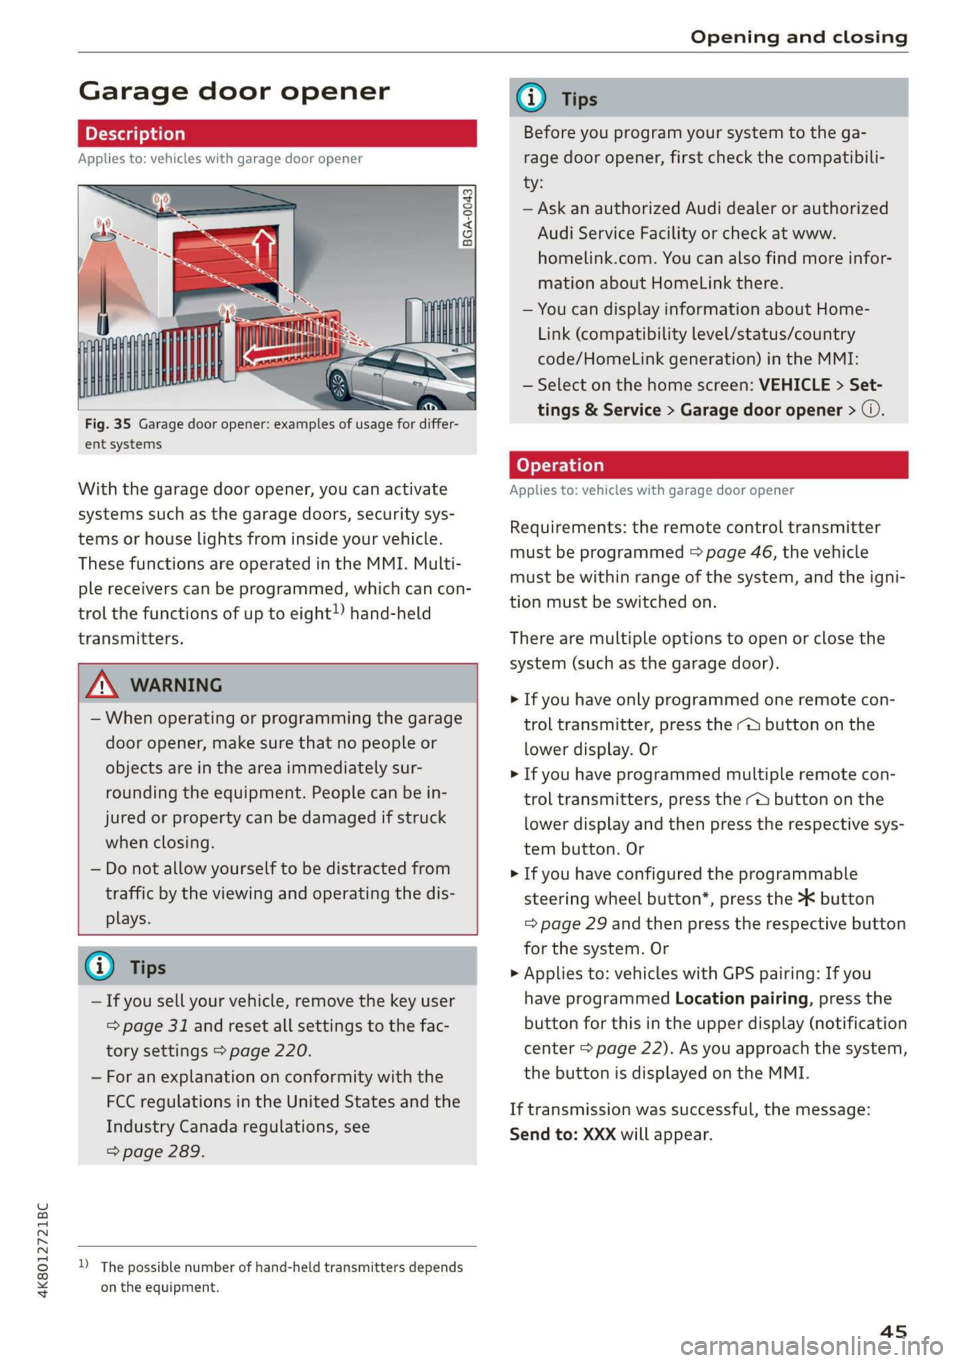
oD + 3
2 <=
go a
ent systems
With the garage door opener, you can activate
systems such as the garage doors, security sys-
tems or house lights from inside your vehicle.
These functions are operated in the MMI. Multi-
ple receivers can be programmed, which can con-
trol the functions of up to eight!) hand-held
transmitters.
A WARNING
— When operating or programming the garage
door opener, make sure that no people or
objects are in the area immediately sur-
rounding the equipment. People can be in-
jured or property can be damaged if struck
when closing.
— Do not allow yourself to be distracted from
traffic by the viewing and operating the dis-
plays.
@ Tips
— If you sell your vehicle, remove the key user
= page 31 and reset all settings to the fac-
tory settings > page 220.
— For an explanation on conformity with the
FCC regulations in the United States and the
Industry Canada regulations, see
=> page 289.
D_ The possible number of hand-held transmitters depends
on the equipment.
G) Tips
Before you program your system to the ga-
rage door opener, first check the compatibili-
ty:
— Ask an authorized Audi dealer or authorized
Audi Service Facility or check at www.
homelink.com. You can also find more infor-
mation about HomeLink there.
— You can display information about Home-
Link (compatibility level/status/country
code/HomeLink generation) in the MMI:
— Select on the home screen: VEHICLE > Set-
tings & Service > Garage door opener > ©.
Applies to: vehicles with garage door opener
Requirements: the remote control transmitter
must be programmed > page 46, the vehicle
must be within range of the system, and the igni-
tion must be switched on.
There are multiple options to open or close the
system (such as the garage door).
> If you have only programmed one remote con-
trol transmitter, press the - button on the
lower display. Or
> If you have programmed multiple remote con-
trol transmitters, press the -@ button on the
lower display and then press the respective sys-
tem button. Or
> If you have configured the programmable
steering wheel button*, press the *K button
= page 29 and then press the respective button
for the system. Or
> Applies to: vehicles with GPS pairing: If you
have programmed Location pairing, press the
button for this in the upper display (notification
center > page 22). As you approach the system,
the button is displayed on the MMI.
If transmission was successful, the message:
Send to: XXX will appear.
45
Page 50 of 310
Lights and Vision
Lights and Vision
Exterior lighting
Sitar MeL Lats eal
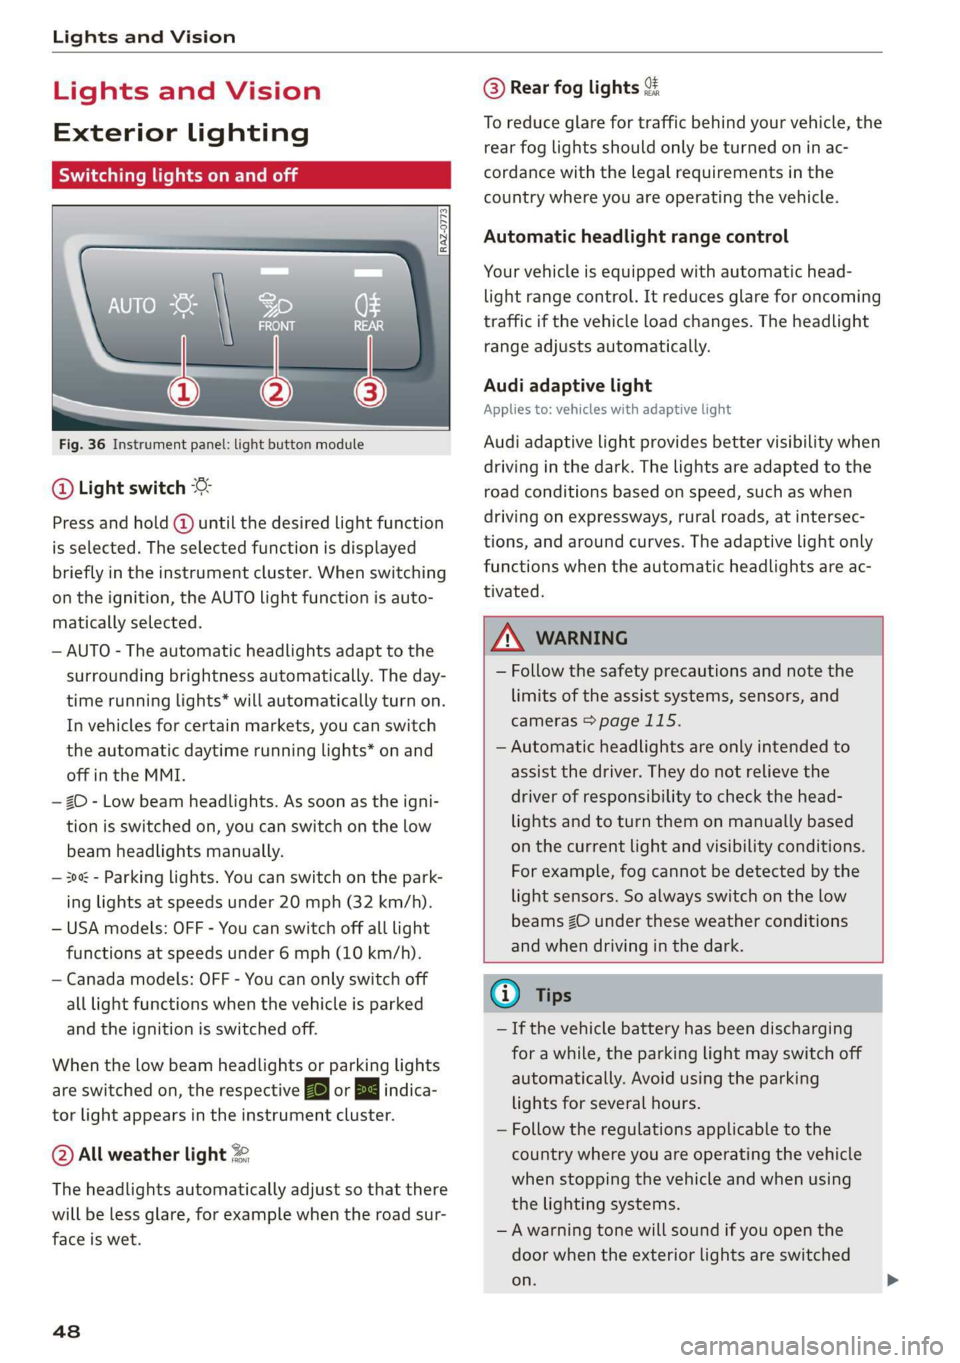
Fig. 36 Instrument panel: light button module
@ Light switch &
Press and hold @ until the desired light function
is selected. The selected function is displayed
briefly in the instrument cluster. When switching
on the ignition, the AUTO light function is auto-
matically selected.
— AUTO - The automatic headlights adapt to the
surrounding brightness automatically. The day-
time running lights* will automatically turn on.
In vehicles for certain markets, you can switch
the automatic daytime running lights* on and
off in the MMI.
— 20 - Low beam headlights. As soon as the igni-
tion is switched on, you can switch on the low
beam headlights manually.
— 30a - Parking lights. You can switch on the park-
ing lights at speeds under 20 mph (32 km/h).
— USA models: OFF - You can switch off all light
functions at speeds under 6 mph (10 km/h).
— Canada models: OFF - You can only switch off
all light functions when the vehicle is parked
and the ignition is switched off.
When the low beam headlights or parking lights
are switched on, the respective Ba or Ea indica-
tor light appears in the instrument cluster.
@ All weather light 2
The headlights automatically adjust so that there
will be less glare, for example when the road sur-
face is wet.
48
@ Rear fog lights %
To reduce glare for traffic behind your vehicle, the
rear fog lights should only be turned on in ac-
cordance with the legal requirements in the
country where you are operating the vehicle.
Automatic headlight range control
Your vehicle is equipped with automatic head-
light range control. It reduces glare for oncoming
traffic if the vehicle load changes. The headlight
range adjusts automatically.
Audi adaptive light
Applies to: vehicles with adaptive light
Audi adaptive light provides better visibility when
driving in the dark. The lights are adapted to the
road conditions based on speed, such as when
driving on expressways, rural roads, at intersec-
tions, and around curves. The adaptive light only
functions when the automatic headlights are ac-
tivated.
ZA WARNING
— Follow the safety precautions and note the
limits of the assist systems, sensors, and
cameras > page 115.
— Automatic headlights are only intended to
assist the driver. They do not relieve the
driver of responsibility to check the head-
lights and to turn them on manually based
on the current light and visibility conditions.
For example, fog cannot be detected by the
light sensors. So always switch on the low
beams ZO under these weather conditions
and when driving in the dark.
@ Tips
— If the vehicle battery has been discharging
for a while, the parking light may switch off
automatically. Avoid using the parking
lights for several hours.
— Follow the regulations applicable to the
country where you are operating the vehicle
when stopping the vehicle and when using
the lighting systems.
—Awarning tone will sound if you open the
door when the exterior lights are switched
on.
Page 51 of 310

4K8012721BC
Lights and Vision
— Only the front headlights turn on when the
daytime running lights are switched on*. In
vehicles in certain markets, the tail lights
will also turn on.
—In cool or damp weather, the inside of the
headlights, turn signals, and tail lights can
fog
over due to the temperature difference
between the inside and outside. They will
clear shortly after switching them on. This
does not affect the service life of the light-
ing.
— When the parking lights are switched on
and the ignition is switched off, the 00-} sym-
bol appears in the light switch module.
Turn signal and high beam lever
©
%
/
@
Fig. 37 Lever: switching on the turn signal and high beams
The lever operates the turn signals, the high
beams and the headlight flasher.
Turn signal >>
The turn signal activates when you move the lev-
er into a turn signal position when the ignition is
switched on. The respective a or B indicator
light flashes.
@ - Right turn signal
@ - Left turn signal
The turn signal blinks three times if you tap the
lever (convenience turn signal).
If an indicator light blinks twice as fast as usual,
a turn signal bulb has failed. Carefully drive to an
authorized Audi dealer or authorized Audi Service
Facility immediately to have the malfunction cor-
rected.
High beams 20 and headlight flasher
> Move the Lever to the corresponding position:
@- High beams on (vehicles with high beam as-
sistant*) > page 49
@ - High beams off or headlight flasher
The =o] indicator light in the instrument cluster
will turn on.
Z\ WARNING
High beams can cause glare for other drivers,
which increases the risk of an accident. For
this reason, only use the high beams or the
headlight flasher when they will not create
glare for other drivers.
High beam assistant
Applies to: vehicles with high beam assistant
The high beam assistant automatically turns the
high beams on or off depending on the surround-
ing conditions.
A camera on the rearview mirror mount can de-
tect light sources from other road users. The high
beams switch on or off automatically depending
on the position of vehicles driving ahead and on-
coming vehicles, the vehicle speed as well as oth-
er environmental factors and traffic conditions.
Switching on the high beam assistant
Requirement: the automatic headlights must be
set and the high beam assistant must be switch-
ed onin the MMI > page 51.
> To activate the high beam assistant, tap the
lever forward @) > page 49, fig. 37. The fa in-
dicator light appears in the instrument cluster
display and the high beams are switched on or
off automatically. If the high beams were com-
pletely or partially switched on, the Ea indica-
tor light will turn on.
Switching the high beams on or off manually
If the high beams did not switch on or off auto-
matically as expected, you may switch them on or
off manually instead:
49