run AUDI A7 2021 Owner´s Manual
[x] Cancel search | Manufacturer: AUDI, Model Year: 2021, Model line: A7, Model: AUDI A7 2021Pages: 350, PDF Size: 126.66 MB
Page 139 of 350

4K8012721BF
Trailer towing
Hill
When you start driving uphill or downhill, trailers
may tilt or sway sooner than when driving ona
level surface. If small swaying movements have
already occurred, you can stabilize the trailer by
firmly braking immediately. Never attempt to
“straighten out” the trailer by accelerating.
Conventional drive system: Downshift before
driving on hills to utilize the engine braking ef-
fect SA.
Plug-in hybrid drive system: Reduce the speed
and use the recuperation braking effect
=> page 101 to relieve the brakes > A\.
Brakes
When using a trailer with overrun brakes, first
brake gently then quickly. This reduces the risk of
jerking while braking if the trailer wheels lock up.
Engine coolant temperature
Pay attention specifically to the coolant tempera-
ture display when there are high outside temper-
atures, and when driving on long inclines
=> page 14. Shift to a higher gear in a timely man-
ner.
Z\ WARNING
Constant braking causes the brakes to over-
heat and can substantially reduce braking per-
formance, increase braking distance, or cause
complete failure of the brake system.
137
Page 148 of 350

Driving information
— The traffic signs on the road always take pri-
ority over the display. The driver is always
responsible for adhering to the regulations
applicable in the country where the vehicle
is being operated.
— Units of measurement and language set-
tings are displayed based on how they were
set in the MMI system settings > page 249.
Applies to: vehicles with traffic light information
Switching traffic light information on and
off
The system can be switched on and off in the
MMI page 141.
Accessing traffic light information
> Select in the instrument cluster: vehicle func-
tions tab > Traffic signs.
@) Tips
If another tab or another function is selected
in the instrument cluster, the traffic light in-
formation will appear in the status bar on the
instrument cluster.
Messages
Applies to: vehicles with traffic light information
Malfunction! See owner's manual
The system could not be configured, for example
due to a network malfunction. Switch the igni-
tion off and shut down the vehicle to restart the
system. Wait several minutes until the vehicle
has shut down completely and then switch the
ignition back on.
Function currently unavailable. See owner's
manual
There is a temporary system malfunction. Check
if one or more of the following situations applies
and correct the issue if necessary:
— Traffic light information is switched off
— Data transmission is deactivated
— The vehicle is not equipped with traffic sign rec-
ognition.
146
— There is no valid license
— Traffic light information is not available in that
area
Lap timer
Introduction
Applies to: vehicles with lap timer
You can record and evaluate lap times with the
lap timer. You can operate the lap timer using the
multifunction steering wheel > page 13.
Opening the lap timer
> Select in the instrument cluster: Vehicle func-
tions tab > [=] button > Lap times.
An additional indicator will appear in the head-up
display”.
ZA\ WARNING
Your focus should always be on driving your
vehicle safely. As the driver, you have com-
plete responsibility for safety in traffic. To re-
duce the risk of an accident, only use the lap
timer functions in such a way that you always
maintain complete control over your vehicle in
all traffic situations.
Gi) Tips
You can retrieve information from the trip
computer while the lap timer stopwatch is
running.
ey Rael)
Applies to: vehicles with lap timer
Requirement: the lap timer must be open
=> page 146.
Timing laps
> To start timing manually, select Start lap 1 in
the menu.
> To start timing automatically as soon as you be-
gin
to drive, select Start lap 1 by driving off or
Start by driving off in the menu.
> To start timing a new lap after driving a lap, se-
lect New lap in the menu. This starts timing
the next lap at the same time.
Page 149 of 350

4K8012721BF
Driving information
After completing a lap, the difference between
the last lap and the previous best lap time will be
indicated with a “~” or “+”.
Pausing timing and displaying a split time
> To insert a pause @ select Pause in the menu.
> To resume timing, select Resume in the menu.
> To display a split time, select Split time in the
menu. The split time appears for approxi-
mately ten seconds in the instrument cluster.
The current lap timing will continue running.
Canceling lap timing
The timing of the current lap will stop. The lap
time will be erased and will not be included in the
statistics.
>» Select Cancel lap in the menu.
Resetting the time
> Select Reset lap times in the menu.
@ Tips
—A maximum of 99 lap times can be meas-
ured.
— If timing is paused, you can continue it later
even if you switch the ignition off.
— Saved lap times cannot be individually de-
leted from the total results.
— The saved lap timer values will remain after
switching the ignition off.
Lap statistics
Applies to: vehicles with lap timer
Displaying lap statistics
You can display the number of laps driven kg
the fastest lap “+”, the slowest lap “~”, and the
average time “®” in the instrument cluster.
> Select in the instrument cluster: Vehicle func-
tions tab > I button > Lap statistics.
> Turn the thumbwheel down or up to display the
individual lap times.
> To return to the lap timing that was started, se-
lect the [J button > Lap times.
D_ Not available in all countries
Resetting lap statistics
Requirement: the lap statistics menu must be
displayed.
> To reset the lap statistics, press and hold the
left thumbwheel until the message No lap
times have been recorded yet. appears.
@) Tips
The lap statistics list the lap times for the last
30 laps. The fastest and slowest lap times out
of up to 99 measured laps are also displayed.
Acceleration
measurement)
Introduction
Applies to: vehicles with acceleration measurement
With the acceleration measurement, you can
measure the time that you need to reach a specif-
ic speed/distance. Keep in mind that the environ-
mental conditions and tire properties can affect
the results of the measurement.
Opening the acceleration measurement
> Select in the instrument cluster: vehicle func-
tions tab > E=] button > Acceleration measure.
ZA\ WARNING
Your focus should always be on driving your
vehicle safely. As the driver, you have com-
plete responsibility for safety in traffic. Only
use the acceleration measurement function
on closed courses to reduce the risk of acci-
dents.
OTe Rane Ue eas
Applies to: vehicles with acceleration measurement
Requirement: the acceleration measurement
must be opened.
> Bring the vehicle to a full stop.
> Select and confirm the desired speed or dis-
tance.
147
Page 179 of 350
4K8012721BF
Parking and maneuvering
General information
The parking aid assists when parking and maneu-
vering by providing warnings about obstacles. If
the ultrasonic sensors on the vehicle > page 139,
fig. 91 detect an obstacle, the system will pro-
vide audio and visual warnings.
Activating and deactivating
Requirement: the vehicle speed must be under
approximately 6 mph (10 km/h).
> Press the Pvt or { button @ in the center con-
sole. When activating, a brief tone will sound
and the LED in the button will turn on.
Automatic activation
> The system activates automatically when re-
verse gear is engaged while the engine is run-
ning. A brief tone will sound.
> If Automatic activation is switched on in the
MMI and if the vehicle approaches an obstacle
at speeds below approximately 6 mph (10
km/h), the parking aid will switch on automati-
cally. Audible signals will sound once the obsta-
cle is within the sensor detection area.
> Applies to: MMI: To switch Automatic activa-
tion on or off, select on the home screen: VEHI-
CLE > Parking aid > Automatic activation.
Automatic deactivation
The distance indicator for the parking aid plus
will deactivate automatically when driving for-
ward faster than 6 mph (10 km/h).
Z\ WARNING
Observe the safety precautions and note the
limits of the assist systems, sensors, and
cameras > page 138.
@) Note
Keep enough distance from the curb to avoid
damage to the rims.
@) Tips
— If the parking aid is deactivated, it can only
be reactivated automatically when one of
the following conditions is met:
— The vehicle speed exceeds 6 mph
(10 km/h)
— The ignition is switched off and back on
again
— The parking brake is set and then released
— The “P” gear is engaged and released
again
Applies to: vehicles with parking aid plus
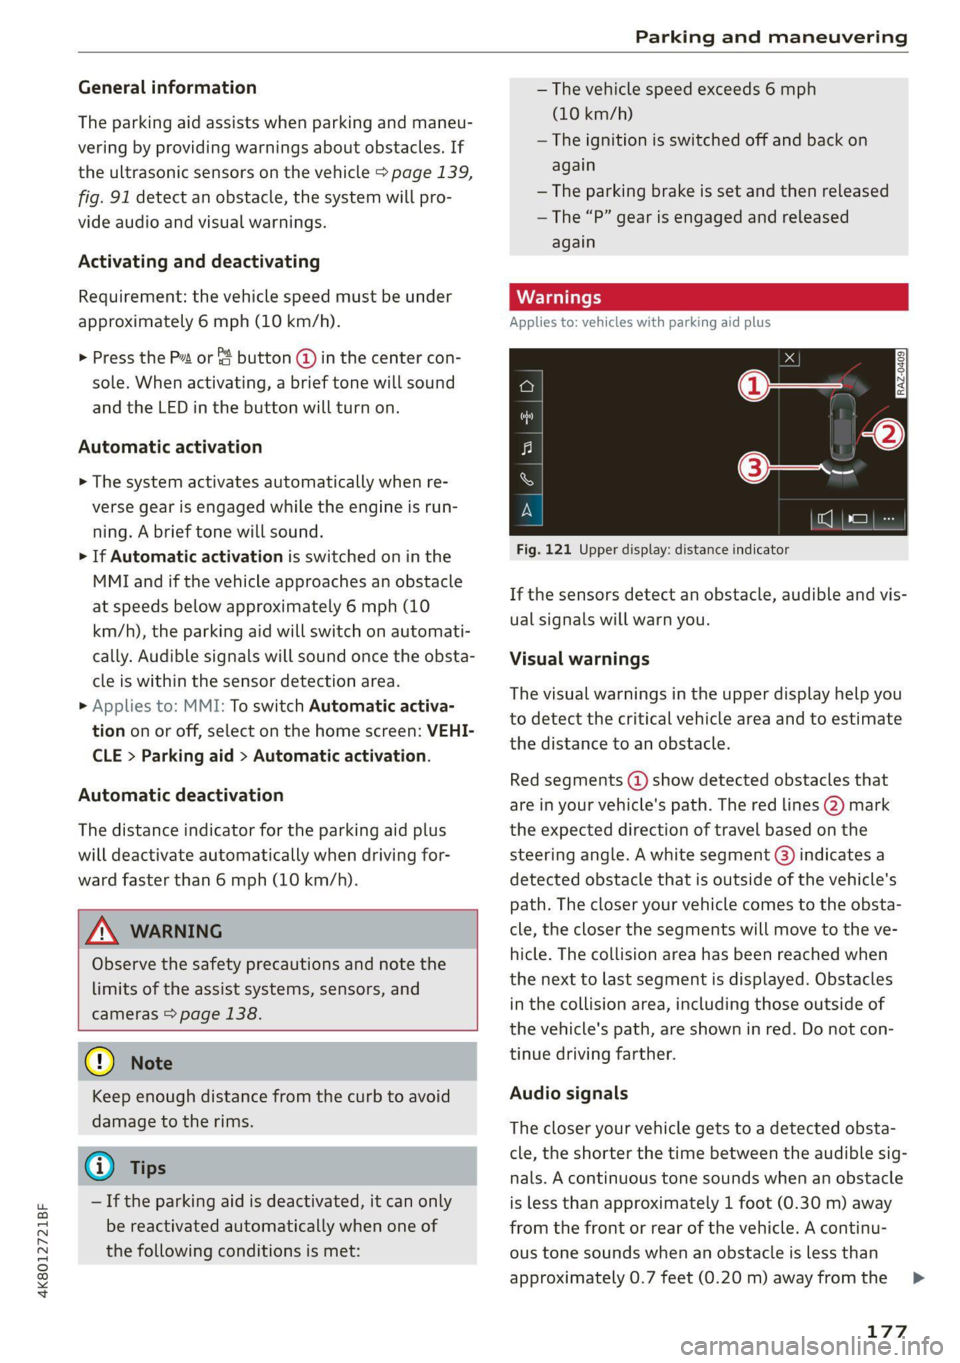
Fig. 121 Upper display: distance indicator
If the sensors detect an obstacle, audible and vis-
ual signals will warn you.
Visual warnings
The visual warnings in the upper display help you
to detect the critical vehicle area and to estimate
the distance to an obstacle.
Red segments (2) show detected obstacles that
are in your vehicle's path. The red lines @) mark
the expected direction of travel based on the
steering angle. A white segment @) indicates a
detected obstacle that is outside of the vehicle's
path. The closer your vehicle comes to the obsta-
cle, the closer the segments will move to the ve-
hicle. The collision area has been reached when
the next to last segment is displayed. Obstacles
in the collision area, including those outside of
the vehicle's path, are shown in red. Do not con-
tinue driving farther.
Audio signals
The closer your vehicle gets to a detected obsta-
cle, the shorter the time between the audible sig-
nals. A continuous tone sounds when an obstacle
is less than approximately 1 foot (0.30 m) away
from the front or rear of the vehicle. A continu-
ous tone sounds when an obstacle is less than
approximately 0.7 feet (0.20 m) away from the
177
>
Page 181 of 350
4K8012721BF
Parking and maneuvering
Rearview camera and
peripheral cameras
Introduction
Applies to: vehicles with rearview camera/peripheral cameras
B8V-0629
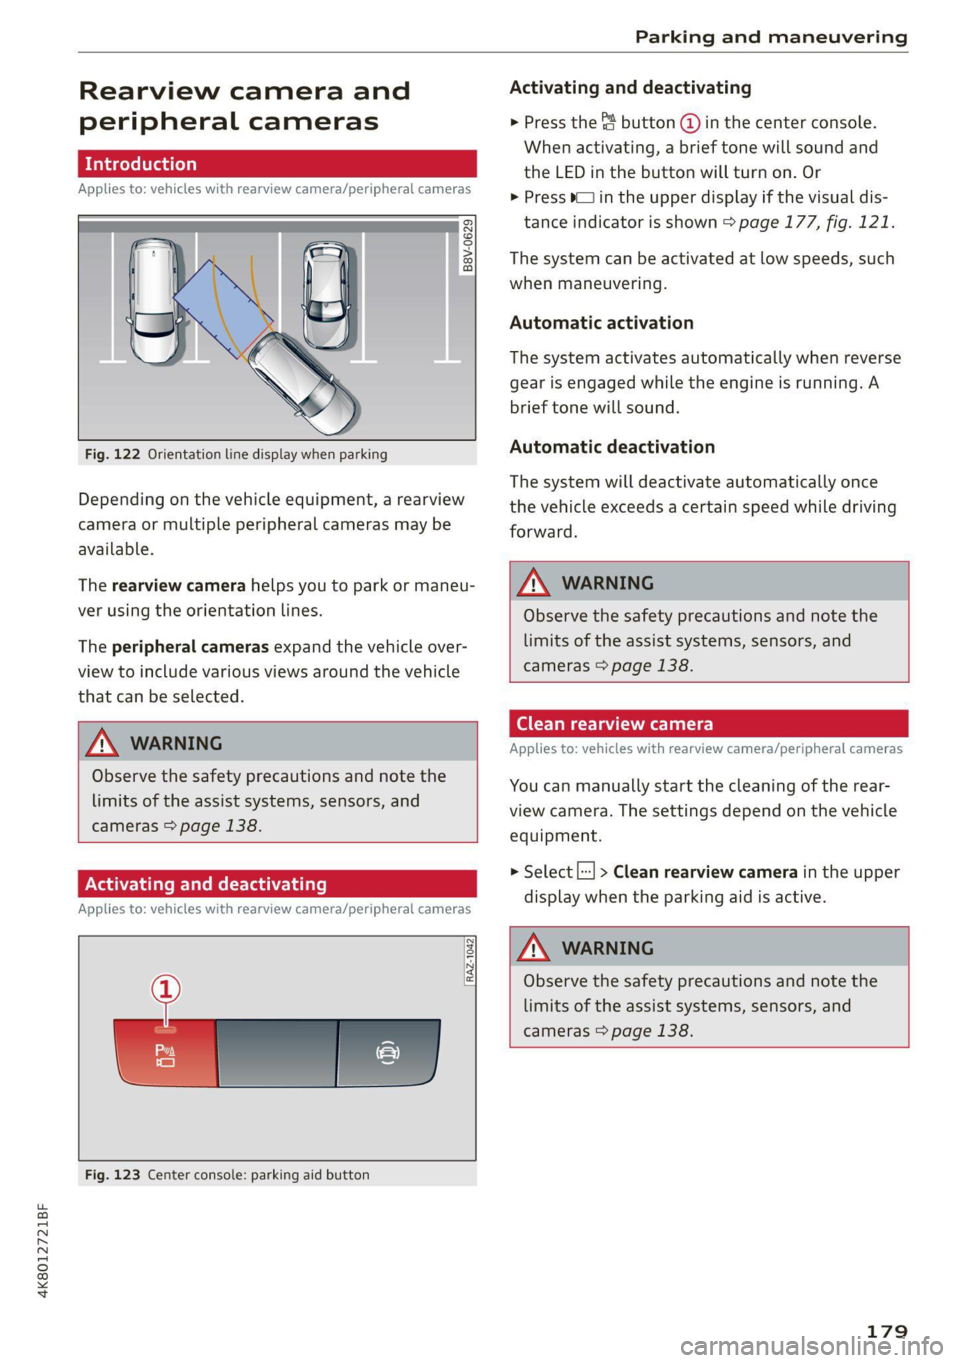
Fig. 122 Orientation line display when parking
Depending on the vehicle equipment, a rearview
camera or multiple peripheral cameras may be
available.
The rearview camera helps you to park or maneu-
ver using the orientation lines.
The peripheral cameras expand the vehicle over-
view to include various views around the vehicle
that can be selected.
ZA WARNING
Observe the safety precautions and note the
limits of the assist systems, sensors, and
cameras > page 138.
Activating and deactivating
Applies to: vehicles with rearview camera/peripheral cameras
[RAZ-1042|
Fig. 123 Center console: parking aid button
Activating and deactivating
> Press the 4 button (@ in the center console.
When activating, a brief tone will sound and
the LED in the button will turn on. Or
> Press bin the upper display if the visual dis-
tance indicator is shown > page 177, fig. 121.
The system can be activated at low speeds, such
when maneuvering.
Automatic activation
The system activates automatically when reverse
gear is engaged while the engine is running. A
brief tone will sound.
Automatic deactivation
The system will deactivate automatically once
the vehicle exceeds a certain speed while driving
forward.
A WARNING
Observe the safety precautions and note the
limits of the assist systems, sensors, and
cameras > page 138.
Clean rearview camera
Applies to: vehicles with rearview camera/peripheral cameras
You can manually start the cleaning of the rear-
view camera. The settings depend on the vehicle
equipment.
> Select |--| > Clean rearview camera in the upper
display when the parking aid is active.
Z\ WARNING
Observe the safety precautions and note the
limits of the assist systems, sensors, and
cameras > page 138.
179
Page 192 of 350
Parking and maneuvering
ZA\ WARNING
Observe the safety precautions and note the
limits of the assist systems, sensors, and
cameras > page 138.
Messages
Applies to: vehicles with park assist plus
If the & or w indicator light turns on, the
park assist is not available or was interrupted.
A message that indicates the cause and possible
solution may appear with some displays. The
weather conditions may be too poor or a sensor
may be covered. Clean the area in front of the
sensors > page 140 and try to turn the system on
again later.
If the malfunction remains, drive to an author-
ized Audi dealer or authorized Audi Service Facili-
ty immediately to have the malfunction correct-
ed.
Remote controlled
parking!)2)
ere eeuel ela)
Applies to: vehicles with remote park assist plus
Remote controlled parking is part of park assist
plus/park assist plus with garage function. The
process for parking or exiting a parking space can
be controlled with a mobile device from outside
the vehicle. To do so, the driver must have both
the vehicle key and the mobile device with him or
her. While the driver controls the vehicle remote-
ly and monitors the vehicle's surroundings, the
system controls the steering, gear selection, ac-
celeration, braking, and locking the vehicle.
ZX WARNING
— Observe the safety precautions and note the
limits of the assist systems, sensors, and
cameras > page 138.
)_ system availability may be limited depending on the mar-
ket.
2) In preparation at the time of printing.
190
— Remote controlled parking is only an assist
system. The driver is always responsible for
maneuvering, driving, and stopping the ve-
hicle and performing other driving maneu-
vers.
— Do not use this function if the vehicle cannot
move freely, for example when on a vehicle
jack.
— Failing to pay careful attention to the vehi-
cle's surroundings increases the risk of an
accident. Sensors and cameras have spots in
which the surrounding area cannot be de-
tected. Objects, animals, and people may
only be detected with limitations may not
be detected at all. Always monitor the traf-
fic as well as the vehicle's surroundings with
direct eye contact. Stay near the vehicle
while controlling it. Make sure you have a
clear view of the vehicle and the area sur-
rounding it. Do not become distracted.
— Applies to: vehicles with anti-theft alarm
system: There is a risk of fatal injury for peo-
ple locked in the vehicle, especially children.
The vehicle is locked during remote control-
led parking. Make sure there are no persons
inside the vehicle both before and after us-
ing
remote controlled parking.
— There is a risk of asphyxiation. Never allow
the engine to run in confined spaces. After
remote controlled parking, make sure the
engine is off.
— Malfunctions when using the myAudi app in-
crease the risk of an accident. Do not exit
the app during the parking process, and
make sure that it does not go into the device
background, for example by accepting an in-
coming call. Observe the operating instruc-
tions from the manufacturer of your mobile
device.
— There is a risk of accident if the connection is
interrupted. In certain situations, the con-
nection between the mobile device and the
vehicle can be interrupted, for example from
other radio devices or when the distance to
Page 195 of 350
4K8012721BF
Parking and maneuvering
Preparing the vehicle
> To enable the selected parking space (2) for re-
mote controlled parking, press E @ on the up-
per display.
> If you have already approached a parking space
in the vehicle, remote controlled parking can be
activated to continue with the rest of the park-
ing process. To enable remote controlled park-
ing, press [J in the upper display.
> Exit the vehicle while the engine is running and
take the vehicle key with you. Always keep both
the vehicle key and the mobile device with you
during the entire remote controlled parking
process.
> Make sure that all doors and the luggage com-
partment lid are closed.
Starting the parking process
> Start the myAudi app soon, or the function will
be canceled.
> Pay attention to the path of the vehicle. If the
traffic situation permits, park your vehicle in
the parking space using the mobile device
> JX. The vehicle key and the mobile device
cannot be more than approximately 20 feet
(6 m) away from the vehicle.
> Pay attention to the path of the vehicle. In un-
clear situations, pause the parking process us-
ing
the mobile device. For example, this may be
necessary if an obstacle appears or the vehicle
comes very close to an obstacle.
> To resume the parking process, start it again on
the mobile device. The rest of the parking proc-
ess will be recalculated based on the vehicle po-
sition.
End of the parking process
If an obstacle appears, stop the parking process
=> page 194.
The parking process will end automatically once
the vehicle has reached the end point in the park-
ing space. Once parking is successfully complet-
ed, the parking lock will be engaged, the parking
brake will be set, and the engine will switch off.
The vehicle will also be locked.
ZA WARNING
— Observe the safety precautions and note the
limits of the assist systems, sensors, and
cameras > page 138.
— Failing to pay careful attention to the vehi-
cle's surroundings increases the risk of an
accident. Park your vehicle with the mobile
device only if you are sure that no obstacle is
in the vehicle's path or under the vehicle,
and that no obstacles will move into the ve-
hicle's path.
@ Tips
— If the parking space is located in a garage, it
must be detected correctly by the vehicle.
When the parking space is detected com-
pletely, the edges of the space will be high-
lighted @).
— The parking process can only be started if
the vehicle key is located outside the vehicle
after the vehicle is prepared. Always keep
both the vehicle key and the mobile device
with you during the entire remote control-
led parking process.
— Remote controlled parking may be restrict-
ed or unavailable in situations such as the
following:
—If the ESC is restricted or switched off, or
if there is a malfunction.
—If there is another vehicle key inside the
vehicle or nearby.
— The system can incorrectly interpret parking
space barriers (such as parking curbs). Take
over the parking process > page 194 if the
vehicle is not completely inside the parking
space or if the vehicle tries to drive over the
parking space barrier.
193
Page 198 of 350

Parking and maneuvering
Activating or deactivating maneuver assist
Applies to: vehicles with maneuver assist
Requirements
> Maneuver assist must be switched on in the
parking system settings in the MMI.
> The speed must not be higher than approxi-
mately 6 mph (10 km/h).
Automatic activation
Maneuver assist activates automatically when re-
verse gear is engaged while the engine is run-
ning. A brief tone will sound.
Deactivating temporarily
If you do not want to use maneuver assist during
a parking cycle, you can deactivate it temporarily.
If maneuver assist is deactivated temporarily, it
will be activated again automatically the next
time park assist is activated.
> To deactivate maneuver assist temporarily,
press % @) > page 195, fig. 135 in the upper
display. The “% symbol will appear.
If you continue driving toward the obstacle after
the vehicle is braked to a stop, maneuver assist
will automatically be temporarily deactivated un-
til the next maneuvering situation.
Activating manually
You can activate maneuver assist in various ways
depending on the situation:
> To activate maneuver assist manually (such as
when driving forward), press the % button in
the center console.
> To reactivate maneuver assist after it has been
deactivated temporarily, press 74 @,
=> page 195, fig. 135 in the upper display. The
® symbol will appear.
Switching on or off permanently
» Applies to MMI: Select on the home screen: VE-
HICLE > Parking aid > Maneuver assist. Or
> Select [| > Maneuver assist in the upper dis-
play when the parking aid is active.
If maneuver assist is switched off permanently,
there will be no symbol in the center of the vehi-
cle graphic @) > page 195, fig. 135.
196
ZA WARNING
Observe the safety precautions and note the
limits of the assist systems, sensors, and
cameras > page 138.
Messages
Applies to: vehicles with maneuver assist
if or fg is displayed when there is a malfunc-
tion, the maneuver assist functions may be un-
available or may be limited.
A message that indicates the cause and possible
solution may appear with some displays. The
weather conditions may be too poor or a sensor
may be covered. Clean the area in front of the
sensors and cameras > page 140 and try to turn
the system on again later.
If the malfunction remains, drive to an author-
ized Audi dealer or authorized Audi Service Facili-
ty immediately to have the malfunction correct-
ed.
Page 262 of 350

Checking and Filling
— Never reach into the radiator fan. The fan is
temperature-controlled and can turn on
suddenly, even when the ignition is switched
off.
— Never open the hood when there is steam or
coolant escaping from the engine compart-
ment, because there is a risk that you could
be burned. Wait until no steam or coolant is
escaping.
— Plug-in hybrid drive: The coolant expansion
tank cap is equipped with a seal that must
never be removed under any circumstances
=> page 262, fig. 164. If the coolant expan-
sion tank for the high-voltage system is not
sealed, please contact an authorized Audi
dealer or authorized Audi Service Facility.
— Plug-in hybrid drive: The sealed cap must
only be opened by an authorized Audi dealer
or authorized Audi Service Facility.
— The cap on the coolant expansion tank must
never be opened when the coolant is hot.
The cooling system is under pressure. There
is a risk of burns
— To protect your face, hands, and arms from
hot steam or coolant, cover the cap with a
thick cloth when opening.
— Do not remove the engine cover under any
circumstances. This increases the risk of
burns.
— Due to the risk of electric shock, never touch
the ignition cable or other components in
the electronic high-voltage ignition system
when the engine is running or is starting.
— If a gear is engaged while the vehicle is sta-
tionary and the engine is running, do not
press the accelerator pedal inadvertently.
Pressing the accelerator pedal will cause the
vehicle to move, and this could result in an
accident.
— If inspections or repairs must be performed
while the engine is running, moving compo-
nents (such as the ribbed belt, generator,
and radiator fan) pose an additional risk.
— Set the parking brake first and select the
“P” (Park) selector lever position.
— Always make sure that no parts of the
body, jewelry, ties, loose clothing, and
long hair can be caught in moving engine
components. Before any work, always re-
move any jewelry and/or ties, tie back long
hair, and make sure all clothing fits close
to the body to reduce the risk of anything
becoming caught in engine components.
— Pay attention to the following warnings list-
ed when work on the fuel system or on the
electrical equipment is required.
— Do not smoke.
— Never work near open flames.
— Always have a working fire extinguisher
nearby.
— All work on the battery or electrical system
in your vehicle can result in injuries, chemi-
cal burns, accidents, or burns. Because of
this, all work must be performed only by an
authorized Audi dealer or authorized Audi
Service Facility.
— Limit your exposure to exhaust and chemi-
cals to as short a time as possible.
ZA WARNING
California Proposition 65 Warning:
— Engine exhaust, some of its constituents,
and certain vehicle components contain or
emit chemicals known to the State of Cali-
fornia to cause cancer and birth defects and
reproductive harm. In addition, certain flu-
ids contained in vehicles and certain prod-
ucts of component wear contain or emit
chemicals known to the State of California
to cause cancer and birth defects or other
reproductive harm.
— Battery posts, terminals and related acces-
sories contain lead and lead compounds,
chemicals known to the State of California
to cause cancer and reproductive harms.
Wash hands after handling.
260
() Note
When filling fluids, be sure not to add any flu-
ids to the wrong reservoirs. Otherwise severe
malfunctions and engine damage will occur.
@) For the sake of the environment
You should regularly check the ground under
your vehicle in order to detect leaks quickly. If >
Page 267 of 350
4K8012721BF
Checking and Filling
> Turn the engine off.
> Open the hood > page 261.
> Unscrew the cap %~ for the engine oil filler
opening > fig. 165.
> Carefully add 0.5 quart (0.5 liter) of the correct
oil > page 262.
>» Close the engine oil filler opening cap.
> Close the hood > page 261.
» Restart the ignition after two minutes and read
the current oil level in the MMI > page 264,
Checking the engine oil level.
> Applies to: using engine oil that meets the rec-
ommended specification: Add some more en-
gine oil again if necessary.
Z\ WARNING
— When adding oil, do not let oil drip onto hot
engine components. This increases the risk
of a fire.
— You must close the cap on the oil filler open-
ing correctly so that oil does not leak out on-
to the hot engine and exhaust system when
the engine is running, because this is a fire
hazard.
— Always clean skin thoroughly if it comes into
contact with engine oil.
—
Engine oil is poisonous and must be kept out
of reach of children.
— Store the engine oil securely in the original
container.
@) Note
— The New Vehicle Limited Warranty does not
cover damage or malfunctions if the recom-
mended intended use of the vehicle and
maintenance measures listed in the Audi
Owner's Manual and the Warranty & Main-
tenance Booklet were not followed.
— Only use high-grade engine oil that explicit-
ly meets the Audi oil quality standard for
your vehicle. Using another oil may cause
severe vehicle damage.
— Do not mix any additives with the engine oil.
Additives may cause engine damage that is
not covered by your New Vehicle Limited
Warranty.
(@) For the sake of the environment
— Oil should never enter the sewer system or
come into contact with the ground.
— Follow the legal regulations in the country
where you are located when disposing of
empty oil containers.
Changing engine oil
Audi recommends having the oil changed at an
authorized Audi dealer or authorized Audi Serv-
ice Facility.
Observe the safety precautions > page 259, Gen-
eral information.
The engine oil must be changed at the intervals
specified in the Warranty & Maintenance Book-
let. This is very important because the lubrication
function of the oil gradually declines during regu-
lar vehicle operation.
The engine oil should be changed more frequent-
ly under certain circumstances. Have the oil
changed more frequently if you often drive short
distances, your vehicle is predominantly in stop-
and-go traffic situations, is in very dusty environ-
ments, or is operated for long periods of time in
temperatures below zero.
Cleansing additives in the oil make fresh oil ap-
pear darker after the engine has run briefly. This
is normal and no reason to change the engine oil
more frequently than recommended.
Because correctly disposing of engine oil is diffi-
cult and special tools and technical knowledge
are needed for an oil change, Audi recommends
having your engine oil changed by an authorized
Audi dealer or authorized Audi Service Facility.
If you change the engine oil yourself, please note
the following important information:
Z\ WARNING
If you change the engine oil on the vehicle
yourself, the following precautions must be
followed:
— Wear protective eyewear.
— Due to the risk of scalding, allow the engine
to cool down sufficiently. >
265