service reset AUDI A7 2021 Owner´s Manual
[x] Cancel search | Manufacturer: AUDI, Model Year: 2021, Model line: A7, Model: AUDI A7 2021Pages: 350, PDF Size: 126.66 MB
Page 37 of 350
4K8012721BF
Personalization
@) Tips
— Depending on the country, you may be able
to use the myAudi app or my.audi.com.
— You do not need to log into the vehicle with
a myAudi user in order to use Audi connect
vehicle control services, which depend on
the vehicle equipment.
— If you sell your vehicle, reset all settings to
the factory default settings.
— Store the vehicle code in a secure place. It
may be necessary to re-enter the vehicle
code.
— When entering the vehicle code, please note
that the code is case-sensitive.
— If you do not have the 10-digit vehicle code,
contact an authorized Audi dealer or author-
ized Audi Service Facility.
35
Page 51 of 350
4K8012721BF
Opening and closing
Quick opening and closing
You can also open or close the roof and roof sun-
shade in one movement.
> Opening the roof and sunshade: slide the 2>
switch back briefly twice in a row to the second
level @).
> Closing the opened roof: push the 2> switch
forward briefly twice in a row to the second lev-
el.
Roof emergency closing
If an object is detected when closing, the roof
will open again automatically. In this case, you
can
then close it with the power emergency clos-
ing function.
> Within five seconds after the sunroof opens au-
tomatically, pull the applicable button until the
roof is closed.
ZA WARNING
To reduce the risk of injury, always pay atten-
tion when closing the roof. Always switch the
ignition off and take the key with you when
leaving the vehicle.
() Note
Always close the roof when you leave the vehi-
cle and when there is precipitation to reduce
the risk of damage to the interior equipment,
particularly the electronic equipment.
@) Tips
— After switching off the ignition, the roof and
sunshades can still be operated for several
minutes as long as neither of the front
doors have been opened.
—It is not possible to open the roof when
temperatures are too low.
)) The possible number of hand-held transmitters depends
on the equipment.
Garage door opener
Applies to: vehicles with garage door opener
With the garage door opener, you can activate
systems such as the garage doors, security sys-
tems or house lights from inside your vehicle.
These functions are operated in the MMI. Multi-
ple receivers can be programmed, which can con-
trol the functions of up to eight!) hand-held
transmitters.
ZA WARNING
— When operating or programming the garage
door opener, make sure that no people or
objects are in the area immediately sur-
rounding the equipment. People can be in-
jured or property can be damaged if struck
when closing.
— Do not allow yourself to be distracted from
traffic by the viewing and operating the dis-
plays.
@) Tips
—If you sell your vehicle, reset all settings to
the factory default settings > page 250.
— The system complies with United States FCC
regulations and ISED regulations
> page 329.
G) Tips
Before you program your system to the ga-
rage door opener, first check the compatibili-
ty:
— Ask an authorized Audi dealer or authorized
Audi Service Facility or check at www.
homelink.com. You can also find more infor-
mation about HomeLink there.
— You can display information about Home-
Link (compatibility level/status/country
code/HomeLink generation) in the MMI:
— Select on the home screen: VEHICLE > Set-
tings & Service > Garage door opener > @.
49
Page 53 of 350
4K8012721BF
Opening and closing
If you would like to set up location pairing at an-
other time:
> Applies to: MMI: Select on the home screen:
VEHICLE > Settings & Service > Garage door
opener.
> Press the Z button.
> Press the # button for the system your vehicle
is facing.
> Select: Location pairing.
> Follow the instructions in the MMI.
Only a maximum of three systems can be dis-
played in the notification center > page 24. If
you would like to have all systems displayed,
press ag.
Renaming programmed systems
You can rename the programmed systems indi-
vidually (names may have a maximum of 10 char-
acters).
> If you have programmed your system, follow
the instructions in the MMI. Or
If you would like to change the name at another
time:
> Applies to: MMI: Select on the home screen:
VEHICLE > Settings & Service > Garage door
opener.
> Press the Z button.
> Press the “ button for the system that you
would like to rename.
> Select: Rename. If necessary, delete the preset
name, such as Garage door opener 1.
> Follow the instructions in the MMI.
Deleting programmed systems
The programmed systems can be deleted individ-
ually or all at once.
> Applies to: MMI: Select on the home screen:
VEHICLE > Settings & Service > Garage door
opener.
> Press the Z button.
> To delete an individual system, press the L]
button for the desired system. If the checkmark
¥ is set, select: Delete.
> To delete all systems, select: All > Delete.
@) Tips
— Make sure the batteries in the hand trans-
mitter are charged before starting the pro-
gramming process.
— The programming process may take up to
30 seconds. It may be necessary for the
hand transmitter to be pressed again in the
meantime.
— The garage door opener may need to be
synchronized with the system after pro-
gramming. Follow the manufacturer's in-
structions for doing this.
@) Tips
In some cases, the system may need to be
programmed in a different mode (“D mode”).
— Switch the ignition on.
— Applies to: MMI: Select on the home screen:
VEHICLE > Settings & Service > Garage
door opener.
— Press and hold the desired button @).
— Select Yes, in D mode and follow the in-
structions on the MMI.
51
Page 101 of 350
4K8012721BF
Driving
minutes to reduce the risk of damage. After a
cool-down period, Launch Control will be
available again.
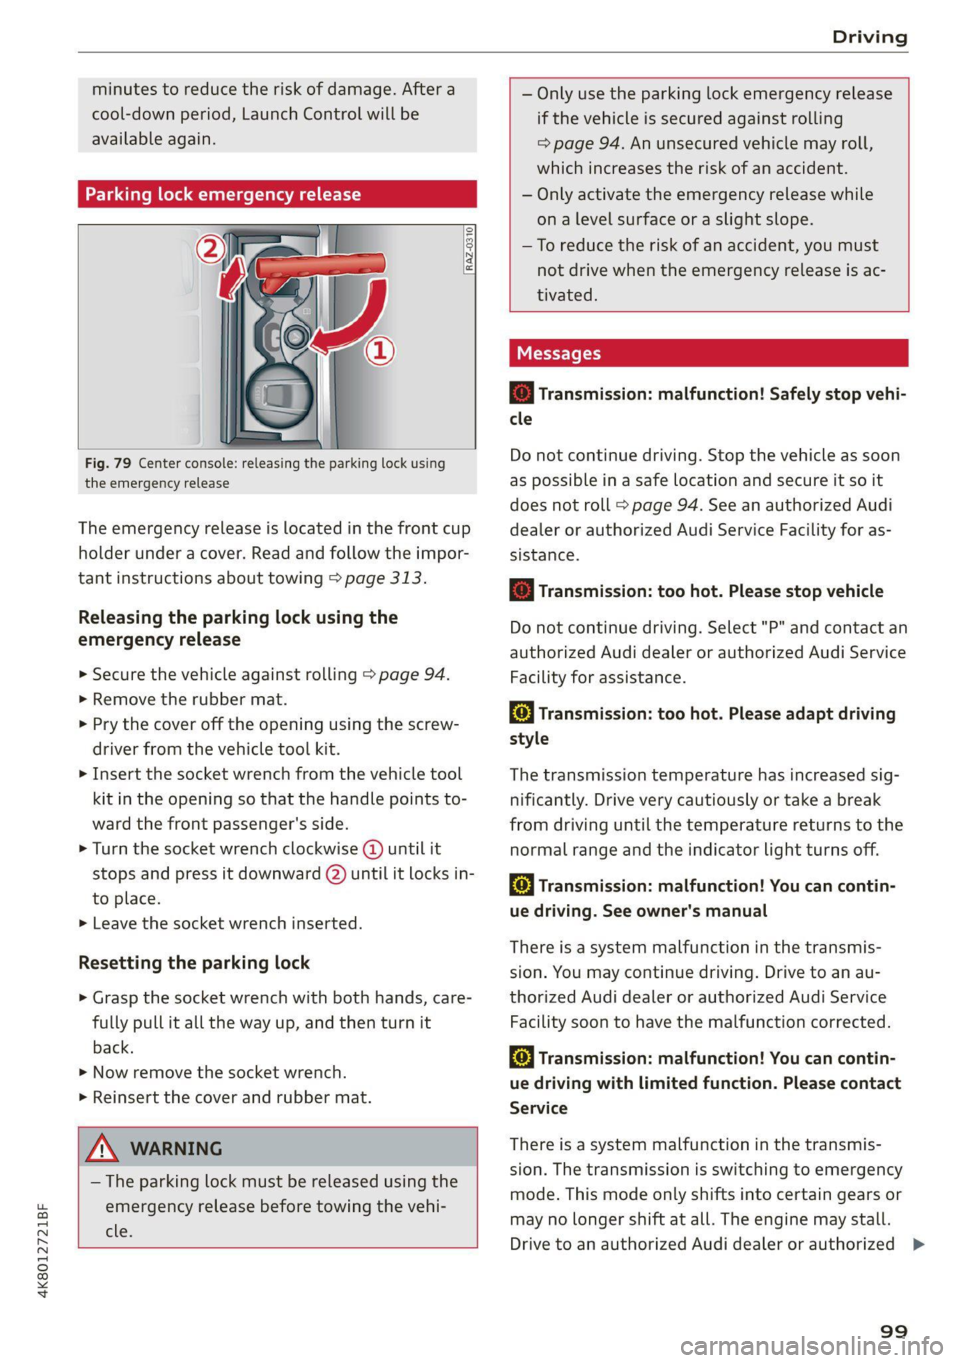
Parking lock emergency release
RAZ-0310)
Fig. 79 Center console: releasing the parking lock using
the emergency release
The emergency release is located in the front cup
holder under a cover. Read and follow the impor-
tant instructions about towing > page 313.
Releasing the parking lock using the
emergency release
> Secure the vehicle against rolling > page 94.
» Remove the rubber mat.
> Pry the cover off the opening using the screw-
driver from the vehicle tool kit.
> Insert the socket wrench from the vehicle tool
kit in the opening so that the handle points to-
ward the front passenger's side.
> Turn the socket wrench clockwise (@ until it
stops and press it downward @) until it locks in-
to place.
>» Leave the socket wrench inserted.
Resetting the parking lock
> Grasp the socket wrench with both hands, care-
fully pull it all the way up, and then turn it
back.
> Now remove the socket wrench.
> Reinsert the cover and rubber mat.
IN WARNING
— The parking lock must be released using the
emergency release before towing the vehi-
cle.
— Only use the parking lock emergency release
if the vehicle is secured against rolling
= page 94. An unsecured vehicle may roll,
which increases the risk of an accident.
— Only activate the emergency release while
ona level surface or a slight slope.
—To reduce the risk of an accident, you must
not drive when the emergency release is ac-
tivated.
Messages
& Transmission: malfunction! Safely stop vehi-
cle
Do not continue driving. Stop the vehicle as soon
as possible in a safe location and secure it so it
does not roll > page 94. See an authorized Audi
dealer or authorized Audi Service Facility for as-
sistance.
oy} Transmission: too hot. Please stop vehicle
Do not continue driving. Select "P" and contact an
authorized Audi dealer or authorized Audi Service
Facility for assistance.
fs} Transmission: too hot. Please adapt driving
style
The transmission temperature has increased sig-
nificantly. Drive very cautiously or take a break
from driving until the temperature returns to the
normal range and the indicator light turns off.
[8] Transmission: malfunction! You can contin-
ue driving. See owner's manual
There is a system malfunction in the transmis-
sion. You may continue driving. Drive to an au-
thorized Audi dealer or authorized Audi Service
Facility soon to have the malfunction corrected.
fs} Transmission: malfunction! You can contin-
ue driving with limited function. Please contact
Service
There is a system malfunction in the transmis-
sion. The transmission is switching to emergency
mode. This mode only shifts into certain gears or
may no longer shift at all. The engine may stall.
Drive to an authorized Audi dealer or authorized >
99
Page 110 of 350
Driving
parking brake is set. You can release the parking
brake manually or automatically when you start
to drive.
Setting and releasing the parking brake
> Setting: pull the ©) switch.
> 1 / o appears, the parking brake is hold-
ing the vehicle. You can remove your foot from
the brake pedal.
> Releasing: when the ignition is switched on,
press and hold the brake pedal and press the ©)
button.
If the red indicator light flashes, the braking
force has not built up enough or it has decreased.
You can also secure the vehicle by selecting the
“P” gear or pressing the brake pedal. Make sure
the indicator light is off before you start driving.
Automatically releasing the parking brake
when starting to drive
Requirement: the driver's door must be closed
and the driver’s safety belt must be fastened.
> Press the accelerator pedal to start to drive.
ZA\ WARNING
—To reduce the risk of an accident, always
make sure the vehicle is situated safely
while stationary.
— If the parking brake is set, it can release au-
tomatically when the accelerator pedal is
pressed. To reduce the risk of an accident,
do not inadvertently press the accelerator
pedal and always shift into “P” when the ve-
hicle is stopped.
— If the power supply fails, you cannot set the
parking brake once it is released, or release
it if it is set. Secure the vehicle against roll-
ing before exiting the vehicle > page 94. See
an authorized Audi dealer or authorized
Audi Service Facility for assistance.
@) Tips
— On steep inclines, especially when in trailer
mode, the vehicle may roll backwards unin-
tentionally when starting to drive. To reduce
the risk of this happening, pull and hold the
©) switch while pressing the accelerator
108
pedal. If enough drive power has built up at
the wheels and the vehicle does not roll
backwards, then release the switch to start
to drive.
— If you leave the vehicle when “D” or “R” are
engaged, the parking brake will be set auto-
matically.
— Noises when the parking brake is set and re-
leased are normal and are not a cause for
concern.
— The parking brake goes through a self-test
cycle at regular intervals when the vehicle is
stopped. Any noises associated with this are
normal.
Emergency braking function
Emergency braking should only be used in an
emergency, if the standard brake pedal is mal-
functioning or obstructed. When the emergency
braking function is activated, the braking effect is
similar to a heavy braking maneuver.
> Pull and hold the ©) switch while driving.
» An audio warning signal will sound and emer-
gency braking will begin.
> If you press the accelerator pedal, emergency
braking will be canceled.
ZA\ WARNING
Heavy braking while driving through curves or
in poor road or weather conditions can cause
the vehicle to slide or the rear of the vehicle to
swerve, which increases the risk of an acci-
dent.
iia Parking brake: malfunction! Safely
stop vehicle. See owner's manual
EG / @ Parking brake: malfunction! Please
release parking brake
If one of the two messages appears, there is a
malfunction in the parking brake. If the message
appears while stationary, check if the parking
brake is released and can be reset. If this is the
case,
switch the ignition off and back on.
Page 133 of 350

4K8012721BF
High-voltage system
Indicator lights Meaning Solution
© Red The control unit has atechni- | Disconnect the charger from the power
O A Off cal malfunction. The charging | supply and reconnect it after 60 seconds.
O @B oft process has been interrupted. |If the malfunction continues, have the
@ 30 Red control unit checked by an authorized
Audi dealer or authorized Audi Service Fa-
© Off cility.
© Red The control unit has a techni- | Disconnect the charger from the power
O QO Off cal malfunction (self-test supply and reconnect it after 60 seconds.
O B oft failed). The charging process | If the malfunction continues, have the
. has been interrupted. control unit checked by an authorized
@ 0 Flashing red Audi dealer or authorized Audi Service Fa-
9 Off cility.
© Red The charging infrastructure of | Have the control unit checked by an au-
@ QC Red the power supply/household | thorized Audi dealer or authorized Audi
@ Bre connection is insufficient: the | Service Facility, and have the power sup-
O 0 of ground conductor is interrupt- | ply/household connection checked by a
ed or not present. The ground | qualified electrician. Do not use the pow-
© Off conductor monitor has inter- | er supply/household connector until the
rupted the charging process. | malfunction is corrected.
© Red The indicator light in the reset | Have the control unit replaced by an au-
@ X Red button on the control unit is | thorized Audi dealer or authorized Audi
@ & Red faulty. The charging process _| Service Facility.
@ 6 Red has been interrupted.
9 Off
O Red The control unit has detected | Press and hold the © button for at least
@ X Red residual current. The charging | two seconds. If the malfunction contin-
@ 2 Red process has been interrupted. | ues, have the control unit checked by an
@ 6 Red authorized Audi dealer or authorized Audi
Service Facility, and have the power sup-
9 Flashing red ply/household connection checked by a
qualified electrician.
O Red The charging infrastructure is | Disconnect the charger from the power
© 1 Flashing red wired incorrectly. The charging | supply. Have the power supply/household
© @ Flashing red process has been interrupted. | connection checked by a qualified electri-
© {) Flashing red can.
9 Off
O Red The control unit has atechni- | Disconnect the charger from the power
@ A Red cal malfunction. Possible supply and reconnect it after 60 seconds.
@ Bred cause of the malfunction: soft- | If the malfunction continues, have the
@ & Red ware error or the load relay control unit checked by an authorized
© Red has been switched incorrectly. | Audi dealer or authorized Audi Service Fa-
The charging process has been
interrupted.
cility, and have the power supply/house-
hold connection checked by a qualified
electrician.
131
Page 165 of 350

4K8012721BF
Driver assistance
Lane guidance - If lane guidance is also active
when adaptive cruise assist control is active, you
can switch it on or off.
Driving program - Depending on the driving pro-
gram and the distance that are set, the vehicle
handling will be adjusted from Sport to Moder-
ate and the lane guidance haptic feedback will be
adjusted.
Store last distance - The last distance that was
set will be stored after the ignition is switched
off. If the distance is not stored, distance
(time distance of approximately 1.8 seconds) is
automatically preset every time the ignition is
switched on.
Predictive control > Set speed limit - adaptation
to speed limits can be switched On or Off. Regu-
lation With tolerance can also be selected, if de-
sired. In this scenario, you may fall below or ex-
ceed the set speed in favor of increased efficien-
cy.
Predictive control > Adjustment to curves along
route - regulation based on the road ahead can
be switched Off or set individually from Slow to
Fast. The setting influences vehicle handling with
predictive control, for example the speed for
driving through curves.
Messages
Applies to: vehicles with adaptive cruise assist
a | or is displayed when there is a malfunc-
tion, the adaptive cruise assist functions may be
unavailable or limited.
A message that indicates the cause and possible
solution may appear with some displays. The
weather conditions may be too poor or a sensor
may be covered. Clean the area in front of the
sensors > page 140 and try to turn on the sys-
tems again later.
If the malfunction remains, drive to an author-
ized Audi dealer or authorized Audi Service Facili-
ty immediately to have the malfunction correct-
ed.
Applies to: vehicles with narrowed road assist
Narrow area
Depending on vehicle equipment, this message
appears in the Driver assistance display if the
adaptive cruise assist is adjusting the speed ina
narrow area, for example a construction zone.
Adaptive cruise assist: Please take over!
Adaptive cruise assist was ended, for example be-
cause the vehicle rolled backwards when starting
ona slight incline even though the system was
active. You must take over further control of the
vehicle.
Applies to: vehicles with laser scanner
Adaptive cruise assist: limited availability.
See owner's manual
This message appears when the sensor view is
limited, for example, when weather conditions
are too poor or a sensor is covered. You can
switch on the adaptive cruise assist, but certain
functions such as assistance in narrow areas will
not be available. Under certain circumstances,
some objects may be detected late or may not be
detected at all. Be especially careful. Cleaning
the area in front of the sensors > page 140 may
correct the malfunction.
163
Page 252 of 350
Additional settings
Bluetooth
> Applies to MMI: Select on the home screen:
SETTINGS > Connection settings > Bluetooth
Bluetooth
You can select a setting for visibility of the MMI
to other Bluetooth devices. To connect a new
Bluetooth device, the Visible setting must be se-
lected. If Invisible is selected, a Bluetooth con-
nection will only be possible with paired devices.
If Off is selected, no Bluetooth device can be con-
nected.
Bluetooth audio player
When this function is switched on, the profile
will load automatically when your Bluetooth au-
dio player is within range.
Bluetooth name
The MMI’s Bluetooth name is displayed and can
be changed.
Factory default settings
Requirement: the ignition must be switched on.
> Applies to MMI: Select on the home screen:
SETTINGS > System maintenance > Restore
factory settings.
> Follow the system instructions.
The settings will be reset. The system will re-
start. This may take some time.
@ Tips
Make sure that not only the settings were de-
leted but also the stored data, if necessary.
Software update
Introduction
Applies to: vehicles with software update
You can update your vehicle’s software.
The functions depend on the country and vehicle
equipment:
— Update through the online system update
=> page 250.
250
— Map material update for the navigation system
=> page 224.
— Have the software update performed by an au-
thorized Audi dealer or authorized Audi Service
Facility. This can result in additional costs.
ZA\ WARNING
— Perform the installation only when the vehi-
cle is stationary. Otherwise, this increases
the risk of an accident
— If the installation fails, contact an author-
ized Audi dealer or authorized Audi Service
Facility immediately to have the malfunction
corrected.
Online system update
Applies to: vehicles with online system update
With the online system update, you can update
the software directly in the vehicle.
Requirement: the MMI must be connected to the
Internet > page 208, Audi connect.
Downloading updates
Requirement: notification for an online system
update will appear in the upper display.
> Press on the notification, or
> Open the notification in the notification center
on > page 24 and press on the notification.
> Follow the system instructions.
You can also check manually if an update is avail-
able.
> Applies to: MMI: Select on the home screen:
SETTINGS > System maintenance > Software
update > Search for updates > desired update
> Continue.
> Follow the system instructions.
The
MMI will start the download. You can check
the status of the download process in the notifi-
cation center > page 24.
Installing updates
Requirement: an online system update must be
downloaded and a notification must be shown in
the upper display.
> Stop the vehicle safely.
Page 275 of 350

4K8012721BF
Checking and Filling
Messages
g Please add washer fluid
Fill the washer fluid for the windshield washer
system and the headlight washer system* when
the ignition is switched off.
@ Note
— The concentration of anti-freezing agent
must be adjusted to the vehicle operating
conditions and the climate. A concentration
that is too high can lead to vehicle damage.
— Never add radiator anti-freeze or other addi-
tives to the washer fluid.
— Do not use a glass cleaner that contains
paint solvents, because this could damage
the paint.
Service interval display
The service interval display detects when your ve-
hicle is due for service.
The service interval display works in two stages:
— Inspection or oil change reminder: after driv-
ing acertain distance, a message appears in the
instrument cluster display each time the igni-
tion is switched on or off. The remaining dis-
tance or time is displayed briefly.
— Inspection or oil change due: if your vehicle
has reached an inspection or oil change interval
or both intervals at the same time, the mes-
sage Inspection due! or Oil change due! or Oil
change and inspection due! appears briefly af-
ter switching the ignition on or off.
Checking service intervals
You can check the remaining distance or time un-
til the next oil change or next inspection in the
Infotainment system.
Applies to MMI: Select on the home screen: VE-
HICLE > Settings & Service > Service intervals.
Resetting the indicator
An authorized Audi dealer or authorized Audi
Service Facility will reset the service interval dis-
play after performing service.
If you have changed the oil yourself, you must re-
set the oil change interval.
Applies to: MMI: To reset the display, select on
the home screen: VEHICLE > Settings & Service
> Service intervals.
@) Note
— Only reset the oil change indicator if the oil
was changed.
— Following the service intervals is critical to
maintaining the service life and value of
your vehicle, especially the engine. Even if
the mileage on the vehicle is low, do not ex-
ceed the time for the next service.
273
Page 342 of 350
Index
OPenatintg’s « exsaces wo wees so wsuoes ov smsaaee ao 220
Setting the destination................ 219
MAP
refer to Message Access Profile......... 205
Map preview. ....... 0. c cece eee eee 219
Map update............ 0. ee eee eee eee 224
MYAUGi app = eeu: ss eens se ees ee wes ae 225
OMMING « serene « 8 waves +o wea © wera ¥ wa a 6 224
USB connection...........050 eee e eee 225
Massage function.......... 0.002 e eee eee 64
Front... 2... cee eee eee eee 65
Mechanical key...........-00 00. e eee 40
Media... 0.0.0... cc cece cece ee eee 236, 239
DFIVES wc 3 2 eee 3 Hawes 5 Y RaeR a 2 Bea § Eee 236
Supported formats ............-00000- 244
Media: center's « « sews x # mows 2s nam 2 ¥ came 2 240
Memory functions «© eeay se eeay ee ore oy 71
Menu language
refer to Setting the language........... 249
Menu pathSiss « « sees se eee ve pews be pees ee 20
Message Access Profile...............0- 205
MeSSaQ0S:: « ¢ sins = ¢ ates & £ Saees ¢ F Heres Fee 205
Mild hybrid drive system...... 0... e eee 100
Mirror compasS..... 2... .0 eee eee eee eee 61
Mirrors
Adjusting exterior mirrors.............-. 57:
DIMMING « = ses oo eee v wom sv me a a ee 58
VaNityeQUPNOR’s comers » + exstioze 0 © aanzace » 6 anaeue oo 59
MMI
refer to Multi Media Interface........... 21
Mobile device
referto Telephone...........-.0eee00 197
Mobile device reminder signal............ 201
Mountain passes.................0.00. 109
Mountain roads..................00008 109
Multifunction steering wheel
Buttons... 0... 02... eee 13, 32
Operating’: « sce 5 ¢ wwe « x ome so ewe & 2 Os 13
Programming buttons...............0.- 32
Voice recognition system.............-. 29
Multi Media Interface................... 21
Menus and symbols..............2+-00- 22
Operating’: « secs 6 wen oo maw oo wee 5 19,22
Switching the displays on or off.......... 21
AUC Ges os csensins = suateans % 5, samme i ot semniens ot ners 32
MYAUGL « « ccsitiss oo coveens vw eescons oo evans & we 33,209
myAudi navigation................. 216, 219
MYAUGI USERS 6 & seccens oo saves vo mecein wo eae as 33
N
NaTrOW Aras esis ss news se eee & eres ae BE 163
Natural leather care and cleaning......... 302
NaVIGStiON « = zeus = wee sv wee ss nemE eee 216
Better route sissoa 2 sawn = men 2 2 maven 6 3 v0 226
Calling... 2... eee eee eee eee ee 219
Changing the scale..........ceeeeveee 219
also refer to Map. = swe. 2 even 2s een eve 220
Navigation database
Version information...............00- 252
Navigation (instrument cluster) .......... 222
ee ee ee ee 83
NHISAs « « ewe » ¢ cen 2 e cows o ews 2 ewe 328
Night vision assist...............-.0.000- 148
Cleaning the camera... ve6. 6s cee ee eee 299
Notification center...............2-.000. 24
Oo
Octane rating (gasoline)................ 254
OdoMtieter’s « seve. ss seme e ome a e eee ve ee 16
Resetting eva v x seas « sworn oo comes wo weno 16
Office address
refer to Business address...........005 222
OFF (climate control system) .............. 88
Oil
referto Engine oil..............00000. 262
On-board computer.............000-0 00s 17
On Board Diagnostic System (OBD)... 259, 321
Online map
refer to Satellite map...............-. 223
Online radio.............. 0.00. e eee eee 232
also refer to Online radio.......... 232, 233
Online roadside assistance.............. 214
Online services
PefeF tO CONNEC ss = xaea ss ewe ee Hae ze: 208
Online system update.................. 250
Online traffic information............... 225
Opening 36
Automatic luggage compartment lid...... 44
Convenience opening................... 48
Fuel filler door... .... eee eee eee eee 256
Hood... 12... . eee eee eee ee 261