coolant AUDI A8 1998 D2 / 1.G AHA ATQ Engines Cooling System Components Owner's Manual
[x] Cancel search | Manufacturer: AUDI, Model Year: 1998, Model line: A8, Model: AUDI A8 1998 D2 / 1.GPages: 40, PDF Size: 0.77 MB
Page 24 of 40
19-20
Coolant pump, removing and installing
Notes:
Always replace seals and gaskets.
Cover the toothed belt with a cloth to protect it
from coolant before removing the coolant pump.
Removing
- Remove front bumper.
Repair Manual, Body Exterior, Repair Group
63
- Move lock carrier into service position.
Repair Manual, Body Exterior, Repair Group
50
- Remove ribbed belt page 13
-8 .
- Remove toothed belt page 13
-12
.
Pa
ge 24 of 40 Coolin
g system com
ponents, removin
g and installin
g
11/21/2002 htt
p://127.0.0.1:8080/audi/servlet/Dis
play?action=Goto&t
yp
e=re
pair&id=AUDI.B5.GE03.19.1
Page 25 of 40
- Drain coolant page 19
-11
.
Pa
ge 25 of 40 Coolin
g system com
ponents, removin
g and installin
g
11/21/2002 htt
p://127.0.0.1:8080/audi/servlet/Dis
play?action=Goto&t
yp
e=re
pair&id=AUDI.B5.GE03.19.1
Page 26 of 40
19-21
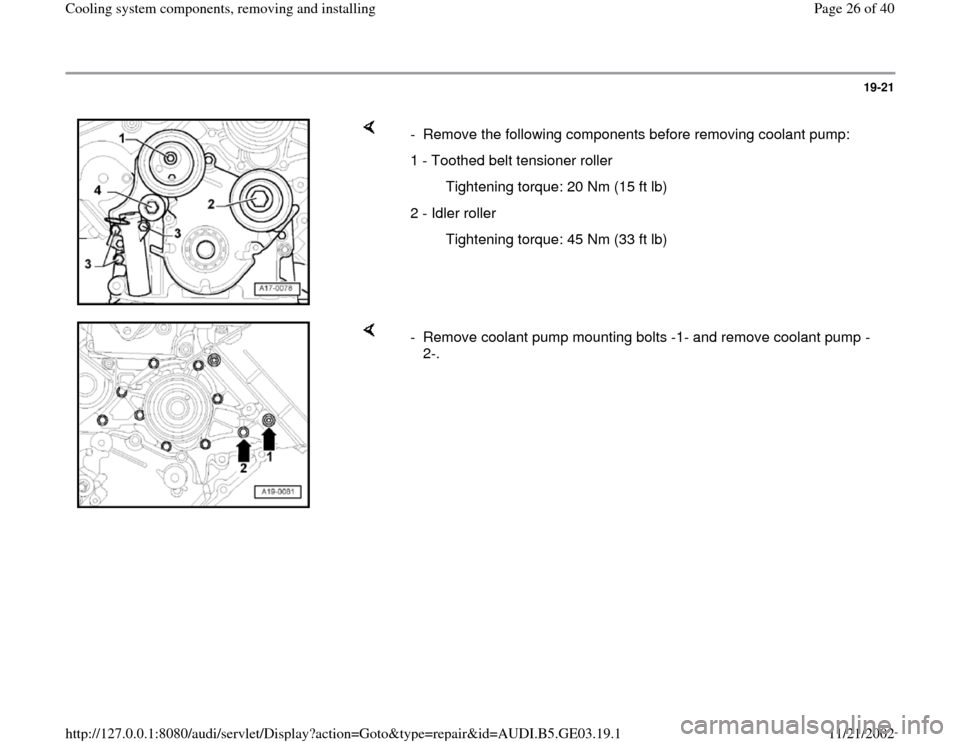
- Remove the following components before removing coolant pump:
1 - Toothed belt tensioner roller
Tightening torque: 20 Nm (15 ft lb)
2 - Idler roller
Tightening torque: 45 Nm (33 ft lb)
- Remove coolant pump mounting bolts -1- and remove coolant pump -
2-.
Pa
ge 26 of 40 Coolin
g system com
ponents, removin
g and installin
g
11/21/2002 htt
p://127.0.0.1:8080/audi/servlet/Dis
play?action=Goto&t
yp
e=re
pair&id=AUDI.B5.GE03.19.1
Page 27 of 40
19-22
Installing
Installation is the reverse of removal, noting the
following:
- Remove any remaining sealant from sealing
surfaces of coolant pump and cylinder block.
- Clean sealing surfaces so they are completely
free of any oil or grease.
- Install new gasket on water pump flange.
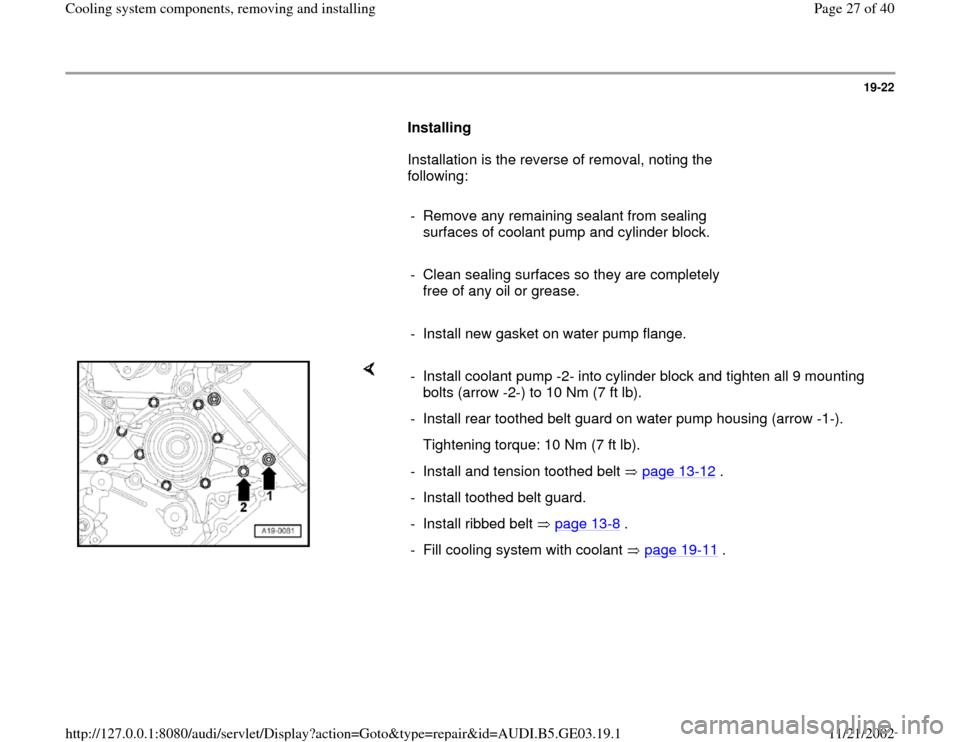
- Install coolant pump -2- into cylinder block and tighten all 9 mounting
bolts (arrow -2-) to 10 Nm (7 ft lb).
- Install rear toothed belt guard on water pump housing (arrow -1-).
Tightening torque: 10 Nm (7 ft lb).
- Install and tension toothed belt page 13
-12
.
- Install toothed belt guard.
- Install ribbed belt page 13
-8 .
- Fill cooling system with coolant page 19
-11
.
Pa
ge 27 of 40 Coolin
g system com
ponents, removin
g and installin
g
11/21/2002 htt
p://127.0.0.1:8080/audi/servlet/Dis
play?action=Goto&t
yp
e=re
pair&id=AUDI.B5.GE03.19.1
Page 28 of 40
19-23
Thermostat, removing and installing
Notes:
Always replace seals and gaskets.
Cover the toothed belt with a cloth to protect it
from coolant before removing thermostat.
Removing
- Drain coolant page 19
-11
.
- Remove front bumper.
Repair Manual, Body Exterior, Repair Group
63
Lock carrier in service position
Repair Manual, Body Exterior, Repair Group
50
- Remove ribbed belt page 13
-8 .
Pa
ge 28 of 40 Coolin
g system com
ponents, removin
g and installin
g
11/21/2002 htt
p://127.0.0.1:8080/audi/servlet/Dis
play?action=Goto&t
yp
e=re
pair&id=AUDI.B5.GE03.19.1
Page 30 of 40
19-24
Installing
Installation is the reverse of removal, noting the
following:
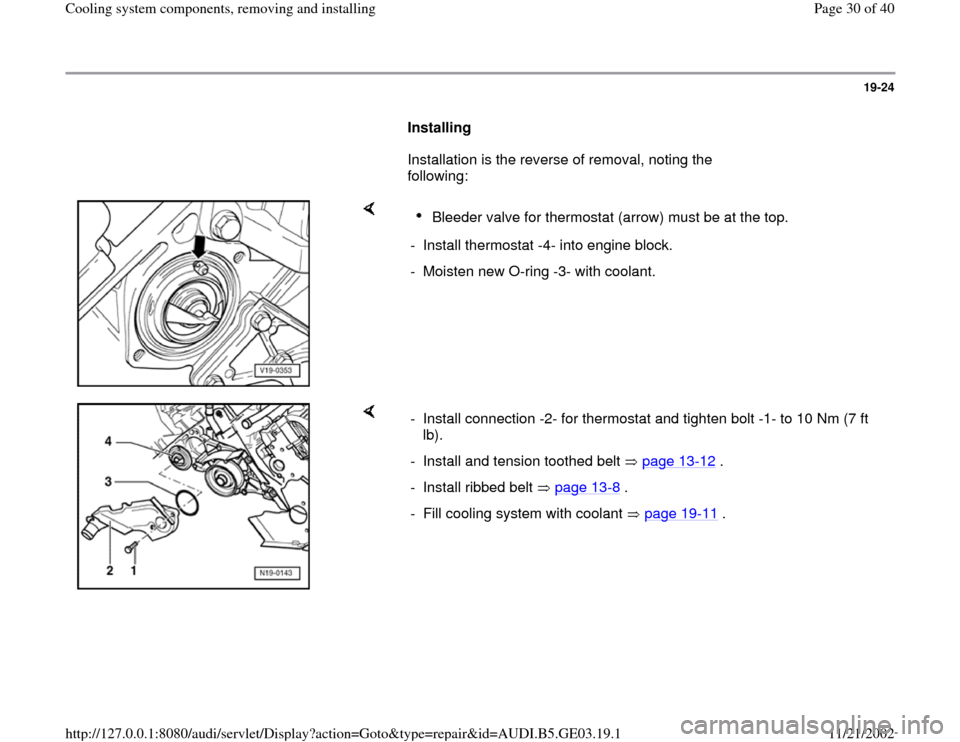
Bleeder valve for thermostat (arrow) must be at the top.
- Install thermostat -4- into engine block.
- Moisten new O-ring -3- with coolant.
- Install connection -2- for thermostat and tighten bolt -1- to 10 Nm (7 ft
lb).
- Install and tension toothed belt page 13
-12
.
- Install ribbed belt page 13
-8 .
- Fill cooling system with coolant page 19
-11
.
Pa
ge 30 of 40 Coolin
g system com
ponents, removin
g and installin
g
11/21/2002 htt
p://127.0.0.1:8080/audi/servlet/Dis
play?action=Goto&t
yp
e=re
pair&id=AUDI.B5.GE03.19.1
Page 32 of 40
19-26
Coolant fan, checking
Test requirements
Test procedure
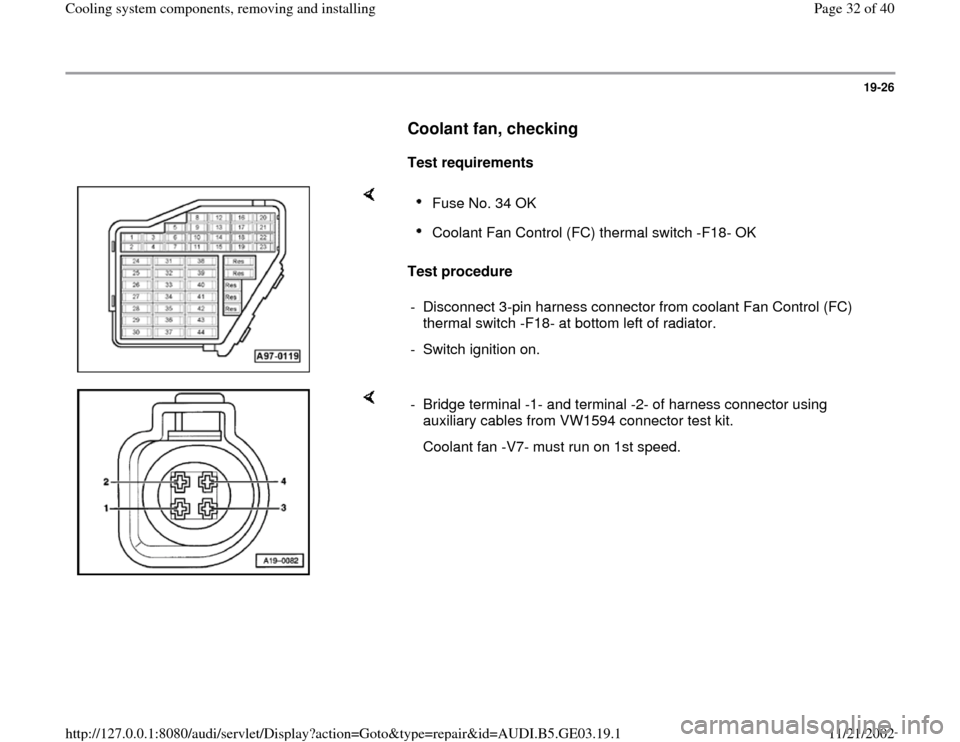
Fuse No. 34 OK Coolant Fan Control (FC) thermal switch -F18- OK
- Disconnect 3-pin harness connector from coolant Fan Control (FC)
thermal switch -F18- at bottom left of radiator.
- Switch ignition on.
- Bridge terminal -1- and terminal -2- of harness connector using
auxiliary cables from VW1594 connector test kit.
Coolant fan -V7- must run on 1st speed.
Pa
ge 32 of 40 Coolin
g system com
ponents, removin
g and installin
g
11/21/2002 htt
p://127.0.0.1:8080/audi/servlet/Dis
play?action=Goto&t
yp
e=re
pair&id=AUDI.B5.GE03.19.1
Page 33 of 40
19-27
If 1st or 2nd fan speed does not run:
Electrical Wiring Diagrams, Troubleshooting & Component Locations
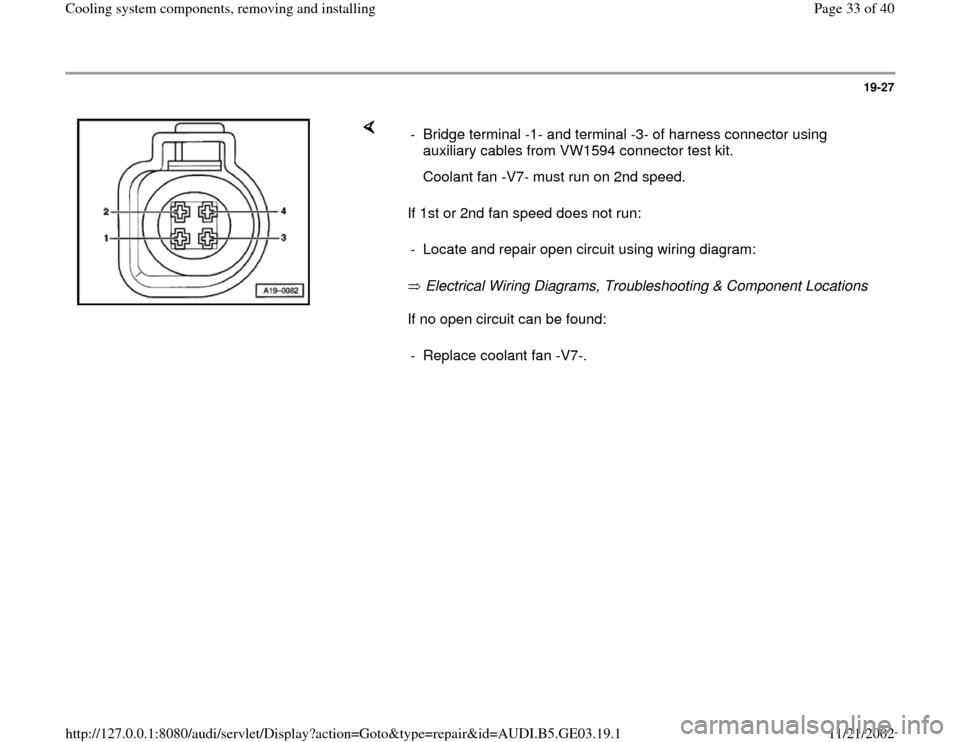
If no open circuit can be found: - Bridge terminal -1- and terminal -3- of harness connector using
auxiliary cables from VW1594 connector test kit.
Coolant fan -V7- must run on 2nd speed.
- Locate and repair open circuit using wiring diagram:- Replace coolant fan -V7-.
Pa
ge 33 of 40 Coolin
g system com
ponents, removin
g and installin
g
11/21/2002 htt
p://127.0.0.1:8080/audi/servlet/Dis
play?action=Goto&t
yp
e=re
pair&id=AUDI.B5.GE03.19.1
Page 34 of 40
19-28
Cooling system, pressure test
Engine at operating temperature
WARNING!
The cooling system is pressurized when the
engine is warm. When opening the expansion
tank, wear gloves and other appropriate
protection, cover the cap with a cloth and
open carefully to relieve system pressure
slowly.
- Open cap on coolant expansion tank.
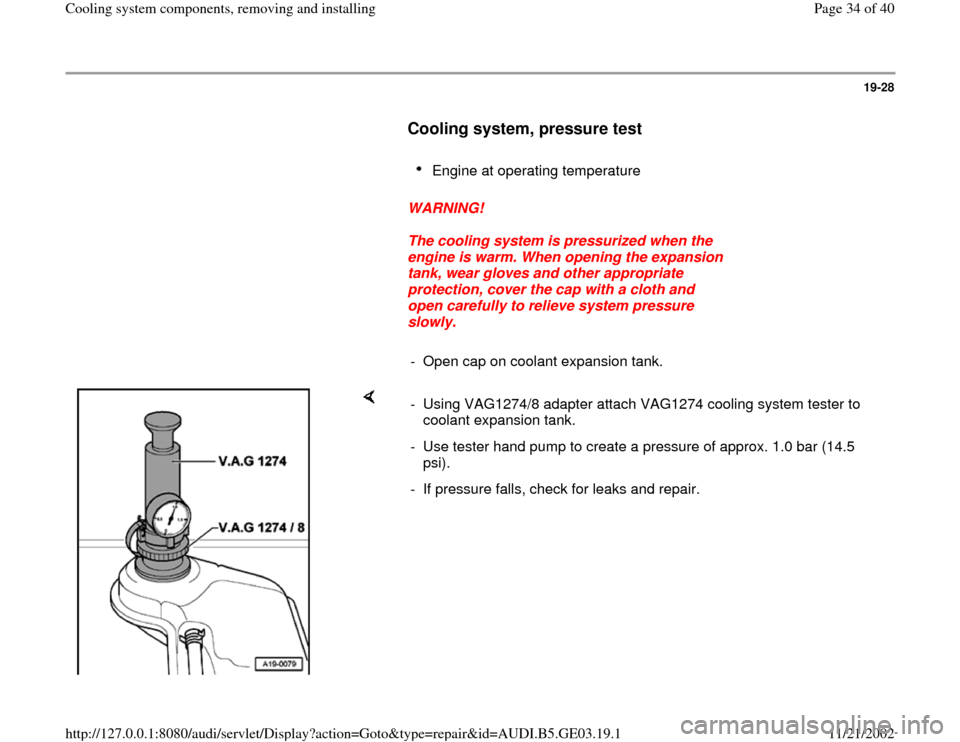
- Using VAG1274/8 adapter attach VAG1274 cooling system tester to
coolant expansion tank.
- Use tester hand pump to create a pressure of approx. 1.0 bar (14.5
psi).
- If pressure falls, check for leaks and repair.
Pa
ge 34 of 40 Coolin
g system com
ponents, removin
g and installin
g
11/21/2002 htt
p://127.0.0.1:8080/audi/servlet/Dis
play?action=Goto&t
yp
e=re
pair&id=AUDI.B5.GE03.19.1
Page 36 of 40
19-30
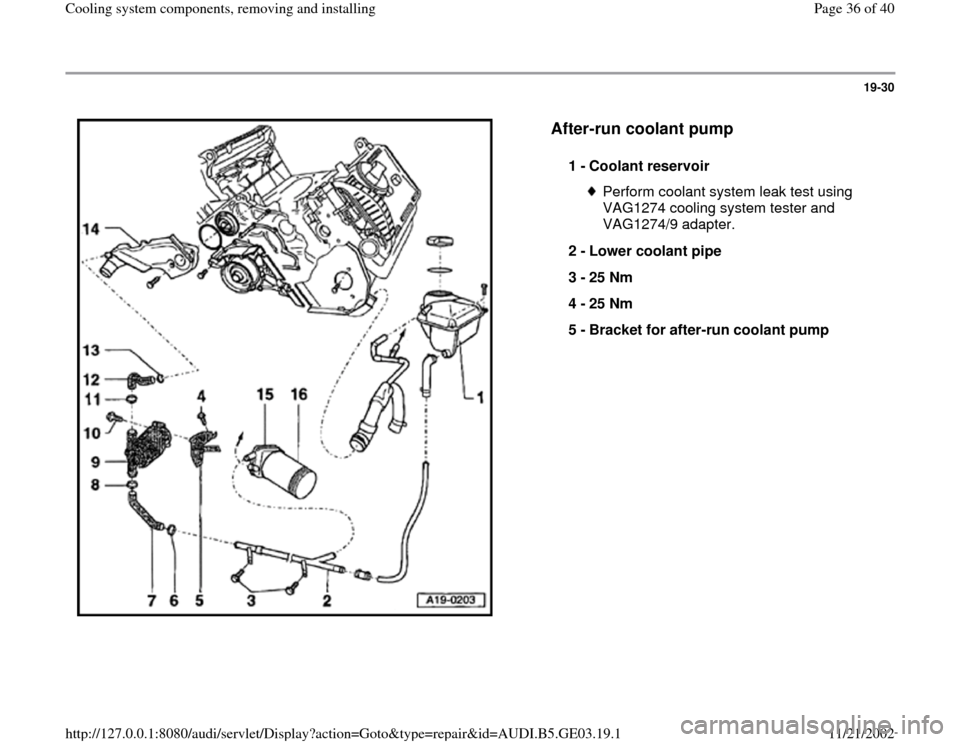
After-run coolant pump
1 -
Coolant reservoir
Perform coolant system leak test using
VAG1274 cooling system tester and
VAG1274/9 adapter.
2 -
Lower coolant pipe
3 -
25 Nm
4 -
25 Nm
5 -
Bracket for after-run coolant pump
Pa
ge 36 of 40 Coolin
g system com
ponents, removin
g and installin
g
11/21/2002 htt
p://127.0.0.1:8080/audi/servlet/Dis
play?action=Goto&t
yp
e=re
pair&id=AUDI.B5.GE03.19.1