oil AUDI A8 1999 D2 / 1.G AHA ATQ Engines Cylinder Block Crankshaft And Flywheel Component Service Manual
[x] Cancel search | Manufacturer: AUDI, Model Year: 1999, Model line: A8, Model: AUDI A8 1999 D2 / 1.GPages: 33, PDF Size: 0.75 MB
Page 1 of 33
13-4
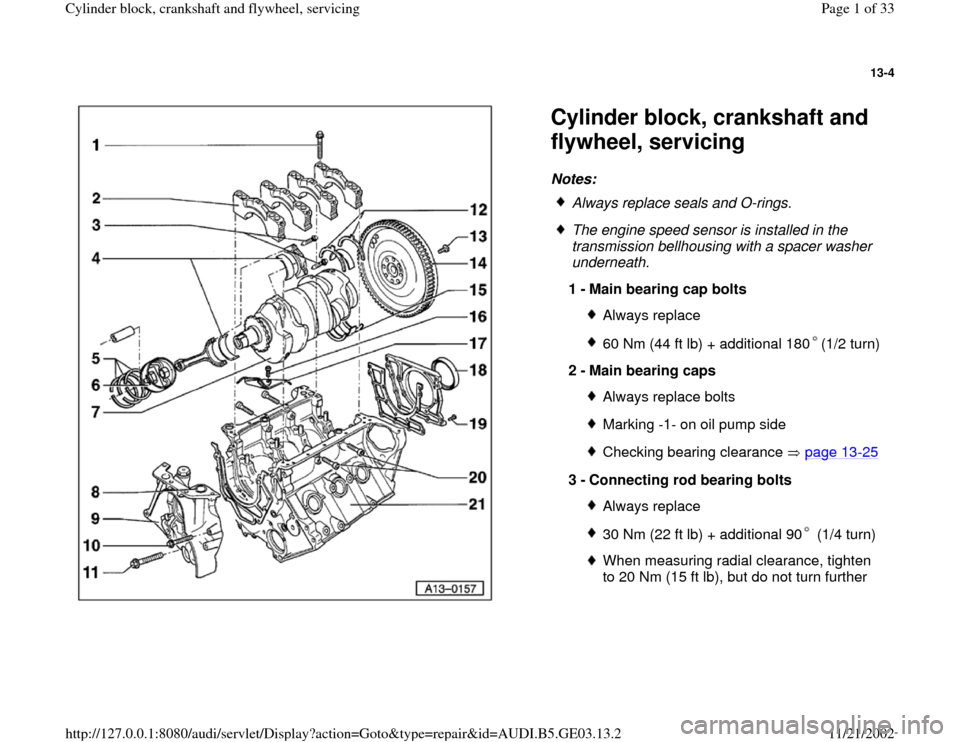
Cylinder block, crankshaft and
flywheel, servicing Notes:
Always replace seals and O-rings.
The engine speed sensor is installed in the
transmission bellhousing with a spacer washer
underneath.
1 -
Main bearing cap bolts
Always replace60 Nm (44 ft lb) + additional 180 (1/2 turn)
2 -
Main bearing caps
Always replace boltsMarking -1- on oil pump sideChecking bearing clearance page 13
-25
3 -
Connecting rod bearing bolts
Always replace30 Nm (22 ft lb) + additional 90 (1/4 turn)When measuring radial clearance, tighten
to 20 Nm (15 ft lb), but do not turn further
Pa
ge 1 of 33 C
ylinder block, crankshaft and fl
ywheel, servicin
g
11/21/2002 htt
p://127.0.0.1:8080/audi/servlet/Dis
play?action=Goto&t
yp
e=re
pair&id=AUDI.B5.GE03.13.2
Page 2 of 33
13-5
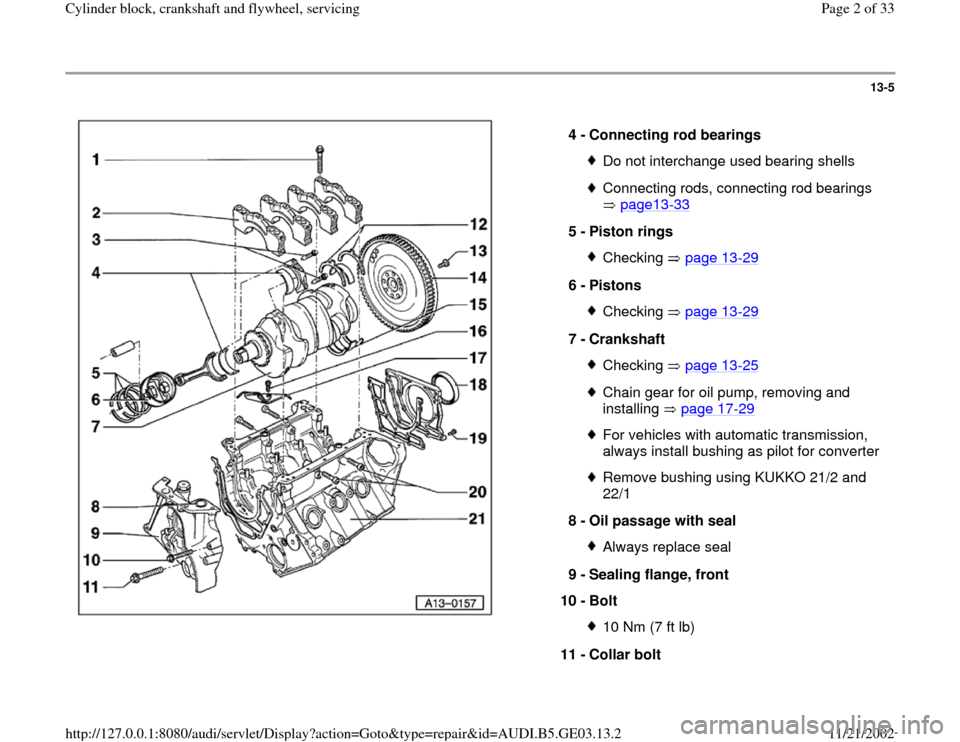
4 -
Connecting rod bearings
Do not interchange used bearing shellsConnecting rods, connecting rod bearings
page13
-33
5 -
Piston rings
Checking page 13
-29
6 -
Pistons
Checking page 13
-29
7 -
Crankshaft
Checking page 13
-25
Chain gear for oil pump, removing and
installing page 17
-29
For vehicles with automatic transmission,
always install bushing as pilot for converter Remove bushing using KUKKO 21/2 and
22/1
8 -
Oil passage with seal Always replace seal
9 -
Sealing flange, front
10 -
Bolt 10 Nm (7 ft lb)
11 -
Collar bolt
Pa
ge 2 of 33 C
ylinder block, crankshaft and fl
ywheel, servicin
g
11/21/2002 htt
p://127.0.0.1:8080/audi/servlet/Dis
play?action=Goto&t
yp
e=re
pair&id=AUDI.B5.GE03.13.2
Page 4 of 33
13-6
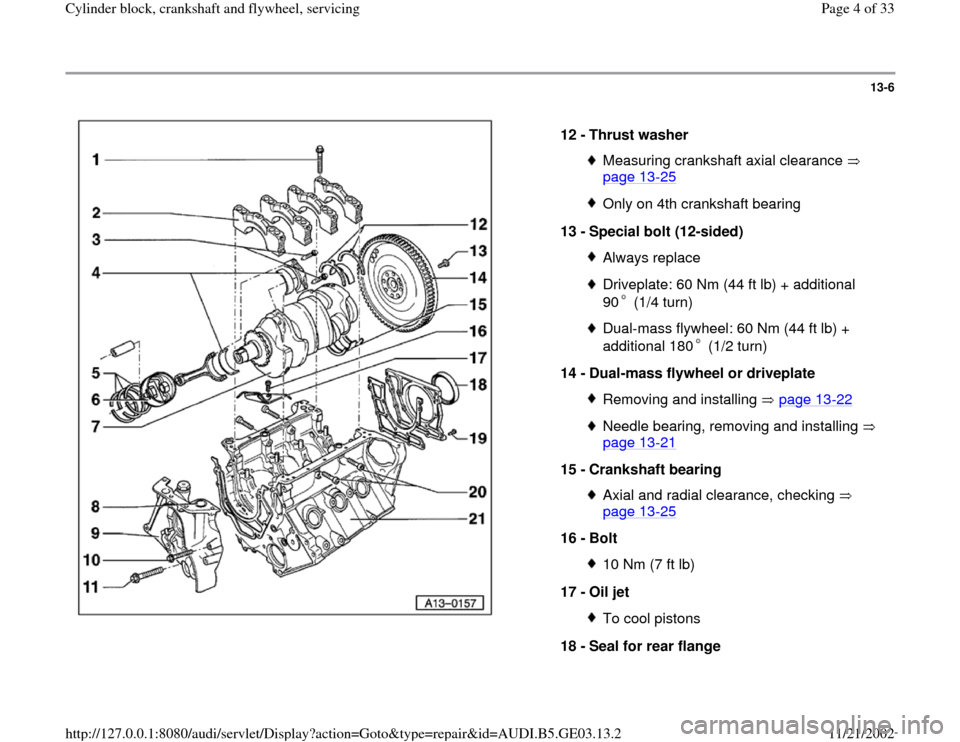
12 -
Thrust washer
Measuring crankshaft axial clearance
page 13
-25
Only on 4th crankshaft bearing
13 -
Special bolt (12-sided) Always replaceDriveplate: 60 Nm (44 ft lb) + additional
90 (1/4 turn) Dual-mass flywheel: 60 Nm (44 ft lb) +
additional 180 (1/2 turn)
14 -
Dual-mass flywheel or driveplate
Removing and installing page 13
-22
Needle bearing, removing and installing
page 13
-21
15 -
Crankshaft bearing
Axial and radial clearance, checking
page 13
-25
16 -
Bolt
10 Nm (7 ft lb)
17 -
Oil jet To cool pistons
18 -
Seal for rear flange
Pa
ge 4 of 33 C
ylinder block, crankshaft and fl
ywheel, servicin
g
11/21/2002 htt
p://127.0.0.1:8080/audi/servlet/Dis
play?action=Goto&t
yp
e=re
pair&id=AUDI.B5.GE03.13.2
Page 13 of 33
13-14
CAUTION!
Before removing ribbed belt, note direction of rotation with chalk or
felt-tip marker. Reversing the direction of rotation of a used belt can
destroy the belt. When installing the ribbed belt, make sure it is
seated correctly on the pulley.
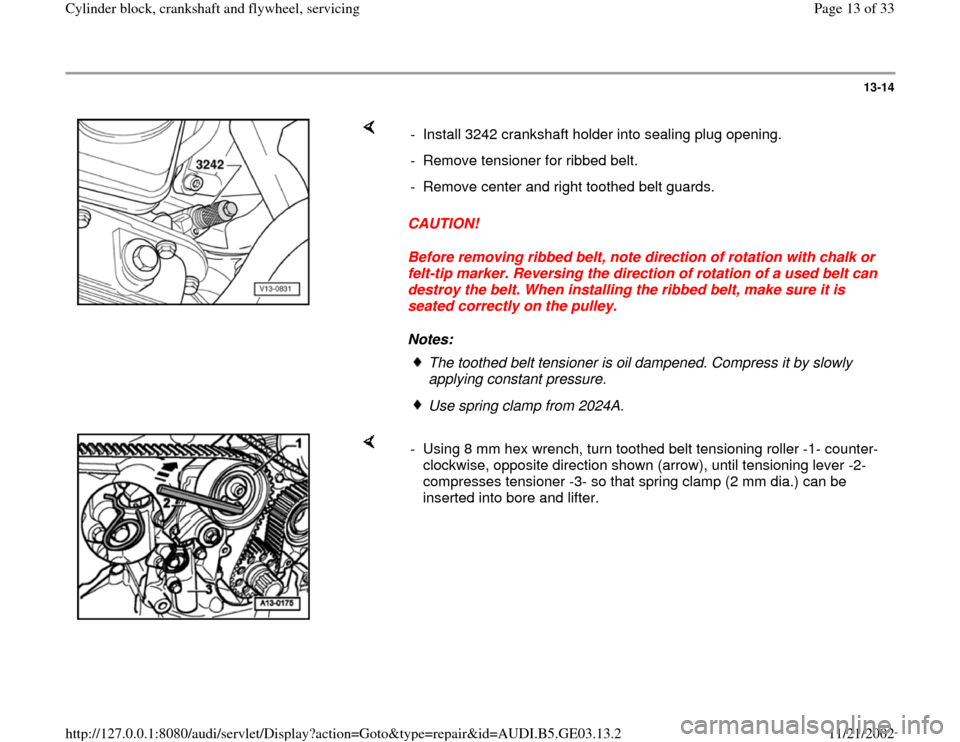
Notes: - Install 3242 crankshaft holder into sealing plug opening.
- Remove tensioner for ribbed belt.
- Remove center and right toothed belt guards.
The toothed belt tensioner is oil dampened. Compress it by slowly
applying constant pressure. Use spring clamp from 2024A.
- Using 8 mm hex wrench, turn toothed belt tensioning roller -1- counter-
clockwise, opposite direction shown (arrow), until tensioning lever -2-
compresses tensioner -3- so that spring clamp (2 mm dia.) can be
inserted into bore and lifter.
Pa
ge 13 of 33 C
ylinder block, crankshaft and fl
ywheel, servicin
g
11/21/2002 htt
p://127.0.0.1:8080/audi/servlet/Dis
play?action=Goto&t
yp
e=re
pair&id=AUDI.B5.GE03.13.2
Page 18 of 33
13-19
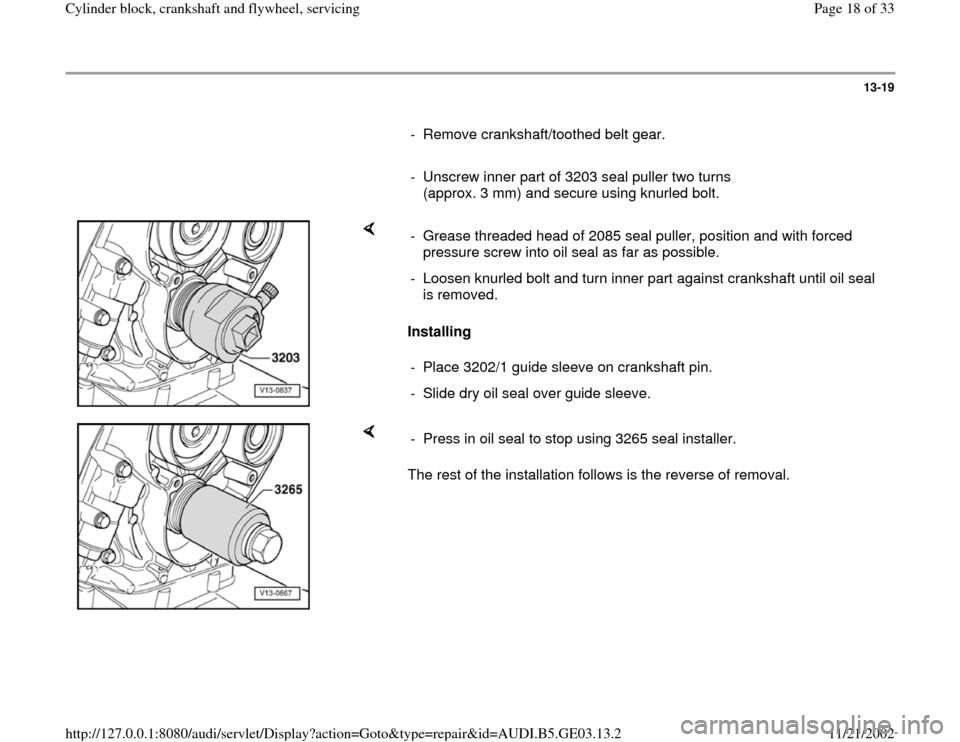
- Remove crankshaft/toothed belt gear.
- Unscrew inner part of 3203 seal puller two turns
(approx. 3 mm) and secure using knurled bolt.
Installing - Grease threaded head of 2085 seal puller, position and with forced
pressure screw into oil seal as far as possible.
- Loosen knurled bolt and turn inner part against crankshaft until oil seal
is removed.
- Place 3202/1 guide sleeve on crankshaft pin.
- Slide dry oil seal over guide sleeve.
The rest of the installation follows is the reverse of removal. - Press in oil seal to stop using 3265 seal installer.
Pa
ge 18 of 33 C
ylinder block, crankshaft and fl
ywheel, servicin
g
11/21/2002 htt
p://127.0.0.1:8080/audi/servlet/Dis
play?action=Goto&t
yp
e=re
pair&id=AUDI.B5.GE03.13.2
Page 19 of 33
13-20
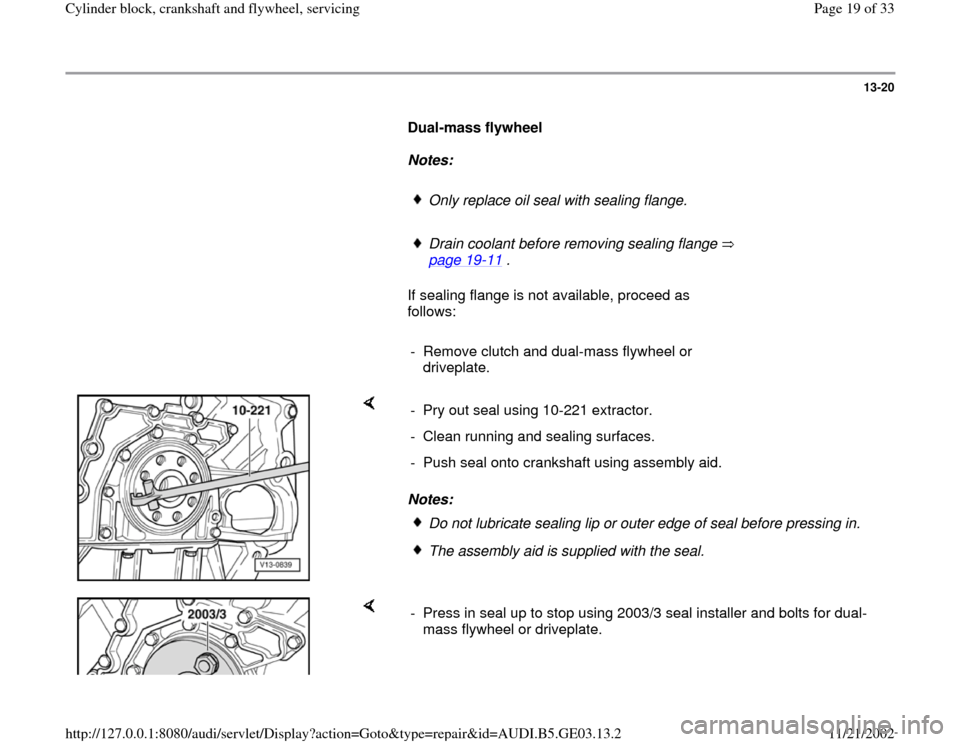
Dual-mass flywheel
Notes:
Only replace oil seal with sealing flange.
Drain coolant before removing sealing flange
page 19
-11
.
If sealing flange is not available, proceed as
follows:
- Remove clutch and dual-mass flywheel or
driveplate.
Notes: - Pry out seal using 10-221 extractor.
- Clean running and sealing surfaces.
- Push seal onto crankshaft using assembly aid.
Do not lubricate sealing lip or outer edge of seal before pressing in.The assembly aid is supplied with the seal.
- Press in seal up to stop using 2003/3 seal installer and bolts for dual-
mass flywheel or driveplate.
Pa
ge 19 of 33 C
ylinder block, crankshaft and fl
ywheel, servicin
g
11/21/2002 htt
p://127.0.0.1:8080/audi/servlet/Dis
play?action=Goto&t
yp
e=re
pair&id=AUDI.B5.GE03.13.2
Page 24 of 33
13-25
Crankshaft axial and radial clearance,
measuring
Axial clearance
CAUTION!
Bearing shells must be reinstalled in their
original location and orientation. Always label
the bearing shells according to their installed
position before removing. Never interchange
used bearing shells.
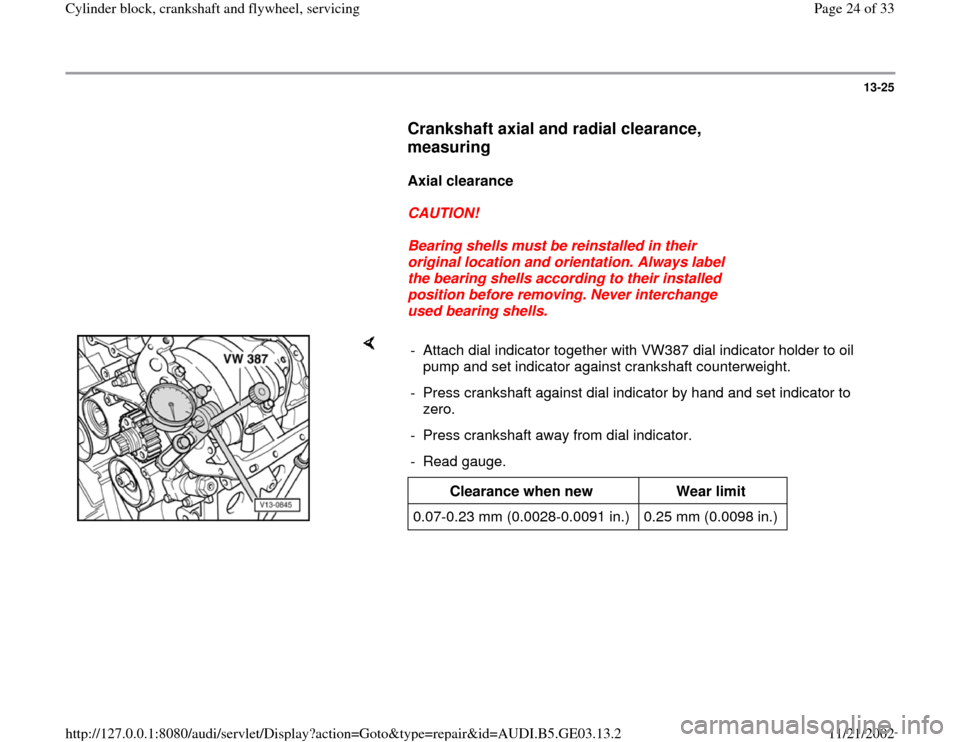
- Attach dial indicator together with VW387 dial indicator holder to oil
pump and set indicator against crankshaft counterweight.
- Press crankshaft against dial indicator by hand and set indicator to
zero.
- Press crankshaft away from dial indicator.
- Read gauge.
Clearance when new
Wear limit
0.07-0.23 mm (0.0028-0.0091 in.) 0.25 mm (0.0098 in.)
Pa
ge 24 of 33 C
ylinder block, crankshaft and fl
ywheel, servicin
g
11/21/2002 htt
p://127.0.0.1:8080/audi/servlet/Dis
play?action=Goto&t
yp
e=re
pair&id=AUDI.B5.GE03.13.2
Page 26 of 33
13-27
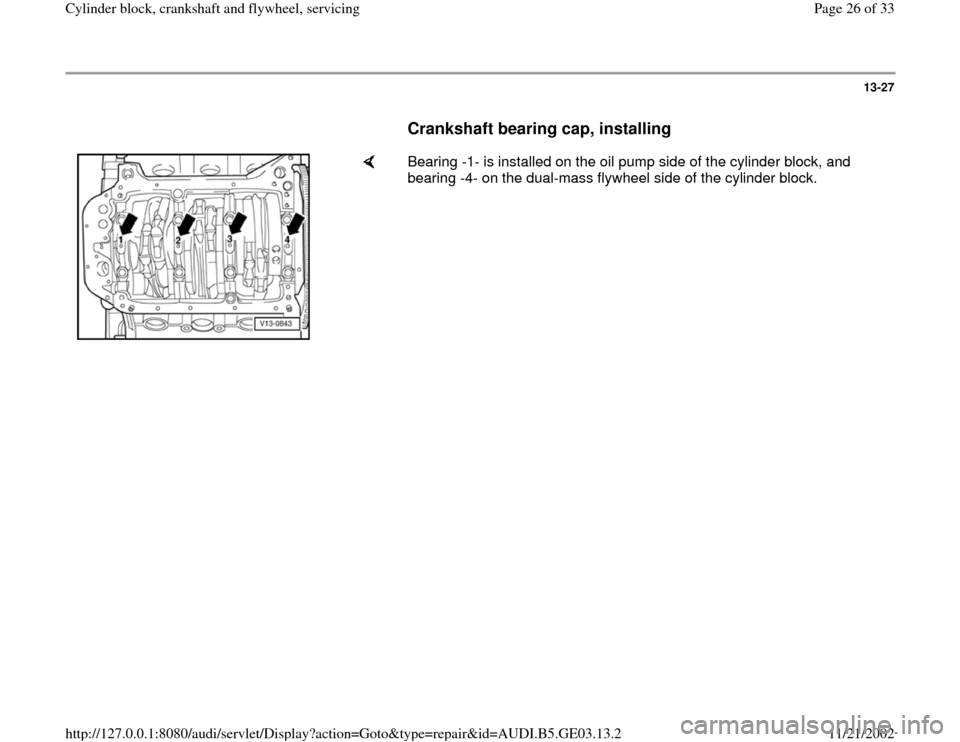
Crankshaft bearing cap, installing
Bearing -1- is installed on the oil pump side of the cylinder block, and
bearing -4- on the dual-mass flywheel side of the cylinder block.
Pa
ge 26 of 33 C
ylinder block, crankshaft and fl
ywheel, servicin
g
11/21/2002 htt
p://127.0.0.1:8080/audi/servlet/Dis
play?action=Goto&t
yp
e=re
pair&id=AUDI.B5.GE03.13.2
Page 30 of 33
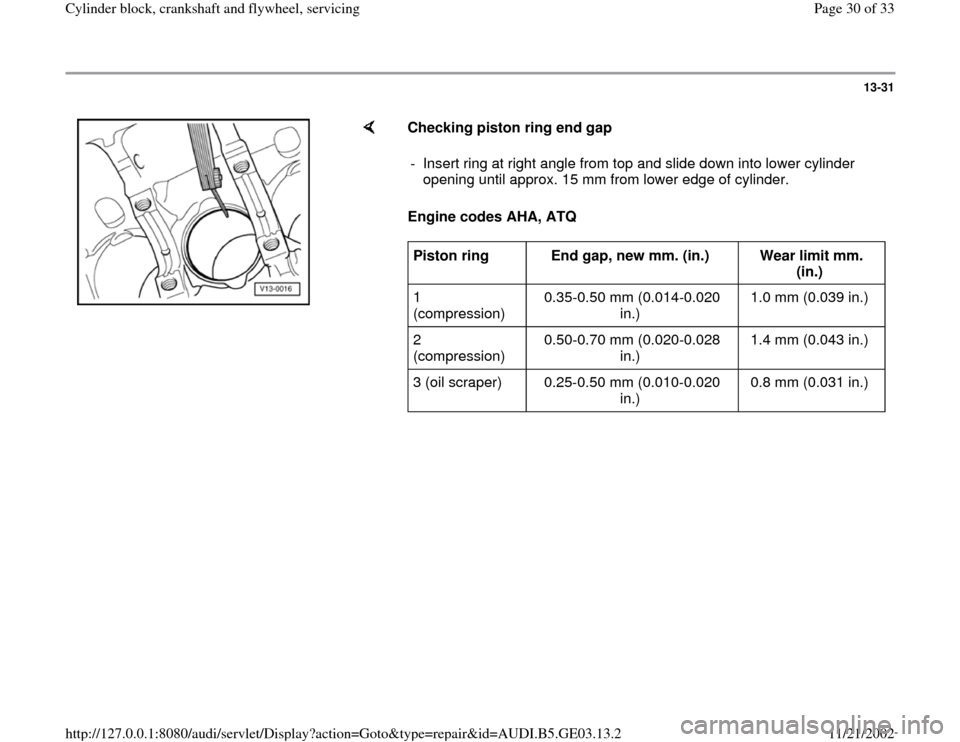
13-31
Checking piston ring end gap
Engine codes AHA, ATQ - Insert ring at right angle from top and slide down into lower cylinder
opening until approx. 15 mm from lower edge of cylinder. Piston ring
End gap, new mm. (in.)
Wear limit mm.
(in.)
1
(compression) 0.35-0.50 mm (0.014-0.020
in.) 1.0 mm (0.039 in.)
2
(compression) 0.50-0.70 mm (0.020-0.028
in.) 1.4 mm (0.043 in.)
3 (oil scraper) 0.25-0.50 mm (0.010-0.020
in.) 0.8 mm (0.031 in.)
Pa
ge 30 of 33 C
ylinder block, crankshaft and fl
ywheel, servicin
g
11/21/2002 htt
p://127.0.0.1:8080/audi/servlet/Dis
play?action=Goto&t
yp
e=re
pair&id=AUDI.B5.GE03.13.2