buttons AUDI A8 2012 User Guide
[x] Cancel search | Manufacturer: AUDI, Model Year: 2012, Model line: A8, Model: AUDI A8 2012Pages: 300, PDF Size: 75.06 MB
Page 65 of 300
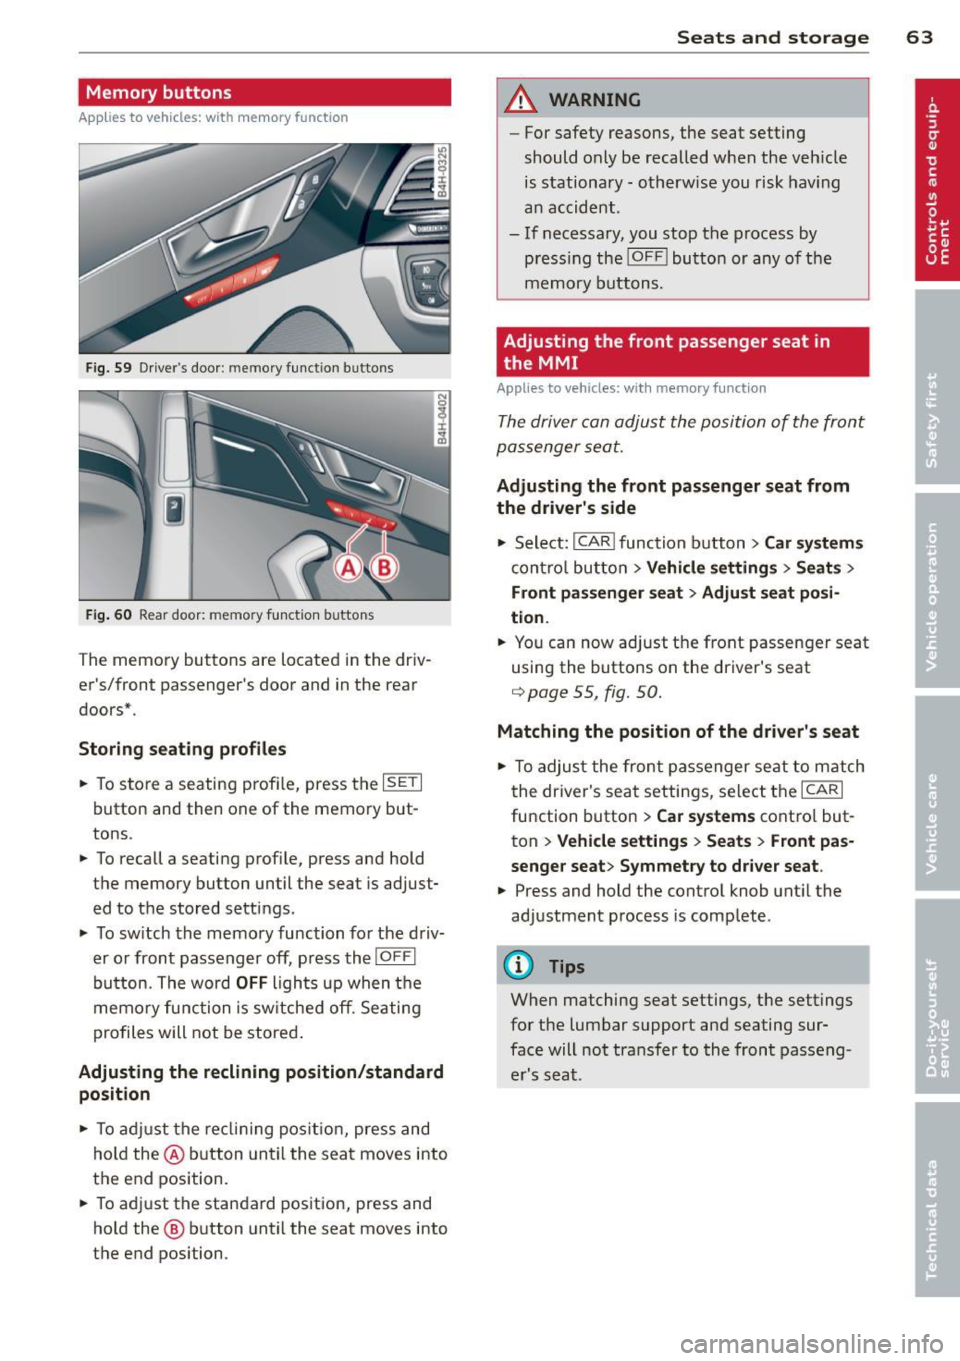
Memory buttons
Applies to vehicles: with memory function
Fig . 59 D river's door: memory function buttons
Fig. 60 Rear door: memory fun ction buttons
The memo ry buttons are located in the dr iv
er 's/fr ont passenger's door and in the rear
doors* .
Storing seating profiles
.. To s tore a seating profi le , press the ISETI
button and then one of the memo ry but
tons .
.. To recall a seati ng prof ile, press and hold
the memory button until the seat is adj ust
ed to t he sto red settings.
.. To sw itch the memo ry function fo r the driv
er o r front passenger off, p ress th e
IOFFI
button. The word OFF ligh ts up when the
memo ry fu nctio n i s s witche d off . S eating
p ro files will not be s tore d.
Adjusting the reclining position/standard
position
.. To adju st the re cl ini ng pos it ion , press and
hol d the @ button until the seat move s into
the end position .
.. To ad just t he standard pos ition, press and
ho ld the @ button until the sea t moves into
the e nd position.
Seats and storage 63
A WARNING
- For safety reasons, the seat setting
should o nly b e recalled w hen the veh icle
is st ationary -oth erw ise you risk hav ing
a n ac cid ent.
- If necessa ry, you stop the process by
press ing the
!OF F! button or any of the
m emory buttons.
Adjusting the front passenger seat in
the MMI
Applies to vehicles: with memory function
The driver can adjust the posi tion of the front
passenger seat.
Adjusting the front passenger seat from
the driver's side
.. Select: !CAR I func tion b utton> Car systems
con trol bu tton > Vehicle settings > Seat s >
Front passenger seat > Adjust seat posi
tion .
.. Yo u can now adj ust the f ront passenger seat
using the buttons on the driver's seat
<=> page 55, fig. 50.
Matching the position of the driver's seat
.. To adju st the fron t passenger se at to match
t he driver's seat settings, se lec t th e
ICARI
function button > Car systems cont ro l but
ton
> Vehicle settings > Seats > Front pas
senger seat > Symmetry to driver seat .
.. Press and hold the control knob unt il the
adjustment process is comp lete .
@ Tips
When matching seat settings, the settings
fo r the lumbar support and seating sur
face will no t tra nsfer to the front passeng
e r's seat.
Page 78 of 300

76 Warm and cold
Operation
We recommend pressing the IAU TOI button and setting the temperature to 72 °F (22 °C) .
Fig. 77 Cockp it co ntrols
F ig . 78 fou r zone automat ic cl imate co ntrol: rea r con
trols
Press the buttons to t urn the f unctions on or
off . Use the d ials to adjust the temperature,
the blower speed and the air distribution . The
LED in a button will light up when the func
tion is sw itched on. The settings are show n in
the cl imate co ntrol d isplay a nd are also shown
in the MMI display for a few seconds . The driv
er and front passenger settings ca n be ad just
ing separately.
You can a lso adjust the rear left and r ight
sides in the fo ur zone automat ic climate co n
trol* ~
fig. 78.
IO FF ! Switching the clim ate control
system on/off
The IO FFI b utton switches the climate control
system on or off . It a lso switches on when you
turn the dia l or press any b utton . Airf low from outside is blocked when the c
limate control
system is switched off .
You can a ctivate the residual hea t fu nction
when the ignition is off by p ressing and hold
i ng the ~ button . The residua l heat from the
coolant is used to heat the vehicle interior.
The residua l heat function switches off a uto
matically after about 30 minutes.
IACI Switching cooling mode on /off
T he air is not coo led and h umidity is not re
moved when cooling mode is switched off.
T his can ca use fog on the windows. Cooling
mode switches off automatically when the
outside temperature is below zero.
1 -1 Switching reci rculation mode on /off
In recircu lation mode, the air inside the vehi
cle is c irculated and f iltered. This prevents the
u nfiltered air outs ide the vehicle from enter
ing the vehicle interior . We recommend
switching recircu lation mode on when driving
t h rough a tunne l or when s itting in traff ic
q &_ .
The !AU TO I button or~ button switches reci r
cu lation mode off.
IAU TOI Switching automatic mode on
A utomat ic mode maintains a cons tant tem
perature inside the vehicle. A ir temperature,
IJli>
Page 79 of 300
airflow and air distribution are controlled au
tomatically.
Adjusting the temperature
Temperatu res between 60 °F (+16 °() and
84 °F (+28 °C) can be set. O uts ide of this
range,
lo or hi will appear in the climate con
trol system disp lay. At both of these settings,
the climate control system runs continuously
at maximum coo ling or heating power. There
is no temperature regulation.
[!] Adjusting the airflow
You can ad just the airf low manually to suit
your needs . To have the airflow regulated au
tomatically, press the
! AUTO ! button.
~ Adjusting the air distribution
You can manually se lect the vents where the
air will flow. To have the air distribution regu
l ated automatically, press the
!AUTOI button.
~ I lil* Adjusting Seat heating/
ventilation*
Pressing the button switches the seat heat
ing/ventilation on at the highest setting ( level
3). The LEDs indicate the temperature leve l.
To reduce the temperature, press the button
again . To switch the seat heating/ventilation
off, press the button repeatedly until the LED
turns off.
After 10 minutes, the seat heating/ventilation
automatically switches from level 3 to level 2.
I n vehicles without the four zone automat ic
climate contro l*, buttons in the rear center
console control the seat heating for both out
er rear seats*.
~ Switch the defroster on/off
The windsh ield and sid e windows are defrost
ed or cleared o f condensation as quickly as
possible. The maximum amount of air flows
mainly from the vents be low the windshield.
Recirculation mode switches off . The tempera
ture is controlled automatically.
The
IAU TOI button switches the defroster off.
Warm and cold 77
~ Switching rear window heater on/off
The rear window heater only operates when
the engine is running. It switches off auto
matically after 10 to 20 minutes, depending
on the outside temperature.
T o p revent the rear window heater from
switching off automatically, press and hold
the ~ button for more than 2 seconds . This
remains stored until the ignition is switched
off .
I SYNC I Synchronization*
When synchronization is switched on, the set
tings for the driver's side are applied to the
front passenger's side (except for seat heat
i ng/venti lation*) . The rear seat is also
synchronized in vehicles with the 4-zone de
luxe automatic climate control system* . Syn
chronization switches off if the sett ings are
adjusted on the front passenger's side or in
the rear* .
You can synchronize the settings in a row by
pressing and holding a knob. For example, to
apply the settings for the front passenger's s ide to the driver's side, press and hold the
knob on the front passenger's s ide.
Air vents
You can open or close the center and rear
vents in the cockpit and the vents in the rear
center console and door pillars us ing the
ridged thumbwheels. The levers adjust the di
rection of the airflow from the vents.
,&. WARNING
-Do not use the recirc ulation mode for ex
tended periods of time. The windows
could fog up since no fresh air can enter
the vehicle. If the windows fog up, press
the air recircu lation button again imme
diately to switch off the air recirculation
function or select defrost .
- Individuals w ith reduced sensitivity to
pa in or temperature could deve lop burns
when using the seat heating function . To
reduce the risk of injury, these indiv idu-
als shou ld not use seat heating. ..,.
Page 92 of 300
90 Audi adaptive cruise control and braking guard
• You must also press the brake pedal when
the vehicle is stopped.
Switching adaptive cruise control off
• Push the lever away from you into position
@ until it clicks into p lace. The message
ACC off appears.
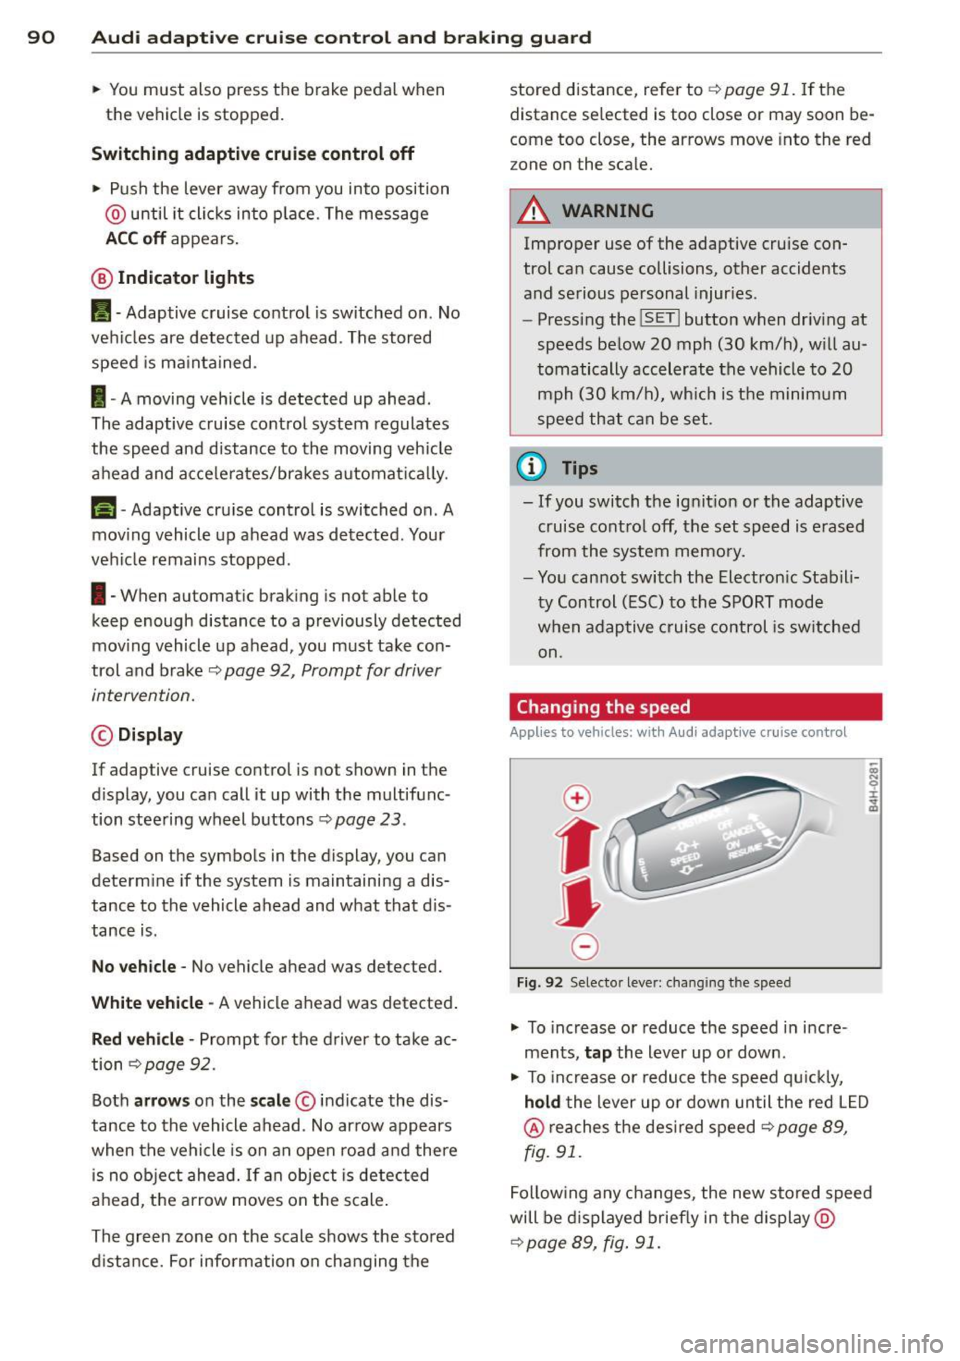
@ Indicator lights
II-Adaptive cruise control is switched on . No
vehicles are detected up ahead. The stored
speed is maintained.
I-A moving vehicle is detected up ahead .
The adaptive cruise control system regulates
the speed and d istance to the moving vehicle
ahead and acce lerates/bra kes automatica lly.
f§ . Adaptive cru ise control is switched on . A
mov ing vehicle up ahead was detected. Your
vehicle remains stopped .
I -When automatic braking is not able to
keep enough distance to a p reviously detected
mov ing vehicle up ahead, you must take con
trol and brake¢
page 92, Prompt for driver
intervention.
© Display
If adap tive cruise control is not shown in the
d isplay, you can call it up with the multifunc
tion steering wheel buttons~
page 23.
Based on the symbols in the display , you can
determ ine if the system is maintaining a dis
tance to the vehicle ahead and w hat that dis
tance is.
No vehicle -No vehicle ahead was detected.
White vehicle -A vehicle ahead was detected .
Red vehicle -Prompt for the driver to take ac
tion ¢
page 92.
Both
arrows on the scale © indicate the dis
tance to the vehicle ahead . No arrow appears
when the vehicle is on an open road and there is no object ahead. If an object is detected
ahead, the arrow moves on the scale.
The green zone on the scale shows the stored d istance. For information on changing the stored distance, refer to
¢
page 91. If the
distance se lected is too close or may soon be
come too close, the arrows move into the red
z one on the sca le.
A WARNING
Improper use of the adaptive cruise con
trol can cause collisions, other accidents
and serious personal injur ies .
- Pressing the
!SET ! button when driving at
speeds below 20 mph (30 km/h), w ill au
tomatically accelerate the vehicle to 20
mph (30 km/h), which is the minimum
speed that can be set .
(D Tips
-If you switch the ignit ion or the adaptive
cruise control off, the set speed is erased
from the system memory.
- You cannot switch the Electron ic Stabili
ty Control (ESC) to the SPORT mode
when adaptive cruise control is switched
on .
Changing the speed
Applies to vehicles: with Audi adaptive cru ise control
0
f
• 0
Fig. 92 Selecto r lever : chang ing t he spee d
• To increase or reduce the speed in incre
ments,
tap the lever up or down.
-
-a)
N
q :r
~
"' To increase or reduce the speed qu ickly,
hold the lever up or down until the red L ED
@ reaches the desired speed ¢ page 89,
fig . 91.
Following any changes, the new stored speed
will be displayed briefly in the display @
¢page 89, fig. 91.
Page 99 of 300

-The curve is too sharp.
(0 Tips
Make sure the camera's field of view
c::> fig. 98 is not obstructed by stickers, de
posits or anything e lse . For information on
cleaning, refer to
c::> page 205.
Lane assist display in the instrument
cluster
App lies to vehicles: with la ne ass ist
Fig. 99 Instrument cluste r: lane ass ist is switched on
and is wa rning
Fig. 100 Instrument clus ter: lane assist is switched on
but not ready to provide warn ings
You can call up the lane assist display using
the buttons in the mult ifunct ion steer ing
wheel
c::> page 23.
When lane assist is switched on, the system
indicates which lines are detected by display
ing solid lines on the left and/or right side of
your vehicle:
Audi lane assist 97
White line(s) Lane assist is switched on and
ready to provide warnings on
the side that is indicated
Red line
(left or right)
c::> fig. 99.
Lane assist is warning you
that you are about to leave
your lane
c::> fig. 99 .
Gray line(s} Lane assist is switched on but
is not ready to provide warn
ings
c::> fig. 100 .
Messages in the instrument cluster
display
When the lane assist turns off automatically,
the instrument cluster indicator goes out and
one of the follow ing messages appears o n the
display:
Audi lane assist: currently unavailable. No
camera view
This message appears if the camera is no lon
ger functional after the system has continous
ly failed to detect the lane markings. This
could happen if :
- The camera field of view
c::> page 96, fig. 98
is dirty or covered in ice. Clean the area on
the windshield.
- The camera field of v iew is fogged over . Wait
until the fog has cleared before switching
lane assist on .
- The system has been unable to detect the
lanes for an extended period of time due to
road conditions such as lanes covered in
snow . Sw itch lane ass ist back on when the
lines are more visible .
Audi lane assist: Currently unavailable
A temporary malfunction is preventing lane
assist from operating. Try switching lane as
sist on again later.
Audi lane assist: System fault!
Drive to your authorized Audi dealer soon to
have the malfunctio n corrected.
Page 108 of 300

106 Night vision assistant
Night vision assistant
Description
Applies to vehicles: with night v isio n ass istant
Fig. 107 Display: n ight vis ion assistant
"Night vis ion assistant with pedestrian detec
tion" uses an infrared camera to monitor the
area in front of you r vehicle at night. Within
the limits of the system, it can display objects
up to about 1000 feet (300 meters) away. The
heat image of a pedestrian detected by the
camera is shown in the instrument cluster dis
p lay ¢
fig. 107. Warm areas appear lighter
and cold areas appear darker.
Pedestrian detection
Applies to vehicles: with nig ht v isio n ass istant
Fig. 108 Display: yellow pedestr ian marking
Fig . 109 D isplay: symbol when infrared image is not
visib le
Night vision assistant can detect pedestrians
that are between about 50 and 300 feet (15
and 90 meters) in front of the vehicle, under
ideal conditions.
If a pedestr ian is detected
when it is dark outside and the vehicle head
lights are switched on, the pedestrian is high
lighted in yellow¢
fig. 108, ¢ page 107,
General information. If another display such
as navigation replaces the image from the
night vision assistant, the symbol
~11 appea rs
in a tab
¢fig . 109.
(D Tips
If the night vision assistant image does
not appear when the system is switched
on, you can access it with the buttons on
the multifunction steering wheel
¢pa ge 24.
Pedestrian warning
Applies to vehicles: wit h night vision assistant
Fig. 110 D isp lay: pedestrian warning
Fig . 111 D isp lay: pedestr ian warning w ith another dis
play
If a pedestr ian is detected in an area in fron t
of the vehicle that the system considers criti
ca l, the pedestrian is highlighted in red
¢fig . 110 and a warning tone sounds. This
area is based on the vehicle speed and
Page 124 of 300

122 Homelink®
Programming transmitters
Applies to vehicles: with Horne link
You con program the buttons in the Home
Link universal remote control located in the
v e hicle headliner.
F ig. 1 31 Co ntrol un it in the h ead liner
Fi g. 1 32 L eft front area of the bum per
Programming a button
.. Make sure your veh icle is wi thin operating
ra nge of the remo te con trolled ga rage d oor
opener.
.. Set t he parking bra ke
~ A in General infor
mation on pa ge 121 .
.. Switc h the ignition on. Do not start the en
gine!
.. The re a re two ways to program a button :
press the button that yo u would like to pro
gram . The M MI will display instruct ions to
guide yo u th rough the programm ing . O r
.,. Se lect :
ICARI f u nct io n button > Car systems
cont rol bu tton > Vehicle settings > Garage
door opener > Program garage door open
er .
.. Se lect t he b utton that yo u wo uld like to
program.
.. Follow the inst ructions in the MMI.
.. If the garage door openi ng must also be
synchronized wit h the Homel ink mod ule, refer to the owner
's manua l for the gar age
door opener .
Using the programmed button
.. Pres s th e pr og rammed butto n~ ,& in Gen
eral informati on on page 1 21
to open t he
g ar age doo r. T he li ght @ will blink or tur n
on .
.. Press t he bu tton again to close the garage
door
q A in General information on
page 121.
Erasing the button programming
.. Sele ct: I CAR I func tion b utt on > Car systems
function key > Vehicle settings > Garage
door opener > Clear program settings
>
Yes .
Displaying the version/status/country
code
.. Select: I CAR I function b utton > Car systems
contro l button > Vehicle settings > Garage
door opener > Version information .
You can program both fi xed code and ro lling
code systems using these instr uctions.
Programming a button
The re quired di stance between the hand he ld
transmit ter and the Homel ink module in the
bumpe r depe nds on the system tha t you are
programmi ng . You may have to try several
t imes.
E ach of the buttons c an be re progra mmed in
dividua lly . The proced ure is the same as fo r in
itia l prog ramming .
~page 12 2, Programming
a button.
Erasing the button programming
I n di vidu al but tons ca n b e reprogr ammed. Fol
l ow the same s teps used when fi rst prog ram
ming the butto n.
If y ou wo uld lik e to er ase all prog rammed but
t o ns at the same time, sele ct Era se bu tt on
p rogr ammi ng .
Page 125 of 300
@ Tips
-To ensure your safety, erasing the pro
grammed Homel ink buttons before sell
i ng the veh icle is recommended.
- Depending on the model of the garage
door opener, you may need to release the
button on the remote and press it again
when programming .
Homelink® 123
Page 182 of 300
180 Child Safety
Attachment locator markers for lower
anchorages
Circular locator buttons on the rear seatback
indicate the lower anchorage locations on the
rear seating positions¢
fig. 160 .
Lower anchorages
The lower anchorage attachment points are
located between the rear seatback and rear
seat cushion
¢ fig . 161.
Lower anchorages secure the child restraint in
the seat witho ut using the vehicle 's safety
belts. Anchorages provide a secure and easy
to-use attachment and minimize the possibili
ty of improper chi ld restraint installation.
All chi ld restraints manufact ured after Sep
tember 1, 2002, must have lower anchorage
attachments for the
LATCH system.
Remember that the lower anchorage points
are only intended for installation and attach
ment of child restraints specifically certified
for use with
LATCH l ower anchorages. Child
restraints that are not equipped with the low
er anchorage attachments can still be instal led in compliance with the c hild restra int
manufacturer's instructions on using vehicle
safety belts.
,&. WARNING
Improper use of LATCH lower anchorages
can cause serious personal injury in an ac
cident .
- Always carefully follow the child re
straints manufacturer's instructions for
proper installation of the child restraint
and proper use of the lower anchorages
or safety belts in your vehicle .
- Never secure or attach any luggage or
other items to the
LATCH lower ancho
rages.
-Always read and heed the important in
formation about child restraints in this
chapter and WARNINGS
¢page 166,
Child Safety.
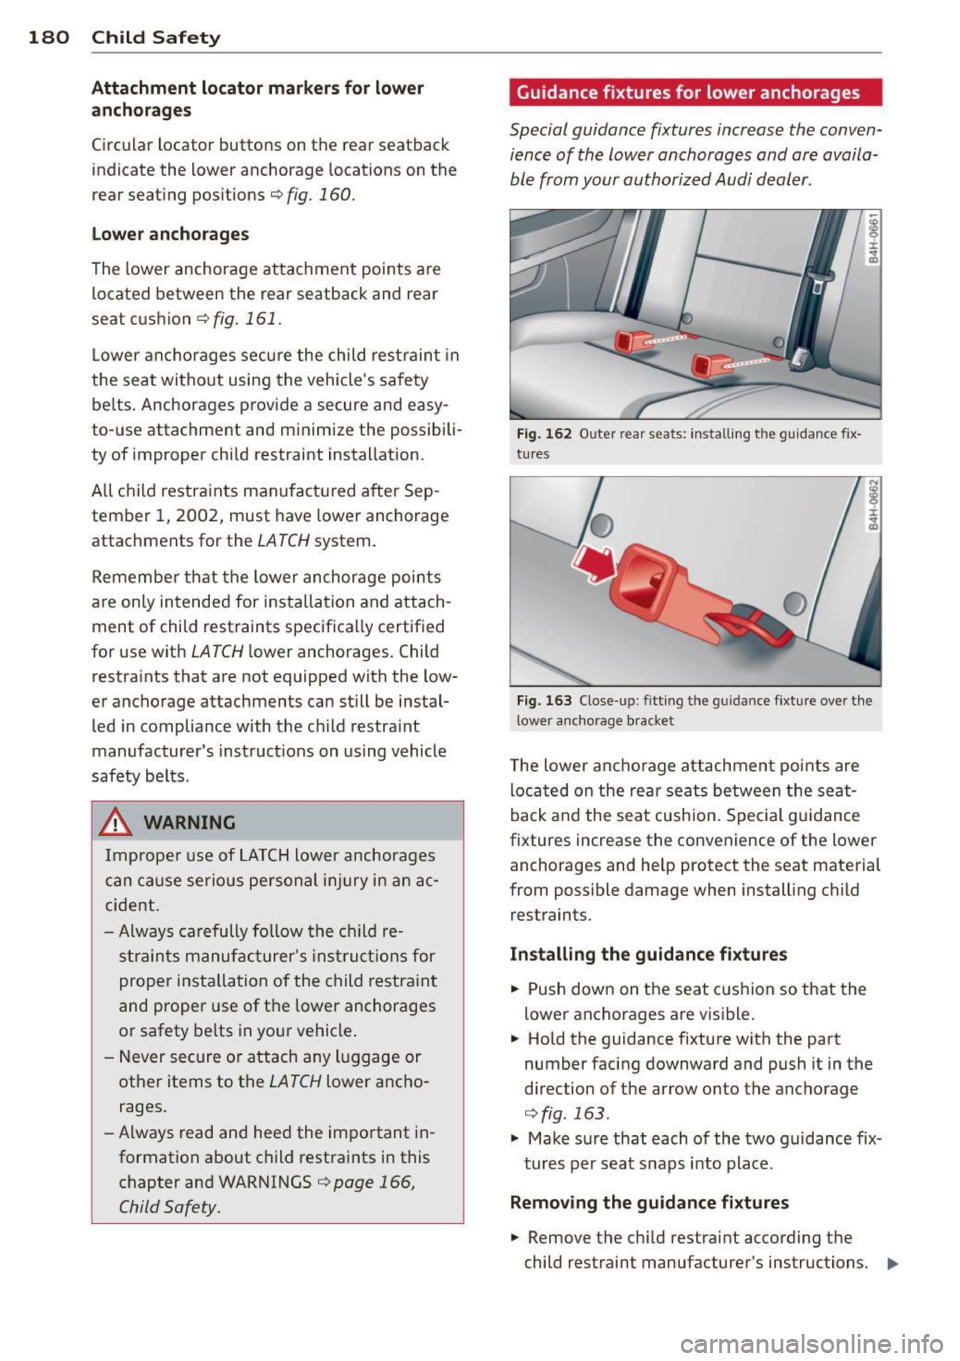
Guidance fixtures for lower anchorages
Special guidance fixtures increase the conven
ience of the lower anchorages and are availa
ble from your authorized Audi dealer.
Fig. 1 62 Outer rear seats: inst all ing th e guidanc e fix
tures
Fig . 163 Close-up: fitting th e g uida nce fixture over t he
lower anchorage bracket
T he lower anchorage attachment points are
located on the rear seats between the seat
back and the seat cush ion. Special guidance
fixtures increase the convenience of the lower anchorages and help protect the seat material
from possible damage when installing ch ild
restraints.
Installing the guidance fixtures
.,. Push down on the seat cushion so that the
lower anchorages are visible.
.,. Hold the guidance fixture with the part
number facing downward and push it in the
direction of the arrow onto the anchorage
¢fig . 163 .
.,. Make su re that each of the two guidance fix
tures per seat snaps into place .
Removing the guidance fixtures
.,. Remove the chi ld restraint according the
child restraint manufacturer's instructions. ..,.
Page 211 of 300
substance use d for u ndercoating cou ld
overheat an d cause a fire.
- Always read and heed all WARNINGS and
other information
¢ page 203.
Exhaust tail pipes
Road sa lt and other corros ive materials will
damage the mater ial in the exhaust tail p ipes
if they are not cleaned regu larly . Do not clean
the ta il p ipes with wheel cleaner, paint polish,
chrome polish or othe r abrasive cleaners .
C lean the tail p ipes with ca r ca re products
that are s uita ble for stain less stee l.
Your authorized Audi dealer can provide clean i ng p rod ucts that have been tested and ap
p roved fo r your vehicle.
Care of interior
Infotainment components
The MMI/RSE* disp lay may be cleaned with a
soft cloth and commercially-ava ilable "LCD
cleaner" . The cloth should be coated light ly
when the clean ing solution when cleani ng the
d isplay.
The MMI/RSE* contro ls must be cleaned first
with a brush so that dirt does not enter the
un it o r enter between the buttons and the
h ousing. Then w iping the controls with a clot h
dampened wi th d ish dete rgent and water is
recommended.
(D Note
To preve nt sc ratches, only clean the dis
p lay when it is d ry.
- To p reven t damage, ma ke s ure fluids do
not enter the cont rols.
Aluminum trim
Use only neutral-pH produc ts to remove spots
and depos its from alum in um s urfaces.
C hr ome ca re products and alkaline cleaners
will attack alum in um s urfaces and can dam
age them over time.
Cleaning and protec tion 209
A WARNING
A lways read and heed all WARNINGS and
other information
¢page 203.
Fabrics and fabric coverings
Fabr ics and fabric cover ings (e.g. seats, door
trim pa ne ls, etc.) shou ld be cleaned at regular
i n tervals w it h a vac uum cleaner. This removes
s ur face di rt particles which cou ld become em
bedded in the fabri c throug h use. Ste am
cleaners sho uld not be used, beca use the
steam tends to p ush the dirt deeper into the
fabric and lock it there .
Normal cleaning
Generally, we recommend using a soft sponge
o r a lint -free microfibe r clo th to the clean fab
ric. Br ushes shou ld only be used for carpets
and floor mats, since other fabric surfaces
could be harmed by br ushes.
Norma l su rface s tains c an be cleaned using a
commerc ially availab le foam cleaner . Spread
the foam on the s urface of t he fabric with a
soft sponge and work it in gently. Do not satu
rate the fabric. T hen pat the foam dry us ing
absorbe nt, dry cloths (e.g. m icrofiber cloth)
and vacuum it after it has dried completely.
Cleaning stains
Stains caused by beverages (e .g. coffee, fr uit
juice, etc.) can be treated with a mild deter
gent solution. Apply the detergent sol ution
with a spo nge. In the case of stubborn stains,
a detergent paste can be applied directly to
the stain and worked into the fabric. After
wards, use copious amounts of clean water to
remove the rem aining de terge nt. Apply the
w at er wit h a d am p clot h or sponge a nd pat
the fabric dry with an abso rbent, dry clot h.
Stains from choco late or makeup should have
de terge nt pa ste (e.g. o x-gall soa p) rubbed i n
to them. Afterwa rds, remove the soap wi th
wa ter (damp sponge) .
Alcohol can be used to treat stains from grease, o il , lipstic k or a ballpoin t pen. M elted ..,_ •
•