key AUDI A8 2012 User Guide
[x] Cancel search | Manufacturer: AUDI, Model Year: 2012, Model line: A8, Model: AUDI A8 2012Pages: 300, PDF Size: 75.06 MB
Page 38 of 300

36 Opening and closing
-When something blocks the rear lid or
makes it difficult for the lid to mov e.
If you press one of the buttons
cs now, the
rear lid will either open or close , depending on
its angle.
If you pull lightly on its handle, the rear lid
will close.
Closing will be stopped immediately when:
- You press the
cs button in the rear lid, or
- You push the handle in the rear lid, or
- You release the
cs button on the driver's
door, or
- When something blocks the rear lid or
makes it difficult for the lid to move.
If you press one of the buttons
cs now, the
rear lid will either close or open , depending on
its angle.
If you pull lightly on its handle, the rear lid
will close.
You can manually stop the automatic open ing/closing of the luggage compartment lid .
The automatic closing process begins if you push down on the rear lid.
,&. WARNING
- After closing the rear lid, always pull up
on it to make sure that it is properly
closed. Otherwise it could open suddenly
when the vehicle is moving.
- To help prevent poisonous exhaust gas
from being drawn into the vehicle, al
ways keep the rear lid closed while driv
ing. Never transport objects larger than
those which fit completely into the lug
gage area, because then the rear lid can
not be fully closed .
- Never leave your vehicle unattended es
pecially with the rear lid left open . A
child could crawl into the car through the
luggage compartment and pull the lid
shut, becoming trapped and unable to
get out. To reduce the risk of personal in
jury, never let children play in or around
your vehicle. Always keep the rear lid as well as the vehicle doors closed when not
in use .
- Never close the rear lid inattentively or
without checking first. Although the
closing force of the rear lid is limited,
you can still seriously injure yourself or others .
- Always ensure that no one is within
range of the rear lid when it is moving, in
particular close to the hinges and the up
per and lower edges - fingers or hands
can be pinched.
- Never try to interfere with the rear lid or
help it when it is being opened or closed
automatically.
(D Tips
- If there is a mechanical problem with au
tomatic closing for the rear lid or there is
an obstruction, it opens again immedi
ately. Check to see why the rear lid could
not be closed before attempting to close
it again.
- The following applies to vehicles equip ·
ped with the Convenience key* feature: if
the remote control key is left in the lug
gage compartment, luggage compart
ment will automatically unlock itself af
ter you lock the vehicle . This prevents
you from unintentionally locking your
key in the luggage compartment .
- When the vehicle is locked, the rear lid
can be unlocked separately by pressing
the button
cs on the master key. When
the rear lid is closed again, it locks auto
matically .
Page 39 of 300
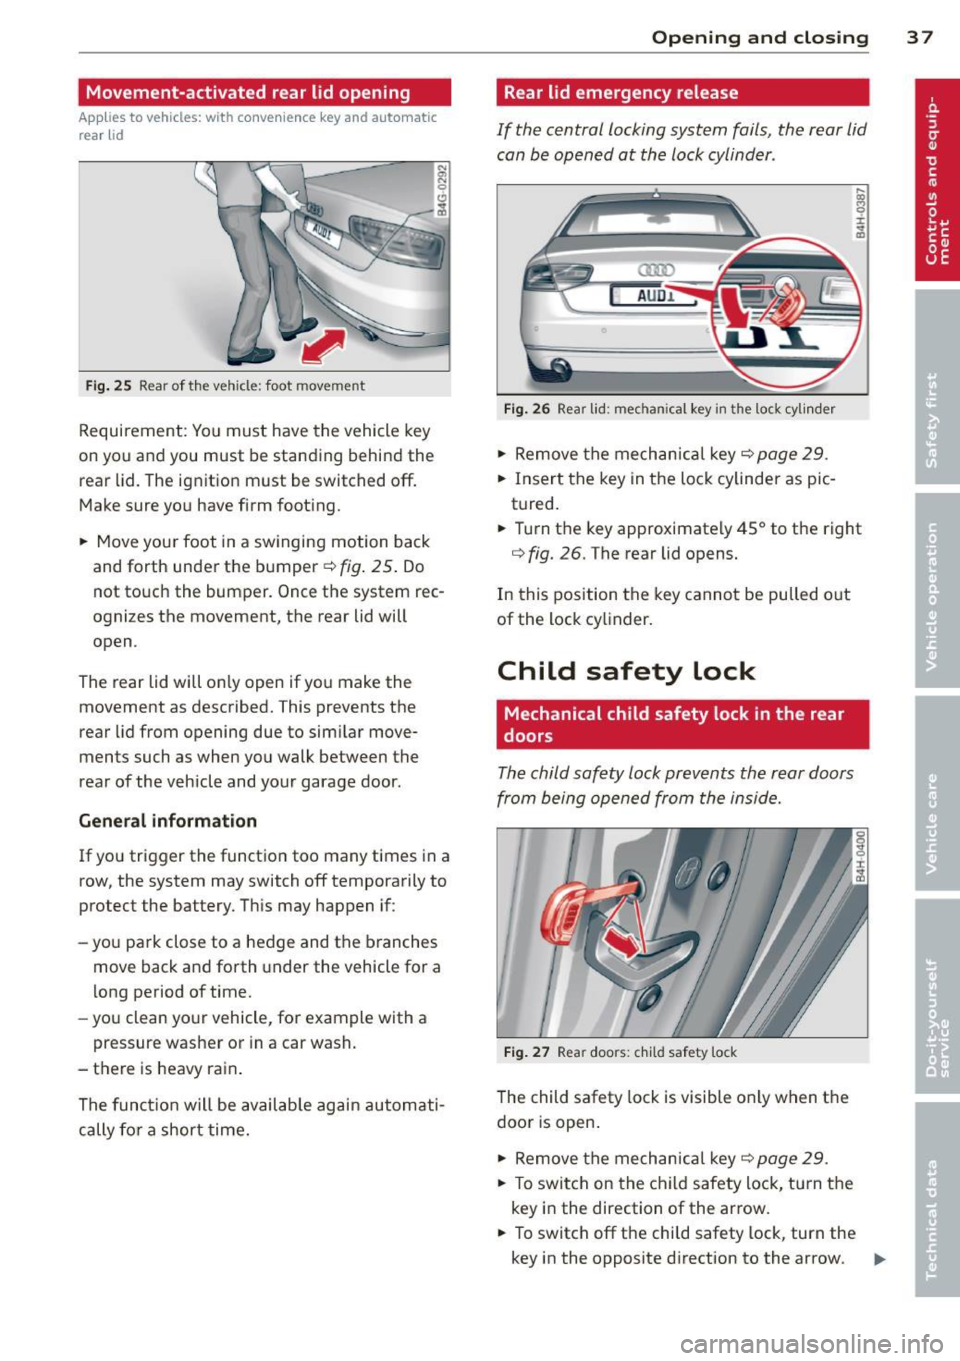
Movement-activated rear lid opening
Applies to vehicles: with convenience key and automatic
rear lid
Fig . 25 Rear of the vehicle: foot movement
Requirement: You must have the vehicle key
on you and you must be standing behind the rear lid. The ignition must be switched off.
Make sure you have firm footing.
• Move your foot in a sw inging motion back
and forth under the bumper¢
fig. 25. Do
not touch the bumper. Once the system rec
ognizes the movement, the rear lid will
open.
The rear lid will on ly open if you make the
movement as described. This prevents the
rear lid from opening due to similar move
ments such as when you walk between the
rear of the vehicle and your garage door.
General information
If you trigger the function too many times in a
row, the system may switch off tempera rily to
protect the battery. This may happen if:
- yo u park close to a hedge and the branches
move back and forth under the vehicle for a
long period of time.
- you clean your vehicle, for example with a
pressure washer or in a car wash.
- there is heavy rain .
The funct ion will be available again automati
cally fo r a short time.
Opening and closing 3 7
Rear lid emergency release
If the central locking system fails, the rear lid
can be opened at the lock cylinder .
(]ID
AUD.I.
Fig . 26 Rear lid: mechan ical key in the lock cylinder
• Remove the mechanical key c::> page 29 .
• Insert the key in the lock cylinder aspic
tured.
• Turn the key approximately 45° to the right
<=> fig. 26. The rear lid opens.
In this position the key cannot be pulled o ut
of the lock cy linder.
Child safety lock
Mechanical child safety lock in the rear
, doors
The child safety lock prevents the rear doors
from being opened from the inside.
Fig. 27 Rear doors: chi ld safety lock
The child safety lock is visible only when the
door is open .
• Remove the mechanical key
c::> page 29.
• To switch on the child safety lock, turn the
key in the direction of the arrow.
• To switch off the child safety lock, turn the
key in the opposite direction to the arrow.
ll>-
Page 41 of 300

- The buttons for the power sun shades* in
the side windows,
- The buttons for the power sun shade* in the
rear window,
- Front passenger power seat adj ustment *
button.
_& WARNING
- When you leave your vehicle -even if on
ly briefly- always take the ignition key
with you. This applies particularly when
children remain in the veh icle. Otherw ise
the ch ildren could start the engine or op
erate electrical equ ipment (e.g. power
w indows) . The power windows are func
t ional until t he driver's door or passeng
er's door has been opened.
- Be careful when closing the windows.
Check to see that no one is in the way, or
serious injury could result!
- When lo cking the veh icle from outside,
t he ve hicle must be unocc upied s in ce the
w indows can no longer be opened in an
emergency.
(D Tips
- The dr iver can lower or raise the power
sun shades * in the side windows by us ing
swi tches © and
@.
-After the ignition has been switched off,
the windows can still be opened o r
closed for about 10 minutes . The powe r
windows are not switched off until the
driver's door or passenger's door has
been opened.
What to do after a malfunction
The one-touch open and close function must
be reactivated if the battery hos been discon
nected.
• Pull and hold the power window switch un
ti l the window is fully closed.
• Release the switch and then pull it again for
at least one second .
Openin g an d clos ing 39
Valet parking
The valet parking feature protects the lug
gage comportment from unauthorized ac
cess.
F ig. 30 Valet par king button
Wi th "valet parking" a ctivated, the rear lid
cannot be opened.
• Remove the mechanical key
c::;, page 29 .
• Open the glove compartment and activate
c::;, fig. 30 the "valet parking" feature by
pressing the
! VALET I b utton. The indicator
light in the swi tch illuminates.
• Close the glove compartment and lock it
w ith the mechanical key.
• Leave the master key with the se rvice per
sonnel for park ing and keep the mechanical
key with you.
When the "valet parking" feature is activated:
- the unlocki ng button fo r the rear l id
c:s in
the dr ive r's door is inactive
- the button
c:s on the mas ter key is inac tive
- the opening handle in the rear lid is inact ive .
The vehicle can be driven and locked and un
locked with the master key. Access to the lug
gage compartment is blocked.
When the valet parking function is switched
on, the message
Vale t par king acti vated ap
pears in the instrument cluster display when
you sw itch the ignition on.
Page 42 of 300
40 Opening and clo sing
Sliding/tilting sunroof
Operation
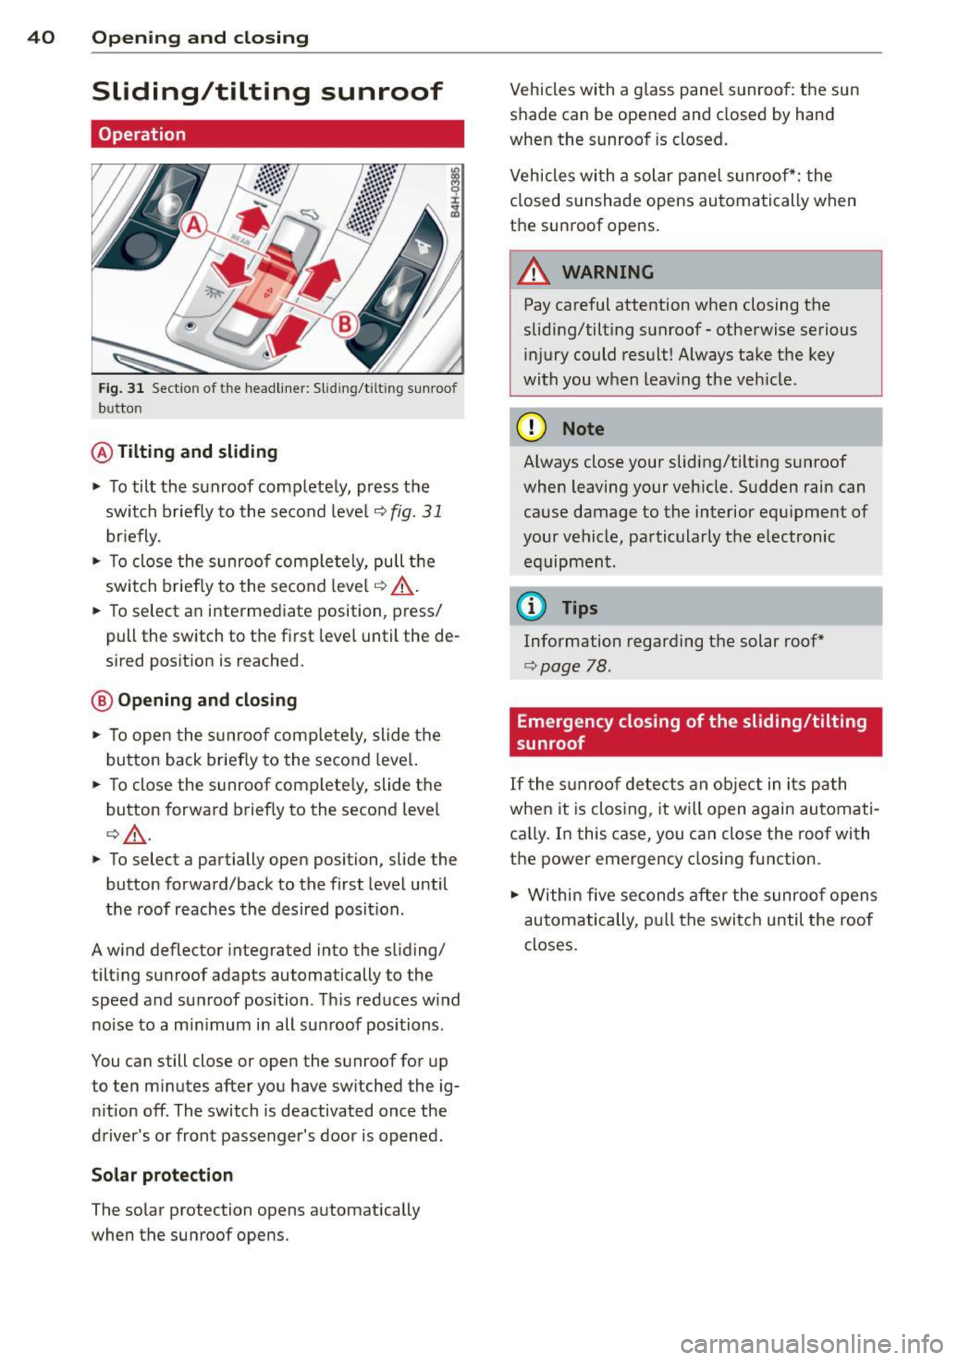
Fig . 31 Section of the headliner: Slid ing/t ilt ing sunroof
b u tton
@ Tiltin g and sliding
.,. To tilt the sunroof completely, press the
switch briefly to the second leve l~
fig. 31
br iefly.
.,. To close the sunroof comple tely, pull the
swit ch briefly to the second level
Q .&_ .
.,. To select an intermediate position, press/
pull the switch to the first leve l until the de
sired position is reached.
@ Opening and clo sing
.,. To open the s unroof complete ly, slide the
button back briefly to the second leve l.
.,. To close the sunroof complete ly, slide the
button forward briefly to the second leve l
QA .
.,. To select a partially open position, slide the
button forward/back to the first level until
the roof reaches the desired posit ion .
A w ind deflector integrated into the sliding/
tilt ing su nroof adapts automatically to the
speed and sunroof position . T hi s reduces w ind
noise to a m in imum in all sun roof positions.
You can still close or open the sunroof for up to ten m inutes after you have sw itched the ig
n ition off . The switch is deactivated once the
d river 's o r front passenger's door is opened .
Solar p rotection
The solar protection opens automatically
when the sunroof opens . Vehicles with a g
lass pane l sunroo f: the sun
shade can be opened and closed by hand
when the sunroof is closed .
Vehicles wi th a solar panel sunroof*: the
cl osed s unshade opens automatically when
t h e sunroof opens.
A WARNING
-
Pay careful attention when closing the
sliding/tilt ing sunroof -otherwise serious
in jury c ould result! Always take t he key
with you w hen leav ing the veh icle.
(D Note
-
A lways close your sliding/tilting sunroof
when leaving y our veh icle. S udden rain can
cause damage to the interior equ ipment of
your vehicle, pa rticularly the e lectronic
equipment.
(D Tips
Information regarding t he solar r oof*
Q poge 78 .
Emergency closing of the sliding/tilting
sunroof
If the s unroof detects an object in its path
when it is clos ing, it w ill open again automati
ca lly. I n this case, you can close the roof with
t h e power emergency closing function .
.,. Within five seconds a fter the sunroo f opens
automatically, p ull the switc h until the roof
closes.
Page 43 of 300
Panoramic sunroof
Opening/closing the roof
Applies to vehicles: with panoram ic sunroof
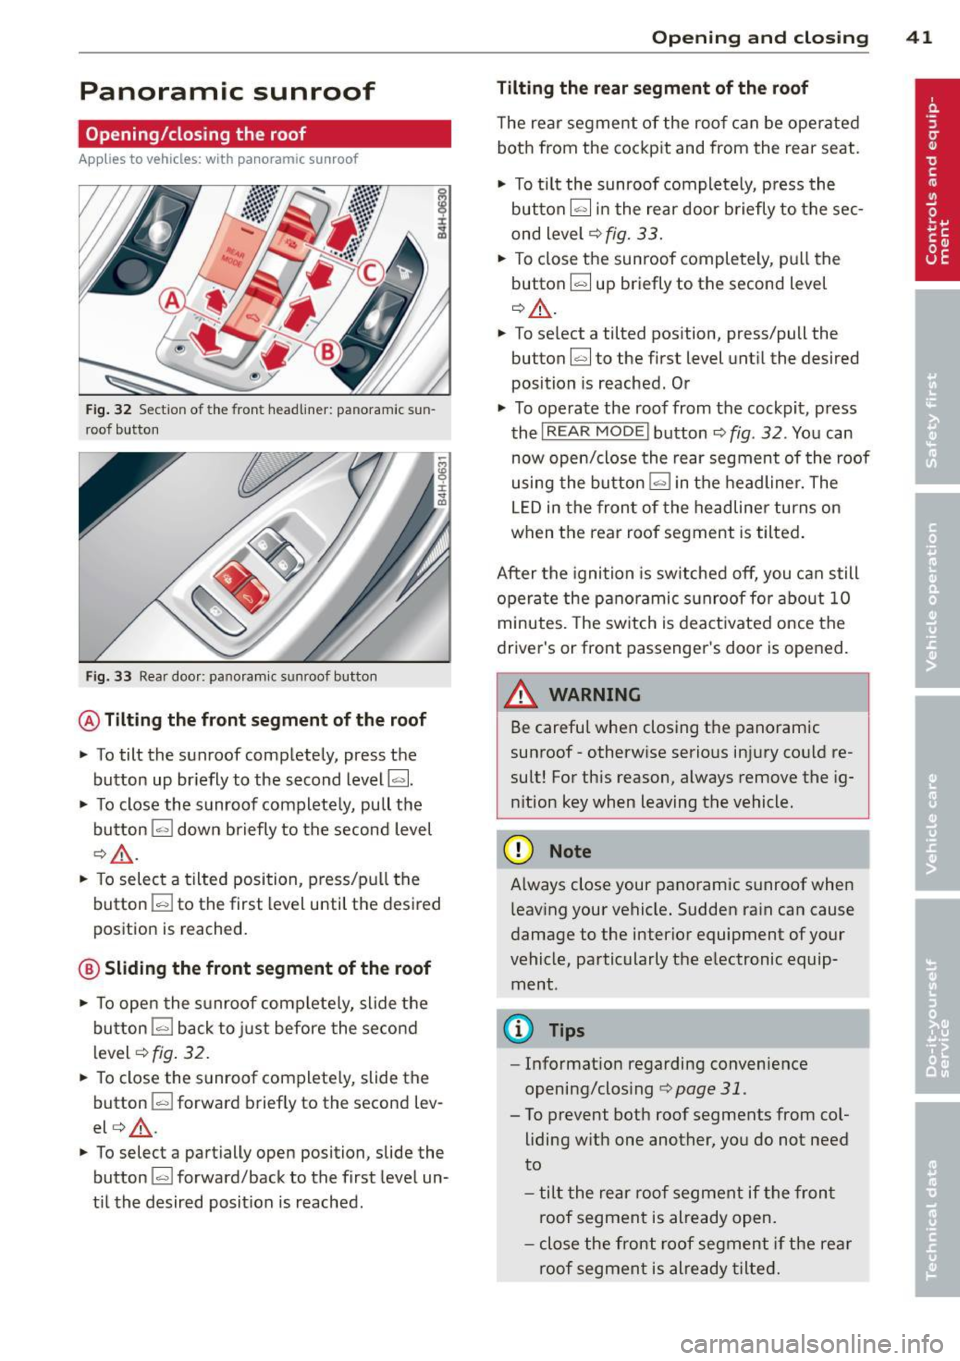
Fig. 32 Section of the front headliner: panoramic sun
roof button
Fig. 33 Rear doo r: panoram ic sunroof button
@ Tilting the front segment of the roof
• To tilt the sunroof completely, press the
button up br iefly to the second level~-
• To close the sunroof completely, pull the
button
1.,,,1 down briefly to the second level
¢ & .
• To select a tilted position, press/pull the
button
l "'-' I to the first level until the desired
position is reached.
@ Sliding the front segment of the roof
• To ope n the su nroof complete ly, slide the
button
l=I back to just before the second
level
<=>fig . 32.
• To close the sunroof completely, slide the
button
l=I forward brief ly to the second lev
el<=> &.
• To select a partially open position, slide the
button
l-"'I forward/back to the first level un
til the desired position is reached.
Opening and closing 41
Tilting the rear segment of the roof
The rear segment of the roof can be operated
both from the cockpit and from the rear seat.
• To tilt the sunroof completely, press the
button[;] in the rear door briefly to the sec
ond level
c:> fig. 33.
• To close the sunroof completely, pull the
button[;] up briefly to the second level
Q & .
• To select a tilted position, press/pull the
button~ to the first level until the desired
position is reached. Or
• To operate the roof from the cockpit, press
the
I REAR MODE ! button¢ fig. 32. You can
now open/close the rear segment of the roof
using the button
l=I in the headliner. The
LED in the front of the headliner turns on
when the rear roof segment is tilted.
After the ignition is switched off, you can still
operate the panoramic sunroof for about
10
minutes. The switch is deactivated once the
driver's or front passenger's door is opened.
WARNING
Be careful when closing the panoramic
sunroof- otherwise serious injury could re
sult! For this reason, always remove the ig
n ition key when leaving the vehicle.
(D Note
A lways close your panoramic sunroof when
l eav ing your vehicle. Sudden rain can cause
damage to the interior equipment of your
vehicle, particularly the electronic equip ment.
(D Tips
- Information regarding convenience
opening/clos ing
i=>page 31.
- To prevent both roof segments from col
liding with one another, you do not need
to
- tilt the rear roof segment if the fron t
roof segment is already open.
- close the front roof segment if the rear
roof segment is already tilted.
Page 44 of 300
42 Opening and closing
Opening/closing the sun shade
Applies to vehicles: with pa noramic sunroof
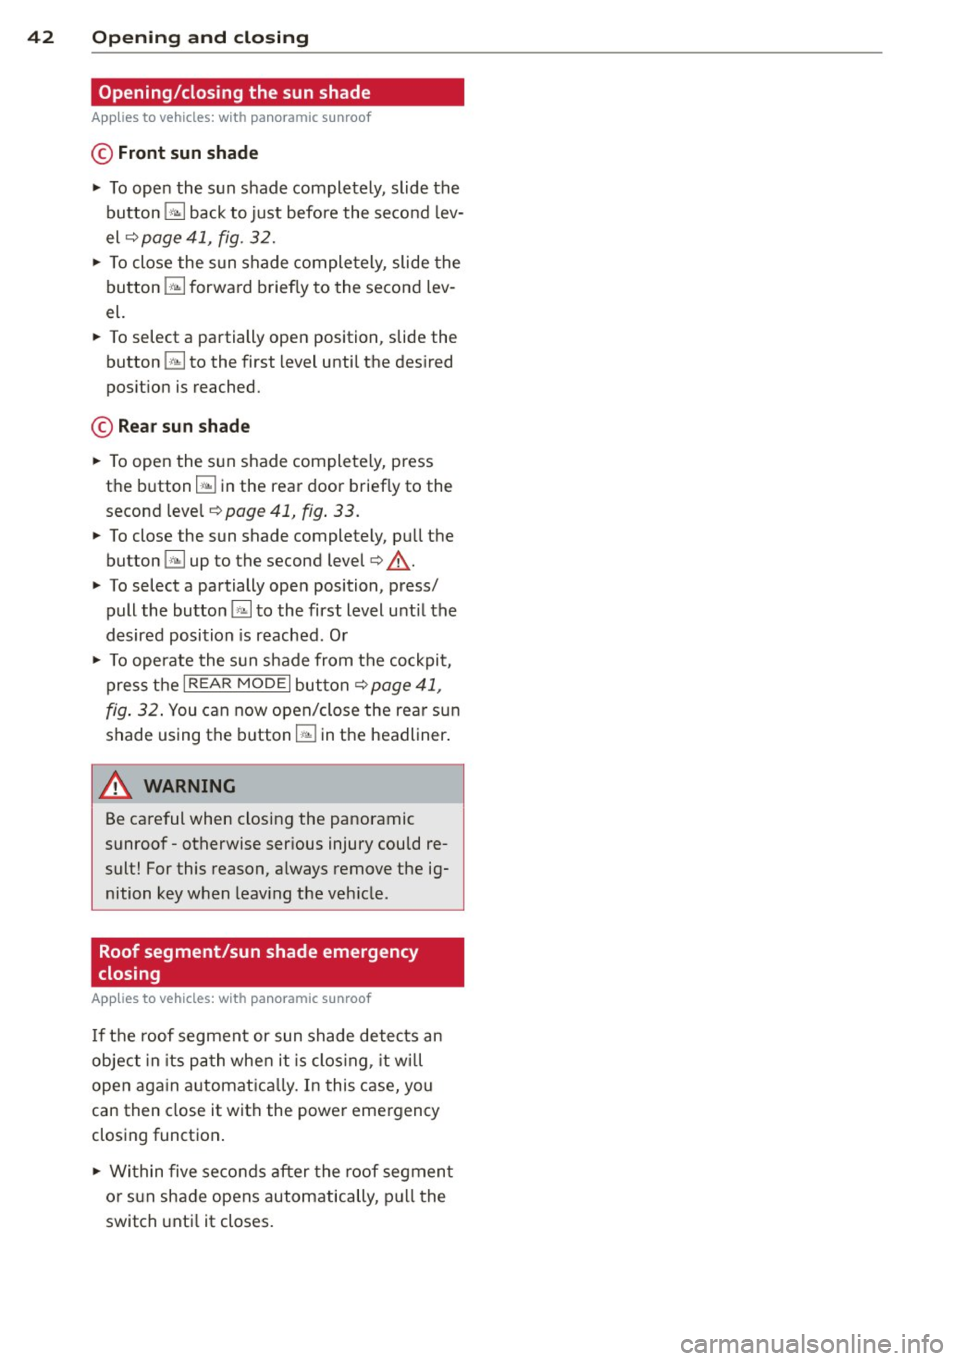
© Front sun shade
.. To open the sun shade completely, slide the
button
G;J back to just before the second lev
el¢
page 41 , fig. 32 .
.. To close the sun shade comple tely, slide the
button
G;J forward briefly to the second lev
el.
.. To select a partially open position, slide the
button ~ to the first level until the desired
position is reached.
© Rear sun shade
.. To open the su n shade completely, press
the button ~ in the rear door briefly to the
second level ¢
page 41, fig. 33 .
.. To close the sun shade completely, pu ll the
button
G;J up to the second level¢.&_ .
.. To select a partially open position, press/
pull the button
G;J to the first level until the
desired position is reached. Or
.. To operate the sun shade from the cockpit,
press the
I REAR MODE I button ¢ page 41,
fig. 32. You can now open/close the rea r sun
shade using the button
r;;J in the headliner.
A WARNING
-
Be careful when closing the panoramic
sunroof - otherwise serious injury could re
sult! For this reason, always remove the ig
nition key when leaving the vehicle.
Roof segment/sun shade emergency
closing
A ppl ies to vehicles: with pa noramic sunroof
If the roof segment or sun shade detects an
object in its path when it is clos ing, it will
open again automatica lly. In this case, you
can then close it with the power emergency
closing function .
.. Within five seconds after the roof segment
or sun shade opens automatically, pull the
switch until it closes.
Page 49 of 300
Selecting a color pr ofile
You can select from the Iv ory , Polar and Ru
b y/ Pol ar
color profiles .
(D Tips
The settings are automa tically sto red and
assigned to the remote con tro l key that is
in use.
Instrument illumination
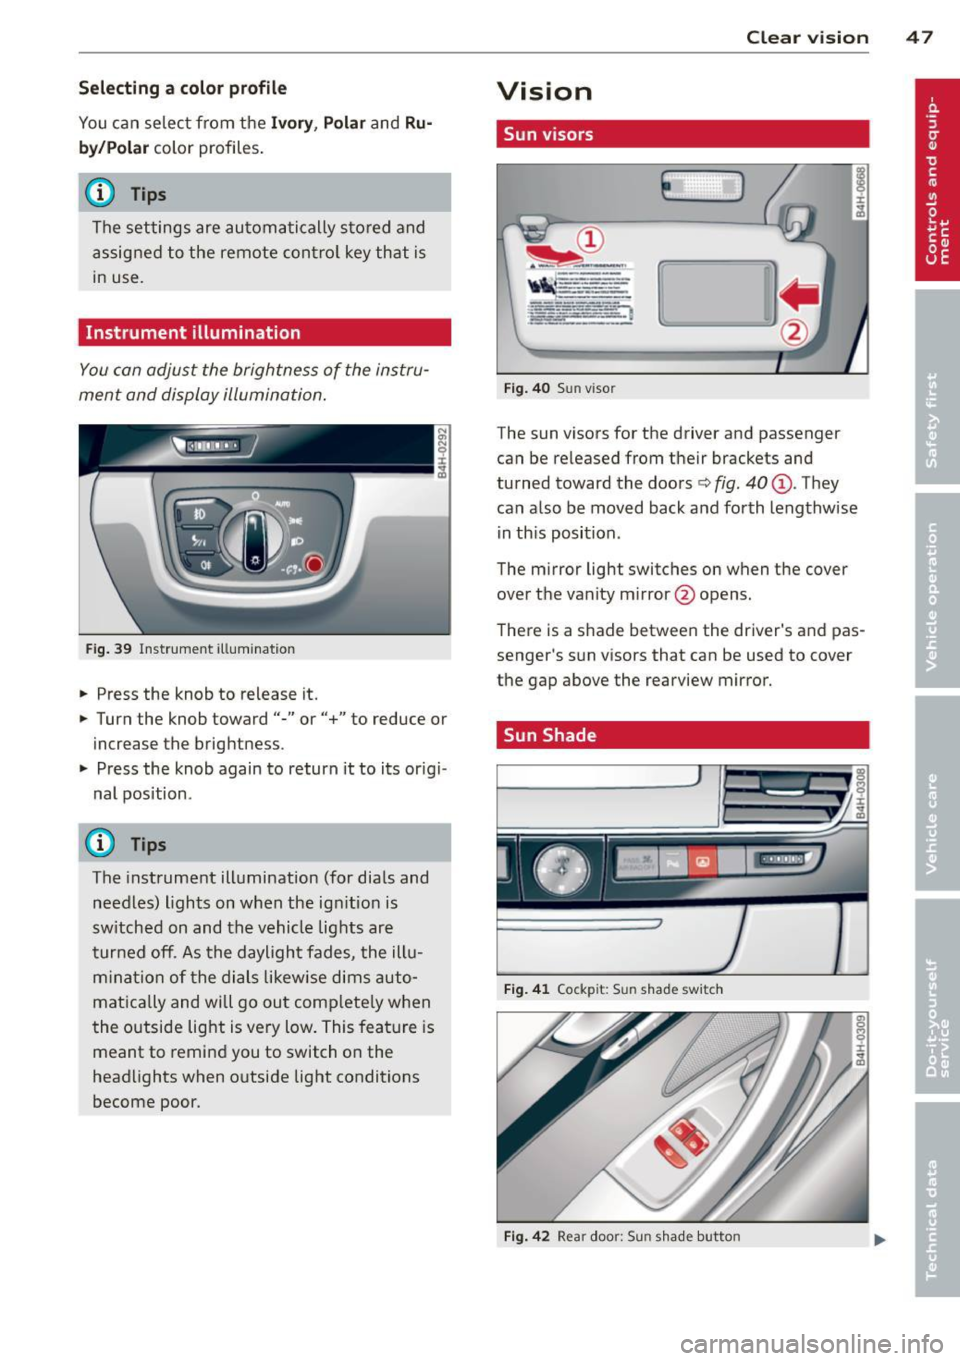
You con adjust the brightness of the instru
ment and display illumination .
Fig . 39 In strument ill um ination
• Press the knob to release it.
• Turn the knob toward"-" or"+" to reduce or
increase the brigh tness .
• Press the knob again to return it to its or igi
nal position .
Q Tips
The instrument illumination (for dials and
needles) lights on when the ig nitio n is
sw itched on and the vehicle lig hts are
turned off. As the daylight fades, the ill u
m ina tion of the dials likewise dims auto
mat ica lly and will go out com plete ly when
t he o utside light is very low . This fea ture is
meant to remind you to switch on the
headlights when o utside light conditions
become poor. Clear vi
sion 4 7
Vision
Sun visors
E J
Fig . 4 0 Sun viso r
The sun visors for the driver and passenger
can be re leased from their bracke ts and
turned toward the doors
c:> fig. 40 (D . They
can a lso be moved back and forth lengthwise
in th is position .
The m irror light switches on when the cover
over the vanity m irror @opens.
T here is a shade between the dr iver 's and pas
senge r's s un visors that can be used to cover
the gap above the rearview mirror.
. Sun Shade
Fi g. 41 Cock pit: Sun shad e swit c h
Fig. 4 2 Rear doo r: S un s had e butto n
Page 50 of 300
48 Clear vis ion
Extending /retracting th e re ar window
s h ad e*
• To extend or retract the sun shade from the
cockpit ,
press the rn button in the center
console
c> fig . 41 .
• To extend or retract the sun shade from the
r e ar of th e vehicle,
press the liiil button in
the door
c> fig . 42 .
Extending the re ar door sun shade s*
• Close the window in the rear door.
• To extend the sun shade
from the d rive r's
s eat ,
pull the left/right rear power window
switch~ in the driver's door .
• To extend the sun shade from the
rear of
th e v ehi cle,
pull the power window sw itch
~ in the left/right rear door.
Re tra cting the re ar doo r sun shades*
• To retract the sun shade from the driv er's
sea t,
press the left/right rear power window
switch~ in the driver's door .
• To retract the sun shade from the
re ar of
th e vehi cle,
press the power window swit ch
~ in the left/ right rear door .
You can adj ust the settings for the rear sun
shade so the shade ret ra cts automa tically
when you selec t the reve rse gear. Select:
CAR
function button > C ar sys tems control button
> Vehicle set tings > Aut omatic rear blind >
On. T he sett ings are automat ica lly stored and
assigned to the remote control key . The sun
shade extends again as soon as the veh icle be
g ins traveling forward at a speed greater than
9 mph (1S km/h), as long as the ignition has not been switched off in th e mea ntime .
& WARNING
When lowe ring or raisi ng the sunshade,
make s ure there is no thing in its way and
t ha t it has a free path to trave l. This could
cause personal injury.
{D) Tips
- Pressing the b utton rn several times
consecutively can tr igger the overload
protection . The sun shade can only be ex- tended/retracted again after a brief wait
ing period.
- The rear window sun shade on ly func
tions when the vehicle interior is warmer
than 14°F (-10°C) .
Vanity mirror in the rear
Applies to vehicles: with vanity mirrors in the rear
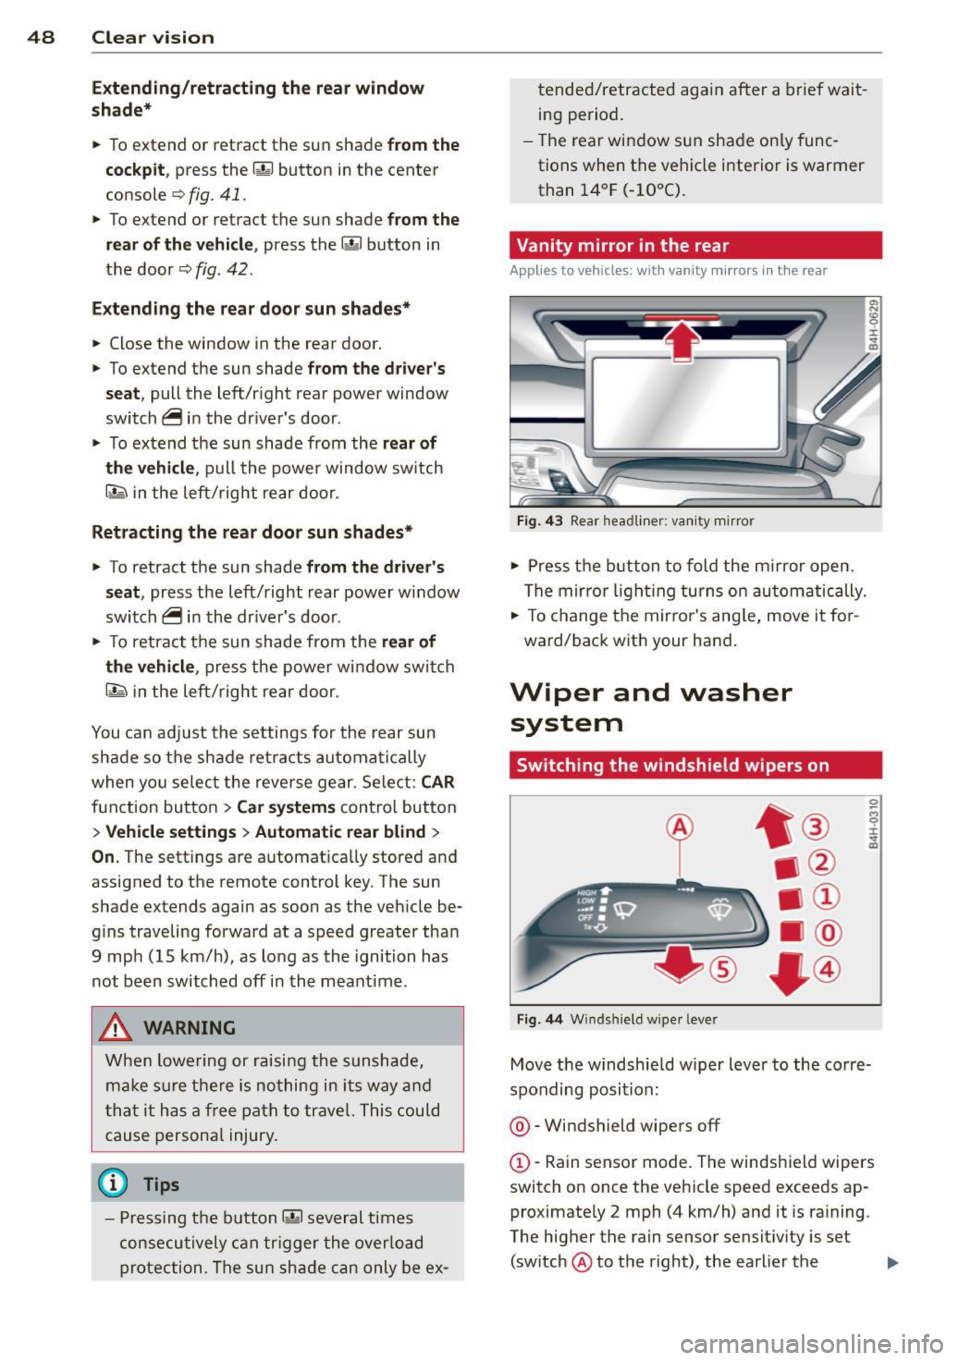
Fig. 43 Rear hea dliner: van it y m irror
• Press the b utton to fold the m irror open.
The mir ro r li ght ing turns on automatically.
• To c hange the mir ro r's ang le, move it for
ward/back with your hand .
Wiper and washer
system
Switching the windshield wipers on
Fig . 44 Winds hield w iper leve r
Move the windshie ld wiper lever to the corre
sponding posit ion :
@ -Windshield wipers off
(D -Rain sensor mode. The windshield wipers
switch on once the vehicle speed exceeds ap
proximate ly 2 mph (4 km/h) and it is raining.
The higher the rain sensor sensit ivity is set
(sw itch @ to the right), the earlier the
Page 53 of 300
Mirrors
Adjusting the exterior mirrors
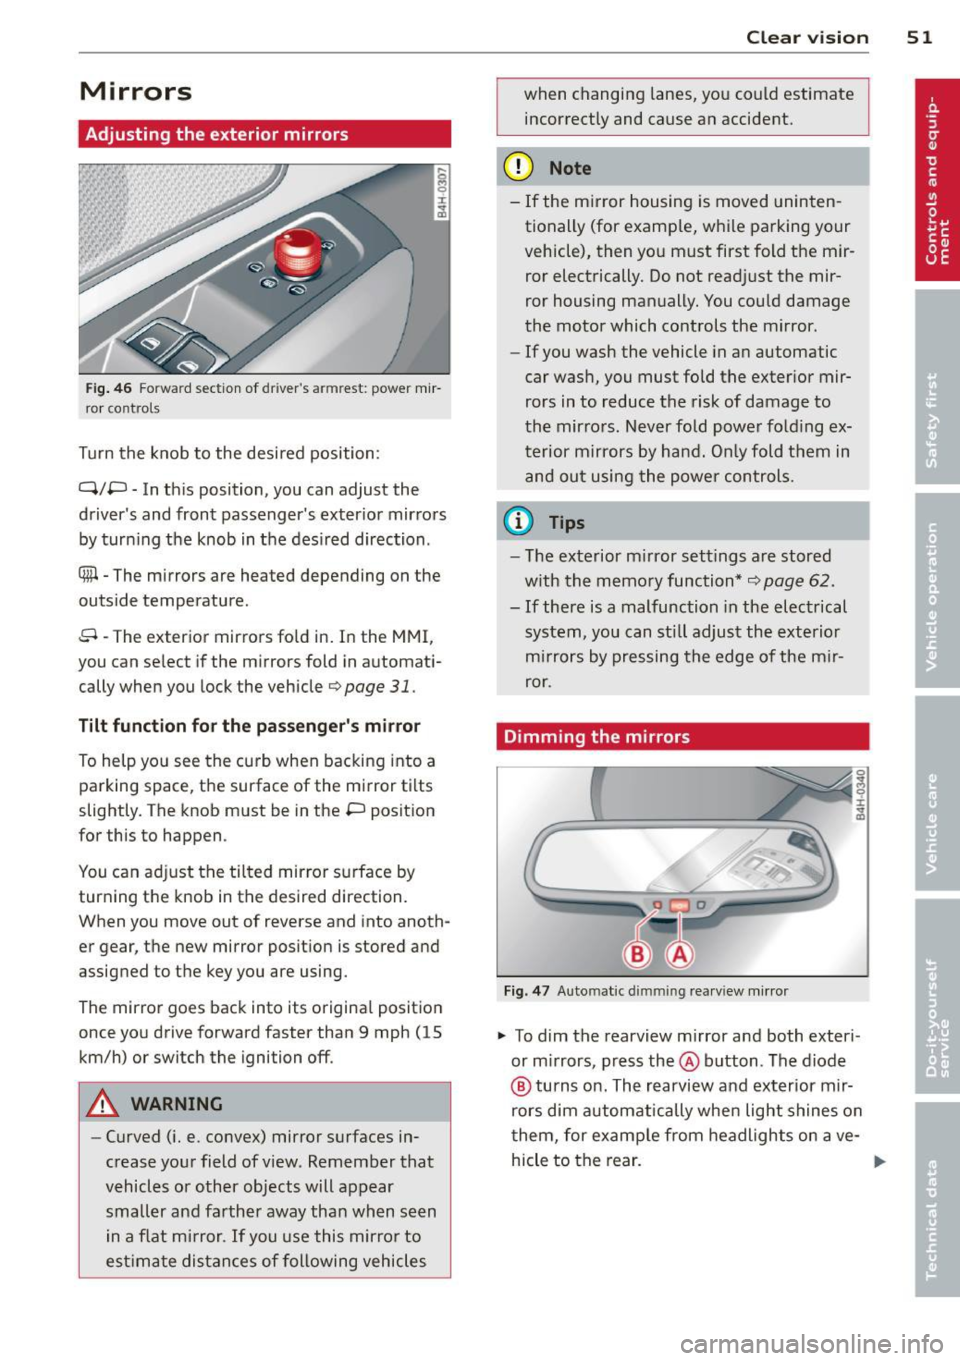
Fig . 46 Fo rwa rd section of d river's a rmrest: power m ir
ror co nt rols
Turn the knob to the desi red position :
Q/P -In th is position, you can adjust the
driver's and front passenger's exter ior mir rors
by turn ing the knob in t he des ired direction .
® -The m irrors are heated depending on the
outside temperature .
8 -The exterior mirrors fo ld in. In the MMI,
you can select if the m irrors fold in automat i
cally when you lock the vehicle
9 page 31.
Tilt function fo r th e pa sseng er' s mi rror
To help yo u see the curb when backing into a
parking space, the surface of the mirror tilts
slightly. The knob must be in the P position
for this to happen .
You can ad just the tilted mirror s urface by
turning the knob in the desired direction.
When you move out of reverse and into anoth
er gear, the new mirror posit ion is stored and
assigned to the key you are using.
The mirror goes back into its origina l posit io n
once you drive forward faster than 9 mph (15 km/h) or switch the ignition off .
A WARNING
-Curved ( i.e. convex) mirror s urfaces in
crease your field of view . Remember that
vehicles or other objects will appear
small er and farther away than when seen
in a flat m irror.
If you use this mirro r to
est imate distances of following vehicles
Clear vi sion 51
when changing lanes, you co uld estimate
incorrectly and cause an accident.
(D Note
- If the m irror housing is moved uninten
tionally (for examp le, w hile pa rking your
vehicle), then yo u must first fold the mir
ror electrically. Do not read just the mir
ror housing man ually. You cou ld damage
the motor which controls the mirror.
- If you wash the vehicle in an automatic
car was h, you must fold the exter ior mir
rors in to reduce the risk of damage to
the mirrors. Never fold power fold ing ex
terior mirrors by hand. O nly fold t hem in
and out using the power controls.
(D Tips
- T he exterior m irror set tings are stored
w ith the m emory function*
9 page 62 .
- If there is a malfunction in the elect rical
system, you can st ill adjust the exterio r
mi rrors by pressing the edge of the m ir
ror.
Dimming the mirrors
Fi g. 47 Auto m atic d immin g rearv iew mirr or
.. To dim the rearview m irror and both exteri
or m irrors, press the@ button . The diode
@ tu rns on. The rearview and exterior mir
rors dim automatically whe n light shines on
t hem, for examp le from headl ights on ave-
hicle to the rear . ..,.
Page 64 of 300
62 Seats and storage
Seat memory
Description
Applies to vehicles: with memory function
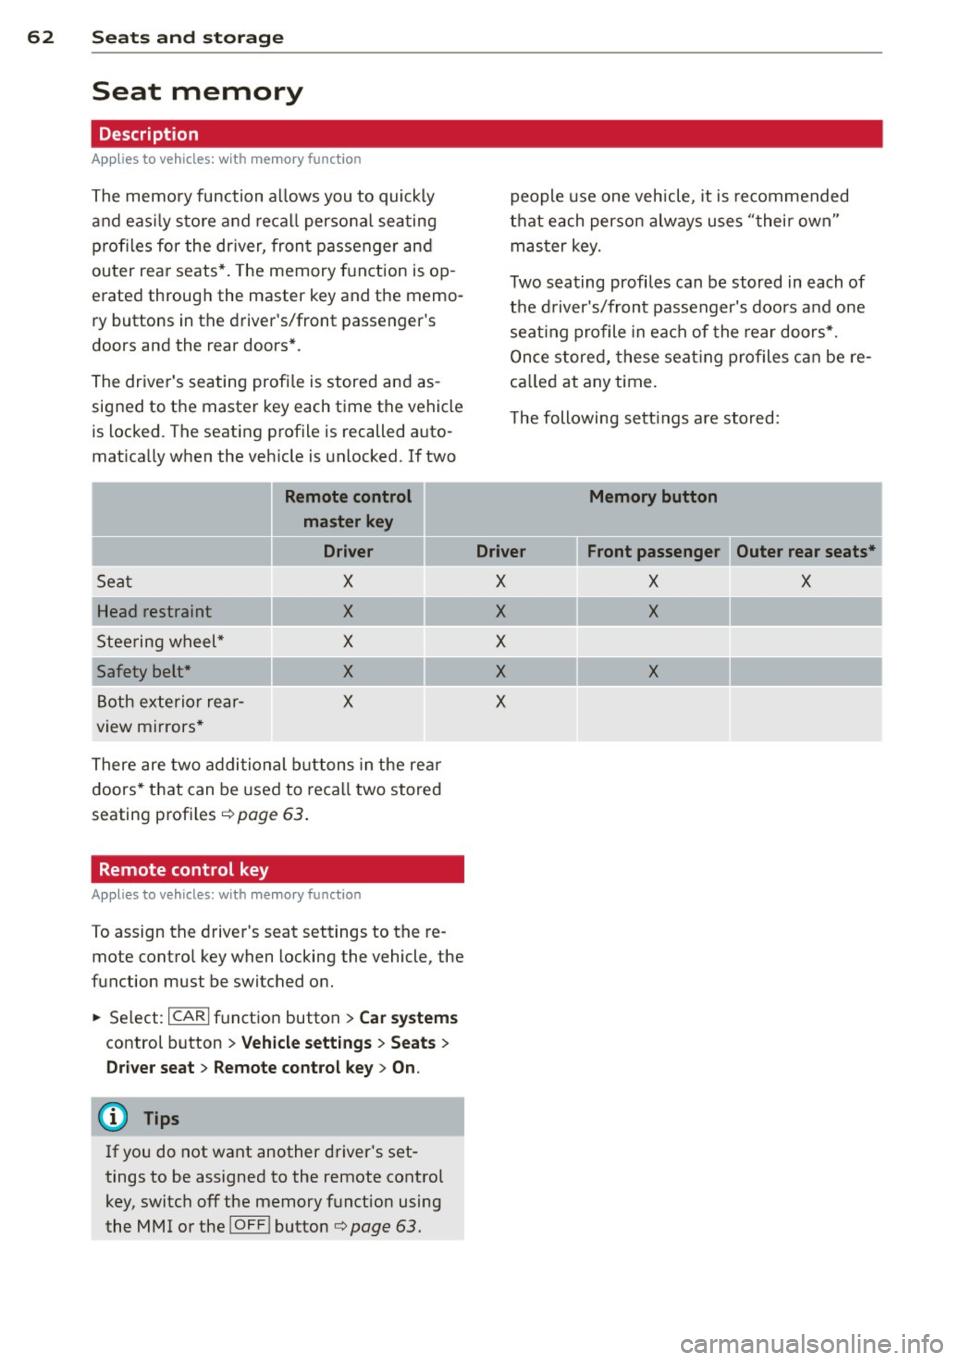
The memory function allows you to quickly
and eas ily store and recall personal seating
p rofiles for the dr iver, front passenger and
outer rear seats*. The memory function is op
erated through the master key and the memo ry buttons in the driver's/front passenger's
doors and the rear doors*.
The driver's seating profi le is stored and as
signed to the master key each time the vehicle
is locked . The seating profile is recalled auto
matically when the vehicle is unlocked. If two
Remote control
master key
Driver
Seat X
Head restraint X
Steering wheel* X
Safety belt* X
Both exterior rear-X
view mirrors *
There are two additional buttons in the rea r
doors* that can be used to recall two stored
seating profiles
r:=;,poge 63.
Remote control key
Applies to vehicles: with memory function
To assign the driver's seat settings to the re
mote contro l key when locking the vehicle, the
function must be switched on .
.. Se lect:
ICARI function button> Car systems
control button > Vehicle settings > Seats >
Driver seat> Remote control key> On.
@ Tips
If you do not want another driver's set
tings to be assigned to the remote control
key, switch off the memory function using
the MMI or the
I OF FI button r:=;,poge 63.
people use one vehicle, it is recommended
that each person always uses "their own"
master key.
Two seating profiles can be stored in each of
the driver's/front passenger's doors and one
seat ing profile in each of the rear doors*.
Once stored, these seat ing profiles can be re
ca lled at any time.
T he following sett ings are stored:
Memory button
Driver Front passenger Outer rear seats*
X X X
X X
X
X
X
X