steering AUDI A8 2012 Owner's Manual
[x] Cancel search | Manufacturer: AUDI, Model Year: 2012, Model line: A8, Model: AUDI A8 2012Pages: 300, PDF Size: 75.06 MB
Page 106 of 300
104 Audi dri ve sele ct
surface o f the tires, which is the outer
circumference. Securing the vehicle at
the axle components, s uspension struts
or towing eyes is not perm itted because
the pressure in the air suspension struts
can change during transport. The veh icle
may not be secured suff ic iently if this
happens .
- If you are go ing to tow a trailer, you
must activate the trailer operat ion mode
¢page 199.
@ Tips
- In some models, the maximum vehicle
speed can only be reached in the
auto
and dynamic modes.
- Selecting the
dynamic mode results in
spo rty sh ifting character istics. The S
gear position engages automati cally.
- In vehicles that have dynamic steering*,
operating noise is heard when starting or
stopp ing the eng ine . Th is does not ind i
cate a problem.
- In vehicles with sport differential*, the
dynam ic mode is deactivated whe n tow
i ng a traile r.
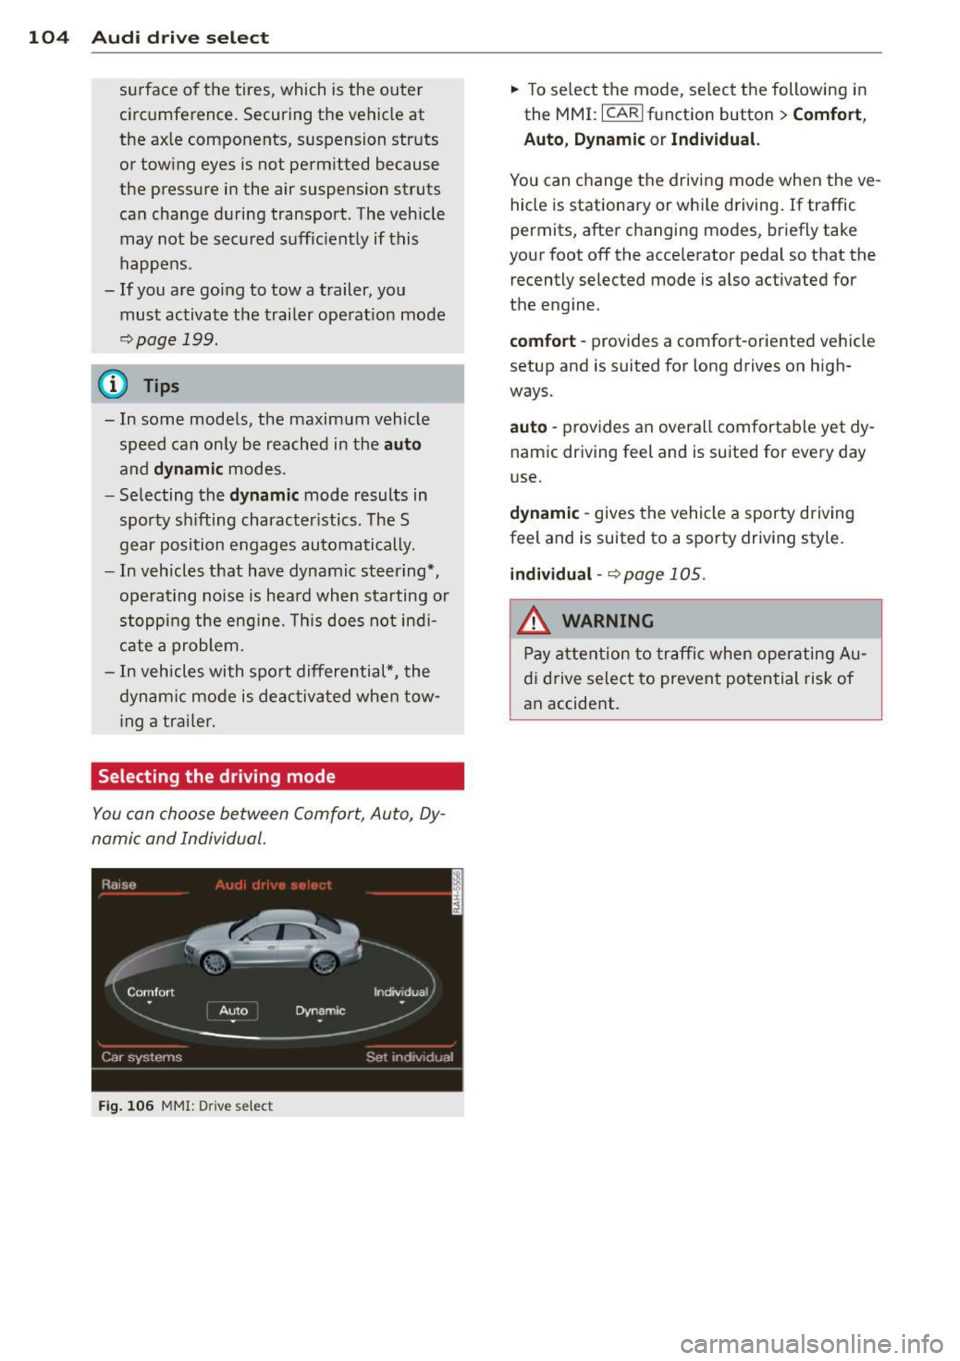
Selecting the driving mode
You can choose be tween Comfort, Auto, Dy
namic and Individual.
Fi g. 106 MM!: D rive se lect
.,. To se lect the mode, select the following in
the MMI :
I CARI function button> Comfort ,
Auto , Dynamic or Indi vidu al.
You can change the driving mode when the ve
hicle is stationary or while driving . If traffic
permits, after changing modes, briefly take
your foot off the accelerator pedal so that the
recently selected mode is also activated for
the engine.
comfort -provides a comfort-oriented vehicle
setup and is suited for long drives on high
ways.
auto -provides an overall comfortable yet dy
nam ic driving feel and is suited for every day
use.
d yna mi c -gives the vehicle a sporty driving
feel and is suited to a sporty driving style .
individual -¢ page 105.
A WARNING
Pay attention to traffic when operating Au
d i drive select to prevent potential risk of
an accide .nt.
Page 107 of 300
Audi drive select 105
Adjusting the Individual mode
You can adjust the vehicle settings to your personal preferences.
~ Select: ICARlf unct ion button> Set individ·
ual
control button. You can now adjust the
individua l systems.
The
individual d riving mode will automatical
l y be activated when yo u have fin ished config
uring the settings.
Systems
Engine
a nd Transmission
Air suspension Steer ing Comfort balanced
comfo
rtable
comfortab le The equ
ipment in your vehicle will determ ine
which sett ings you can adjust. The following
tab le prov ides a n overview of the c haracteris
tics of eac h driving mode.
Dynamic
ba lanced spo
rty
---.. ,
s porty
ba lanced spo
rty
Dynamic steering*
Sport differential *
Cornering light*
Belt tensioner c o mfo rtable/ind ire c t balanced/dire ct sporty/direc t
spo rty
Adaptive cruise control *
balanced
comfortable
Standard
comfo rtable
Yo ur
individual mode se ttings a re auto
mat ica lly store d an d assig ned to t he re
mote control key bein g use d.
Raising/lowering the
vehicle
Raising the vehicle
You ca n ra ise your veh icle temporarily, for ex
ample to drive over a tall curb.
~ Se lect the following i n the MMI: I CARI f unc
t ion button >
Raise control button.
~ Wait for the arrows in the d isplay to stop
blinking and the vehicle to reach its fina l po
s it io n.
Lowe ring the vehicle
~ T o lower the veh icle, select the fo llow ing in
the MMI: ICARlfunction button>
Lower con
trol button.
~ Wa it for the arrows in the d isplay to stop
blinking and th e vehicle to lower complete
ly . ag
ile
balanced
Standard
balanced
(D Note
---.. ,
---.. ,
sporty Deployment t ime
adapt ed
sporty
- Remember that your ve hicle is not sui ta
ble fo r dr iv ing offroa d even when it is
raised . There is not enough ground clear
ance.
- If the vehicle is ra ised, it will lower auto
matically when driving 62 mph (100 km/
h) or faster.
Driver messages
Air suspension : vehicle currently too low.
Le vel control running
Air suspension: vehicle currently too high. Level control running
T he dr iver mess age swi tches o ff when the lev
el con tro l process is comp lete.
Page 108 of 300

106 Night vision assistant
Night vision assistant
Description
Applies to vehicles: with night v isio n ass istant
Fig. 107 Display: n ight vis ion assistant
"Night vis ion assistant with pedestrian detec
tion" uses an infrared camera to monitor the
area in front of you r vehicle at night. Within
the limits of the system, it can display objects
up to about 1000 feet (300 meters) away. The
heat image of a pedestrian detected by the
camera is shown in the instrument cluster dis
p lay ¢
fig. 107. Warm areas appear lighter
and cold areas appear darker.
Pedestrian detection
Applies to vehicles: with nig ht v isio n ass istant
Fig. 108 Display: yellow pedestr ian marking
Fig . 109 D isplay: symbol when infrared image is not
visib le
Night vision assistant can detect pedestrians
that are between about 50 and 300 feet (15
and 90 meters) in front of the vehicle, under
ideal conditions.
If a pedestr ian is detected
when it is dark outside and the vehicle head
lights are switched on, the pedestrian is high
lighted in yellow¢
fig. 108, ¢ page 107,
General information. If another display such
as navigation replaces the image from the
night vision assistant, the symbol
~11 appea rs
in a tab
¢fig . 109.
(D Tips
If the night vision assistant image does
not appear when the system is switched
on, you can access it with the buttons on
the multifunction steering wheel
¢pa ge 24.
Pedestrian warning
Applies to vehicles: wit h night vision assistant
Fig. 110 D isp lay: pedestrian warning
Fig . 111 D isp lay: pedestr ian warning w ith another dis
play
If a pedestr ian is detected in an area in fron t
of the vehicle that the system considers criti
ca l, the pedestrian is highlighted in red
¢fig . 110 and a warning tone sounds. This
area is based on the vehicle speed and
Page 109 of 300

steering angle. The pedestrian warning prompts you to pay even closer attention to
the area in front of the vehicle and to watch
out for pedestrians.
I f another display such as the trip comp uter
replaces the image from the night vision as
sistant, the indicator light turns red when
there is a pedestrian warn ing
I Q fig. 111.
@ Tips
The pedestrian marking and warning tone can be adjusted in the MMI
¢ page 108.
General information
Applies to vehicles: with night vision assistant
N 0
8 :i:
~
Fig. 112 Front of the vehicle: night vision assistant
camera
The following situations may affect the func
tion of the night vision assistant system:
- poor v is ibility such as snow, rain, fog or
heavy road spray
- dirty lens on the night vision assistant cam- era
Make sure the n ight v ision assistant camera
i::> fig. 112 is not cove red by stickers, deposits
or any other obstruct ions because that can
prevent the camera from working properly.
F or information on cleaning the lens, refer to
¢page 205.
P edestrian detection depends on the differ
ence in temperat ure between the person and
the background. Pedestrians may not be de
tected if the temperature difference is too
small. The pedestrian highlighting feature is
deactivated at temperatures above 77 °F (25
0
() and when it is light outside.
N ig ht visi on ass is ta n t 107
A WARNING
Night vision ass istant has limits and can
not always detect pedestr ians . Always pay
close attention to traffic and the area
around your vehicle even when night vision
assistant is sw itched on.
- Night vision assistant can only warn
about people located within the visual
range of the infrared camera. The vis ual
range corresponds to the image in t he in
strument cluster display.
- Night vision assistant may not detect
peop le and highlight them if
- they are not in an upright posit ion, for
example if they are sitt ing, crouching
or lying down and/or
- if the outline in the display is incom
plete or interrupted, for example be
cause the person is part ially hidden by
a parked vehicle .
@ Tips
- Pedestrian detection and the pedestrian
warm ing a re limited to objects that are
detected as pedestrians. The system
does not detect an imals. Even though
the shape and warmth radiated by each
object detected is evaluated, the system
does have limitat ions and it can give in
correct warnings .
- For technical reasons, the image pauses
in split second intervals.
Switching on and off
Applies to vehicles: with night vision assistant
F ig. 113 Area around the light switch: night v is ion as-
s ista nt button .,.
Page 114 of 300

112 Automatic Transmission
When parking on a level surface, simply place
the selector lever in the P position. On slopes,
activate the parking brake first and then
move
the selector lever to the P position. This pre
vents too much stress from being placed on
the locking mechanism.
A WARNING
Read and follow all WARNINGS Q .&. in Se
lecting a selector lever position on
page
111.
- Do not press the accelerator pedal when
changing the selector lever position
wh ile the vehicle is stationary and the
engine is ru nn ing. This could result in a
crash .
- Never engage R or P while driving.
It
could cause a crash .
- Power is still transmit ted to the whee ls
when the engine is running at idle. To
prevent the vehicle from "creeping", you
must keep your foot on the brake in all
selector lever positions except P and N
when the engine is running. Do not inad
vertently press the accelerator pedal
when the veh icle is stationary . Otherwise
the vehicle will start to move immediate
ly, even if the parking brake is set. This
could result in a crash.
Kick-down
Kick-down enables maximum acceleration .
When you press the accelerator pedal down
beyond the resistance point , the automatic
transmission downshifts into a lower gear, de pending on vehicle speed and engine RPM.
It
shifts up into the next h igher gear once the
maximum specified engine RPM is reached .
A WARNING
Please note that the wheels could spin on
slic k or slippery roads when kick-down is
active.
Shifting manually
The shift paddles allow the driver to shift the
gears manually .
Fig. 118 Steering whee l: sh ift in g manually
" To shift to a higher or lower gear temporari
ly, tap the
0 or 0 shift paddle Q fig. 118.
" To switch manual mode on, press the~
button. M and the gear that is currently en
gaged @appears in the instrument cluster
display
Q page 109, fig. 115.
" To shift up one gear, tap the right shift pad
dle
G) ¢ fig . 118 .
" To shift down one gear, tap the left shift
paddle Q.
" To switch manual mode off, press the~
button again, or
" Move the selector lever back and release it .
When you acce lerate or reduce the speed, the
transmission automatically shifts into the cor
rect gear shortly before reaching the RPM lim
it. If you select a lower gear than the one cur
rently shown in the display, the automatic
transmission will only shift down once there is no danger of exceeding the maximum RPM .
The engine braking effect increases when you
downsh ift when going downhill.
. Transmission malfunction
[O] Transmission: please press the brake ped
al and select the position again
Press the brake pedal and select the desired
se lector lever position again. You can then
continue driving.
[O] Transmission hot: please modify driving
~le
~
Page 120 of 300

118 Advanced Parking System
Reverse Parking
Applies to vehicles: with park ing system advanced
Parking mode 1 con be used when parking in
a garage or into a parking space.
Fig. 127 MMI display: aiming at a parking spot
Fig. 128 MMI display : al igning the vehicl e
• Turn the steering wheel until the orange
orientation lines
(D appear in the parking
spot
c::> fig . 12 7 . Use the markings @to help
you estimate the distance from an obstacle. Each marking represents 3
ft (1 meter). The
blue area represents an extension of the ve
hicle's outline by approximately 16
ft (5 me
ters) to the rear.
• While driving in reverse gear, adjust the
steering wheel angle to fit the parking space
with the aid of the orange orientation lines
¢(D. @ marks the rear bumper. Stop the
vehicle when the red orientation line © bor
ders an object
c::> ,& !
_& WARNING
-The rear view camera does not show the
entire area behind the vehicle
¢page 115, fig. 123. Watch out espe
cially for small children and animals. The rear view camera cannot always detect
them, posing risk of an accident!
- Please note that objects not touching the
ground can appear to be further away
than they really are (for example, the
bumper of a parked vehicle, a trailer
hitch, or the rear of a truck). In this case,
you should not use the help lines to help
with parking, which poses danger of an accident!
(D Note
In the M MI dis play , the direction of travel
of the vehicle rear is represented depend
ing on the steering wheel angle . The vehi
cle front swings out more than the vehicle
rear. Maintain plenty of distance so that
your outside mirror or a corner of your ve
hicle does not collide with any obstacles.
This can damage to your vehicle.
Parallel Parking
Applies to vehicles: with parking system adva nced
Use parking mode 2 to help you parallel pork
along the side of a street.
Fig. 129 MMI display: blue surface in the park ing spot
Fig. 130 MMI disp lay: Blu e curve on the curb
Page 121 of 300

The following steps app ly only when there is
no obsta cle such as a wa ll near the parking
spot. Otherwise, please read the information
provided in the "Parking Next to Obstacles"
section
c::> page 119.
~ Activate the turn signal.
~ Position your vehicle parallel to the edge of
the street, approximately 3 ft (1 meter)
from a parked vehicle .
~ Switch the MM I on and se lect reverse gear .
The parking aid tu rns o n and parking mode
1 appears on the display .
~ Press the contro l bu tton (D c::> fig. 129 on
the MMI contro l conso le. Parking mode 2
appea rs .
~ Back up and align yo ur vehicle so t he b lue
area @ borders on the rear end of the vehi
cle or on the parking spot line. The bl ue area
represents an extension of the veh icle's out
line by approximate ly 16 ft (5 meters) to the
rear . The long side of the blue area should
be o n the curb . The entire blue area must fit
i nto the parking spot .
~ With the vehicle stopped, turn the steer ing
whee l to the right as far as it w ill go.
~ Back into the park ing spot until the blue
cu rve to uches the curb
c::> fig. 130. Stop the
vehicle.
~ With the veh icle stopped, turn the steer ing
wheel to the left as far as it will go .
~ Continue to back into the park ing spot until
the vehicle is parked para llel to the curb .@
marks the rear bumper. Stop the vehicle
when the red orientation line@ borde rs an
object
c::> .&, . Keep an eye o n the fron t of
yo ur vehicle while do ing this
c::> (j) .
Parking next to obstacles
When t here is an obstacle (such as a wall)
next to the pa rking spot, choose a spot w ith
mo re space on t he sides. Position the long
side of the b lue a rea so that there is sufficient
space from the curb. The a rea m ust no t be on
the c urb. You w ill also need to start turn ing
the steering wheel much earlie r. T he re should
be a suffic ient amo unt of space between the
curb and the blue curve, and the blue c urve
c::> fig. 130 must not touch the curb.
Ad vanced P arking S ystem 119
A WARNING
-The rear view camera does not show the
entire area behind the vehicle
c::> page 115, fig. 12 3 . Watch out espe
cially fo r small children and anima ls . The
rea r view came ra ca nnot alway s de te ct
them, posing r is k of an a ccident!
- P lease note that objects not touching the
g rou nd can appear to be further away
than they really are (for example, the
bumper of a parked vehicle, a trai ler
hitch, or the rea r of a truck) . In this case,
you shou ld not use the help lines to help
with parking, wh ich poses danger of an
accident!
(D Note
In the MMI display, the direction of travel
of the vehicle rear is represented depend
i ng on the steering wheel angle . The vehi
cle front swings out more than the vehicle
rear. Maintain ple nty of d istance so that
your outside mirror or a corner of your ve
hicle does not col lide with any obstacles.
T his can damage to your ve hicle.
(0 Tips
The left o r right orientation lines and su r
faces will be disp layed, depending on the
turn s ignal being used .
Adjusting the display
and warning tones
App lies to v ehicl es: wi th parkin g sys tem advanced
The display and warning tones can be adjust
ed in the MMI.
~ Select: I CAR I function b utton > Car sy stem s
contro l button > Dri ver a ssist > Parking aid
> Setting s control b utton .
Display
On -when the parking system is switched on,
either the vis ual d isp lay or the picture from
the rea r view camera is disp layed .
IJI>
Page 127 of 300
.. Make sure to use the right child restraint
correct ly to protect children
Q page 166,
Child Safety.
.. Sit properly in your seat and make sure that
your passengers do the same¢
page 54,
General recommendations .
.. Faste n your safety belt and wear it properly.
Also instruct your passengers to fasten their
safety belts properly ¢
page 134 .
What impairs driving safety?
Safe driving is directly related to the condi
tion of the vehicle, the driver as well as the
driver 's ability to concentrate on the road
without being distracted.
The driver is respons ible for the safety of the
veh icle and all of its occupants.
If your ability
to drive is impai red, safety r isks for everybody
in the vehicle increase and you also become a
hazard to everyone else on the road ¢ _&. .
Therefore:
.. Do not let yourself be dist racted by passen
gers or by using a cellular telephone.
.. NEVER drive when your driving ability is im
paired (by medications, alcohol, drugs, etc.).
.. Observe all traffic laws, rules of the road
and speed limits and plain common sense .
.. ALWAYS adjust your speed to road, traffic
and weather conditions .
.,. Take frequent breaks on long trips . Do not
drive for more than two hours at a stretch.
.. Do NOT drive when you are tired, under
pressure or when you are stressed.
A WARNING
Impaired driving safety increases the risk
of serious personal injury and death when
ever a vehicle is being used.
Driving Safely 125
Proper occupant
seating positions
Proper seating position for the driver
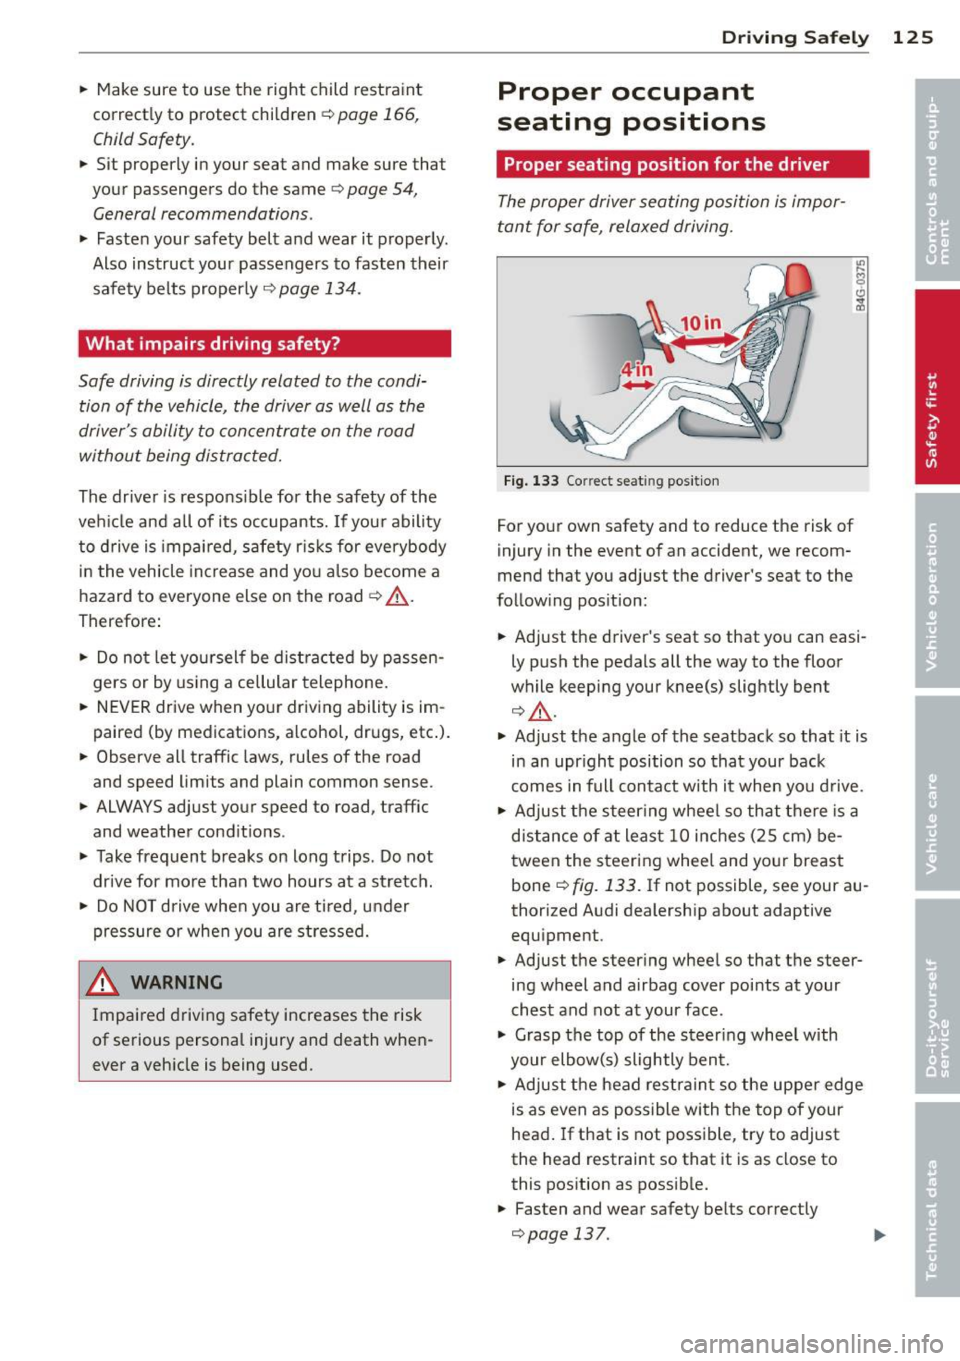
The proper driver seating position is impor
tant for safe, relaxed driving .
Fig. 133 Correct seat ing pos it ion
For your own safety and to reduce the risk of
injury in the event of an accident, we recom
mend that you adjust the driver's seat to the
follow ing pos ition:
.. Adjust the driver's seat so that you can easi
ly push the pedals all the way to the floor
wh ile keeping your knee(s) slightly bent
¢ _&. .
.. Adjust the angle of the seatback so that it is
in an upr ight position so that your back
comes in full contact w ith it when you drive.
.. Adjust the steering wheel so that there is a
distance of at least 10 inches (25 cm) be
tween the steering wheel and yo ur breast
bone
Q fig. 133. If not possible, see your au
thorized Audi dealership about adaptive
equipment .
.. Adjust the steer ing wheel so that the steer
ing wheel and airbag cover points at your
chest and not at your face.
.,. Grasp the top of the steering whee l with
your elbow(s) slightly bent.
.. Adjust the head restraint so the upper edge
is as even as possible with the top of your
head. If that is not poss ible, try to adjust
the head restraint so that it is as close to
this position as possible .
.. Fasten and wear safety belts correctly
¢page 137.
Page 128 of 300
126 Driving Safely
• Always keep both feet in the footwell so
that you are in control of the vehicle at all
times.
For detailed information on how to adjust the
driver's seat, see
r:::> page 55.
A WARNING
Drivers who are unbelted, out of position
or too close to the airbag can be seriously
injured by an airbag as it unfolds. To help
reduce the risk of serious personal injury:
- Always adjust the driver's seat and the
steering wheel so that there are at least
10 inches (25 cm) between your breast
bone and the steering wheel.
- Always adjust the driver's seat and the
steering wheel so that there are at least
4 inches (10 cm) between the knees and
the lower part of the instrument panel.
- Always hold the steering wheel on the
outside of the steering wheel rim with
your hands at the 9 o'clock and 3 o'clock positions to help reduce the risk of per
sonal injury if the driver's airbag inflates.
- Never hold the steering wheel at the
12 o'clock position or with your hands at
other positions inside the steering wheel
rim or on the steering wheel hub. Hold
ing the steering wheel the wrong way
can cause serious injuries to the hands,
arms and head if the driver's airbag in
flates.
- Pointing the steering wheel toward your
face decreases the ability of the supple
mental driver's airbag to protect you in a
collision.
- Always sit in an upright position and nev
er lean against or place any part of your
body too close to the area where the air
bags are located.
- Before driving, always adjust the front
seats and head restraints properly and
make sure that all passengers are prop
erly restrained.
- Never adjust the seats while the vehicle
is moving. Your seat may move unexpect- edly and you could lose control of the ve
hicle .
- Never drive with the backrest reclined or
tilted far back! The farther the backrests
are tilted back, the greater the risk of in
jury due to incorrect positioning of the safety belt and improper seating posi
tion .
- Children must always ride in child seats
r:::> page 166. Special precautions apply
when installing a child seat on the front passenger seat¢
page 142.
Proper seating position for the front
passenger
The proper front passenger seating position
is important for safe, relaxed driving .
For your own safety and to reduce the risk of
injury in the event of an accident, we recom
mend that you adjust the seat for the front
passenger to the following position :
• Adjust the angle of the seatback so that it is
in an upright position and your back comes in full contact with it whenever the vehicle is
moving.
• Adjust the head restraint so the upper edge
is as even as possible with the top of your
head. If that is not possibl e, try to adjust
the head restraint so that it is as close to
this position as possible¢
page 128.
• Keep both feet flat on the floor in front of
the front passenger seat .
• Fasten and wear safety belts correctly
r:::> page 13 7.
For detailed information on how to adjust the
front passenger's seat, see
r:::> page 54 .
A WARNING
-
Front seat passengers who are unbelted,
out of position or too close to the airbag
can be seriously injured or killed by the air
bag as it unfolds. To help reduce the risk of
serious personal injury:
Page 138 of 300
136 Safety belts
occupant will slam violently into the steering
wheel, instrument panel, windshield, or what
ever else is in the way
c::> fig. 138. This impact
with the vehicle interior has all the energy
t hey had just before the crash.
Never rely on a irbags alone for protection.
Even when they deploy, airbags provide only
additional protection. Airbags are not sup
posed to deploy in all kinds of accidents. Al
though your Audi is equipped with airbags, all
vehicle occupants, including the driver , must
wear safety belts correctly in order to mini
mize the risk of severe injury or death in a
crash.
Remember too, that airbags will deploy only
once and that your safety belts are always
there to offer protection in those accidents in
which airbags are not supposed to deploy or
when they have already deployed . Unbelted
occupants can also be thrown out of the vehi
cle where even more severe or fatal injuries
can occur.
It is also important for the rear passengers to
wear safety belts correctly. Unbelted passen
gers in the rear seats endanger not only them
selves but also the driver and othe r passen
gers ~
fig. 139. In a frontal collision they will
be thrown forward violently, where they can
hit and injure the driver and/or front seat pas
senger .
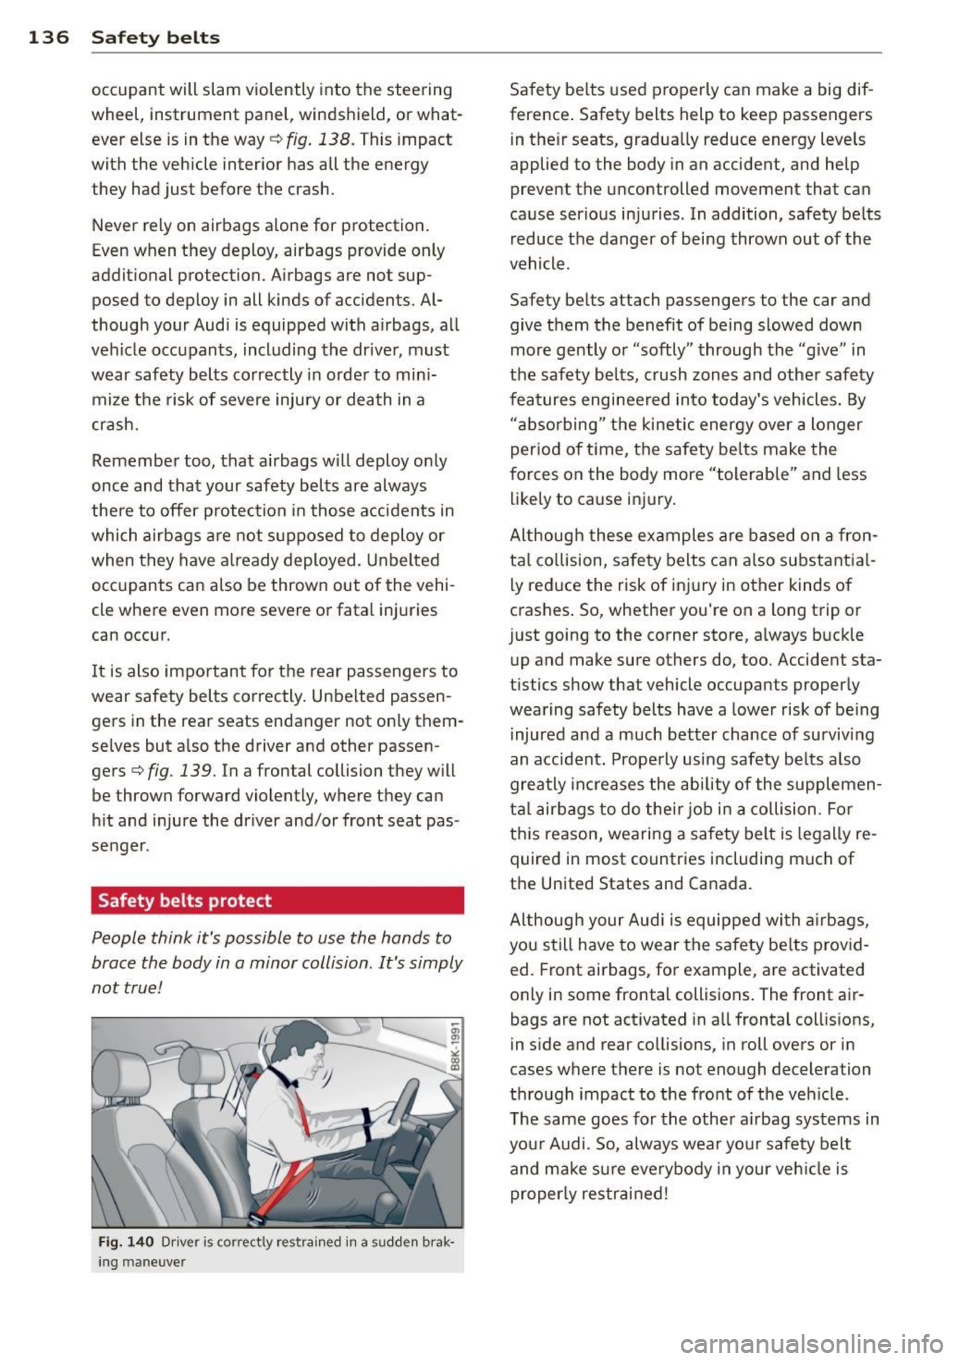
Safety belts protect
People think it's possible to use the hands to
brace the body in a minor collision . It's simply
not true !
Fig. 140 Driver is co rr ect ly re strain ed in a sudd en brak
ing maneuve r
Safety belts used properly can make a big dif
ference. Safety belts help to keep passengers
in their seats, gradually reduce energy levels
applied to the body in an accident, and help
prevent the uncontrolled movement tha t can
cause serious injuries . In addition, safety belts
reduce the danger of being thrown out of the
vehicle .
Safety belts attach passengers to the car and
give them the benefit of being slowed down
more gently or "softly" through the "give" in
the safety belts, crush zones and other safety
features engineered into today's vehicles. By
"absorbing " the kinetic energy over a longer
period of ti me, the safety belts make the
forces on the body more "tolerable" and less
likely to cause injury.
Although these examples are based on a fron
tal collision, safety belts can also substantial
ly reduce the r isk of injury in other kinds of
crashes. So, whether you're on a long trip or
just going to the corner store, always buckle up and make sure others do, too. Accident sta
tistics show that vehicle occupants properly
wearing safety belts have a lower risk of being
injured and a much better chance of surviving
an accident. Properly using safety belts also
greatly increases the ability of the supplemen
tal airbags to do their job in a collision . For
this reason, wearing a safety belt is legally re
quired in most countries including much of
the United States and Canada.
Although your Audi is equipped with airbags,
you still have to wear the safety belts provid
ed. Front airbags , for example, are activated
only in some frontal collisions. The front air
bags are not activated in all frontal collisions,
in side and rear collisions, in roll overs or in
cases where there is no t enough decelera tion
through impact to the front of the vehicle .
The same goes for the other airbag systems in
your Audi . So, always wear your safety belt
and make sure everybody in your vehicle is
properly restrained!