warning AUDI A8 2013 Owners Manual
[x] Cancel search | Manufacturer: AUDI, Model Year: 2013, Model line: A8, Model: AUDI A8 2013Pages: 318, PDF Size: 79.34 MB
Page 221 of 318

headlight washer system (night vis ion as
sist*) .
If the area is heavily soi led, you can
clean it with glass clean ing agent and a soft,
dry cloth.
(D Note
- If you wash your vehicle with a pressure
washer,
- make sure there is enough d istance to
sensors in the rear bumper .
- do not clean the camera lenses and the area around them with the pressure
washer.
- Never use warm or hot water to remove
snow or ice from the camera lens . Th is
could cause the lens to c rac k.
- Neve r clean the came ra lens w it h abra
s ive p roducts.
Waxing and Polishing
Waxing
A good wax coat ing protects the ve hicle pa int
to a large extent aga inst the environmen tal
factors listed under
r::o page 215, Washing and
even against slight scratches .
You can use a liquid ca r wax to p rotect your
pa int as soo n as o ne week after your veh icle
h as been de livered .
Even if you regular ly use a
waxing process in
automatic ca r washes, we recommend t hat
you ma nually app ly a coat of wax to give the
pa int extra protec tion , particula rly if wate r no
l onge r beads on the clean paint .
P rotect p lastic body pa rts with ca r wax i n the
same way as the vehicle body.
During warm weather dead insects tend to
collect on the front bumper and on the for
ward area of the hood . They a re much easier
to remove from pai nt tha t is waxed
often.
Polishing
Poli sh your vehicle only if the pa int has lost its
shine and the gloss cannot be brought back
with wax .
Cleaning and protec tion 219
If the po lish used does not contain p reserva
tive compounds, the paint must be waxed af
terwards.
_& WARNING
A lways read and heed all WARNINGS and
other information
r::opage 215 .
([) Note
Do not use car wax on
- matte or anodized meta l trim
- ru bber or ru bber- lik e t rim.
Trim strips
Metal trim needs special care.
For environmental reasons, Audi fabric ates
the bright t rim strips and trim p ieces from
pure chromium-free al uminum .
Dirt and marks on the trim strips shou ld be
removed w ith a
pH-balanced cleaning agent
(do not use a chrome cleane r) . Aud i dealers
carry clean ing produc ts which have been test
ed fo r use on your vehicle and are not ha rmfu l
to the environment.
T o avoid co rrosion on the exter ior trim st rips,
o nly a pH-ba lanced solu tion should be used
for the windsh ield washer.
_& WARNING
A lways read and heed all WARN INGS and
o ther in formation
r::o page 215 .
Plastic and vinyl
Plastic needs special care.
Use a clean , damp cloth or sponge to remove
dust and light s urface di rt . For other soil, use
a lukewa rm all-p urpose cleaning so lution or a
mild saddle soap for v inyl tr im . Remove wate r
spots and traces of soa p wi th a cle an, d amp
clo th or sponge. Use a clean, so ft cloth to rub
dry .
G rease , ta r or oil stains can be removed w it h a
cl ea n clot h or sponge soake d wit h all- purpose .,.
•
•
Page 222 of 318
220 Cleaning and protec tio n
cleaner or with a solvent designed especially
to clean viny l.
Occasionally apply a colo rless v inyl or leather
preservat ive to reta in the material's l uste r
and p liability .
A WARNING
Always read and heed a ll WARNINGS and
other information
Q page 215.
Aluminum trim
Use only n eutr al- pH products to remove spots
and depos its from aluminum surfaces.
Chrome care products and alkaline cleaners
will attack alum inum surfaces and can dam
age them over time .
A WARNING
Always read and heed a ll WARNINGS and
other information
Q page 215.
Touch -up paint
Minor paint damages should be touched up
immediately .
.. Use either a touch-up pa int stick or spray
paint to cove r minor scratches and nicks .
Your Audi dealer has touch-up paint for minor scra tches and stone chips. Scratches should
be touched up soon after they occur to pre
vent corrosion .
If a spot starts to rust, however, a simple
touch-up job w ill not be enough. The affected
surface must be sanded smooth and coated
with an anti-rust pr imer befo re the pa inted
finish ca n be restored .
The number for the original vehicle paint can be found on the vehicle ident ificat ion label
Q page 290 .
A WARNING
Always read and heed a ll WARNINGS and
other information
Qpage 215.
Windows
Clear vision to all sides .
Clean all windows regula rly to remove road
film and car wash wax buildup.
.. Remove snow from w indows us ing a brush.
.. Use a plastic ice sc raper to remove ice from
w indows and mirrors.
.. Remove other residue on the windows with
a spray-on g lass cleaner .
.. Wipe the windows dry with a clean piece of
cloth or kitchen paper towel.
The best way to remove snow from windows and mirrors is to use a brush . Use a non-abra
s ive
plastic ic e scrape r -better st ill, a spray
deicer - to remove
ice from w indows and m ir
ro rs.
Oil , grease or s ilicone residue can be removed
with
gla ss cleaner or silicon e remover . How
ever, wax res idue requires the use of a spec ial
ly formula ted so lve nt. Please contact your
A udi dealer for adv ice on safe products for
wax removal.
Windows should also be cleaned on the inside at regu la r i nte rvals .
Never dry windows with the same chamo is
that you use to dry pai nted surfaces. Wax resi
due on the chamois can impa ir v is ion through
t h e windows.
A WARNING
- Always re ad and heed a ll WAR NINGS and
other info rmation
Q page 215.
- The windsh ield must no t be treated w ith
water-repellen t materials. They can in
crease glare unde r poo r vis ibility condi
tions such as wetness, darkness, or when
the sun is low on the horizon . In addi
tion, they can cause the w indshield w ip
ers to chatter.
(D Note
- Never use warm or hot water to remove
snow and ice from windows and mirrors .
Th is could cause the glass to crack. ..,_
Page 223 of 318
-To prevent damage to the wi res of the
rear defogger, do not place any adhesive
stickers on the inside of the rear window
over the wires.
- To he lp prevent dirt from scratching the
window, always scrape in a forward di
rection - pushing the scraper away from
you - never back and forth .
Cast (light) alloy wheels
Cast (light) alloy wheels require special care.
~ Wash the wheels with a sponge or hose
brush every other week.
~ For deep cle aning afterwa rds, use only a
dedica ted
acid -free cast alloy wheel cleaner.
~ Rub a coa t of liquid wax on to the r ims every
three month . Be sure to reach and treat all
parts of the rim .
To preserve the decorat ive appearance of the
cast alloy wheels , some special care is neces
sary . In add it ion to road dirt and salt , brake
dust is also corros ive. If left on for too long,
b rake dust can cause pi tting.
Use only specia l
acid-free cleaners formulated
for alloy rims. Safe products are available at
your Aud i deale r. Never leave the cleaner on
the r ims longe r than spec ified on the label. If
n o t rinsed off promptly , the acid co nta ined in
some cleaners can attack the th reads on the
wheel bo lts .
Never use abras ive or metal polishing clean
in g agents. If the prote ctive coat ing has been
chipped, e .g. by k icked up road d irt, touch it
up as soon as possib le .
A WARNING
- Moist ure and ice on brakes may affect
braking efficiency
i:> page 200, General
information.
Test the brakes carefully
each time you wash the vehicle .
- Always read and heed all WARNINGS and other information
c> page 215.
Cleaning and protec tion 221
Body cavity sealing
The body cavity sealing does not need to be
checked .
All body cav ities which could be affected by
corros io n have been thoroughly protected at
the factory .
This sealing does not require any inspection or additional treatmen t. If any wax should seep
out of the cavi ty when the ambie nt tempera
ture is high, it can be removed with a p lastic
scraper and a su itable solvent .
A WARNING
Solvents can be dangero us.
- Benz ine is flammab le and toxic. If you
use benz ine fo r removing the wax , keep
sparks, flame and lig hted cigarettes
away. Never d ump ben zine on the
grou nd, into open streams or down sew
age drains .
- Be s ure to obse rve a ll safe ty and environ
men tal reg ulations. Fo llow all instruc
tions on the container.
- Always read and heed a ll WAR NIN GS and
o ther information ¢
page 215.
Chassis
Have the undercoating checked for damage
from time to time.
The lower body shell of your Aud i is also thor
oughly p rotec ted against cor ros io n.
Any damage to the undercoat ing caused by
road hazards should be repaired promptly .
A WARNING
Too much undercoating in the wrong pla
ces can cause a fire.
- Do not apply additional undercoating or
rustp roofing on or nea r the exhaust
manifold, exhaust pipes, catalyti c con
ver ter or he at shields. While driving, the
substance used fo r undercoating co uld
overheat and cause a fire.
•
•
Page 224 of 318
222 Cleaning and protec tio n
-Always read and heed all WARNINGS and
other information ¢
page 215.
Exhaust tail pipes
Road salt and other corrosive materials will
damage the material in the exhaust tail pipes
if they are not cleaned regularly . Do not clean
the tail p ipes with wheel cleaner, paint pol ish,
chrome po lish or other abrasive cleaners.
C lean the tail p ipes with car ca re p roducts
that are su itable for stain less stee l.
Your author ized Audi dealer can provide clean
ing p roducts that have been tested and ap
p roved fo r you r vehicle.
Care of interior
Infotainment components
The MMI/RSE* display may be cleaned with a
soft cloth and commercially-ava ilable "LCD
cleaner" . The cloth should be coated lightly
when the clean ing solution when cleaning the
d isplay.
The MMI/RSE* contro ls must be cleaned first
with a brush so t hat dirt does not ente r the
un it or enter between the buttons and the
housing. Then wiping the controls with a cloth
dampened with dish detergent and water is recommended.
CJ) Note
To prevent sc ratches, only clean the dis
play when it is d ry.
- To prevent damage, ma ke sure fluids do
not enter the controls.
Aluminum trim
Use only n eutral-pH products to remove spots
and deposits from aluminum surfaces.
Chrome ca re products and alkaline cleaners
will attack aluminum s urfaces and can dam
age them over time.
A WARNING
A lways read and heed all WARNINGS and
other information¢
page 215.
Fabrics and fabric coverings
Fabrics and fabric cover ings (e .g. seats, door
trim panels, etc.) should be cleaned at regular i ntervals w ith a vacuum cleaner. This removes
su rface di rt particles which could become em
bedded in the fabric through use. Steam
cleaners should not be used, because the
steam tends to p ush the dirt deeper into the
fabric and lock it there.
Normal clean ing
Generally, we recommend using a soft sponge
o r a lint-free microfiber cloth to the clean fab
ric. Brushes shou ld only be used for carpets
and floor mats, since other fabric surfaces
could be harmed by brushes.
Norma l su rface stains can be cleaned using a
commercially available foam cleaner . Spread
the foam on the s urface of the fabric with a
soft sponge and work it in gently. Do not satu
rate the fabric. Then pat the foam dry using
absorbent, dry cloths (e.g. m icrof iber cloth)
and vacuum it after it has dried completely.
Cle anin g sta ins
Stains caused by beverages (e .g. coffee, fruit
juice, etc.) can be treated with a mild deter
gent solution. Apply the detergent solution
with a sponge. In the case of stubborn stains, a detergent paste can be applied directly to
the stain and worked into the fabric. After
wards, use copious amounts of clean water to
remove the rema in ing deterge nt. Apply the
water wit h a damp clo th or sponge and pat
the fabric dry with an abso rbent, dry cloth .
Stains from choco late or makeup should have
detergent paste (e.g. ox-gall soap) rubbed in
to them. Afterwa rds, remove the soap with
water (damp sponge) .
Alcohol can be used to treat stains from grease, o il, lipstick or a ballpoin t pen . Melted ..,.
Page 225 of 318
grease or dye must be patted off using ab
sorbent material. It may be necessary to re
treat the areas with detergent paste and wa
ter.
In the case of general soiling of the uphols
tery and cover material, we recommend hiring
a specialist that has the equipment to clean
the seat covers and other fabric surfaces by
shampooing and spray extraction.
A WARNING
Always read and heed all WARNINGS and
the information
Qpage 215.
Open Velcro fasteners on your clothing can
damage the seat cover. Please make sure
that Velcro fasteners are closed.
Plastic parts and instrument panel
Always use a clean cloth moistened in clear
water to clean these areas. For persistent dirt
use an Audi approved
solvent-free plastic
cleaner/protectant.
A WARNING
Solvents can change the properties of
some plastics and make it harde r for the
airbag to deploy.
- Never clean the instrument panel or the
surface of airbag modules with cleaning
products that contain solvents.
- Products containing solvents will make
the surface of this part porous.
- Serious injuries can result if plastic parts
come loose when the airbag is deployed.
- Always read and heed all WARNINGS and other information~
page 215.
(D Note
Cleaning agents containing solvents will
attack the material and can change the
way it behaves.
Cleaning and protection 223
Trim and molding
Trim and molding in the vehicle interior can
be cleaned with a dry microfiber cloth. To pre
vent scratches, do not use any cleaning solu
tions.
Natural leather
Appl ies to vehicles: with natural leather
Audi makes great efforts to maintain the
properties, natural look and feel of interior
leather.
General
We offer many different types of leathe r on
our vehicles. Most are different types of nappa l eather, which has a smooth surface and
comes in various colors.
Th e intensity of the color determines the visu
al characteristics and appearance. If the sur
face of the leather has a typical natural look,
then the leather is a nap pa leather that has
been left in a relatively natural condition. This
leather offers particularly good comfort and
breathes well. Fine veins, closed grains, insect
bites, skin folds, and subt le variations in color
remain visible. These characteristics demon
strate that the material is natural.
Natural nappa leather is not covered by a col
or finish. It is therefore more sensit ive to soil
ing and wear, which is something you need to
consider if children, animals or other factors
might prove to be particularly hard on the
leather .
By contrast, leather types that are covered by
a colored finish layer are more durable. This
has a positive effect on the leather 's resist
ance to wear and soiling in daily use. On the
other hand, the typical characteristics of natu
ral leather are barely or not apparent. Howev
er, this does not mean that the leather itself
is of inferior quality. •
•
Page 227 of 318
~ Apply the product very sparing ly .
~ Wipe it off with a damp cloth.
If you have any questions abo ut cleaning and
caring for the leather in your vehicle, it is best
to contact your authorized Audi dealer, who
will be glad to help you and tell you about our
fu ll range of leather care products, such as:
- Leather cleaning and care kit
- Creams to care for colored leathe r
- Spot removers for ballpo int pens, shoe pol-
ish , etc.
- Oil/grease dissolv ing spray
- New and upcoming products.
A WARNING
Always read and heed all WARNINGS and other information
~ page 215.
CD Note
- Never use chemical solvents (e.g. lighter
flu id, turpentine), waxes, shoe polis h or
s imilar products on the leather surfaces
i n your Audi.
- To avoid damage, have stubborn stains removed by a commerc ial cleani ng spe
cia list .
Cleaning Alcantara ® (synthetic suede)
Appl ies to vehicles : wit h Alcantara upholstery
Removing dust and dirt
~ Moisten a cloth, squeeze out excess water
and wipe down the se at su rfaces .
Removing stains
~ Moisten a cloth w ith lukewarm water or
with diluted ethyl (rubb ing) alcohol.
~ Dab at the stain. Start at the outside and
work inwa rds.
~ Once the s tain is no longer visib le, use a
soft d ry cloth or t issue to soak up the mois
tu re .
D o not use leather cleaning produc ts on Al
cantara.
You may use a suitable shampoo fo r removing
dust and dirt.
Cleaning and protec tion 225
D ust and gr it in the po res and seams can
scratch and damage th e surface. If the car is
l eft stand ing in the sun for long per iods, the
A lcantar a cover s should be protected aga inst
direct sunlight to prevent it from fad ing.
Slight co lor variations will develop in normal
use a nd are not an indication of mate rial dete
rioration .
CD Note
- Never use chemical so lvents (e.g . lighter
fluid, tu rpenti ne), waxes, shoe polish or
simi lar p roducts on A lcantara ® surfaces .
- T o avoid damage, have stubborn sta ins
removed by a comme rcial clean ing spe
cialist.
- Do not use b rushes, stiff sponges or sim
ilarly abrasive cleani ng a ids.
Safety belts
Only well -maintained safety belts work relia
bly when needed .
~ Keep belts clean.
~ For cleaning, use a mild soap a nd wate r so l
ution . Let belts dry thorough ly and away
from d irect sunlight .
~ Do not allow i nertia ree l safety belts to re
tract before they are comp letely dry.
~ Check t he condition of your safety belts reg
ularly .
Heavi ly so iled safety be lts may not ret ra ct
properly.
A WARNING ~
D amaged safety belts can break in a crash .
- Anyth ing th at m ight damage yo ur safety
be lts could mean tha t you and your pas
sengers would not be adequate ly pro
tected in an accident.
- Safety belt performance depends on cor
rect insta llation . Never remove be lts
from the vehicle to clean them.
- Do not use chemical cleaning agents,
b leach or dyes. They have corrosive prop
erties which weaken the webb ing .
•
•
Page 228 of 318
226 Cleaning and protec tio n
-When cleaning your safety belts, inspect
them for damage.
If you discover dam
age, see your Audi dealer .
- Always read and heed all WARNINGS and
other information
¢ page 215.
Cooler
Applies to vehicles: with cooler
A layer of ice or frost in the cooler interferes
with its cooling performance.
Cl ean ing
The refr igerator sho uld be cleaned regularly.
.. Wash the cooler w ith lukewarm water and a
mild cleaning solut ion, if necessary .
.. The n wipe the cooler dry.
.. Dust and dirt will accumu late near the ven
t il ation openings in the luggage compar t
ment due to normal cooler usage. This
should be cleaned regularly.
Defrost ing
.. Swi tch the cooler off¢ page 75.
.. Remove any food or beve rages and al low
the cooler to defrost with the door open .
.. Wipe the inside of the cooler dry and clean
the cooler , if necessary .
Defrost the cooler if yo u will not be using it
for extended periods of time .
@ Note
-Do not try to speed up the defrost ing
process by applying heat.
- To reduce the risk of personal injury or
damage to the refrigera to r,
- do not use any abrasive cleaners, sol
vents, wax, aggressive cleaning solu
tions, so lutions with strong fragrances,
etc.,
- do not clean the coo ler with cleaning
tools such as stee l wool.
1l Use o nly th e co rrect cle anin g so lu ti on s. Never use gas
o lin e or d ie se l fu el.
Engine compartment
Be especially careful when cleaning the en
gine compartment.
Always switch off the ign it ion before cle an
i ng th e eng in e¢ .&. .
Plenum panel
Remove leaves from the plenum panel i n front
of the windshield under the engine compart
ment. This prevents the water drain holes
from becoming b locked, and it prevents de
bris from entering the vehicle interior through
the heat ing and ventilat ion ducts .
Corrosi on protect ion
The engine compartment and transmission
have been corrosion-protected at the factory .
Good anti-corrosion treatment is very impor
tant, partic ularly in the winter.
If the vehicle
is frequently driven on salt treated roads, the
entire engine compartment and plenum panel
shou ld be thoroughly cleaned at the end of
winter and retreated to prevent salt damage .
At the same time, the underside of t he veh icle
shou ld be washed as well.
If the engine compartment is cleaned at any
time with grease remov ing solutions
1>, or if
you have the engine washed, the anti-corro
s ion treatment is almost a lways removed as
well . It is therefo re esse ntia l to have a lo ng
lasti ng corrosion pro te ct ion reapplied to all
surfaces, seams, joints and components in the
engine compartment .
A WARNING
Be aware: The engine compartment of any
motor vehicle is a potentially hazardous
area.
- Before working in the engine compart
ment, be sure to read the information
¢page 232.
Page 231 of 318
-Blend must contain not more than 15%
MTBE.
Seasonally adjusted gasoline
Many gasoline grades are blended to perform
espec ially we ll for winter or summer driving.
During seasonal change-over, we suggest that
you fill up at busy gas stat ions where the sea
sonal adjustment is more likely to be made in
time .
(D Note
-Methanol fuels which do not meet these
requirements may cause corrosion and
damage to plastic and rubber compo
nents in the fuel system .
- Do not use fue ls that fail to meet the
specified criter ia in this chapter.
- If you are unable to determine whether
or not a particular fue l blend meets the
specifications, ask your service station or
its fuel supp lier.
- Do not use fuel for which the contents
cannot be identified.
- Fuel system damage and performance
problems resulting from the use of fuels
different from those specified are not
the responsibility of Audi and are not
covered under the New Vehicle or the Emission Control System Warranties.
- If you experience a loss of fuel economy
or driveability and performance prob l ems due to the use of one of these fuel
blends, we recommend that you switch
to unblended fuel.
Gasoline additives
A major concern among many auto manufac
turers is carbon deposit build- up caused by
the type of gasoline you use.
Although gasoline grades differ from one manufacturer to another , they have certain
things in common. All gasoline grades contain
substances that can cause deposits to collect
on vital engine parts, such as fuel injectors
and intake valves. Although most gasoline brands include additives to keep engine and
Fuel supply and filling your fuel tank 229
fuel systems clean, they are not equally effec
tive .
A udi recommends using TOP TIER Detergent
Gasoline. For more info rmation on TOP TIER
Detergent Gasoline, please go to the official
website (www.toptiergas.com).
After an extended period of using inadeq uate
fuels, carbon deposit build-ups can rob your
engine of peak performance.
Q) Note
Damage or malf unct ion due to poor fue l
quality is not covered by the Aud i New Ve
hicle Limited Warranty.
Fuel tank
Fuel filler neck
The fuel filler neck is located on the right rear
side panel behind the fuel fille r flap.
If the power locking system should fail, you
can still open the flap manually -for deta iled
instruct ions see ¢
page 231.
You can find the fuel tank capacity of your ve
hicle in
Technical Data ¢ page 292.
The label on the inside of the fuel fi ller flap
tells you the correct fue l for your vehicle. For
more information about fuel specifications,
see ¢
page 228.
Your vehicle fue l tank has an on board refuel
li ng vapor recovery system. This feature helps
to prevent fuel vapors from escaping from the
tank and polluting the environment while you refuel your vehicle . In order to fill the tank
properly while protecting the environment,
please fo llow this refueling procedure careful
ly.
_&. WARNING
Under normal operating conditions, never
carry additional fuel containers in your car.
Gas canisters and other containers used to
transport f uel can be dangero us. Such con
tainers, full or empty, may leak and could
cause a fire in a collision. If you must
•
•
Page 232 of 318
230 Fuel supply and filling your fuel tank
transport fuel to use for your lawn mower,
snow blower, etc., be very careful and al
ways observe local and state laws regard
ing the use, transportat ion and storage of
such fuel containers. Make certain the con
tainer meets industry standards (ANSI/
AS TM F852 -86) .
(D Note
Never drive your vehicle until the fuel tank
is completely empty. The irregular supply
of fuel can cause misfiring. Gasoline could
enter the exhaust system and damage the
catalyt ic converter.
Refuelling
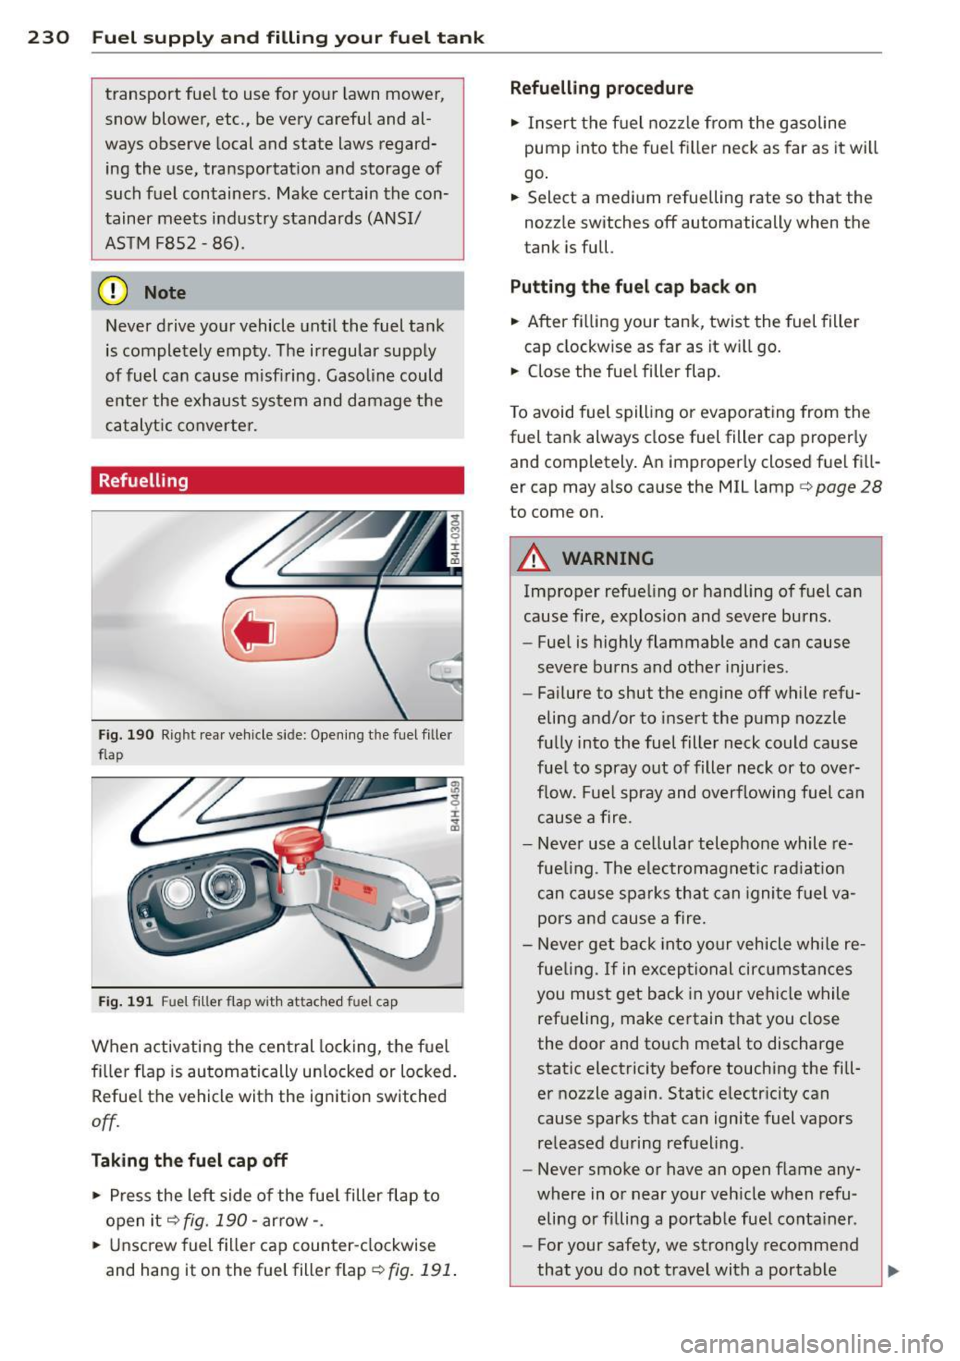
Fig. 190 Right rear vehicle side: Opening the fuel filler
flap
Fig . 191 Fuel filler flap with attached fuel cap
When activating the central locking, the fuel
fi ller flap is automatically un locked or locked.
Refuel the vehicle with the ignition switched
off.
Taking the fuel cap off
~ Press the left side of the fue l filler flap to
open it
q fig. 190 -arrow-.
~ Unscrew fuel filler cap counter-clockwise
and hang it on the fuel filler flap¢
fig. 191.
Refuelling procedure
~ Insert the fu el nozzle from the gasoline
pump into the fuel filler neck as far as it will
go .
~ Select a medium refuelling rate so that the
nozzle switches off automatically when the
tank is full.
Putting the fuel cap back on
~ After fi lling your tank, twist the fuel filter
cap clockwise as far as it w ill go.
~ Close the fue l filler flap.
T o avoid fuel spilling or evaporating from the
fuel tank always close fuel filler cap properly
and completely. An improperly closed fuel fill
er cap may also cause the MIL lamp¢
page 28
to come on.
A WARNING
Improper refue ling or handling of fuel can
cause fire, explosion and severe burns.
- Fuel is highly flammable and can cause
severe burns and other injur ies.
- Failure to shut the engine
off while refu
eling and/or to insert the pump nozzle
fully into the fuel filter neck could cause
fuel to spray out of filler neck or to over
flow. Fuel spray and overflowing fuel can
cause a fire.
- Never use a cellular telephone while re
fue ling. The electromagnet ic rad iat ion
can cause sparks that can ignite fuel va
pors and cause a fire.
- Never get back into your vehicle whi le re
fueling.
If in exceptional circumstances
you must get back in your vehicle while
refueling, make certain that you close
the door and touch metal to discharge
static electricity before touching the fill
er nozzle again. Static electricity can
cause sparks that can ignite fuel vapors
released during refueling.
- Never smoke or have an open flame any
where in or near your veh icle when refu
eling or filling a portable fuel container.
- For your safety, we strongly recommend
that you do not travel with a portable
Page 234 of 318
232 Checking and filling
Checking and filling Engine hood
Releasing the engine hood
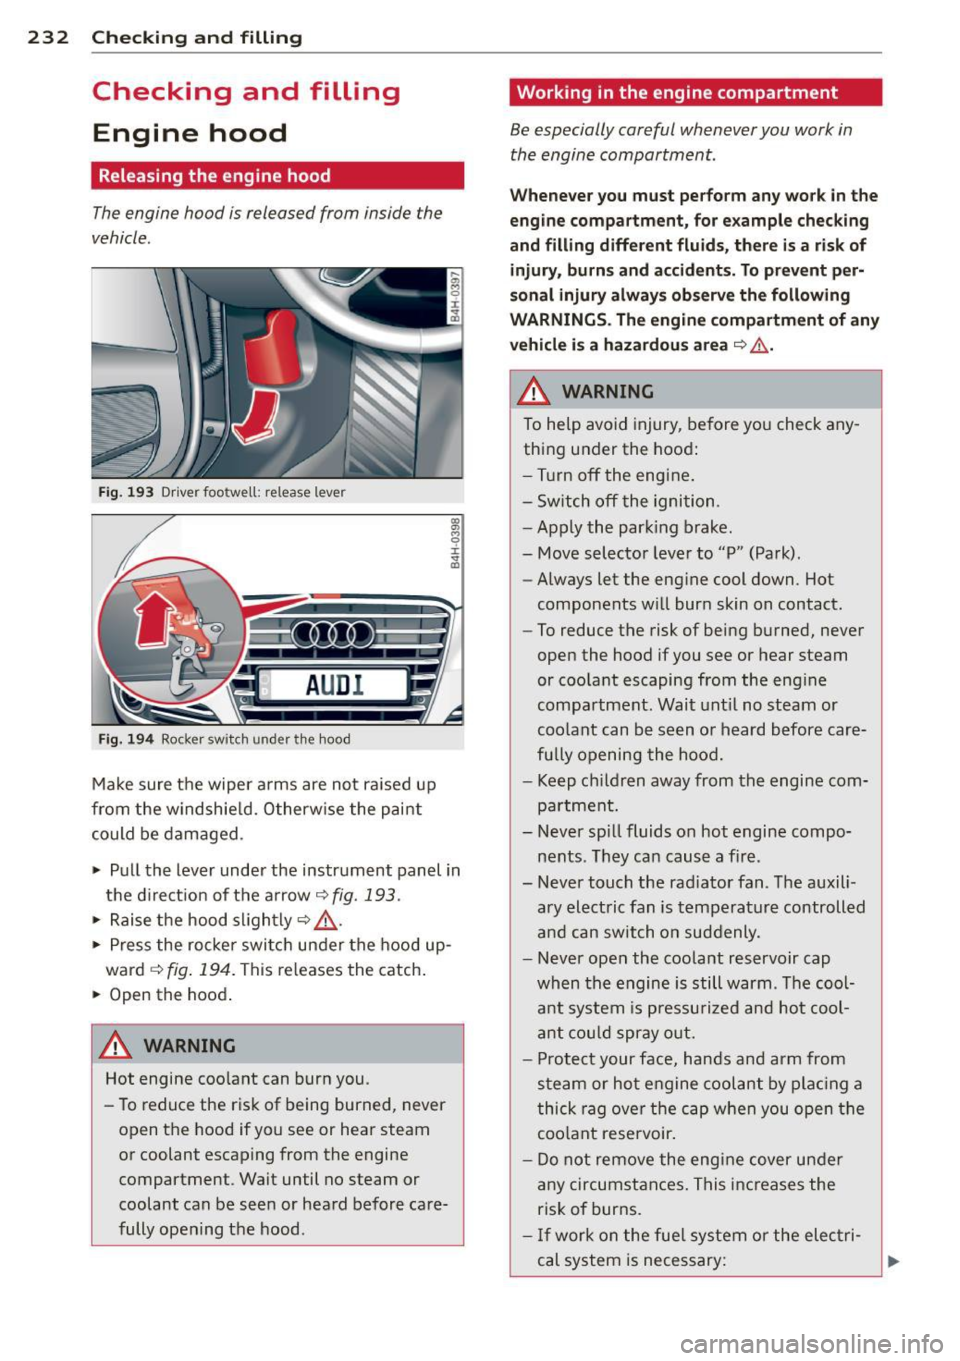
The engine hood is released from inside the
vehicle .
Fig. 193 Driver foo twell: release lever
AUD I
Fig. 194 Rocker switch un der the hood
Make sure the wiper arms are not raised up
from the windshield. Otherwise the paint
could be damaged .
.,. Pull the lever under the instrument panel in
the direction of the arrow
~ fig. 193.
.,. Raise the hood slightly~,&. .
... Press the rocker switch under the hood up
ward
~ fig. 194. This releases th e catch.
... Open the hood.
&_ WARNING
Hot engine coolant can burn you.
- To reduce the risk of being burned, never
open the hood if you see or hear steam
or coolant escaping from the engine compartment . Wait until no steam or
coolant can be seen or heard before care
fully opening the hood .
' Working in the engine compartment
Be especially careful whenever you work in
the engine compartment.
Whenever you must perform any work in the
engine compartment, for example checking
and filling different fluids, there is a risk of injury, burns and accidents. To prevent per
sonal injury always observe the following
WARNINGS. The engine compartment of any
vehicle is a hazardous area
~ ,&. .
A WARNING
To help avoid injury, before you check any
thing under the hood:
- Turn off the engine.
- Switch off the ignition .
- Apply the parking brake.
- Move selector lever to "P" (Park) .
- Always let the engine cool down. Hot
components will burn skin on contact.
- To reduce the risk of being burned, never
open the hood if you see or hear steam
or coolant escaping from the engine
compartment. Wait until no steam or
coolant can be seen or heard before care
fully opening the hood.
- Keep children away from the engine com
partment.
- Never spill fluids on hot engine compo
nents . They can cause a fire .
- Never touch the radiator fan. The auxili
ary electric fan is temperature controlled
and can switch on suddenly .
- Never open the coolant reservoir cap
when the engine is still warm . The cool
ant system is pressurized and hot cool
ant could spray out.
- Protect your face, hands and arm from
steam or hot engine coolant by placing a
thick rag over the cap when you open the
coolant reservoir.
- Do not remove the engine cover under
any circumstances. This increases the
risk of burns.
- If work on the fuel system or the electri
cal system is necessary: