door lock AUDI A8 2013 User Guide
[x] Cancel search | Manufacturer: AUDI, Model Year: 2013, Model line: A8, Model: AUDI A8 2013Pages: 318, PDF Size: 79.34 MB
Page 40 of 318
38 Openin g and clo sing
- You press the c::5 button on the remote con
tro l master key, or
- You press the
c::5 button in the luggage
compartment lid, or
- You push the handle in the luggage com
partment lid, or
- You pull the
c::5 button in the driver 's door ,
or
- When something b locks the luggage com
partment lid or makes it d iff icult for the lid
to move.
I f you press one of the buttons
c::5 now, the
l uggage compartment lid will either open or
close, depending on its ang le.
If you pull lightly on its handle, the luggage
compartment lid will close .
Closing will be stopped immediately when:
- You press the
c::5 button in the luggage
compartment lid, or
- You push the handle in the luggage com
partment lid, or
- You release the
c::5 button on the driver's
door, or
- When something b locks the luggage com
partment lid or makes it difficult for the lid
to move.
I f you press one of the buttons
c::5 now, the
l uggage compartmen t lid will either close or
open, depending on its ang le .
If you pull lightly on its handle, the l uggage
compartment lid w ill close.
You can manually stop the automatic open ing/closing of the luggage compartment lid.
The a utomat ic clos ing p rocess beg ins if you
pus h down on the l uggage compar tment lid .
_&. WARNING
-After closing the luggage compartment
lid, a lways pu ll up on it to make sure that
it is properly closed. Otherwise it could
open suddenly when the veh icle is mov
ing.
- To help prevent poisonous exhaust gas from being drawn into the veh icle, al- ways keep the
luggage compartment lid
closed while dr iv ing. Never transport ob
jects larger than those which fit com pletely into the luggage area, because
then the luggage compartment lid can not be fully closed .
- Never leave your vehicle unattended es pecia lly with the luggage compartment
lid left open. A chi ld co uld crawl into the
car through the luggage compartment
and pu ll the lid shut, becoming trapped
and unable to get out . To red uce the risk
of persona l inju ry, never let children play
in or around your vehicle. Always keep
the luggage compartment lid as well as
the vehicle doors closed when not in use.
- Never close the luggage compartment
lid inattentively or witho ut checking
first. Although the clos ing force of the
luggage compartment lid is limited, you
can st ill seriously injure yourself o r oth
ers .
- Always ensure that no one is within range of the luggage compartment lid
when it is moving, in particu la r close to
the hinges and the upper and lower
edges -finge rs or hands can be pinched.
- Neve r try to in terfere with the luggage
compartment lid o r help it when it is be
ing opened or closed automat ica lly.
(D Tips
- If there is a m echan ica l problem with au
tomati c clos ing for the luggage compart
ment lid o r there is an obstruc tion, it
opens again immediate ly. Check to see
why the luggage compartment lid could
not be closed before attempting to close
it again .
- The following applies to vehicles equip
ped with the Convenience key * feature: if
the remote control key is left in the lug
gage compartment, luggage compart
ment w il l automatically unlock itself af
ter you lock the vehicle . Th is prevents
you from unintentionally lock ing you r
key i n the l uggage compartment.
Page 41 of 318
-When the vehicle is locked, the luggage
compartment lid can be unlocked sepa
rately by pressing the button
C:::$ on the
master key. When the luggage compart
ment lid is closed again, it locks auto
matically.
- If the veh icle battery charge drops be
low a certa in level, you can still open or
close the luggage compartment lid man
ually, however, you w ill need to apply
more force to close it.
Movement-activated luggage
compartment lid opening
Applies to vehicles: with convenience key and automatic
luggage compartment lid
Fig. 28 Rear of the vehicle : foot movement
Requirement: You must have the vehicle key
on you and you must be standing behind the
luggage compartment lid. The ignition must
be sw itched off . Make sure you have firm foot
ing.
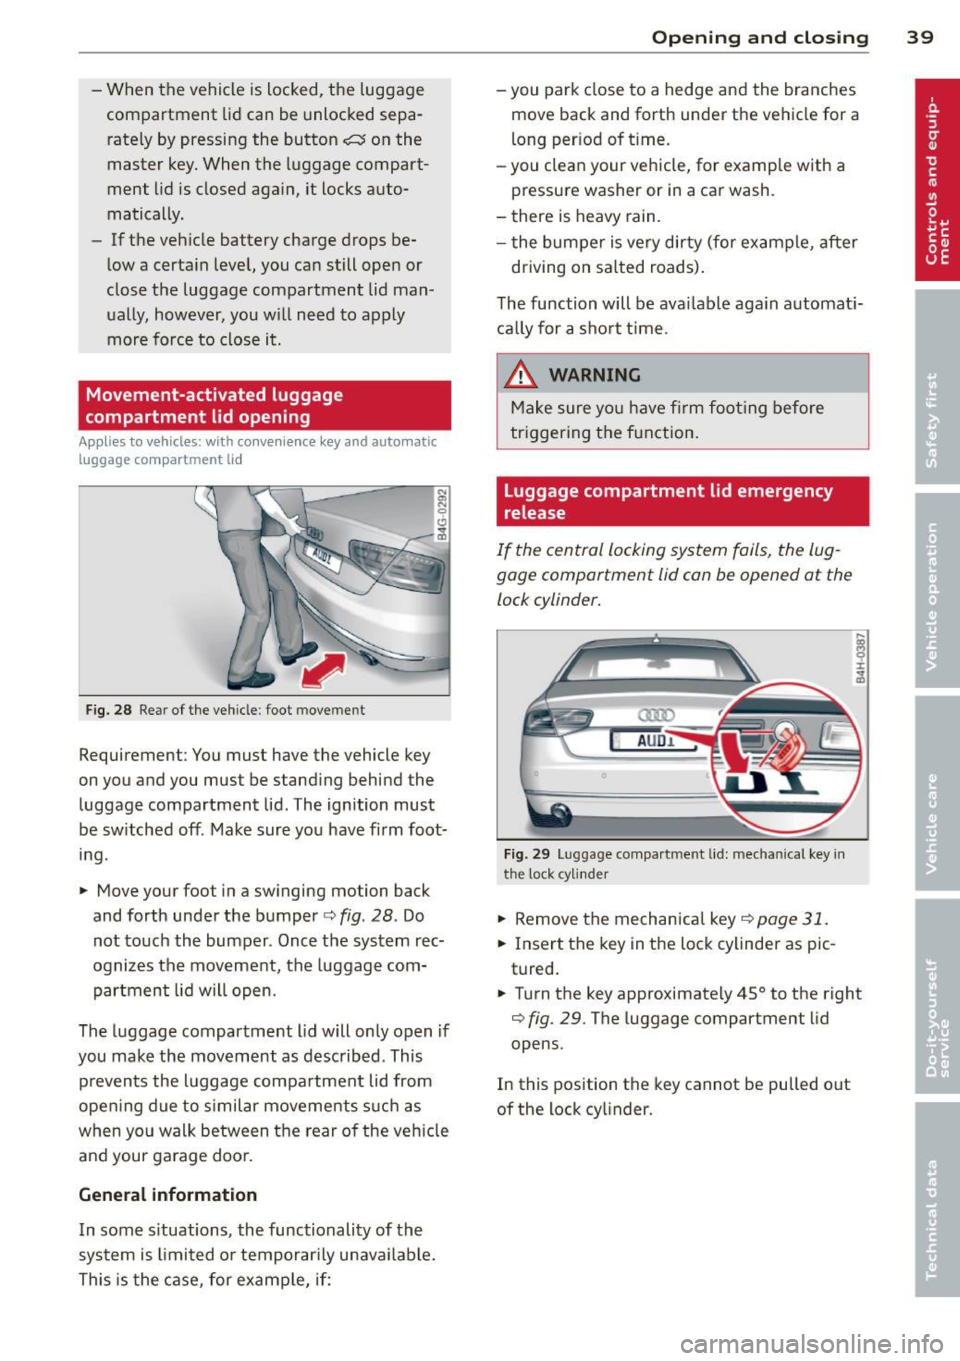
.. Move your foot in a swinging motion back
and forth under the bumper
c::> fig . 28. Do
not touch the bumper. Once the system rec
ognizes the movement, the luggage com
partment lid will open.
The luggage compartment lid will only open if
you make the movement as described. This p reven ts the luggage compartment lid from
open ing due to s imilar movements s uch as
when yo u walk between the rear of the vehicle
and your garage door.
General information
I n some s ituations, the functionality of the
system is limited o r temporar ily unava ilable.
This is the case, for examp le, if:
Op enin g an d clos ing 39
-you park close to a hedge and the branches
move back and forth under the vehicle for a
long per iod of t ime.
- you clean your vehicle, for examp le with a
pressure washer or in a car wash.
- there is heavy rain.
- the bumper is ve ry dirty (for example, after
driving on sa lted roads) .
The function will be ava ilable aga in automat i
ca lly for a sho rt time .
.&, WARNING
Make sure yo u have f irm foot ing before
triggering the function.
Luggage compartment lid emergency
release
If the central locking system fails, the lug
gage compartment lid can be opened at the
lock cylinder.
am
AUD.1
Fi g. 29 Luggage compartment lid: mechanical key in
the lock cylinder
.,. Remove the mechanical key c::> page 31.
.. Insert the key in the lock cylinder aspic
tured.
-
.. Turn the key approximately 45° to the right
c::> fig. 29. The luggage compartment lid
opens.
In this position the key cannot be pulled out
of the lock cy linder.
Page 42 of 318
40 Opening and clo sing
Child safety lock
Mechanical child safety lock in the rear
doors
The child safety lock prevents the rear doors
from being opened from the inside.
F ig . 3 0 Rear doors: child safety loci<
The child safety lock is vis ible on ly when the
door is open .
.. Remove the me chanical key
¢page 31.
.. To sw itch on the child safety lock, turn the
key in the direct ion of the arrow .
.. To sw itch
off the child safety lock, turn the
key in the oppos ite direction to the arrow.
W hen the chi ld safety locks a re activated, the
inside door handles do not work and the doors
can only be opened from the outside.
Power child safety lock for the rear
doors
Applies to vehicles: with power child safety loci< in the
rear doo rs
The power child safety lock t prevents the
rear doors from being opened from the in
side.
F ig . 3 1 Sec tion from drive r's doo r: co ntro ls
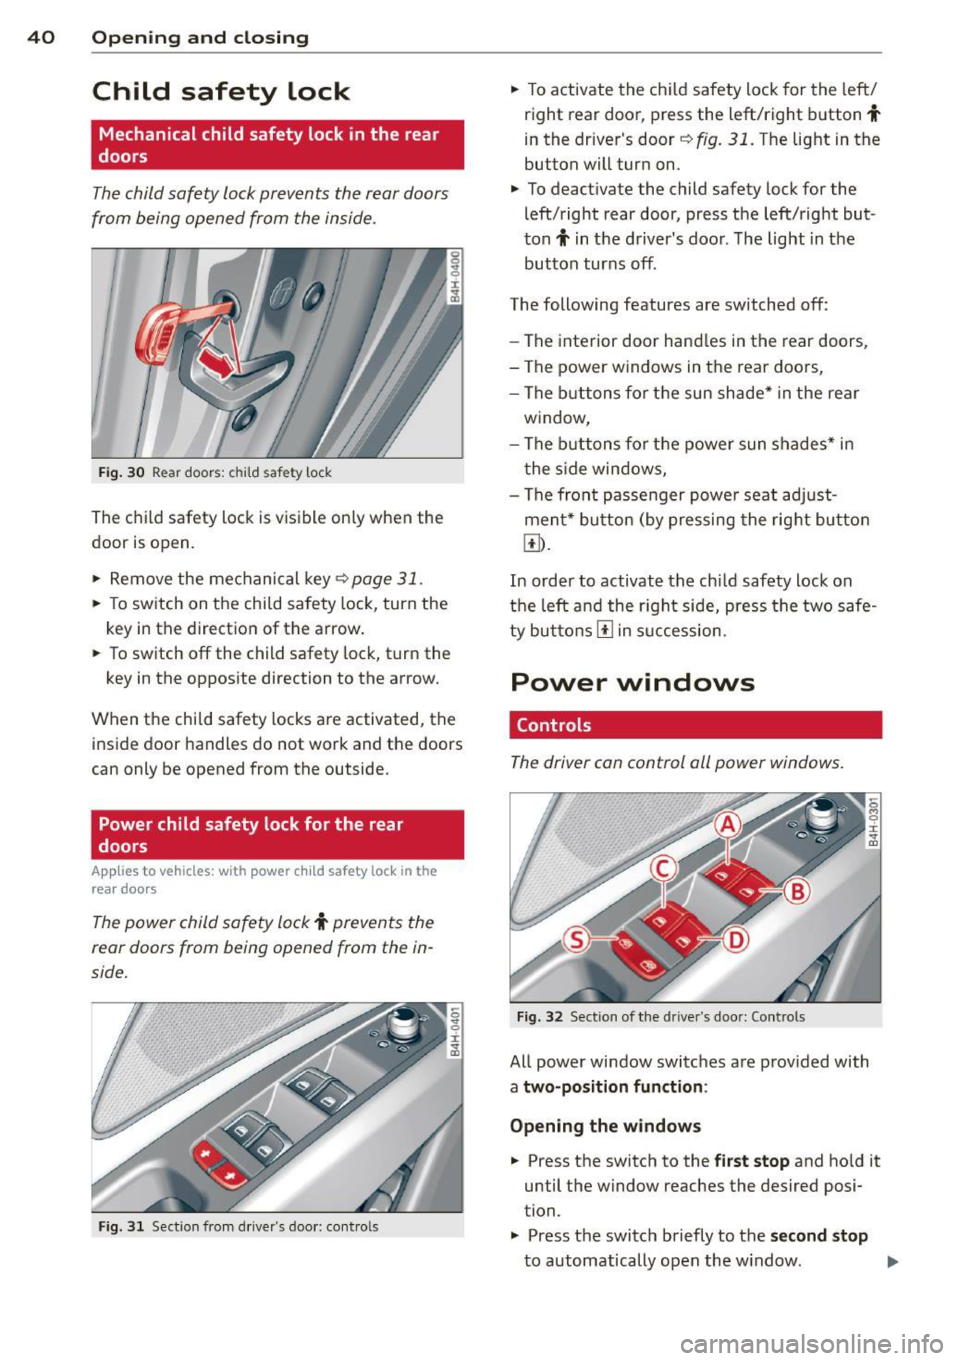
.. To activate the ch ild safety lock for the le ft /
r ight rear doo r, press the left/right b utton
t
in the dr iver's door~ fig. 31. The light in the
button will turn on .
.. To deact ivate the child safety lock for the
left/ right rear door, press the left/rig ht but
ton
t in th e d river's doo r. T he light in t he
button turns
off .
The following features are switched off:
-The interior door hand les in the rear doors,
- The power windows in t he rear doo rs,
- The bu ttons fo r th e sun shade * in the re ar
w indow,
- The buttons fo r th e p ower sun shades* i n
t he s ide win dows,
- The fro nt passenger powe r seat adjust
ment * butt on (by pressing the rig ht butto n
@.
In order to activate the ch ild safety lock on
t h e le ft and the righ t side, press the two safe
ty bu ttons
I!] in suc cession.
Power windows
Controls
The driver can control all power windows.
Fig. 3 2 Sect ion of the dr iver 's door: Co ntrols
All powe r window switc hes are prov ided with
a two-position function :
Opening the windows
.. Press t he switch to the first stop and ho ld it
until the wind ow reaches the desired posi
tion.
.. Press t he switch briefly to the
second stop
to automatically open the w indow. IJI,
Page 43 of 318

Closing the windows
• Pull the switch to the first stop and hold it
until the window reaches the desired posi
tion.
• Pull the switch briefly to the
second stop to
automatically close the window.
Power window switches
@ Driver's door
@ Passenger's door
© Left rear door
@ Right rear door
® Safety button (or two safety buttons in
vehicles with power child safety locks
¢ poge40)
Child safety lock
When the safety button®¢ fig. 32 is press
ed, the LED in the button lights up. The fol
lowing features are switched off:
- The power windows in the rear doors,
- The buttons for the power sun shades* in
the side windows,
- The buttons for the power sun shade * in the
rear window,
- Front passenger power seat adj ustment*
button.
_& WARNING
- When you leave your vehicle - even if on
ly briefly- always take the ignition key
with you. This applies particularly when
children remain in the veh icle. Otherw ise
the ch ildren could start the engine or op
erate electrical equ ipment (e.g. power
w indows). The powe r windows are func
tional until the driver's door or passeng
er's door has been opened.
- Be careful when closing the windows.
Check to see that no one is in the way, or
serious injury could result!
- When locking the vehicle from outside,
the vehicle must be unoccupied sinc e the
windows can no Longer be opened in an
emergency.
Opening and closing
@ Tips
-The driver can Lower or raise the power
sun shades* in the side windows by using
switches © and @.
- After the ignition has been switched off,
the windows can still be opened or
closed for about 10 min utes. The power
windows are not switched off until the dr iver's door or passenger's door has
been ope ned.
What to do after a malfunct ion
The one-touch open and close function must
be reactivated if the battery hos been discon
nected .
• Pull and hold the power window switch un
til the w indow is fully closed.
• Release the sw itch and then pull it again for
at least one second.
Valet parking
The valet parking feature protects the lug
gage comportment from unauthorized
ac
cess .
Fig. 33 Valet parking bu tton
With "valet parking" activated, the luggage
compartment lid cannot be opened.
• Remove the mechanical key¢
page 31.
• Open the glove compartment and activate
¢
fig. 33 the "valet parking" feature by
pressing the
! VALE TI button . The indicator
light in the sw itch illuminates .
.,.. Close the glove compartment and lock it
w ith the mechanical key .
liJJ,,
41
Page 49 of 318
Adjusting the exterior lighting
The settings are adjusted in the MMI.
~ Select: ICARI f u nct ion button> Car systems
control button > Vehicle sett ings > E xterior
lighting .
Automatic headlights
You can a djust the fo llow ing settings in the
Automatic headl ights men u:
Headlight s activation time -You can adjus t if
the hea dlights sw itch on
Early , Med . or Late
according to the sensitivity of the light se nsor .
Audi adaptive light* -You can sw itch adaptive
l ig ht
On a n d Off .
Automatic high beams*
You can switch th e high beam assist on and
off .
Daytime running lights
USA models :
You can sw itch the dayt ime ru n
n ing lights
on and off .
Canada models:
The function ca nnot be
turned off. It is activated a utomat ica lly each
time the ignition is switched on. This menu item is shown "greyed out" .
Coming home, Leaving home
The coming home function illuminates the
a rea outside the vehicle when yo u switch the
i gnit ion off and open the driver's door. To turn
the function o n, select
Lights when leaving
car > On .
The leav ing home function illuminates the
area outside the vehicle when yo u un lock the
ve hicle. To t urn the funct ion on, select
Lights
when unlocking car > On .
The coming home and leaving home functions
only operate when it is dark and the light
switch is in the
AUTO pos ition.
Clear vision 4 7
Turn signal and high beam lever
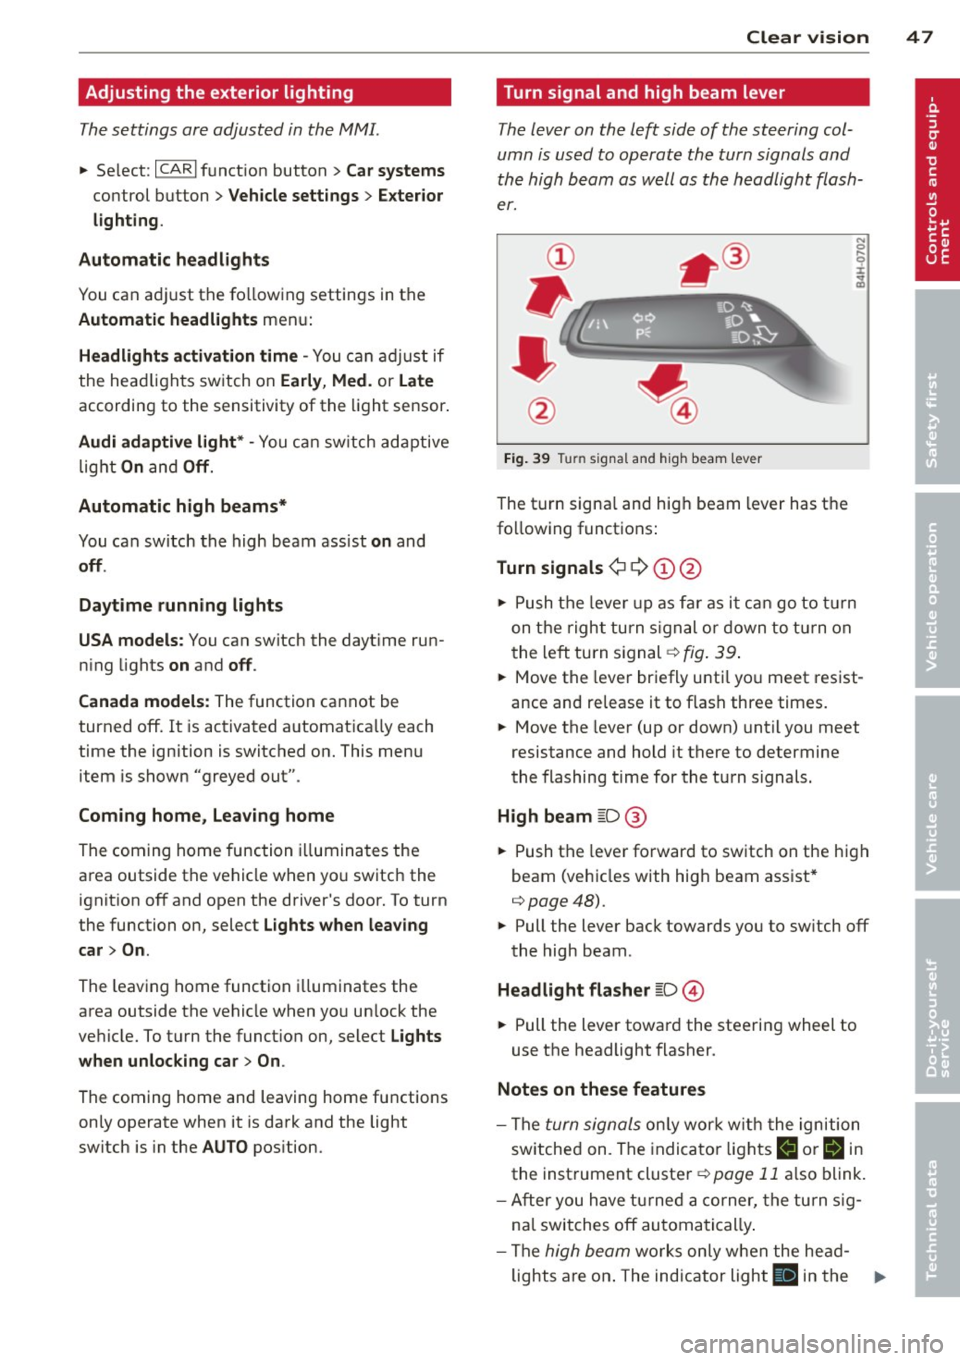
The lever on the left side of the steering col
umn is used to operate the turn signals and
the high beam as w ell as th e headlight flash
er.
Fig. 39 T urn signal and high beam lever
The t urn signa l and hig h beam lever has t he
fo llow ing funct ions :
Turn signals ¢ Q ©@
N 0 ,._
± .. a,
~ Push t he leve r up as fa r as i t can go t o tur n
on t he righ t turn s igna l or d own to t urn on
t he le ft turn s ignal
¢ fig . 39 .
~ Move the leve r br iefly u ntil yo u meet res ist
ance and re lease it to f lash three times.
~ Move the lever (up or down) until you meet
resistance and hold it there to determine
the flashing t ime for the tu rn signals.
High beam ~D @
~ Push t he leve r forward to sw itch on the high
beam (veh icles with hig h beam ass ist*
¢ poge4 8).
~ Pull the lever back towards you to sw itch off
the high beam .
Headlight flasher ~D ©
~ Pull the lever towar d the steering wheel to
use the headlight flasher.
Notes on these features
- The turn signals on ly wor k w it h t he igniti on
sw itche d on . T he indica to r li ghts
II or B in
the inst rument cluster¢ page 11 also blink .
- Aft er you h ave tu rned a cor ner, the tu rn s ig -
na l swi tches off au toma tica lly .
- The
high beam wo rk s onl y w hen the he ad-
lights a re on . The indic ator ligh t
ii in the .,.
Page 51 of 318

_& WARNING
High beam assist is only i ntended to assist
the driver . The driver is sti ll responsible for
cont ro lling the h eadlights and switching
the high beams on and off manually de pen ding on traffic, ligh ting and visibili ty
condi tions. Failure to interve ne manually
may lead to r isk o f accident . It m ay be nec
essary to operate the high beams man ual
ly in the following sit uat ions, e .g .:
- For adverse wea ther conditions such as
fog, heavy rain, blowing snow or s praying
water .
- On roads where oncoming traffic may be partia lly obsc ured s uch as exp ressways .
-If there are in dividuals on the road wi th
no light ing or poor lightin g, such as cy
cli sts .
- In tight c urves and on steep slopes .
- In po orly lit areas.
- With stro ng re flecto rs su ch a s signs.
-If the area of t he wind shie ld nea r th e
sensor is fogg ed over, d irty, icy or cov
ered w it h a st icker.
(D} Tips
- The high beam ass ist is active above a
speed of approx . 25 mph (40 km/h).
- If afte r activation, you r speed falls below
approx . 15 mph (24 km/h), the hig h
beams w ill automa tica lly be switched
off .
Interior lights
Front and rear interior lighting
Fig. 41 Headl iner: Front in te ri or l ights
Clear vi sion 49
Fig . 4 2 Rea r headliner: Read ing l ig ht
Press the appropriate button r::;, fig . 41:
El-Inte rior light ing on/off
~ -Door contact swi tch. The interio r ligh ting
turns o n automatically when yo u unl ock the
v e hicle, open a door or sw itch the ignition
off .
The inter ior light ing turns off s evera l seconds
after you close the doors, when you lock the
vehicle or when you switch the ignition on .
When a doo r is open, the l ight turns off after
a few minutes.
~ -Read ing lights on/off
@[I -Switching the rear read ing lights on/off
from the cockpit.
I REAR MODE i* -Sw itch ing the rea r reading
li gh ts on/off from the cockpit: press the
I REAR MODE i bu tton and then the appropriate
button ~ in the cockpit.
Ambience lighting
App lies to vehicles : wit h ambience lig hting
You can select a color profile and br ightness
for t he ambie nce lighting in various areas of
the veh icle, called zones .
Turning ambience lighting on
.. Select in the MMI: ICAR lfunction button>
Car systems control button > Vehicle set
t ings > Interior light ing > On .
Adjusting /turning off the brightne ss
.. Select in the MMI: ICAR lfunction button>
Car systems control b utton > Vehicle set
tings
> Inte rior lighting > Brightness .
Page 63 of 318
©-Switching front passenger seat adjust
ment on/off: this function must be activated
in the MMI
r=> page 63, r:=> &. To switch front
passenger seat adjustment on, pre ss the but
ton . You can now adjust the front passenger
seats using the buttons @ and @. If you do
not press the buttons @ or@ , front passen
ger seat adjustment sw itches
off automatical
ly after approximately ten seconds.
A WARNING
- The power adjustment for the individual
seats also works with the ignition . For
this reason, children should never be left
unattended in the vehicle -they could be
injured!
- Exercise caution when adjusting the
seats. Unsupervised or careless seat ad
justment can pinch fingers or hands
causing injuries.
- Vehicles with a pass through in the cen
ter console have seat ing for four. The
long center console between the two
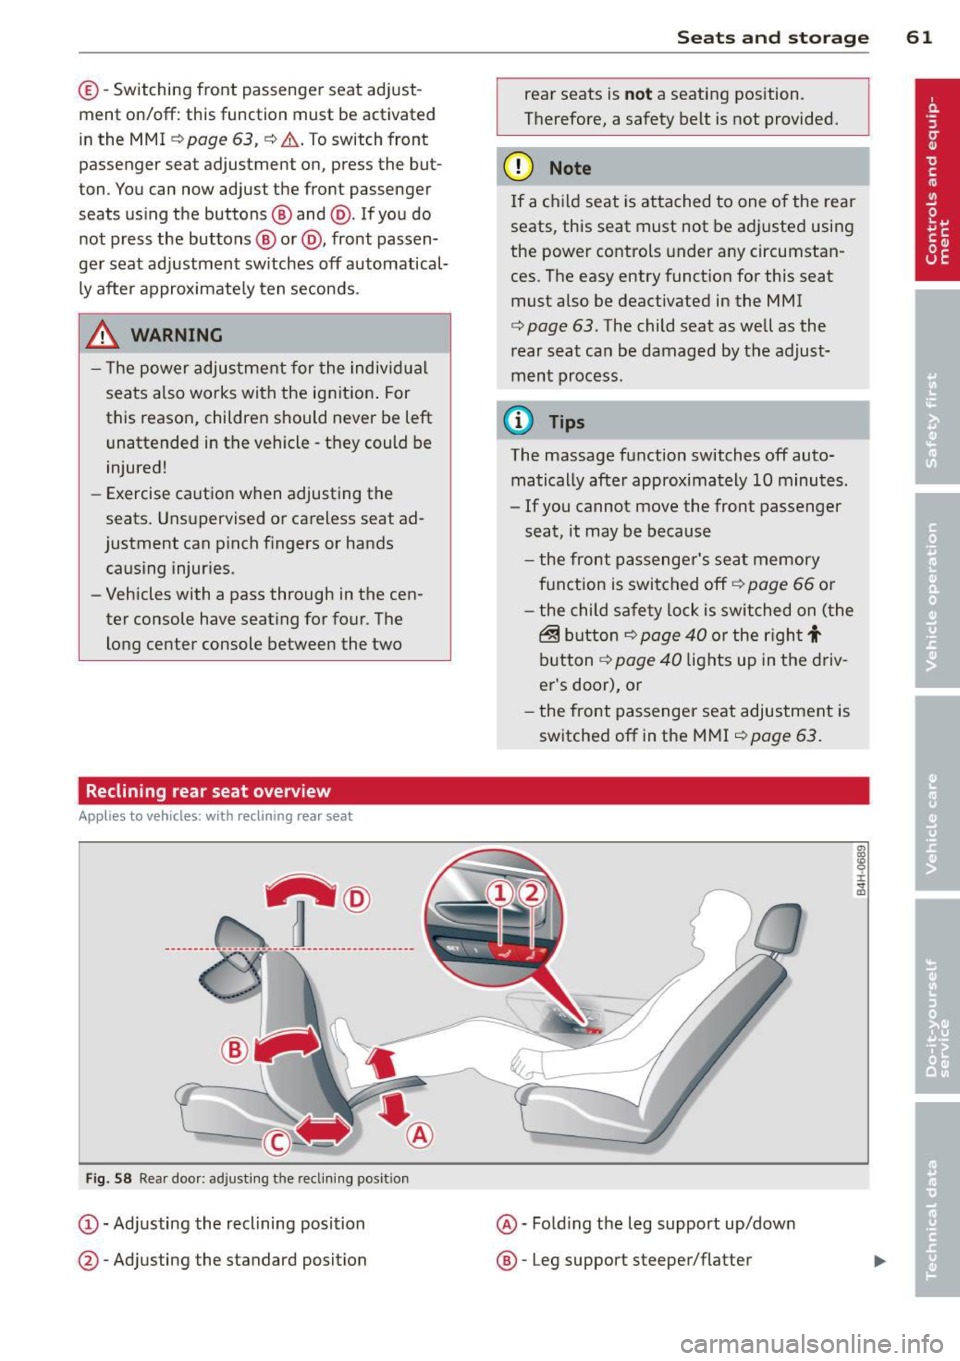
Reclining rear seat overview
Applies to vehicles: with reclining rear seat
----------------- ~@ -------
F ig. 58 Rear door: a djusting t he reclining posit ion
@ -Adjusting the reclining position
@ -Adjusting the standard position
Seats and storage 61
rear seats is not a seating position.
Therefore, a safety belt is not provided .
.
(D Note
If a child seat is attached to one of the rear
seats, this seat must not be adjusted using
the power controls under any circumstan
ces . The easy entry funct ion for this seat
must also be deactivated in the MMI
r:=> page 63. The child seat as well as the
rear seat can be damaged by the adjust
ment process.
@ Tips
The massage function switches off auto matically after approximately 10 minutes .
- If you cannot move the front passenger
seat , it may be because
- the front passenger's seat memory
function is switched off
r::!> page 66 or
- the child safety lock is switched on (the
~ button r::!> page 40 or the rig ht t
button r::!> page 40 lights up in the driv
er's door), or
- the front passenger seat adjustment is
switched
off in the MMI r::!> page 63.
@-Fold ing the leg support up/down
@ -Leg suppo rt steeper/flat ter
I ± ...
"'
Page 65 of 318
@ Tips
If you cannot move the seat into the re
clining position, it may be because
- the front passenger's seat memory func
tion is switched off¢
page 66 or
- the child safety lock is switched on (the
@ button
¢ page 40 or the right t but
ton ¢
page 40 lights up in the driver's
door), or
- the front passenger seat adjustment is
switched off in the MMI
¢ page 63.
Massage function remote control
Applies to vehicles: with reclining rear seat and massage
fu nct ion
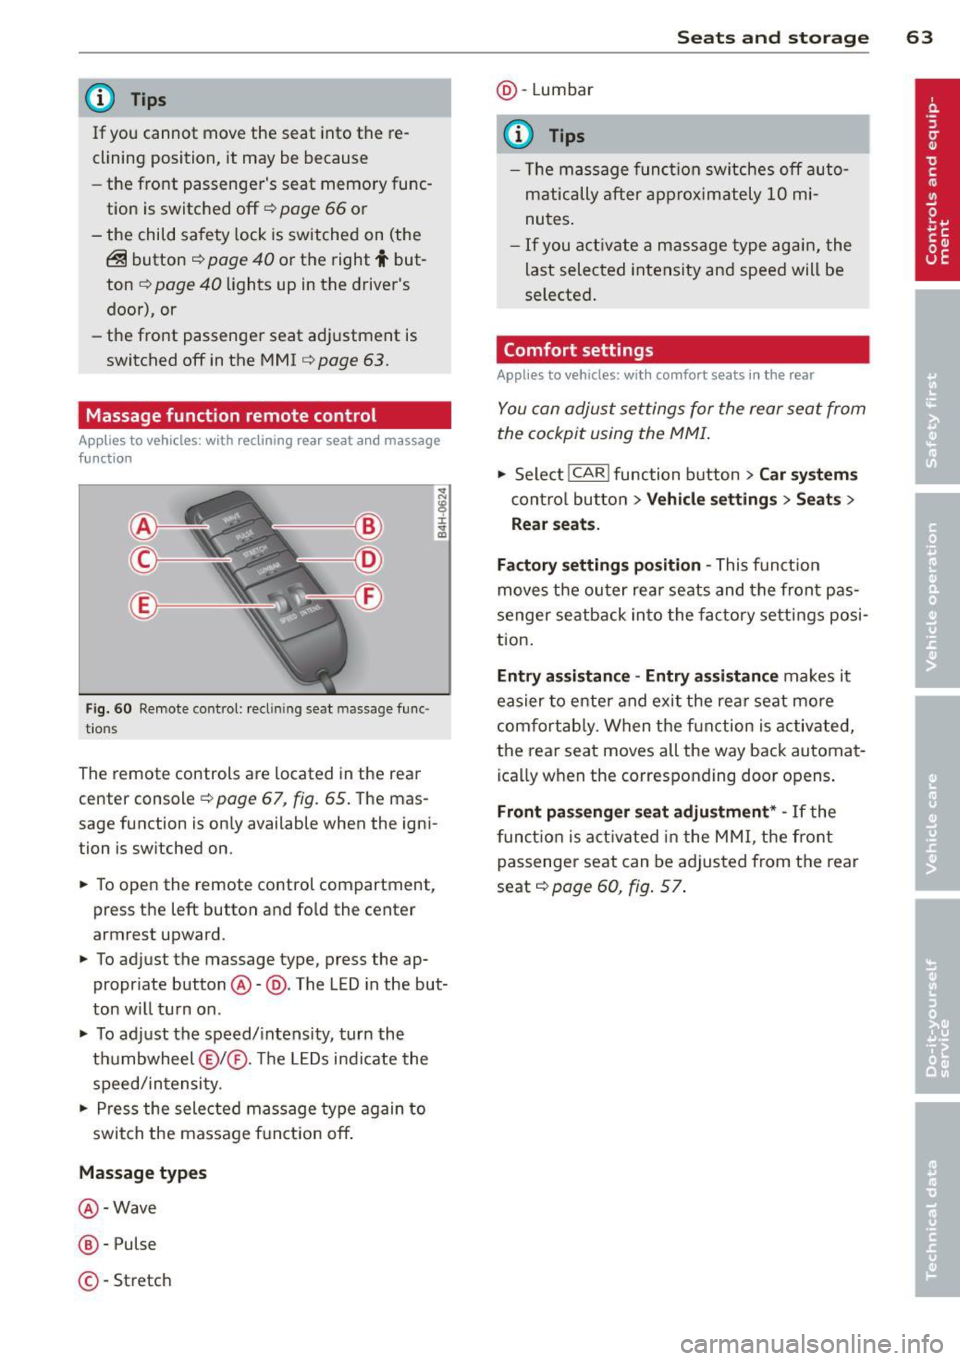
F ig. 60 Remote control: reclin ing seat massage func
t ions
The remote controls are located in the rear
center console ¢
page 67, fig. 65. The mas
sage function is only available when the igni
tion is switched on.
.,. To open the remote control compartment,
press the left button and fo ld the center
armrest upward .
.,. To adjust the massage type, press the ap
propriate button @-@ . The LED in the but
ton w ill turn on .
.,. To adjust the speed/intensity, turn the
thumbwheel @I® . Th e LED s indicate the
speed/intensity .
.,. Press the selected massage type again to
switch the massage funct ion off .
Massage types
@-Wave
@-Pulse
©-Stretch
Seats and storage 63
@-Lumbar
(D Tips
- Th e massage function switches off auto
matically after approximately 10 mi
nutes .
-If you activate a massage type again, the
last selected intensity and speed will be
selected.
Comfort setting s
Applies to vehicles: wit h co mfort seats in the rear
You can adjust settings for the rear seat from
the cockpit using the MMI.
.,. Select I CAR I function button > Car systems
control button > Vehicle settings > Seats >
Rear seats.
Factory settings position -
This function
moves the outer rear seats and the front pas
senger seatback into the factory settings posi
tion.
Entry as sistance -Entry assistance makes it
easier to enter and exit the rea r seat more
comfortab ly. When the function is activated,
the rear seat moves all the way back automat
ically when the corresponding door opens .
Front passenger seat adjustment * -If the
function is activated in the MMI, the front
passenger seat can be adjusted from the rear
seat ¢
page 60, fig. 5 7.
Page 67 of 318
Seat memory
Description
Applies to vehicles: with memory function
The memo ry function a llows you to quick ly
and eas ily s to re and re ca ll persona l seating
p rofi les for the driver, fron t passenger an d
ou ter rea r seats* . The memory f unction is op
erated throug h the master key and the memo
ry buttons in the driver 's/front passenger's
doors and the rear doors*.
The drive r's seating profi le is stored and as
signed to t he master key each t ime the vehicle
i s locked. The seating p rofile is recalled auto
mat ica lly when the veh icle is unlocked. If two
Remote control
master key
Driver
Seat X
Head restraint X
Steeri ng w heel* X
Safety belt * X
Both exterior rear-X
view mirrors *
There are two addi tio nal buttons in the re ar
doors * that can be use d to reca ll two stored
seating profi les
¢page 66.
Remote control key
Appl ies to vehicles: with memory function
To assign the d river 's seat settings to the re
mote contro l key when locking the vehicle, the
function must be switc hed on.
~ Se lect: I CAR I f u nct ion button > Car systems
control button > Vehicle setting s > Seats >
Driver seat > Remote control key > On.
(D Tips
If you do n ot want another driver's set
tings to be assigned to the remote control
key, switch off the memory f unction using
the MMI o r the
IOF FI button¢ page 66.
Seats and storage 65
people use one vehicle, it is recommended
t h at each perso n always use s "their own"
mas ter key.
T wo sea ting profiles can be stored in each of
the d river 's/front passenger's doors and one
seat ing p rofile in ea ch of t he rear doors*.
Once stored , these sea ting pro files c an be re
ca lled at any time.
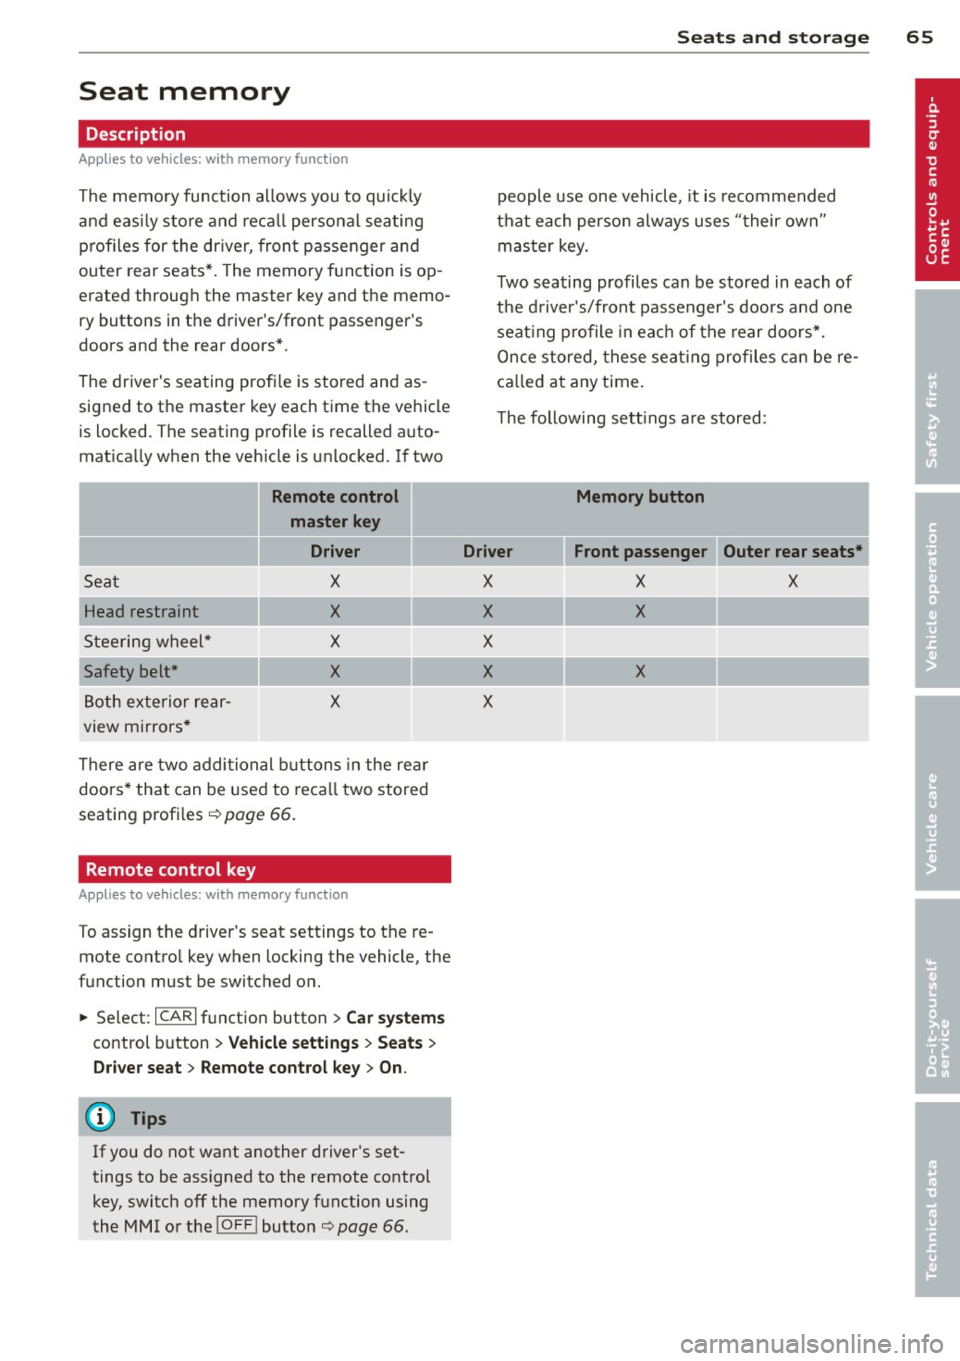
T he following se tt ings a re stored:
Memory button
Driver Front passenger Outer rear seats*
X X X
X X
X
X X
X
Page 85 of 318

the stored position as soon as you switch on
the ignition.
Starting and stopping
the engine
Starting the engine
This button switches on the ignition and
starts the engine.
Fig. 85 Center console: S TART ENGINE S TOP b utton
Switching the ignition on/off
• To switch the ignition on/off, press the
I START ENGINE STOPI button. Do not press
the brake pedal while doing this.
Starting the engine
• Press the brake pedal QA .
• Press the !START ENGINE STOPI button
Q fig . 85. The engine will start.
If the engine does not start immediately, the
starting process is automatically stopped af
ter a short time. Repeat starting procedure.
Start-Stop-System*:
When you stop and the Start -Stop -System*
turns off the engine, the ignition still remains
switched on.
- If you press the !S TART ENGINE STOPI but
ton now, the ignition will be switched off.
The engine will not start
¢page 89.
- Make sure that the ignit ion is switched off
before exiting the vehicle.
Switching the ignition/engine off
automatically*
The follow ing applies to vehicles with Start
Stop-System*: to prevent the battery from
On the road 83
draining, the ignition and the engine will
switch off automatically under the following
cond itions:
- The vehicle has already been driven.
- The driver's door is opened.
- The driver's seat belt is removed .
- The brake pedal is not pressed down.
- The vehicle is stationary.
In this case, the activated low beam will be re
placed by the side marker lights. The side
marker lights will switch off after a certain pe
riod of time or when you lock the vehicle .
A WARNING
-Never allow the engine to run in conf ined
spaces -danger of asphyx iation.
- Never turn off the engine until the vehi
cle has come to a complete stop.
- The brake booster and power steering
only work when the engine is running. If
the engine is off, you have to use more
force when steering or braking. Because
you cannot steer and brake as you usual
ly would, this could lead to crashes and
serio us injuries.
(D Note
- Avo id h igh engine rpm, full throttle and
heavy engine loads until the engine has
reached operating temperature - other
w ise you risk engine damage.
- The engine cannot be started by pushing
or towing the vehicle.
@ Tips
-After a co ld engine is started, there may
be a brief period of inc reased noise be
cause oil pressure must first build up in
the hydraulic valve adjusters. This is nor
ma l and not a cause for concern.
-If you leave the vehicle with the ignition
switched on, the ignition w ill switch off
after a certain period of time. Please
note that electrical equipment such as
exterior lights will sw itch off as well
when that happens.