seats AUDI A8 2013 User Guide
[x] Cancel search | Manufacturer: AUDI, Model Year: 2013, Model line: A8, Model: AUDI A8 2013Pages: 318, PDF Size: 79.34 MB
Page 67 of 318
Seat memory
Description
Applies to vehicles: with memory function
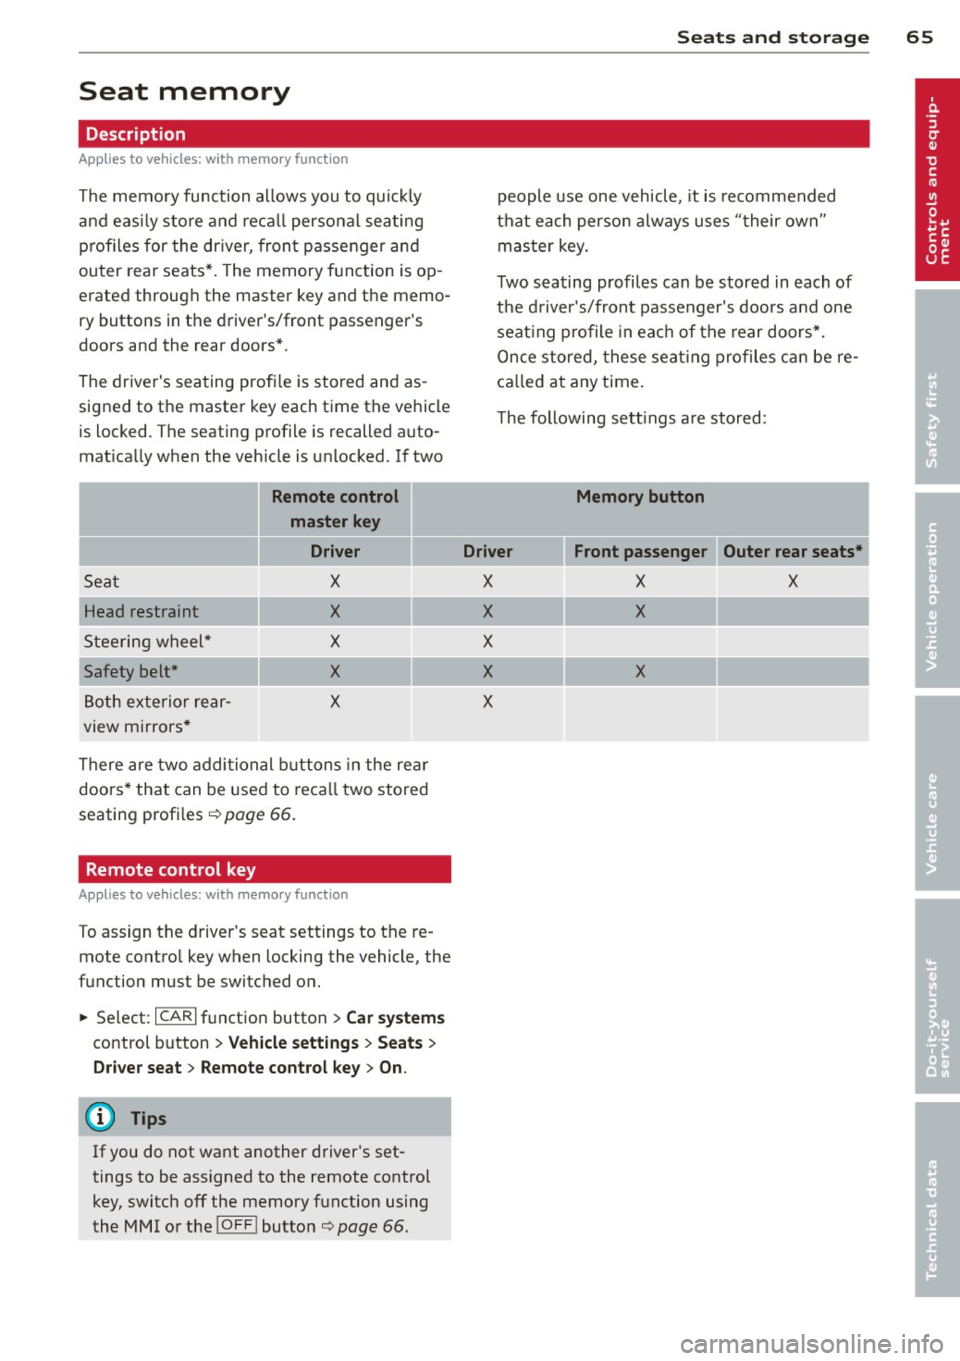
The memo ry function a llows you to quick ly
and eas ily s to re and re ca ll persona l seating
p rofi les for the driver, fron t passenger an d
ou ter rea r seats* . The memory f unction is op
erated throug h the master key and the memo
ry buttons in the driver 's/front passenger's
doors and the rear doors*.
The drive r's seating profi le is stored and as
signed to t he master key each t ime the vehicle
i s locked. The seating p rofile is recalled auto
mat ica lly when the veh icle is unlocked. If two
Remote control
master key
Driver
Seat X
Head restraint X
Steeri ng w heel* X
Safety belt * X
Both exterior rear-X
view mirrors *
There are two addi tio nal buttons in the re ar
doors * that can be use d to reca ll two stored
seating profi les
¢page 66.
Remote control key
Appl ies to vehicles: with memory function
To assign the d river 's seat settings to the re
mote contro l key when locking the vehicle, the
function must be switc hed on.
~ Se lect: I CAR I f u nct ion button > Car systems
control button > Vehicle setting s > Seats >
Driver seat > Remote control key > On.
(D Tips
If you do n ot want another driver's set
tings to be assigned to the remote control
key, switch off the memory f unction using
the MMI o r the
IOF FI button¢ page 66.
Seats and storage 65
people use one vehicle, it is recommended
t h at each perso n always use s "their own"
mas ter key.
T wo sea ting profiles can be stored in each of
the d river 's/front passenger's doors and one
seat ing p rofile in ea ch of t he rear doors*.
Once stored , these sea ting pro files c an be re
ca lled at any time.
T he following se tt ings a re stored:
Memory button
Driver Front passenger Outer rear seats*
X X X
X X
X
X X
X
Page 68 of 318
66 Seats and st o rage
Memory buttons
App lies to vehicles: with memory function
Fig. 63 Drive r's door : m emory f unction butto ns
Fig . 64 Rear door: memory f unction butto ns
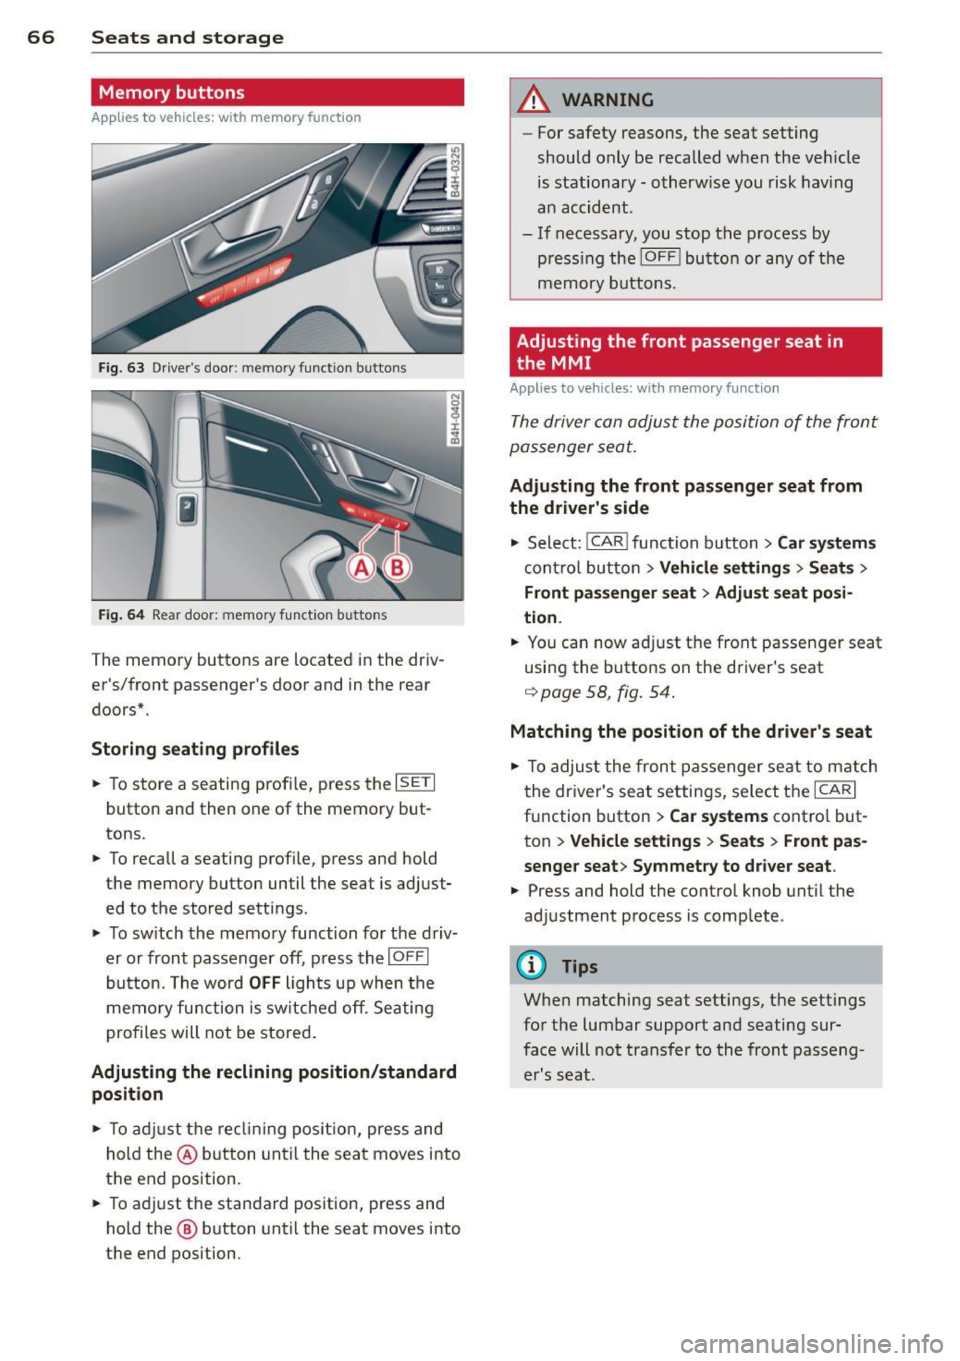
The memory buttons are located in the driv
er's/front passenger's door and in the rear
doors".
Storing seating p rofiles
.. To s tore a seating profi le, press the ISETI
button and then one of the memory but
tons .
.. To recall a seating profile, press and hold
the memory button until the seat is adjust
ed to the stored settings .
.. To sw itch the memory function for the driv
er or front passenger off, press the
I OFF I
button. The word OFF lights up when the
memo ry fu nction is sw itched off. Seating
profiles will not be stored .
Adjusting the re cl ining po sition /standard
position
.. To adj ust the recl ining pos it ion, press and
hold the@ button until the seat moves into
the end position .
.. To ad just the standard pos ition, press and
hold the @ button until the seat moves into
the end position.
A WARNING
- For safety reasons, the seat setting
should only be recalled when the veh icle
is stationary· otherw ise you risk hav ing
an accident .
- If necessary, you stop the process by
press ing the
IOF Fj button or any of the
memory buttons.
Adjusting the front passenger seat in
the MMI
Applies to vehicles: with memory function
The driver can adjust the position of the front
passenger seat.
Ad justing the front p assenger seat from
the driv er's s ide
.. Select: !CAR ! function b utton> Car sy ste m s
cont ro l button > V eh icle setting s > Seats >
Front pa ssenger sea t> Adju st seat p osi
ti on.
.. You can now adjust the front passenger seat
using the buttons on the driver's seat
¢ page 58, fig. 54.
Matching the position of the driver's se a t
.. To adjust the front passenger seat to match
the driver's seat settings, select the
ICARI
function button > Car systems contro l but
ton
> V ehicle sett ings > Seats > Fr ont pa s·
s enger seat > Sy mmetry to dri ver seat .
.. Press and hold the control knob unti l the
adjustment process is comp lete .
@ Tips
When matching seat settings, the settings
for the lumbar support and seating sur·
face will not transfer to the front passeng
er's seat .
Page 69 of 318
Full-length center
console
Overview
Applies to vehicles: with full-le ngth center console
Fig. 65 Rear: full -lengt h center console
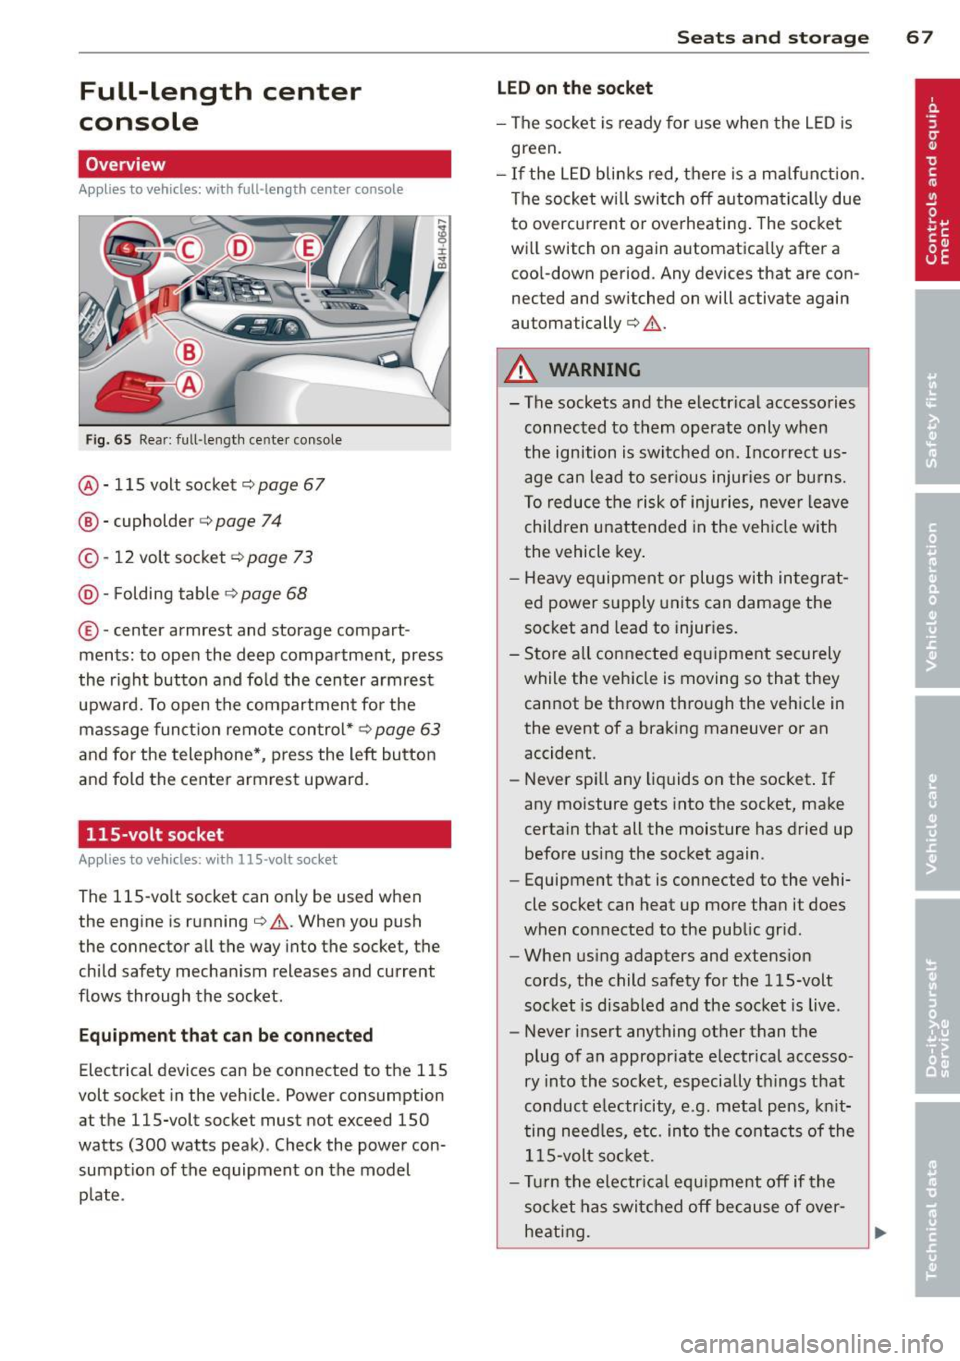
@ · 115 volt socket c::> page 67
@ · cupholder c::> page 74
© -12 volt socket c::> page 73
@· Folding table c::> page 68
© ·center armrest and storage compart
ments : to open the deep compartment, press
the r ight button and fold the center armrest
upward. To open the compartment for the
massage function remote control*
c::> page 63
and for the telephone*, press the left button
and fold the center armrest upward.
115-volt socket
Applies to vehicles: with 115-volt socket
The 115-vo lt socket can on ly be used when
the engine is running
c::> .&. . When you push
the connector all the way into the socket, the
child safety mechanism releases and current
flows through the socket.
Equipment that can be connected
Electrical devices can be connected to the 115
volt socket in the vehicle. Power consumption
at the 115-volt socket must not exceed 150
watts (300 watts peak) . Check the power con
sumpt ion of the equipment on the model
plate .
Seats and storage 67
LED on the socket
-The socket is ready for use when the LED is
green.
- If the LED blinks red, there is a malfunction.
The socket wi ll switch off automatically due
to overcurrent o r overheating . The socket
will switch on again automatica lly after a
cool-down period . Any devices that are con
nected and switched on will activate again
automatically
c::> .&. .
A WARNING
-- The sockets and the-electrical accessories
connected to them operate only when
the ignition is switched on. Incorrect us
age can lead to ser ious injuries or burns.
To reduce the risk of injuries, never leave
children unattended in the veh icle with
the vehicle key.
- Heavy equipment or plugs with integrat
ed power supply units can damage the
socket and lead to injuries.
- Store all connected equipment securely
while the vehicle is moving so that they
cannot be thrown through the vehicle in
the event of a braking maneuver or an
accident.
- Never spill any liquids on the socket . If
any moisture gets into the socket, make
certain that all the moisture has dried up before using the socket again .
- Equipment that is connected to the vehi·
cle socket can heat up more than it does
when connected to the public gr id.
- When using adapters and extension
cords, the child safety for the 115-volt
socket is disabled and the socket is live .
- Never insert anything other than the
plug of an appropriate electrical accesso
ry into the socket, especially things that
conduct e lectricity, e.g. meta l pens, knit
ting need les, etc. into the contacts of the
115-volt socket.
- Turn the electrical equ ipment off if the
socket has switched off because of over
heating.
Page 70 of 318
68 Seats and storage
(D Note
-Always follow the manufacturer's in
str uctions for all electrical accessories
you want to use with the electrical sock
et!
- Do not connect lamps that contain a ne
on tube. For technical reasons the lamp
may be damaged.
- Do not connect any 230-volt equipment
to the 115-volt socket. The equipment
may be damaged. If necessary, check the
permissible voltage for the equipment
on the model label.
- In the case of some power packs, e.g . for
a laptop computer, the built-in overcur
rent shutoff prevents it from being
switched on because of excessive start
up current. In this case, disconnect the
power pack from the consumer and re
connect it after about 10 seconds.
@ Tips
- Unshielded equipment may cause inter
ference in the radio and the vehicle elec
tronics.
- Some equipment may work properly be
cause of the reduced power (wattage),
available from the socket.
Folding table in the center console
Applies to vehicles: with folding table in the center con·
sole
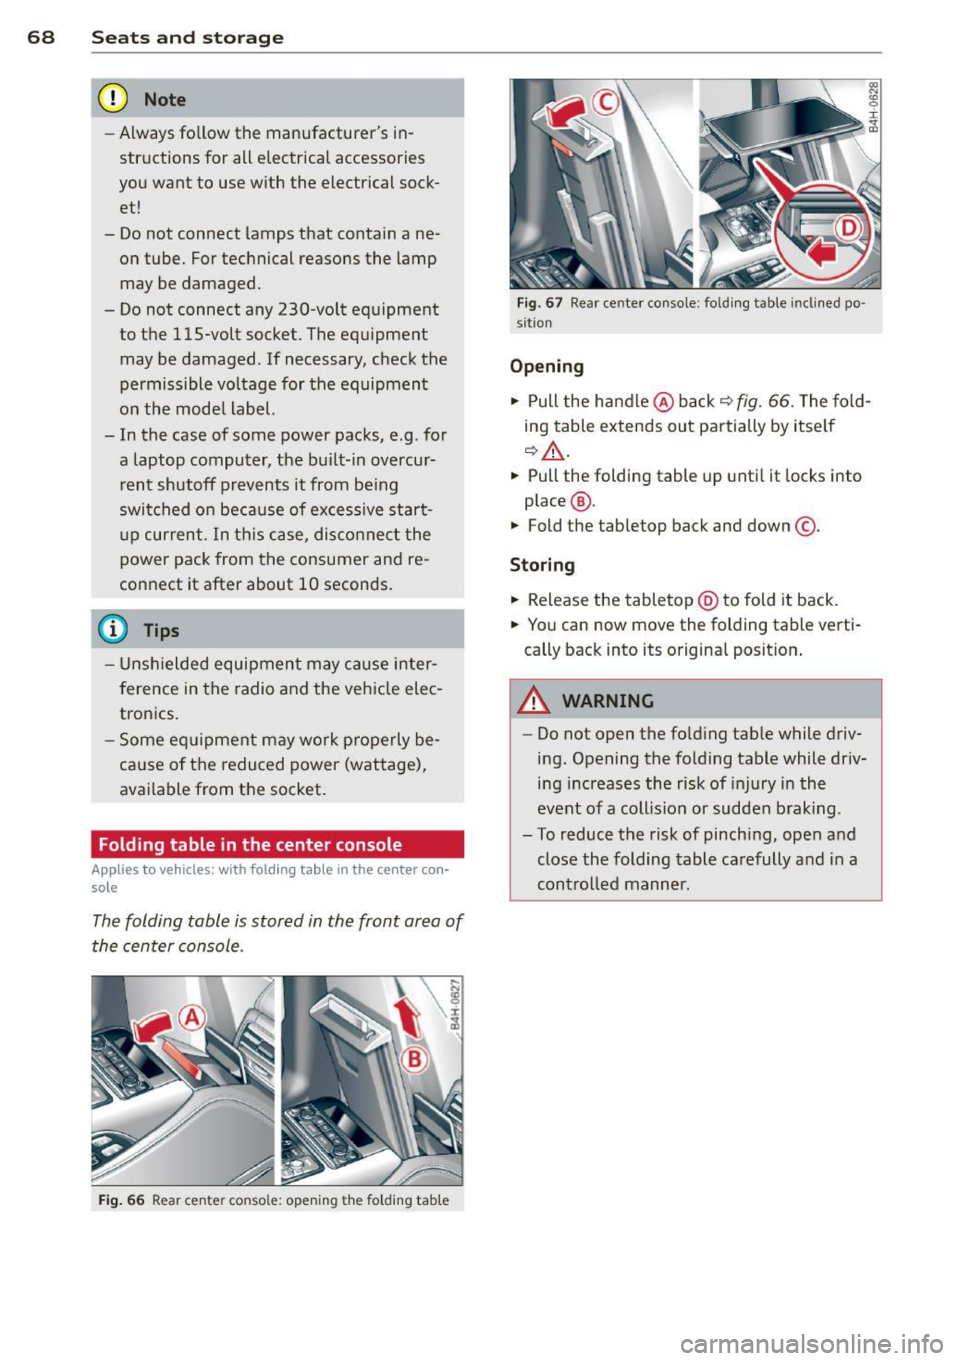
The folding table is stored in the front area of
the center console .
Fig. 66 Rear cente r conso le: opening the fo lding table
Fig. 67 Rear center console: folding table inclined po ·
si tion
Opening
.. Pull the handle @back ¢ fig. 66. The fold
ing table extends out partially by itself
¢,&. .
.. Pull the folding table up until it lock s into
place @.
.. Fold the tabletop back and down @.
Storing
.. Release the tabl etop @ to fold it back.
.. You can now move the folding table verti
cally back into its original position.
A WARNING
--=
- Do not open the folding tab le while driv-
ing. Opening the folding table while driv
ing increases the risk of injury in the
event of a collision or sudden braking .
- To reduce the risk of pinching, open and
close the folding table carefully and in a
controlled manner.
Page 71 of 318
Luggage compartment
Tie-downs and luggage compartment net
The Luggage compartment net prevents small
objects from sliding.
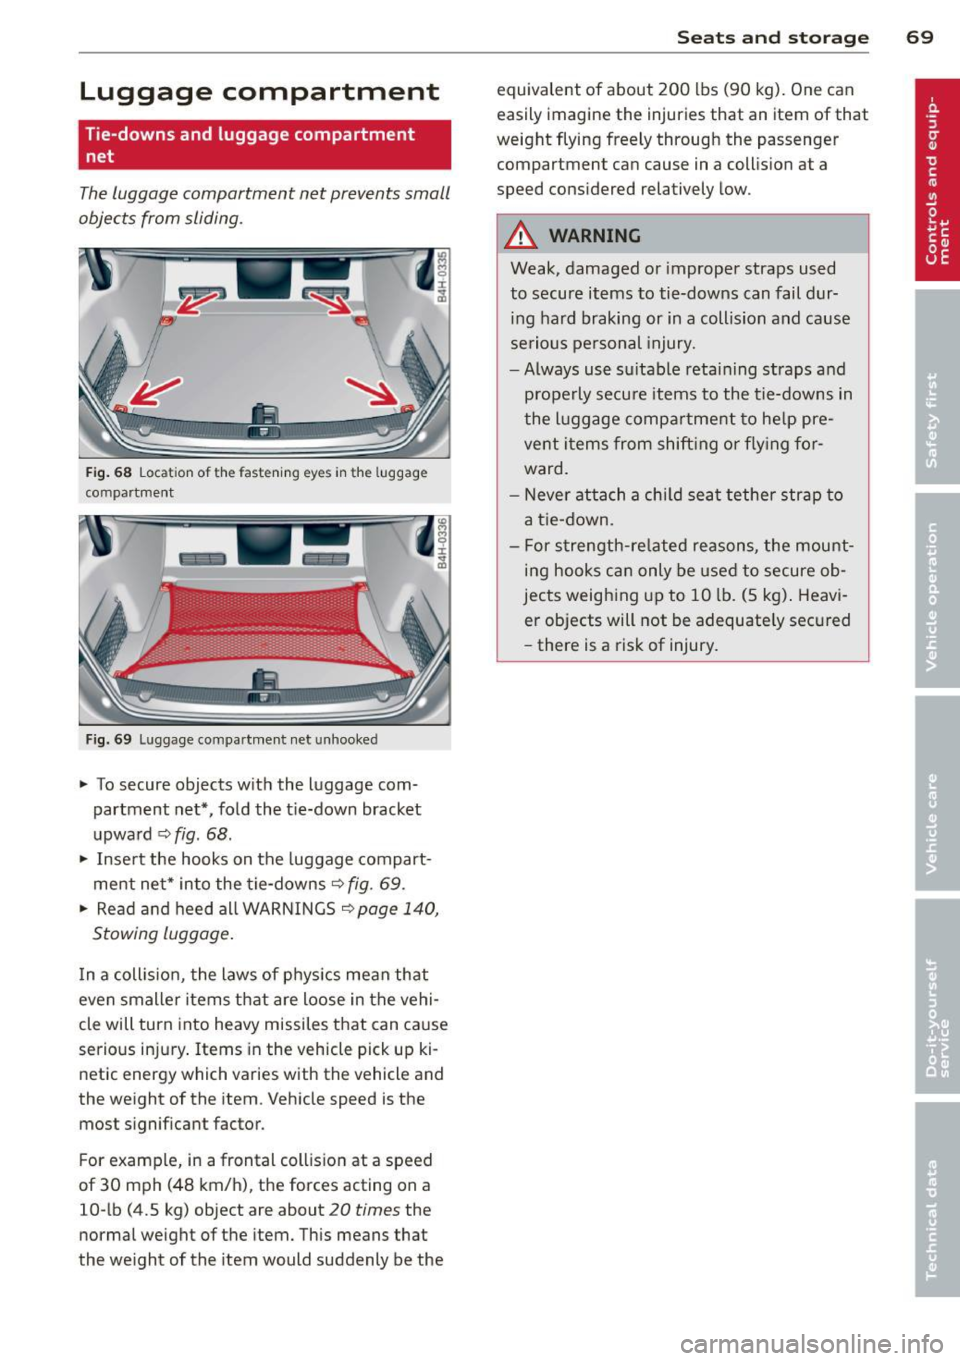
Fig. 68 Locat ion of the fastening eyes in the luggage
compartment
Fig. 69 Luggage compartment net unhooked
~ To secure objects with the luggage com
partment net*, fold the t ie-down bracket
upward
<:;> fig. 68.
~ Insert the hooks on the luggage compart
ment net* into the tie-downs
¢ fig . 69.
~ Read and heed all WARNINGS ¢page 140,
Stowing Luggage.
I n a coll is ion, the laws of phys ics mean that
even smaller items that are loose in the vehi
cle will turn into heavy missiles that can cause
serious injury . Items in the vehicle pick up ki
netic energy which varies with the vehicle and
the weight of the item. Vehicle speed is the
most s ignificant factor.
F or example, in a frontal collis ion at a speed
of 30 mph (48 km/h), the forces acting on a
10-lb (4.5 kg) object are about
20 times the
normal weight of the item. This means that
the we ight of the item would suddenly be the
Seats and storage 69
equivalent of about 200 lbs (90 kg). One can
easily imagine the injuries that an item of that
weight flying freely through the passenger compartment can cause in a collision at a
speed considered relatively low.
A WARNING
Weak, damaged or improper straps used
to secure items to tie-downs can fail dur
ing hard braking or in a collision and cause
serious personal injury.
-Al ways use su itable retaining straps and
prope rly secure items to the tie-downs in
the lu ggage compartment to help pre
vent items from shifting or flying for
ward.
- Never attach a child seat tether strap to
a tie-down.
- For strength-related reasons, the mount
ing hooks can only be used to secure ob
jects weighing up to 10 lb. (5 kg). Heavi
er objects will not be adequately secured
- there is a risk of injury.
Page 72 of 318

70 Seats and storage
Pass-through with ski
sack
Preparing the pass-through
Appl ies to vehicles: with pass-through and ski sack
Long objects such as skis con be transported
in the ski sock.
Fig. 70 Rear benc h seat: removing t he protective cover
Fig . 71 Rear center armres t: attaching the protective
cover
.. Fold the rear center arm rest and the cover
located beh ind it down .
.,. Press the butto n to remove the p rotective
c ove r¢
fig . 70.
.. To p rotect the front area of the center arm
r est, position the cover as illustrated
,::;, fig. 71 and press the suct io n cups down so
they adhere.
.. Remove the ski sack and unfold it.
Loading and securing the ski sack
Applies to vehicles: with pass -through and ski sack
--~ --
--· ---
Fig. 72 Luggage compartmen t: pass -th roug h in th e
back rest
F ig. 73 Rear bench seat: secu ring the sk i sack
Loading
.,. Fold the pass-through cover in the luggage
compa rtment down ¢
fig. 72.
.,. Slide the pointed end of the s kis into the sk i
sack first¢ &. The front par t of the bind
ings must be direc tly under the securing
strap on the ski sack@¢
fig. 73.
Securing
.,. Insert the securing strap@ on the ski sack
into the center safety belt latch © ¢
fig. 73 .
.,. Tigh ten t he secur ing strap @.
Securing (vehicles with full-length center
console )
In the pass-th rough, two securi ng straps are
i n the hooks lo cated in the lugg age compa rt·
ment .
.,. Hook the hooks into the front tie-downs in
the luggage compartment .
.,. Tigh ten the secur ing str ap @ in the rear .
Page 74 of 318
72 Seats and storage
-When not in use, to reduce fuel consump
tion, wind noise and to guard against theft.
A WARNING
- Use of an unapproved roof rack or incor
rect mounting of an approved roof rack
can cause the roof rack or the items at
tached to it to fall off the roof onto the
road .
- Objects falling from the roof of a vehicle
can cause a crash and personal injury .
- Only mount the roof rack on the desig
nated locations on the roof
c::> fig. 7 4.
-The roof rack system must be installed
exactly according to the instructions pro
vided.
- When driving with a roof rack system,
changes to the center of gravity and wind
resistance can change the vehicle han
dling and lead to a collision . Always
adapt your driving and your speed to the
current conditions.
- Your vehicle warranty does not cover any
damages to the vehicle caused by using
roof racks or mounting structures not
approved by Audi for your vehicle. The
same applies to damage resulting from
incorrect roof rack installation.
- Always check the roof rack mountings
and hardware before each trip and dur
ing a trip to make sure everything is se
curely tightened. If necessary, retighten
the mountings and check the entire sys
tem from time to time.
- After mounting a roof rack system, or
when you transport objects on the roof
of your vehicle, the height of the vehicle
is naturally increased. Be careful when
driving under low bridges or in parking
garages for example . This could cause
damage to the load and even the vehicle itself.
- Make sure the open rear lid and the sun
roof* do not come into contact with the
roof rack.
Loading the roof rack
Always distribute loads evenly. Make sure
anything on the roof rack is securely tied
down.
.. Always distribute the loads on the roof rack
evenly .
.. Always attach items to the roof rack secure-
ly before you drive off.
The maximum permissible roof weight is
220
lb (100 kg).
The roof weight is the total of
the weight of the roof rack, the attachments
and the cargo you are carrying. You must also
not exceed the maximum load weight for the
roof rack you are using.
When using a roof rack system which has a lower load carrying capacity, you must not use
up the total maximum permissible load carry
ing capacity specified above. Instead, you
should load the roof rack system only to the
maximum capacity specified by the manufac
turer of the roof rack system .
A WARNING ,_
Weak, damaged or improper straps used
to secure items to the roof rack can fail
during hard braking or in a collision and
cause serious personal injury .
- Make sure the roof rack is installed exact
ly as specified above
c::> page 71.
-Always use suitable mounting straps for
securing items to the roof rack to help
prevent items from shifting or flying for
ward .
- Items on the roof rack must always be securely mounted .
- The use of a roof rack can negatively af
fect the way a vehicle handles . Cargo
that is large, heavy, bulky, long or flat
will have a greater negative influence on
the vehicle's aerodynamics, center of
gravity and overall handling. Always
drive slowly, avoid sudden braking and
maneuvers when transporting cargo on
the roof of your vehicle.
Page 75 of 318
-Never exceed the maximum permissible
load carry ing capacity of the roof of your
vehicle, the permissible axle weights and
the permissible total weight of your vehi cle
~ page 290, Weights.
@ For the sake of the environment
As a result of the increased wind resistance created by a roof rack, your vehicle is
using fue l unnecessarily. So remove the
roof rack after using it.
12-volt sockets
Applies to vehicles: 12-volt sockets
Electrical accessories can be connected to ev
ery 12-volt socket.
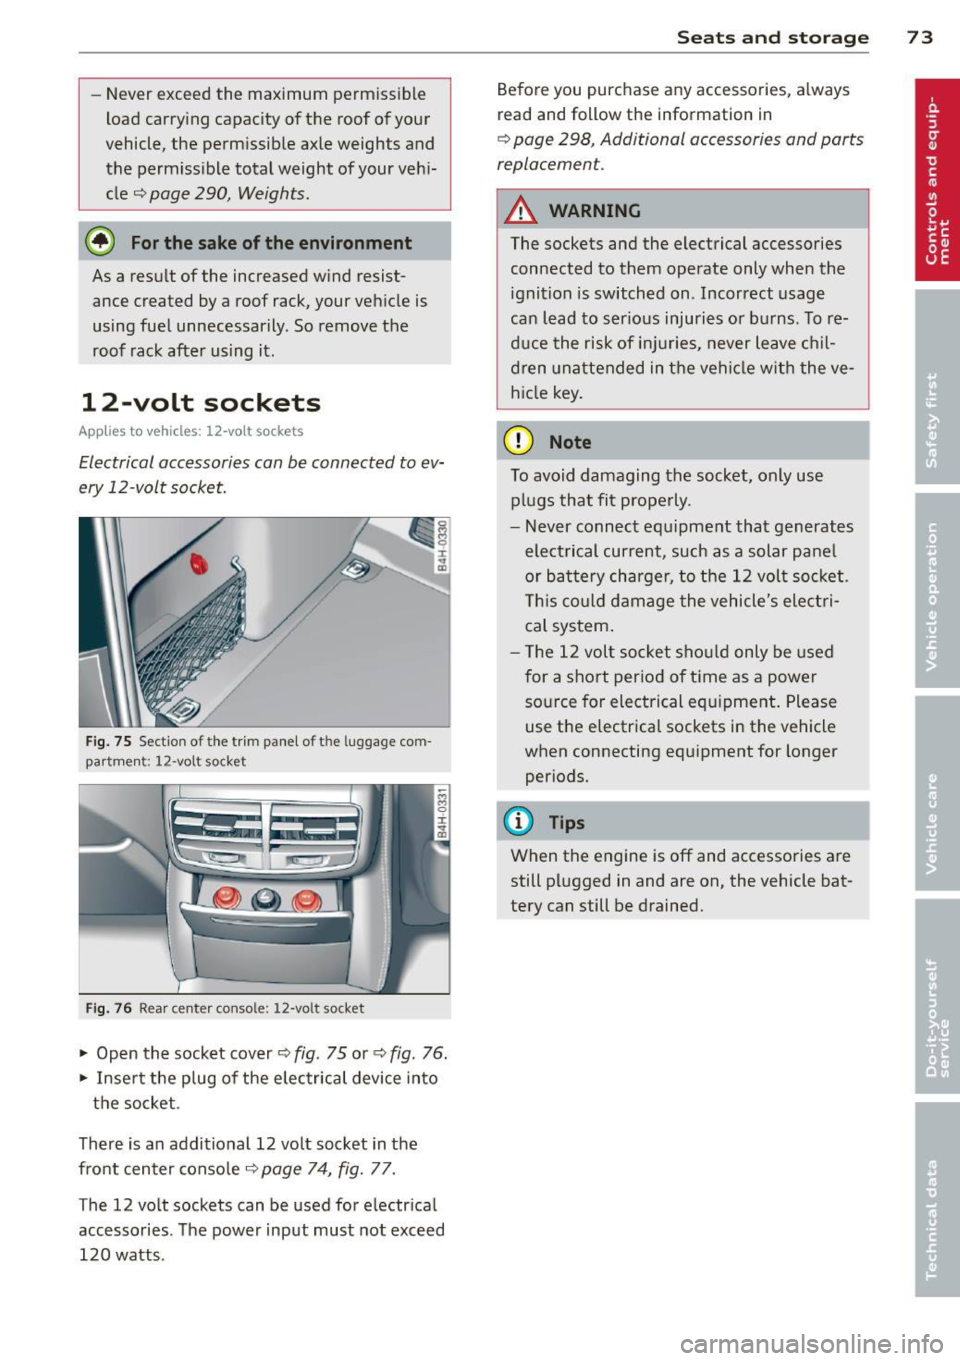
Fig. 75 Section of the trim panel of the luggage com
part men t; 12-volt socket
Fig. 76 Rear center console: 12-volt socket
"' Open the socket cover¢ fig. 75 or¢ fig. 76.
"' Insert the plug of the e lectrical device into
the socket.
There is an additional 12 volt socket in the
front center console¢
page 74, fig. 77.
The 12 volt sockets can be used for electrical
accessories. The power input must not exceed
120 watts.
Seats and storage 73
Before you purchase any accessories, always
read and follow the information in
~ page 298, Additional accessories and parts
replacement.
A WARNING
The sockets and the electrical accessories
connected to them operate only when the ignition is switched on. Incorrect usage
can lead to ser ious injuries or burns. To re
duce the risk of injuries, never leave chil
dren unattended in the vehicle with the ve
hicle key.
(D Note
To avoid damaging the socket, only use
plugs that fit properly.
- Never connect equipment that generates
electrical current, such as a solar pane l
or battery charger, to the 12 volt socket.
This could damage the vehicle's electri
cal system .
- The 12 volt socket should only be used
for a short period of ti me as a power
source for electrical equ ipment . Please
use the electrical sockets in the vehicle
when connecting equipment for longer periods.
(D Tips
When the engine is off and accessories are
still plugged in and are on, the vehicle bat
tery can still be drained.
Page 76 of 318
7 4 Seats and storage
Storage
(upholder
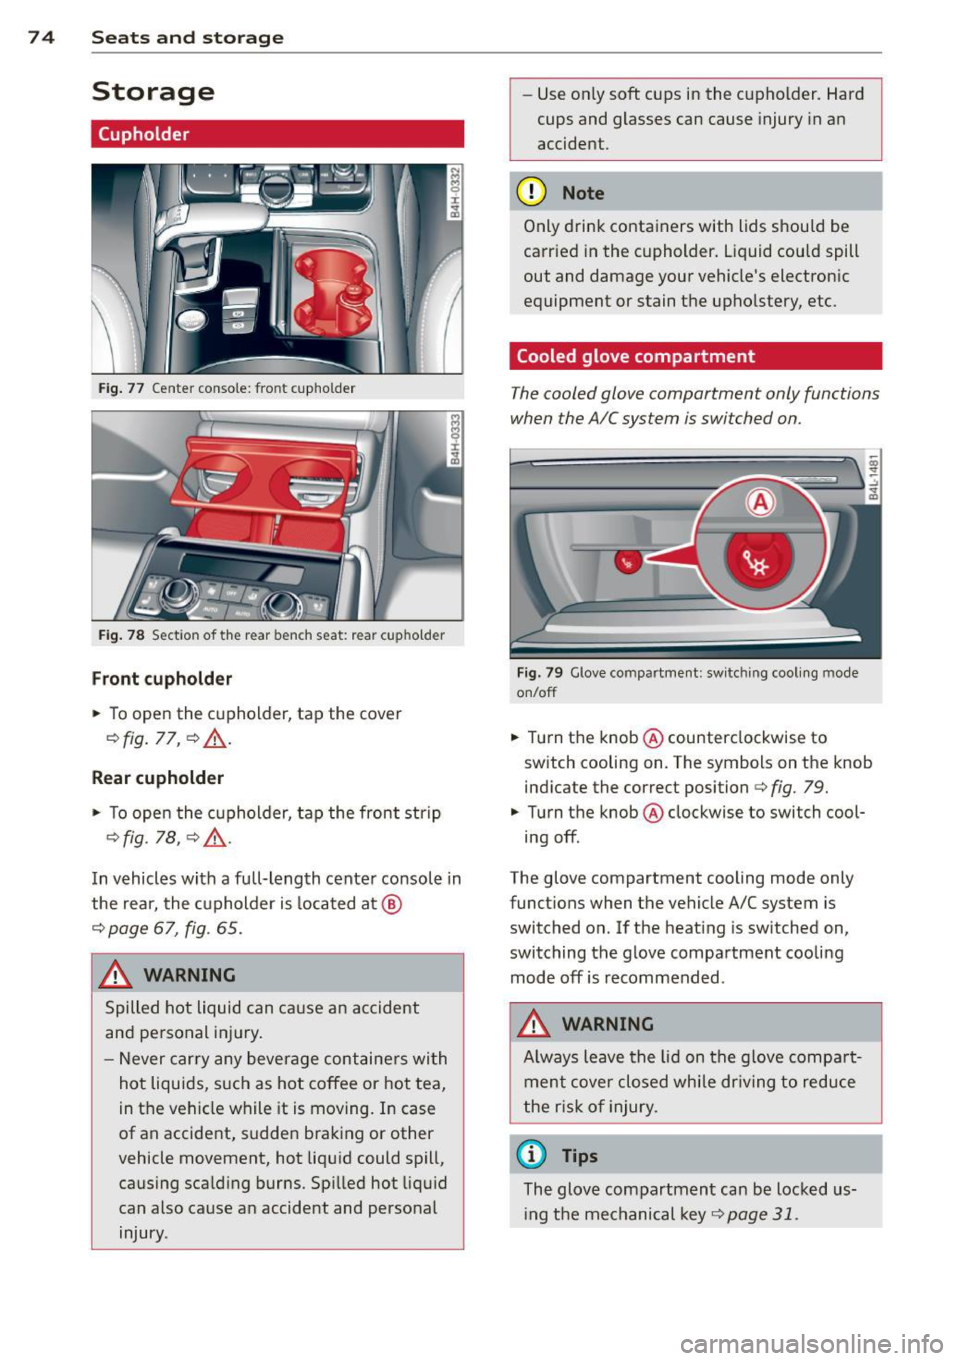
Fig . 77 Center conso le: front cupholder
Fig. 78 Section of the rear bench seat: rear cupholder
Fr ont cuphold er
., To open the cupholder, tap the cover
¢ fig. 77, ¢ &_ .
Rear cupholder
., To open the cupholder, tap the front strip
¢ fig. 1a, ¢ A .
In vehicles with a full-length center console in
the rear, the cupholder is located at @
¢ page 67, fig. 65.
A WARNING
Spilled hot liquid can cause an accident
and personal inj ury .
- Never car ry any beverage containers wi th
hot liquids, s uch as hot coffee or hot tea,
in the veh icle while it is mov ing. In case
of an accident, sudden braking or other
vehicle movement, hot liqu id could spill,
causing scalding burns. Spi lled hot liquid
can also cause an accident and personal injury. -
Use on ly soft cups in the cupholder. Hard
cups and glasses can cause injury in an
accident.
(D Note
Only drink containers with lids should be
carried in the cupholder. Liquid could spill
out and damage your vehicle's electronic
equipment or stain the upholstery, etc.
Cooled glove compartment
The cooled glove compartment only functions
when the AIC system is switched on.
Fig. 79 Glove compartme nt: sw itching cool ing mode
on/off
., Turn the knob @counterclockwise to
sw itch cooling on . The symbols on the knob
indicate the correct position¢
fig. 79 .
., Turn the knob @clockwise to switch cool·
ing off.
The glove compartment cooling mode only
funct ions when the vehicle A/C system is
switched on. If the heat ing is sw itched on,
switching the glove compa rtment cooling
mode off is recommended.
A WARNING
A lways leave the lid on the glove compa rt
ment cove r closed while dr iving to reduce
t he r isk o f injury.
(1) Tips
The glove compartment can be Locked us·
i ng the mechanical key
¢page 31.
Page 78 of 318
76 Seats and storage
-the temperature in the luggage compart
ment is below 131 °f (55 °C). The cooler
switches off automatically if the tempera
ture in the luggage compartment exceeds 131 °f (55 °C). Once the tempera ture falls
below 131 °f (55 °C) again, the cooler
switches on aga in automatically .
- the battery is adequately charged . The cool
er switches off automatically if the vehicle
battery voltage falls below a minimum lev
el. This prevents the battery from discharg
ing. The cooler switches back on again auto
matically when the battery voltage increases
again (e.g . after starting the engine).
The cooler cools to 42.8 °f
(+ 6 °C) and the
freezer cools to 21.2 °f (-6 °C) in opt imum
cooling conditions . The cooling performance
is affected by the temperature in the luggage
compartment. The temperature inside the
cooler will be higher if the luggage compart
ment is hot.
A WARNING
To avoid putting the occupants at any risk, please observe the following safety rules:
- The maximum capacity is 2.5 kg (5.5
lbs.).
- Never overload the cooler. This could
cause injury in the event of a collision or
sudden braking.
- The cooler lid must always be kept closed
while you are driving. Make sure the re
taining catch is securely engaged. The contents of the coo ler could be thrown
forward into the passenger compart
ment in the event of a collision or under
sudden braking -risk of injury!
- Inflammable liquids, gas canisters, etc.
must not be stored in the cooler -risk of
explosion! This also includes any prod
ucts that might emit volatile or inflam
mable gases.
- Liquids will freeze at temperatures at or
below 32 °f (0 °C) and may cause glass
bottles to burst!
(D Note
- The ventilation openings for the cooler
are located on the back panel trim in the
luggage compartment and
must be kept
clear at all times.
- If the cooler is not functioning properly,
switch it off to prevent further damage.
Have it checked by a qualified workshop.
Operation
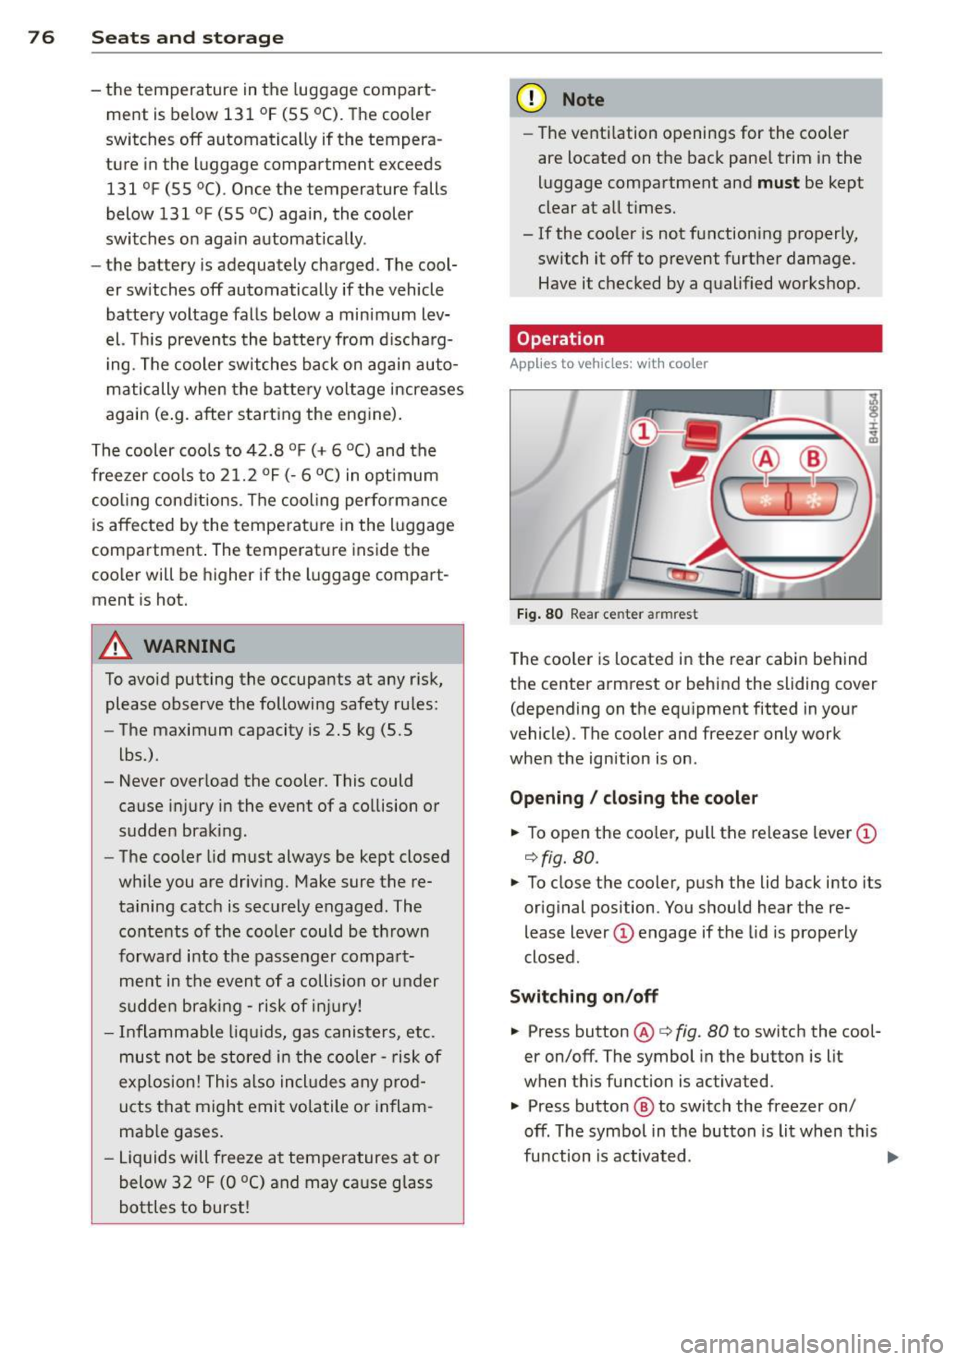
App lies to vehicles: wit h cooler
Fig. 80 Rear cen ter armrest
The cooler is located in the rear cabin behind
the center armrest or behind the sliding
cover
(depending on the equipment fitted in your
vehicle) . The cooler and freezer only work
when the ignition is on .
Opening / closing the cooler
.,. To open the cooler, pull the release lever(!)
c!> fig. 80.
.. To close the cooler, push the lid back into its
original position . You should hear the re
lease lever
(D engage if the lid is properly
closed.
Switching on/off .,. Press button @c::>fig.
80 to switch the cool
er on/off. The symbol in the button is lit
when this function is a ctivated .
.. Press button
@ to switch the freezer on/
off . The symbol in the button is lit when this
function is activated.