steering wheel AUDI A8 2013 User Guide
[x] Cancel search | Manufacturer: AUDI, Model Year: 2013, Model line: A8, Model: AUDI A8 2013Pages: 318, PDF Size: 79.34 MB
Page 84 of 318
82 On the road
On the road
Steering
Adjusting steering wheel position
The steering wheel position can be adjusted
for height and reach .
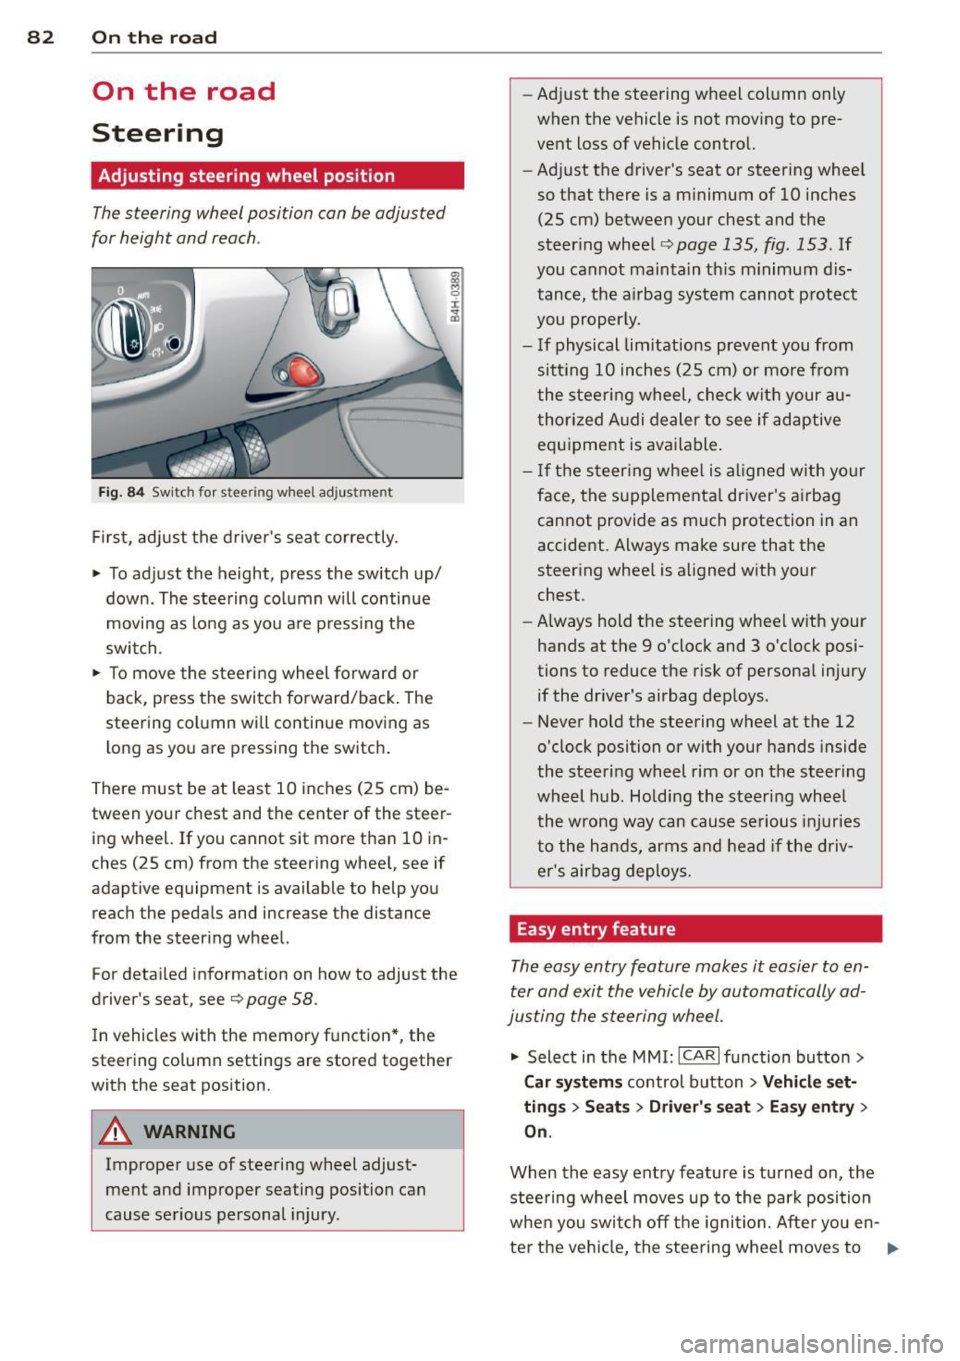
Fig. 84 Switch for steering whee l adjustment
F irst, adjust the driver's seat correctly.
• To adjust the height, press the switch up/
down. The steering column will continue
moving as long as you a re pressing the
switch.
• To move the steeri ng wheel forward or
back, press the switch forward/back . The
steering column wi ll continue moving as
long as you are pressing the switch .
There must be at least 10 inches (25 cm) be
tween your chest and the center of the steer ing wheel. If you cannot sit more than 10 in
ches (25 cm) from the steering wheel, see if
adaptive equipment is available to help you
reach the pedals and increase the distance
from the steering wheel.
For detai led informat ion on how to adjust the
driver's seat, see
Q page 58.
In vehicles with the memory function* , the
steering column settings are stored together
with the seat position.
A WARNING
Improper use of steering wheel adjust
ment and improper seating position can
cause serious personal injury . -
Adjust the steering wheel col umn only
when the vehicle is not mov ing to pre
vent loss of vehicle control.
- Adj ust the driver's seat or steering whee l
so that there is a m inimum of 10 inches
(25 cm) between your chest and the
steer ing wheel
Q page 135, fig . 153 . If
you cannot maintain th is m inimum dis
tance, the airbag system cannot p rotect
you properly.
- If physical limitations prevent you from sitt ing 10 inches (25 cm) or more from
the steering wheel, check wit h your au
thorized A udi dealer to see if adaptive
equipment is available .
- I f the steering wheel is al igned with your
face, the supplementa l driver's airbag
cannot provide as much protection in an
accident. Always make sure that the
steering whee l is aligned with your
chest.
- Always hold the steering wheel w ith your
hands at the 9 o'clock and 3 o'clock posi
tions to reduce the risk of persona l injury
if the dr iver's airbag dep loys.
- Never hold the steering wheel at the 12
o'clock position or with your hands inside
the steeri ng wheel rim or on t he steering
wheel hub. Holding the steer ing wheel
the wrong way can cause serious injuries
to the hands, arms and head if the driv
er's airbag deploys.
Easy entry feature
The easy entry feature makes it easier to en
ter and exit the vehicle by automatically ad
justing the steering wheel.
• Select in the MMI : ICAR lfunction button>
Car sy st e m s control button > Ve hicle set·
tin gs > Se ats > Driver's s eat > Ea sy entr y>
On .
When the easy entry feature is turned on, the
steering wheel moves up to the park position
whe n you switch off the ignition. Afte r you en-
ter the ve hicl e, the steering wheel moves to .,..
Page 88 of 318

86 On the road
driving force has been built up at the
wheels.
E mergency brake function
An emergency brake ensures t hat the vehicle
can be slowed down even if the
normal brakes
fail
c::> page 87, Emergency braking .
Indicator lights
-If the parking b rake is closed w ith the igni
t ion
sw itch ed on the indicator lights come
on - (USA models)/ . (Canada models)
i n the i nstr ument cluster and in the switch .
- If the par king brake is closed w ith the igni
t ion
s wit ched off the indicato r lights come
on - (USA models)/ . (Canada models)
in the instrument cluster and in the switch
for about 20 seconds.
.&_ WARNING
Do not press the accelerator peda l inadver
tently if the vehicle is stat ionary but the
eng ine is running and a gear is selected.
Otherw ise the vehicle will start to move
immed iate ly and could result in a crash .
@ Note
If the symbo l. in the display or the ind i
cator light
1111 (USA models) . (Cana
da models) in the instrument cluster flash
es, there is a malfunction in the brake sys
tem . Please refer to the detai led descrip
tion of the indicator lights
c::> page 14.
- If the indicato r light - (USA mod-
els) . (Canada mode ls) or
liJ turns
on, there may be a malfunction in the parking b rake
c::> poge 15.
(D Tips
- You can apply the pa rking brake at any
t ime - even w ith the ignition switched
off . T he ignit ion must be on in order to
r elease the parking brake.
- Occ asiona l noises when the par king
brake is applied and re leased are no rma l
and are not a ca use for concern .
- When the vehicle is par ked, the par king
brake goes through a se lf -test cycle at regu
lar interva ls. Any associated noises
are normal.
Parking
Parking
.,. Stop the vehicle with the foot brake .
.,. Pull the switch(®) to apply the parking
brake.
.,. Select the P selector lever position
c::>page 115.
.,. Turn the engine off c::> _&. .
In addit ion on inclin es and g rades
.,. Turn the steering whee l so that your vehicle
w ill roll aga inst the curb in ca se it should
start to move.
.&_ WARNING
- When you leave your vehicle - even if on
ly br iefly - always take the ignit io n key
wit h you. This applies pa rticularly when
children remain in the vehicle. Otherwise
the children co uld s tart the engine, re
lease the parking brake or operate elec
trica l equipment (e.g . power windows) .
There is the r isk o f an accident.
- When the vehicle is locked, no one - par
ticularly not children should rema in in
the vehicle. Locked doors make it more
d ifficult for emergency workers to get in
to the vehicle - putting lives at risk .
· Starting from rest
The starting assist function ensures that the
parking broke is released au tomatically upon
star ting.
Stopping a nd applying parking brak e
.,. Pull the switch(®) to apply the parking
brake.
St arting and automatically releasing the
parking brake
.,. When you start to drive as usual , the park
ing brake is a utomatically rel eased and your
vehicle beg ins to move. ..,..
Page 91 of 318

@ Tips
When you stop and the start-stop-system
turns the engine off, the ignition remains on. Make sure that the ign ition is switched
off before exiting the vehicle.
General information
App lies to vehicles: with Start-Stop-System
The standard Start-Stop-mode can be cancel·
led for different system-related reasons.
Fig. 89 Instrument cluster : eng ine-Stop temporar ily
u navailable
Engine will not switch off
Before each stop phase, the system checks if
certain cond itions have been met . For exam
p le, the engine will
not be switched off in the
following situations:
- The engine has not reached the minimum
required temperature for Start -Stop-mode .
- The interio r temperature selected by the A/C
system has not been reached.
- Th e outside temperature is extremely h igh/
low.
- The windshield is being defrosted
9page 81.
- The parking system* is switched on.
- The battery charge level is too low .
- The steering wheel is sharply turned or there is a steer ing movement.
- After engaging the reverse gear.
- On sharp inclines .
The
(jj indicator light appears in the informa
tion line in the instrument cluster display
9fig. 89.
On the road 89
Engine automatically restarts
The stop phase is interrupted in the following
situations, for example. The engine restarts
without any action by the driver.
- The interior temperature varies from the
temperature selected in the A/C system.
- The windsh ield is being defrosted
9page 81.
-The brake pedal is pressed severa l times in a
row.
- The battery charge level becomes too low .
- High power consumpt ion.
@ Tips
If you shift into the D, Nor S positions af
ter sh ifting into
reverse, the vehicle must
be driven faster than 6 mph (10 km/h) in
order for the engine to sw itch off aga in.
Switching the Start-Stop-System on/off
manually
App lies to vehicles: wi th Start-Stop-Sys te m
If you do not wish to use the system, you can
switch it off manually.
Fig. 90 Center console: Start-Stop-System button
.,. To switch the Start-Stop-System off/on
manually, press the
l "'I button. The LED in
the button turns on when the system is
sw itched off.
@ Tips
If you switch the system off during a stop
phase, the engine will start again auto
matically.
Page 98 of 318
96 Audi adaptive cruise control and braking guard
• You must also press the brake pedal when
the vehicle is stopped.
Switching adaptive cruise control off
• Push the lever away from you into position
@ until it clicks into p lace. The message
ACC off appears.
@ Indicator lights
II-Adaptive cruise control is switched on . No
vehicles are detected up ahead. The stored
speed is maintained.
I-A moving vehicle is detected up ahead .
The adaptive cruise control system regulates
the speed and d istance to the moving vehicle
ahead and acce lerates/brakes automatica lly.
S, -Adaptive cruise contro l is switched o n. A
mov ing vehicle up ahead was detected. Your
vehicle remains stopped .
I-When au tomatic braking is not able to
keep enough distance to a p reviously detected
mov ing vehicle up ahead, you must take con
trol and brake ¢
page 98 , Prompt for driver
intervention.
© Display
If adap tive cruise control is not shown in the
d isplay, you can call it up with the multifunc
tion steering wheel buttons~
page 23.
Based on the symbols in the display , you can
determ ine if the system is maintaining a dis
tance to the vehicle ahead and w hat that dis
tance is.
No vehicle -No vehicle ahead was detected.
White vehicle -A vehicle ahead was detected .
Red vehicle -Prompt for the driver to take ac
tion ¢
page 98 .
Both arrows on the scale© indicate the dis
tance to the vehicle ahead . No arrow appears
when the vehicle is on an open road and there is no object ahead. If an object is detected
ahead, the arrow moves on the scale .
The green zone on the scale shows the stored d istance. For information on changing the stored distance, refer to
¢
page 97. If the
distance se lected is too close or may soon be
come too close, the arrows move into the red
z one on the sca le.
A WARNING
Improper use of the adaptive cruise con
trol can cause collisions, other accidents
and serious personal injur ies .
- Pressing the
!SET ! button when driving at
speeds below
20 mph (30 km/h), w ill au
tomatically accelerate the vehicle to
20
mph (30 km/h), which is the minimum
speed that can be set .
(D Tips
-If you switch the ignit ion or the adaptive
cruise control off, the set speed is erased
from the system memory.
- You cannot switch the Electron ic Stabili
zation Control (ESC) to the SPORT mode
when adaptive cruise control is switched
on .
Changing the speed
Applies to vehicles: with Audi adaptive cruise control
0
f
• 0
Fig. 99 Selecto r lever : chang ing t he spee d
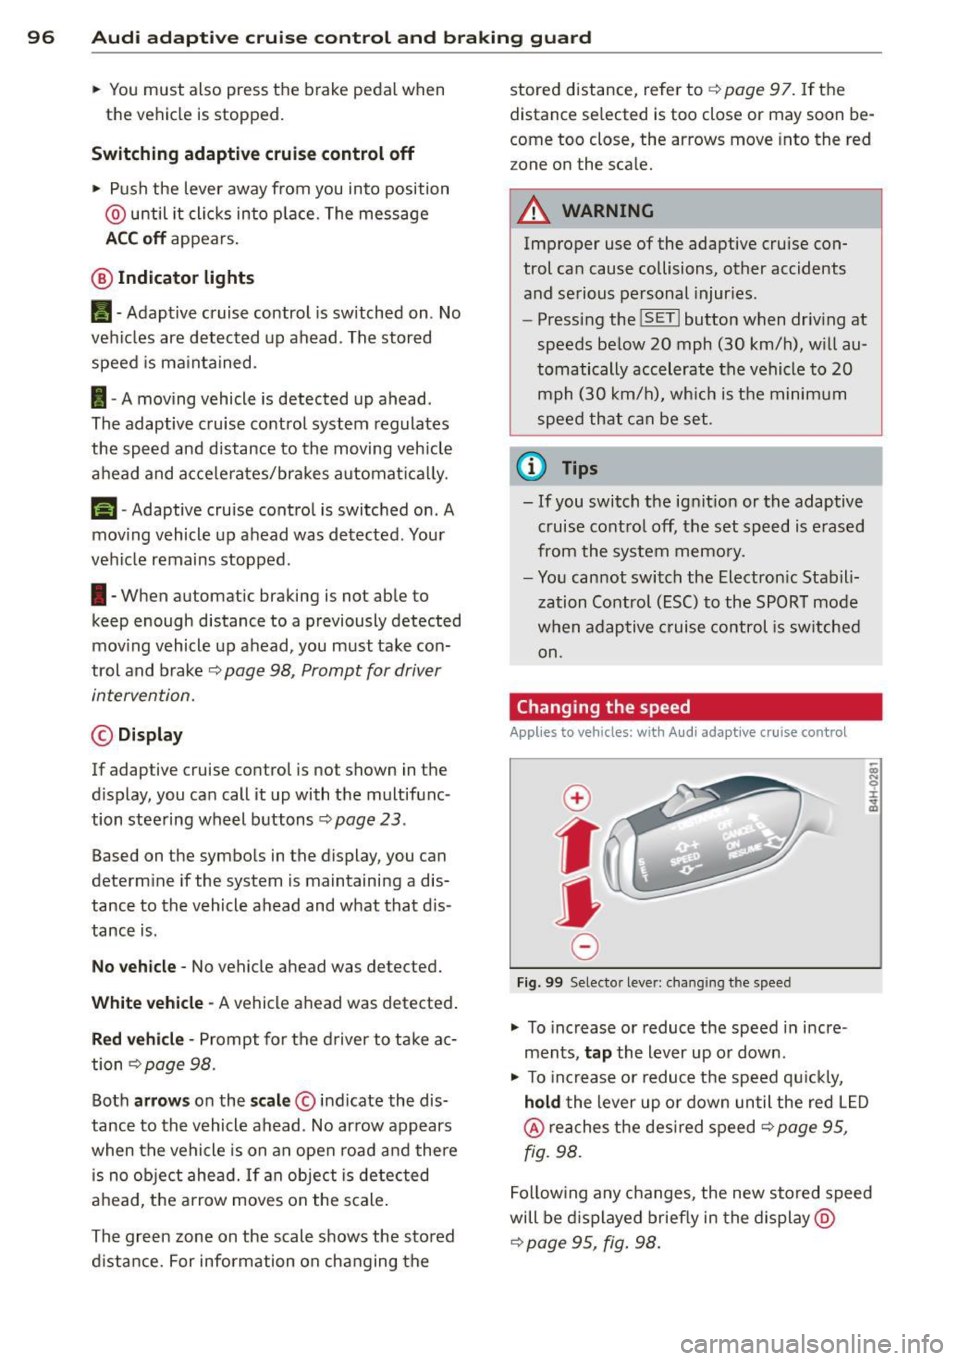
• To increase or reduce the speed in incre
ments,
tap the lever up or down.
-
-a)
N
q :r
~
"' To increase or reduce the speed qu ickly,
hold the lever up or down until the red L ED
@ reaches the desired speed ¢ page 95,
fig . 98.
Following any changes, the new stored speed
will be displayed briefly in the display @
¢ page 95 , fig. 98.
Page 106 of 318
104 Audi lane assist
Setting the warning point and steering
wheel vibration
Applies to vehicles: with lane assist
You can adjust individual settings in the MMI.
.. Se lect: ICARI function button> Car systems
control button > Driver assist > Audi lane
assist .
Setting the warning point
Early: With this setting, a warning is provided
before a wheel touches the detected lane
boundary line . The warning depends on the
angle in which the veh icle is approaching the
line. The distance at which the warning is giv
en increases as the angle becomes sharper. If
you dr ive towa rd a boundary line at a very
sha rp angle, the warning will come just before
a wheel touches the line.
Medium : With this setti ng, the warn ing po int
is adapted to the course of the road, the lane
width and the speed. You wi ll sti ll be warned
if you cross slightly over a dotted line when
driving on curves.
Late : This setting has the same properties as
medium. You will only be warned once a
wheel crosses a detected line.
Setting the steering wheel vibration
The steering wheel v ibration can be set to
Low , Medium or Strong . Selecting each of the
settings will cause the steering wheel to vi
b rate so you can check the strength of the vi
bration in that setting.
(D Tips
Your settings are automatically stored and
assigned to the remote contro l key being
used .
Page 114 of 318
112 Night vision assistant
Night vision assistant
Description
Applies to vehicles: with night v isio n ass istant
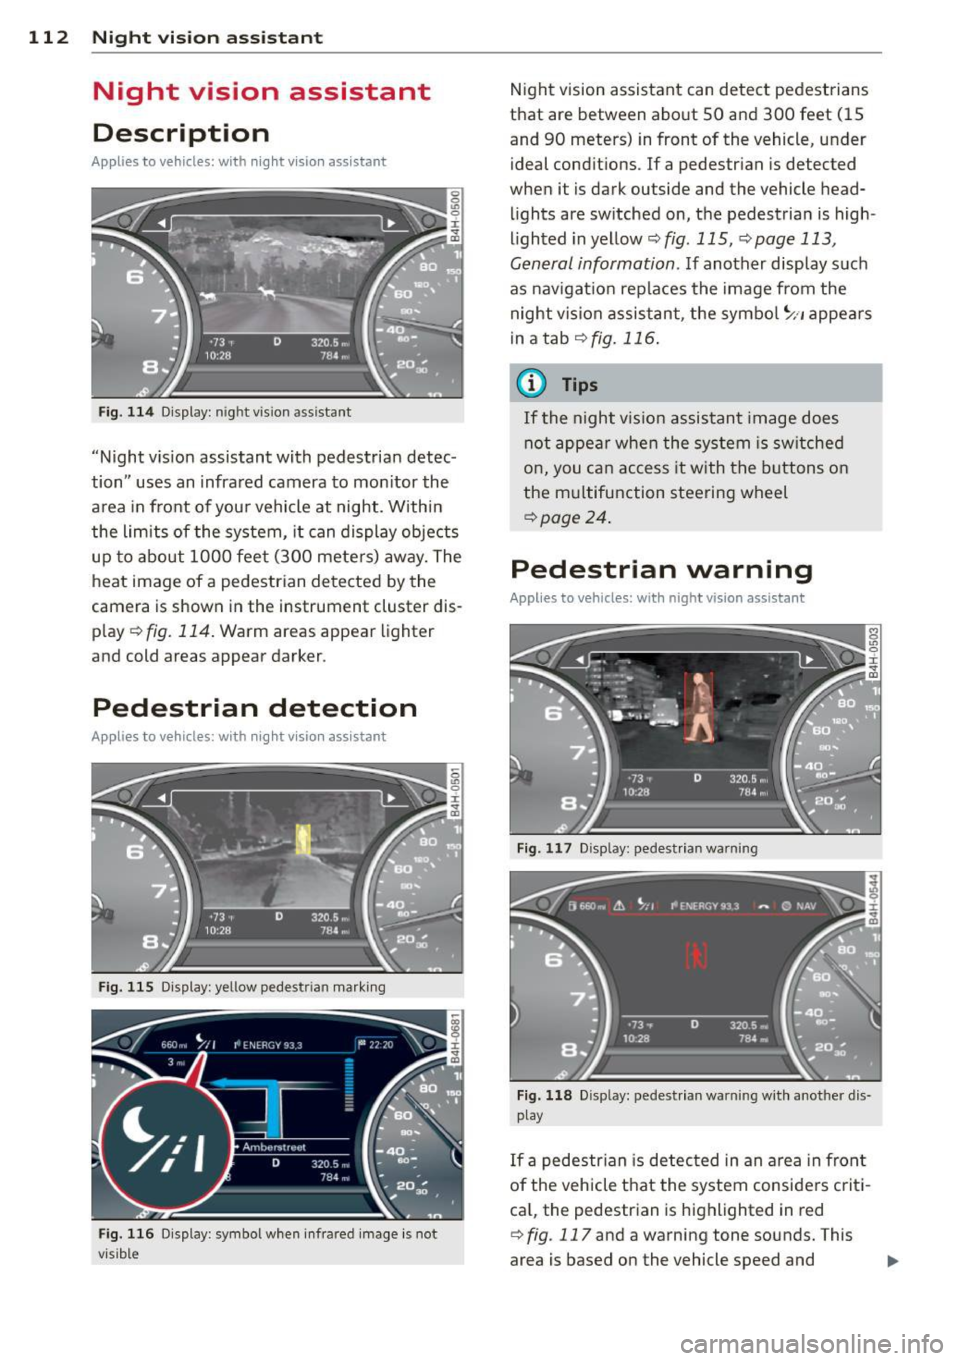
Fig. 114 Display: n ight vis ion assistant
"Night vis ion assistant with pedestrian detec
tion" uses an infrared camera to monitor the
area in front of you r vehicle at night. Within
the limits of the system, it can display objects
up to about 1000 feet (300 meters) away. The
heat image of a pedestrian detected by the
camera is shown in the instrument cluster dis
p lay ¢
fig. 114. Warm areas appear lighter
and cold areas appear darker.
Pedestrian detection
Applies to vehicles: with nig ht v isio n ass istant
Fig. 115 Display: yellow pedestr ian marking
Fig. 116 Display: symbol when infrared image is not
visib le
Night vision assistant can detect pedestrians
that are between about 50 and 300 feet (15
and 90 meters) in front of the vehicle, under
ideal conditions.
If a pedestrian is detected
when it is dark outside and the vehicle head
lights are switched on, the pedestrian is high
lighted in yellow¢
fig. 115, ¢page 113,
General information.
If another display such
as navigation replaces the image from the
night vision assistant, the symbo l
~11 appears
in a tab
¢fig . 116 .
(D Tips
If the night v ision assistant image does
not appear when the system is switched
on, you can access it with the buttons on
the multifunction steering wheel
¢page 24.
Pedestrian warning
Applies to vehicles: wit h night vision assistant
Fig. 117 D isp lay: pedestrian warning
Fig. 118 Disp lay: pedestr ian warning w ith another dis
play
If a pedestr ian is detected in an area in fron t
of the vehicle that the system considers criti
ca l, the pedestrian is highlighted in red
¢
fig . 117 and a warning tone sounds. This
area is based on the vehicle speed and
Page 125 of 318
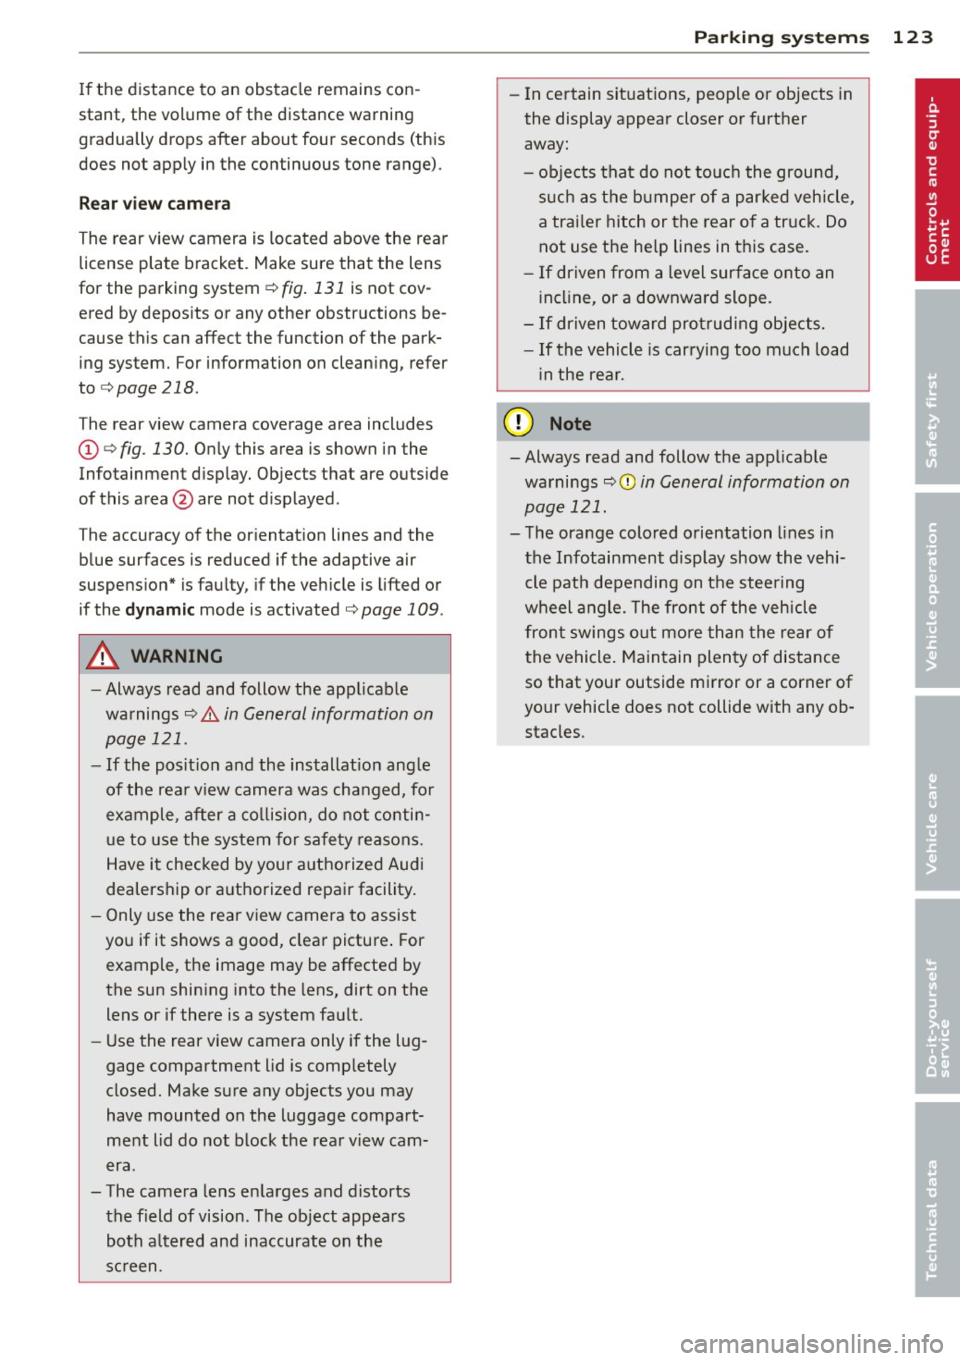
If the distance to an obstacle remains con
stant, the volume of the distance warning
gradually drops after about four seconds (this
does not apply in the continuous tone range).
Rear view camera
The rear view camera is locat ed above the rear
license plate bracket. Make sure that the lens
for the parking system
r::;, fig. 131 is not cov
ered by deposits or any other obstructions be
cause this can affect the function of the park
ing system. For information on clean ing, refer
to
c;, page 218.
The rear view camera coverage area includes
(Dr::;, fig. 130. Only this area is shown in the
Infotainment display. Objects that are outside
of this area @are not displayed.
The accuracy of the orientation lines and the
blue surfaces is reduced if the adaptive air
suspens ion* is faulty, if the veh icle is lifted or
if the
dynamic mode is activated r::;, page 109.
A WARNING
-Always read and follow the applicable
warnings
r::;, &. in General information on
page 121.
- If the position and the installation angle
of the rear view camera was changed, for
example, after a collision, do not contin
ue to use the system for safety reasons.
Have it checked by your authorized Audi
dealership or authorized repair facility.
- Only use the rear view camera to assist
you if it shows a good, clear picture. For
example, the image may be affected by
the sun shining into the lens, dirt on the
lens or if there is a system fault.
- Use the rear view camera only if the lug
gage compartment lid is comp letely
closed. Make sure any objects you may
have mounted on the luggage compart
ment lid do not block the rear view cam
era .
- The camera lens enlarges and distorts the field of vision. The object appears both altered and inaccurate on the
screen.
Parking systems 123
-In certain situations, people or objects in
the display appear closer or further
away:
- objects that do not touch the ground,
such as the bumper of a parked vehicle,
a trailer hitch or the rear of a truck. Do
not use the help lines in this case.
- If driven from a level surface onto an
inclin e, or a downward slope.
-If driven toward protruding objects.
- If the vehicle is carrying too much load
in the rear.
(D Note
-Always read and follow the applicable
warnings
r::;, (D in General information on
page 121.
- The orange colored orientation lines in
the Infotainment display show the vehi cle path depending on the steering
wheel angle. The front of the vehicle
front swings out more than the rear of
the vehicle. Maintain plenty of distance
so that your outside mirror or a corner of
your vehicle does not collide with any ob stacles.
Page 127 of 318
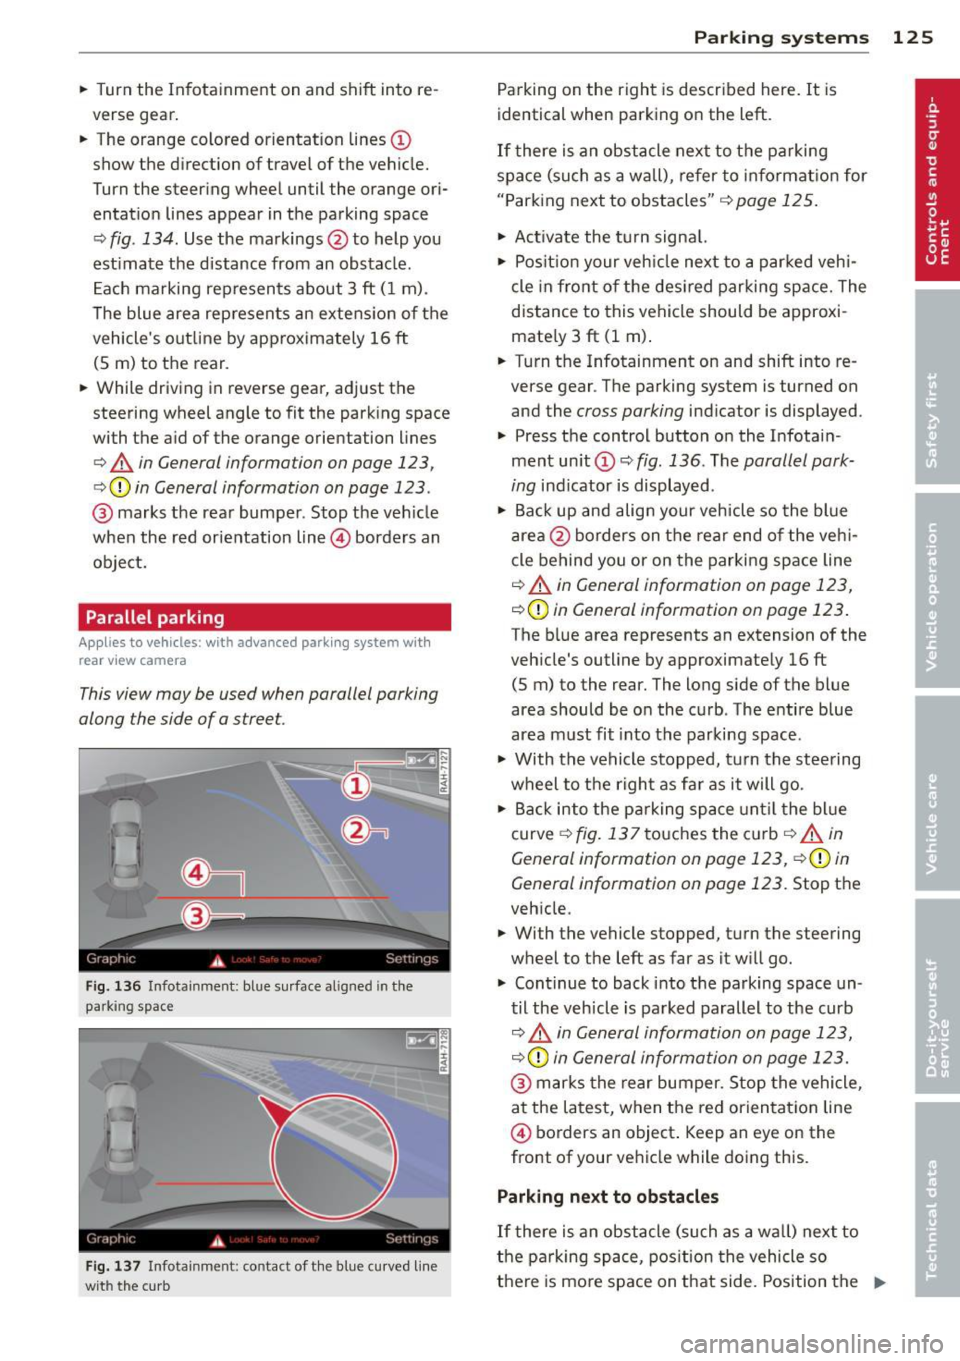
.. Turn the In fotainme nt on and shift into re
verse gear .
.. The orange colored orientation lines@
show the direction of travel of the vehicle.
Turn the steer ing wheel until the orange ori
entat io n lines appear in the parking space
¢
fig. 134 . Use the markings @to help you
est imate the distance from an obstacle .
E ach ma rking represen ts about 3 ft ( 1 m).
The blue area rep resents an extens ion of the
vehicle's out line by approximately 16 ft
(S m) to the rear .
.. While driving in reverse gear, adjust the
steering wheel angle to fit the park ing space
with the aid of the orange orientation lines
¢ & in General information on page 123,
c:>(D in General information on page 123.
@ marks t he rear bumper. Stop the veh icle
when the red orientation line@ borders an
object.
Parallel parking
Appl ies to vehicles : with advanced parking system with
rear vi ew camera
This view may be used when parallel parking
along the side of a street.
Fig . 136 Infotainment: blue s urface aligned in the
parking space
F ig . 137 Infotainment: contact of t he blue curved line
with the curb
P arking sys tems 125
Parking on the right is descr ibed here. It is
identical when parking on the left.
If there is an obstacle next to the parking
space (su ch as a wall), re fer to info rmat io n for
" P ark ing next to obstacles"
¢ page 125.
.. Ac tivate the t urn signa l.
.,. Pos it io n your veh icle next to a par ked vehi
cle in fro nt of the des ired parking space. The
distance to this vehicle should be approxi
mate ly 3 ft (1 m) .
.. Turn the Infotainment on and shift into re
verse gear . The parking system is turned on
and the
cross parking indicator is displayed.
.. Press the control button o n the Infotain
ment un it CD ¢
fig. 136. The parallel park
ing
ind icator is displayed.
.. Bac k up and alig n your vehicle so the blue
a rea @ borders on the rear end of the veh i
cle behind you or on the parking space line
¢ & in General information on page 123,
¢ (D in General information on page 123.
The blue area represents an extension of the
veh icle's outline by approximately 16 ft
(S m) to the rear. The long side of the blue
area should be on the c urb . The entire b lue
area must fit into the parking space .
.,. With the vehicle stopped, t urn the stee ring
wheel to the r ight as fa r as it will go .
.. Ba ck into the p arking space until t he bl ue
curve ¢
fig. 137 to uches the cu rb ¢ & in
General information on page 123,
c:>(D in
General information on page 123 .
Stop the
veh icle .
.. With the vehicle stopped, turn the steering
wheel to the left as far as it will go .
.,. Continue to back into t he parking space un
til the veh icle is pa rked parallel to the curb
c::> .&, in Gen eral information on page 123,
c::> (D in General informa tion on page 123.
@ marks the rear bumper. Stop the vehicle,
a t the la tes t, when the red orien tat ion line
@ borders an object . Keep an eye on the
front of your vehicle while doing this.
Parking next to obstacles
If there is an obstacle (su ch as a wa ll) next to
t he pa rking space, pos ition the vehicle so
there is mo re space on that side. Pos ition the
II--
Page 131 of 318
Cross parking
Applies to vehicles: with top view camera system and rear
mode
This view may be used when parking in a ga
rage or in a parking space.
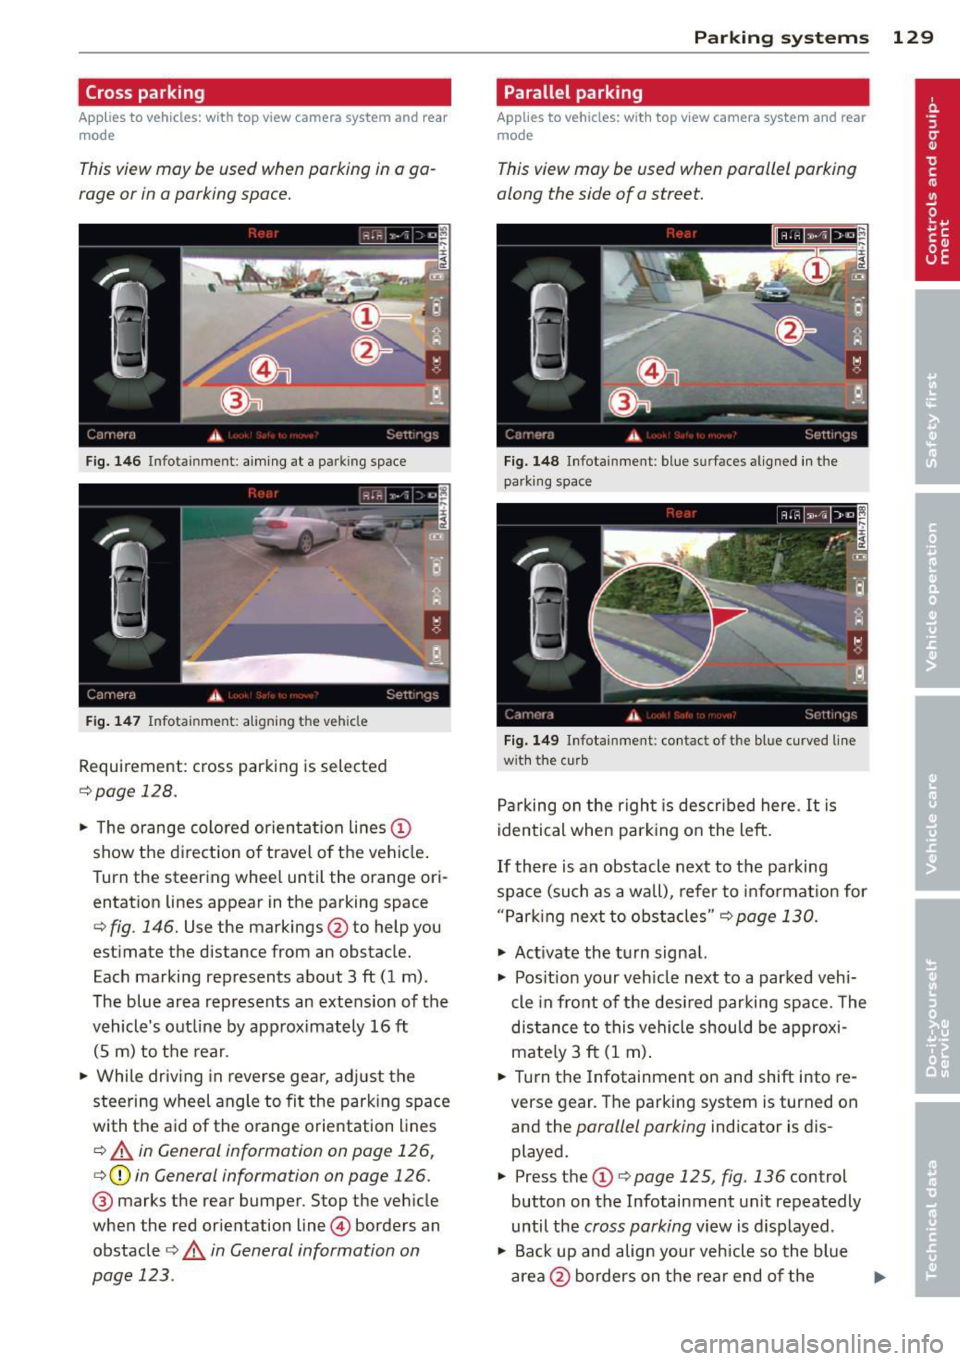
Fig. 1 46 Infotainment: aiming at a parking space
Fig . 14 7 Infota inment: aligni ng the veh icle
Requirement: cross parking is selected
<=:> page 128.
.,. The orange colo red orien ta tion lines (D
show the d irection of t ravel of the vehicle .
Turn the steer ing whee l until the orange ori
entation lines appear in the parking space
¢ fig. 146. Use the markings @to help you
estimate the distance from an obstacle.
Each marking represents about 3 ft (1 m).
The blue area represents an extens ion of the
vehicle's out line by approximately 16 ft
(5 m) to t he rear .
.. While dr iv ing in reverse gear, adj ust the
steering wheel angle to fit the park ing s pace
with the aid of the o range orientation lines
¢ A in General information on page 126,
¢(D in General information on page 126.
@ marks the rear bumper. Stop the veh icle
when the red orientation line@) borders an
obstacle
¢ .& in General information on
page 123.
P arking systems 129
Parallel parking
Applies to vehicles: with top view camera system and rear
mode
This view may be used when parallel parking
along the side of a street.
Fig. 148 Infota inment : blue surfa ces aligned in the
park ing space
Fig. 149 Infotainment : co ntac t of the blue cu rved line
w it h the curb
P a rking on the r igh t is descr ibed here. It is
identical when park ing on the left.
If there is an obstacle next to the parking
spa ce (such as a wall), refer to info rmat ion for
" P ar king next to obst acles "
<=:>page 130.
.. Act ivate the turn signal.
.,. Pos it ion your veh icle next to a park ed veh i
cle in fro nt of the des ired parking space. The
distance to this vehicle should be approxi
mate ly 3 ft (1 m) .
.. Turn the Infotainment on and shift into re
verse gear . T he parking system is turned on
and the
parallel parking indicator is dis
played.
.. Press the
(D ¢ page 125, fig . 136 control
button on the Infotainment unit repeatedly
until the
cross parking v iew is d isplayed .
.,. Back up and align your vehicle so the blue
area @ borders on t he rear end of the
Iii>
Page 132 of 318

130 Park in g s ystems
vehicle or on the parking space line ¢ A in
General information on page 126, ¢(Din
General information on page 126 .
The blue
area represents an extension of the vehicle's
outline by approximately 16 ft (5 m) to the
rear . The long side of the blue area should
be o n the curb. The e ntire blue area must fit
into the parking space.
,. With the veh icle stopped, turn the steer ing
wheel to the right as far as it w ill go .
.. Back into the par king space until the b lue
curve
¢ page 125, fig . 137touches the curb
¢ A in General information on page 126,
q(D in General information on page 126.
Stop the vehicle.
,. With the vehicle stopped, turn the steering
wheel to the left as far as it will go .
,. Continue to back into the parking space un
t il the vehicle is pa rked pa ralle l to the curb
9 A in General information on page 126,
q(j) in General information on page 126.
@ marks the rear bumper. Stop the ve hicle,
at the latest, when the red orientation line
@ borders an object. Keep an eye on the
front of your vehicle wh ile doing this.
P arking ne xt to obstacles
When there is an obs tacle (such as a wall)
next to the parking space, choose a space with
more space on the sides. Position the long
side of the blue area so that there is sufficient
space from the curb. The area must not be on
the curb. You will also need to start turning
the steering wheel much earlier . There should
be a suffic ient amount of space between the
curb and the b lue curve, and the blue curve
¢ page 125, fig. 137 must not touch the cu rb.
(D Tips
The left or r ight orientation lin es and sur
faces will be displayed, depend ing on the
turn signa l being used.
Trailer view
Applies to vehicles: with top view came ra system and
tra iler hitch
This view assists you in positioning the vehicle
in front of a trailer.
Fig . 1 50 Infotainme nt: rear mode
Requirement: the trailer mode is selected
¢ page 128.
.. Now you can posit ion your veh icle in front
of the trai ler
c> A in General information
on page 126, ¢(Din General information
on page 126.
The orange co lored orienta
tion line denotes the expected path toward
the t railer hitch . Use the b lue lines to help
you estima te the distance to the tra iler
h itch .
Setting the mode
Applies to vehicles: with top view camera system
,. Select: I CAR I func tion button > C ar sy stem s
contro l butto n > Driver a ssist > Parking aid
> Change to front /rear > Auto or Manual.
Auto -
This v iew behind the veh icle ( Rea r
mode) is displayed au toma tica lly when you
shift into reverse. This view in front of the ve
hicle
( F ront mode) is displayed automatically
whe n you sh ift into the forward gears.
Manual -This view behind the vehicle (Rear
mode) is always displayed when you turn on
the system.