transmission AUDI A8 2013 User Guide
[x] Cancel search | Manufacturer: AUDI, Model Year: 2013, Model line: A8, Model: AUDI A8 2013Pages: 318, PDF Size: 79.34 MB
Page 121 of 318
![AUDI A8 2013 User Guide A WARNING 1=
Please note that the wheels could spin on
slick or slippery roads when kick-down is
act ive.
Transmission malfunction
[O] Transmission: please pre ss the brake ped
a AUDI A8 2013 User Guide A WARNING 1=
Please note that the wheels could spin on
slick or slippery roads when kick-down is
act ive.
Transmission malfunction
[O] Transmission: please pre ss the brake ped
a](/img/6/57614/w960_57614-120.png)
A WARNING 1=
Please note that the wheels could spin on
slick or slippery roads when kick-down is
act ive.
Transmission malfunction
[O] Transmission: please pre ss the brake ped
al and select the position again
Press the brake pedal and select the des ired
selector lever pos it ion again. You can then
continue dr iv ing .
[O] Transmission hot: please modify driving
style
The transmission temperature has increased
significantly due to the sporty driving manner. Drive in a less sporty manner until the tem
perature returns to the normal range and the
in dicator light switches of .
[O] Gearbox malfunction: you can continue
driving
There is a system ma lfunction in the transmis
sion. You may continue driving. Drive to your
authorized Audi dealer or qualified repair fa
cility soon to have the malfunction corrected.
l'§J/1;1 Gearbox malfunction: you can contin
ue driving in D only until engine is off
There is a system malfunction in the transmis
sion. The transmission is switching to emer
gency mode. If you turn the engine off, you
will not be able to select any other selector
lever positions after start ing the engine again.
Drive to your authorized Aud i dealer or quali
fied repair facility immediately to have the
malfunction corrected.
[O] Gearbox malfunction: you can continue
driving (limited functionality)
There is a system ma lfunction in the transmis
sion. The transmission is switching to emer
gency mode. This mode only shifts into cer
tain gears or will not longer shift at all. The
engine may stall. Dr ive to your authorized
Aud i dealer or qualified repair facility immedi
ately to have the malfunction corrected.
Automatic Transmission 119
[o];ffl Gearbox malfunction: no reverse gear
(you can continue driving)
The re is a system malfunction in the transmis
s ion. The transmission is switching to emer
gency mode. This mode on ly shifts into cer
tain gears or will not longer shift at a ll. You
cannot engage the reverse gear . Dr ive to your
authorized Aud i dea ler immediately to have
the malfunction corrected.
[O] Vehicle may roll! Cannot shift to P. Please
apply parking brake
-The parking lock was released using the
emergency release ¢
page 120. Or
- The parking brake cannot engage automati
cally . Drive to your authorized Audi dea ler o r
qualified repair facility immediately to have
the malfunction corrected.
[O] Gearbox malfunction: Stop and shift to P
Do not continue dr iving . Select the P selector
lever position and see your authorized Audi
dealer or qualified repair facility for assis
tance.
Page 122 of 318
120 Automatic Transmission
Parking lock emergency release
The parking lock must be released using the
emergency release before towing the vehicle .
@
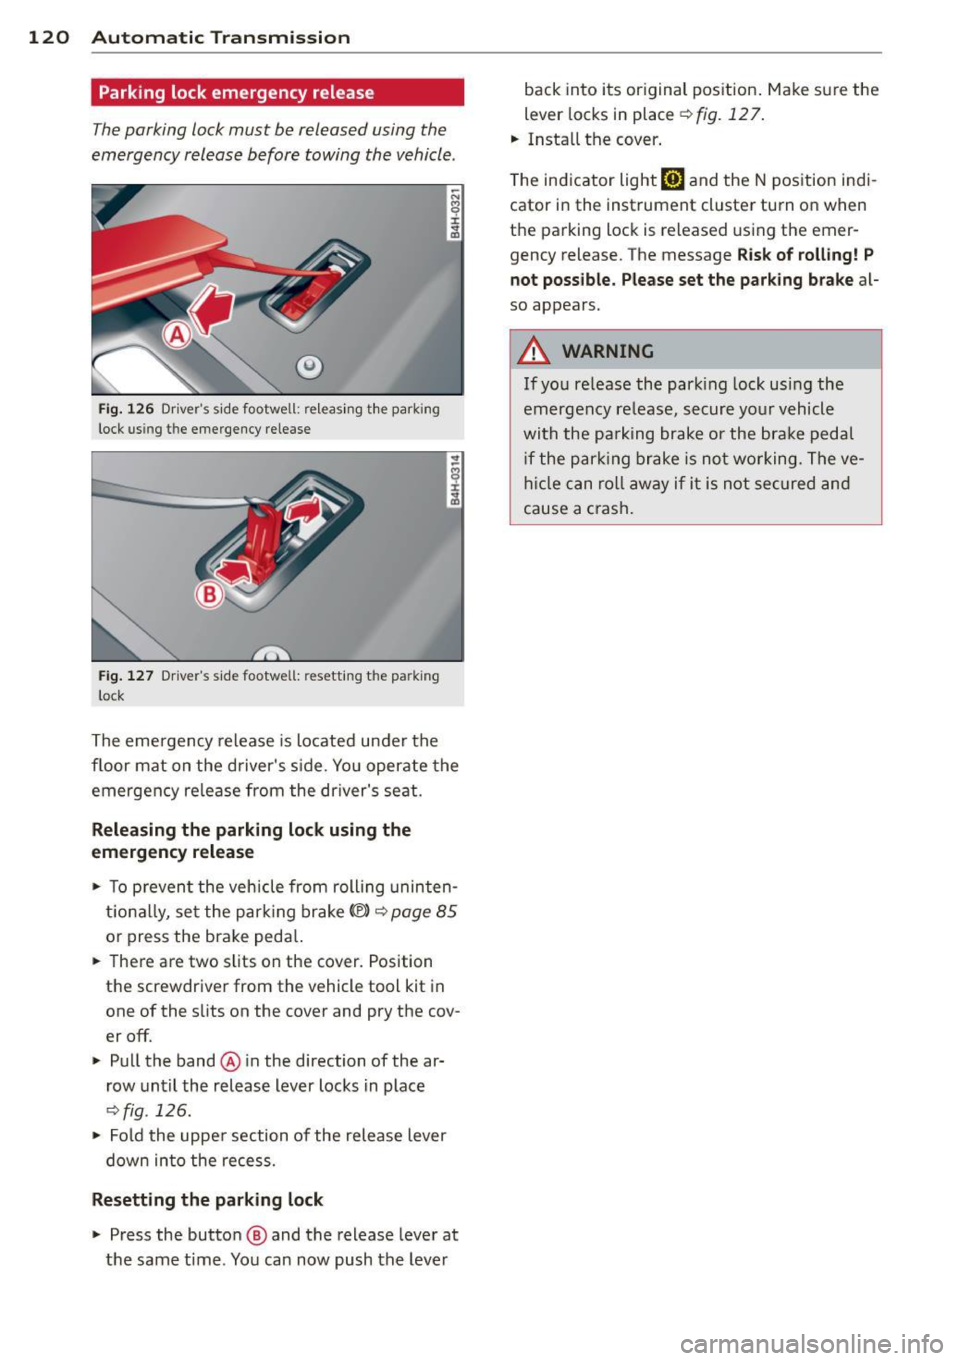
Fig. 126 Dr iver's side footwell: releasing t he park ing
lock us ing t he emergency release
Fig. 127 Drive r's s ide footwe ll: resetting th e pa rking
l ock
The emergency release is located under the
floor mat on the driver's side. You operate the
emergency re lease from the dr iver's seat.
Releasing the parking lock using the
emergency release
• To prevent the vehicle from rolling uninten
tionally, set the park ing brake© ¢
page 85
or press the brake peda l.
.. There are two slits on the cover. Position
the screwdriver from the vehicle tool kit in
one of the s lits on the cover and pry the cov
er off.
• Pull the band@ in the direction of the ar
row until the release lever locks in place
¢ fig . 126.
• Fold the uppe r section of the release lever
down into the recess.
Resetting the parking lock
• Press the button @ and the release lever at
the same time . You can now push the lever back into its original pos
ition . Make sure the
lever locks in place
¢fig. 127.
.. Install the cover .
T he indicator light
[O] and the N position indi
cator in the instrument cluster turn on when
the parking lock is released using the emer
gency release . The message
Risk of rolling! P
not possible . Please set the park ing brake
a l
so appears.
A WARNING
If you release the park ing lock using the
emergency release, secure your vehicle
with the pa rking brake or the brake pedal
i f the parking brake is not working. The ve
hicle can roll away if it is not secured and
cause a crash.
Page 203 of 318
Effect of w ate r and ro ad sa lt
In certain situa tions, for example after driving
through water, in heavy rain, after overnight
condensation or after washing your car, the
braking effect can be reduced by moisture or
ice on the brake rotors and brake pads. The
brakes must be dried first wit h a few careful
brake applications.
At higher speeds and with the windshield wip
ers turned on, the brake pads press against
the brake rotors for a short amount of time.
This occurs at regular intervals w ithout the
driver noticing and provides for better brake response time under wet condit ions.
The effectiveness of the brakes can be reduced
when the vehicle is dr iven o n a salt-covered
road and the brakes are not used . Likewise,
you clean
off accumulated sa lt coating from
brake discs and pads with a few caut ious ap
p lications of the brake¢&. -
Due to their surface characteristics, ceram ic
brake roto rs* absorb mo isture in such condi
tions. This can cause a temporary reduction in
b rak ing fo rce compared to d ry brakes. You can
compensate for this by pressing the brake pedal harder .
Corrosion
There may be a tendency for dirt to build up
on the brake pads and corrosion to form on
the discs if the car is not dr iven regularly or
on ly for short t rips with little use of the
brakes.
I f t he b rakes are not used frequently, or if co r
rosion has formed on the dis cs, it is advisable
to clean
off the pads and discs by brak ing
firm ly a few times from a moderately high
speed ¢.&. .
Faults in the brake system
If you should notice a sudden increase in
b rake peda l travel, then o ne of the two bra ke
circuits may have failed~ .&..
Int ellig ent technolog y 201
Low br ake fluid level
Malfunctions can occu r in the bra ke system if
the b rake fluid level is too low. The brake fluid
level is monitored electronica lly.
Brake lining wear status
B rake lining wear may be checked by visual in
spe ct ion of the condition of the brake pads
through the open ings in the wheel. If neces
sary, the whee l may be removed for this in
spection
r=;, page 2 7 3, Changing a wheel.
_& WARNING
-You should perform braking maneuvers
for the purpose of cleaning the brake
system only if road conditions permit.
Other road users must not be put at risk -
you may cause an accident!
- Before descend ing a steep grade, reduce
speed and sh ift transmission into a lower
gear or lower dr iving range . Do not ride
the brakes or hold t he pedal down too
long o r too often. Th is could cause the
brakes to get hot and diminish braking
efficiency .
- Do not "ride the brakes" by rest ing you r
foo t on the pedal when you do not intend
to b rake . This may cause the brakes to
overheat, premature wear and increased
stopping distance.
- Under certain climatic and operating
conditions such as passing thro ugh wa
ter, dr iv ing in heavy rain or after washing
the vehicle, the effectiveness of the brakes can be reduced. In winter, ice can
accumu late on the brake pads, lin ings,
discs and drums . Carefully app ly brakes
for a test. Brakes w ill dry and ice coat
ings w ill be cleaned
off after a few care
fu l brake applicat ions.
- Driving for an extended period of time on
salt- cove red roads without using your
brakes can a lso affect braking efficiency .
Clean
off accum ulated salt coating from
brake discs and pads with a few careful
brake applications.
•
•
Page 210 of 318

208 Driving and en vir onm ent
Driving through water
on roads
Note the following to avoid vehicle damage
when driving through water, for example on
flooded roads:
- The water must not be any higher than the
bottom of the vehicle body.
- Do not drive faster than wa lking speed.
A WARNING
After driving through water, mud, slush,
etc., the brakes may be slow to take effect
because of wet brake rotors and pads. Dry
the brakes first by braking carefully to re
sto re the full braking effect.
@) Note
- Vehicle components such as the eng ine,
transmission, suspension or electr ical
system can be severely damaged by driv i ng th rough water.
- Always switc h off the Start-Stop-System
when driving through water~
page 87.
(1) Tips
-Check the depth of the water before dr iv
i ng through it.
- Do not stop the veh icle, dr ive in reverse
or switch the engine off when driving
through water .
- Keep in mind that oncoming vehicles
may create waves that raise the water
level and make it too deep for your vehi
cle to drive th rough safely.
- Avoid dr iving through salt water because
i t can cause corrosion.
Operate your vehicle
economically and
minimize pollution
General
Your personal style of driving will determine
the economy of your vehicle, as well as ex
haust and noise levels.
Fuel economy, environmenta l impact, and
wear on your engine, brakes and tires largely
depend on three factors:
- your personal driving style
- operating conditions
- technical limitat ions
If you ant ic ipate what you need to do next and
drive economically, you can easily cut your
fuel consumpt ion by 10-15 percent . This sec
t ion w ill give you some tips on how you can
help the env ironment and your pocketbook.
@ Tips
The consumption estimates as published
by ENVIRONMENTAL PROTEC TION AGENCY
( E PA) and Transpo rt Canada may not corre
spond to your actual consumption on the
road, which will vary depending upon vehi
cle load and speed, road and weather con
ditions, trip length, etc.
Drive smoothly and keep a lookout
ahead
Vehicles use the most fuel when they are ac
celerating.
.,. Avoid unnecessary accelerating and braking.
Vehicles use the most fuel when they a re ac
ce lerating. If you anticipate what is going to
happen next, you will need to brake less and,
t hu s, acce lerate less . Let the vehicle coast
whenever possible -for examp le when you see
that the next traff ic light is red.
Page 218 of 318
216 Cleaning and protec tio n
Automatic car wash
The vehicle can be washed in almost any
modern automatic car wash .
The vehicle paint is so durable that the vehicle
can normally be washed without problems in
an automatic car wash. However, the effect on
the paint depends to a large extent on the de
sign of the facility, the filte ring of the wash
water, the type of wash and care mater ial , etc.
I f the pa int has a dull appearance afte r going
through the car wash or is scratched, bring
this to the attention of the operator immedi
ately. If necessary, use a different car wash.
Before going through a car wash, be sure to
take the usual precautions such as closing the
windows and power roof . Factory installed an
tennas must not be removed.
I f you have installed additional accessor ies on
the vehicle - such as spoilers, roof rack, etc. -
it is best to ask the car wash operator if these
should be removed .
When driving through an automatic car wash,
fi rst se lect the N position and then switch the
engine off. If you switch the engine off when N is engaged, the transmission remains in N
for approximately 30 m inutes and then Pis
engaged.
Further information for automatic gearboxes
~ page 115.
A WARNING
Always read and heed all WARNINGS and
other information
r:::;, page 215.
- Before washing the vehicle in an auto
matic car wash, p lease make sure to re
tract the exterior mirrors to prevent
them from being damaged. Power fold i ng exter ior mirrors must not be folded
i n or out by hand . Always use the electri
ca l power control.
- Compare the track of your vehicle with the d istance between the guide rails of the facility - the
re is a risk of damage to
the whee ls and tires .
- Compare the height and width of your
vehicle with the height and width of the tunnel at the facility .
Washing the vehicle by hand
A lot of water is needed when washing a vehi
cle by hand.
.,. Before yo u start washing, make su re you
have read and understood the WARNINGS
~ A in General information on page 215.
.,. First soak all dried dirt unti l it is soft, then
rinse it off.
.,. As you clean your vehicle, start with the
roof and work your way down to the bottom,
using a sponge, a sponge glove or a clean brush .
.,. Rinse the sponge o r the sponge g love often,
flushing it clean each time.
.,. Use spec ial car shampoo only for very per
sistent dirt .
.,. Rinse the car thoroughly with water.
.,. Use a chamois leather to gently wipe the ex-
ter ior dry.
Use a separate sponge for cleaning the
whee ls , door si lls and other regions exposed
to road dirt. In this way, you will not scratch
the pa int with coarse particles imbedded in
the sponge the next time you wash the car.
A WARNING
-- Wash your vehicle only when the ign ition
is switched off to reduce the risk of a
crash.
- Do not clean the underside of the chas sis, fenders, wheel covers, or other hard
to reach parts without protect ing your
hands and arms . You may cut you rself on
sha rp-edged metal pa rts.
- Always read and heed all WARNINGS and other info rmation
c;, page 215. ~
Page 228 of 318
226 Cleaning and protec tio n
-When cleaning your safety belts, inspect
them for damage.
If you discover dam
age, see your Audi dealer .
- Always read and heed all WARNINGS and
other information
¢ page 215.
Cooler
Applies to vehicles: with cooler
A layer of ice or frost in the cooler interferes
with its cooling performance.
Cl ean ing
The refr igerator sho uld be cleaned regularly.
.. Wash the cooler w ith lukewarm water and a
mild cleaning solut ion, if necessary .
.. The n wipe the cooler dry.
.. Dust and dirt will accumu late near the ven
t il ation openings in the luggage compar t
ment due to normal cooler usage. This
should be cleaned regularly.
Defrost ing
.. Swi tch the cooler off¢ page 75.
.. Remove any food or beve rages and al low
the cooler to defrost with the door open .
.. Wipe the inside of the cooler dry and clean
the cooler , if necessary .
Defrost the cooler if yo u will not be using it
for extended periods of time .
@ Note
-Do not try to speed up the defrost ing
process by applying heat.
- To reduce the risk of personal injury or
damage to the refrigera to r,
- do not use any abrasive cleaners, sol
vents, wax, aggressive cleaning solu
tions, so lutions with strong fragrances,
etc.,
- do not clean the coo ler with cleaning
tools such as stee l wool.
1l Use o nly th e co rrect cle anin g so lu ti on s. Never use gas
o lin e or d ie se l fu el.
Engine compartment
Be especially careful when cleaning the en
gine compartment.
Always switch off the ign it ion before cle an
i ng th e eng in e¢ .&. .
Plenum panel
Remove leaves from the plenum panel i n front
of the windshield under the engine compart
ment. This prevents the water drain holes
from becoming b locked, and it prevents de
bris from entering the vehicle interior through
the heat ing and ventilat ion ducts .
Corrosi on protect ion
The engine compartment and transmission
have been corrosion-protected at the factory .
Good anti-corrosion treatment is very impor
tant, partic ularly in the winter.
If the vehicle
is frequently driven on salt treated roads, the
entire engine compartment and plenum panel
shou ld be thoroughly cleaned at the end of
winter and retreated to prevent salt damage .
At the same time, the underside of t he veh icle
shou ld be washed as well.
If the engine compartment is cleaned at any
time with grease remov ing solutions
1>, or if
you have the engine washed, the anti-corro
s ion treatment is almost a lways removed as
well . It is therefo re esse ntia l to have a lo ng
lasti ng corrosion pro te ct ion reapplied to all
surfaces, seams, joints and components in the
engine compartment .
A WARNING
Be aware: The engine compartment of any
motor vehicle is a potentially hazardous
area.
- Before working in the engine compart
ment, be sure to read the information
¢page 232.
Page 275 of 318
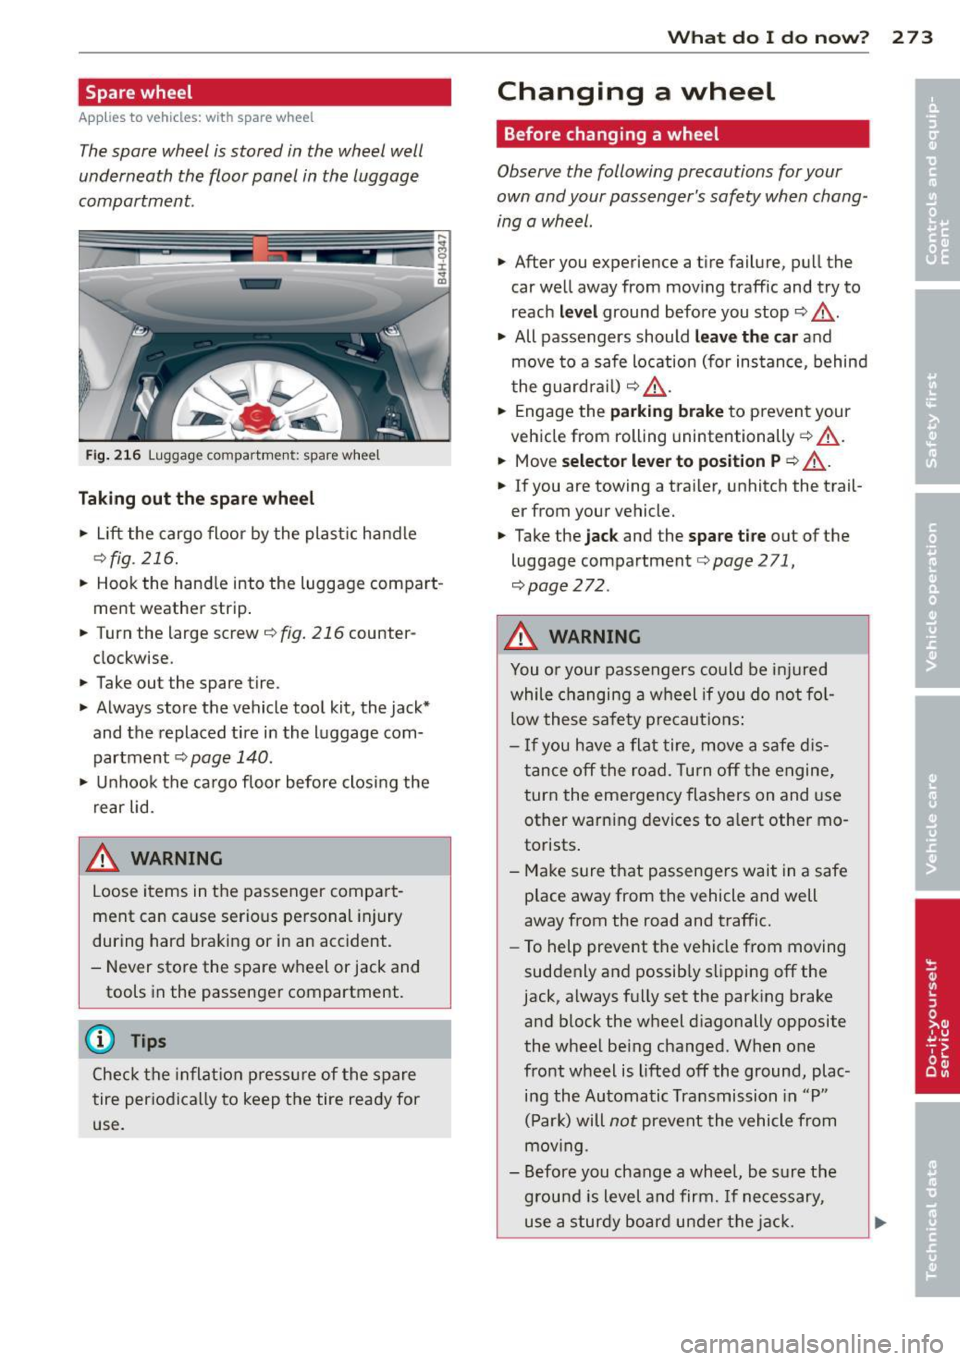
Spare wheel
Applies to vehicles: with spare wheel
The spare wheel is stored in the wheel well
underneath the floor panel in the luggage
compartment.
F ig. 21 6 Luggag e compartme nt: spare wheel
Taking out the sp are whee l
• Lift the cargo floor by the plast ic handle
c:> fig . 216.
• Hook the hand le into the luggage compart
ment weather strip .
• Turn the large screw
c:> fig. 216 counter
clockwise.
• Take out the spare tire.
• Always store the vehicle tool kit, the jack*
and the replaced tire i n the luggage com
partment
c:> page 140 .
• Unhook the ca rgo floor before closing the
rear lid.
& WARNING
Loose items in the passenger compa rt
ment can cause serious pe rsonal in jury
during hard braking or in an accident.
- Never store the spare wheel or jack and
tools in the passenger compartment.
@ Tips
Check the inflat io n press ure of the spare
tire periodically to keep the tire ready for
use.
-
What do I d o now ? 273
Changing a wheel
Before changing a wheel
Observe the following precautions for your
own and your passenger's safety when chang
ing a wheel.
• After you experience a tire failure, pull the
car well away from mov ing traffic and try to
reach
le vel ground before you stop c:> ,&.
• All passengers should leave the car and
move to a safe location (for ins tance, behind
t he guardra il)
c:> ,& .
• Engage the parking brak e to prevent your
vehicle from rolling unintentionally
c:> ,& .
• Move sele ctor lever to po sit ion Pc:> &_ .
• If you are towing a trailer, unhitch the trail
er from your vehicle.
• Take the
jack and the spare tire out of the
luggage compartment
c:> page 271,
c:> page
272 .
& WARNING
You o r you r passengers could be i njured
while changing a wheel if you do not fo l
low these safe ty pre caut ions :
-I f you have a flat tire, move a safe d is
tance off the road. Turn off the e ngine,
turn the emergency flashers on and use
other warning devices to a lert other mo
torists .
- Make sure that passengers wait in a safe
place away from the vehicle and well
away from the road and traffic.
- To help prevent the vehicle from moving
suddenly and possib ly slipping off the
jack, always full y set the parking brake
a nd b lock the wheel d iagonally opposite
the wheel be ing changed. When one
front wheel is lifted off the ground, plac ing the Au tomatic Transmission in "P"
( P ar k) will
not prevent the vehicle from
mov ing .
- Before you chang e a whee l, be s ure the
g round is level and firm. If necessary,
use a sturdy board un der the jac k.
-
Page 284 of 318

282 Fuses and bulb s
Fuse panel
® (red)
No. Equipment
=
I 6
Right headlight (headlight
with adaptive light)
7 ESC control module
8
Sound actuator, AEM control module
9 Adaptive cruise control
10 Transmission control mod
-
ule
11 Climate control system sen-
sors
Fuse panel © (brown)
No. Equipment
1
Electromechanical parking
brake
2 Suspension control system
sensor
3
Right rear door control mod-
ule
Smart modul tank
5
Front cl imate control system
contro ls
6
Rear climate control system
controls
7 Networking gateway
8 Cooler
9
Interface for specia l func-
tions
10 Cell phone adapter, Blue-
tooth handset
11 AEM contro
l module
12
13 Ambient
lighting
14 Rear exterior lighting
15 Fuel pump
I 16 Electromechanical parking
brake
Amps
=
10
5
7,5
10
5
5
5
5
7,5
5
15
10
5
15
5
5
15
10
10
20
25
30
-
Fuse panel @ (black)
No. Equipment
1
3
5
6
7
Automatic luggage com partment lid
Rear sockets
adaptive air suspens ion
115-V socket
Electromechanical parking
brake
8 Rear seat heating
9 Rear exterior lighting
10 Rear climate control system
blower
Rear sun shade, closing aid,
11 luggage compartment lock,
keyless go/entry, fuel filler
door
12 Luggage
compartment lid
control module
Fuse panel E (red)
No. Equipment
1 Rear seat adjustment but-
tons
3 Left rear seat (pneumatics)
5 Tra iler hitch control modu le*
6 Left rear seat
7 Right rear seat
8 Trailer hitch control module*
9 Trai ler hitch control modu le*
10 Right rear seat (pneumatics)
Fuse panel
® (brown)
No. Equipment
1 Start-Stop-System,
Radio re-
ceiver/sound amplifier
Sound amplifier
Start-Stop-System, Rear
3 Seat Entertainment, radio
receiver/sound amplifier
5 Automatic dimming interior
rearview mirror
6 DVD changer
Amps
5
20
15
25
30
25
20
20
20
30
Amps
5
7,5 20
30
30
20 15
7,5
Amps
30
30
10
5
5
Page 286 of 318

284 Emergency situations
Emergency situations
General
This chapter is intended for trained emer
gency crews and working personnel who
have the necessary tools and equipment to
perform these ope rations.
Starting by pushing or
towing
Q;) Note
Vehicles w ith an automatic transmission
cannot be started by pus hing o r tow ing.
Starting with jumper
cables
If necessary, the engine can be started by
connecting it to the battery of another vehi
cle.
If the engine should fail to start because of a
discharged or weak battery, the battery can be
connected to the battery of
another vehicle,
using a
pair of jumpe r cables to start the en
g ine .
Jumper cables
Use only jumper cables of sufficiently large
cross section to carry the starter current safe
ly. Refer to the manufacturer's specif ications.
Use only jumper cables with
insulated termi
na l clamps which are distinctly marked:
plus(+) cable in most cases colored red
minu s(-) cable
in most cases colored black .
A WARNING
Batteries contain electricity, acid, and gas.
Any of these can cause very serious or fatal
inju ry. Follow the instructions below for
safe handling of your veh icle's battery.
- Always shield you r eyes and avoid lean
ing over the battery whenever possible.
- A discharged battery can freeze at tem
peratures just be low 32 °F (0 °C). Before connecting a
jumper cable, you must
thaw the frozen battery complete ly, oth
erwise it could explode.
- Do not allow battery acid to contact eyes
or skin . Flush any contacted area with
water immediately .
- Improper use of a booster battery to start a vehicle may cause an explosion.
- Vehicle batteries generate explosive gas
es. Keep sparks, flame and lighted ciga
rettes away from batteries.
- Do not try to jump start any vehicle with a low acid level in the battery.
- The vo ltage of the booster battery must
also have a 12-Volt rating. The capacity
(Ah) of the booster battery should not be
lower than that of the discharged bat
tery . Use of batteries of d ifferent voltage
or substantially different "Ah" rating
may cause an exp losion and personal in
jury.
- Never charge a frozen batte ry. Gas trap
ped in the ice may cause an explosion.
- Never charge or use a battery that has
been frozen. The battery case may have
be weakened.
- Use of batter ies of different voltage or
substantially different capacity (Ah) rat
ing may cause an exp losion and injury.
The capacity (Ah) of the booster battery
should not be lower than that of the dis
charged battery.
- Before you check anything in the engine
compartment, always read and heed a ll
WARNINGS¢
page 226 , Engine com
partment.
«I) Note
-Applying a higher voltage booster bat
tery will cause expensive damage to sen
sitive electronic components, such as
contro l units, relays, rad io, etc .
- There must be no electrical contact be
tween the vehicles as otherwise current
could already start to flow as soon as the
positive(+) terminals are connected. ..,_
Page 288 of 318
286 Emergency situations
-When connecting jumper cables, make
sure that they cannot get caught in any
moving parts in the engine compar t
ment .
- Before you check anything in the engine
compartment, always read and heed all
WARNINGS
c:> page 226 , Engine com
partment.
(D Note
Improper hook-up of jumper cables can ru
in the generator.
- Always connect POSITIVE(+) to POSI
TIVE( +), and NEGATIVE( -) to NEGATIVE
( - ) ground post of the battery manager
control unit.
- Check that all screw plugs on the battery
cells are screwed in firmly . If not, tighten
plugs prior to connecting clamp on nega
tive battery terminal.
- Please note that the procedure for con
necting a jumper cable as described
above applies specifically to the case of
your vehicle being jump started. When
you are giving a jump start to another ve
hicle, do
not connect the negative(-) ca
ble to the negative(-) terminal on the
discharged battery ©
c:> fig. 230. In
stead, securely connect the negative(-)
cable to either a solid metal component
that is firmly bolted to the engine block
or to the engine block itself . If the bat
tery that is being charged does not vent
to the outside, escaping battery gas
could ignite and explode!
Emergency towing
with commercial tow
truck
General hints
Your Audi requires special handling for tow
tng.
The following information is to be used by
commercial tow truck operators who know
how to operate their equipment safely.
-Never tow your Audi. Towing will cause
damage to the engine and transmission.
- Never wrap the safety chains or winch ca
bles around the brake lines.
- To prevent unnecessary damage, your Audi
must be transported with a flat bed truck.
- To load the vehicle on to the flat bed, use
the towing loop found in the vehicle tools
and attach to the front or rear anchorage
c:> pag e 286 and c:> page 287.
.&_ WARNING
=
A vehicle being towed is not safe for pas-
sengers. Never allow anyone to ride in a
vehicle being towed, for any reason.
Front towing loop
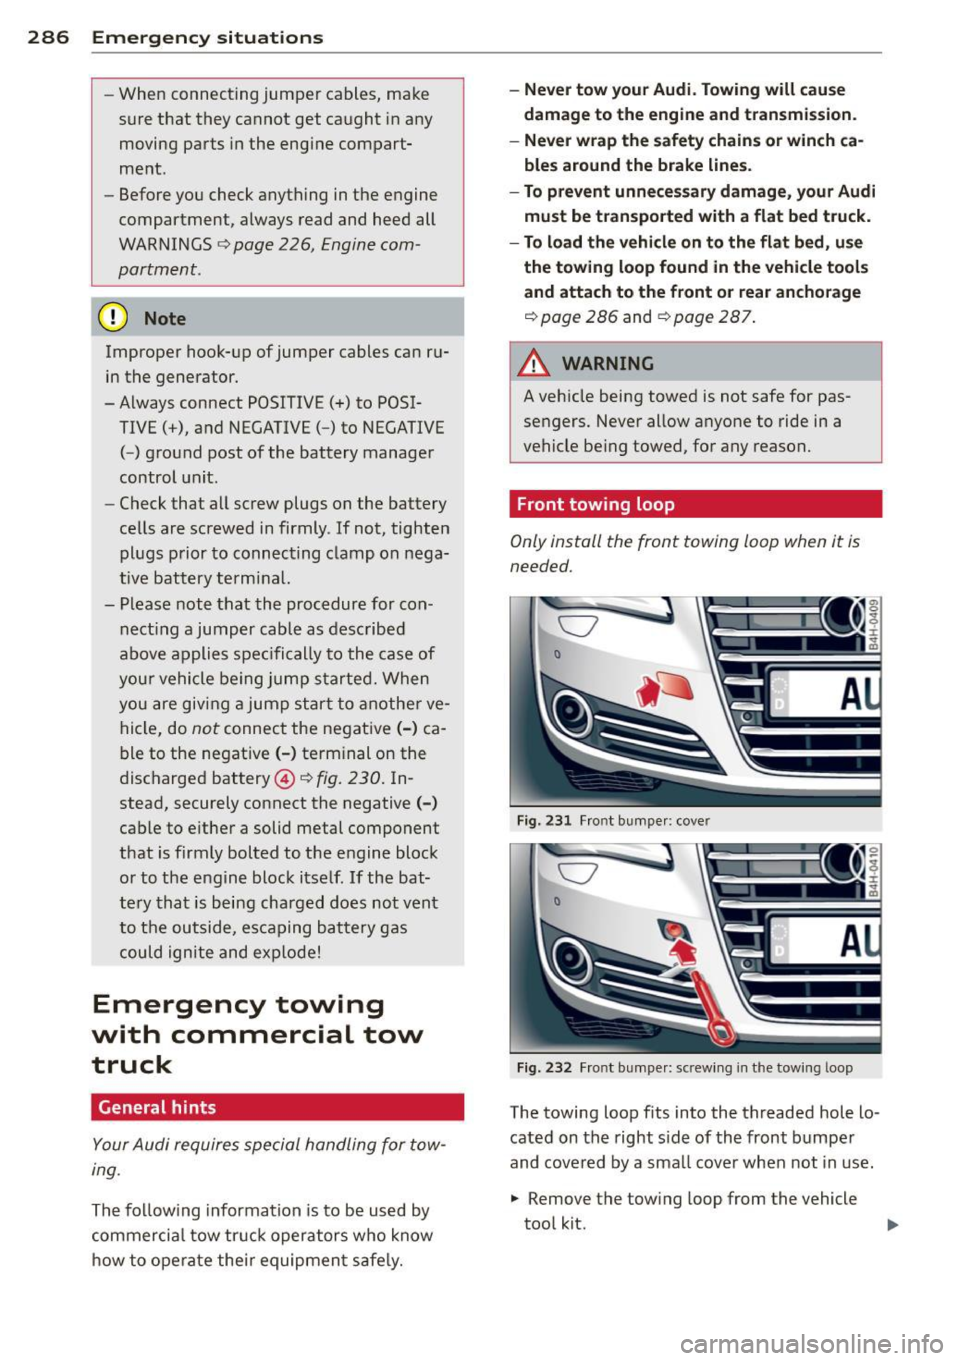
Only install the front towing loop when it is
needed .
C7
0
Fig. 231 Front bumper: cover
Fig. 232 Front bumper : sc rewing in th e towin g loop
-
The towing loop fits into the threaded hole lo
cated on the right side of the front bumper
and covered by a small cover when not in use.
.,. Remove the towing loop from the veh icle
tool kit.