wheel AUDI A8 2013 User Guide
[x] Cancel search | Manufacturer: AUDI, Model Year: 2013, Model line: A8, Model: AUDI A8 2013Pages: 318, PDF Size: 79.34 MB
Page 28 of 318
26 Instruments and warning/indicator lights
program. The fuel economy messages turn off
automatically after a certain period of time.
.,. To turn an economy message off immedi-
ately after it appears, press any button on
the multifunction steering wheel.
@ Tips
- Once you have turned a fuel economy
message off, it will only appear again af
ter you turn the ignition on again.
- The fuel economy messages are not dis
played in every instance, but rather in in
tervals over a period of time.
Cylinder on demand System
Applies to vehicles: with 4.0 TFSJ engine
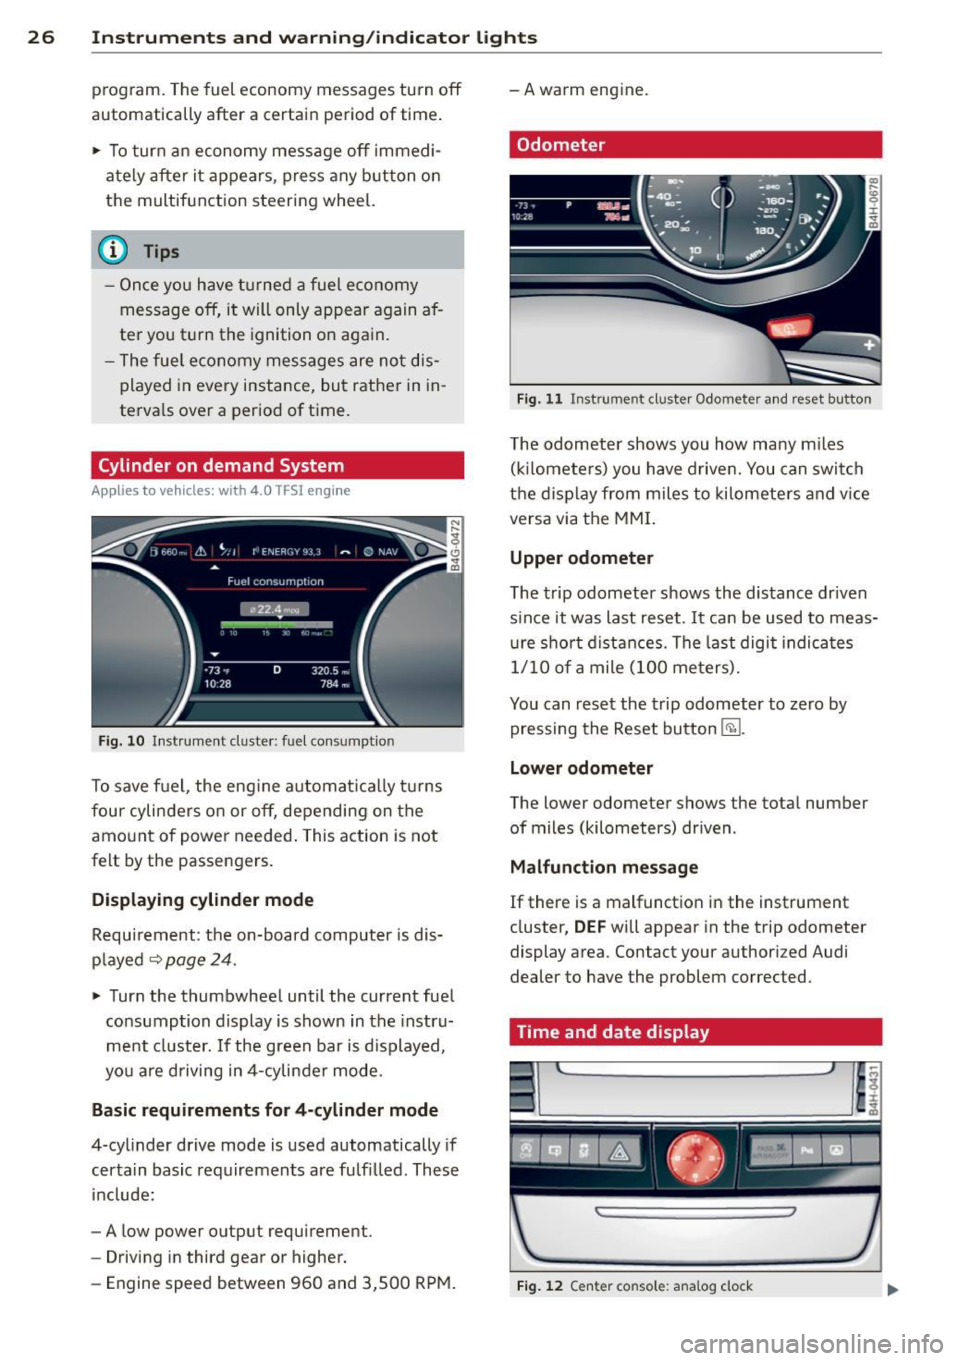
Fig. 10 Instrument duster: fuel consumption
To save fuel, the engine automatically turns
four cylinders on or off, depending on the
amount of power needed. This action is not
felt by the passengers.
Displaying cylinder mode
Requirement: the on-board computer is dis
played
~ page 24.
.,. Turn the thumbwheel until the current fuel
consumption display is shown in the instru
ment cluster.
If the green bar is displayed,
you are driving in 4-cylinder mode.
Basic requirements for 4-cylinder mode
4-cylinder drive mode is used automatically if
certain basic requirements are fulfilled. These
include:
- A low power output requirement.
- Driving in third gear or higher.
- Engine speed between 960 and 3,500 RPM. - A warm engine.
Odometer
Fig. 11 Instrument cluster Odometer and
reset button
The odometer shows you how many miles
(kilometers) you have driven. You can switch
the display from miles to kilometers and vice
versa via the MMI.
Upper odometer
The trip odometer shows the distance driven
since it was last reset. It can be used to meas
ure short distances. The last digit indicates
1/10 of a mile (100 meters).
You can reset the trip odometer to zero by
pressing the Reset button
Efil.
Lower odometer
The lower odometer shows the total number
of miles (kilometers) driven.
Malfunction message
If there is a malfunction in the instrument
cluster,
DEF will appear in the trip odometer
display area. Contact your authorized Audi
dealer to have the problem corrected .
Time and date display
Fig. 12 Center console: analog clock
Page 32 of 318
30 Opening and clo sing
Opening and closing
Keys
Key set
Fig . 16 Key set
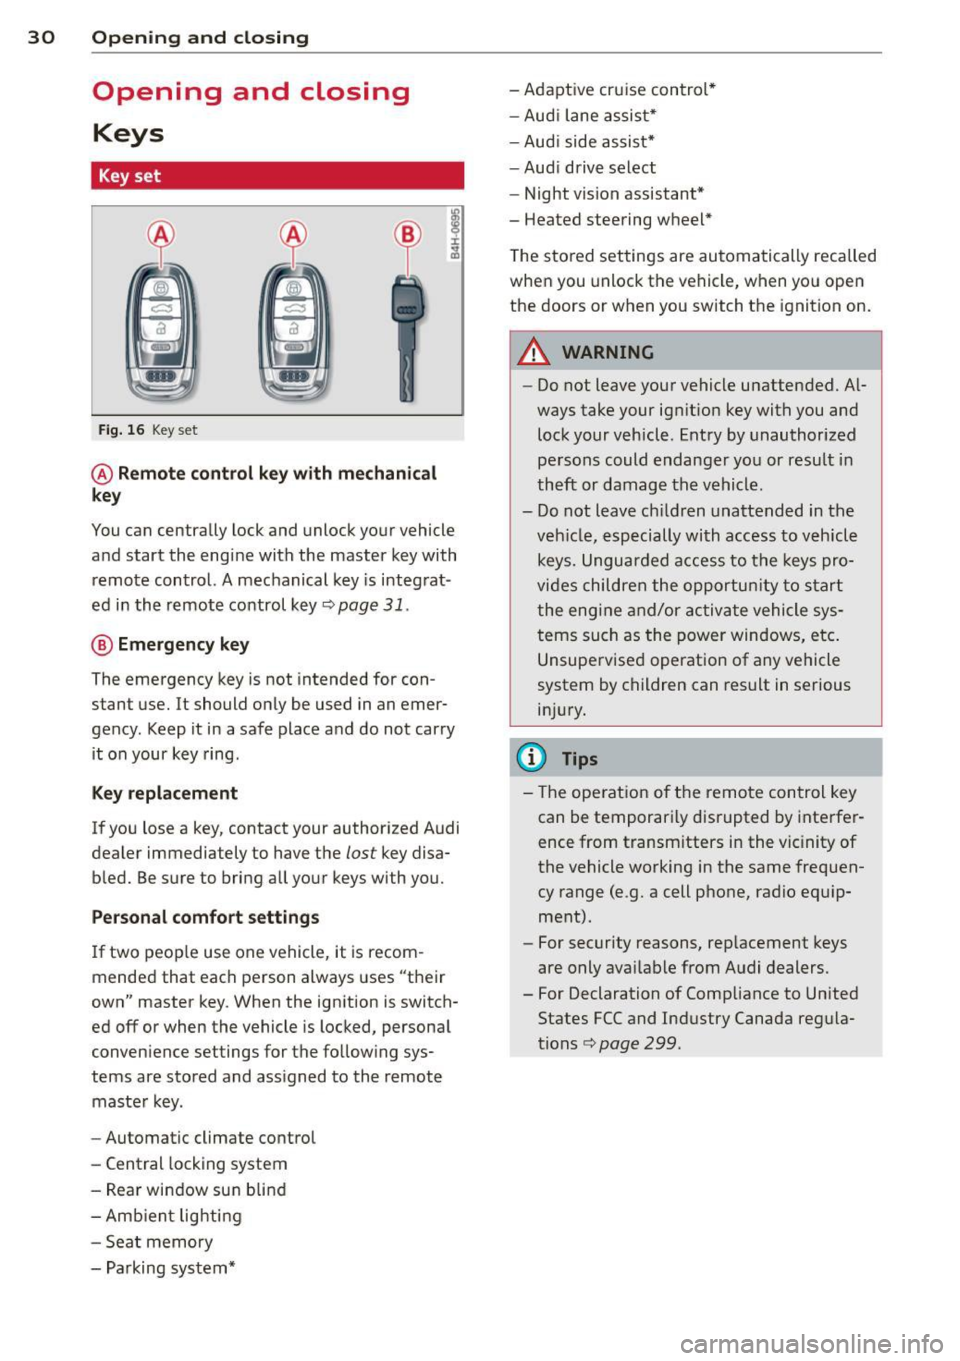
@ R emot e control k ey with mechan ical
ke y
You can centrally lock and unlock your vehicle
and start the engine with the master key with
remote control. A mechanical key is integrat
ed in the remote control key
r:::;, page 31 .
@ Eme rgency ke y
The emergency key is not intended for con
stant use.
It should only be used in an emer
gency. Keep it in a safe place and do not carry it on your key ring .
Key replac em ent
If you lose a key, contact your authorized Audi
dealer immediately to have the
lost key disa
bled. Be sure to bring all your keys with you.
P er sonal c omfo rt se ttin gs
If two peop le use one vehicle, it is recom
mended that each person always uses "their
own" master key . When the ignition is switch
ed off or when the vehicle is locked, personal
convenience settings for the follow ing sys
tems are stored and ass igned to the remote
maste r key.
- Automatic climate control
- Central locking system
- Rear window sun blind
- Amb ient lighti ng
- Seat memory
- Parking system* - Adaptive cruise control*
-
Aud i lane assist*
- Aud i side assist*
-Aud i drive select
- Night vision assistant*
- Heated steering wheel *
T he stored settings are automatically recalled
when you unlock the vehicle, when you open the doors or when you switch the ignition on.
A WARNING
-- Do not leave your vehicle unattended. A l
ways take your ignit ion key with you and
lock your vehicle. Entry by unauthorized
pe rsons could endanger you or result in
theft or damage the vehicle.
- Do not leave ch ildren unattended in the
veh icle, especially with access to vehicle
keys. Unguarded access to the keys pro
vides children the opportun ity to s tart
the engine and/or ac tiva te vehicle sys
tems such as the power windows, etc.
Unsupervised operation of any vehicle
system by children can result in serious
inj ury.
(D Tips
- The ope ration of the remote con trol key
can be temporarily disrupted by interfe r
ence from transm itters in the vic inity of
the vehicle working in the same frequen
cy range (e .g. a cell phone, radio equ ip
ment).
- For security reasons, rep lacement keys
are only avai lable from Audi dealers.
- For Declaration of Comp liance to United
States FCC and Industry Canada regula
tions
<=> page 299.
Page 47 of 318

Clear vision Lights
Switching the headlights on and off
Fig . 37 Instrument pane l: l ig ht sw itc h wit h all -weath
er lights•
The headlights only wo rk when the ignition is
switched on. While start ing the eng ine o r
when switching off the ign ition, the head
lights will go off and on ly the side marker
lights will be on .
If the system is not operating properly, a
warn ing symbol in the dr iver information dis
p lay is d isplayed
c::> page 21 .
Light switch -'tj_ -
Turn the switch c::> fig . 37 to the correspond ing
position . When the lights a re switched on, the
oD o: symbo l turns on .
0 -The lights are off or the dayt ime runn ing
lights are on:
- USA model s: The day time running lights
will come on automatically when the igni
t ion is on and the light switch
c::> fig . 3 7 is in
the
O posit ion or the AUTO position (only in
daylight cond itions). The
Daytime runni ng
light s
function can be turned on and off in
the MMI
c::> page47, c::>A .
-Ca nada mod els: T he daytime running lights
will come on automatically when the igni
tion is on and the light switch
c::> fig. 37 is in
the
O position, the : Do: position or the AUTO
position (only in daylight conditions) c::> A .
AUTO -Automatic headlights switch on and
off depend ing o n brightness, for example i n
tw ilight, during rain or in tunnels
c::> &. .
:Do: -Side marker lights
io -Low beam headlights
Clear vi sion 45
lm -Fog lights* (vehicles with Xenon p lus
headlights *)
~ -All-weather lights * (vehicles with LED
headlights*)
c::> fig. 37
@TI -Rear fog lights* . When the rear fog lights
are on, the symbol
0$ on the switch will illu
minate .
All-weather lights*
In vehicles with all -weather lights, the front
lights are adjusted automat ically so that you
are less like ly to see glare from your own
headlights, for example when dr iving on a wet
road .
Automatic dynamic headlight rang e
control*
Your vehicle is equipped with a headlight
range contro l system so that the headlights
do no t blind oncoming traff ic if the vehicle
load changes. The headlig ht range a lso ad
justs automatically when braking and acceler
at ing .
Light function s
The following light functions are availab le de
pending on vehicle equipment and on ly func
t ion when the light switch is in the AU TO posi
tion . You can deactivate these functions i n the
MM I under
Audi adapt ive ligh t c::> page 47 .
Static corner ing light* (vehicles with LED
headlights or adaptive light) -the cornering
light sw itches on automat ically when the
steering wheel is turned at a ce rtain angle at
speeds up to approxima tely 44 mph (70 km/
h) and when the turn signal is act ivated at
speeds up to approximately 25 mph (40 km/
h) . The area to the side of the veh icle is illumi
nated better when tur ning .
Dynamic curve lig ht* (vehicles wi th adap tive
light) -the curve light only functions at
speeds between approximately 6 mph (10 km/h) and 110 km/h and adapts itself to the
curves in the road.
Ill>
Page 49 of 318
Adjusting the exterior lighting
The settings are adjusted in the MMI.
~ Select: ICARI f u nct ion button> Car systems
control button > Vehicle sett ings > E xterior
lighting .
Automatic headlights
You can a djust the fo llow ing settings in the
Automatic headl ights men u:
Headlight s activation time -You can adjus t if
the hea dlights sw itch on
Early , Med . or Late
according to the sensitivity of the light se nsor .
Audi adaptive light* -You can sw itch adaptive
l ig ht
On a n d Off .
Automatic high beams*
You can switch th e high beam assist on and
off .
Daytime running lights
USA models :
You can sw itch the dayt ime ru n
n ing lights
on and off .
Canada models:
The function ca nnot be
turned off. It is activated a utomat ica lly each
time the ignition is switched on. This menu item is shown "greyed out" .
Coming home, Leaving home
The coming home function illuminates the
a rea outside the vehicle when yo u switch the
i gnit ion off and open the driver's door. To turn
the function o n, select
Lights when leaving
car > On .
The leav ing home function illuminates the
area outside the vehicle when yo u un lock the
ve hicle. To t urn the funct ion on, select
Lights
when unlocking car > On .
The coming home and leaving home functions
only operate when it is dark and the light
switch is in the
AUTO pos ition.
Clear vision 4 7
Turn signal and high beam lever
The lever on the left side of the steering col
umn is used to operate the turn signals and
the high beam as w ell as th e headlight flash
er.
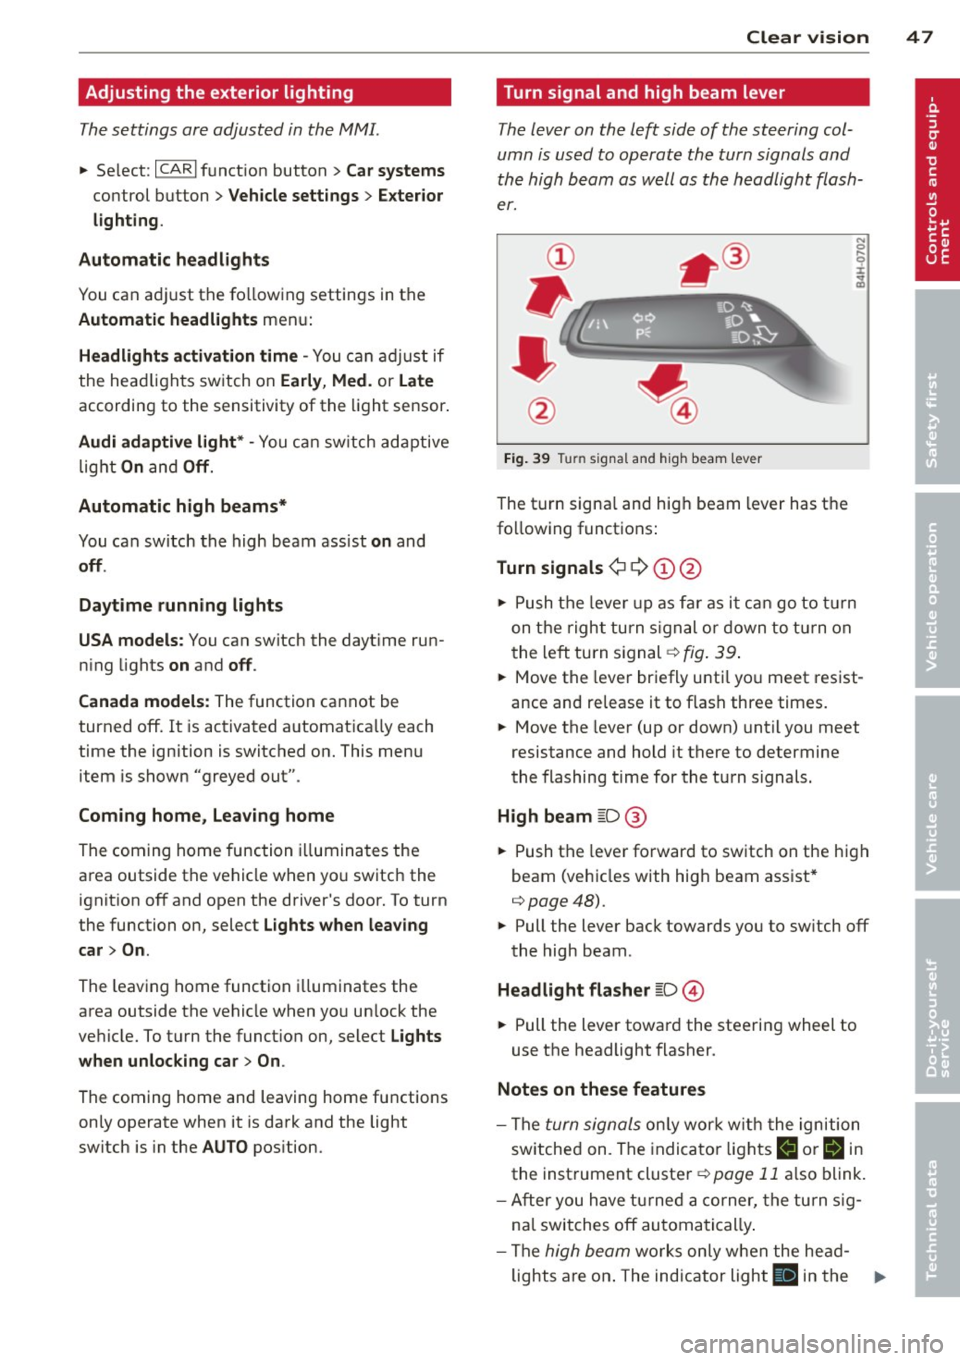
Fig. 39 T urn signal and high beam lever
The t urn signa l and hig h beam lever has t he
fo llow ing funct ions :
Turn signals ¢ Q ©@
N 0 ,._
± .. a,
~ Push t he leve r up as fa r as i t can go t o tur n
on t he righ t turn s igna l or d own to t urn on
t he le ft turn s ignal
¢ fig . 39 .
~ Move the leve r br iefly u ntil yo u meet res ist
ance and re lease it to f lash three times.
~ Move the lever (up or down) until you meet
resistance and hold it there to determine
the flashing t ime for the tu rn signals.
High beam ~D @
~ Push t he leve r forward to sw itch on the high
beam (veh icles with hig h beam ass ist*
¢ poge4 8).
~ Pull the lever back towards you to sw itch off
the high beam .
Headlight flasher ~D ©
~ Pull the lever towar d the steering wheel to
use the headlight flasher.
Notes on these features
- The turn signals on ly wor k w it h t he igniti on
sw itche d on . T he indica to r li ghts
II or B in
the inst rument cluster¢ page 11 also blink .
- Aft er you h ave tu rned a cor ner, the tu rn s ig -
na l swi tches off au toma tica lly .
- The
high beam wo rk s onl y w hen the he ad-
lights a re on . The indic ator ligh t
ii in the .,.
Page 59 of 318
Seats and storage
General recommen
dations
Why is your seat adjustment so important?
The safety belts and the airbag system can
only provide maximum protection if the front
seats are correctly adjusted.
There are various ways of adjusting the front
seats to provide safe and comfortable support
for the driver and the front passenger. Adjust
your seat properly so that :
- you can easily and quick ly reach all the
switches and controls in the instrument
panel
- your body is properly supported thus reduc ing physical stress and fatigue
- the safety belts and airbag system can offe r
maximum protection
¢ page 152.
In the following sections, you will see exactly
how you can best adjust your seats .
There are special regulations and instructions
for installing a child seat on the front pas
senger's seat. Always fo llow the information
regarding chi ld safety provided in
¢ page 176, Child Safety.
A WARNING
Incorrect seating position of the driver and
all other passengers can result in serious
personal injury.
- Always keep your feet on the f loor when
the vehicle is in motion -never p ut your
feet on top of the instrument panel, out
of the window or on top of the seat cush
ion. Th is applies especially to the passen
gers . If your seating position is incorrect,
you increase the r isk of injury in the case
of sudden braking or an acc ident. If the
airbag inflates and the seating position
is incorrect, this could result in persona l
injury or even death.
- It is important for both the driver and
front passenger to keep a distance of a t
Seat s an d sto rage 57
least 10 inches (25 cm) between them
selves and the steering wheel and/or in
strument panel. If you're s itting any
closer than th is, the airbag system can
not protect you properly. In addition, the
front seats and head restraints must be
adjusted to your body height so that t hey
can give you maximum protect ion.
- Always try to keep as much distance as
possible between yourself and the s teer
ing wheel o r instrument pane l.
- Do not adjust the driver's or front pas
senger's seat whi le the vehicle is moving.
Your sea t may move unexpected ly, caus
ing sudden loss of vehicle cont rol and
personal injury . If you adjust yo ur seat
while the veh icle is moving, yo u are out
of posit ion.
Driver's seat
The correct seat position is important for safe
and relaxed driving.
We recommend that you adjus t the dr iver's
seat in the fo llowing manner:
.,. Adjust t he seat in fore and aft direction so
that you can easily push the peda ls to the
floor wh ile keeping your knees s lightly bent
i:::> A in Why is your seat adjustment so im
portant? on page 57.
.,. Adjust the backrest so that when you sit
w ith your back against the backrest, you can
still grasp the top of the steering wheel.
.,. Adjust the head restraint so the upper edge
is as even as possible with the top of your head . If that is not poss ible , try to adjust
the head res traint so that it is as close to
this pos ition as possib le
i:::> page 64.
A WARNING
Never place any objects in the dr iver's foot
well. An object could get into the pedal
area and interfere with pedal funct ion . In
case of sudden braking or an acc ident, you
wo uld not be able to brake or accelerate.
Page 65 of 318
@ Tips
If you cannot move the seat into the re
clining position, it may be because
- the front passenger's seat memory func
tion is switched off¢
page 66 or
- the child safety lock is switched on (the
@ button
¢ page 40 or the right t but
ton ¢
page 40 lights up in the driver's
door), or
- the front passenger seat adjustment is
switched off in the MMI
¢ page 63.
Massage function remote control
Applies to vehicles: with reclining rear seat and massage
fu nct ion
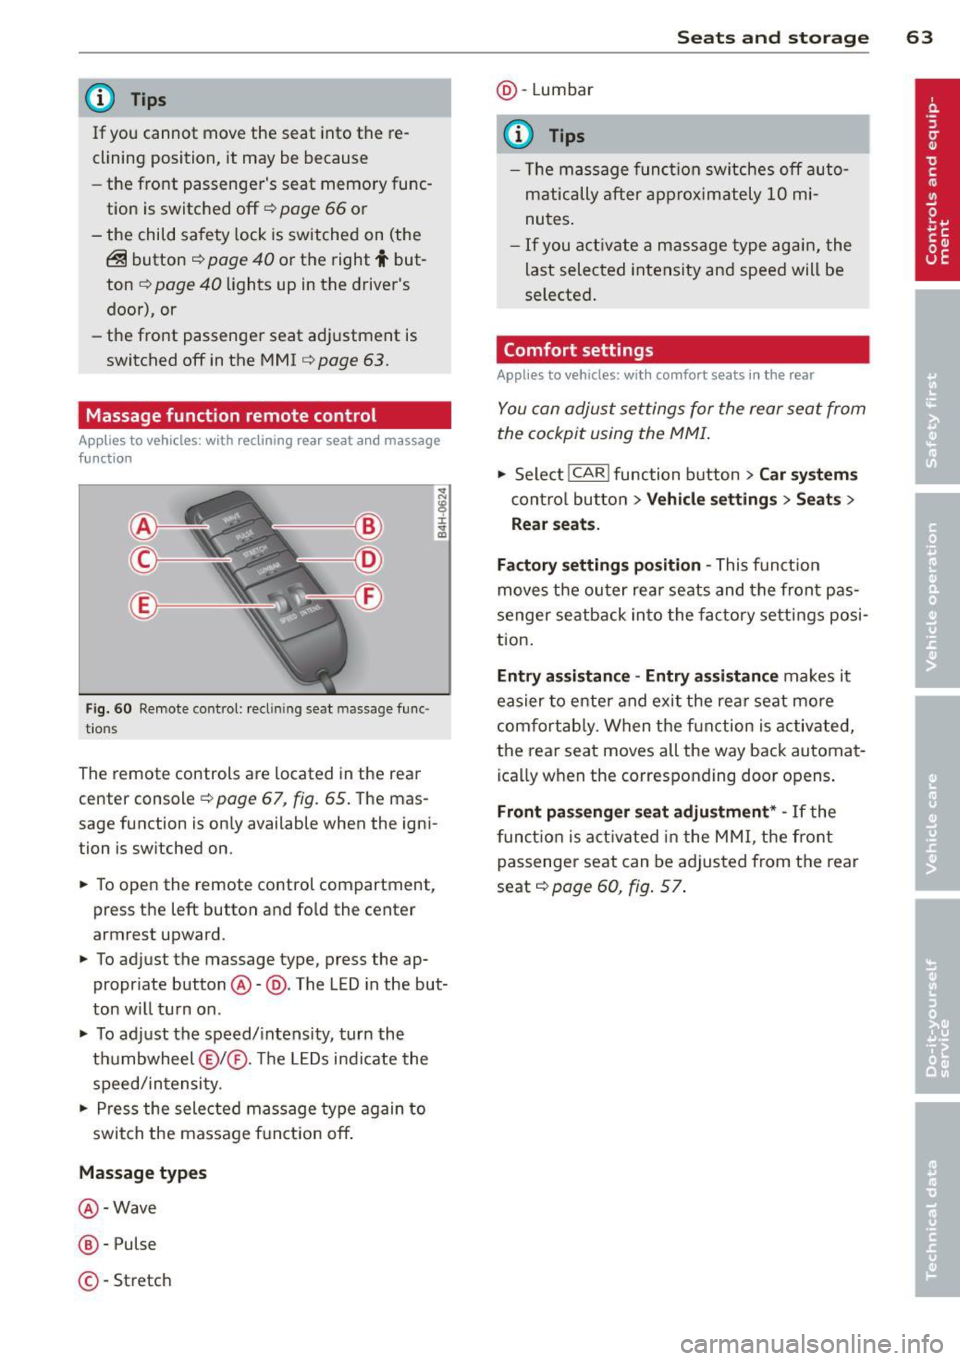
F ig. 60 Remote control: reclin ing seat massage func
t ions
The remote controls are located in the rear
center console ¢
page 67, fig. 65. The mas
sage function is only available when the igni
tion is switched on.
.,. To open the remote control compartment,
press the left button and fo ld the center
armrest upward .
.,. To adjust the massage type, press the ap
propriate button @-@ . The LED in the but
ton w ill turn on .
.,. To adjust the speed/intensity, turn the
thumbwheel @I® . Th e LED s indicate the
speed/intensity .
.,. Press the selected massage type again to
switch the massage funct ion off .
Massage types
@-Wave
@-Pulse
©-Stretch
Seats and storage 63
@-Lumbar
(D Tips
- Th e massage function switches off auto
matically after approximately 10 mi
nutes .
-If you activate a massage type again, the
last selected intensity and speed will be
selected.
Comfort setting s
Applies to vehicles: wit h co mfort seats in the rear
You can adjust settings for the rear seat from
the cockpit using the MMI.
.,. Select I CAR I function button > Car systems
control button > Vehicle settings > Seats >
Rear seats.
Factory settings position -
This function
moves the outer rear seats and the front pas
senger seatback into the factory settings posi
tion.
Entry as sistance -Entry assistance makes it
easier to enter and exit the rea r seat more
comfortab ly. When the function is activated,
the rear seat moves all the way back automat
ically when the corresponding door opens .
Front passenger seat adjustment * -If the
function is activated in the MMI, the front
passenger seat can be adjusted from the rear
seat ¢
page 60, fig. 5 7.
Page 82 of 318
80 Warm and cold
airflow and air distribution are controlled au
tomatically.
Adjusting the temperature
Temperatures between 60 °F (+16 °() and
84
°F (+28 °C) can be set. Outside of this
range,
lo or hi will appear in the climate con
trol system display. At both of these settings,
the climate control system runs continuously
at maximum cooling or heating power. There
is no temperature regulation.
~ Adjusting the airflow
You can adjust the airflow manually to suit
your needs. To have the airflow regulated au
tomatically, press the
! AUTO ! button.
~ Adjusting the air distribution
You can manually select the vents where the
air will flow. To have the air distribution regu
lated automatically, press the
IAUTOI button.
~ I lil* Adjusting Seat heating/
ventilation*
Pressing the button switches the seat heat
ing/ventilation on at the highest setting (level
3). The L EDs indicate the temperature level.
To reduce the temperature, press the button
again. To switch the seat heating/ventilation
off, press the button repeatedly until the LED
turns off.
After 10 minutes, the seat heating/ventilation
automatically switches from level 3 to level 2.
In vehicles without the four zone automatic
climate control*, buttons in the rear center
console control the seat heating for both out
er rear seats*.
~ Switch the defroster on/off
The windshield and side windows are defrost
ed or cleared of condensation as quickly as
possible. The maximum amount of air flows
mainly from the vents below the windshield.
Recirculation mode switches off. The tempera
ture is controlled automatically.
The
IAUTOI button switches the defroster off.
~ Switching rear window heater on/off
The rear window heater only operates when
the engine is running. It switches off auto
matically after 10 to 20 minutes, depending
on the outside temperature.
To prevent the rear window heater from
switching off automatically , press and hold
the~ button for more than 2 seconds. This
r ema ins stored until the ignition is switched
off.
I SYNC I Synchronization*
When synchronization is switched on, the set
tings for the driver's side are applied to the
front passenger's side (except for seat heat
ing/ventilation*). The rear seat is also
synchronized in vehicles with the 4-zone de
luxe automatic climate control system*. Syn
chronization switches off if the settings are
adjusted on the front passenger's side or in
the rear*.
You can synchronize the settings in a row by
pressing and holding a knob. For example, to
apply the settings for the front passenger's side to the driver's side, press and hold the
knob on the front passenger's side.
Air vents
You can open or close the center and rear
vents in the cockpit and the vents in the rear
center console and door pillars using the
ridged thumbwheels. The levers adjust the di
rection of the airflow from the vents.
,&. WARNING
- Do not use the recirculation mode for ex
tended periods of time. The windows
could fog up since no fresh air can enter
the vehicle. If the windows fog up, press
the air recirculation button again imme
diately to switch off the air recirculation
function or select defrost.
- Individuals with reduced sensitivity to
pain or temperature could develop burns
when using the seat heating function. To reduce the risk of injury, these individu-
als should not use seat heating . .,..
Page 83 of 318
(D Note
To avoid damage to the heating elements in the seats, do not kneel on the seats or
place heavy loads on a small area of the
seat.
Setup
The climate control system setup is accessed
through the MMI.
• Se lect: ICARI function button > Car systems
control button > A/C.
Rear cabin settings*
When this function is selected, all sett ings for
the rear can be adjusted through the climate
control system in the cockpit . The climate
control system settings cannot be adjusted in
the rear seat at the same time. This function
switches off after a certain period of time or
when one of the dials in the cockp it is press
ed .
Auto recirculation*
The sensitivity level of the automatic recircu
l ation mode can be set at various levels from
off to sensitive. The recirculation mode l"""I is
controlled on automatically. You must press
the ~ button if fog forms on the w indows .
Footwell temperature
You can adjust the footwe ll temperature so
that it is cooler or warmer.
A/C mode
The strength of the airflow can be adjusted to
light, medium o r strong .
Windshield heat*
When the defroster~ is switched on and the
Auto settin g is selec ted, the windshie ld de
froster is controlled automatically.
Solar roof*
Park ing vent ilation is controlled automat ically
in the
auto setting .
Warm and cold 81
When the ignition is off, solar-powered park
ing ventilation may switch on, as long as
- t here is sufficient sunlight,
- the outside temperatur e is not too low,
- the sunroof is closed or tilted and
-auto (MMI) is selected.
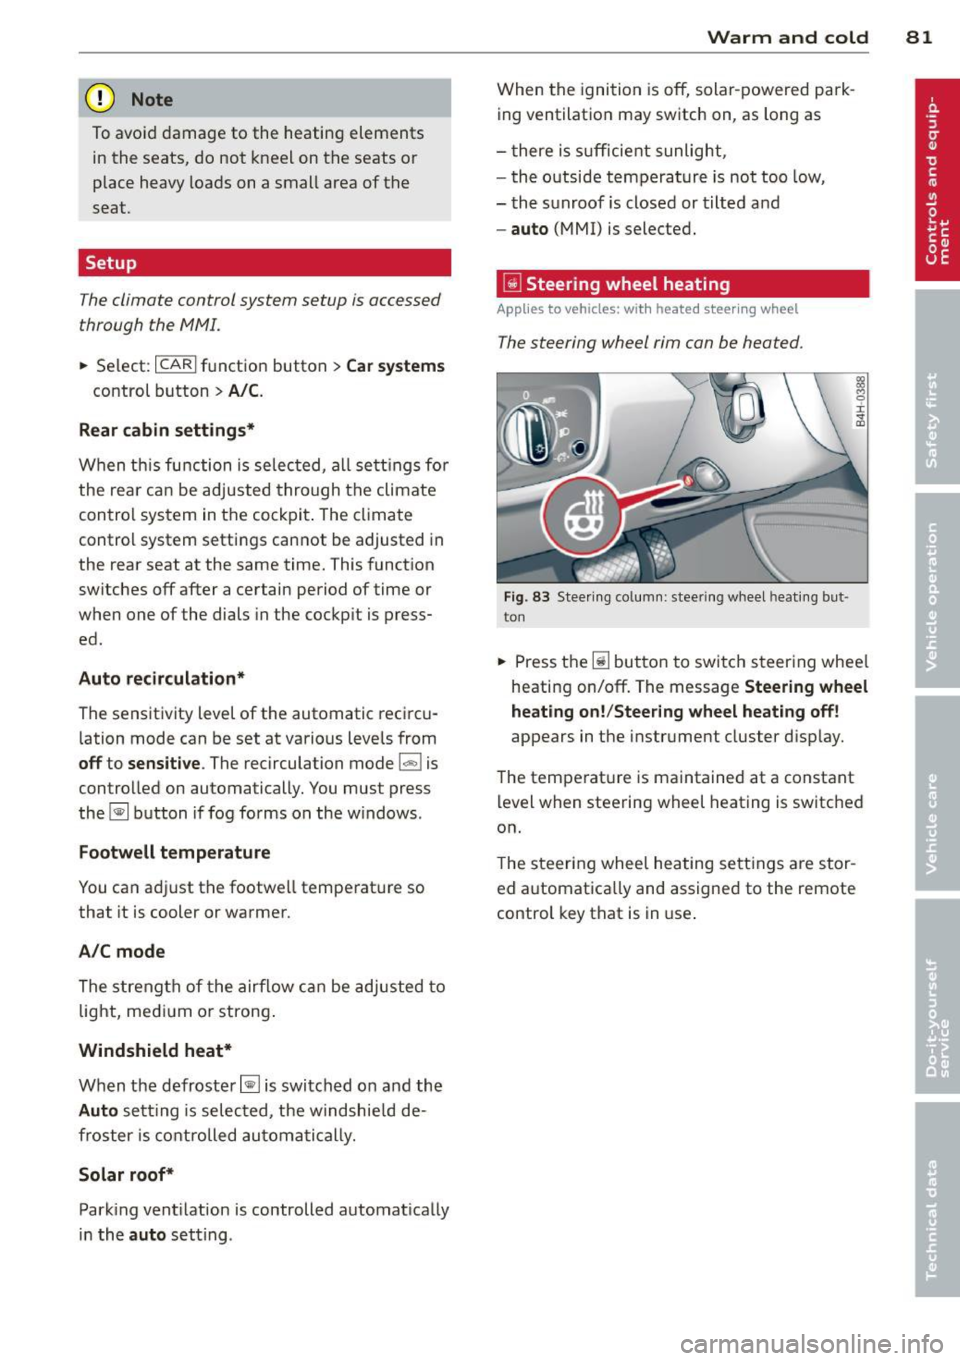
~ Steering wheel heating
App lies to vehicles: with heated steering wheel
The steering wheel rim can be heated .
Fig. 83 Steering column: steering wheel heating but ·
ton
~ 0
± ... CD
• Press the~ button to switch steering whee l
heating on/off. The message
Steering wheel
heating on! /Steering wheel heating off!
appears in the instrument cluster disp lay.
The temperature is maintained at a constant
level when steering wheel heating is switched
on.
T he steering wheel heating settings are stor
ed a utomatically and assigned to the remote
control key that is in use .
Page 84 of 318
82 On the road
On the road
Steering
Adjusting steering wheel position
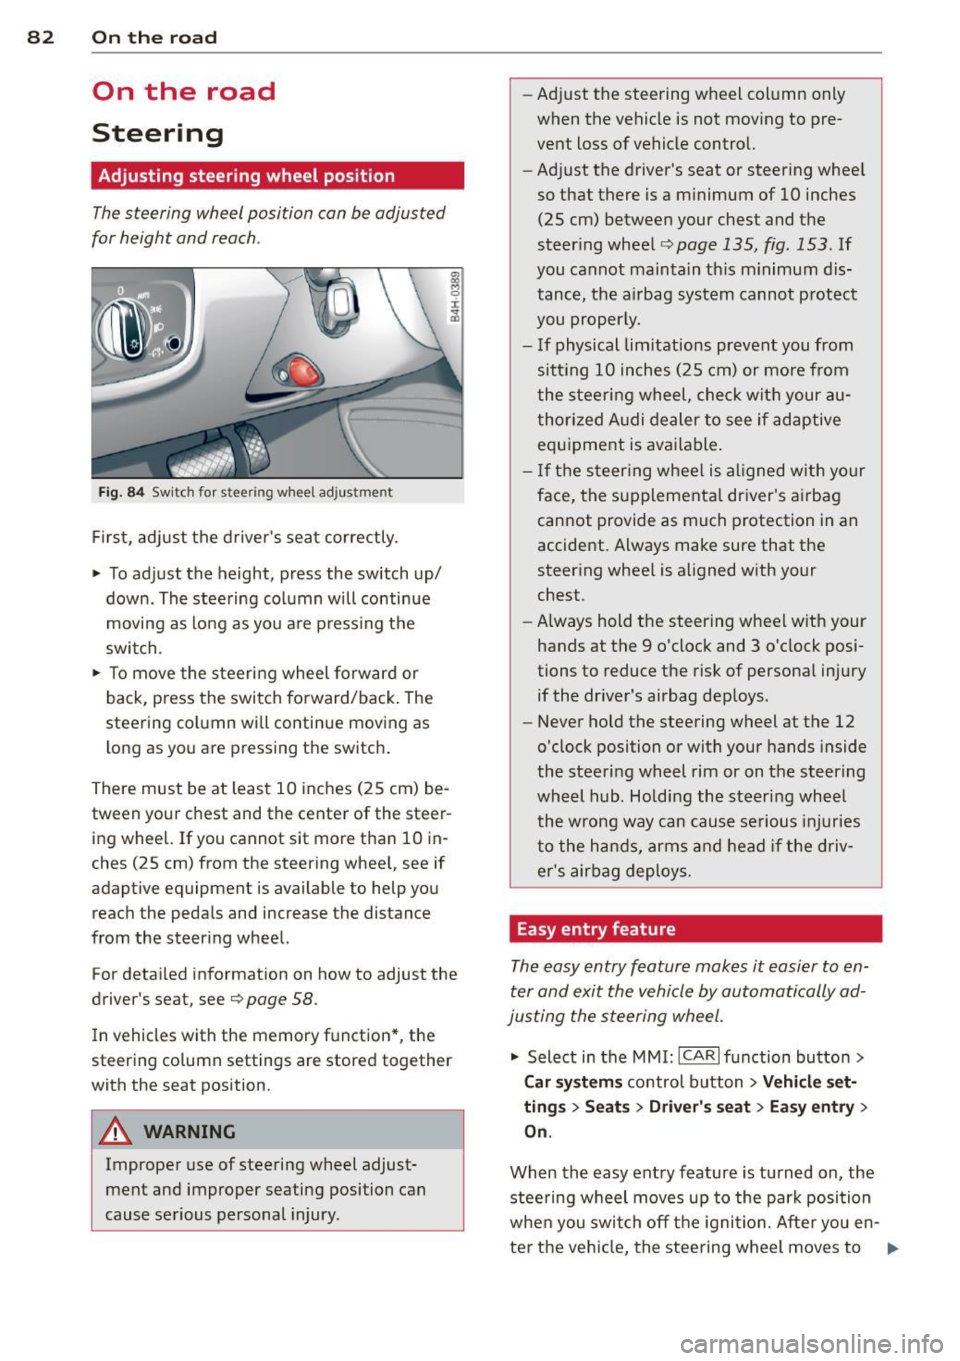
The steering wheel position can be adjusted
for height and reach .
Fig. 84 Switch for steering whee l adjustment
F irst, adjust the driver's seat correctly.
• To adjust the height, press the switch up/
down. The steering column will continue
moving as long as you a re pressing the
switch.
• To move the steeri ng wheel forward or
back, press the switch forward/back . The
steering column wi ll continue moving as
long as you are pressing the switch .
There must be at least 10 inches (25 cm) be
tween your chest and the center of the steer ing wheel. If you cannot sit more than 10 in
ches (25 cm) from the steering wheel, see if
adaptive equipment is available to help you
reach the pedals and increase the distance
from the steering wheel.
For detai led informat ion on how to adjust the
driver's seat, see
Q page 58.
In vehicles with the memory function* , the
steering column settings are stored together
with the seat position.
A WARNING
Improper use of steering wheel adjust
ment and improper seating position can
cause serious personal injury . -
Adjust the steering wheel col umn only
when the vehicle is not mov ing to pre
vent loss of vehicle control.
- Adj ust the driver's seat or steering whee l
so that there is a m inimum of 10 inches
(25 cm) between your chest and the
steer ing wheel
Q page 135, fig . 153 . If
you cannot maintain th is m inimum dis
tance, the airbag system cannot p rotect
you properly.
- If physical limitations prevent you from sitt ing 10 inches (25 cm) or more from
the steering wheel, check wit h your au
thorized A udi dealer to see if adaptive
equipment is available .
- I f the steering wheel is al igned with your
face, the supplementa l driver's airbag
cannot provide as much protection in an
accident. Always make sure that the
steering whee l is aligned with your
chest.
- Always hold the steering wheel w ith your
hands at the 9 o'clock and 3 o'clock posi
tions to reduce the risk of persona l injury
if the dr iver's airbag dep loys.
- Never hold the steering wheel at the 12
o'clock position or with your hands inside
the steeri ng wheel rim or on t he steering
wheel hub. Holding the steer ing wheel
the wrong way can cause serious injuries
to the hands, arms and head if the driv
er's airbag deploys.
Easy entry feature
The easy entry feature makes it easier to en
ter and exit the vehicle by automatically ad
justing the steering wheel.
• Select in the MMI : ICAR lfunction button>
Car sy st e m s control button > Ve hicle set·
tin gs > Se ats > Driver's s eat > Ea sy entr y>
On .
When the easy entry feature is turned on, the
steering wheel moves up to the park position
whe n you switch off the ignition. Afte r you en-
ter the ve hicl e, the steering wheel moves to .,..
Page 88 of 318

86 On the road
driving force has been built up at the
wheels.
E mergency brake function
An emergency brake ensures t hat the vehicle
can be slowed down even if the
normal brakes
fail
c::> page 87, Emergency braking .
Indicator lights
-If the parking b rake is closed w ith the igni
t ion
sw itch ed on the indicator lights come
on - (USA models)/ . (Canada models)
i n the i nstr ument cluster and in the switch .
- If the par king brake is closed w ith the igni
t ion
s wit ched off the indicato r lights come
on - (USA models)/ . (Canada models)
in the instrument cluster and in the switch
for about 20 seconds.
.&_ WARNING
Do not press the accelerator peda l inadver
tently if the vehicle is stat ionary but the
eng ine is running and a gear is selected.
Otherw ise the vehicle will start to move
immed iate ly and could result in a crash .
@ Note
If the symbo l. in the display or the ind i
cator light
1111 (USA models) . (Cana
da models) in the instrument cluster flash
es, there is a malfunction in the brake sys
tem . Please refer to the detai led descrip
tion of the indicator lights
c::> page 14.
- If the indicato r light - (USA mod-
els) . (Canada mode ls) or
liJ turns
on, there may be a malfunction in the parking b rake
c::> poge 15.
(D Tips
- You can apply the pa rking brake at any
t ime - even w ith the ignition switched
off . T he ignit ion must be on in order to
r elease the parking brake.
- Occ asiona l noises when the par king
brake is applied and re leased are no rma l
and are not a ca use for concern .
- When the vehicle is par ked, the par king
brake goes through a se lf -test cycle at regu
lar interva ls. Any associated noises
are normal.
Parking
Parking
.,. Stop the vehicle with the foot brake .
.,. Pull the switch(®) to apply the parking
brake.
.,. Select the P selector lever position
c::>page 115.
.,. Turn the engine off c::> _&. .
In addit ion on inclin es and g rades
.,. Turn the steering whee l so that your vehicle
w ill roll aga inst the curb in ca se it should
start to move.
.&_ WARNING
- When you leave your vehicle - even if on
ly br iefly - always take the ignit io n key
wit h you. This applies pa rticularly when
children remain in the vehicle. Otherwise
the children co uld s tart the engine, re
lease the parking brake or operate elec
trica l equipment (e.g . power windows) .
There is the r isk o f an accident.
- When the vehicle is locked, no one - par
ticularly not children should rema in in
the vehicle. Locked doors make it more
d ifficult for emergency workers to get in
to the vehicle - putting lives at risk .
· Starting from rest
The starting assist function ensures that the
parking broke is released au tomatically upon
star ting.
Stopping a nd applying parking brak e
.,. Pull the switch(®) to apply the parking
brake.
St arting and automatically releasing the
parking brake
.,. When you start to drive as usual , the park
ing brake is a utomatically rel eased and your
vehicle beg ins to move. ..,..