change wheel AUDI A8 2013 Owner's Manual
[x] Cancel search | Manufacturer: AUDI, Model Year: 2013, Model line: A8, Model: AUDI A8 2013Pages: 318, PDF Size: 79.34 MB
Page 275 of 318
Spare wheel
Applies to vehicles: with spare wheel
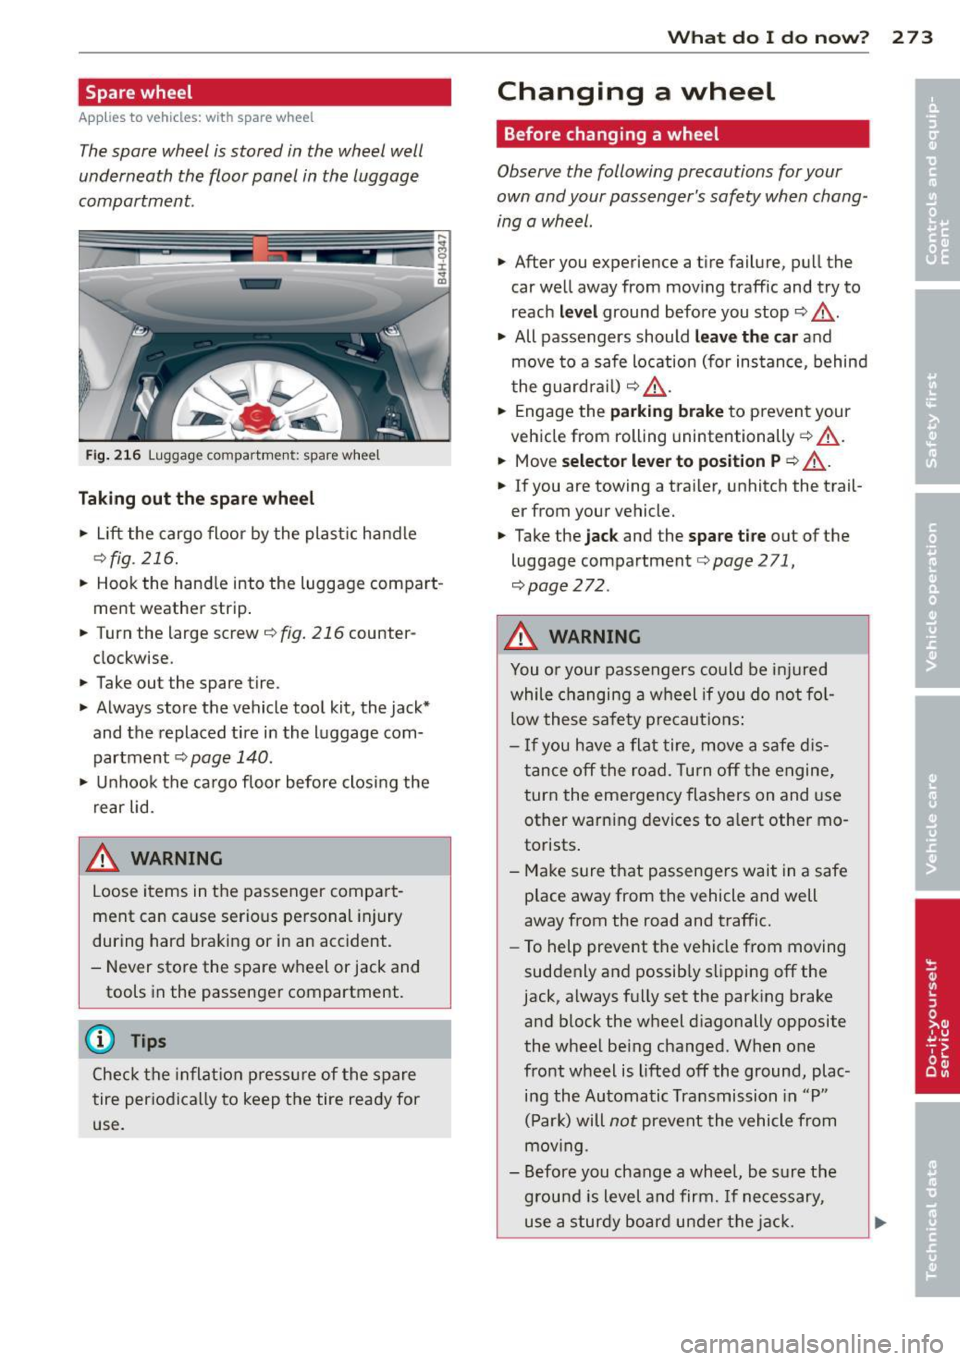
The spare wheel is stored in the wheel well
underneath the floor panel in the luggage
compartment.
F ig. 21 6 Luggag e compartme nt: spare wheel
Taking out the sp are whee l
• Lift the cargo floor by the plast ic handle
c:> fig . 216.
• Hook the hand le into the luggage compart
ment weather strip .
• Turn the large screw
c:> fig. 216 counter
clockwise.
• Take out the spare tire.
• Always store the vehicle tool kit, the jack*
and the replaced tire i n the luggage com
partment
c:> page 140 .
• Unhook the ca rgo floor before closing the
rear lid.
& WARNING
Loose items in the passenger compa rt
ment can cause serious pe rsonal in jury
during hard braking or in an accident.
- Never store the spare wheel or jack and
tools in the passenger compartment.
@ Tips
Check the inflat io n press ure of the spare
tire periodically to keep the tire ready for
use.
-
What do I d o now ? 273
Changing a wheel
Before changing a wheel
Observe the following precautions for your
own and your passenger's safety when chang
ing a wheel.
• After you experience a tire failure, pull the
car well away from mov ing traffic and try to
reach
le vel ground before you stop c:> ,&.
• All passengers should leave the car and
move to a safe location (for ins tance, behind
t he guardra il)
c:> ,& .
• Engage the parking brak e to prevent your
vehicle from rolling unintentionally
c:> ,& .
• Move sele ctor lever to po sit ion Pc:> &_ .
• If you are towing a trailer, unhitch the trail
er from your vehicle.
• Take the
jack and the spare tire out of the
luggage compartment
c:> page 271,
c:> page
272 .
& WARNING
You o r you r passengers could be i njured
while changing a wheel if you do not fo l
low these safe ty pre caut ions :
-I f you have a flat tire, move a safe d is
tance off the road. Turn off the e ngine,
turn the emergency flashers on and use
other warning devices to a lert other mo
torists .
- Make sure that passengers wait in a safe
place away from the vehicle and well
away from the road and traffic.
- To help prevent the vehicle from moving
suddenly and possib ly slipping off the
jack, always full y set the parking brake
a nd b lock the wheel d iagonally opposite
the wheel be ing changed. When one
front wheel is lifted off the ground, plac ing the Au tomatic Transmission in "P"
( P ar k) will
not prevent the vehicle from
mov ing .
- Before you chang e a whee l, be s ure the
g round is level and firm. If necessary,
use a sturdy board un der the jac k.
-
Page 276 of 318
274 What do I do now ?
-Always store the vehicle tool kit, the jack
and the replaced t ire in the luggage com
partment ¢
page 140.
@ Tips
Before changing the wheel, yo u m ust acti
vate t he jac king mode, so t hat the auto
mat ic cont rols fo r the Adaptive Air S us
pens io n do not make it mo re diff ic u lt to
lift the vehicle with the jack
c.';> page 2 76 .
Changing a wheel
When you change a wheel, follow these
quence described below step-by-step and in
exactly that order .
1. Activate the vehicle jack mode
¢page 276.
2. Remove the decorative wheel cover* . For
more deta ils see also
¢ page 274, Deco
rative wh eel covers
o r ¢ page 275 ,
Wheels with wheel bolt caps.
3 . Loosen the wheel bolts¢ page 275.
4. Locate the proper mo unt ing po in t for the
j ack and align t he jack be low tha t poi nt
¢ page 276 .
5. Raise the car with the jack¢ page 276.
6. Remove the wheel with the flat tire and
then install
the spare ¢ page 2 77.
7. Tighten all wheel bo lts light ly .
8 .
Low er th e ve hicle w ith the jack .
9 . Use t he wh eel bolt wren ch a nd
firmly
tig hte n all whee l bolts c.';> page 2 75.
1 0 . Repl ace t he decor ative wheel cover* .
11. Deactivate t he ve hicle jack mode in the
M MI:
!CARI fu nction button > Car systems
control b utton > Servicing & checks > Air
susp.: jack mode
> Off .
The vehicle jack mode sw itches off automati
cally at speeds above 10 km/h .
A WARNING
Always read and follow all WAR NINGS and
information
¢ .&. in Raising the vehicle on
page 2
76 a n d ¢ page 2 78.
After changing a wheel
A wheel change is not complete without the
doing the following .
.,. Always store the vehicle tool kit, the jack*
and the rep laced tire in the luggage com
pa rtment
¢ page 140.
... Check the tir e pr essure on the spa re whee l
immed iate ly afte r mounting i t.
.,. As soon as possib le, have the
tightening
torques
on all whee l bolts che cked with a
torque wre nch. The correc t tig hten ing tor
que is 90 ft l b (120 Nm).
... Have the flat tire
replaced as soon as possi
ble.
@ Tips
- If you not ice that the w heel bo lts a re
co rroded and difficult to turn while
chang ing a tire, t hey shou ld be rep laced
before you check the tig htening to rque.
- Dr ive at reduced speed until you have the
t ightening torques checked.
- After changing a whee l, the t ire p ress ure
in all four tires must be chec ked/co rrect
ed and the tire p ress ure monito ring in di
cator must b e sto red in th e MMI
¢ page 269 .
' Decorative wheel covers
Applies to vehicles: w ith decorative whee l covers
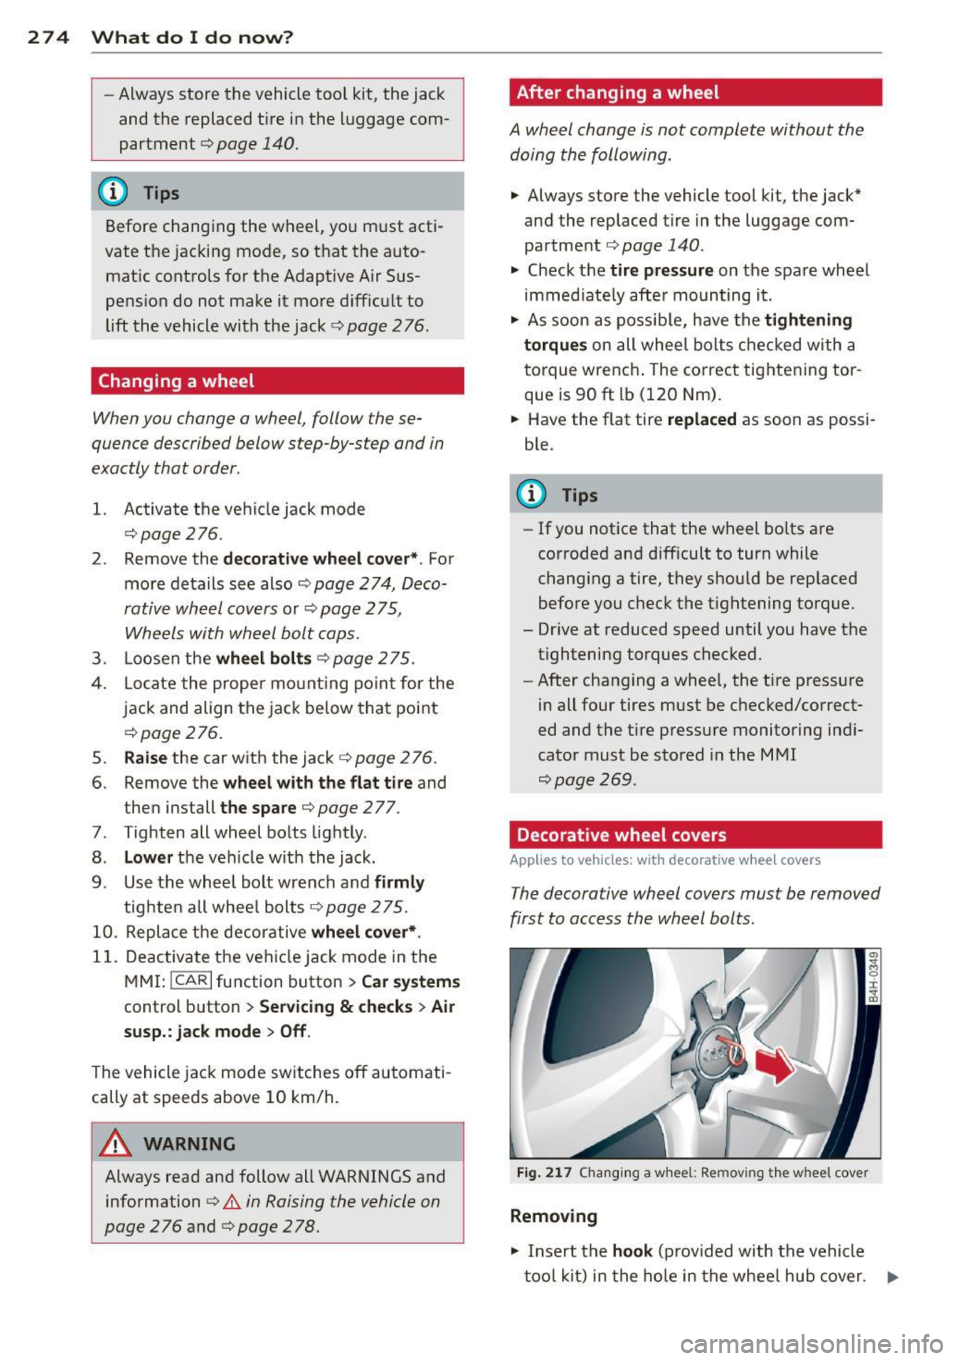
The decorative wheel covers must be removed
first to access the wheel bolts.
Fig. 217 C ha ngin g a w hee l: Remov ing th e w heel cove r
Removing
.,. In sert the hook (p rov ided with t he vehicle
t oo l ki t) in the hole in the whee l hub cover . .,..
Page 278 of 318

276 What do I do n ow ?
ho ld on to the car to keep your ba lance
and take care not to slip .
Raising the vehicle
The vehicle must be lifted with the jack first
before the wheel can be removed .
Fig. 220 Sill panels : m ark ings
Fig . 22 1 Sill: posit ion ing t he veh icle jack
.. Activate the vehicle jack mode in the MMI:
I CAR ! function button > Ca r sys tem s control
button>
S ervicing & checks > Air susp .:
jack mod e > On .
.. Engage the parking brake to prevent your
vehicle from ro lling u ninten tionally.
.. Move the
se lector l ever to po siti on P .
.. Find the marking (imprint) on the sill that
is nearest the wheel that will be changed
o
fig. 220 . Behind the marking, there is a
lifting point on the s ill for the vehicle jack .
.. Turn the
ve hicle jack located under the lift
ing point on the si ll to raise the jack until its
arm @o
fig. 221 is located under the des
i gnated plastic mount o ,& o0.
.. Align the jack so that its arm@o
fig. 221
engages in the designated lifting po int in
the door sill and the movable base @ lies
flat on the gro und. The base @ must be
ver
tical
under the lifting point @. ..
Wind the jack up fu rther until the f lat t ire
comes off the ground o
.&,.
Position t he vehicle jack only under the desig
nated lifting points on the si ll
c:> fig. 220.
There is exactly one locat ion for each wheel.
The jack must not be positioned at any other location
c:> .&, c:>Q).
An un stable surfac e under the jack ca n cause
the vehicle to slip off the jack . Always provide
a firm base for the jack on the ground . If nec
essary place a sturdy board or simi lar support
under the jack. On
hard, slipper y surfaces
(such as tiles) use a rubbe r mat or similar to
prevent the jack from slipping
c:> .&, .
A WARNING ~
-You or your passengers co uld be injured
while changing a wheel if you do no t fo l
low these safety p reca utio ns:
- Position the vehicle jack on ly at the
designated lifting points and align the
jack. Otherwise, the vehicle jack co uld
slip and cause an injury if it does not
have sufficient hold on the vehicle.
- A soft or unstable surface under the
jack may cause the vehicle to slip off
the jack . Always prov ide a firm base for
the jack on the ground. If necessa ry,
u se a st urdy boa rd under the jack.
- On hard, s lippery su rface (such as t iles)
use a rubber mat or sim ilar to prevent
the jack from slipping.
- To help prevent injury to yo urself and
your p asse ngers:
- Do not raise the vehicle until you are
sure the jack is securely engaged.
- Passengers must not remain in the ve
hicle when it is jacked up.
- Make sure that passengers wait in a
safe place away from the vehicle and
well away from the road and traffic .
- Make sure jack pos ition is correct, ad
just as necessary and then continue to
raise the jack.
- Changes in temperature or load can af
fect the height of the vehicle.
Page 295 of 318
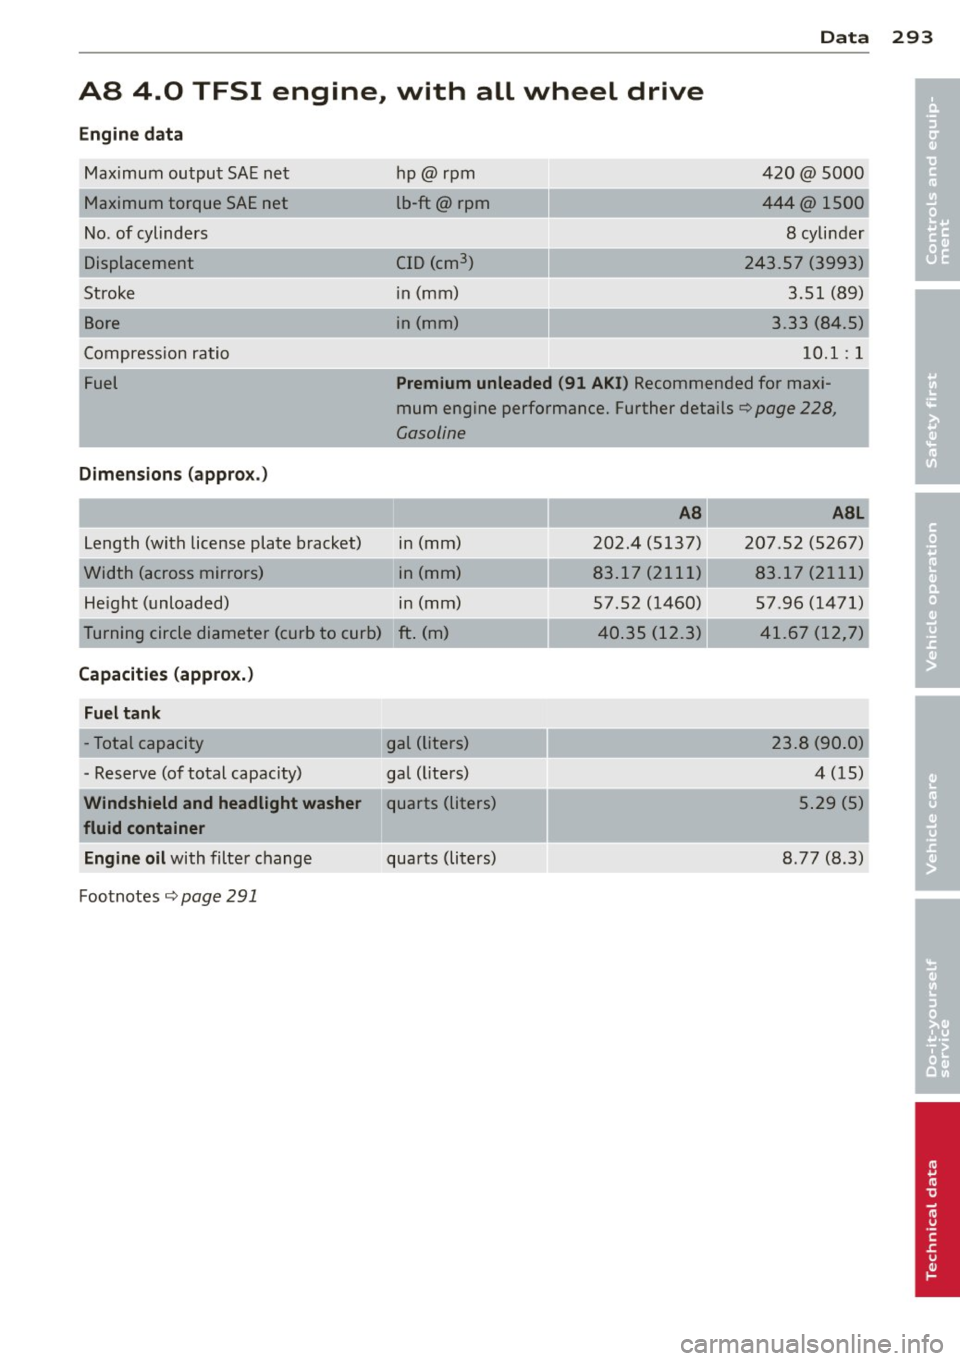
AS 4.0 TFSI engine., with all wheel drive
Engine data
Maximum output SAE net
Maximum torque SAE net
No . of cylinders
Displacement
Stroke
Bore
Compression ratio hp@rpm
lb-ft@ rpm
CID (cm
3 )
in (mm)
in (mm)
Data
420@5000
444@1500
8 cylinder
243.57 (3993) 3.51 (89)
3 .33 (84.5)
10.1 : 1
Fuel Premium unleaded (91 AKI) Recommended for maxi
mum engine performance. Further details¢
page 228,
Gasoline
Dimensions (approx .)
Length (with license plate bracket)
Width (across mirrors)
He ight (unloaded) in (mm)
in (mm)
in (mm)
T urning circle diameter (curb to curb) ft . (m)
Capacities (approx.)
Fuel tank
- Total capacity gal (liters)
- Reserve (of total capacity) gal (l iters)
__ _.. __
Windshield and headlight washer quarts (liters)
fluid container
Engine oil with filter change
Footnotes
¢ page 291
quarts (liters)
AS
202.4 (5137)
83.17 (2111)
57 .52 (1460)
-....... -
4 0.35 (12.3)
ASL
207 .52 (5267)
83.17 (211 1)
57 .96 (1471)
41.67 (12,7)
23 .8 (90 .0)
4 (15)
5 .29 (5)
8 .77 (8.3)
293
•
•
Page 296 of 318
294 Data
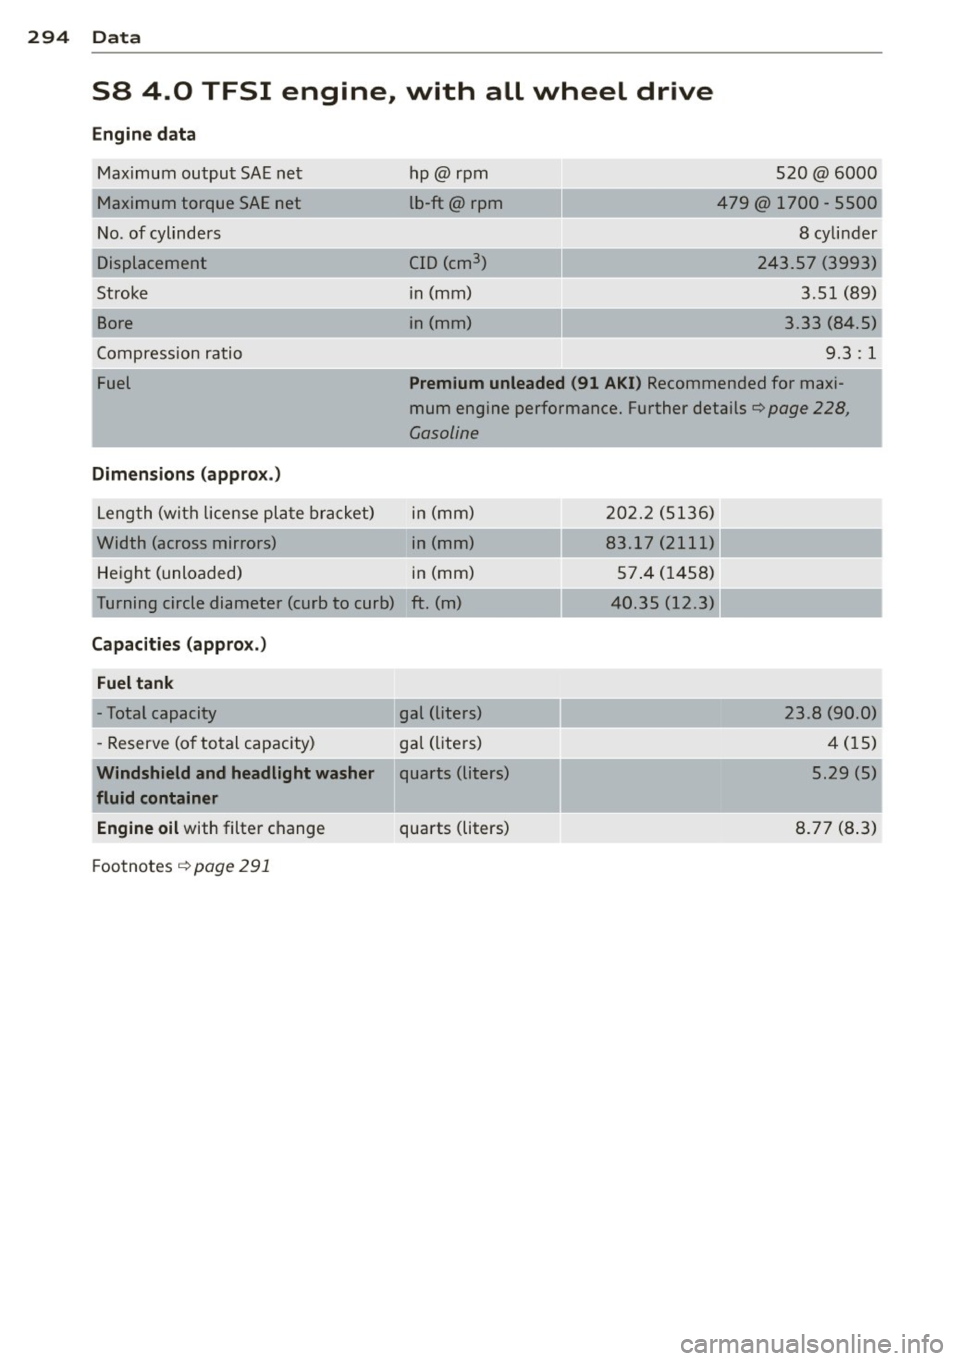
S8 4.0 TFSI engine, with all wheel drive
Engine data
Maximum output SAE net
Maximum torque SAE net
N o. of cylinders
Displacement
Strok e
Bore
C ompression ratio hp@rpm
l
b-ft@ rpm
CID (cm
3 )
in (mm)
i n (mm)
520@6000
479@ 1700 - 5500
8 cylinder
243 .57 (3993)
3.51 (8 9)
3.33 (84 .5)
9.3 : 1
Fuel Premium unleaded (91 AKI) Recommended for maxi
mum engine performance. Further details
Q page 228,
Gasoline
Dimensions (approx .)
Leng th (wit h license pl ate brac ket) in (mm)
Width (across mirrors) in (mm)
He igh t (unloaded) in (mm)
T urning circle diamet er (curb to curb) ft. (m)
Capacities (appro x.)
Fuel tank
- Total capacity gal (liters)
- Reserve (o f to tal capacity) gal ( lite rs)
Windshield and headlight washer quarts (liters)
fluid container
Engine oil with filter change quarts (liters)
F oo tnotes
Q page 291
2 02 .2 (51 36)
83.17 (2111) 57.4 (1458)
4 0.35 (12.3)
23.8 (90.0)
4 (15)
5.29 (5)
8. 77 (8 .3)
Page 309 of 318
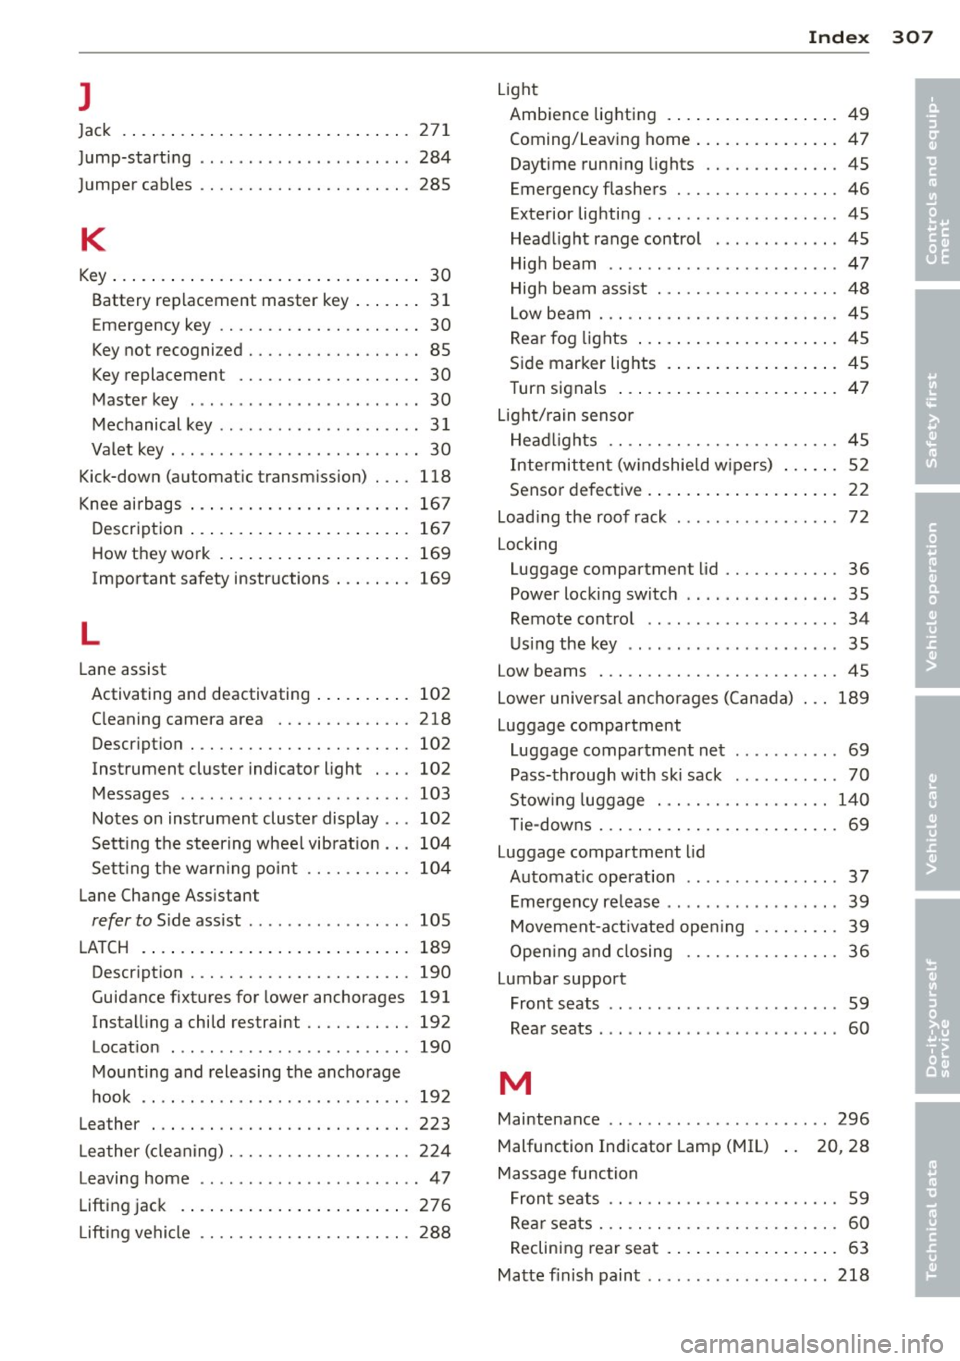
l
Jack . ..... .. .. ..... ..... ... .. .. ... 271
J ump-starting ..... ..... ... .. .. .. .. . 284
Jumper cables ............. .... .. .. . 285
K
Key ... .. .. .. .. .. .. .. .... ... .. .. .... 30
Battery replacement master key . . . . . . . 31
E mergency key . . . . . . . . . . . . . . . . . . . . . 30
Key not recogni zed . . . . . . . . . . . . . . . . . . 85
Key replacement . . . . . . . . . . . . . . . . . . . 30
Master key . . . . . . . . . . . . . . . . . . . . . . . . 30
Mechanical key . . . . . . . . . . . . . . . . . . . . . 31
Valet key . .. ......... ........ .. .. .. 30
K ick-down (automat ic transm ission) . .. . 118
Knee airbags ... .. .. .. .... ... .. .... . 167
Description ... .. .. .. .... ... .. .. ... 167
H ow they work . .. ..... ... .. .. .. .. . 169
Important safety instructions . .. .. .. . 169
L
Lane assist
Activating and deactivating ... .. .. .. . 102
C leaning camera area ..... .. .. .. .. . 218
Descr ipt ion . ............. .... .. ... 102
Instrument cluster indicato r light . .. . 102
Messages .. ... .. .. ...... .. .. .. .. . 103
Notes on instrumen t cluster display .. . 102
Sett ing the steering wheel vib rat ion .. . 104
Sett ing t he war ning po in t .. .. .. .. .. . 104
Lane Change Ass istant
refer to S ide ass ist . ....... .. .. .. .. . 105
L A T CH .... .. .. .... .. .... ... .. .. ... 189
Description . ............. .... .. .. . 190
Guidance fixtures for lower anchorages 191
Instal ling a chi ld restraint .. .. .. .. .. . 192
Locat ion
Mount ing and releasing the ancho rage
hook .. .. .. .... ... ... ..... .. .. .. .
Leather 190
19 2
223
L ea ther (cle aning) .......... .. .. .. ... 224
Leaving home ..... .. ...... .. .. .. .. .. 47
Lifting jack . ... ... ..... ... .. .. .. ... 276
Lifti ng vehicle .. ........... .. .. .. ... 288
Inde x 307
Light
Ambience lighting . .. ... .... ... .. .. . 49
Coming/Leav ing home .. ..... ... .. .. . 47
Daytime runn ing lights ............. . 45
Emergency flashers ................ . 46
Exterior lig hti ng ... ................. 45
Head light range control .. .. ... ... .. . 45
Hig h beam ....... ...... ........... 47
Hig h beam assist . .. . .............. . 48
L ow be am . .. .. .. .... ........... .. . 45
Rear fog lights ... .. .. .. ...... ... .. . 45
Side marker lights . .. .. ..... ... .. .. . 45
Turn signals ... .. .. . ... ...... ... .. . 47
L ight/ rain senso r
Head lights .. .. .. .... ........... .. . 45
Intermit ten t (w indshie ld w ipers) ... .. . 52
Senso r de fec tive . . . . . . . . . . . . . . . . . . . . 22
Load ing the roof rack ............... .. 72
Locking Luggage compartment lid ....... .... . 36
Power locking switch .... ......... .. . 35
Remote contro l . . . . . . . . . . . . . . . . . . . . 34
Us ing the key .. ... ...... ........... 35
Low beams
. .. .. .. ................. . 45
Lower unive rsal ancho rages (Can ada) 189
Luggage compartment Luggage compartment net . . . . . . . . . . . 69
Pass-through w ith ski sack . . . . . . . . . . . 70
Stow ing luggage . .... ............. 140
T ie-downs . . . . . . . . . . . . . . . . . . . . . . . . . 69
Luggage compartment lid
Automat ic operation .. .. ...... .... .. 37
Emergency re lease ................ .. 39
Movement-a ct ivated ope ning .... .. .. . 39
Open ing and closing ............. .. . 36
Lumbar support Front seats . . . . . . . . . . . . . . . . . . . . . . . . 59
Rea r seats ........ ...... ........... 60
M
Maintenance .. .. .. .. . .. .... .... .. .. 296
Malfunction Indicator Lamp (MIL) 20 , 28
Massage fu nction
Fron t seats . . . . . . . . . . . . . . . . . . . . . . . . 59
Rear seats . . . . . . . . . . . . . . . . . . . . . . . . . 60
Reclining rear seat . .. .. ..... ... .. .. . 63
Matte f inish paint .. .. . .. .. .. ... ... .. 218
•
•