key AUDI A8 2014 Owner's Manual
[x] Cancel search | Manufacturer: AUDI, Model Year: 2014, Model line: A8, Model: AUDI A8 2014Pages: 314, PDF Size: 78.47 MB
Page 68 of 314

66 Seats and storage
Seat memory
Description
Applies to vehicles: wit h memory fu nctio n
The memory function allows you to quickly
and eas ily store and recall personal seating
p rofiles for the dr iver, front passenger and
outer rear seats*. The memory function is op
erated through the master key and the memo ry buttons in the driver's/front passenger's
doors and the rear doors*.
The driver's seating profi le is stored and as
signed to the master key each time the vehicle
is locked . The seating profile is recalled auto
matically when the vehicle is unlocked. If two
Remote control
master key
Driver
Seat X
Head restraint X
Steering wheel* X
Safety belt* X
Both exterior rear-X
view mirrors*
There are two additional buttons in the rea r
doors* that can be used to recall two stored
seating profiles
r:=;,page 67.
Remote control key
Appl ies to vehicles: with memory function
To assign the driver's seat settings to the re
mote contro l key when locking the vehicle, the
function must be switched on .
.. Se lect :
I CAR I function button > Car systems
control button > Vehicle settings > Seats >
Driver seat > Remote control key> On.
@ Tips
If you do not want another driver's set
tings to be assigned to the remote control
key, switch off the memory function using
the MMI or the
! OF F! button r:=;, page 67. people
use one vehicle, it is recommended
that each person always uses "their own"
master key.
Two seating profiles can be stored in each of
the driver's/front passenger's doors and one
seat ing profile in each of the rear doors*.
Once stored, these seat ing profiles can be re
ca lled at any time.
T he following sett ings are stored:
Memory button
Driver Front passenger Outer rear seats*
X
X X
X X
X
X
X
X
Page 70 of 314
68 Seats and storage
Full-length center
console
Overview
Appl ies to vehicles: with full-len gth ce nter console
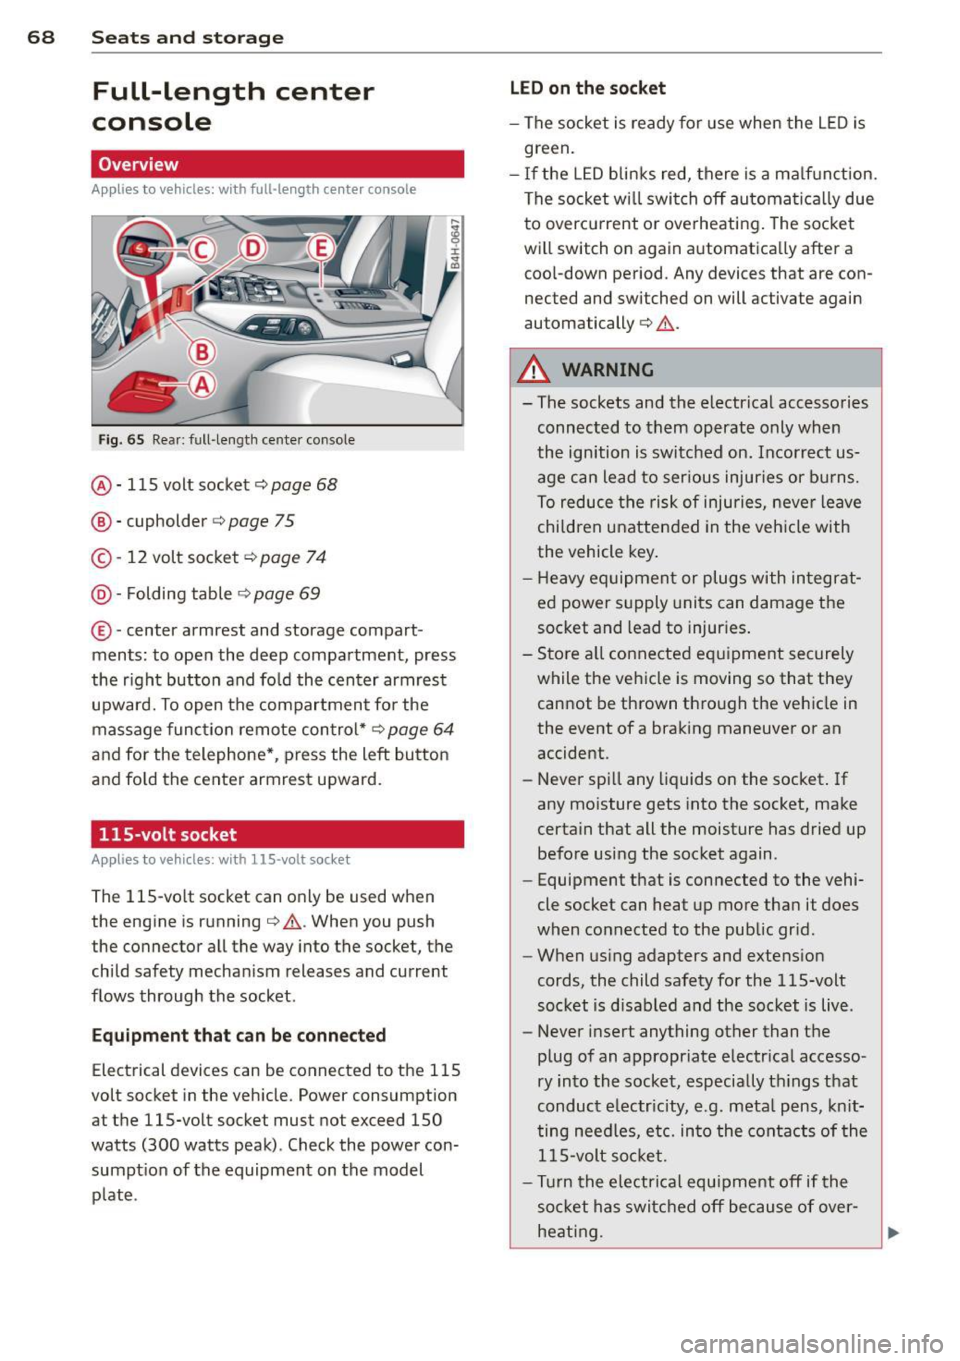
Fig. 65 Rear: full -length center console
@ · 115 volt socket ¢ page 68
@ · cupholder <=> page 75
© · 12 volt socket c:> page 7 4
@ · Folding table ¢ page 69
® ·center armrest and storage com part ·
ments: to open the deep compartment, press
the r ight button and fo ld the center armrest
upward. To open the compartment fo r the
massage func tion remote con trol*
c:> page 64
and fo r the telephone* , press the left button
and fo ld the center armrest upward.
115-volt socket
App lies to vehicles: with 115 -vo lt socket
The 115-vo lt socket can only be used when
the engine is running¢
A. When you push
the connector all the way into the socket, the
child safety mechan ism releases and current
flows through the socket .
Equipm ent that can be conn ected
Electrical devices can be connected to the 115
volt socket in the veh icle. Power consumption
at the 115-volt socket must not exceed 150
watts (300 watts peak) . Check the power con·
sumpt ion of the equipment on the model
p late .
LED on th e socket
- The socket is ready for use when the L ED is
green.
- If the LED blin ks red, there is a ma lf u nction.
The socket wi ll swi tch off automa tica lly due
to overcu rrent or overheating. The socke t
will switch on again automatica lly after a
coo l-down period. Any devices that are con
nected and switched on will activate again
automatically
c:> A .
A WARNING
-
- The sockets and the electr ical accessories
connec ted to them operate only when
the ignition is switched on. Incorrect us
age can lead to ser ious injuries or burns.
To reduce the risk of injuries, neve r leave
chi ldren unattended in the veh icle with
the vehicle key .
- H eavy equipment or plugs with in tegrat
ed power s upply units can damage the
socket and lead to injur ies .
- Sto re a ll connected e quipment securely
while the veh icle is moving so that they
cannot be thrown through the veh icle in
the event of a braking maneuver or an
accident.
- Never sp ill any liquids on the socket . If
any mo isture gets into the socket, make
certain that all the moisture has dried up before using the socket again.
- Equipment that is connected to the vehi·
cle socket can heat up more than it does
when connected to the public gr id .
- When us ing adapters and extens ion
cords, the child safety for the 115-volt
socket is d isabled and the socket is live.
- Never insert anything other than the
p lug of an appropriate e lectr ical accesso·
ry in to the socket, especially th ings that
conduct e lectr icity, e.g . meta l pens, kn it
ting needles, etc. in to the cont acts of the
1 15-volt so cket.
- Turn the electrical equ ipment off if the
socket has switc hed off because of over·
heat ing.
Page 76 of 314
7 4 Seats and storage
- Never exceed the maximum perm issible
load carrying capacity of the roof o f your
vehicle, the permissible axle weights and
the permissible total weight of your veh i
cle
c::, page 289, Weights .
@ For the sake of the environment
As a result of the increased wind resist
ance created by a roof rack, your vehicle is
using fuel unnecessarily. So remove the
roof rack after using it.
12-volt sockets
Applies to vehicles: 12-volt soc kets
Electrical accessories can be connected to ev
ery 12-volt socket.
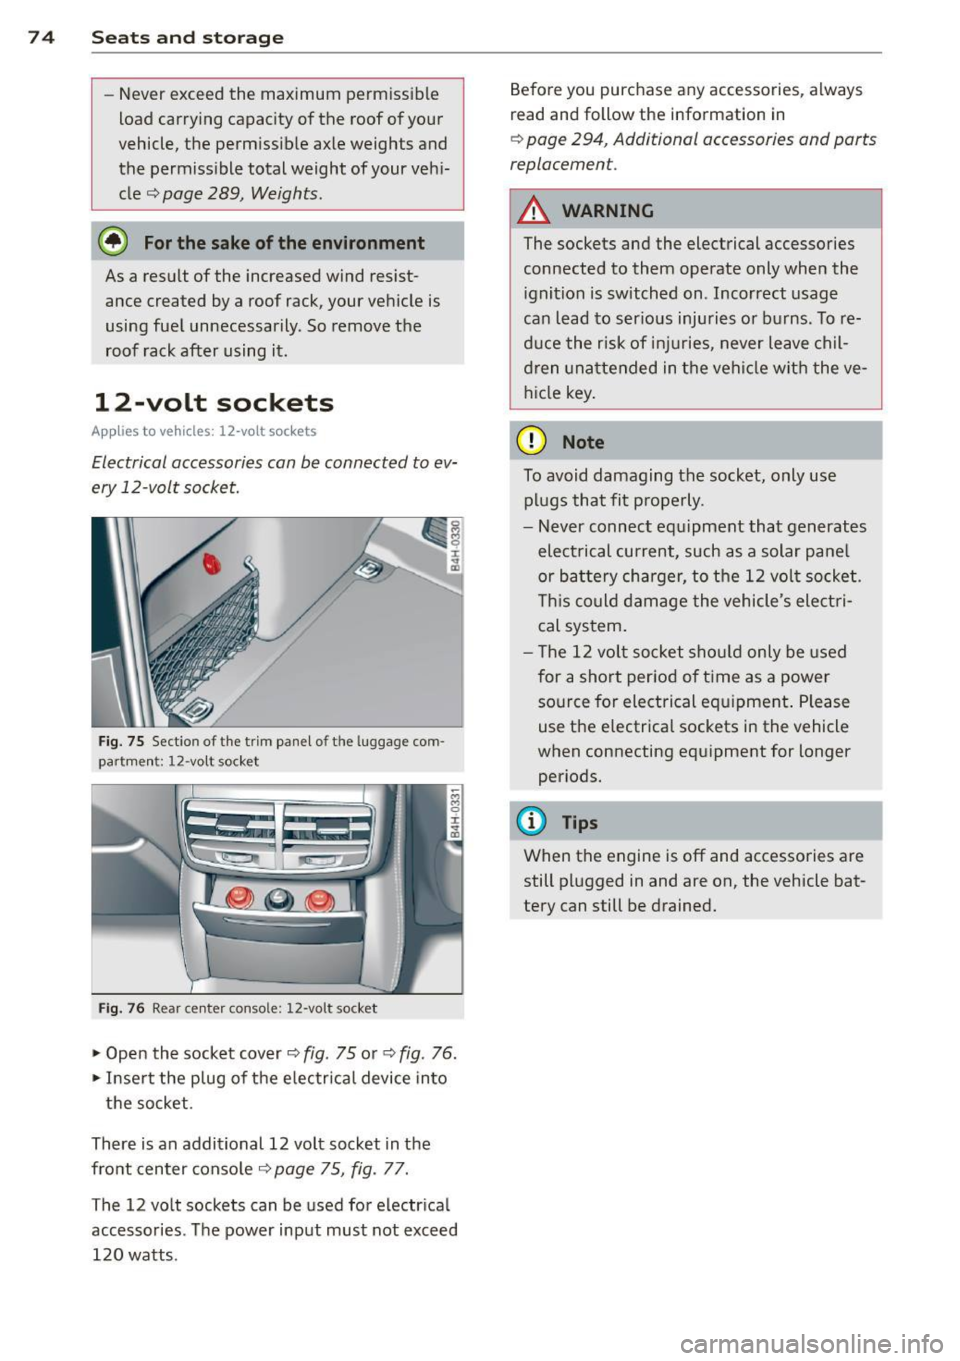
Fig. 75 Sect io n of the trim panel o f th e luggage com
part ment : 12 -vol t socket
Fig. 76 Rear center conso le: 12-vo lt socket
... Open the socket cover c::, fig . 75 or c::, fig . 76 .
... Inse rt the p lug of the e lectrical device into
the socket.
There is an additional 12 vo lt socket in the
fro nt center console
c::> page 75, fig. 77.
The 12 volt sockets can be used for electr ica l
accessories . Th e power input must not exceed
120 watts . Before you purchase any accessories
, always
read and follow the information in
c::, page 294, Additional accessories and parts
replacemen t.
A WARNING
The sockets and the electrical accessories
connected to them operate only when the
i gnition is switched on . Incorrect usage
ca n lead to ser ious injuries or burns. To re
duce the risk of inj uries, never leave ch il
dren unattended in t he vehicle with the ve
hicle key .
(D Note
To avoid damaging the socket, only use
plugs that fit p roperly.
- Never connect equ ipment that generates
elect rical current, such as a solar panel
or battery charger, to the 12 vol t socket .
T his could damage the vehicle 's elect ri
cal sys tem .
- The 12 volt socket shou ld only be used
for a short per iod of t i me as a power
so urce for electrical equ ipment . Please
use the electrical sockets in the vehicle
when connecting equipment for longer periods.
@ Tips
When the engine is off and accessories are
still plugged in and are on, the vehicle bat
tery can still be drained.
Page 77 of 314
Storage
(upholder
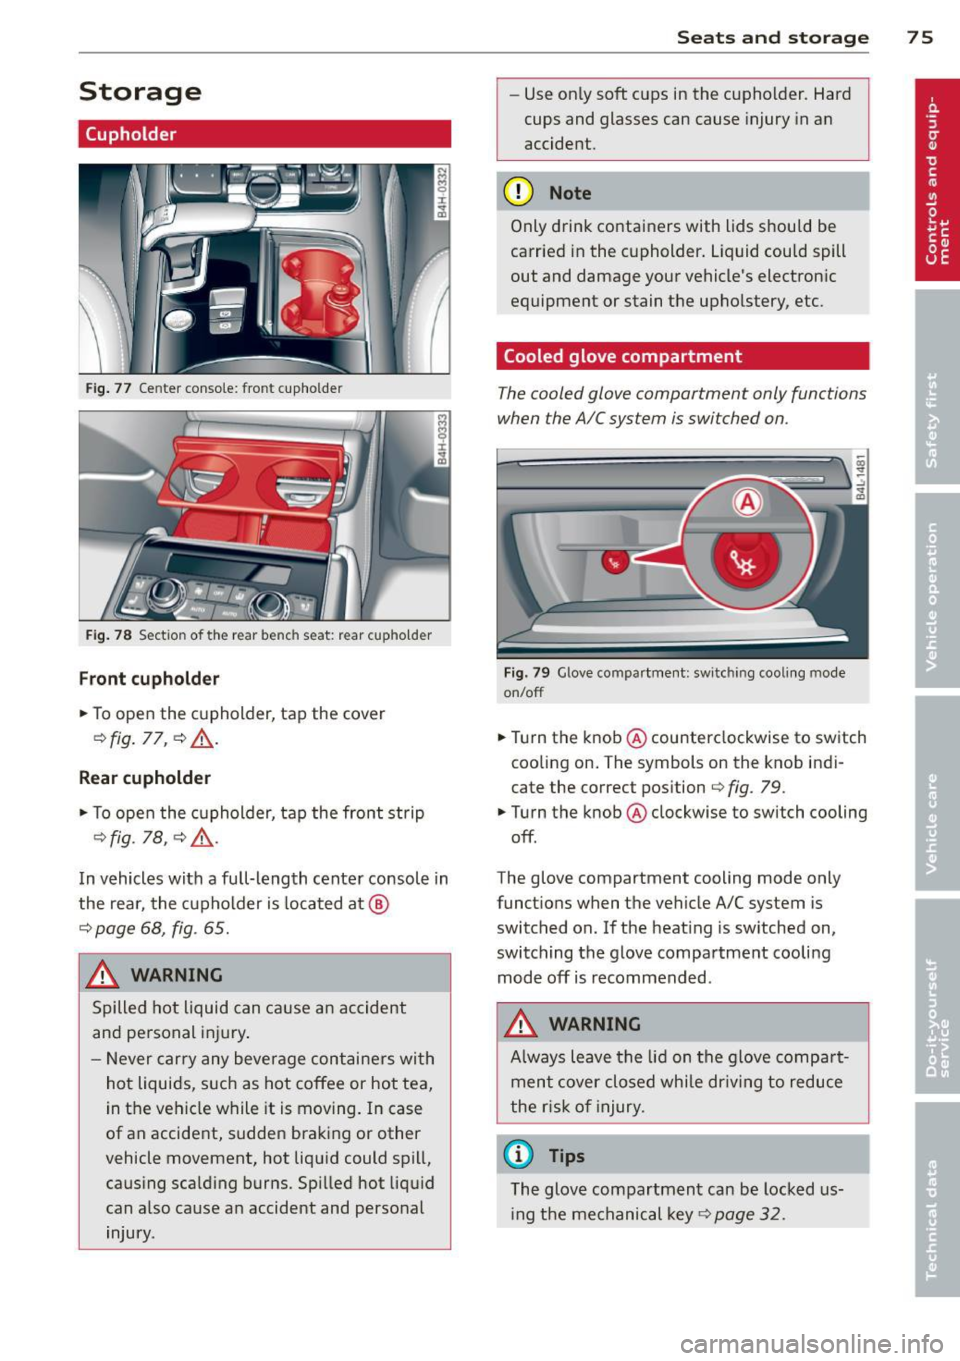
Fig. 77 Center console: front cupho lder
Fig. 78 Section of the rear bench seat: rear cupholder
Front cupholder
.,. To open the cupholder, tap the cover
Q fig . 77, Q &,.
Rear cupholder
.,. To open the cupholder, tap the front strip
Q fig. 18, QA .
In vehicles with a full-length center console in
the rear, the cupholder is located at @
Qpage 68, fig. 65.
A WARNING
Spilled hot liquid can cause an accident
and personal injury .
- Never carry any beverage containers with
hot liquids, such as hot coffee or hot tea,
in the vehicle while it is moving. In case
of an accident, sudden braking or other
vehicle movement, hot liquid could spill, causing scalding burns. Spilled hot liquid
can also cause an accident and personal
injury.
Seats and storage 75
-Use on ly soft cups in the cupholder. Hard
cups and glasses can cause injury in an
accident.
(D Note
Only drink containers with lids should be
carried in the cupholder. Liquid could spill
out and damage your vehicle's electronic
equipment or stain the upholstery, etc.
Cooled glove compartment
The cooled glove compartment only functions
when the AIC system is switched on.
Fig. 79 Glove compar tment: switching cooling mode
on/off
.,. Turn the knob@ counterclockwise to switch
cooling on. The symbols on the knob indi
cate the correct position
~ fig. 79 .
.,. Turn the knob @ clockwise to switch cooling
off .
The glove compartment cooling mode only
functions when the vehicle A/C system is
switc hed on. If the heating is switched on,
switching the glove compartment cooling mode off is recommended .
A WARNING
Always leave the lid on the glove compart
ment cover closed while dr iving to reduce
the risk of injury.
a) Tips
The glove compartment can be locked us
i ng the mechanical key
Q page 32.
Page 81 of 314
Warm and cold Climate controls
Description
Th e climate control sy stem warms, cools and
adds humidity to the a ir in the veh icle inter io r.
It is the most effect ive when the windows and
sunroof* a re closed. If the temperature inside
the parked vehicle becomes very warm, open ing the window briefly will speed up the cool
ing process.
I n all heating mode f unctions except
defrost,
the blower on ly switches to a higher speed
once the engine coolant has r eached a certain
temperature.
Condensation from the cooling system can
drip and form a puddle of water under the vehicle. This is normal and does not mean there
is a leak.
Pollutant filter
The po llutant filte r removes po llutants s uch
as dust and pollen from the air.
The air pollutants filte r must be changed at
t he intervals spec ified in you r Wa rra nty
&
Main tenance book let, so tha t the air condi
tioner can properly work.
I f you drive you r vehicle in an area with h igh
ai r po llution , the fi lter may need to be
changed more freq uent ly than specified in
your Aud i Warranty
& Ma intenance booklet. If
i n doubt, ask your authorized A udi Service Ad
visor for advice .
Key coded settings
The clima te con trol settings are a utomat ically
stored and assigned to the remote contro l key
that is in use .
& WARNING
Reduced visibility is dangero us and can
cause accidents . -
Warm and cold 79
-For safe driving it is very important that
all windows be free of ice, snow and con
densat ion.
- Comp letely fam iliarize yourse lf with the
proper use and funct ion of the heat ing
and ve nti lation system and especially
how to defog and defrost the w indows.
- Never use the windshield wiper/washer
system in freez ing weather unt il you
have warmed the w indshield first, using
the heating and ventilation system. The
washer sol ution may free ze o n the wind
shie ld an d red uce visib ility.
(D Note
- If you suspect that the air conditioner has been damaged, switch the system
off to avoid furt her damage and have it
i n spected by a q ua lified dea lership.
- Repairs to the Audi air condition er re
quire specia l techni cal know ledge and
speci al tools. Contact an autho rized Aud i
dealer fo r ass istance.
@ For the sake of the environment
B y reduci ng the amou nt of f uel you use,
you also re duce the amount of pollu tan ts
emitted in to the a ir .
(D Tips
- Keep the air intake s lo ts ( in fro nt of the
w indshield) free from ice, snow and de
br is in order to maintai n the proper f unc
tion of the climate control system.
- T he energy m anagement system may
switch the seat heating* or rear window
defroster off temporar i Ly . These systems
are available again as soon as the energy
balance has been restored .
- Air escapes through vents under the rear
window. When placing items of clothing
on the luggage compartment cover, en
sure that the openings are not covered.
Page 84 of 314
82 Warm and cold
(D Note
To avoid damage to the heating e lements
in the seats, do not kneel on the seats or
place heavy loads on a small area of the
seat .
Setup
The climate control system setup is accessed
through the MMI.
.. Se lect : ICAR !function button> C ar sys tems
control button > A/C.
Rear c abin settings *
When this function is selected, all se tt ings fo r
the rear ca n be adjusted through the climate
contro l system in the cockpit . The climate
control system settings cannot be adjusted in
the rear seat at the same time. This function
switches off after a certain period of time or
when one of the dials in the cockp it is press
ed .
Auto re ci rculati on* Solar roof*
Pa
rking ventilation is cont ro ll ed automatically
in the
auto setting .
When the ignition is off, solar-powered park
i ng ventilat io n may sw itch on, as long as
- there is sufficient sunlight,
- the outside temperature is not too low,
- the sunroof is closed or tilted and
- auto (MMI) is selected .
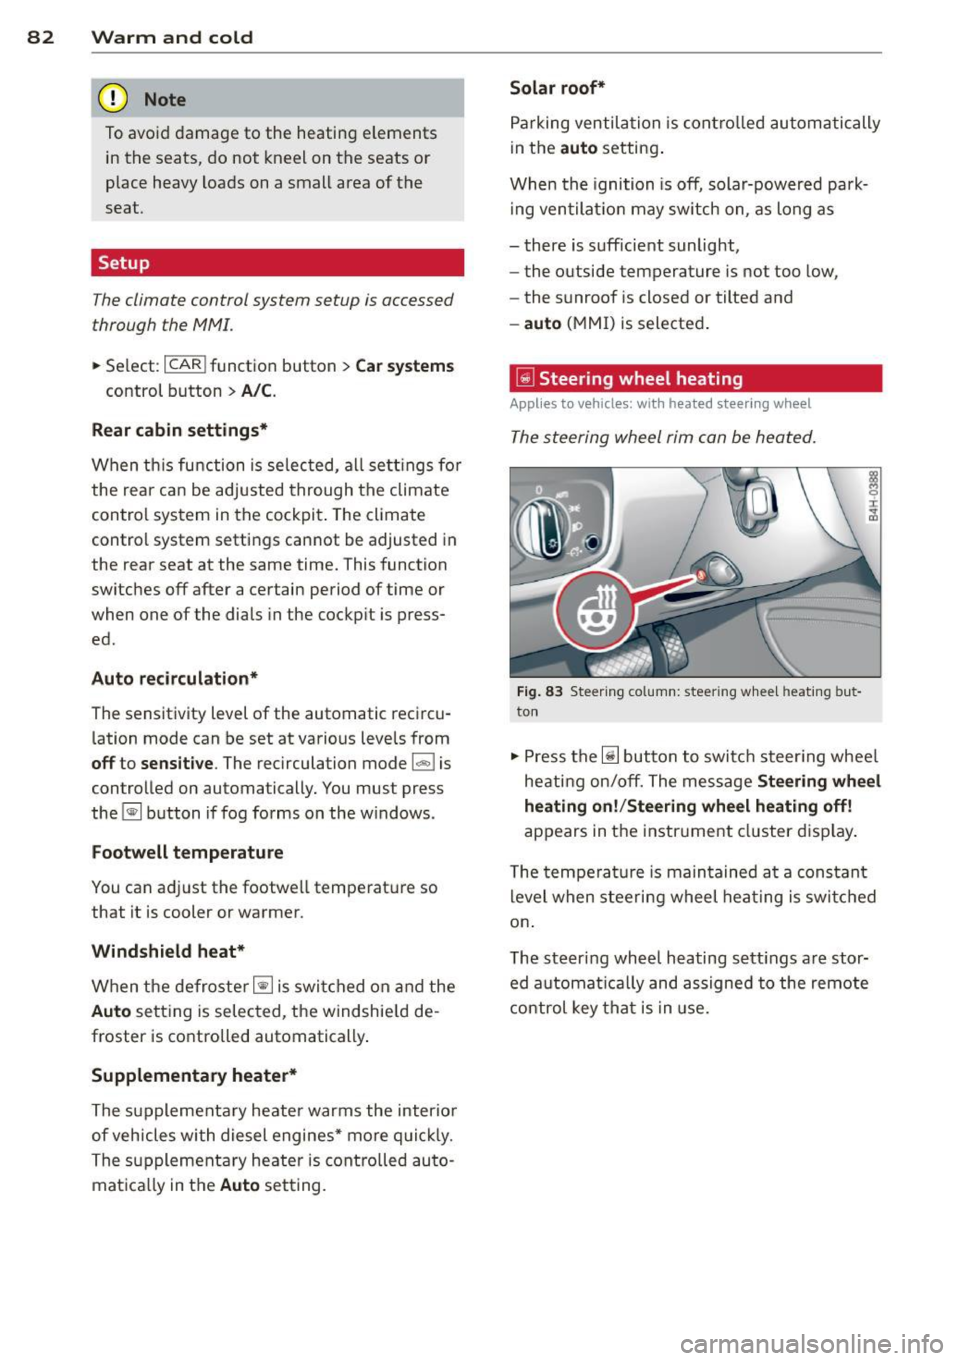
Ii!] Steering wheel heating
Applies to vehicles: wit h heated s tee rin g wheel
The steering wheel rim can be heated.
Fig. 83 Steer ing col umn: steering w heel h eat ing but-
The sensitivity level of the automatic reci rcu-to n
lation mode can be set at various leve ls from
off to sensiti ve . The recirculation mode I""' ! is
controlled on automatically. You must press
the ~ button if fog forms on the w indows.
Fo otwell temperature
You can a dju st the footwell temperat ure so
that it is cooler or warmer.
Windshield heat*
When the defroster~ is swi tched on an d the
Aut o sett ing is selected, the windshie ld de
froster is controlled automatically .
Supplementary heater*
The supplementary heater warms the interio r
of vehicles with diesel engines* mo re q uic kly.
The supplementa ry heater is contro lled auto
matica lly in the
Aut o setting. ..
Press the~ button to switch steer ing whee l
heati ng on/off. The message
Steerin g wheel
h eating on! /Steering wheel heating off!
appears in the instr ument cl uster display .
T he tempera ture is main tained a t a constant
level when stee ring wheel hea ting is switc hed
on .
The steer ing wheel heating sett ings a re stor
ed automat ica lly and assigned to the remote
c ontrol key that is in use.
Page 87 of 314
Stee ring lock
The stee ring locks when you t urn the engine
off us ing the
I S TAR T ENGINE STOP! button
and open the driver 's door . The locked steer
i ng he lps pr event ve hicle theft.
E mergenc y off
If necessary , the eng ine can be sw itched off
with the selector leve r in the R, Dor S pos i
tions . The engine stops i f you press the
I S TART ENGINE STOP! button at speeds below
6 mph (10 km/h) .
.&_ WARNING
- Never turn off the eng ine before the ve
hicle has come to a complete stop. The
full function of the brake booster and the power steering is not quaranteed. You
must use mo re force to turn or brake if
necessary. Because you cannot steer and
brake as you usua lly would, this could
lead to crashes and serious injur ies.
- For safety reasons, you shou ld always
par k your vehicle with the se lector lever
in P. Otherwise, the veh icle co uld inad
vertent ly roll away .
- After the engine has been switched off,
the radiator fan can continue to r un for
up to 10 mi nutes -even with the ignition
switched off.
It can a lso switch on aga in
after some time if the coolant tempera
ture rises as the result of a heat buildup
or if the engine is hot and the engine
compartment is addit ionally heated by
the sun's rays .
0 Note
Do not stop the engine immed iate ly after
hard or extended dr iving . Keep the engine
r u nning for approximately two minutes to
prevent excessive heat build-up.
Driver message in the instrument
cluster display
Turn off ignition before leaving car
On th e ro ad 85
This message appears and a warning tone
sounds if you open the driver's door when the
ignition is sw itched on.
Pre ss brak e pedal t o sta rt engine
This message appears if yo u press the
I STAR T ENG IN E S TOP I button to start the en
gine and do not dep ress the br ake pedal. The
engine can only be s tarte d if the brake pedal
is depressed.
I!! I s key in th e vehi cle?
If the indicator light turns on and the mes
sage appears, the remote control key was re
moved from the vehicle whi le the engine was
run ning . If the ignition key is not in the veh i
cl e you will not be able to swi tch on the igni
tion or res tart the engine after i t has been
switched off. You will a lso not be able to lock
the ve hicle from the outsid e.
Shift to P, oth erwi se v ehicle can roll aw ay.
Do ors d o n ot lo ck if lever is not in P .
This dr iver message appears for safety rea
sons if the transmission has not bee n shifted
to the P position when you switc h the ign ition
off . Move the selec to r l ever to the P posi tion .
Otherwise the vehicle is not protected from
ro lling and cannot be locked.
fl Key is not r ecognized. Hold back of key
again st marked area . See ow ner' s m anu al.
If the indicato r light turns on and this mes
sage appea rs, there is a malfunct ion
~ page 86.
Turn off ign ition before lea ving ca r. Battery
is d is c harging
This message appears if the driver's door is
opened wh ile the ignition is switched on . Al
ways switch off the ign it ion if you a re leav ing
the ve hicle . See also
Q page 90 .
Shift to P and turn off ignition before lea v
ing car, otherwi se v ehicle can roll away
T his messag e app ears if the driver's door is
opened wh ile the ignition is switched on and
the selector lever is not in the P posit ion. Shift
the selecto r lever into the P pos ition and .,..
Page 88 of 314

86 On the road
switch off the ignition when you exit the vehi
cle. Otherwise the vehicle could ro ll. See a lso
c::> page90 .
Starting the engine if there is a
malfunction
It may not be possible to s tart the engine un
der certain circumstances , for example if the
battery in the vehicle key is drained , if inter
ference has affected the key or if there is a
system malfunction .
I
------ -~
Fig. 86 Center conso le /maste r key : start ing t he engi ne
if th ere is a mal funct io n
Requirement : The message K ey not recog
n ized. Hold back of key against mark ed area.
See own er' s manual.
must appear and the in
d icator light
II must switch on.
" Hold the master key vertically in the loca
t ion ind icated
f>l) c::> fig. 86.
" Press the brake peda l c::> .&. in Starting the
engine on page 84.
" Press the l ~s =T~ A~R =T~ E~N ~ c= r~ N ~E~ s=T~ O~ P~ I button . The
engine will s tart .
" Drive to your authorized Audi dealer imme
diately to have the malfunction corrected.
@ Tips
You can view the message again by press
ing the
I STAR T ENGINE STOP I button.
Electromechanical
parking brake
Operation
The electromechanical parking brake replaces
the hand brake.
F ig . 8 7 Center co nsole: Park ing b rake
" Pull on the switch(®) c::> fig . 87 ® to apply
the parking brake. The indicator light in the
sw itch ill uminates.
" Step on the brake pedal or the accelerator
pedal and p ress the switch
(®} at t he same
time to re lease the park ing brake . The ind i
cato r light in the swit ch goes out.
Your vehicle is equipped with an electrome
chanical parking brake . The parking b rake is
designed to p revent the veh icle from rolling
u nintentionally and replaces the hand b rake .
In add ition to the normal functions of a tradi
t ional hand brake, the electromechanical
parking brake provides vario us conven ience
and safe ty f unct io ns.
When starting from rest
- The integral starting ass ist helps you when
driving by automat ically releasi ng the park
ing brake
c::> page 87, Starting from rest .
-When start ing on inclines, the start ing as
sist prevents the vehicle from uni ntentional
ly ro lling back . The braking force of the
pa rk ing brake is not released unt il suff ic ient
driving force has been bui lt up at the
wheels . ..,.
Page 89 of 314

Emergency brake function
An emergency brake ensures that the vehicle
can be slowed down even if the
normal brakes
fail
c::> page 88, Emergency broking.
Ind icator light s
-If the par king b rake is closed w ith the igni
t ion
s wit ched on the indicator lights come
on - (USA models)/ . (Canada models)
in the instrument cluster and in the switch.
- If the par king brake is closed w ith the igni
tion
s witc hed off the indicator lights come
on - (USA models)/ . (Canada models)
in the instr ument cluster and in the switch
for about 20 seconds.
A WARNING
Do not press the accelerator peda l inadver
tently if the vehicle is stat ionary but the
eng ine is running and a gear is selected.
Otherw ise the vehicle will start to move
immediately and cou ld result in a crash.
(D Note
If the symbol . in the display or the ind i
cato r light
1111 (USA models) . (Cana
da models) in the instrument cluster flash
es, the re is a malfunction in the bra ke sys
tem. Please refer to t he detai led descr ip
t ion of the indicator lights¢
page 14.
- If the indicato r light - (USA mod-
els) . (Canada mode ls) or
IIJ t ur ns
on, there may be a malfunction in the
parking brake
r=> poge 15.
@ Tips
-You can apply the pa rking brake at any
time -even w ith the ignition swi tched
off. The ignition must be on and the
brake pedal must be pressed in order to
release the parking brake.
- Occasiona l noises when the parking
brake is applied and re leased are norma l
and are not a ca use for concern.
- When the vehicle is parked, the parking
brake goes through a se lf-test cycle at
On th e ro ad 87
regular inte rva ls. Any associated noises
are normal.
· Parking
.. Press the brake pedal to stop the veh icle.
.. Pull the switch(®) to set the parking brake.
.. Select the P selector lever posit io n
c::> poge 116.
.. Tu rn the engine off c::> .&_ .
.,. When on inclines o r declines, tur n the steer
ing wheel so that your veh icle w ill ro ll into
t he c urb if it beg ins to move.
A WARNING
-==
- When you leave your vehicle -even if on-
ly briefly -always take the ignition key
with you. This applies particularly when
children remain in the vehicle. Otherwise
the children cou ld start the engine, re
lease the parking brake or operate elec
trical equipment (e.g. powe r wi ndows).
T here is the r is k of an accident.
- When the veh icle is locked, no one -par
ticularly not children should rema in in
the vehicle. Locked doors ma ke i t mo re
diff icult for emergency wo rke rs to ge t in
to the veh icle -putt ing lives at risk.
Starting from rest
The starting assist function ensures that the
parking broke is released automatically upon starting.
Stopping and applying park ing brake
.. Pull the sw itch(®) to apply the parking
brake .
Starting and automatic ally releasing the
parking brake
.. When you sta rt to dr ive as usual, the park
ing brake is automatically released and your
veh icle begi ns to move.
When stopping at a traffic signal or stopping in city traff ic, the parking brake can be ap-
plied . The vehicle does not have to be he ld
IJ>-
Page 101 of 314
Audi adaptive cruise control and braking guard 99
then maintains the stored distance. If the ve
hicle ahead accelerates, adaptive cr uise con
trol will also accelerate up to the stored
speed.
The higher the speed, the greater the distance
in yards (meters) ¢.&. . The
Distance 3 setting
is recommended .
The distances prov ided are spec ified values.
Depending on the driving situation and the
how the vehicle ahead is driving, the actual
d istance may be more or less than these tar
get distances.
The various symbols for the time increments
appear briefly in the information line @
¢ page 96, fig. 98 when you change the set
tings.
~ -~ --- Distance 1: This setting corre
sponds to a distance of 92 feet/28 meters
when traveling at 62 mph (100 km/h), or a
time interva l of
l second.
~ -- ~-- Distance 2: This setting corre
sponds to a distance of 118 feet/36 meters
when traveling at 62 mph (100 km/h), or a
time interva l of 1.3 seconds .
~--- ~-Distance 3: This setting corre
sponds to a distance of 164 feet/SO meters
when traveling at 62 mph (100 km/h), or a
time interva l of 1.8 seconds .
~---- ~ Distance 4: This setting corre
sponds to a distance of 210 feet/64 meters
when traveling at 62 mph (100 km/h), or a
time interva l of 2.3 seconds .
A WARNING
Following other vehicles too closely in
creases the risk of collisions and serious
personal injury.
- Setting short distances to the traffic
ahead reduces the time and distance
available to br ing your vehicle to a safe
stop and makes it even more necessary
to pay close attention to traffic.
- Always obey applicable traffic laws, use
good judgment, and select a safe follow- ing distance
for the traffic, road and
weather conditions.
@ Tips
- Distance 3 is set automatically each time
you switch the ignition on.
- Your standard settings are automatically
stored and assigned to the remote con
tro l key being used.
Selecting the driving mode
Applies to vehicles: with Aud i adapt ive c ruise contro l
.,. Select the desired driving mode in drive se
lect¢
page 110.
(0 Tips
Your settings are automat ica lly stored and
assigned to the remote control key being
used.
Prompt for driver intervention
Applies to vehicles: with Audi adapt ive cru ise contro l
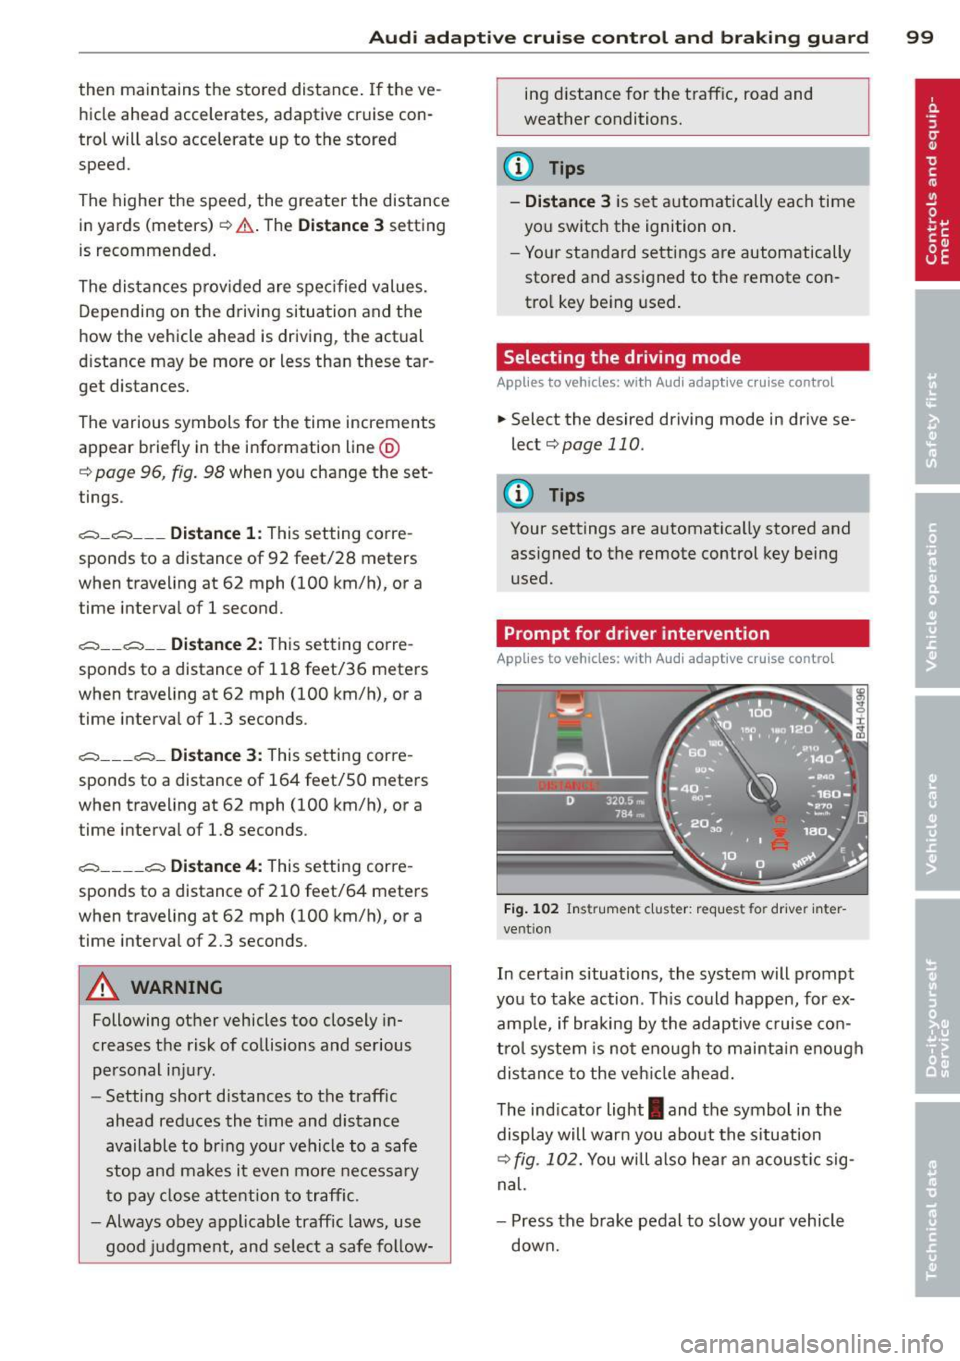
Fig. 102 Instrument cluster: request fo r drive r in ter
vent ion
In certa in situations, the system will prompt
you to take action . Th is could happen, for ex
amp le, if braking by the adaptive cruise con
trol system is not enough to maintain enough
distance to the vehicle ahead.
The indicator light
I and the symbol in the
display will warn you about the situation
¢ fig. 102. You will also hea r an acoustic sig
nal.
- Press the brake pedal to slow your vehicle
down.