steering AUDI A8 2014 Owner's Manual
[x] Cancel search | Manufacturer: AUDI, Model Year: 2014, Model line: A8, Model: AUDI A8 2014Pages: 314, PDF Size: 78.47 MB
Page 92 of 314
90 On the road
Engine will not swit ch off
Before each stop phase, the system checks i f
certain cond itions have been met. For exam
p le, the engine will
n ot be switched off in the
following situations:
- T he eng ine has not reached the minimum
required temperature for Start -Stop-mode .
- The inter io r temperature selec ted by the A/C
system has not been reached .
- T he outs ide temperature is extremely h igh/
low .
- T he w indshield is being defrosted
¢page 82.
-The parking system* is switched on.
- The battery charge level is too low .
- The steering wheel is sharply turned or
there is a steering movement.
- After engaging the reverse gear.
- On sharp inclines.
The
tiij indica to r light appears in the informa
tion line in the ins trument cluster disp lay
<=:>fig . 89 .
Engine automatically restarts
The stop phase is interrupted in the following
situations, for examp le. The engine restar ts
witho ut any act ion by the driver.
- T he interio r temperature varies from the
temperature selected in the A/C system .
- The w indshield is being defrosted
<=:> page 82.
- The brake pedal is pressed several times i n a
row .
- The battery charge level becomes too low .
- High power consumption.
Sw itching the ignition automatically
To prevent the battery from d raining, the igni
tion will switc h off
automat ically when a ll of
the following conditions have been met:
- T he veh icle has already been driven.
- T he eng ine has been tu rned off by the Star t-
Stop-System*.
- The driver's door is opened.
- The driver's seat belt is removed.
- The brake pedal is not pressed dow n. -
The vehicle is stationa ry .
In this case, the activated low beam will be re
placed by the side ma rke r lights. The s ide
marker lights w ill switch off after approxi
mately 30 minutes or when you lock the vehi
cle .
If the Star t-Stop System h as n ot turned off
the engine or if you have sw itched the Start
Stop system off man ua lly, the ignition will
not
be automatica lly switched off and the engine
will continue to ru n ¢ ,& .
A WARNING
=
Never allow the engine to run in confined
spaces -danger of asphyxiation.
(D Tips
If you shift into the D, Nor S posit ions af
ter sh ifting into reverse, the vehicle must
be driven faster tha n 6 mph (10 km/h) in
order for the engine to sw itch off again.
Switching the Start-Stop -System on/off
manually
App lies to vehicles: wi th Start-Stop -System
If you do not wish to use the system, you con
switch it off manually.
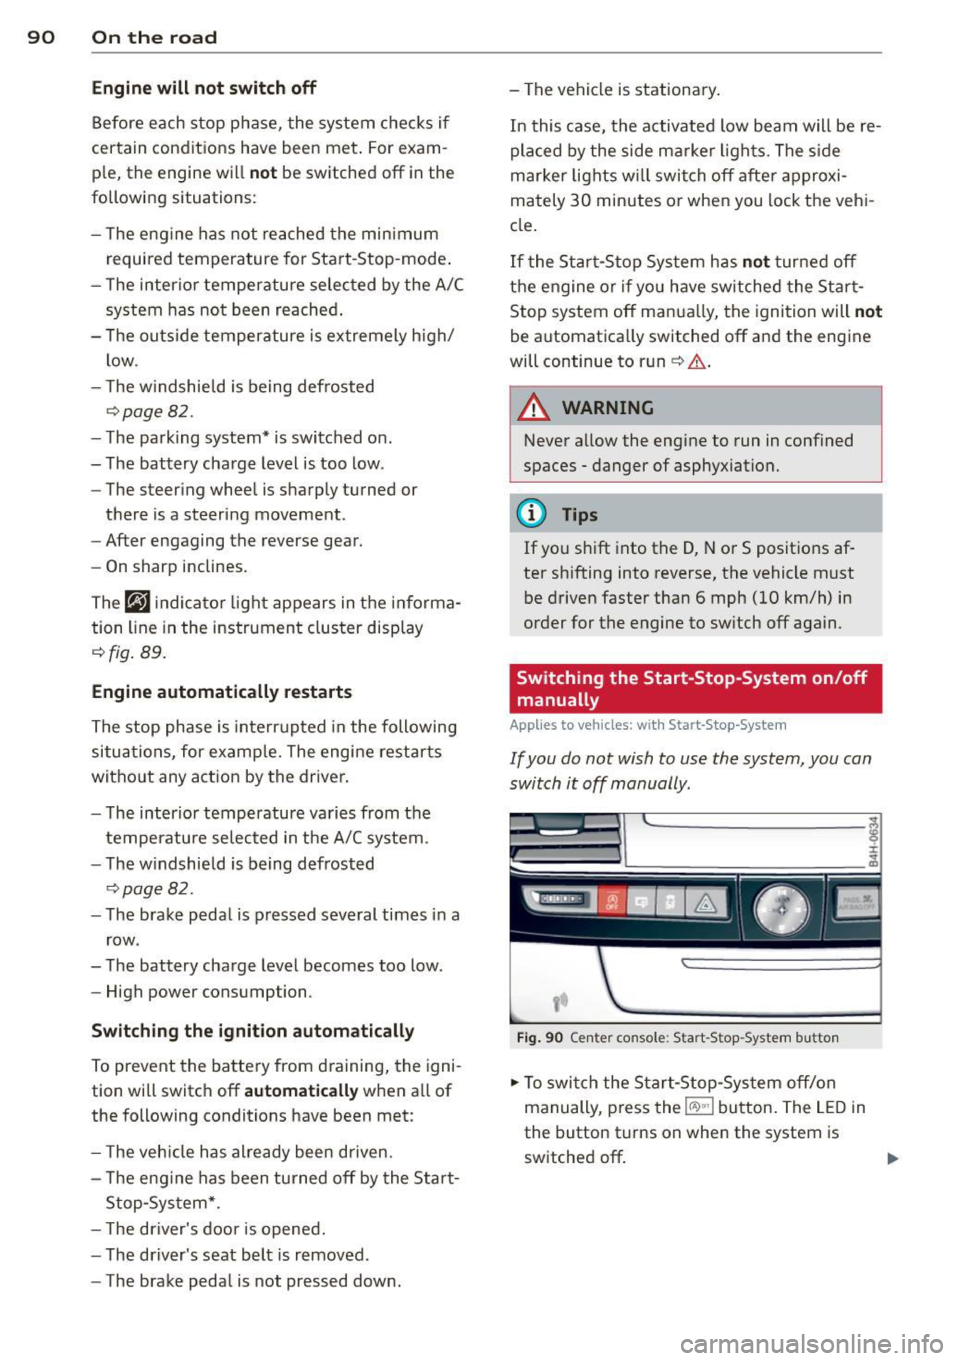
F ig . 90 Ce nter console: Start-Stop -System button
.,. To swi tch the Start-Stop-Sys tem off/on
manually, p ress the
l(A) ~·I button. The L ED in
the button turns on when the system is
switched off .
Page 99 of 314
Audi adaptive cruise control and braking guard 97
.. You must also press the b rake pedal when
the vehicle is stopped.
Switching adaptive cruise control off
.. Push the lever away from you into position
@ until it clicks into place. The message
ACC off appears.
@ Indicator lights
fl -Adaptive cruise control is switched on. No
vehicles are detected up ahead . The stored
speed is ma intained.
I -A moving vehicle is detected up ahead .
The adaptive cruise control system regulates
the speed and distance to the moving vehicle
ahead and acce lerates/brakes automatica lly.
f¥i -Adaptive cruise control is switched on. A
mov ing vehicle up ahead was detected . Your
veh icle remains stopped .
I· When automatic braking is not able to
keep enough distance to a previously detected
mov ing vehicle up ahead, you must take con
trol and brake
c:::> page 99, Prompt for driver
intervention.
© Display
If adaptive cruise control is not shown in the
d isplay, you can call it up with the multifunc
tion steering wheel buttons¢
page 24 .
Based on the symbols in the display, you can
determine if the system is maintaining a dis
tance to the vehicle ahead and what that dis
tance is.
No vehicle -No vehicle ahead was detected.
White vehicle -A vehicle ahead was detected.
Red vehicle -Prompt for the driver to take ac
tion
c:::> page 99.
Both
arrows o n the scale © indicate the dis
tance to the vehicle ahead . No arrow appears
when the vehicle is on an open road and there
is no object ahead.
If an object is detected
ahead, the arrow moves on the scale.
The green zone on the scale shows the stored
distance. For information on changing the stored distance, refer to
c:::> page 98
. If the
distance selected is too close or may soon be
come too close, the arrows move into the red
z one on the sca le .
A WARNING
Improper use of the adaptive cruise con
trol can cause collisions, other accidents
and serious personal injuries.
- Pressing the
!SET ! button when driv ing at
speeds below 20 mph (30 km/h), w ill au
tomatically accelerate the vehicle to 20
mph (30 km/h), which is the minimum
speed that can be set.
@ Tips
-If you switch the ignit ion or the adaptive
cruise control off, the set speed is erased
from the system memory.
- You cannot switch the Electronic Stabili
zation Control (ESC) to the SPORT mode
when adaptive cruise control is switched
on.
Changing the speed
App lies to veh icles: w it h A ud i ada ptive c ruise co ntrol
0
f
• 0
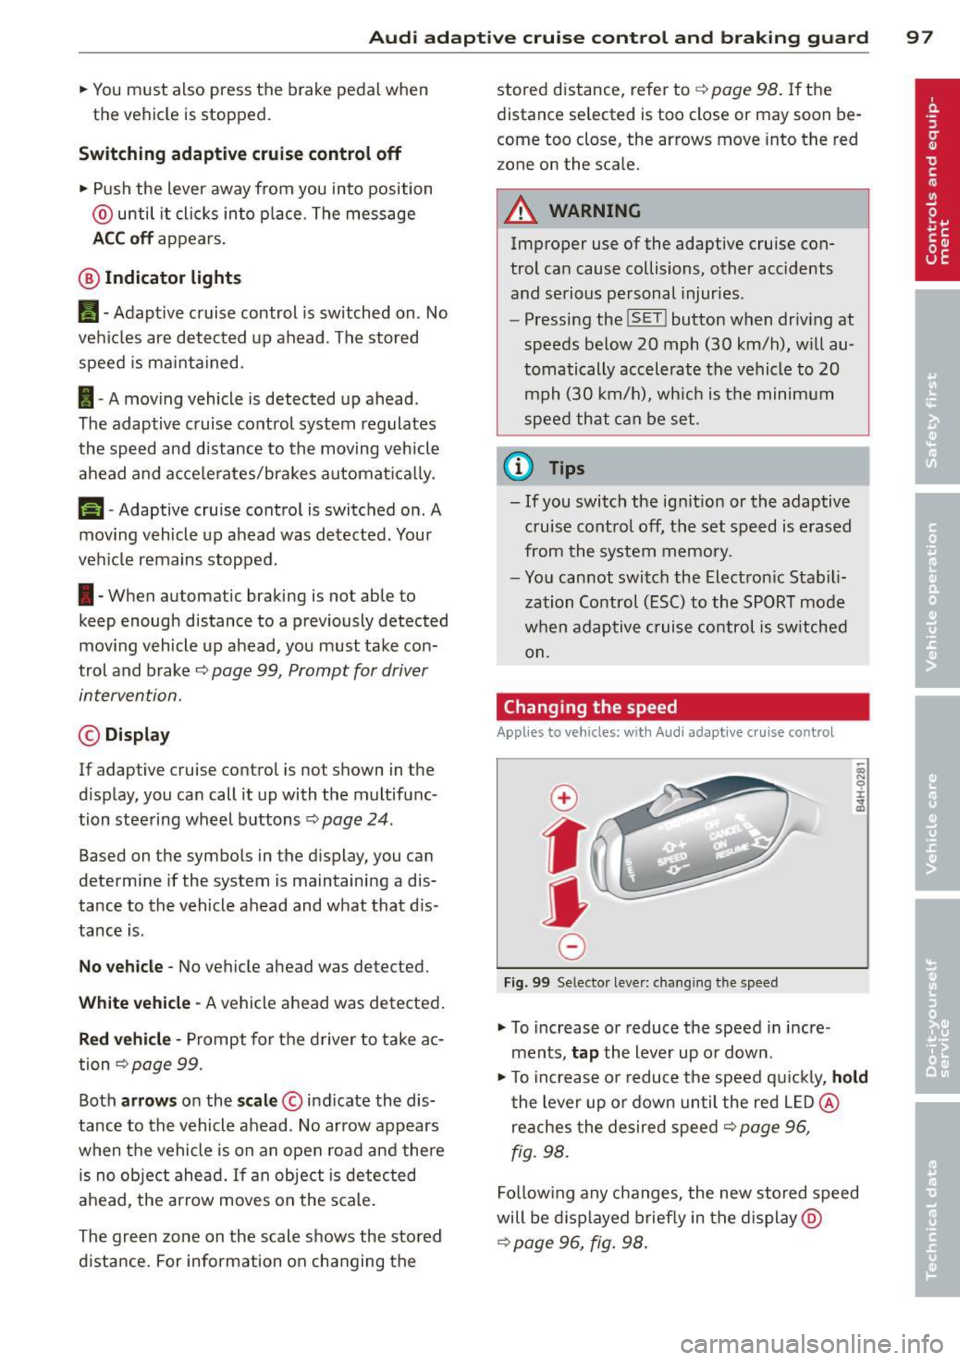
Fig. 99 Selector lever: changing the speed
.. To increase or reduce the speed in incre
ments,
tap the lever up or down.
.,. To increase or reduce the speed q uickly,
hold
the lever up or down until the red LED @
reaches the desired speed
c:::> page 96,
fig. 98.
Follow ing any changes, the new stored speed
will be displayed briefly in the display @
c:::> page 96, fig. 98.
Page 106 of 314
104 Audi la ne ass is t
- The curve is too sharp.
(1_) Tips
Make sure the camera's fie ld of view
c::> fig. 105 is not obstr ucted by st ickers,
deposits or anything else. For in formation
on cleaning, refer to
c::;, page 216.
Lane assist display in the instrument
cluster
Ap plies to vehicles: with la ne ass ist
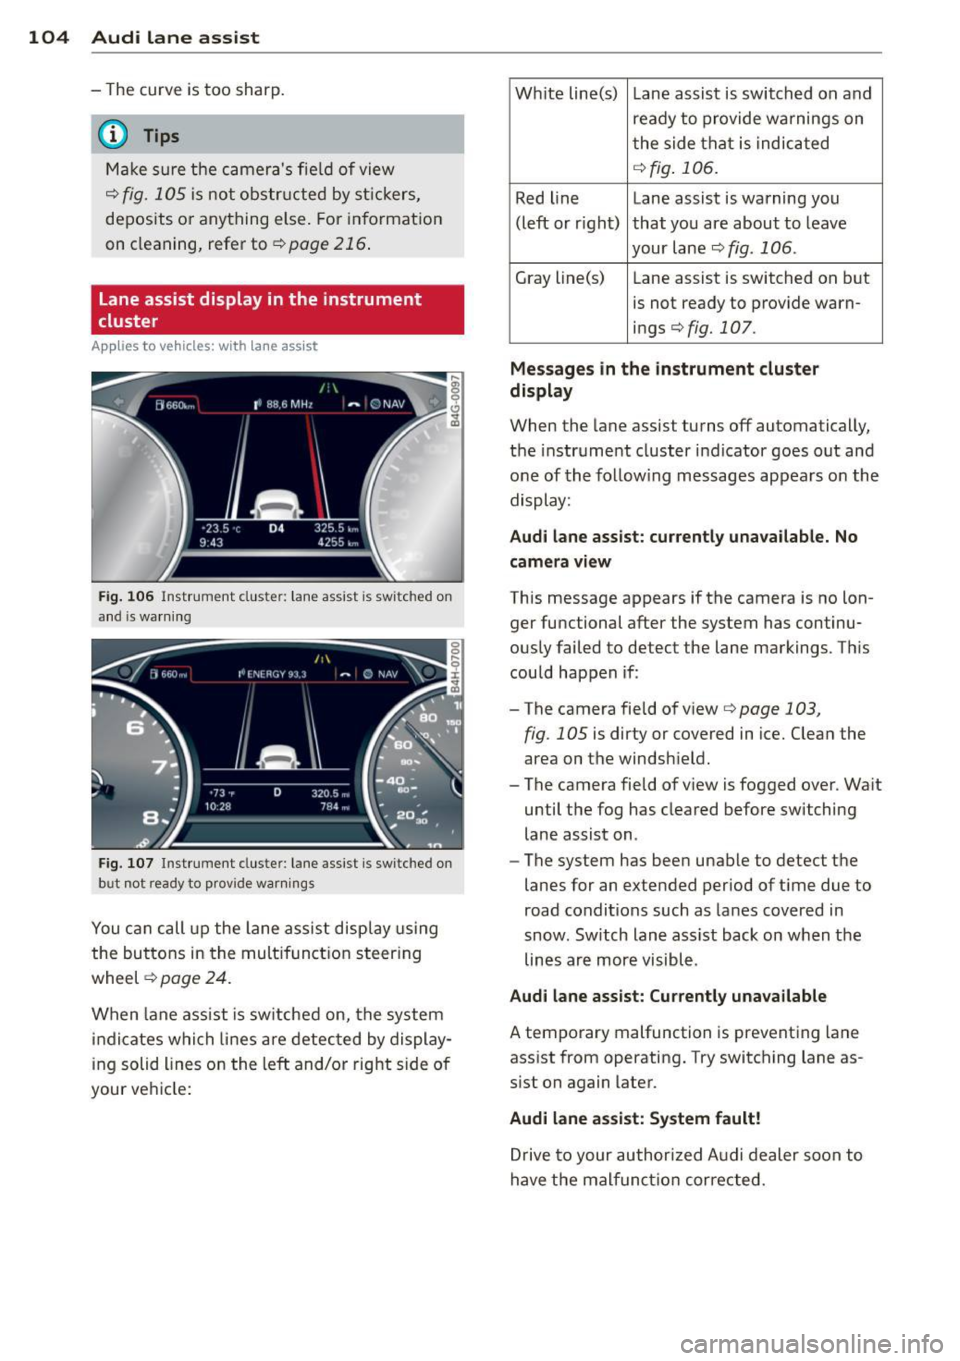
Fig . 106 Instrument clus te r: lane assist is switc hed on
a nd is wa rning
Fig. 107 Instrument cluste r: lane assist is switched on
but not ready to prov ide warnings
You can call up the lane assist display using
the buttons in the mult ifunction steering
wheel
c::> page 24.
When lane assist is sw itched on, the system
i ndicates which lines are detected by display
ing solid lines on the left and/or right side of
your ve hicle: Wh
ite line(s) Lane assist is switched on and
ready to provide warnings on
the side that is indicated
<=:> fig . 106.
Red line Lane assist is warning you
(left or rig ht) that you are about to leave
your lane
c::;, fig. 106 .
Gray line(s)
Lane assist is switched on but
is not ready to provide warn-
ings
c::;, fig. 107.
Mess ages i n the in strum ent clu ster
di spl ay
When the lane assist turns off automatically,
the instrument cluster indicator goes out and
one of the follow ing messages appears on the
display:
Aud i lane a ssis t: cu rrently un availa ble . No
cam era v iew
This message appears if the camera is no lon
ger functional after the system has continu
ously failed to detect the lane markings. This
could happen if :
-The camera field of view
c::;, page 103,
fig . 105 is dirty or covered in ice. Clean the
area on the windshield.
- The camera field of view is fogged over. Wa it
until the fog has cleared before switching
lane assist on.
- The system has been unable to detect the
lanes for an extended period of ti me due to
road conditions such as lanes covered in
snow. Sw itch lane assist back on when the
lines are more visible.
Audi lane assis t: Cu rren tly una vailabl e
A temporary malfunction is preventing lane
assist from operating. Try switching lane as
sist on again later.
Audi lane assis t: Sys te m f ault !
Drive to your author ized Audi dealer soon to
have the malfunct ion corrected.
Page 107 of 314

Setting the warning point and steering
wheel vibration
Appl ies to vehicles: with lane assist
You can adjust individual settings in the MMI.
.. Select : I CARI funct ion button > Car systems
control button > Driver assist> Audi lane
assist .
Setting the warning point Early :
With this setting, a warning is provided
before a wheel touches the detected lane
boundary line. The warning depends on the
angle in which the ve hicle is approaching the
line. The distance at which the warning is giv
e n increases as the angle becomes sharper. If
you dr ive toward a boundary line at a very
sha rp angle, the warning will come just before
a w heel touches the line.
Medium : With this sett ing, the warning point
i s adapted to the cou rse of the road, the lane
width and the speed . You wi ll st ill be warned
if you cross slightly over a dotted line when
driving on curves.
Late: This setting has the same properties as
medium. You will only be warned once a
wheel crosses a detected line.
Setting the steering wheel vibration
The steering wheel v ibration can be set to
Low , Medium or Strong . Selecting each of the
set tings will cause the steering wheel to vi
brate so you can ch eck the strength of the vi
bration in that setting.
@ Tips
Your settings are automatically stored and
assigned to the remote contro l key be ing
used.
Audi lane assist 105
Page 112 of 314
110 Audi drive select
Audi drive select
Driving settings
Introduction
Aud i d rive select mak es it possible to expe ri
ence diffe ren t types of vehi cle se ttin gs i n o ne
ve hicl e. The dr ive r can se lect th ree
Comfort ,
Auto
and Dynamic modes in the M MI to
switch between a sporty and a comforta ble
driving mo de.
You c an a lso a djust the setti ng according to
your p re ferences in the
individual mo de. For
examp le, you ca n combine settings such as a
sporty en gine t uning with comfortab le steer
ing.
A WARNING
Improper use of the A udi drive select can
cause collisions, ot her acc idents and se ri
ous pe rsonal injury.
Description
The vehicle setup in each mode depends on
the veh icl e's featu res. The engine, t ransm is
sion, stee ring, reve rsible sa fe ty belt tension
e rs a nd adap tive air su spension are alw ays in
volved.
Engine and transmission
Depending on the mode, the e ng ine and the
tra nsmission respond quic ker or i n a more bal
an ced manne r to acce le rator pedal move
men ts. In the sporty dyn ami c mode, the
tra nsmission sh ifts at highe r RP Ms.
Air suspension
The adaptive air suspens ion/adaptive air sus
pe nsion spor t*
(Air suspension in the MM I) is
an elec tronic ally con trolled air suspensio n and
da mpi ng sys tem. They are adjus ted depend
ing on the se lected driving mode, the drive r's
steering, braking and acceleration input and
the road s urface, ve hicle speed and load. A
sporty setting is generally used i n ve hicles
with adaptive air suspension sport*. T
he vehicle clea rance varies depending on the
se lected mo de an d the speed .
T he highw ay setting is activate d automatically
whe n you dr ive above 7 5 mph (120 km/ h) for
more than
3 0 seconds in the auto or dynamic
mode. The gro und clea rance is increased a uto
matically if the speed drops below
44 mph
(70 km/h) for more than 120 seconds.
Steering
T he s teering adap ts i n t erms of s teer ing effor t
and stee ring ratios . Indirect stee ring that
moves easily, like the steer ing in comfo rt
mode, is best suited to long drives on a high
way. In contrast, dynamic mode provides
sporty, direct steer ing .
The following app lies to vehi cles with dynamic
stee ring* : the steer ing rat io changes based on
vehicle speed in order to ma inta in optimum
steering effort for the drive r at all times. This
sets the stee ring to be less sens itive at h igher
s p eeds in order to provide improved vehicl e
control. At r educed speeds, howeve r, steer ing
is mo re dir ect i n order to keep the stee ring ef
f o rt as minima l as po ssible when the drive r is
mane uveri ng the veh icle. At low and average
speeds, dynamic steering ad dit iona lly pro
vides more responsive steering pe rformance .
Sport differential*
As a compone nt o f the all whee l dr ive system
(quat tro)
r:!> page 204, the Spor t differen tia l*
dis tributes t he d riving power to the rear ax le
depen ding on the sit uat io n. The distrib ution
of power var ies depending on the se lected
mode, from ba lanced (comfort) to agile (dy
nam ic). The goal is a high level of agility and
ability to accelerate on curves . The vehicle is
very res pons ive to stee ring .
Curve light*
The curve light adapts to driving on curves.
The pivoting act ion and the lighting are also
adapted to the mode.
Adaptive cruise control*
T he be hav ior when ac celera ting can be adjust
ed from comforta ble to sporty, de pending on ..,.
Page 113 of 314
the drive select mode. Adaptive cruise control
also responds to the driving behavior of the
veh icle ahead in a more conservative or sporty
manner.
Engine sound*
The sound of the engine is adapted to the se
l ected mode and ranges from subtle to sporty.
(D Note
- Make sure there is enough clearance
above and below the vehicle when park
i ng. The height of the vehicle can change
once it is parked due to temperature
fluctuations, changes to the load cond i
tions and changes to the dr iv ing modes,
which can affect clearance.
- When transporting the veh icle on a car
carrier, tra in, ship or by other means, on
ly tie the veh icle down at the running
surface of the tires, which is the outer
circumference. Secur ing the vehicle at
the axle components, s uspension struts
or towing eyes is not permitted because
the pressure in the air suspension struts
can change during transport . The vehicle
may not be sec ured s ufficient ly if this
happens.
- If you are going to tow a trailer, you
must activate the trailer operation mode
C? poge 212.
@ Tips
- In some models, the maximum vehicle
speed can only be reached in the
auto
and dynamic modes.
- Selecting the
dynamic mode results in
sporty shifting characteristics . The S
gear position engages automatically.
- In vehicles that have dynamic steering*,
operating noise is heard when starting or
stopping the engine. Th is does not indi
cate a problem.
Audi drive select 111
-In vehicles w ith sport differential*, the
dynamic mode is deactivated when tow
ing a trailer.
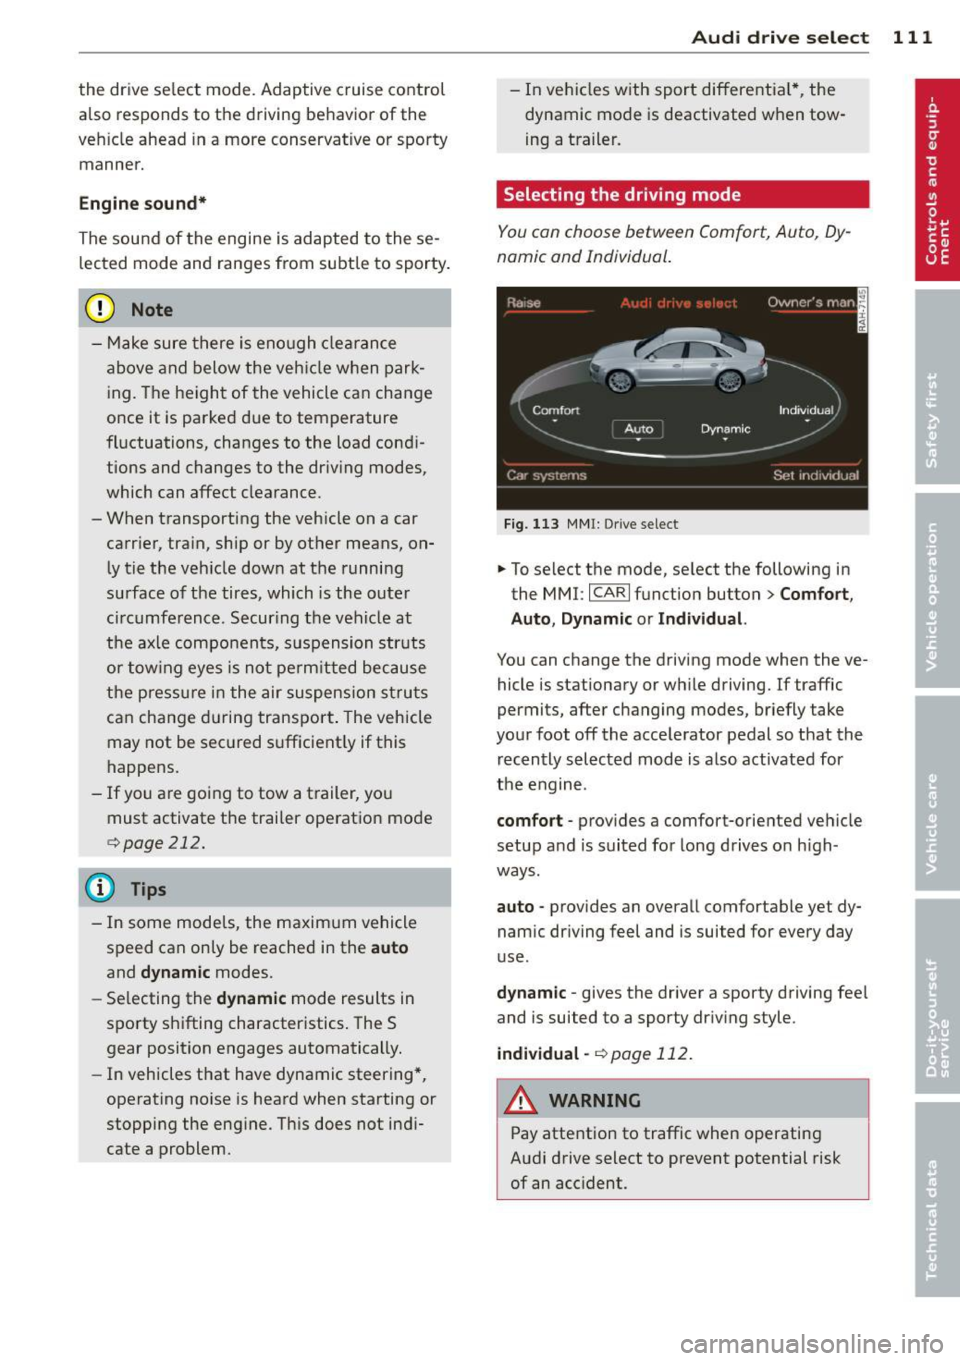
Selecting the driving mode
You con choose between Comfort, Auto, Dy
namic and Individual.
Fig . 1 13 MMI: Drive select
.,. To select the mode, se lect the following in
the MMI:
I CARI f unction button > Comfort,
Auto , Dynamic
or Individual.
You can change the driving mode when the ve
hicle is stationary or wh ile driving. If traffic
permits, after changing modes, briefly take
your foot off the accelerator pedal so that the
recently selected mode is also activated for
the engine.
comfort -provides a comfort-oriented ve hicle
setup and is suited for long drives on h igh
ways .
auto -provides an overall comfortable yet dy
namic dr iving feel and is suited for every day
use.
dynamic -gives the driver a sporty driving fee l
and is suited to a sporty driv ing style.
individual-¢page 112.
A WARNING
Pay attention to traffic when operating
Audi drive select to prevent potential risk
of an accident.
Page 114 of 314
112 Audi drive select
Adjusting the Individual mode
You can adjust the vehicle settings to your personal preferences .
• Se lect : I CAR ! function button > Set individu
al
control button. You can now adjust the in
dividual systems.
The
individual driving mode will automatical
ly be activated when you have finished config
uring the settings .
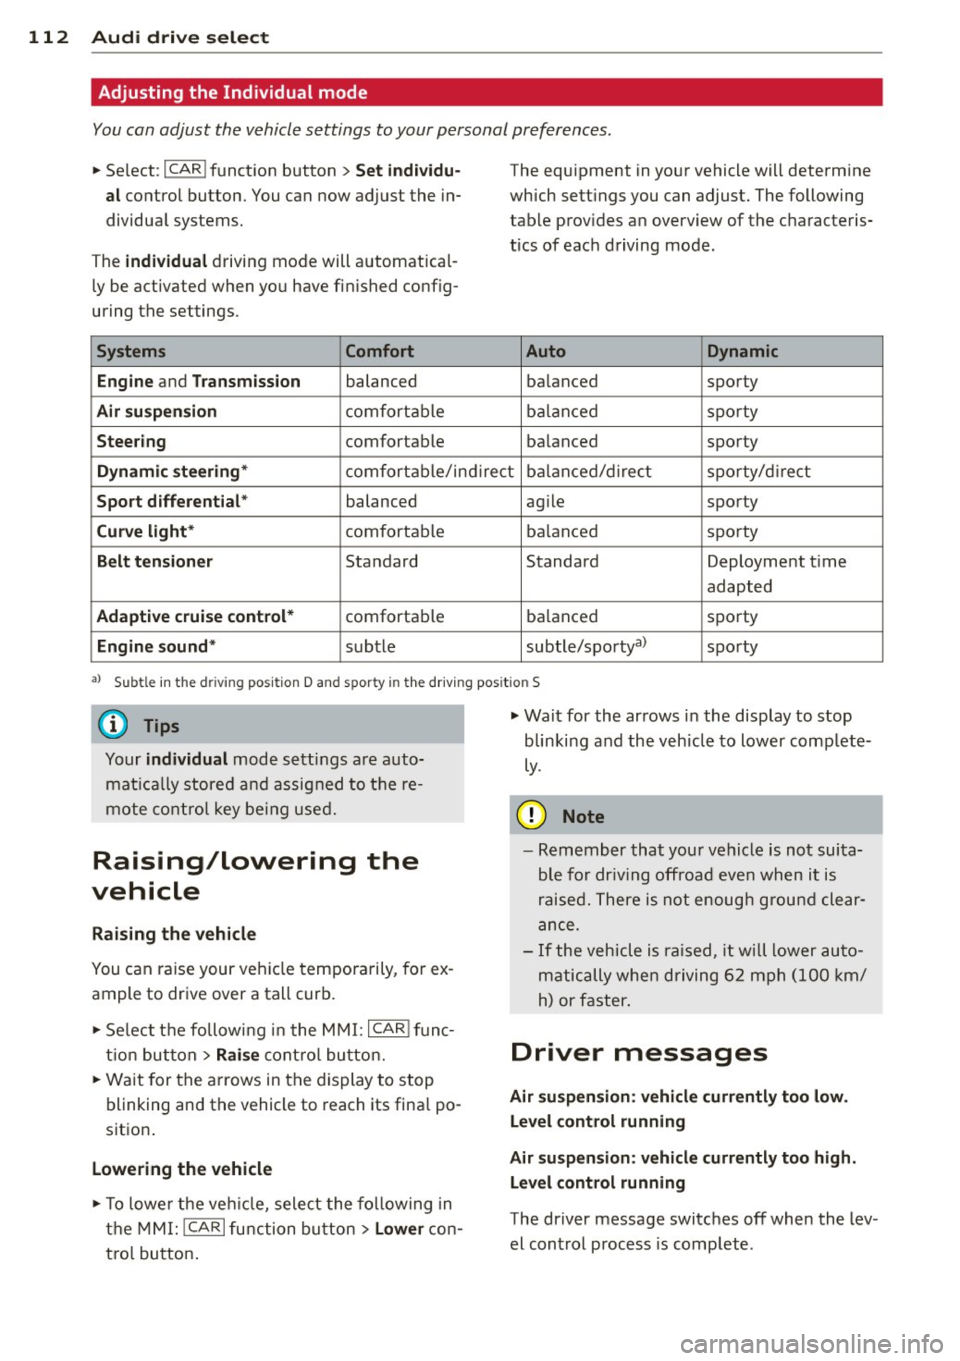
Systems Comfort
Engine
and Transmission balanced
Air suspension comfortable
Steering comfortable The equipment
in your vehicle will determine
which settings you can adjust. The following
table provides an overview of the characteris
tics of each driving mode.
Auto Dynamic
balanced sporty
balanced sporty
balanced sporty
Dynamic steering* comfortable/indirect balanced/direct sporty/direct
Sport differential * balanced agile sporty
Curve light* comfortable balanced sporty
Belt
tensioner Standard Standard Deployment time
adapted
Adaptive cruise control* comfortable
balanced sporty
Engine
sound* subtle subtle/sportya> sporty
a) Subt le in th e d riv ing posi tion D an d sp or ty in the driving pos itio n S
(D Tips
Your individual mode settings are auto
matically stored and assigned to the re
mote control key being used.
Raising/lowering the
vehicle
Raising the vehicle
You can raise your vehicle temporarily, for ex
ample to drive over a tall curb .
• Se lect the following in the MMI:
I CAR I func
tion button
> Raise control button.
• Wait for the arrows in the display to stop
blinking and the vehicle to reach its final po
sition .
Lowering the vehicle
• To lower the veh icle, select the following in
the MMI:
ICARI function button > Lower con
tro l button. •
Wait for the arrows in the display to stop
blinking and the vehicle to lower comp lete
ly.
0 Note
- Remember that your vehicle is not suita
ble for driv in g offroad even when it is
raised. There is not enough ground clear
ance.
- If the vehicle is raised, it will lower auto
matically when driving 62 mph (100 km/
h) or faster .
Driver messages
Air suspension: vehicle currently too low.
Level control running
Air suspension: vehicle currently too high.
Level control running
The driver message switches off when the lev
el control process is complete .
Page 115 of 314

Night vision assistant
Description
Appl ies to vehicles: with night v isio n ass istant
Fig. 114 Display: night v ision assistan t
"Night vis ion assistant with pedestrian detec
tion" uses an infrared camera to mon itor the
area in front of your vehicle at night . Within
the limits of the system, it can display objects
up to about 1000 feet (300 mete rs) away. The
h eat image of a pedestrian detected by the
camera is shown in the instrument cluster dis
p lay
¢ fig. 114. Warm areas appear lighter
and cold areas appear darker.
Pedestrian detection
Applies to vehicles: with night v isio n ass istant
Fig. 115 D isplay: yellow pedestrian marking
Fig. 116 Display: symbol when in frared image is not
v is ibl e
Night vision assistant 113
Night vision assistant can detect pedestrians
that are between about 50 and 300 feet (15
and 90 meters) in front of the vehicle, under
ideal conditions . If a pedestrian is detected
when it is dark outside and the vehicle head
light s are switched on, the pedestrian is high
lighted in yellow
~ fig. 115, ¢page 114,
General information .
If another display such
as navigat ion replaces the image from the
night vis ion assistant , the symbo l~,, appears
in a tab
¢fig. 116.
(D Tips
If the night v is ion assistant image does
not appear when the system is switched
on, you can access it with the buttons on
the mu ltifunction steering wheel
¢ page 25.
Pedestrian warning
Applies to vehicles: wit h night vision assistan t
Fig.117 D isp lay: pedestr ian wa rning
Fig. 118 Disp lay : pedestrian warnin g wit h anot her dis
play
If a pedestr ian is detected in an area in front
of the vehicle that the system considers criti
cal, the pedestrian is highlighted in red
¢fig . 117 and a warning tone sounds. This
area is based on the vehicle speed and
Page 116 of 314

114 Night visi on assis tant
steering angle. The pedestrian warning
prompts you to pay even closer attention to
the area in front of the vehicle and to watch
out for pedestrians.
I f another display such as the tr ip computer
replaces the image from the night vision as
sistant , the ind icator light turns red when
there is a pedestrian warning .
¢fig. 118 .
@ Tips
The pedestrian marking and warning tone
can be adjusted in the MMI r::!)poge
115.
General information
Applies to vehicles: with night vision assistant
Fig. 119 Front of the vehi cle: n ig ht v ision ass istant
camera
The following s ituations may affect the func
tion of the night vision assistant system:
- poor vis ibility such as snow, ra in , fog or
heavy road sp ray
- dirty lens on the night vision ass istant cam -
era
M ake sure the night v ision assistant camera
¢ fig. 119 is not cove red by stickers, deposits
or any other obstruc tions because that can
p revent the camera from working p roperly.
F or information on cleaning the lens, refer to
r::!) page
216.
Pedestrian de tect ion depends on the differ
ence in temperat ure between the person and
the background. Pedestrians may not be de
tected if the temperature difference is too
smal l. The pedestrian highlighting feature is
deactivated at temperatures above 77 °F (25
0 () and when it is light outside.
A WARNING
--
Night vision ass istant has l imits and can
not always detect pedestrians . Always pay
close attention to traffic and the area
a round your vehicle even when night vision
assis tant is sw itched on.
- Night vision assistant can only warn
about people located within the v isual
range of the infrared camera. The vis ual
ra nge corresponds to the image in the in
strument cluster display.
- Night vision assistant may not detec t
peop le and highlight them if
- they are not in an upright posit ion, for
example if they are sitt ing, crouching
o r lying down and/or
- if the outline in the disp lay is incom
plete or interrupted, for example be
cause the perso n is part ial ly hidden by
a parked vehicle.
@ Tips
- Pedestrian detection and the pedestrian
warm ing are limited to objects that are
detected as pedest rians. The system
does not detect an imals. Even though
the shape and warmth radiated by each objec t detected is eval uated, the system
does have limitat io ns and it can g ive in
correct warnings .
- For technical reasons, the image pauses
in split second in tervals.
Switching on and off
Applies to vehicles: with night vision assistant
Fig. 120 Area aro und the light switc h: ni ght v is ion as -
s ista nt button
Ill>
Page 126 of 314
124 Parking systems
If the distance to an obstacle remains con
stant, the volume of the distance warning
gradually drops after about four seconds (this
does not apply in the continuous tone range).
Rear view camera
The rear view camera is located above the rear
license plate bracket. Make sure that the lens
for the parking system¢
fig. 131 is not cov
ered by deposits or any other obstructions be
cause this can affect the function of the park
ing system. For information on cleaning, refer
to
¢ page 216.
The rear view camera coverage area includes
(D ¢ fig. 130. Only this area is shown in the
Infotainment display. Objects that are outside
of this area@are not displayed.
The accuracy of the orientation lines and the blue surfaces is reduced if the adaptive air
suspension" is faulty, if the vehicle is lifted or
if the
dynamic mode is activated¢ page 110.
A WARNING
-Always read and follow the applicable
warnings¢ .&.
in General information on
page 122.
- If the position and the installation angle
of the rear view camera was changed, for
example, after a collision, do not contin
ue to use the system for safety reasons.
Have it checked by your authorized Audi
dealership or authorized repair facility.
- Only use the rear view camera to assist
you if it shows a good, clear picture. For
example, the image may be affected by
the sun shining into the lens, dirt on the
lens or if there is a system fault.
- Use the rear view camera only if the lug
gage compartment lid is completely
closed. Make sure any objects you may
have mounted on the luggage compart
ment lid do not block the rear view cam
era .
- The camera lens enlarges and distorts
the field of vision. The object appears both altered and inaccurate on the
screen. -
In certain situations, people or objects in
the display appear closer or further
away:
- objects that do not touch the ground,
such as the bumper of a parked vehicle,
a trailer hitch or the rear of a truck. Do
not use the help lines in this case.
- If driven from a level surface onto an
incline, or a downward slope.
- If driven toward protruding objects.
-If the vehicle is carrying too much load
in the rear.
{[) Note
-Always read and follow the applicable
warnings
c::> (D in General information on
page 122.
- The orange colored orientation lines in
the Infotainment display show the vehi
cle path depending on the steering
wheel angle. The front of the vehicle
front swings out more than the rear of
the vehicle. Maintain plenty of distance
so that your outside mirror or a corner of
your vehicle does not collide with any ob stacles.