air suspension AUDI A8 2018 Owners Manual
[x] Cancel search | Manufacturer: AUDI, Model Year: 2018, Model line: A8, Model: AUDI A8 2018Pages: 356, PDF Size: 54.71 MB
Page 24 of 356
Cockpit overview
A WARNING
Do not tow your veh icle when there is a mal
function in the electronic steering lock
-this
increases the risk of an accident.
@-Engine start system
-
• Engine start system fault. Please contact
dealer
Do not switch the ignit ion off because you may
not be able to switch it o n aga in .
Drive to an authorized Audi dea ler or authorized
Aud i Serv ice Facility immediately to have the
malfunct io n corrected.
ml Engine start system fault. Please contact
dealer
There is a malfunction in the engine starting sys
tem .
Drive to an authorized Aud i dea le r or authorized
Aud i Service Facility immediately to have the
malfunction corrected .
0 Air suspension
• Air suspension: System fault You can contin
ue driving slowly (max. speed 35 mph)
There is a malfunction that can result in restrict
ed driving stability .
Drive to an autho rized Aud i dea le r or authorized
Aud i Service Facility immediately at a maximum
speed of 35 mph (60 km/h) to have the ma lf unc
tion corrected.
• Air suspension: Service mode. Vehicle can
only be moved with restrictions
Carefully drive to an author ized Audi dealer or
author ized Audi Service Facility immed iate ly to
have the serv ice mode deactivated.
rl Air suspension : System fault
There is a system malfunction that can result in
restricted driving stability or reduced ground
clearance.
22
Drive to an authorized A udi dealer or authorized
Audi Service Facility immediate ly to have the
malfunction corrected.
rl Air suspension: Vehicle too low Ground
clearance reduced
The ground clearance is very low due to a system
malfunction . Wait u ntil the air su spension sys
tem has restored normal gro un d clearance. Oth
erwise, conditions s uch as an uneven road surface
can lead to ve hicle damage.
;;.I C; Electronic Stabilization Control (ESC)
If the bl indicator light blinks while driving, the
ESC or ASR (Anti-Slip Regulation) is act ively regu
lating.
If the
Jjj indicator light turns on, the system has
switched the ESC off. In this case, you can switch
the ignit ion off and then on to switch the ESC on
again. The indicator light turns off when the sys
tem is functioning fully .
If the
II indicator light turns on, the ESC was
switched off using the
Im button Q page 12 7.
Stabilization control (ESC/ ABS): Fault! See
owner's manual
If the bl ind icat or light and the ABS indicato r
li ght
fJ] (U SA mode ls)/ [iJ (Canada models)
turn on and this message appears, there is a mal
function in the ABS system or electronic differen
tia l lock. This also causes the ESC to malfunction .
The brakes still function with their normal power, but ABS is not active .
Drive to an authorized Audi dealer or authorized
Audi Service Facility immediately to have the malfunction corrected.
A WARNING
If the la (USA mode ls) . (Canada mod
els) brake system indicator light turns on to
gethe r with the ABS and ESC indicator lights,
the ABS and ESC r egulating function may
ha ve malfunctioned. Functions that stabilize
the vehicle are no longer available. This could
cause the vehicle to swerve, which increases
Page 93 of 356
u. co .... N
" N .... 0 0 :c '
When driv ing with a trailer, activate the trailer
mode of the air suspension. Switch the air sus
pension trailer mode on when you are towing a
trailer . This will limit the regulation by the air
suspension while driving. Select in the MMI:
ICARI function button> (Car)* systems control
button >
Vehicle settings > Air susp.: towing >
On.
Coolant temperature
The coolant temperature gauge ¢ page 9 must
be observed carefully . The coolant temperature
can increase if you dr ive on long inclines in a low
gear at h igh engine speeds . Reduce your speed
i mmed iately if the LEDs in the top part of the dis
p lay turn on.
For more information about ind icator lights, re
fer
to . ¢ page 20.
A WARNING
Anyone not properly restrained in a moving
veh icle is at a much greater risk in an acci
de nt. Never let anyone ride in you r car who is
not properly wearing the restraints p rovided
by Audi.
Trailer towing
information
Important to know
-
Your ve hicle handles different ly when towing a
tra ile r because of the additiona l we ight and dif
ferent weight distribution . Safety, performance
and economy wi ll greatly depend on how careful
l y you load your trailer and operate your rig.
Before you actually tow your trailer, practice
turning, stopping and backing up in an area away
from traffic . Keep practicing until you have be
come comp letely familiar with the way your vehi
cle-trailer combination behaves and responds.
Backing up is difficult and requires practice .
Backing up with a trailer generally requires steer
ing action opposite to that when backing up your
vehicle without a trailer.
Trailer towing
Maintain a greater distance between your vehicle
and the one in front of you . You will need more
room to stop . To compensate for the trailer, you
will need a larger than normal turning radius.
When passing, remember that you cannot accel
erate as fast as you normally wou ld because of
the added load. Make sure you have enough room
to pass. After passing, allow p lenty of room for
your trailer before changing lanes again.
Avoid jerky starts, sharp turns or rapid lane
c h anges.
(D Tips
-Do not tow a trailer during the break-in peri
od of your ve hicle.
-If you tow a trailer, your Audi may require
more frequent maintenance due to the ex
tra load
¢ page 336 .
Parking on a slope
Do not park on a slope with a trailer. If it cannot
be avoided, do so only after doing the following:
When parking:
.,. App ly the foot brake.
.,. Have someone place chocks under both the ve
hicle and the trailer wheels .
.,. With chocks in place, slowly release the brakes
until the wheel chocks absorb the load .
.,. Tur n the whee ls towards the curb .
.,. Apply the parking brake .
.,. Select the P selector lever posit ion.
When restarting after parking:
.. App ly the foot brake .
.. Start the engine .
.,. Select the D selector lever position.
.,. Release the parking brake and slowly pull out
and away from the wheel chocks.
.,. Stop and have someone retrieve the wheel
chocks .
(D Tips
If you move the selector lever of the automat
i c transmission to P befo re applying the park-
in g brake and before blocking the wheels, you
.,_
91
Page 114 of 356
Ass is tanc e system s
In the sporty dynamic mode, the transmission
shifts at higher speed ranges.
Air su spen sion
The adaptive air suspension/adaptive air suspen
sion spo rt* is an e lectron ica lly contro lled a ir sus
pens ion and damping system . The adjustment
depends on the driving mode selected, steering movements, the driver's braking and accelera
tion , and as the road surface, vehicle speed and
load . A sporty sett ing is generally used in vehicles
with adap tive a ir suspension sport*.
The vehicle ground clearance depends on the mode se lected and the speed . When you are in
the auto or dynamic mode, the h ighway sett ing is
activated when you dr ive above 75 mph (120 km/
h) for more than 30 seconds . The ground clear
ance is increased automatically if the speed
drops below 44 mph (70 km/h) for more than 120 seconds .
Stee ring
The power steer ing adap ts . Indirect steer ing that
moves easily as in comfort mode is especially
suited to long drives on a h ighway . The dynam ic
mode p rovides spo rty , d irect steering.
Applies to: vehicles with dynamic steering
The steering ratio changes based on vehicle
speed in order to ma intain optimum steering ef
fort for the dr ive r at all times . This sets the steer
i n g to be less sensit ive at hig he r speeds in o rder
to p rovide imp roved vehicle contro l. At reduced
speeds, steer ing is more direct in order to keep
the steering effort as minima l as possib le when
the driv er is maneuvering the v ehicl e. At low and
average speeds, dynamic steering* addit ionally
provides more responsive steering performance.
Sport diff ere ntial *
As a component of the all wheel drive system (quattro)
¢ page 131, the sport differential dis
tributes the driving power to the rear axle de
pending on the situation. The distribution of
power va ries from balanced (comfort) to sporty
(dynamic) depending on the selec ted mode . The
goal is a high level of agility and ab il ity to accel
erate on curves . The ve hicle is very respons ive to
steer ing .
112 Corn
ering light *
The co rnering ligh t adapts the hig h beams to the
direction of the curve depending on the speed.
The pivoting action and the lighting also adapt to
the mode.
Adaptive cruise cont rol*
The be hav io r whe n accelerat ing ca n be adjusted
from comfortable to sporty, depending on the drive select mode. Adaptive cruise control also
responds to the driving behavior of the vehicle
ahead in a more cons ervative or sporty manner.
Engine sound *
The eng ine sound adapts to the c urrent mode
and can be subtle to spo rty.
{[» Note
- Make s ure there is enough clearance above
and be low the vehicle when pa rk ing . T he
heig ht of t he ve hicle can change on ce it is
parked d ue to temperature fluctuations,
changes to the load conditions and changes
to the driv ing modes, which can affect clear
ance .
- When transporting the vehicle on a car car
rier, train, ship or by other means, on ly tie
the vehicle down at the runn ing surface of
the tires, which is the outer c ircumference.
Securing the vehicle at the axle compo
nents, suspens ion struts o r tow ing eyes is
not pe rm itted because the p ressure i n the
air suspe nsion s truts ca n change d uring
t ra nspo rt. The vehi cle may not be secu red
sufficiently i f th i s happens.
(D Tips
- In some mo dels, the max imum ve hicle
speed can only be reached in t he auto and
dynamic modes.
- Th e S se lector lever posi tion a utomat ic all y
engages if the dynami c mode is selected.
- In ve hicl es tha t h ave dynam ic stee rin g*, op
erat ing no ise is he ard when sta rting o r stop
ping the engine . This does no t indi ca te a
prob lem.
Page 115 of 356
u. co ..... N
" N ..... 0 0 :c '
.,. To se lect t he mode , se lect the following in the
Infota inment : ICAR !f u nct io n button>
Comfort ,
Auto , D ynami c or Individual.
You can change t he d riving mode when the vehi
cle is stat ionary o r w hil e d riving. If traffic per
m its, after cha ng ing modes, br iefly take yo ur
foot off the accelerator peda l so that t he recen tly
se lected mode is a lso activated for the engine.
Comfort -provides a comfort-o rie nted ve hicle
setup and is su ited for long dr ives on hig hways .
Adjusting the Individual mode
Ass istance systems
Auto -provides an overa ll comfortab le yet dy
namic driving feel and is suited for everyday use .
Dynamic -gives the dr ive r a spo rty d riving fee l
and is suited to a sporty driv ing style .
Individual -~page 113 .
A WARNING
Pay attention to t raff ic w hen ope rating the
dr ive sele ct to redu ce the r is k of a n accident.
-
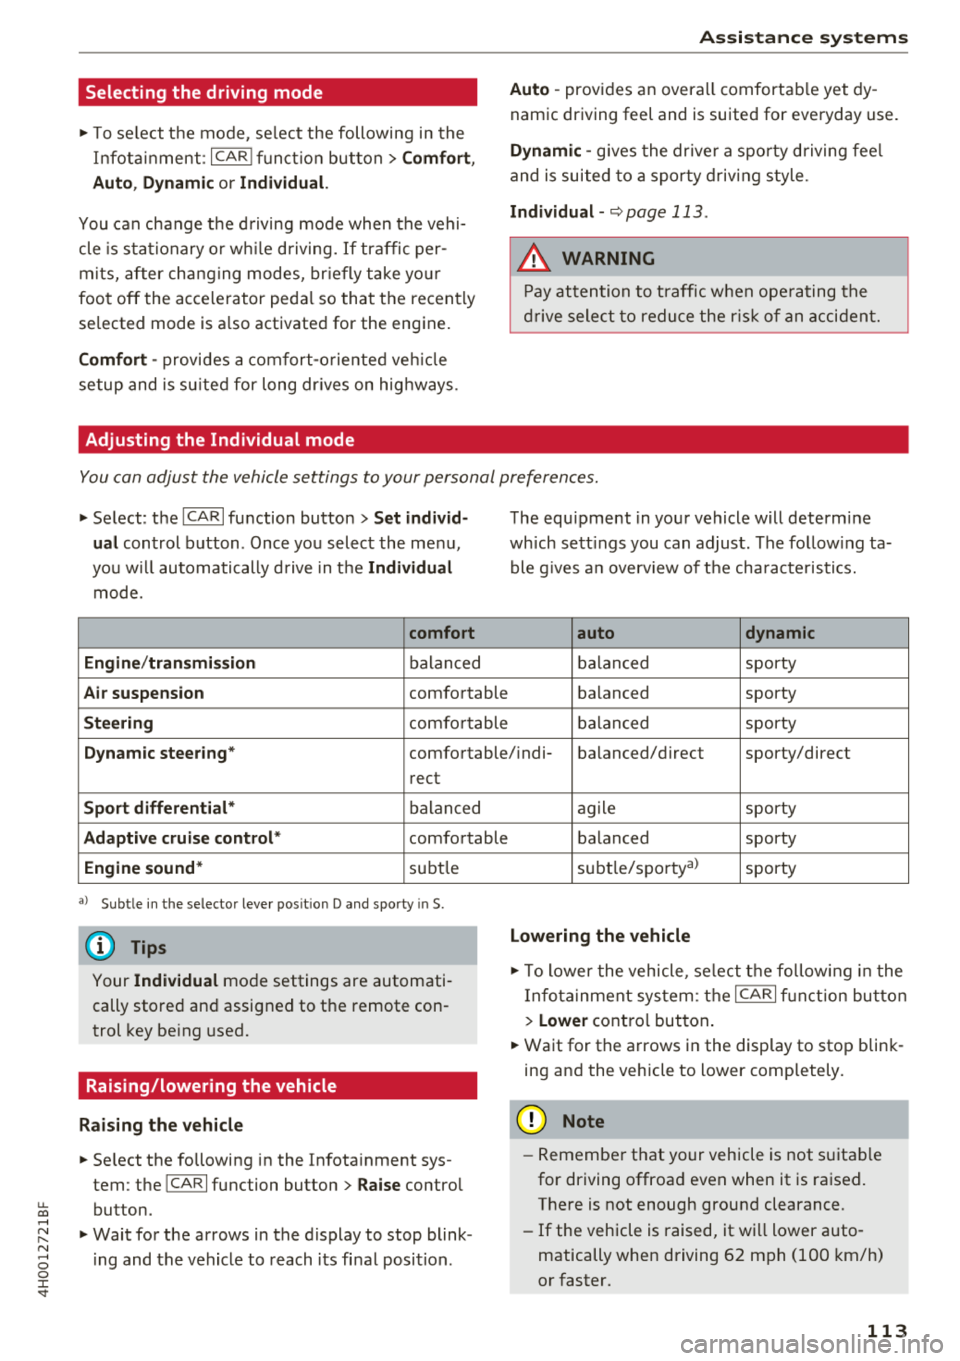
You can adjust the vehicle settings to your personal preferences .
.,. Select : the !CA RI fu nction button > Set individ
ual
control button . Once you select the me nu,
you w ill automatically d rive in t he
Individual
mode.
comfort
Engine /transmission
balan ced
Air suspension comfortable
Steering co mfo rtable The equ
ipment in you r vehicle will determ ine
wh ich sett ings you can adjust . The follow ing ta
ble g ives a n overv iew of t he cha racte ristics.
auto dynamic
balan ced sporty
b alanced sporty
ba lan ced sporty
Dynamic steering * comfortable/ ind i- balanced/direc t sporty/direct
rect
Sport differential * balanced
Adaptive cruise control * comfortable
Engine sound* subtle
a> Sub tle in t he se lector leve r po sit io n D and sporty in S.
(D Tips
Your Individual mode settings are automati
cally stored an d assigned to the remote con
trol key be ing used.
Raising/lowering the vehicle
Raising the vehicle
.,. Se lect the following in the Infota inment sys
tem : the
!CAR! function button> Raise control
button .
.,. Wait for the arrows in the display to stop blink
i ng and the vehicle to reach its fi nal posit ion . ag
ile sporty
balanced sporty
subt le/spor ty al
sporty
Lowering the vehicle
.,. To lower the vehicle, se lect t he follow ing in the
I nfota inment system: the
ICAR! f u nct ion bu tto n
>
Lower cont ro l button .
.,. Wait for the a rrows i n the display to stop blink
ing and the veh icle to lower comp letely .
@ Note
-Remember t hat yo ur vehicle is not s uitab le
for driving offroa d eve n when it is ra ised.
There is not enough ground clearance.
- If the vehicle is raised, it wi ll lower auto
matically when driving 62 mph (100 km/h)
o r faster.
113
Page 116 of 356
Assistance systems
Messages
Air suspension: Vehicle is too high. Controlling
level. . .
Air suspension: Vehicle is too low. Controlling
level. . .
The drive r message sw itches off whe n the level
cont rol p rocess is complete.
114
Page 243 of 356
lL t:0 ....
"' ......
"' .... 0 0 :c '
Undeployed airbag modu les and pretension
ers might be classified as Perch lorate Materi
al· special handling may apply, see
www.dtsc .ca.gov/hazardouswaste/
perchlorate. When the vehicle or parts of the
restraint system including a irbag modules
and safety belts with p retensioners are scrap·
ped, a ll applicable laws and regu lations must
be observed. Your a uthorized Audi dealer is
familiar w ith these requirements and we rec
ommend that you have yo ur dealer perform
this service for you .
Other things that can affect Advanced
Airbag performance
Changing the vehicle's suspension system can
change the way that the Advanced Airbag System pe rforms in a crash. For examp le, using tire-r im
comb ina tions not approved by Audi, lowering the
veh icle, chang ing the s tiffness of the suspens ion,
including the springs, suspension struts, shock
absorbers etc . can change the forces that are
measured by the airbag sensors and sent to the
e lectronic contro l unit . Some suspension changes
can, for example, increase the force levels meas
ured by the sensors and make the airbag system
deploy in crashes in wh ich it would not deploy if
the changes had not been made . Other ki nds of
changes may reduce the fo rce levels measured by
the sensors and preven t the airbag from deploy
ing when i t should.
A WARNING
Changing the vehicle's suspension including
use of unapproved tire-rim combinations can
change Advanced Airbag performance and in
crease the risk of serious personal injury in a
crash.
-Never install suspens ion components that
do not have the same performance charac
teristics as the components originally instal
led on your veh icle.
-Never use tire-rim combinations that have
not been approved by Audi.
Airbag system
A WARNING
Items stored between the safety belt buckle
and the center console can cause the sensors i n the buckle to send the w rong information
to the electronic control modu le and prevent
the Advanced A irbag System from wo rking
p roperly.
- Always make sure that nothing can interfe re
with the safety belt buckles and that they
are not obstructed.
Knee airbags
Description of knee airbags
The knee airbag system can provide supplemen
tal protection to properly restrained front seat
occupants.
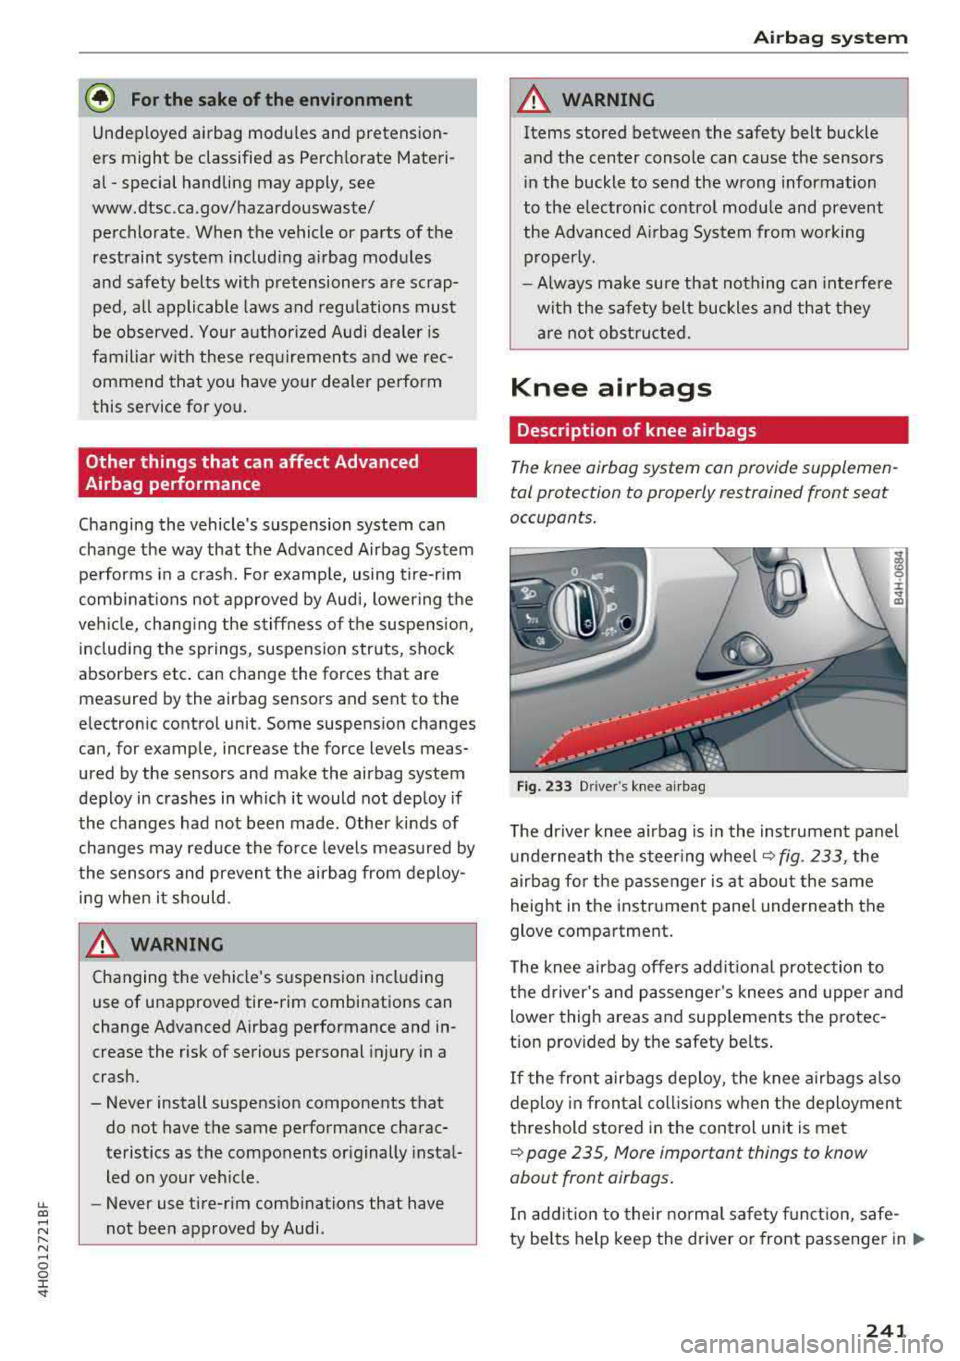
F ig . 233 Dr ive r's knee airbag
T he driver knee airbag is in the ins trument panel
u nderneath the steer ing
whee l~ fig. 233, the
airbag fo r the passe nger is at abou t the same
height in the instr ument pane l underneath the
glove compartment.
The knee airbag offers add itional protection to
t h e driver 's and passenger's knees and uppe r and
lower thigh areas and supplements the protec
t ion prov ided by the safety be lts .
If the front airbags deploy, the knee airbags also
deploy in frontal collis ions when the deployment
threshold stored in the control unit is met
~ page 235, More important things to know
about front airbags.
In add ition to their normal sa fety f unct ion, safe-
ty be lts he lp keep the driver or front passenge r in
..,.
241
Page 315 of 356
u. co .... N
" N .... 0 0 :c '
c ident.
- The factory-supplied jack is intended on ly
for your vehicle m odel. Under no circum
stances should it be used to lift heavy
vehicles or other loads; you r isk injuring
yourself .
- Never start the en gine when the vehicle is
ra ised, which could cause an accident .
- Support the veh icle secure ly w ith appropr i
ate stands if work is to be performed under
neath the vehicle; otherwise, there is a po
tent ial risk for in ju ry .
- Never use the jack supplied with your Audi
on another vehicle, particularly on a heav ier
one . The jack is only suitable for use on the
vehicle it came w it h .
(D Tips
The vehicle jack* in your vehicle is mainte
na nee -free .
Replacing wheels
Before changing a wheel
Observe the following precautions for your own
and your passenger's safety when changing a
wheel.
.,. After yo u experience a tire fail ure, pull the car
we ll away from moving t raffic and t ry to rea ch
level g round before you s top ¢&, .
.,. All passengers sho uld lea ve the ca r and move
to a saf e location (for instance, be hind t he
guardrai l) ¢ &, .
.,. Engage the parking brake to prevent you r vehi
cle from rol ling
unintentionally ¢ A_.
.,. Move selector lever to position P ¢ A_.
.,. If you a re towing a trailer, unh itch the trailer
from your ve hicle.
.,. Take the jack and the spare tire ou t of the lug
gage compa rtment
¢ page 312.
A WARNING
You or your passengers cou ld be inju red wh ile
chang ing a wheel if you do not follow these
safety precautions :
Emergenc y ass is tanc e
-If you have a flat tire, move a safe distance
off the road. Turn off the eng ine, turn the
emergency flashers on and use other warn ing dev ices to alert other motorists .
- Make sure that passengers wait in a safe
p lace away from the vehicle and well away
from the road and traff ic .
- To help prevent the veh icle from moving
suddenly and possib ly slipping off the jack ,
always fu lly set the par king brake and block
the front and back of the wheel diagonally
opposite the wheel being changed. W hen
one front w heel is li fted off the gro und,
p lacing the Au tom atic Transmi ssion in P
(Park) will
not p revent the vehicle from
mov ing.
- Before you change a wheel, be sure the
g ro u nd is leve l and firm. If necessary, use a
sturdy board under the jack .
- Always s tore the vehicle tool ki t, the jack
an d the replaced tire in the luggage com
pa rtment ¢
page 213 .
(D Tips
Befo re c hangin g the wheel, you mus t activ ate
the jacking mode, so that the a utomat ic con
tro ls for the Adaptive Air Suspension do not
make it more di fficult to lift the vehicle with
the jack
¢ page 315 .
Changing a wheel
When you change a wheel , follow the sequence
described below step -by-step and in exactly that
order .
1. Activate the vehicle jack mode ¢ page 315 .
2. Remove the de corative wheel cover *. For
more detai ls see
a lso ¢ page 314, Decora
tive wheel covers
or ¢ page 314, Wheels
with wheel bolt caps .
3. Loosen the wheel bolts ¢ page 315 .
4. Loca te t he p roper mount ing point for the
jac k and alig n the jack be low that po int
¢page 315 or ¢ page 316.
S. Rai se the ca r wi th the jack ¢ page 315 or
¢page 316 .
313
Page 326 of 356
Fuses and bulbs
Fuse panel@ (black ) Fuse panel@ (black)
8 Front passenger power window 11 Right rear power window
9 ESC con trol module 12 Front passenger's seat (pne umatic)
10 E
SC control module
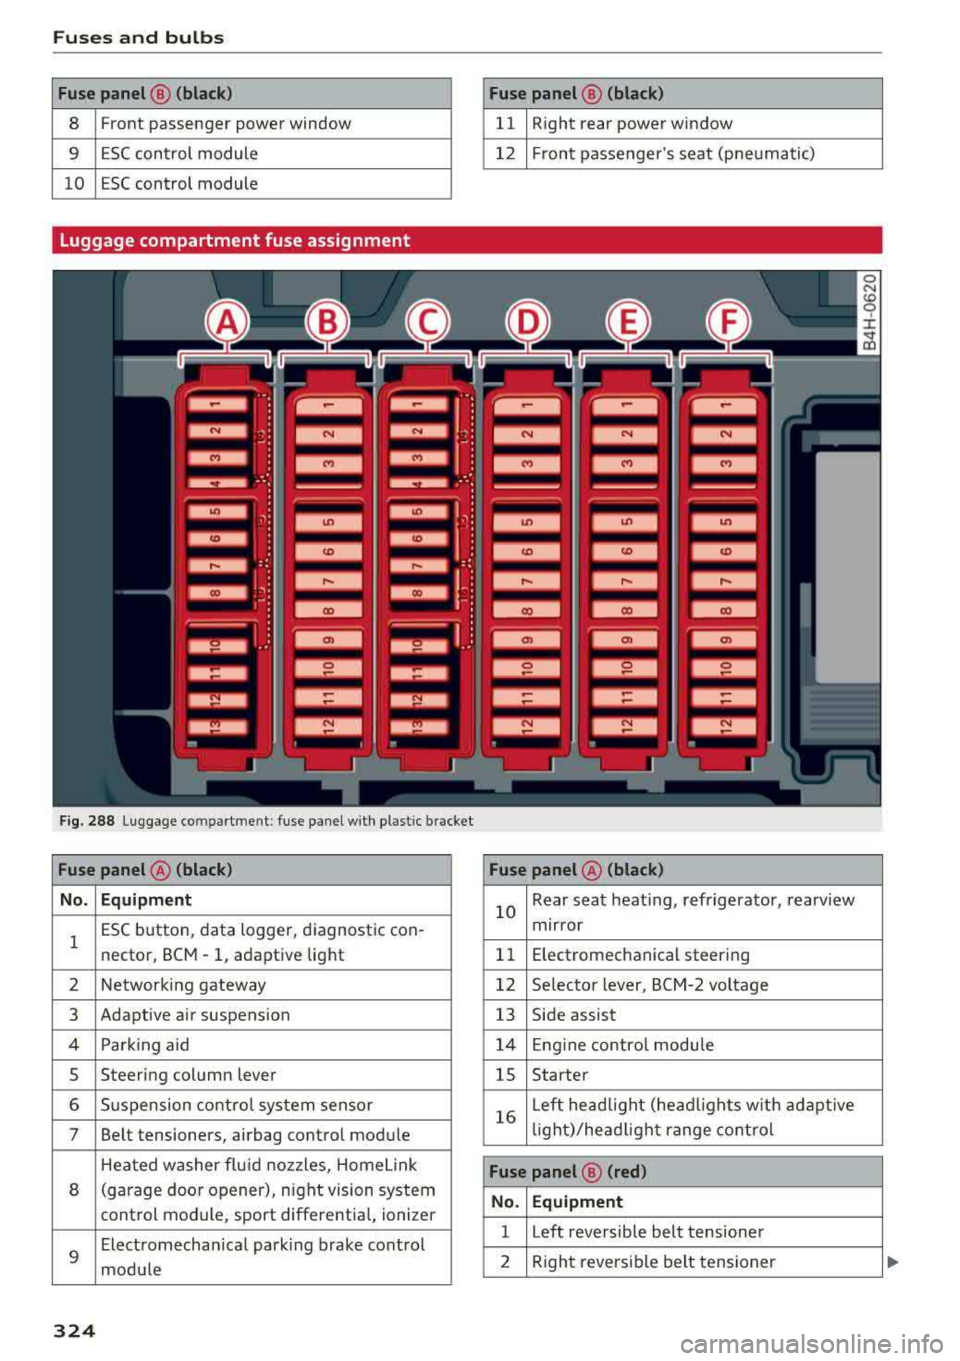
Luggage compartment fuse assignment
F ig . 28 8 Luggage co mpar tment : fuse panel w it h plastic bracket
Fuse panel @ (black) Fuse panel@ (black)
No. Equipment
10 Rear seat heat
ing, refrigerator, rearv iew
1 ESC b
utton , data logger, d iagnost ic con -
nector, BCM - 1, adaptive lig ht mir
ror
1 1 Electromechanical steering
2 Network ing gateway 12 Selec tor lever, BCM-2 vol tage
3 Adaptive air suspension
13 Side assist
4 Park ing a id 14 E ngine contro l module
5 Steer
ing column lever
15 Starter
6 S usp ension contro l system senso r
7 Belt tensioners, airbag control mod ule 16
L
eft head light (he adlights w it h adap tive
li ght)/head light range co ntr ol
Heated w asher flu id no zz les, Home link
8 (garage doo r opener), night vision system
cont rol mod ule, sport differe ntia l, ionizer
9
Electromecha nica l par king brake cont rol
modu le
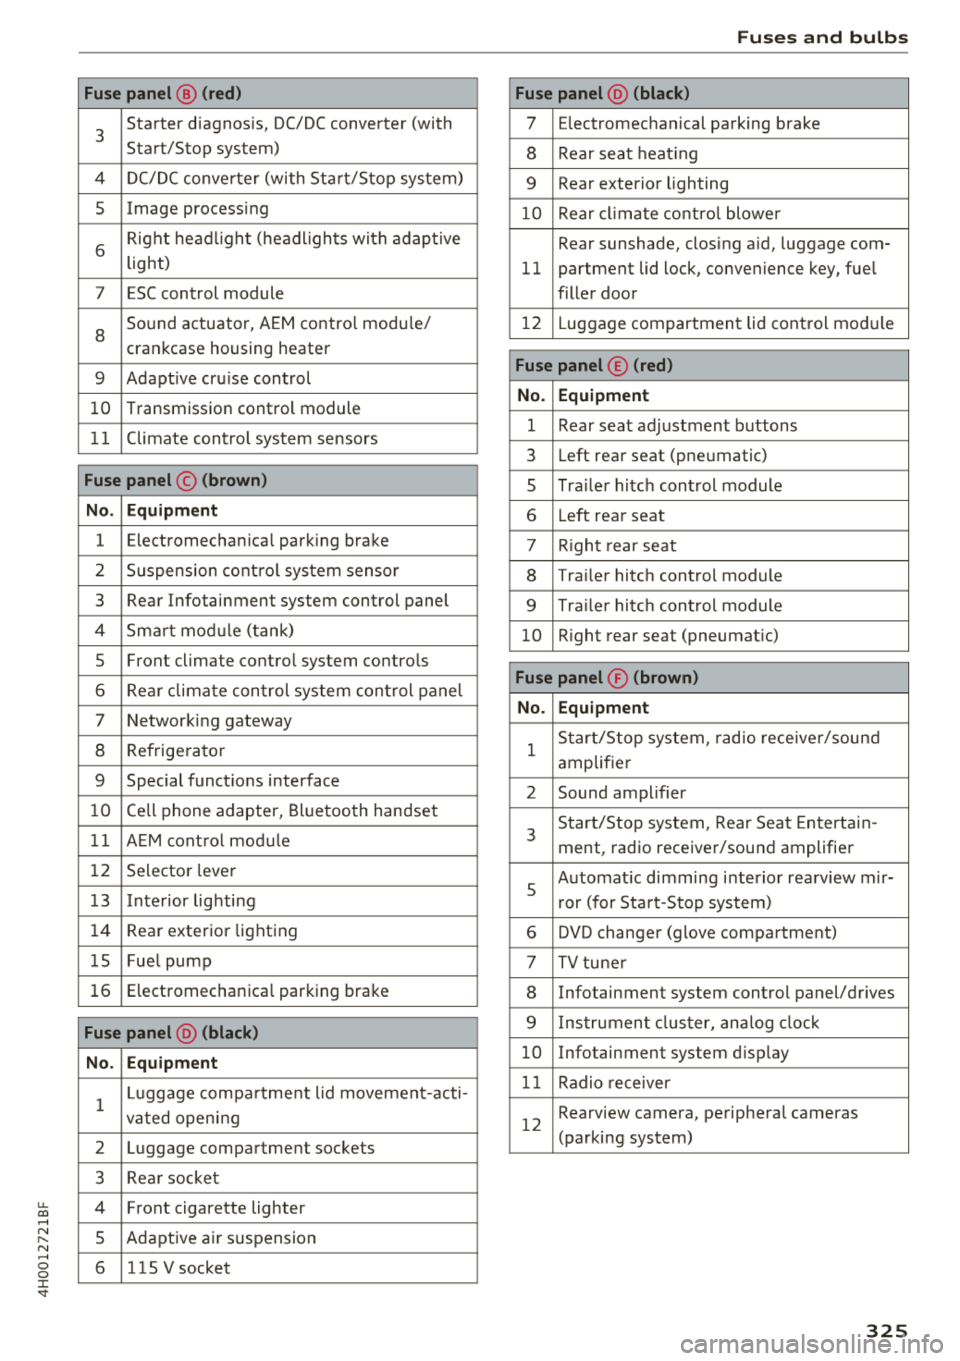
Fuse panel ® (red)
No . Equipment
1 Left reversible belt tensioner
2 R
ight revers ible belt tensioner
324
Page 327 of 356
u. co .... N
" N .... 0 0 :c '
3
Starter diagnosis, DC/DC converter (with
Start/Stop system)
4 DC/DC converter (with Start/Stop system)
5 Image processing
6
Right headlight (headlights with adaptive
light)
7 ESC control module
8
Sound actuator, AEM control module/
crankcase housing heater
9 Adapt ive cru ise control
10 Transmission control module
11 Climate control system sensors
Fuse panel © (brown)
No. Equipment
1 Electromechan ica l park ing brake
2 Suspension control system sensor
3 Rear Infotainment system control panel
4 Smart module ( tan k)
5 Front climate control system controls
6 Rea r climate control system control panel
7 Networking gateway
8 Refrigerator
9 Special functions interface
10 Cell phone adapter, Bluetooth handset
11 AEM control module
12 Selector lever
1 3 Inte rior lighting
14 Rear exterior lighting
15 Fue l pump
16 Electromechanica l parking brake
Fuse panel @ (black)
No. Equipment
1
Luggage compa rtment lid movement-acti-
vated opening
2 Luggage compartment sockets
3 Rear socket
4 Fro nt cigarette lighter
5 Adaptive air su spension
6 115 V socket
Fuses and bulbs
Fuse panel @ (black)
7 Electromechanical parking brake
8 Rear seat heat ing
9 Rear exterior lighting
10 Rear climate control blower
Rear sunshade, closing a id, luggage com-
11 partment lid lock, convenience key, fue l
filler door
12 L uggage compartment lid control module
Fuse panel © (red)
No. Equipment
1 Rear seat adjustment buttons
3 Left rear seat (pne umatic)
5 Tra iler hitch control module
6 Left rea r seat
7 Right rear seat
8 Trailer hitch control module
9 Trailer hitch control module
10 Right rear seat (pneumat ic)
Fuse panel ® (brown)
No. Equipment
1
Start/Stop system , radio receiver/sound
amplifier
2 Sound amplifier
3
Start/Stop system, Rear Seat Entertain -
ment, radio receiver/sound amplifier
5
Automat ic dimming interior rea rview mir-
r or (for Start-Stop system)
6 DVD changer (glove compartment)
7 TV tuner
8 Infotainment system control panel/drives
9 Instrument cluster, analog clock
10 Infotainment system d isp lay
11 Radio receiver
12
Rearview camera, perip heral cameras
(parking system)
325
Page 333 of 356
lL t:0 ....
"' ......
"' .... 0 0 :c '
Lifting with workshop hoist and with floor
jack
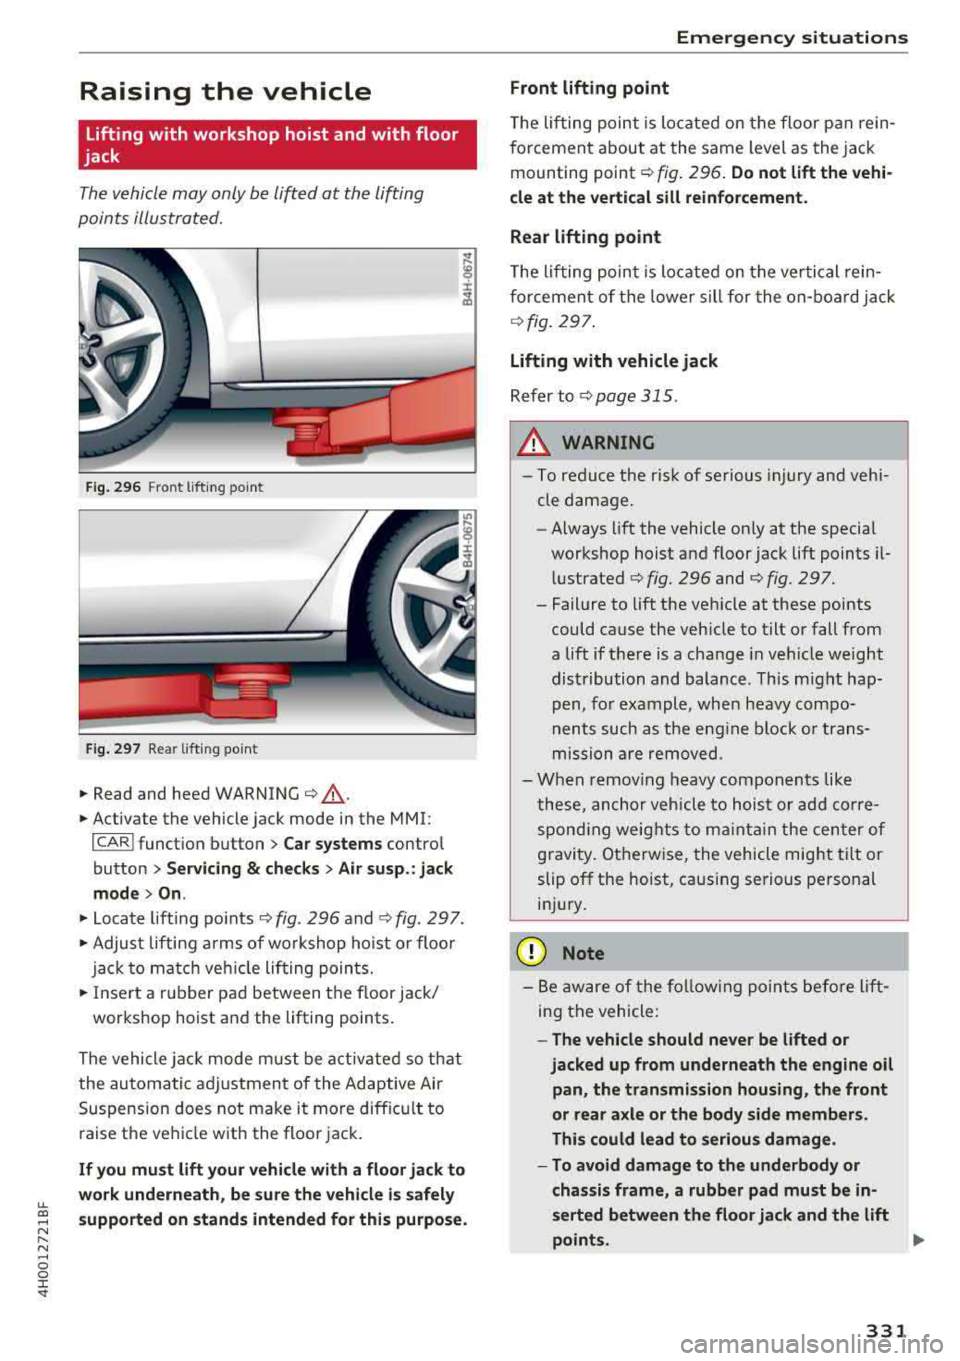
The vehicle may only be lift ed at the lifting
points illus tr at ed.
Fig. 296 Fro nt lift in g poin t
Fig. 29 7 Rear lift ing poin t
.,. Read and heed WARNING c::> &, .
.. Activate the veh icle ja ck mode in the MMI :
I CARI funct ion button> Car systems control
button >
Servicing & checks > Air susp.: jack
mode > On .
.. Loca te lift ing po ints c::> fig . 296 and c::>fig . 297 .
.. Adju st lifting arms of wo rkshop ho ist o r floo r
ja ck t o ma tch vehicle li fting poin ts.
.. In se rt a rubb er pa d between the floor j ack/
wor kshop ho ist and the lifting points .
T he vehicle ja ck mode m ust be a ct iv a te d so th at
the au tomatic a djustment of the Ad aptive Air
Suspension does not m ake it more diffic ult to
raise the ve hicle wit h the floor jack.
If you must lift your vehicle with a floor jack to
work underneath , be sure the vehicle is safely
supported on stands intended for this purpose .
Emergency situations
Front lifting point
The lifting poi nt is locate d on the floor p an rein
f o rcement about at the same level as the ja ck
mounting point
c::> fig . 296 . Do not lift the vehi
cle at the vertical sill reinforcement .
Rear lifting point
T he lifting p oin t i s lo cate d on the ve rtic al rei n
f o rceme nt o f th e lower s ill for the on- bo ar d jac k
c::>fig. 297 .
Lifting with vehicle jack
Refer to c::> pag e 315 .
A WARNING
- To reduce the r is k of se rious inju ry and veh i
cle dama ge.
- Always lift the vehicle o nly at the specia l
wor kshop h oist a nd f loor jack lift points
il
l ustrated c::> fig. 296 and c::> fig. 297.
- Failure to lift t he ve hicle at these points
could cause the veh icle to tilt o r fall from
a lift i f there is a change in vehicle weight
dist ribution and balance . This might hap
pen, fo r example, when h eavy compo
nents such as the eng ine block o r trans
missi on are re moved .
- Whe n re mov ing heavy comp onents like
these, an ch or veh icle t o hois t or ad d co rre
spon ding weig hts t o m aintai n the cen ter of
g ravi ty . Ot herw ise, the vehicle mig ht tilt or
slip off t he hoist, caus ing se rio us pe rsonal
i njur y .
(D Note
- Be aw are of the fo llow ing po ints b efor e lift
ing the vehicle:
-The vehicle should never be lifted or
jacked up from underneath the engine oil
pan, the transmission housing, the front
or rear axle or the body side members.
This could lead to serious damage .
- To avoid damage to the underbody or
chassis frame, a rubber pad must be in
serted between the floor jack and the lift
points .
.,.
331