display AUDI A8 2021 User Guide
[x] Cancel search | Manufacturer: AUDI, Model Year: 2021, Model line: A8, Model: AUDI A8 2021Pages: 362, PDF Size: 99.29 MB
Page 21 of 362
4N0012721BF
Touch displays
tating
Applies to: touch displays
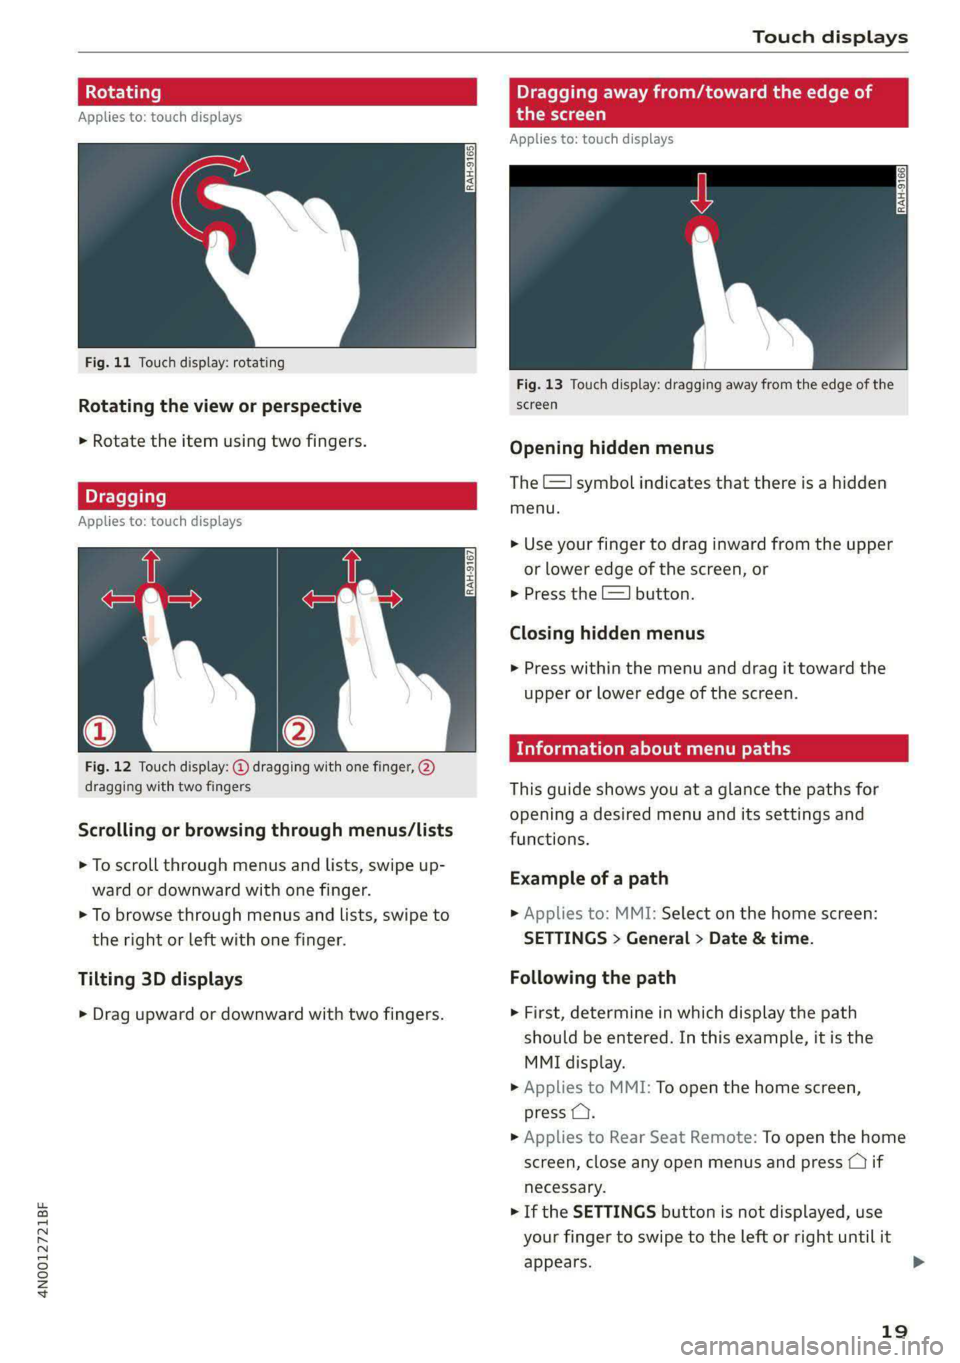
Fig. 11 Touch display: rotating
Rotating the view or perspective
> Rotate the item using two fingers.
gging
Applies to: touch displays
Fig. 12 Touch display: @ dragging with one finger, @
dragging with two fingers
Scrolling or browsing through menus/lists
> To scroll through menus and lists, swipe up-
ward or downward with one finger.
> To browse through menus and lists, swipe to
the right or left with one finger.
Tilting 3D displays
> Drag upward or downward with two fingers.
Dragging away from/toward the edge of
the screen
Applies to: touch displays
Fig. 13 Touch display: dragging away from the edge of the
screen
Opening hidden menus
The E=] symbol indicates that there is a hidden
menu.
> Use your finger to drag inward from the upper
or lower edge of the screen, or
> Press the =] button.
Closing hidden menus
> Press within the menu and drag it toward the
upper or lower edge of the screen.
nformation about menu paths
This guide shows you at a glance the paths for
opening a desired menu and its settings and
functions.
Example of a path
> Applies to: MMI: Select on the home screen:
SETTINGS > General > Date & time.
Following the path
> First, determine in which display the path
should be entered. In this example, it is the
MMI display.
>» Applies to MMI: To open the home screen,
press ().
> Applies to Rear Seat Remote: To open the home
screen, close any open menus and press (1) if
necessary.
> If the SETTINGS button is not displayed, use
your finger to swipe to the left or right until it
appears.
19
>
Page 22 of 362
Touch displays
> Press the SETTINGS button.
> If the General button is not displayed, swipe
toward the left or right with one finger until it
appears.
> Press the General button.
> If the Date & time button is not displayed,
swipe upward or downward with one finger un-
tilit appears.
> Press the Date & time button.
G) Tips
If a menu or symbol is in parentheses in the
path, for example, (General) or ({23), then it is
an optional menu item that does not need to
be used in every system.
You can adjust or turn off the MMI touch display
feedback.
> Applies to MMI: Select on the home screen:
SETTINGS > Display & Brightness > MMI.
Possible settings:
— Brightness
— Touchscreen feedback
Multi Media Interface
De AUC eel
Audi recommends performing certain Infotain-
ment system functions, such as entering a desti-
nation, only when the vehicle is stationary. Al-
ways be prepared to stop operating the Infotain-
ment system in the interest of your safety and
the safety of other road users.
ZA WARNING
Only use the Infotainment system when road,
traffic, weather, and visibility conditions per-
mit and always in a way that allows you to
maintain complete control over your vehicle.
@ Tips
Certain functions are not available while driv-
ing.
20
Wiis mela mel mela
Switching the MMI on or off
> To switch the MMI off, press and hold the
On/Off knob > page 37, fig. 27 until the up-
per display and all Infotainment system func-
tions are switched off.
> To switch the MMI on, press the On/Off knob.
Restarting the MMI
>» Press and hold the On/Off knob for at least 10
seconds.
Switching displays on or off
> To switch the upper display off, press [oJ on the
lower display.
> To switch the upper display on, touch the upper
display or press (Jon the lower display.
> To switch both displays on or off, press and hold
Co] on the lower display.
Introduction
You can display and operate Infotainment system
and vehicle functions using both of the Multi Me-
dia Interface (MMI) touch displays.
Configuration wizard
After starting for the first time, the configuration
wizard helps you to set up the vehicle, for exam-
ple to set the desired system language and con-
nect a telephone.
> Follow the instructions in the display.
> Applies to: MMI: To access the configuration
wizard at a later time, select on the home
screen: HELP > Configuration wizard.
Tool tips
You can have tool tips displayed if necessary.
They introduce various MMI functions to you.
> Applies to: MMI: To open the tool tips, select on
the home screen: HELP > Tool tips > Basic in-
formation or Expert information.
> Follow the instructions in the display.
Page 23 of 362

4N0012721BF
Touch displays
Menus and symbols
m< bo
CeCe
AS 4
\\
RAX-0175|
| 2 % @ 8 OF h: 350m ee ice
ce
Co) CoN ens PINTS}
any CW Pa LS OauNCS
Ce eC cc)
\
SD
Turn on climate control
Fig. 14 MMI: upper/lower display
Label Description
Overview screen
Displays selected information tiles and provides quick access to
certain functions > page 22
Quick access bar
Return to the home screen or the overview page, open menus
quickly > page 22
Display area Select a menu, apply settings, display content > page 22
®|@|
©
|
©
Favorites Use or manage favorites > page 22
Status bar
Displays existing notifications © > page 23, status display @)
=> page 23, time
Function bar Activate functions or access attached content > page 24
Shortcuts Use shortcuts > page 24
Climate control settings Adjust the climate control system settings > page 100
Description of common symbols
You can operate the default functions using the
symbols that follow. The symbols may be found
in any menu, depending on the context.
Search for content
Open explanations for a menu
Open settings for the selected
Symbol
Description
menu
Go back one level
Close the menu
Open the submenu
Adjust the settings
21
Page 24 of 362
Touch displays
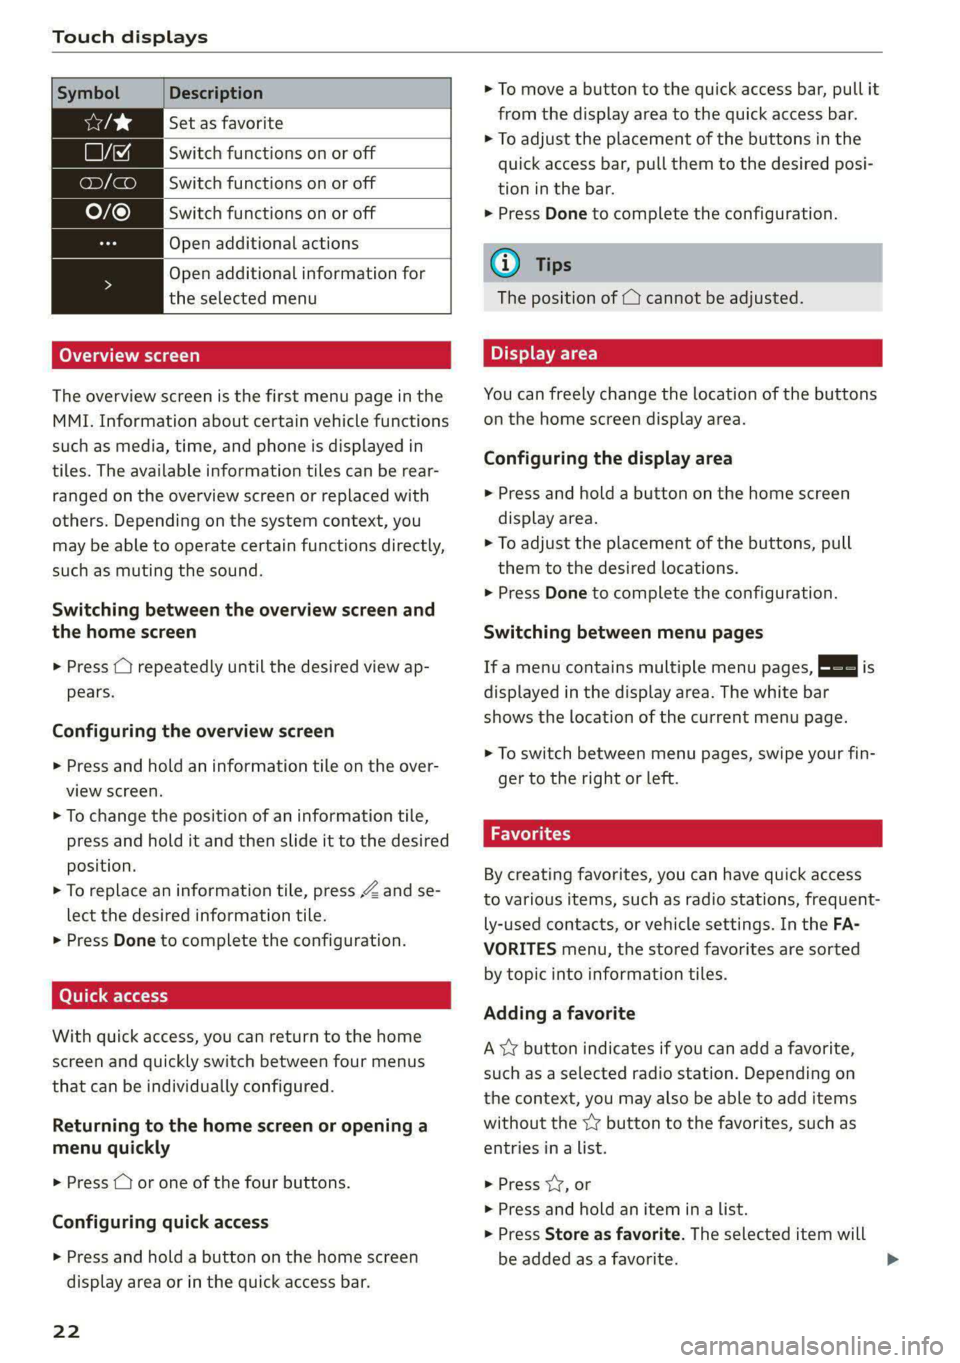
Symbol Description
Set as favorite
LJ Switch functions on or off
ony (a Switch functions on or off
O/@ Switch functions on or off
Open additional actions
Open additional information for
the selected menu
Overview screen
The overview screen is the first menu page in the
MMI. Information about certain vehicle functions
such as media, time, and phone is displayed in
tiles. The available information tiles can be rear-
ranged on the overview screen or replaced with
others. Depending on the system context, you
may be able to operate certain functions directly,
such as muting the sound.
Switching between the overview screen and
the home screen
> Press () repeatedly until the desired view ap-
pears.
Configuring the overview screen
> Press and hold an information tile on the over-
view screen.
> To change the position of an information tile,
press and hold it and then slide it to the desired
position.
> To replace an information tile, press Z and se-
lect the desired information tile.
> Press Done to complete the configuration.
Quick access
With quick access, you can return to the home
screen and quickly switch between four menus
that can be individually configured.
Returning to the home screen or opening a
menu quickly
> Press ( or one of the four buttons.
Configuring quick access
> Press and hold a button on the home screen
display area or in the quick access bar.
22
> To move a button to the quick access bar, pull it
from the display area to the quick access bar.
> To adjust the placement of the buttons in the
quick access bar, pull them to the desired posi-
tion in the bar.
> Press Done to complete the configuration.
G) Tips
The position of © cannot be adjusted.
Display area
You can freely change the location of the buttons
on the home screen display area.
Configuring the display area
> Press and hold a button on the home screen
display area.
> To adjust the placement of the buttons, pull
them to the desired locations.
> Press Done to complete the configuration.
Switching between menu pages
If a menu contains multiple menu pages, Eee] is
displayed in the display area. The white bar
shows the location of the current menu page.
> To switch between menu pages, swipe your fin-
ger to the right or left.
Favorites
By creating favorites, you can have quick access
to various items, such as radio stations, frequent-
ly-used contacts, or vehicle settings. In the FA-
VORITES menu, the stored favorites are sorted
by topic into information tiles.
Adding a favorite
A YY button indicates if you can add a favorite,
such as a selected radio station. Depending on
the context, you may also be able to add items
without the YY button to the favorites, such as
entries in a list.
> Press YY, or
> Press and hold an item ina list.
> Press Store as favorite. The selected item will
be added as a favorite.
Page 25 of 362
4N0012721BF
Touch displays
Using favorites
> Applies to: MMI: Select on the home screen:
FAVORITES. The stored favorites will be dis-
played.
> To access a stored favorite, press that favorite.
Stored favorites can only be deleted or config-
ured in the corresponding menu (such as RADIO).
Arranging information tiles
> Applies to: MMI: Select on the home screen:
FAVORITES.
> Press and hold the desired information tile.
> Pull the information tile into the desired posi-
tion.
> Press Done to confirm the configuration.
Off O88 o8 of
O88 o8 af
O88 o8 of ef
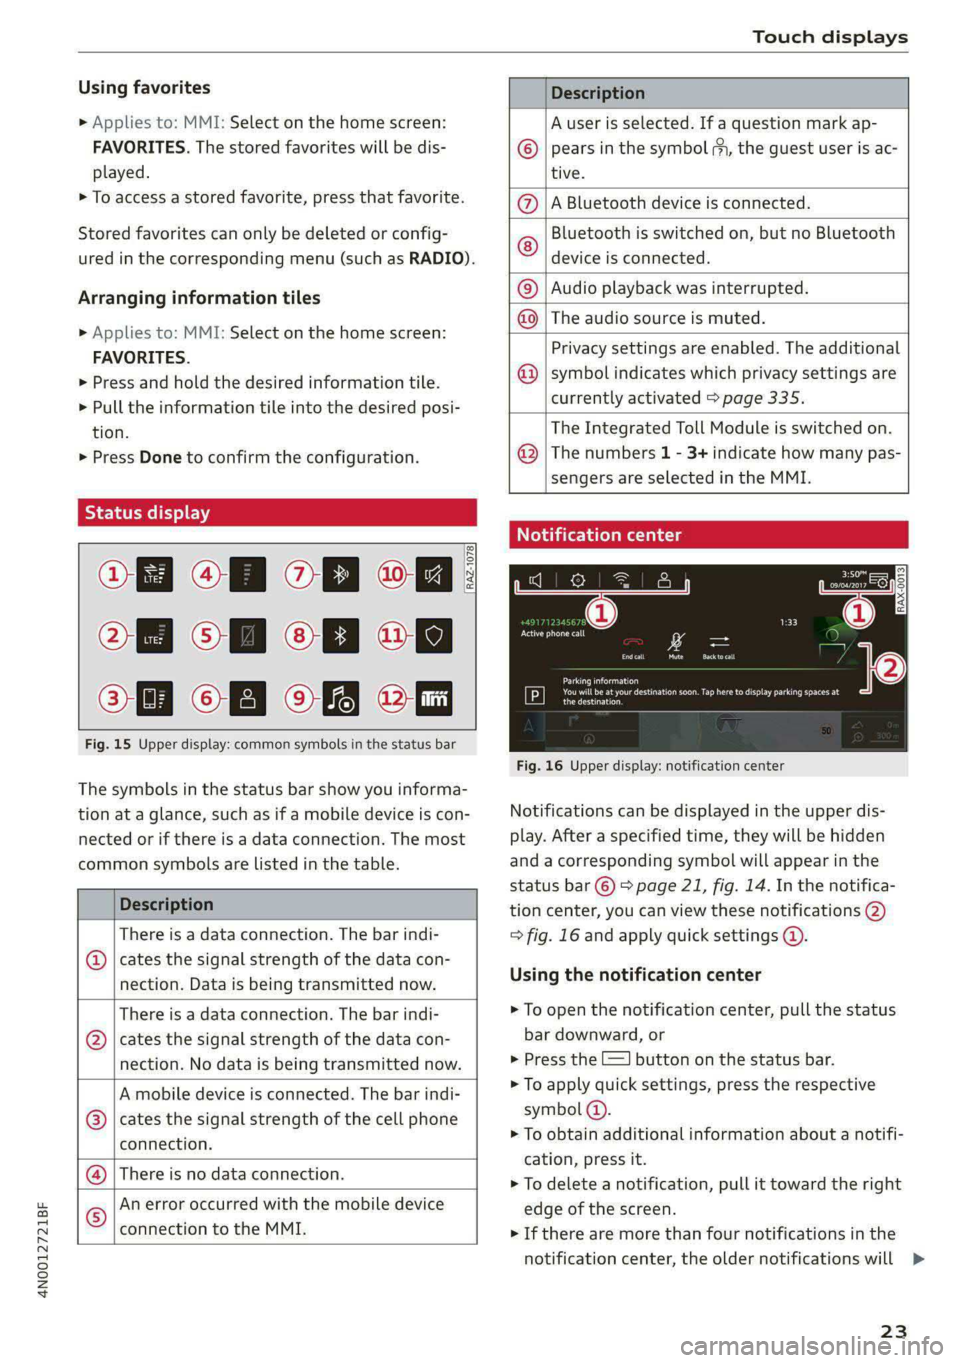
Fig. 15 Upper display: common symbols in the status bar
[RAZ-1078
The symbols in the status bar show you informa-
tion at a glance, such as if a mobile device is con-
nected or if there is a data connection. The most
common symbols are listed in the table.
Description
There is a data connection. The bar indi-
@ | cates the signal strength of the data con-
nection. Data is being transmitted now.
There is a data connection. The bar indi-
@ | cates the signal strength of the data con-
nection. No data is being transmitted now.
A mobile device is connected. The bar indi-
@ | cates the signal strength of the cell phone
connection.
There is no data connection. ®
An error occurred with the mobile device
connection to the MMI. ©
Description
A user is selected. If a question mark ap-
pears in the symbol ;h, the guest user is ac-
tive.
A Bluetooth device is connected.
Bluetooth is switched on, but no Bluetooth
device is connected. ©
|Q|
©
Audio playback was interrupted.
©|© The audio source is muted.
Privacy settings are enabled. The additional
symbol indicates which privacy settings are
currently activated > page 335.
The Integrated Toll Module is switched on.
The numbers 1 - 3+ indicate how many pas-
sengers are selected in the MMI.
Notification center
feo}
©
©
RAX-0013
Re it
Cres
Cea)
oe eo En
Pere
Fig. 16 Upper display: notification center
Notifications can be displayed in the upper dis-
play. After a specified time, they will be hidden
and a corresponding symbol will appear in the
status bar ©) > page 21, fig. 14. In the notifica-
tion center, you can view these notifications @
= fig. 16 and apply quick settings @.
Using the notification center
> To open the notification center, pull the status
bar downward, or
> Press the =] button on the status bar.
> To apply quick settings, press the respective
symbol @).
> To obtain additional information about a notifi-
cation, press it.
> To delete a notification, pull it toward the right
edge of the screen.
> If there are more than four notifications in the
notification center, the older notifications will
23
>
Page 26 of 362
Touch displays
be hidden. To display the older notifications,
drag your finger upward on the screen.
Setting which content is displayed
You can set whether some notifications should be
displayed.
> To set the displayed content, press &S, or
» Applies to MMI: Select on the home screen:
SETTINGS > Notifications.
> Select and confirm which notifications should
be displayed.
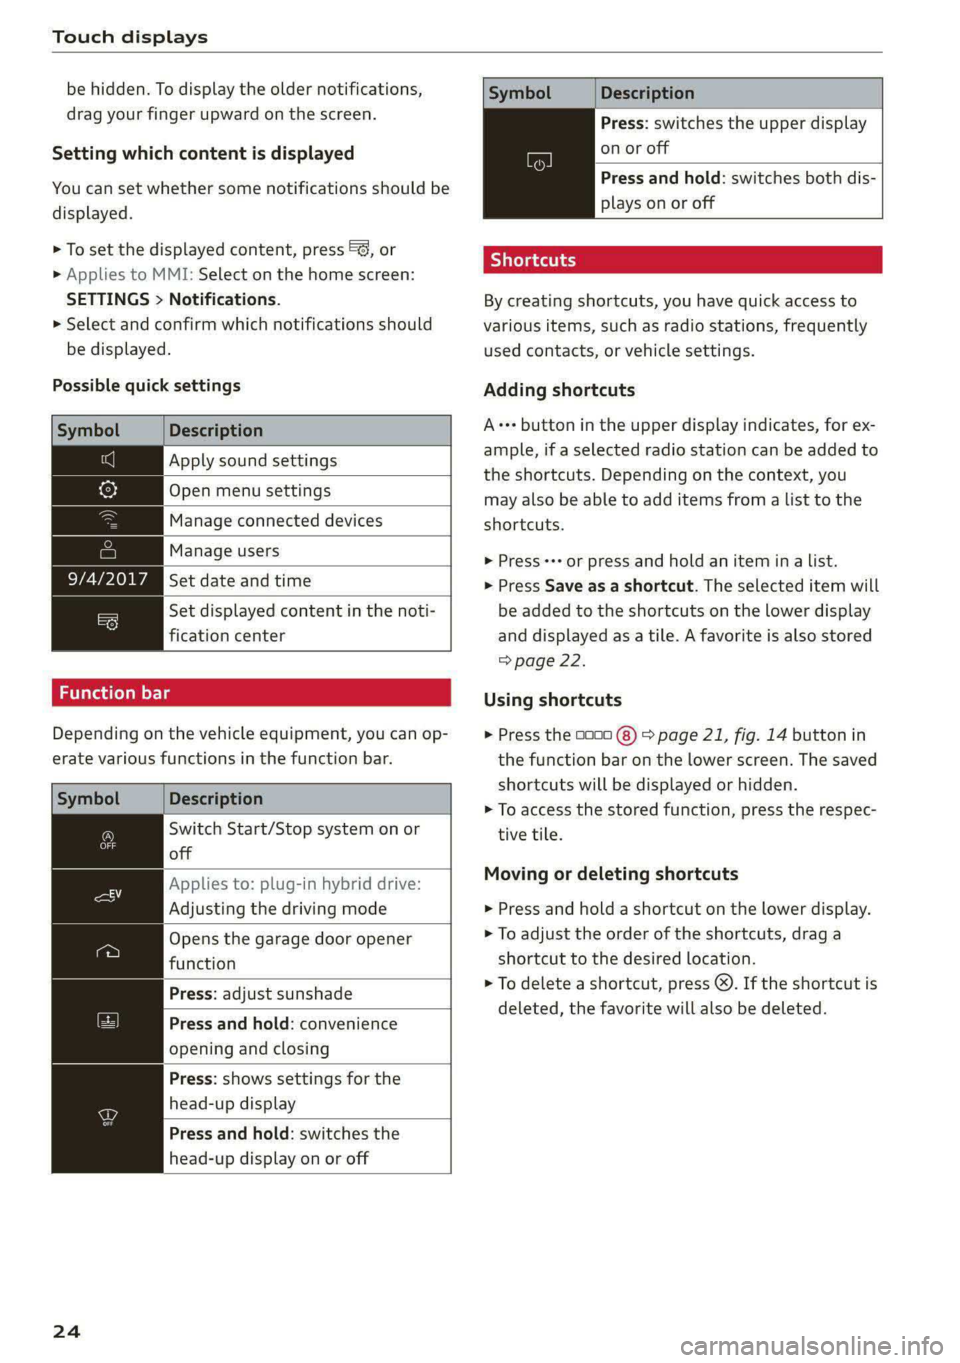
Possible quick settings
Symbol Description
Apply sound settings
Open menu settings
Manage connected devices
Manage users
Set date and time
= Set displayed content in the noti-
fication center
Depending on the vehicle equipment, you can op-
erate various functions in the function bar.
Description
Switch Start/Stop system on or
off
Applies to: plug-in hybrid drive:
Adjusting the driving mode
Opens the garage door opener
function
Press: adjust sunshade
Press and hold: convenience
opening and closing
Press: shows settings for the
head-up display
Press and hold: switches the
head-up display on or off
24
Symbol Description
Press: switches the upper display
on or off
Press and hold: switches both dis-
plays on or off
Shortcuts
By creating shortcuts, you have quick access to
various items, such as radio stations, frequently
used contacts, or vehicle settings.
Adding shortcuts
A+++ button in the upper display indicates, for ex-
ample, if a selected radio station can be added to
the shortcuts. Depending on the context, you
may also be able to add items from a list to the
shortcuts.
> Press +++ or press and hold an item ina list.
> Press Save as a shortcut. The selected item will
be added to the shortcuts on the lower display
and displayed as a tile. A favorite is also stored
=> page 22.
Using shortcuts
> Press the 0000 (8) > page 21, fig. 14 button in
the function bar on the lower screen. The saved
shortcuts will be displayed or hidden.
> To access the stored function, press the respec-
tive tile.
Moving or deleting shortcuts
> Press and hold a shortcut on the lower display.
> To adjust the order of the shortcuts, drag a
shortcut to the desired location.
> To delete a shortcut, press ®. If the shortcut is
deleted, the favorite will also be deleted.
Page 27 of 362
4N0012721BF
Touch displays
acuta ole)
[ee Gye esl
< >
les, CA, 90012
Pe)
les, Los Feliz, CA, 90027
Pt)
(eer Com es
Peas
NET)
[RAZ-0711
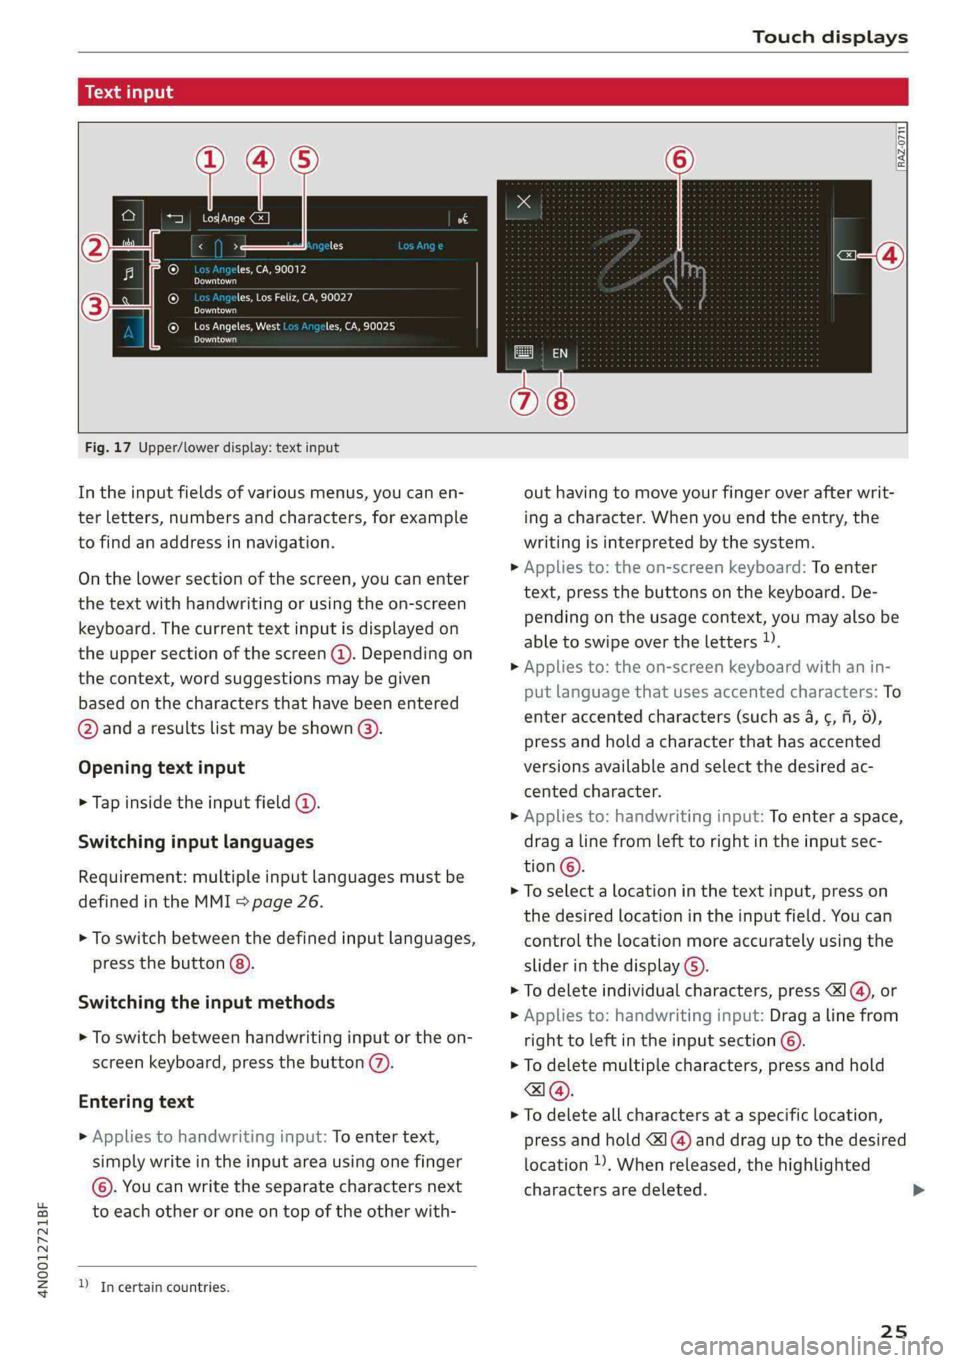
Fig. 17 Upper/lower display: text input
In the input fields of various menus, you can en-
ter letters, numbers and characters, for example
to find an address in navigation.
On the lower section of the screen, you can enter
the text with handwriting or using the on-screen
keyboard. The current text input is displayed on
the upper section of the screen @). Depending on
the context, word suggestions may be given
based on the characters that have been entered
@ and a results list may be shown @).
Opening text input
> Tap inside the input field @.
Switching input languages
Requirement: multiple input languages must be
defined in the MMI > page 26.
> To switch between the defined input languages,
press the button @).
Switching the input methods
> To switch between handwriting input or the on-
screen keyboard, press the button (7).
Entering text
> Applies to handwriting input: To enter text,
simply write in the input area using one finger
©. You can write the separate characters next
to each other or one on top of the other with-
D In certain countries.
out having to move your finger over after writ-
ing a character. When you end the entry, the
writing is interpreted by the system.
> Applies to: the on-screen keyboard: To enter
text, press the buttons on the keyboard. De-
pending on the usage context, you may also be
able to swipe over the letters )).
> Applies to: the on-screen keyboard with an in-
put language that uses accented characters: To
enter accented characters (such as 4, ¢, fi, 6),
press and hold a character that has accented
versions available and select the desired ac-
cented character.
> Applies to: handwriting input: To enter a space,
drag a line from left to right in the input sec-
tion ©.
> To select a location in the text input, press on
the desired location in the input field. You can
control the location more accurately using the
slider in the display ©).
> To delete individual characters, press
> Applies to: handwriting input: Drag a line from
right to left in the input section ©.
> To delete multiple characters, press and hold
> To delete all characters at a specific location,
press and hold <] @) and drag up to the desired
location ). When released, the highlighted
characters are deleted.
25
Page 28 of 362
Touch displays
Accepting suggested words or selecting
entries from the results list
> To accept a suggested word (2) or select an en-
try from the results list @), press on it.
> To display more content in the results list, drag
your finger upward or downward on the screen.
Setting the input language or keyboard
layout
> Applies to MMI: Select on the home screen:
SETTINGS > Language & keyboard > Keyboard.
> To define additional input languages, press the
© button.
> To change the keyboard layout for an input lan-
guage, press >. For example, you can select be-
tween QWERTZ and QWERTY.
Rear Seat Remote
Introduction
Applies to: vehicles with Rear Seat Remote
With Rear Seat Remote, you can control conven-
ience and Infotainment system functions in the
rear of the vehicle, such as the climate control
system or the media playback in the vehicle.
ZA\ WARNING
— As the driver, do not allow usage of the Rear
Seat Remote to distract you from driving, as
this could increase the risk of an accident.
For example, do not reach behind you while
driving to operate the Rear Seat Remote.
— The Rear Seat Remote can only be operated
when the vehicle is stationary or when the
remote is securely positioned in the desig-
nated holder in the vehicle. Like all loose ob-
jects, it could be thrown through the vehicle
and
cause serious injuries in a collision. If
the Rear Seat Remote is not in the designat-
ed holder, it must always be securely stowed
while driving.
— Do not use any wireless devices on the front
seats within range of the airbags while driv-
ing. Also read the warnings in the chapter
> page 84.
— The Rear Seat Remote can become hot while
charging. Pay attention to the housing and
display temperature, and be careful when
26
removing the Rear Seat Remote from the
holder.
— There are magnets located on the back of
the Rear Seat Remote and in the designated
holder. For people with pacemakers, the
electromagnetic radiation may impair pace-
maker function. Always maintain a mini-
mum distance of approximately 6 inches (15
cm) from the magnets.
@) Note
— Always follow the information found in 9®
in General information on page 222.
— Protect the Rear Seat Remote against pro-
longed exposure to direct sunlight.
— Extremely high or low temperatures that
can occur inside vehicles can damage the
Rear Seat Remote and/or impair the device
performance. Never leave your Rear Seat
Remote in the vehicle in extremely high or
low temperatures.
— Protect the Rear Seat Remote from coming
into contact with any fluids.
G) Tips
— Please note that the Rear Seat Remote can
be used only when the ignition is switched
on and within range of your vehicle's active
Wi-Fi hotspot.
— Please note that a Wi-Fi connection does
not automatically make it possible to use
the Internet. For additional information,
see the chapter > page 222.
— When playing online media sources, there
may be longer loading times or restrictions
on media playback, depending on the Inter-
net connection or the Wi-Fi usage (for ex-
ample, if there is intensive usage by multi-
ple devices on the hotspot).
— Signals from Bluetooth devices and Wi-Fi
hotspots within range of the vehicle may
impair the vehicle Wi-Fi services. If multiple
Bluetooth devices and Wi-Fi hotspots are
within range of the vehicle, it may cause re-
duced data transfer rates, connection inter-
ruptions, or limitations when streaming me-
dia.
Page 29 of 362
4N0012721BF
Touch displays
— The system complies with United States FCC
regulations and ISED regulations
=> page 341.
Applies to: vehicles with Rear Seat Remote
a
=.
S
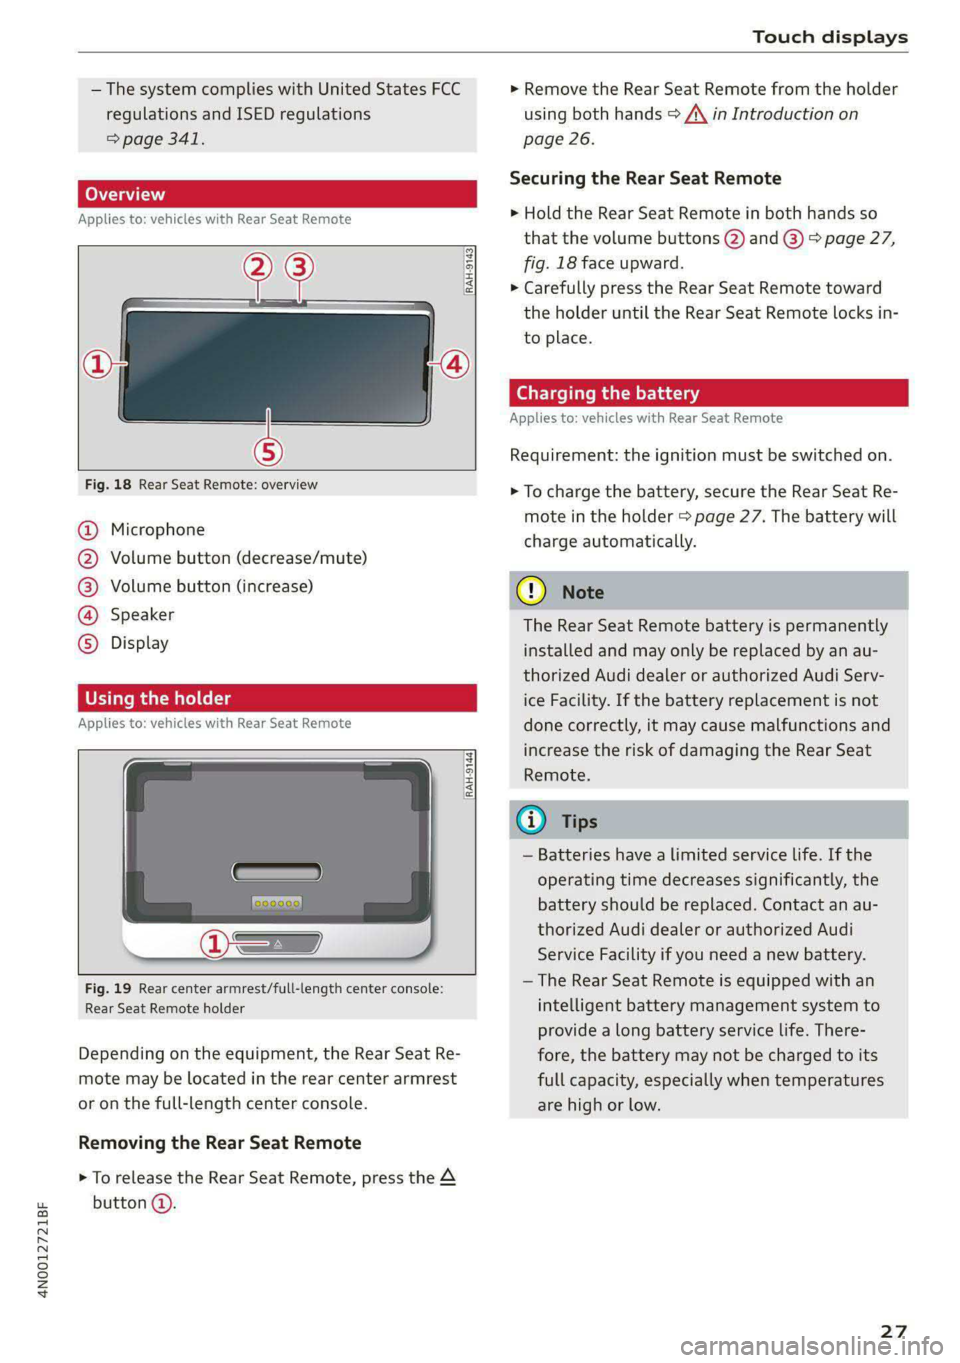
Fig. 18 Rear Seat Remote: overview
a] g
| = <
ic
@ Microphone
@ Volume button (decrease/mute)
@®) Volume button (increase)
@ Speaker
©) Display
Using the holder
Applies to: vehicles with Rear Seat Remote
[RAH-9144)
Fig. 19 Rear center armrest/full-length center console:
Rear Seat Remote holder
Depending on the equipment, the Rear Seat Re-
mote may be located in the rear center armrest
or on the full-length center console.
Removing the Rear Seat Remote
> To release the Rear Seat Remote, press the A
button @.
> Remove the Rear Seat Remote from the holder
using both hands > A\ in Introduction on
page 26.
Securing the Rear Seat Remote
> Hold the Rear Seat Remote in both hands so
that the volume buttons @) and @) > page 27,
fig. 18 face upward.
> Carefully press the Rear Seat Remote toward
the holder until the Rear Seat Remote locks in-
to place.
Charging the battery
Applies to: vehicles with Rear Seat Remote
Requirement: the ignition must be switched on.
> To charge the battery, secure the Rear Seat Re-
mote in the holder > page 27. The battery will
charge automatically.
G) Note
The Rear Seat Remote battery is permanently
installed and may only be replaced by an au-
thorized Audi dealer or authorized Audi Serv-
ice Facility. If the battery replacement is not
done correctly, it may cause malfunctions and
increase the risk of damaging the Rear Seat
Remote.
@) Tips
— Batteries have a limited service life. If the
operating time decreases significantly, the
battery should be replaced. Contact an au-
thorized Audi dealer or authorized Audi
Service Facility if you need a new battery.
— The Rear Seat Remote is equipped with an
intelligent battery management system to
provide a long battery service life. There-
fore, the battery may not be charged to its
full capacity, especially when temperatures
are high or low.
27
Page 30 of 362

Touch displays
Menus and symbols
Applies to: vehicles with Rear Seat Remote
RAX-0092
RADIO fA MEDIA SOUND | (7)
Fig. 20 Display: home screen (left) and submenu (right)
Symbol/Description Description
Select and open applications. Depending on the equipment, you
Applications may be able to use the following applications: SEATS, LIGHTS, ME-
DIA, RADIO, PHONE, DEVICES, SOUND, SETTINGS, TIPS
Set and operate the climate control system for the rear section
=> page 100
Climate control system
Use your finger to drag downward from the top of the screen to
=) Quick access open the quick access area. You can adjust the volume or open tele-
phone functions during a phone call > page 214.
(Home screen Go to the home screen
a Back Go one step back
Adjusting the volume, opening telephone functions during a phone
Media playback gall: noge 214
Side selection in vehicle
functions
Connecting to the MMI G) Tips
Applies to: vehicles with Rear Seat Remote
Switching between different seats > page 75 Q/e
|@Oe@;
©
|
O|
©
The Rear Seat Remote remains connected to
To use the Rear Seat Remote, you must connect it the MMI if you remove the remote from the
to the MMI. holder.
Applies to: vehicles with Rear Seat Remote
Requirement: the ignition must be switched on.
> Secure the Rear Seat Remote in the designated
holder > page 27. The Rear Seat Remote will
automatically connect to the MMI. The Rear Seat Remote settings can be set in the
MMI, for example to restrict operation by chil-
dren.
28