brakes AUDI ALLROAD 2000 Owners Manual
[x] Cancel search | Manufacturer: AUDI, Model Year: 2000, Model line: ALLROAD, Model: AUDI ALLROAD 2000Pages: 306, PDF Size: 9.95 MB
Page 104 of 306
Parking
brake lever
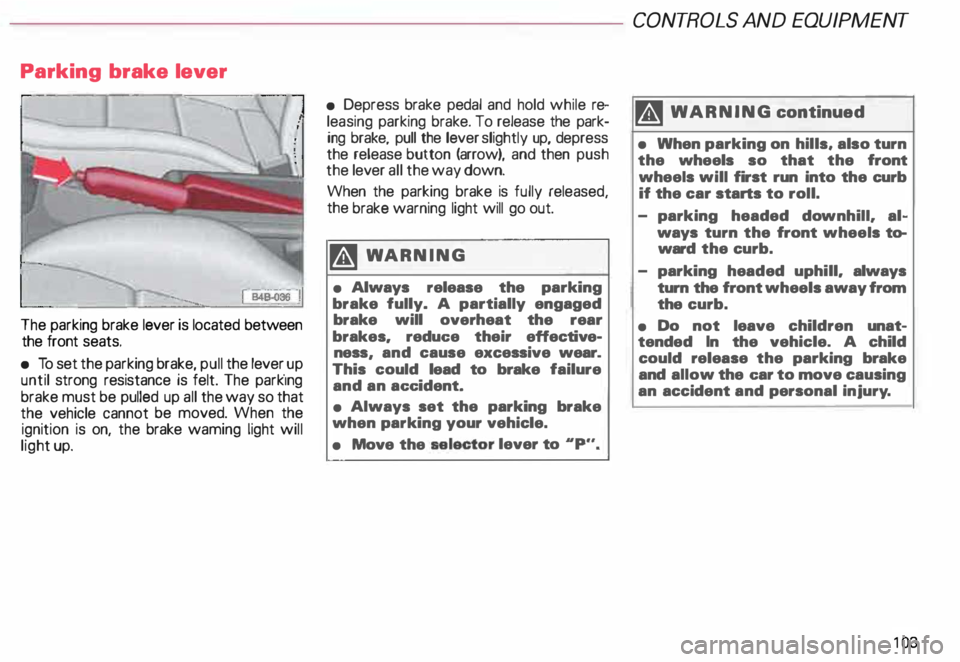
The parking brake lever is located between
the front seats.
• To set the parking brake, pull the lever _up
until strong resistance is felt. The park1ng
brake must be pulled up all the way so that
the vehicle cannot be moved. When the
ignition is on, the brake waming light will
light up. •
Depress brake pedal and hold while re
leasing parking brake. To release the park
ing brake, pull the lever slightly up, depress
the release button (arrow), and then push
the lever all the way down.
When the parking brake is fully released,
the brake warning light will go out.
�W ARNING
• Always release the parking
brake fully. A partially engaged
brake will overheat the rear
brakes. reduc:e their effective
ness and cause excessive wear.
This • could lead to brake failure
and an ac:c:ident.
• Always set the parking brake
when parking your vehicle.
• Move the selector
lever to .. p.,. CONT
ROLS AND EQUIPMENT
II WARNING continued
• When parking on hills, also turn
the wheels so that the front
wheels will first run into the curb
if the car starts to roll.
- parking headed downhill. al
ways turn the front wheels to
ward the curb.
- parking headed uphill. always
turn the front wheels away from
the curb.
• Do not leave children unat
tended In the vehicle. A child
could release the parking brake
and allow the c:ar to move causing
an accident and personal injury.
10 3
Page 109 of 306
CONT
ROLS AND EQUIPMENT---------------------
R-Reverse
Reverse should be selected only when the
vehicle has come to a full stop and the en
gine is running at idle speed.
Before you move the selector lever
to the reverse position you have to
depress the push button in the han
dle of the selector laver.
If the ignition is switc hed on, the backup
lig hts come on when the selector lever is
moved into the R (Reverse) position
10 8 N-Neutral
Shi ft to this position for standing with
brakes applied.
Before you move the selector laver
from N (Neutral) to R position you
have to depress the button in the
handle of the selector lever.
When the vehicle is stationary or at
speeds below 3 mph I 5 km/h, you
can only move the lever out of N
(Neutral) by applying the foot-brake
before and while moving the selec
tor lever.
Do not use N (NeutraU for coasting
down hill. Coasting downhill with
the transmission in Neutral and
while the engine is not running will
result in damage to the automatic
transmission and can also damage
the catalytic converter. D -
Normal driving position
Position D is for normal city and highway
driving. It ranges from zero to top speed and
all five gears shift automatically, depending
on engine load, driving speed and automati
cally selected shift programs.
Before you move the selector lever
to position 4 you have to depress the
button in the handle of the selector
lever.
Sometimes it may be better to temporarily
engage one of the following selector posi
tions.
4- Position for hilly stretches
This selector lever position is recom
mended in situations, for example when
driving on hilly stretches, where the trans
mission shifts frequently between fourth
and fifth gears in position D. Also, in posi
tion 4 the engi ne's braking effect is greater
than in D.
In position 4, the first, second, third and
fourth gears will engage automatically.
Page 126 of 306
---------------------CONTROLS AND EQUIPMENT
Turn signals and
emergency flasher
Refer to "Turn signal I headlight d1mmer
switch lever and emergency flasher" on
pages 152 and 156 for details.
High beam �D
The indicator light lights up when the high
beams are switched on or when the head
light flasher is used.
See "Turn signal I headlight dimmer switch
lever" on page 156 for details.
Malfunction Indicator
�
Lamp (MIL) CHECK
The Malfunction Indicator Lamp is part of
the On Board Diagnostic system (OBD).
The lamp comes on when the ignition is
switched on and will go out after the engine
is started and the idle has stabilized. This is
to assure you that the Malfunction Indicator
Lamp is working properly.
For more details, see page 128. Airbag
System AIR
BAG
The ind icator light for the airbag and belt
tensioner system must come on when
the ignition is switched on, and go out after
a few seconds. If the light does not go out,
or if it comes on while you are driving, this
ind icates a fault in the airbag I belt tensioner
syste m.
If the indicator light does not come on when
the ignition is switched on, this also indi
cates a system malfunction. If any of these
conditions occur, have the air bag system in
spected immediately by your authorized
Audi Dealer.
For more details, see page 25. Anti-lock
Brake System
USA models:
Canada models: ABS
8
This warn ing light monitors the ABS and
EDL (Electronic Differential Lock,
sys tems.
The light will come on for a few seconds
when the ignition is switched on. The light
will go out after an automatic check se
quence.
For additional information on the ABS sy
stem, see page 202.
� WARNING
If the ABS warning light does not
go out, or if it comes on while driv
ing, the ABS system is not working
properly. The vehicle can then be
stopped only with the standard
brakes (without ABS,. You won't
have the protection ABS provides.
Contact your Audi Dealer as soon
as possible.
125
Page 128 of 306
f4
WARNING continued
• If the brake warning light does
not go out with the engine running
and the parking brake released, or
lights up while you ere driving, the
fluid level in the brake fluid reser
voir is too low.
• If you believe that it Is safe to do
so, proceed immediately at low
speed to the nearest authorized
Audi Dealer or qualified workshop
and have the brake system in
spected.
• Please be very careful and be
sure to remember that after sev
eral brake applications, you will
need greater pressure on the brake
pedal to stop your vehicle. Conse
quently, you must allow for in
creased braking distances. Trying
to brake as quickly as usual could
lead to an accident.
For details see "Brakes.. on page
201. Generator
This
light comes on when the ignition is
turned on and goes out after the engine is
started. If the light does not go out after
star ting and rewing up the engine momen
tarily or lights up while driving, there may be
a malfunc tion in the electrical system, or the
V- belt driving the gener ator may be broken. A If the warning light comes on
V while driving, stop the vehicle
and turn oft the engine. Inspect the
belts.
If the V-belt is not torn, you can still continue
driving to the nearestAudi Dealer. However,
since the battery is no longer being charged,
switch off all unne cessary electrical equip
ment.
If the V- belt is tom, the power steering and
the radiator fan will also not work.
Obtain expert assistance.
g Always heed all WA RNINGS
r!!l on page 232, chapter "En
gine compartment '". CONT
ROLS AND EQ UIPMENT
Safety belts
Yo ur vehicle has a warning light to remind
you to wear your safety belt and to make
sure that others do too.
After switching on the ignition, the warning
light in the instrument cluster will come on
for about 6 seconds along with a war ning
tone. As soon as you fasten your safety belt,
the warning tone will stop.
The warning light, however, will be on for
the entire 6 seconds.
Fasten your safety belt now and ma
ke sure that your passengers also
properly put on their safety belts.
Please be sure to read the chapter
"Safety belts" page 14.
127
Page 196 of 306
------------------------VEHICLE
OPERATION
Operate your vehicle economically and
• Do not drive if you are tired.
Make frequent rest stops, at least after ev
ery two hours of driving.
• Always adapt vehicle speed to
traffic, weather and road condi
tions.
Remember that especially on smooth, slip
pery roads, vehicle handling and braking de
pend a great deal on tire adhesion. On wet
roads, the front wheels can hydroplane es
pecially at higher speeds. If this happens,
you will then, no longer be able to steer or
brake properly.
• Always observe the posted speed
limits and use common sense. Your
good judgment can mean the differ
ence between arriving safely at your
destination and having an accident.
Additional information regarding safety can
be found in the individual chapters of this
manual. minimize
pollution
Va rious factors influence fuel consumption:
engine wear, brakes and tires, environmen
tal impact.
This chapter addresses some of these
points.
Yo ur personal sty!e of driving
wi II determine the economy of your vehicle,
as well as exhaust and noise levels.
«i? Do not let your vehicle stand and
, warm
up.
When the engine is idling, it takes a very
long time to warm up. Moreover, during
warm-up, both engine wear and exhaust
gas emissions are very high. Therefore, be
ready to drive off immediately after starting
the engine and avoid high engine speeds.
«i? Avoid full throttle.
Accelerating gently reduces fuel consump
tion, engine wear, and does not disturb the
environment. <£'
Avoid driving at high speed.
Fuel consumption, exhaust emissions and
engine noise increase disproportionately at
high speeds. If you drive at approximately
three quarters of top speed, fuel consump
tion will be reduced by one half. Never drive
faster than the posted speed limit and
weather conditions permitting.
r.:Cib Drive as smoothly as possible
W5 and keep a lookout ahead.
Unn ecessary accelerating and braking in
crease fuel consumption and disturb the en
vironment.
r.:Cib Switch off your engine if you are
W5 caught in a traffic jam. This
saves fuel and reduces emissions.
195
Page 200 of 306
-----------------------VEHICLE OPERATION
Driving on rough roads or rugged terrain
For off road use, your Audi allroad is
equipped with a 4-level air suspension ride
height adjustment system, in addition to all
wheel drive.
Yo ur vehicle's ground clearance (ride height)
can be adjusted to changing terrain condi
tions with the push of a butt on.
At the highe st level setting (maximum clear
ing level), ground clearance is 8.2 inches
(20.8 em).
Some general tips
Navar drive on terra in that is too de
manding for the design of your ve
hicle or for your driving abilities.
Navar t�;�ke any unnecessary
chances!
• Before you take your vehicle off-roa d,
make certain that you know how to operate
the ride height adjustment system-see pa
ge 153. •
Make sure that you adjust the ride height
just before you travel on any rough sections
of terra in.
• Always adjust the vehicle's speed
to the trail and terrain conditions.
• Stow any luggage or other items in the
luggage compartment and make certain
that they are properly secured so that they
do not shift.
• Never travel on any roads, trails or terrain
on which motor vehicle travel is prohibited.
r.:Cib Always protect the environW ment. Respect our natural su�
roundings.
• After traveling off-road, remember to re
move any branches or other foreign objects
caught in the grille, underbody or wheels. In
particular, look for foreign objects (stones)
caught in the tire treads.
Check the vehicle for possible damage.
• Clean dirty windows, headlight and tail
light lenses and license plates. •
Check your brakes after traveling off-road
especially after driving through water.
• If need be, clean the underbody, suspen
sion parts, etc. (for example, in an under
body wash).
Some driving tips
Unpaved roads and off-road
• Drive slowly on unfamiliar roads and ter
rain, and stay alert for unexpected hazards
(for example, potholes, rocks and stumps).
• To avoid hanging up the vehicle and dam
aging the undercarriage on extremely un
even terrain, drive over large humps with
the hump in the center of the vehicle.
Instead, always drive over the hump with
the vehicle wheels on one side of the ve
hicle positioned over the crown of the
hump.
199
Page 201 of 306
VE
HICL E OPER ATION
Driving on slopes
• If you find that you cannot climb a grade,
never try to turn. Back down the hill in re
verse gear. If you don't. the vehicle may
tip or roll over!
• To reduce the danger of rolling the ve
hicle, drive the vehicle as close as possible
to the "fall line" (direction of maximum
slope) -not at an angle to the fall line.
If it feels like the vehicle is about to
roll over when you are trav eling at
an angle to the fall line, turn into the
fall line immediately.
• Never park your vehicle on extreme
uphill or down hill slopes.
Deep snow
• You should promptly install wheels
equipped with winter or all-season tires
when you expect winter road conditions -
see page 260.
• Install snow chains before attempting to
drive through deep, unplowed snow - see
page 261.
200 Driving
through water
• Always make certain that the ride level
system is in the highest level before cross
ing streams and similar water obstacles.
• You should always determine how deep
the water is before you drive through it.
• When crossing through water, travel only
at a walking speed. If possible, do not
stop and do not shut off the engine.
• Avo id driving through salt water
(beaches, for example).
After you have traveled through wa
ter, mud or slush, your brakes may
be slow to respond due to wet brake
rotors and pads. To get back the full
braking effectiveness, apply the
brakes cautiously to dry them out
The brakes must be dry before you
can get full brake performance. Sand,
quicksand and similar unsta
ble soils
Cross sandy or other unstable terrain briskly
and, if possible, do not stop.
Page 202 of 306
Braking
General notes
• The brakes on today's automobiles are
still subject to wear, depending largely on
operating conditions and driving habits. On
vehicles which are driven mostly in stop
an d-go city traffic or which are driven hard,
the brake pads should be checked by your
authorized Audi Dealer more often than
specified in the Maintenance booklet.
• On steep slopes, you should use the
braking effect of the engine. This way, you
prevent unnecessary wear to the brake sys
tem. If you must use your brakes, do not
hold the brakes down continu ously. Pump
the brakes at interv als.
• Under certain conditions, for example,
when driving through water or very heavy
rain, or even after washing your vehicle, the
braking effect can be reduced due to the
wet brake pads or pads which are iced-up in
the winter. A few cautious brake applica
tions should dry off the brake pads or re
move ice coati ngs. The
effect iveness of the brakes can be re
duced when the vehicle is driven on a salt
covered road and the brakes are not used.
Clean off accumulated salt coating from
brake discs and pads with a few cautious
brake applications.
�W ARNING
• If you damage the front spoiler,
or if you install a different spoiler,
be sure the air flow to the front
brakes is not obstructed, other
wise the brake system could over
heat reducing the effectiveness of
the entire brake aystem.
• Failure of one brake circuit will
impair the braking capability re
sulting in an increased stopping
distance.
Avo id driving the vehicle and have
it towed to the nearest authorized
Audi Dealer or qualified work
shop. VEH
ICLE OPERATION
Brake booster
�W ARNING
• The brake booster works with
vacuum pressure which is created
only when the engine is running.
Never let the vehicle roll to a stop
with the angina shut off.
• If the brake booster is not work
ing, for example when towing your
vehicle, or because the brake boo
ster has somehow been damaged,
the brake pedal must be pressed
harder to make up for the lack of
booster assistance.
201
Page 203 of 306
VE
HICL E OPER ATION------------------------
Functioning of Anti-Lock Brake
System (ABS)
The ABS contributes effectively to vehicle
control since it prevents the wheels from
locking when the brakes are applied. This
means that the vehicle remains steerable
and is less likely to skid.
Nota
Yo u don't have to "pump" the brake.
Just hold the brake pedal down.
However, do not expect that the ABS short
ens braking distance under all circum
stances. When driving on gravel or on newly
fallen snow on top of icy surfaces, braking
distance may be even longer , therefore, un
der these circumstances, it is especially im
portant that you drive slowly and with great
care.
202 How the
ABS system works
An automatic check is made when a speed
of about 4 mph (6 km/h) is reached.
When this happens a pumping noise can be
heard.
If an individual wheel begins to rotate too
slowly in relation to vehicle speed and tends
to lock, the ABS automatically reduces
brake pressure to prevent that wheel from
locking.
This automatic adjustment process
will cause a slight vibration of the
brake pedal and soma noises to alert
you that vehicle speed must be
adapted to existing road and traffic
conditions. Enhanced
ABS function {Offroad
Mode)
To improve braking on loose terrain (for ex
ample: gravel, scree, mud, slush, snow),
turn off the ESP (see page 205), which will
switch the ABS to a special mode designed
for off-road requirements.
In this mode, the ABS control system is
changed to allow a "wedge" of loose rock
or soil to form in the front of the wheels.
This improves braking performance.
The ESP indicator light in the instrument
cluster will come on when you have
switched to this special ABS mode (see
page 124).
This special ABS mode will remain active up
to about 40 mph (60 km/h). ABS operation
is not affected at speeds over 40 mph
(60 km/h).
To turn his special ABS mode off, press the
ESP button (To activate ESP, see page 152).
The ABS off-road mode will also be deacti
vated when vou turn off the engine.
Page 204 of 306
�W
ARNING
Although the ABS is very effec
tive, always remember that brak
ing capability is lim ited by tire
tracti on.
Always adjust your driving speed
accor ding to the road and traffic
conditions. Do not let the extra
safety afforded by the ABS tempt
you into taking extra risks. The
ABS cannot overcome the laws of
physics.
If ABS is not functioning properly, a warning
light will come on. See page 125 for addi
tional details. Conditions
affecting
braking efficiency
Moisture or road salt
�W ARNING
• Under certain climatic and oper
ating conditions such as passing
through water, driving in heavy
rain or after washing the vehicle,
the effectiveness of the brakes
can be reduced. In winter, ice can
accumulate on the brake pads, lin
ings, discs and drums. Cautiously
apply brakes for a test. Brakes will
dry and ice coatings will be
cleaned off after a few cautious
brake applications. VE
HICLE OPERATION
� WARNING continued
• Driving for an extended period
of time on salt-covered roads with
out using your brakes can also af
fect braking efficiency. Clean off
accumulated salt coating from
brake discs and pads with a few
cautious brake applications.
Overhea ting the brakes
�W ARNIN G
• Do not "ride the brakes" by rest
ing your foot on the pedal when
you do not intend to brake. This
may cause the brakes to overheat,
premature wear and Increased
stopping distance.
Always heed all WAR NINGS
on next page.
203