269 AUDI E-TRON 2019 Owners Manual
[x] Cancel search | Manufacturer: AUDI, Model Year: 2019, Model line: E-TRON, Model: AUDI E-TRON 2019Pages: 310, PDF Size: 81.91 MB
Page 6 of 310
Table of contents
Playing medias. « ssiie vo sence yo weve » 6 ene 221
Options and settings..............0.. 225
Supported media and file formats...... 227
Troubleshooting wwii «s wwine ev eee ae eae 228
Audi smartphone interface...... 229
SOtUP 8 wceow oo anew 3 wai oo nae @ ¥ ORI 6 229
TrOUBLESHOOEING weiner sv ermcnve » 1 eretane ww wenn 230
Additional settings.............. 231,
SyStem/Setings'. « « scare © « sosnore w 2 eee ¥ 6 231
Connected devices................--- 232
Legalinformation................... 233
Maintenance and Care........... 235
Checking and Filling............. 235
Motorcompartmentss wisi ss wessa ee concn 235
Cooling systeM....... 2... eee eee eee 237
Brake fluid: « « sacs = seems sy eees oy cee 239
Electrical-system ies <2 eswa s 6 ese es een 239
Battery. ........ 0.0... cee ee 240
Windshield washer system...........- 241
Service interval display............... 242
Wheels .......... 00... 243
Wheels and Tires « us ss ewe ss un ga 243
Tire pressure monitoring system....... 260
Care and cleaning................ 263
General information................. 263
Car washes ........ 0... e eee 263
Cleaning and care information......... 264
Taking your vehicle out of service....... 268
Do: It YOUFSELF cas « ations ¢ ean ss eee 269
Emergency assistance........... 269
General information 0... ccc ees 269
Equipment..................0.00005 269
Tire mobility Kit os ss ceca se eee + cers 269
Changingatire..................000. 271
Collapsible spare tire................. 275
JUMP Starting « sows ss vers & o cows + & sees 276
TOWING) cnasers © « sonsene % 5 anssaas 6 # sacuins & # simare 276
Fuses and bulbs.................. 279
FUSES sacs vo cscs x a eros we ena Woo cae woe 279
Bulbs... 2. eee eee ee 282
Customer information........... 283
Data privacy..................000. 283
Image recording............seeeeeees 283
Datamemoniesy. « s sscams sv sume ov ene a 0s 283
Transmitted information.............. 284
Accessories and technical
CHANGES... 1... eee eee eee 286
Warranty......... 00-000. e eee eee 286
Audi Literature Shop..............00. 286
Driving in other countries............. 286
Maintenance, repairs, and technical
MOGIFIcAatIONS vase x x mem = x saw x 2 sue 286
Accessories and parts................ 288
Reporting Safety Defects.............. 288
Declaration of compliance for
telecommunications equipment and
electronic systems............---0000- 289
Technical data..................8. 291
Identification data................00. 291
Vehicle dataiscs: = s xews 2s eens sp oes ye 291
Index... 0.2... eee 293
Page 40 of 310
Opening and closing
switched off. You must be standing at the center
behind the luggage compartment lid.
> Move your foot back and forth under the bump-
er one time > fig. 30. Do not touch the bumper.
Make sure you have firm footing. The luggage
compartment lid will open or close » once the
system detects the movement. The automatic
opening or closing will be canceled if you re-
peat one of the movements described.
Follow the safety precautions > page 35.
The luggage compartment lid will only open
or close )) if you perform the movement as
described. This prevents the luggage com-
partment lid from opening or closing due to
similar movements )), such as when you walk
between the rear of the vehicle and your ga-
rage door. In some situations, the function
may be limited or temporarily unavailable.
This may happen if:
— You are standing too close to the bumper or
too far away from it
— The luggage compartment lid was closed or
opened immediately beforehand
— You park close to a hedge and the branches
move back and forth under the vehicle for a
long period of time
— You clean your vehicle, for example with a
pressure washer or in a car wash
— There is heavy rain
—The bumper is very dirty, for example after
driving on salt-covered roads
— There is interference to the vehicle key's ra-
dio signal, such as from mobile devices or
remote controls
D_ The closing function applies to vehicles that also have au-
tomatic luggage compartment lid operation.
2) Use the flat side of the reversible screwdriver blade.
38
Mechanically unlocking the luggage
compartment lid
The luggage compartment lid can be released
from the inside in an emergency.
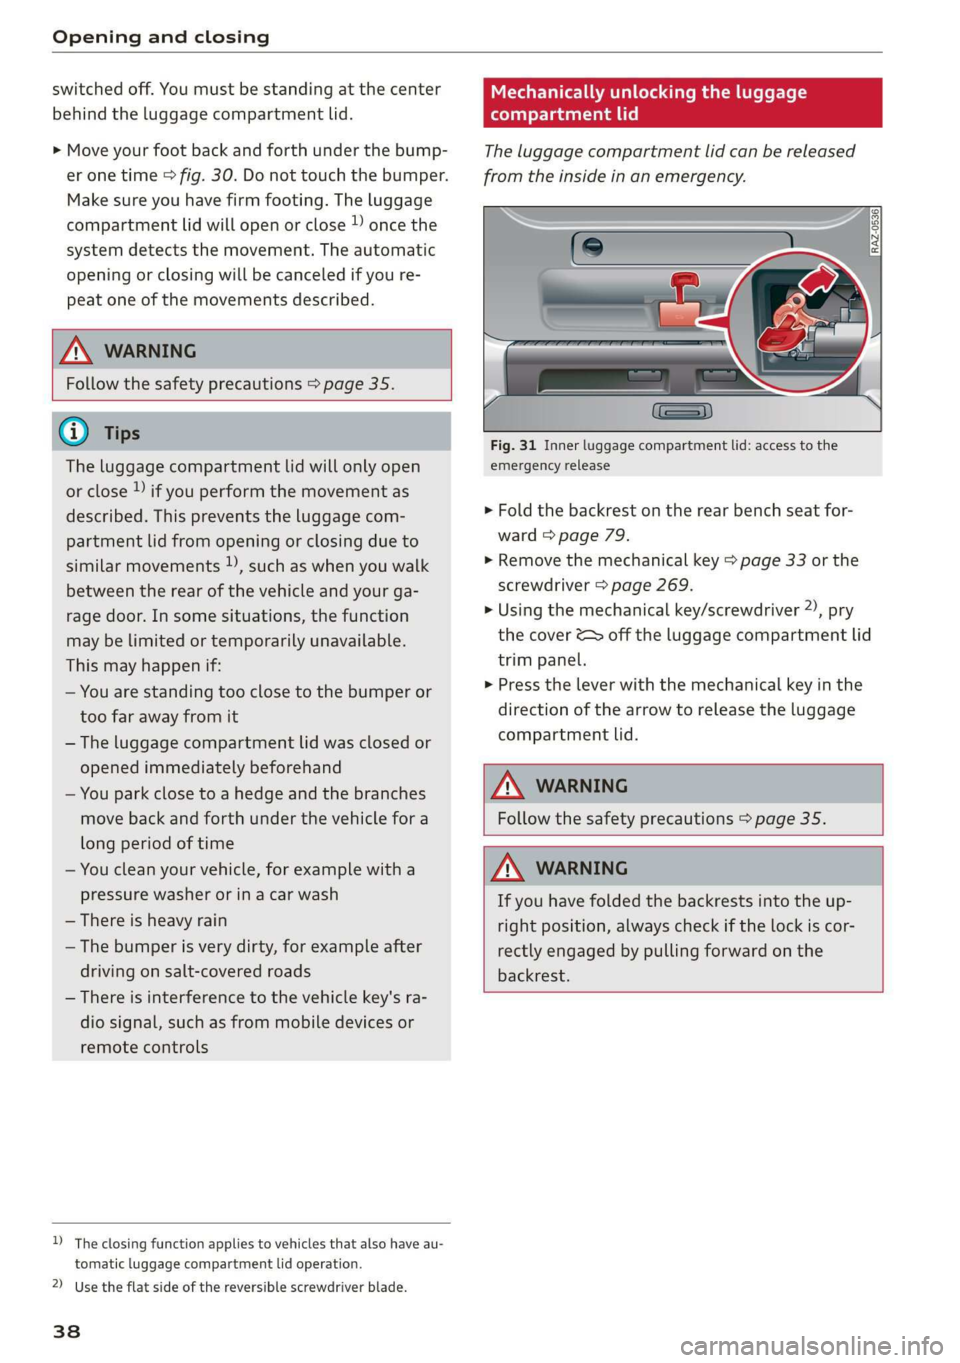
Fig. 31 Inner luggage compartment lid: access to the
emergency release
> Fold the backrest on the rear bench seat for-
ward > page 79.
> Remove the mechanical key > page 33 or the
screwdriver > page 269.
> Using the mechanical key/screwdriver 2), pry
the cover &> off the luggage compartment lid
trim panel.
> Press the lever with the mechanical key in the
direction of the arrow to release the luggage
compartment lid.
Follow the safety precautions > page 35.
If you have folded the backrests into the up-
right
position, always check if the lock is cor-
rectly engaged by pulling forward on the
backrest.
Page 271 of 310
4KE012721BB
Emergency assistance
Emergency assistance
General information
> Park the vehicle as far as possible from moving
traffic in the event of a breakdown. In the event
of a flat tire, park the vehicle ona level surface.
If you are ona steep hill, be especially careful.
> Set the parking brake.
> Switch the emergency flashers on.
> Have the passengers exit the vehicle. They
should move to a safe place, for example be-
hind a guard rail.
Z\ WARNING
Follow the steps given above. This is for your
protection and the for the safety of others on
the road.
Equipment
Vehicle tool kit, tire
vehicle jack
Applies to: vehicles with the vehicle tool kit, tire mobility kit,
and vehicle jack
yi aYaLaL eae Tale|
AZ-0636
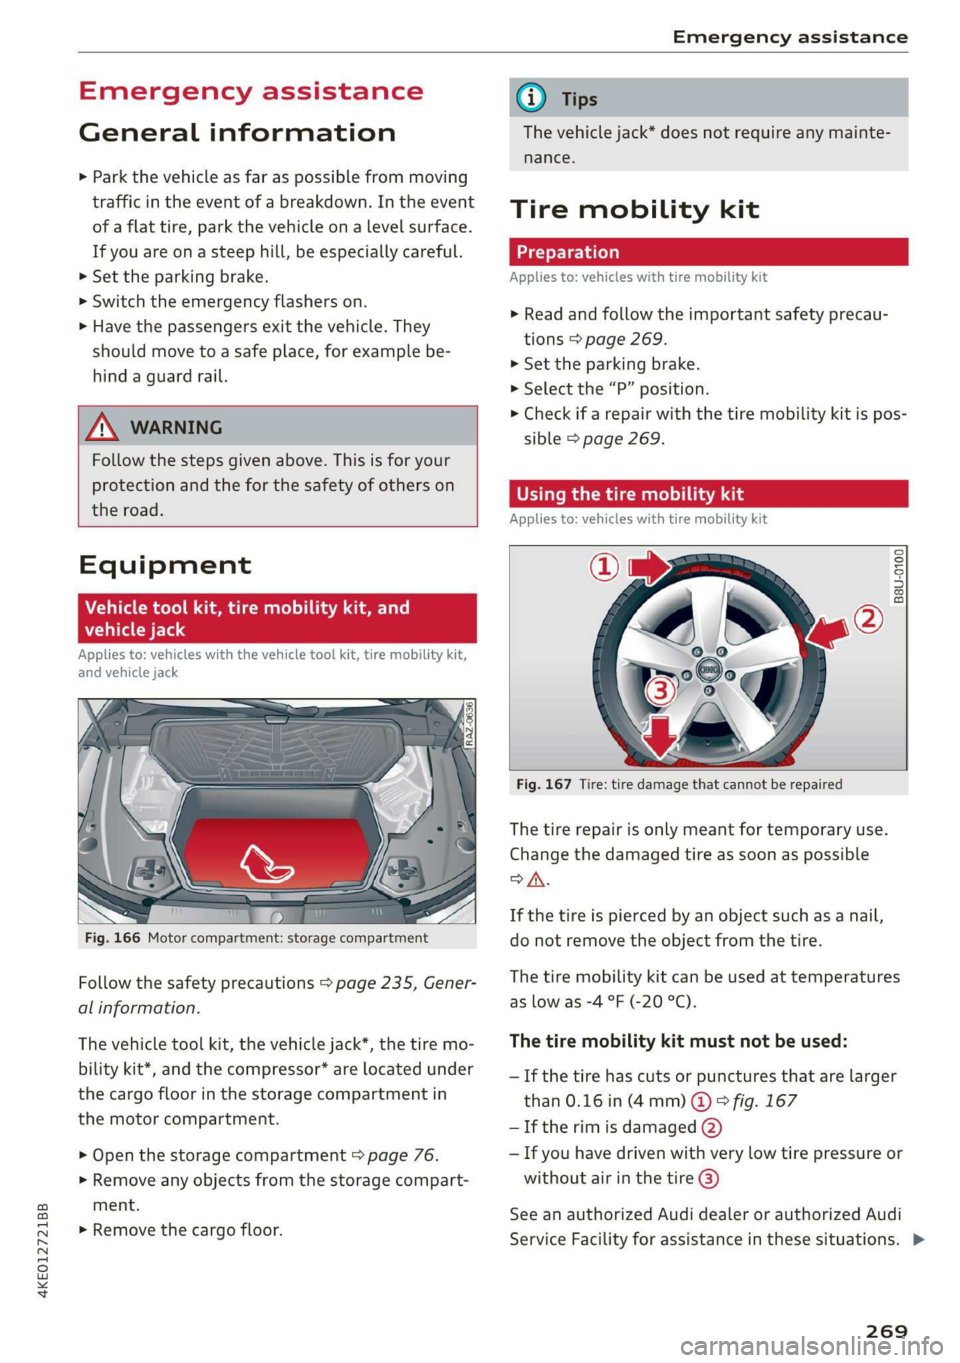
Fig. 166 Motor compartment: storage compartment
Follow the safety precautions > page 235, Gener-
al information.
The vehicle tool kit, the vehicle jack*, the tire mo-
bility kit*, and the compressor* are located under
the cargo floor in the storage compartment in
the motor compartment.
> Open the storage compartment > page 76.
> Remove any objects from the storage compart-
ment.
> Remove the cargo floor.
G) Tips
The vehicle jack* does not require any mainte-
nance.
Tire mobility kit
Applies to: vehicles with tire mobility kit
> Read and follow the important safety precau-
tions > page 269.
>» Set the parking brake.
> Select the “P” position.
> Check if a repair with the tire mobility kit is pos-
sible > page 269.
UE Raimi) LaLa
Applies to: vehicles with tire mobility kit
B8U-0100
Fig. 167 Tire: tire damage that cannot be repaired
The tire repair is only meant for temporary use.
Change the damaged tire as soon as possible
SA.
If the tire is pierced by an object such as a nail,
do not remove the object from the tire.
The tire mobility kit can be used at temperatures
as low as -4 °F (-20 °C).
The tire mobility kit must not be used:
—If the tire has cuts or punctures that are larger
than 0.16 in (4 mm) @ © fig. 167
— If the rim is damaged (2)
— If you have driven with very low tire pressure or
without air in the tire @)
See an authorized Audi dealer or authorized Audi
Service Facility for assistance in these situations. >
269
Page 272 of 310
Emergency assistance
ZA WARNING
— Please note that the tire mobility kit cannot
be used in all situations, and that it may on-
ly be used temporarily.
— The tire sealant must not come in contact
with skin, eyes, or clothing.
— If tire sealant comes into contact with your
eyes or your skin, thoroughly rinse the af-
fected area immediately with clean water.
— Do not inhale the fumes.
— If you swallow any of the tire sealant, thor-
oughly rinse your mouth immediately and
drink a lot of water. Do not induce vomiting.
Seek medical attention immediately.
— Change your clothing immediately if it
comes into contact with tire sealant.
— If an allergic reaction occurs, seek medical
attention immediately.
— Keep the tire sealant away from children.
G) Tips
— If sealant leaks, allow it to dry in place. You
can then peel it off like a sticker.
— Note the expiration date on the sealant bot-
tle. Replace the tire sealant at an authorized
Audi dealer or authorized Audi Service Fa-
cility.
— Radio reception can be interrupted when
operating the compressor.
— Follow the legal regulations that are appli-
cable in the country where you are operating
the vehicle.
D_ The compressor may look different. However, the way it is
operated is generally the same.
270
Repairing tires
Applies to: vehicles with tire mobility kit
RAZ-0213|
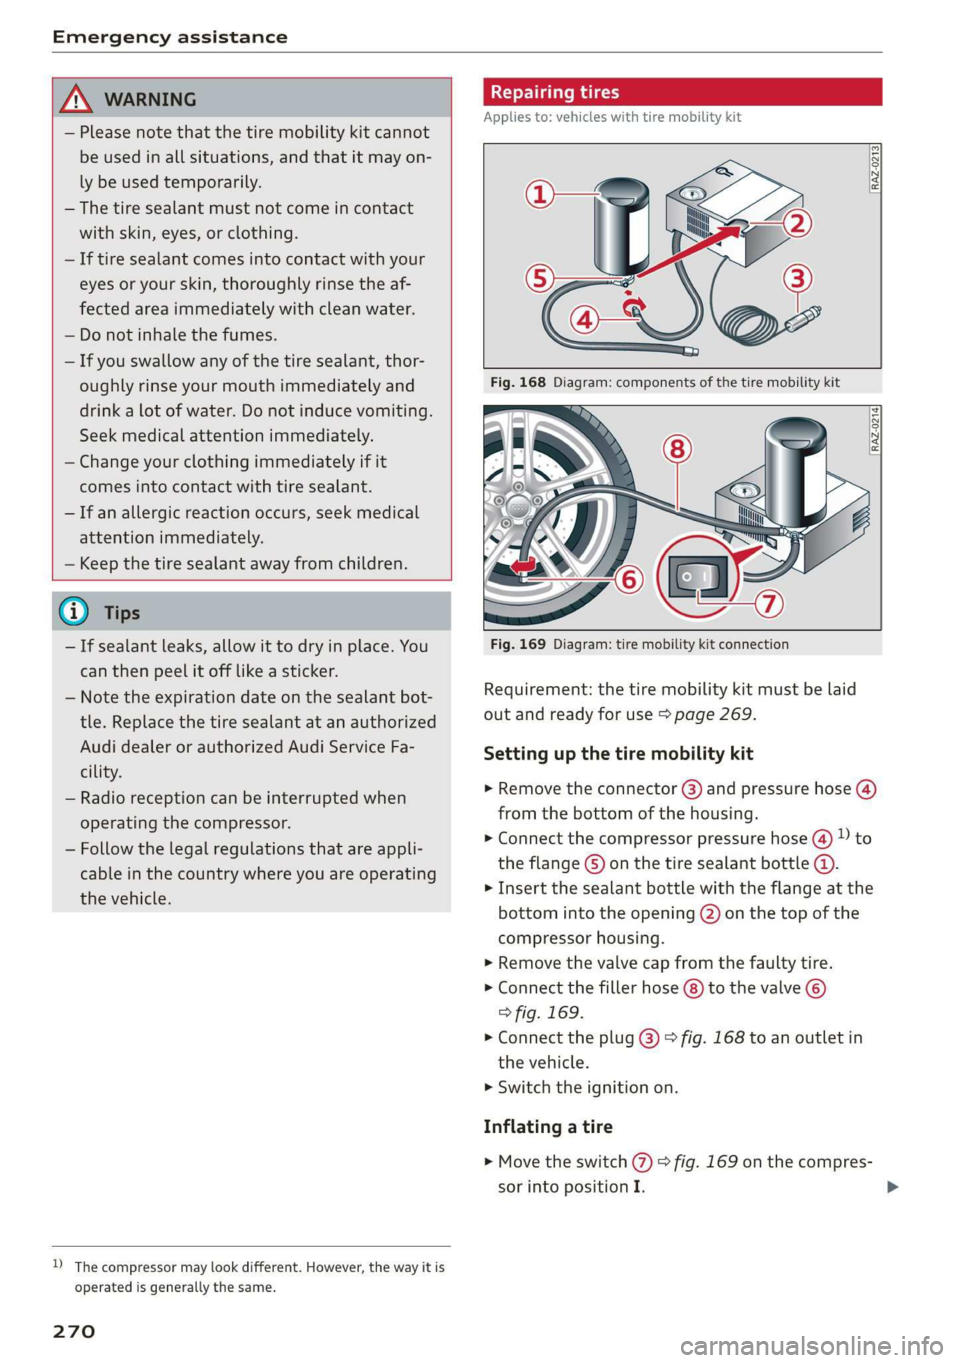
Fig. 169 Diagram: tire mobility kit connection
Requirement: the tire mobility kit must be laid
out and ready for use > page 269.
Setting up the tire mobility kit
> Remove the connector (3) and pressure hose (4)
from the bottom of the housing.
> Connect the compressor pressure hose @ D to
the flange © on the tire sealant bottle ©.
> Insert the sealant bottle with the flange at the
bottom into the opening @) on the top of the
compressor housing.
> Remove the valve cap from the faulty tire.
>» Connect the filler hose (8) to the valve ©)
> fig. 169.
> Connect the plug @) © fig. 168 to an outlet in
the vehicle.
> Switch the ignition on.
Inflating a tire
> Move the switch (7) > fig. 169 on the compres-
sor into position I.
Page 273 of 310
4KE012721BB
Emergency assistance
> Inflate the tire to between 29 psi (200 kPA)
and 36 psi (250 kPA) and read the pressure on
the gauge.
> If this tire pressure is not reached, remove the
filler hose. Drive slowly approximately 33 feet
(10 m) forward or in reverse so that the sealant
can be distributed in the tire. Inflate the tire
again > A\.
ZA\ WARNING
— Read and follow the manufacturer's safety
precautions on the compressor and in the in-
structions on the bottle of sealant.
— Ifa tire pressure of 29 psi (200 kPA) cannot
reached after inflating for 6 minutes, then
the tire is too severely damaged. Do not con-
tinue driving.
— If the tire cannot be repaired with the tire
sealant, see an authorized Audi dealer or au-
thorized Audi Service Facility for assistance.
@) Tips
Do not operate the compressor for more than
six minutes continuously, or it can overheat.
Once the compressor has cooled, you can con-
tinue to use it.
CeeTnn eas]
Applies to: vehicles with tire mobility kit
> Affix the sticker that says "max. 50 mph (max.
80 km/h)" that is provided with the tire mobili-
ty kit within the driver's field of vision.
> Stop the vehicle after driving for about 10 mi-
nutes and check the tire pressure.
> If the tire pressure is lower than 19 psi (130
kPA), then the tire is too severely damaged. Do
not continue driving.
Nv WARNING
Pay attention to the following after repairing
the tire:
— Do not drive faster than 50 mph (80 km/h).
— Avoid hard acceleration or braking and driv-
ing fast around curves.
— The vehicle may become more difficult to
control.
— If the tire is too severely damaged, see an
authorized Audi dealer or authorized Audi
Service Facility for assistance.
(@) For the sake of the environment
You can give the used tire sealant bottle to an
authorized Audi dealer or authorized Audi
Service Facility for disposal.
G) Tips
Remember to obtain a new bottle of sealant
from an authorized Audi dealer or authorized
Audi Service Facility after repairing a tire.
Changing a tire
You must complete the preparation before
changing a tire.
> Read and follow the important safety precau-
tions > page 269.
> Set the parking brake.
> Select the “P” position.
> When towing a trailer: disconnect the trailer
from your vehicle.
> Lay out the vehicle tool kit > page 269 and the
spare tire > page 275.
> Applies to: vehicles with air suspension: Select
on the home screen: VEHICLE > Settings &
Service > Air suspension: wheel change.
> Switch the ignition off.
Z\ WARNING
When using the vehicle jack* on a road with a
steep hill or when offroad, you must take ex-
tra precautions to prevent the vehicle from
rolling. Use suitable objects to block the front
and
back of the wheel that is diagonal from
the wheel with the flat tire.
271
Page 277 of 310
4KE012721BB
Emergency assistance
> The wheel bolt tightening specification must be
120 ft lbs (160 Nm). Have it checked as soon as
possible with a torque wrench. Drive carefully
until then.
> Have the faulty wheel replaced as quickly as
possible.
Collapsible spare tire
Applies to: vehicles with collapsible spare tire
The collapsible spare tire is intended for short-
term use only. Have the damaged tire checked
and replaced if necessary by an authorized Audi
dealer or authorized Audi Service Facility as soon
as possible.
There are some restrictions on the use of the col-
lapsible spare tire. The collapsible spare tire has
been designed specifically for your type of vehi-
cle. Do not replace it with the collapsible spare
tire from another type of vehicle.
The collapsible spare tire is located in the lug-
gage compartment under the cargo floor cover.
Requirement: the vehicle tool kit > page 269 and
the compressor must be laid out.
Removing
> Lift the cargo floor using the handle.
> Turn the handwheel counter-clockwise and re-
move it.
> Remove the cover.
> Remove the collapsible spare tire.
You must inflate the collapsible spare tire before-
hand in order to use it.
Inflating
> Remove the valve cap from the collapsible
spare tire.
> Tighten the compressor hose on the collapsible
spare tire valve.
> Connect the compressor hose to a vehicle sock-
et and switch it on.
> Let the compressor run until the specified value
on the tire pressure sticker is reached
> page 253, fig. 165>©.
> Screw the valve cap back onto the valve.
Returning to storage
> Remove the valve cap to drain the air.
» Wait several hours before placing the collapsi-
ble spare tire in the spare wheel well. Only then
will it fold down completely so that you can
store it securely.
> Then screw the valve cap back onto the valve.
> Secure the collapsible spare tire with the cover
and the handwheel.
> Fold the cargo floor cover back into place.
Snow chains
Using snow chains on the collapsible spare tire is
not permitted for technical reasons.
If you have to drive with snow chains and a rear
tire fails, mount the collapsible spare tire in place
of a front tire. Install the snow chains on the
front tire that you removed, and install that in
place of the rear tire that failed.
ZA\ WARNING
— Only use the collapsible spare tire in emer-
gencies and drive very carefully, especially if
it is more than six years old.
— The compressor and the hose can become
very hot during operation which increases
the risk of burn injuries.
— After installing a collapsible spare tire, the
tire pressure must be checked as quickly as
possible to reduce the risk of an accident.
— Do not drive faster than 50 mph (80 km/h)
with the collapsible spare tire. Driving faster
than that increases the risk of an accident.
—To reduce the risk of an accident, avoid hard
acceleration or braking and driving fast
around curves with the collapsible spare
tire.
— Never drive using more than one collapsible
spare tire, because this increases the risk of
an accident.
— Normal tires or winter tires must not be
mounted on the collapsible spare tire rim.
@) Note
The compressor must be switched off after six
minutes at the most to reduce the risk of
275
>
Page 279 of 310
4KE012721BB
Emergency assistance
— The vehicle must not be tow started for
technical reasons.
@ Tips
— Switch Audi pre sense* off > page 153 when
loading the vehicle onto a vehicle carrier,
train, ship,
or other type of transportation,
or when towing the vehicle. This can prevent
an undesired intervention from the pre
sense* system.
— Follow the local legal regulations for tow-
ing.
Read and follow the important information under
=> page 276.
Preparations
> Only secure the towing cable or tow bar at the
designated towing loops > page 277,
=> page 278.
> Make sure the towing cable is not twisted. Oth-
erwise it could disconnect from the towing loop
while towing.
> Switch the emergency flashers on in both vehi-
cles > page 46. However, do not do this if it
prohibited by law.
Towing vehicle (front)
> Only start to drive when the towing cable is
taut.
> Press the brake pedal very carefully.
> Avoid sudden braking or driving maneuvers.
Vehicle being towed (rear)
> Make sure the ignition is switched on so that
the steering wheel is not locked and so that you
can use the turn signals, the horn, and the
windshield wipers if needed > A\.
> The brake booster only operates when the igni-
tion is switched on. Power steering only works
when the ignition is switched on and the vehicle
is rolling ). If the brake booster and power
steering are not functioning, you must press
D_ Requirement: the vehicle battery must have a sufficient
charge level.
the brake pedal much harder and use more
force to steer.
> Release the parking brake > page 93.
> Select the “N” selector lever position.
> Make sure the towing cable is always taut.
ZA\ WARNING
Never tow a vehicle using a tow bar or towing
cable if the vehicle does not have electrical
power.
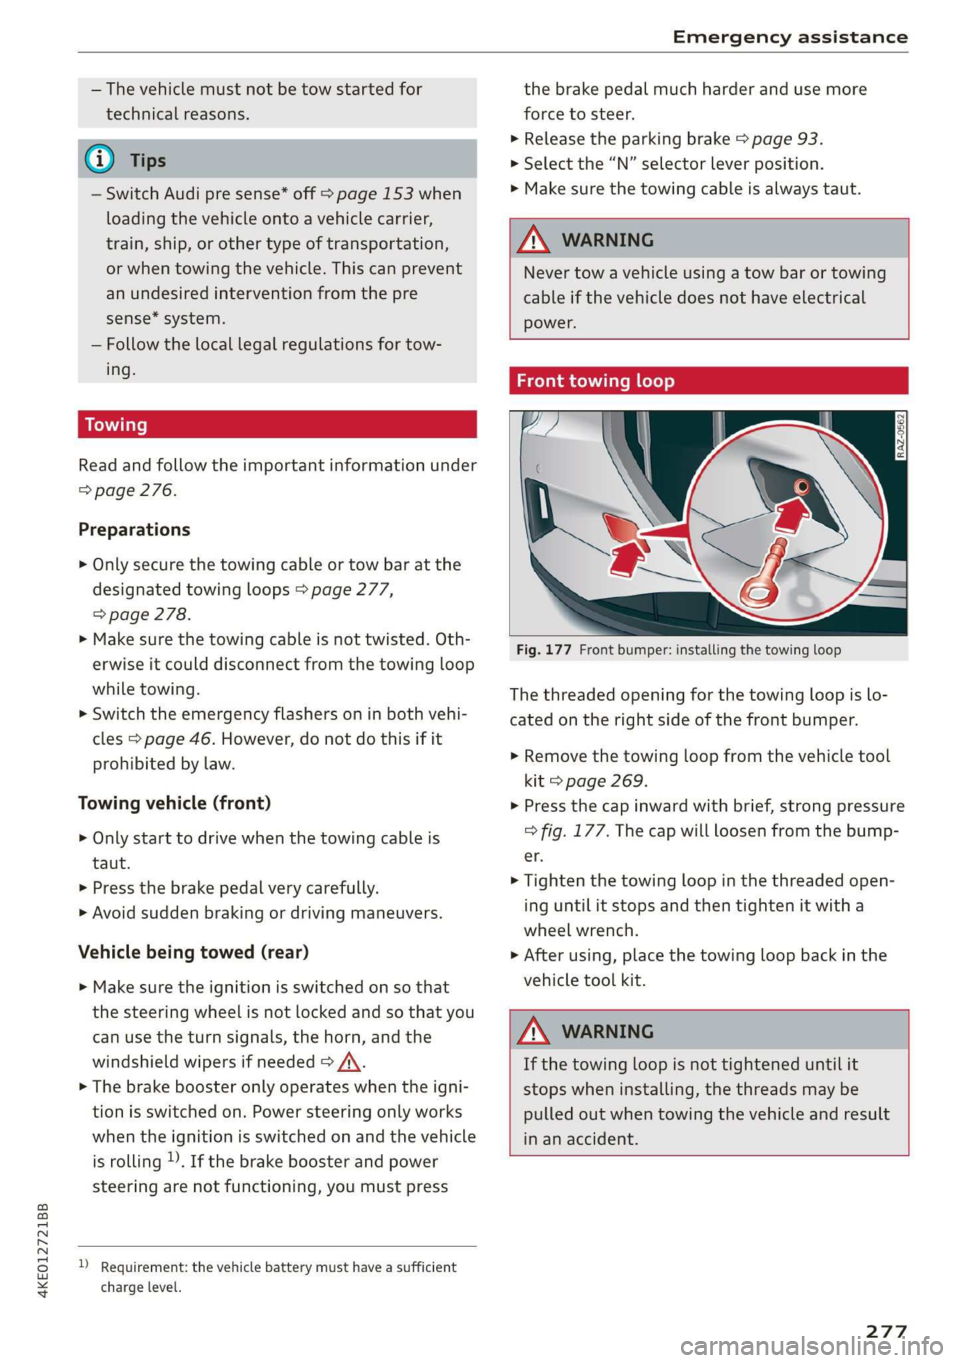
Front towing loop
Fig. 177 Front bumper: installing the towing loop
The threaded opening for the towing loop is lo-
cated on the right side of the front bumper.
> Remove the towing loop from the vehicle tool
kit > page 269.
> Press the cap inward with brief, strong pressure
=> fig. 177. The cap will loosen from the bump-
er.
> Tighten the towing loop in the threaded open-
ing until it stops and then tighten it with a
wheel wrench.
> After using, place the towing loop back in the
vehicle tool kit.
ZA WARNING
If the towing loop is not tightened until it
stops when installing, the threads may be
pulled out when towing the vehicle and result
in an accident.
277
Page 280 of 310
Emergency assistance
Rear towing loop
2 3
eB
ig =
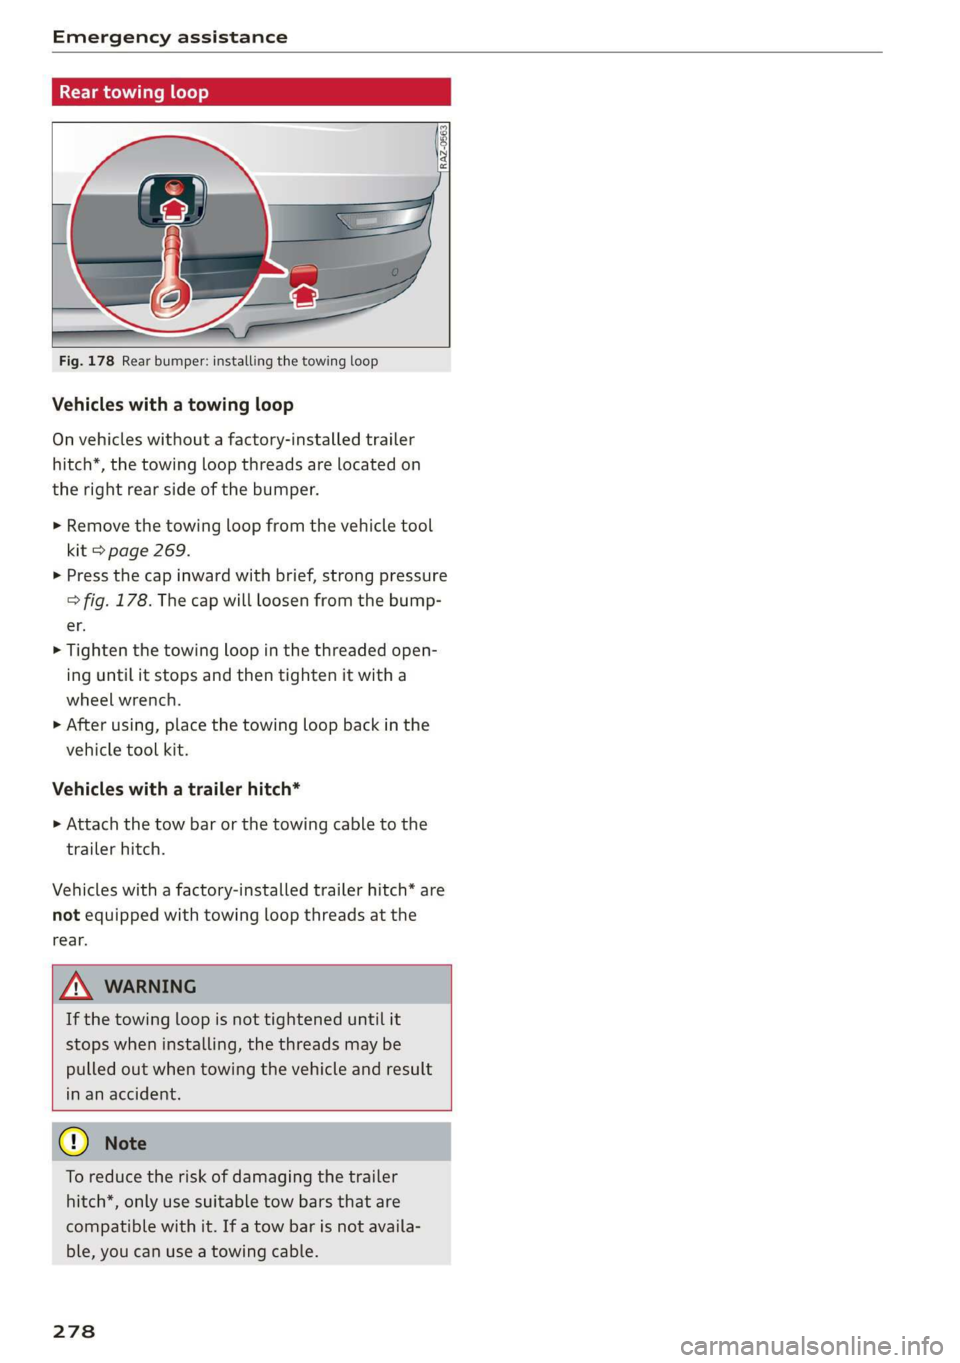
Fig. 178 Rear bumper: installing the towing loop
Vehicles with a towing loop
On vehicles without a factory-installed trailer
hitch*, the towing loop threads are located on
the right rear side of the bumper.
> Remove the towing loop from the vehicle tool
kit > page 269.
> Press the cap inward with brief, strong pressure
=> fig. 178. The cap will loosen from the bump-
er.
> Tighten the towing loop in the threaded open-
ing until it stops and then tighten it with a
wheel wrench.
>» After using, place the towing loop back in the
vehicle tool kit.
Vehicles with a trailer hitch*
>» Attach the tow bar or the towing cable to the
trailer hitch.
Vehicles with a factory-installed trailer hitch* are
not equipped with towing loop threads at the
rear.
If the towing loop is not tightened until it
stops when installing, the threads may be
pulled out when towing the vehicle and result
in an accident.
To reduce the risk of damaging the trailer
hitch*, only use suitable tow bars that are
compatible with it. If a tow bar is not availa-
ble, you can use a towing cable.
278
Page 281 of 310
4KE012721BB
Fuses and bulbs
Fuses and bulbs
Fuses
Seale mie
> Remove the screwdriver from the vehicle tool
kit > page 269.
> Remove the appropriate cover.
> Remove the colored plastic clip from the fuse
panel, if necessary.
> Remove the fuse using the clip.
» Replace the blown fuse only with a fuse that
has the same current rating.
> Reinstall the plastic bracket.
> Install the cover.
Fuse color identification
er
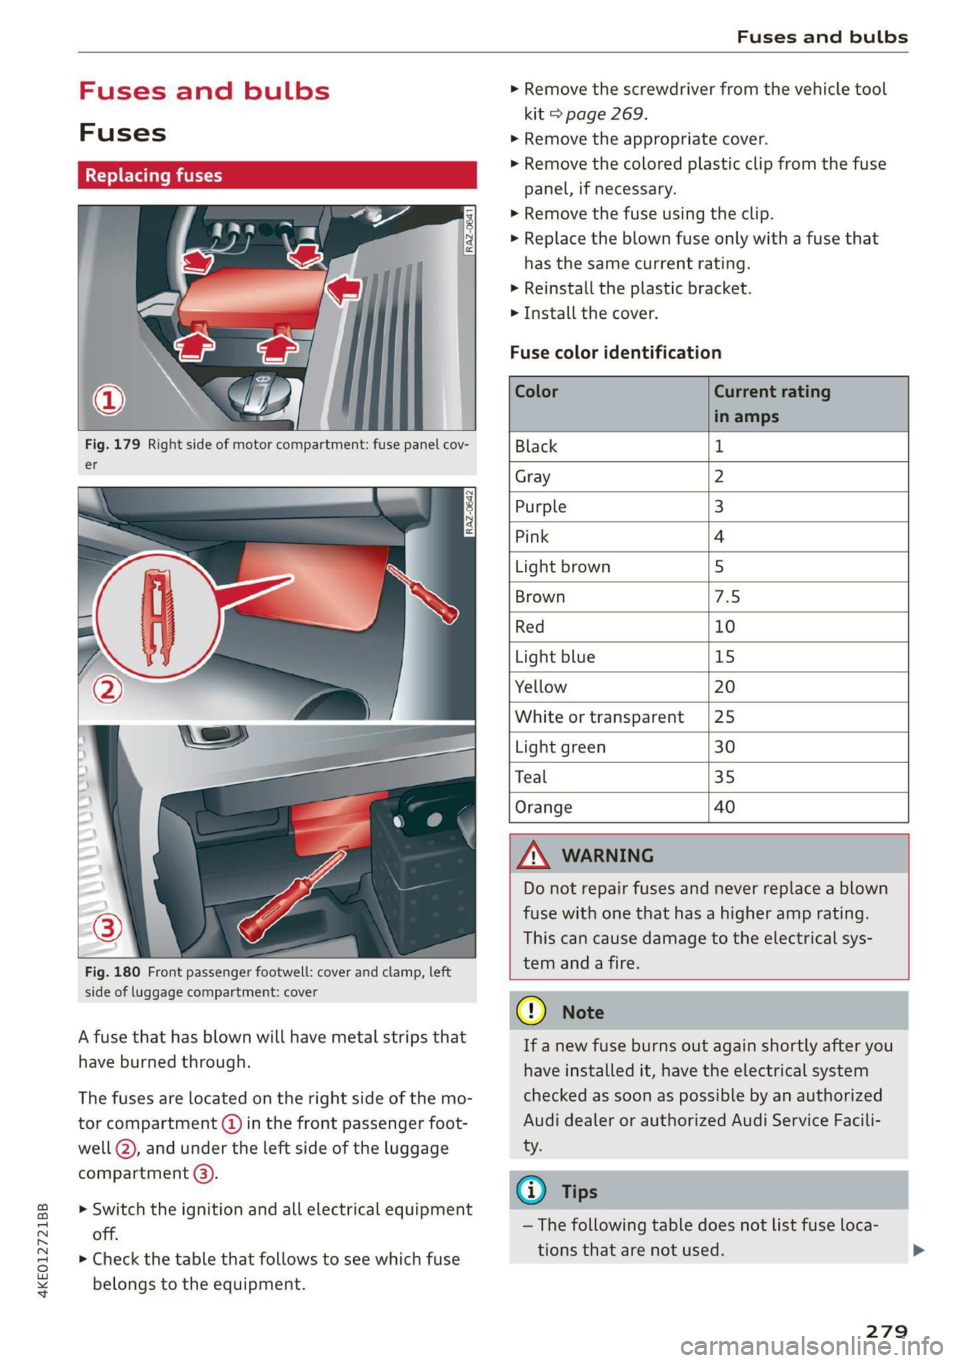
Fig. 180 Front passenger footwell: cover and clamp, left
side of luggage compartment: cover
A fuse that has blown will have metal strips that
have burned through.
The fuses are located on the right side of the mo-
tor compartment (@ in the front passenger foot-
well @), and under the left side of the luggage
compartment @).
> Switch the ignition and all electrical equipment
off.
> Check the table that follows to see which fuse
belongs to the equipment.
Color Current rating
in amps
Black 1
Gray 2
Purple 3
Pink 4
Light brown 5
Brown To
Red 10
Light blue 15
Yellow 20
White or transparent [25
Light green 30
Teal 35
Orange 40
Z\ WARNING
Do not repair fuses and never replace a blown
fuse with one that has a higher amp rating.
This can cause damage to the electrical sys-
tem and a fire.
© Note
If a new fuse burns out again shortly after you
have installed it, have the electrical system
checked as soon as possible by an authorized
Audi dealer or authorized Audi Service Facili-
ty.
G) Tips
— The following table does not list fuse loca-
tions that are not used.
279
Page 295 of 310
4KE012721BB
Index
A
A/C cooling mode............. ee eee eee ee 82
Accelerator pedal.............--00000005 89
also refer to Accelerator pedal........... 89
ACCeSSOFICS . 6... eee 288
Active lane assist
refer to Lane departure warning......... 147
refer to Lane guidance................ 147
Adaptive cruise assist..............-000. 139
Cleaning the sensors...........00 ee eee 264
Predictive control.................... 137
Adaptive cruise control
refer to Adaptive cruise assist........... 139
Adaptive darnipers « wax ss eae 2» seme s oe 99
Adjusting the air distribution............. 82
Adjusting the brightness................. 48
Adjusting the sound..............-...0- 231
Adjusting the temperature............... 82
Adjusting the vents ...........0 cece eens 84
Adjusting the volume..............000005 26
Adjusting the volume (announcements) .... 231
Adjusting the welcome sound............ 231
Airbag SySteM « » ene s ews 4 5 Hemme tee Eee 64
Air quality display...............022-.08. 84
Air suspension...........0..0 000. ee eee 99
Airtransport........... 0.0.00 .00200 eee 104
Alarm system
refer to Anti-theft alarm system.......... 32
Alignment pin (changing the wheel)....... 269
All-weather lights.................00000. 44
ALSeaSOMtineSien. is 5: suse 6 samme «0 imevsnee ow we 258
All wheel drive
refer to quattro... . 2... cece eee eee 101
AMI
refer to Audi music interface........... 220
Android Auto
refer to Audi smartphone interface...... 229
Anti-freeze
Windshield washer system............. 241
Anti-lock braking system.............05. 101
Anti-Slip Regulation.................05. 102
Anti-theft alarm system ..........--..00-- 32
Anti-theft wheel bolts.................. 272
Apple CarPlay
refer to Audi smartphone interface...... 229
Aspect ratio (video) ..............0. 223,225
ASR
refer to Anti-Slip Regulation............ 101
Audi adaptive light..................000. 44
Audi connect
refer to connect............ee008 184,185
Audi drive select. .... 0.0... eee e eee eee eee 98
Audi e-tron compact charging system..... 114
Adjusting the charging power level...... 114
Changing or attaching the power cable... 118
SOGUIING*s « & cvsiane wo cranes = wiersie © eireten @ © on 119
Status and malfunction indicators....... 115
Audi music interface...............2.-- 220
AUTOM ESiscns x 5: scaniae 0 0 scones 0 atasene 0 a asouane 221
Audi phone BOX. weiss & scinie ev eerie ve emcene 171
Audi PreISONS@iics 4 + svnns ae maces os oes o 8 150
Messages ...... 00.0.0. cece eee eee eee 153
Audi side assist
refer to Side assist. ........0.. 0000000 154
Audi smartphone interface.............. 229
Legalinformation..........0...eebeee 233
Audi virtual cockpit
refer to Instrument cluster.............. 11
AUTO
Automatic headlights .................. 44
Climate control system..............0-. 82
Auto Lock (central locking) ............... 29
Automatic climate control
refer to Climate control system.......... 81
Automatic luggage compartment lid.... 36,37
Automatic wipe/wash system............. 50
Auxiliary climate control................. 84
AVErAGe CONSUMPTION 4 6 weieure o weceie ae waco 14
Average’Speed ic. i civ 6 x essen so cranes 6 w sre 14
B
BaqehOOKsts « scan
Charge level display.............0005 ee 11
Charging (12 Volt vehicle battery)....... 241
High-voltage batteryiews « ass ss gouy s x as 104
Vehicle battery (12 Volt)............... 240
Winter operation (12 Volt vehicle battery) . 240
Battery (vehicle)
refer to High-voltage battery........... 104
293