navigation AUDI E-TRON 2019 Owners Manual
[x] Cancel search | Manufacturer: AUDI, Model Year: 2019, Model line: E-TRON, Model: AUDI E-TRON 2019Pages: 310, PDF Size: 81.91 MB
Page 5 of 310
4KE012721BB
Table of contents
High-voltage system............. 104
Generalinformation................. 104
Charging the high-voltage battery...... 105
Charging equipment................. 112
Trailer towing.................0.-. 120
Driving with atrailer................. 120
Assist systems................... 123
ASSIST SYSTEMS ic: 6 & cas 5c cae 5 ow i238
General information................. 123
Surrounding area detection............ 124
Switching the systems on and off....... 126
Driving information.............. 128
Speed warning system..............-- 128
Camera-based traffic sign recognition... 128
Traffic light information.............. 130
NightiVision aSSistix = «xem : s ases : soe 131
Integrated Toll Module............... 133
Driver assistance................. 134
Cruise control system's.o. « cees ss rows ss 134
Efficiency assist...............--005. 135
Adaptive cruise assist................ 139
Distance warning .............e0e000. 147
Lane departure warning............... 147
Audi presense........... 0. cece eee 150
SIG@iASSISE sew: » 2 cues = y ewe ae AeA Ge we 154
EXIEWAPniNng sive «6 ccerane 2 @ soeee «0 cuesime @ 6 156
Intersection assistant................ 157
Emergency assist... ....:seeceeeevees 158
Parking and maneuvering....... 160
IRCROAWECION « = eas x o sees 5 o eee ge oe 160
Parking system plus...............00. 160
Rearview camera and peripheral cameras. 162
Rear cross-traffic assist............... 166
Adjusting the parking aids............. 167
Infotainment system............ 169
Telephone... - es.s =) gees be eens ces 169
TEROMUCLION 5 scoane a vanes » 6 nani + 6 exeemn 169
Setup... eee eee eee eee 170
Disconnecting a mobile device......... 171
Using the Audi phone box............. 171
Using the telephone.................. 173
M@SSAG@S ves s x sere + & ewe ¢ o eee § eee 178
SOPGINGS sacs +o aeowens w evewens a x euswoe a» eemeoe 180
Instrument cluster...............0008 182
Troubleshooting sacs ss sews + ¢ wae 3 x ew 182
Audi connect..................... 184
Generalinformation..............05- 184
Audi connect Infotainment............ 185
Using a Wi-Fi hotspot................ 185
Audi connect Infotainment services..... 185
Audi connect vehicle control services.... 186
SQECINOS cccssin ws eseuwie x priesens wm sores w 6 syenne 188
Troubleshooting..................5-. 190
Emergency call..................- 491,
Overview... .... 0... eee eee eee 191
EM@rgency Call + wsws « zaen 3 = suze 3 2 reR 191.
Online roadside assistance............ 192
Navigation. « : ssc < : soos sp eens ss 193
Opening navigation.................. 193
myAudi navigation.................0. 193
Entering adestination................ 194
Stopping route guidance.............. 199
MAP ieccsie 9 2 wxotiose 1 ssumene of 9 enwEem 4 ot tase & Oo we 199
Personal route assistance............. 201
‘Alternative roUtes:: « + wean 2 & wane 2 & eevwe 202
Additional functions................. 202
Satellite map.......... cc cece 204
Electric:range sass s x meas 5 ¢ cues ¥ ¢ mes 204
Mapruipdates. 2 caus + x res ao nenene 2 9 one 204
Traffic information...............0005 206
Options and settings................. 207
Troubleshooting wisi. cs vere ewer sv ere 209
RaGIO:: » acs ¢ = seen ¢ » ees y ¢ eS EE eee 210
Opening theradio'. « sas a 6 ssn s & sess 210
Radio functions..............0000005 211
Options and settings................. 215
Troubleshooting sis «6 ween oo wane 6 + eae 216
Media................. 0 eee eee eee 217
General information................. 217:
SD card reader.............-00000005 217
DVD drive... 2. . eee ee eee 217
Bluetooth audio player............... 218
Online media.......... ee eee eee eee 219
Amazon Alexa....... 0.00.0 ee eee eae 220
Multimedia connections.............. 220
Page 14 of 310
Instrument cluster
> To load another profile, select and confirm
Switch profile 2).
> Select and confirm the desired profile. The
user-specific settings will load.
> To cancel the seat, mirror, and steering column
adjustment, select Cancel.
@) Tips
For more information and usage options for
personal profiles, see > page 27.
Operating
S| S| 9] ny S| cc
3:50™
2/17/2019
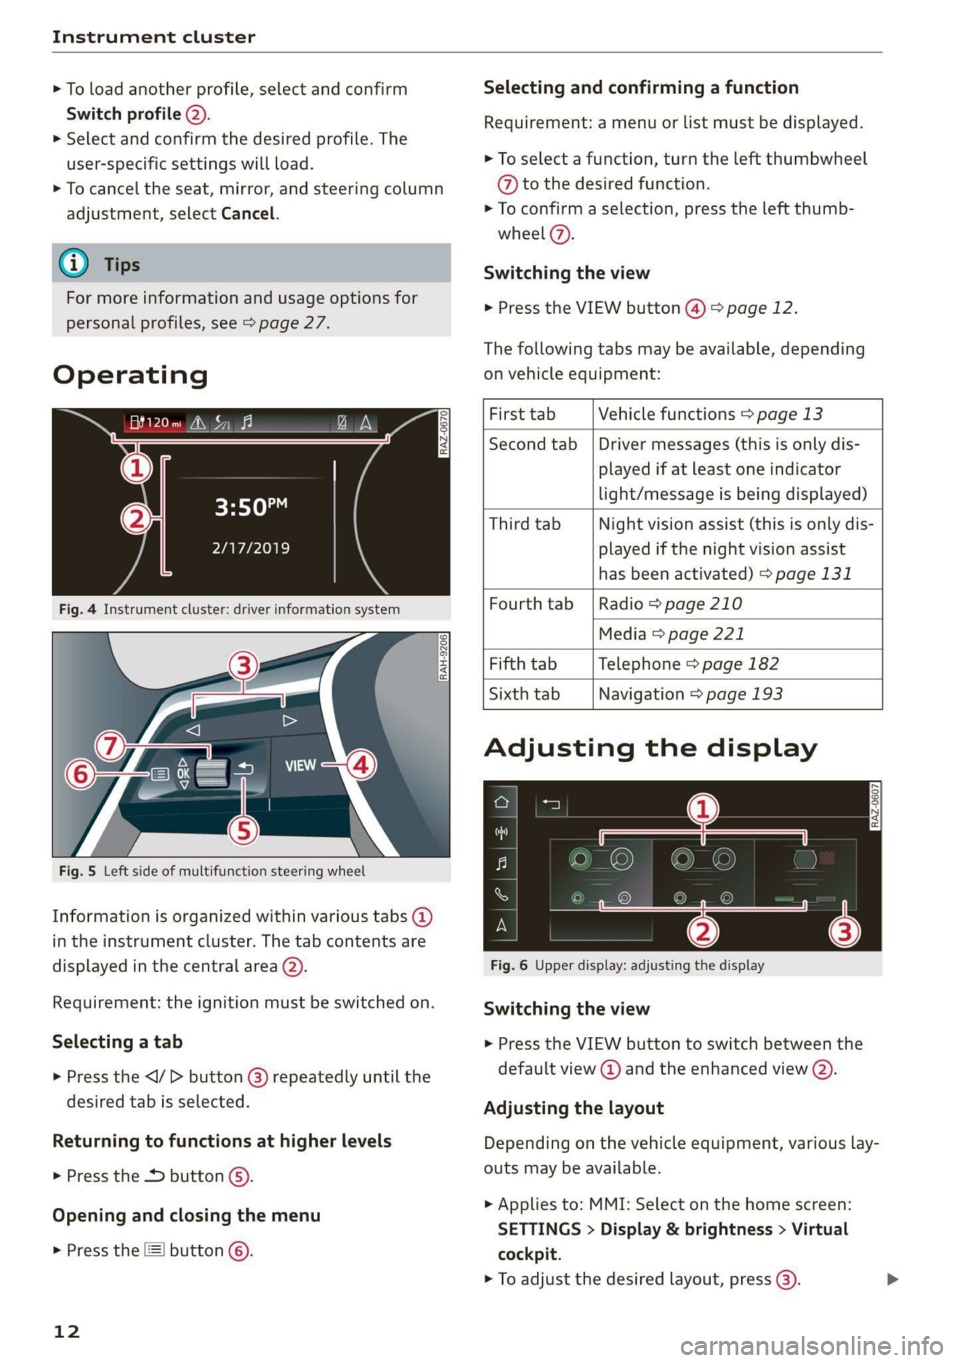
Fig. 4 Instrument cluster: driver information system
RAH-9206|
Fig. 5 Left side of multifunction steering wheel
Information is organized within various tabs @)
in the instrument cluster. The tab contents are
displayed in the central area (2).
Requirement: the ignition must be switched on.
Selecting a tab
> Press the button @) repeatedly until the
desired tab is selected.
Returning to functions at higher levels
> Press the D button ©).
Opening and closing the menu
> Press the [=] button ©.
12
Selecting and confirming a function
Requirement: a menu or list must be displayed.
> To select a function, turn the left thumbwheel
@ to the desired function.
> To confirm a selection, press the left thumb-
wheel (7).
Switching the view
> Press the VIEW button @) > page 12.
The following tabs may be available, depending
on vehicle equipment:
First tab Vehicle functions > page 13
Second tab | Driver messages (this is only dis-
played if at least one indicator
light/message is being displayed)
Third tab Night vision assist (this is only dis-
played if the night vision assist
has been activated) > page 131
Fourth
tab | Radio > page 210
Media > page 221
Fifth tab Telephone > page 182
Sixth tab Navigation > page 193
Adjusting the display
S| 3| S| iS
| ec
Fig. 6 Upper display: adjusting the display
Switching the view
> Press the VIEW button to switch between the
default view @ and the enhanced view ().
Adjusting the layout
Depending on the vehicle equipment, various lay-
outs may be available.
> Applies to: MMI: Select on the home screen:
SETTINGS > Display & brightness > Virtual
cockpit.
> To adjust the desired layout, press (3).
Page 23 of 310
4KE012721BB
Touch displays
acailelt ia
[ee Gye esl
g >
les, CA, 90012
Pe)
les, Los Feliz, CA, 90027
Pt)
(eer Com es
Pea
NET)
[RAZ-0115
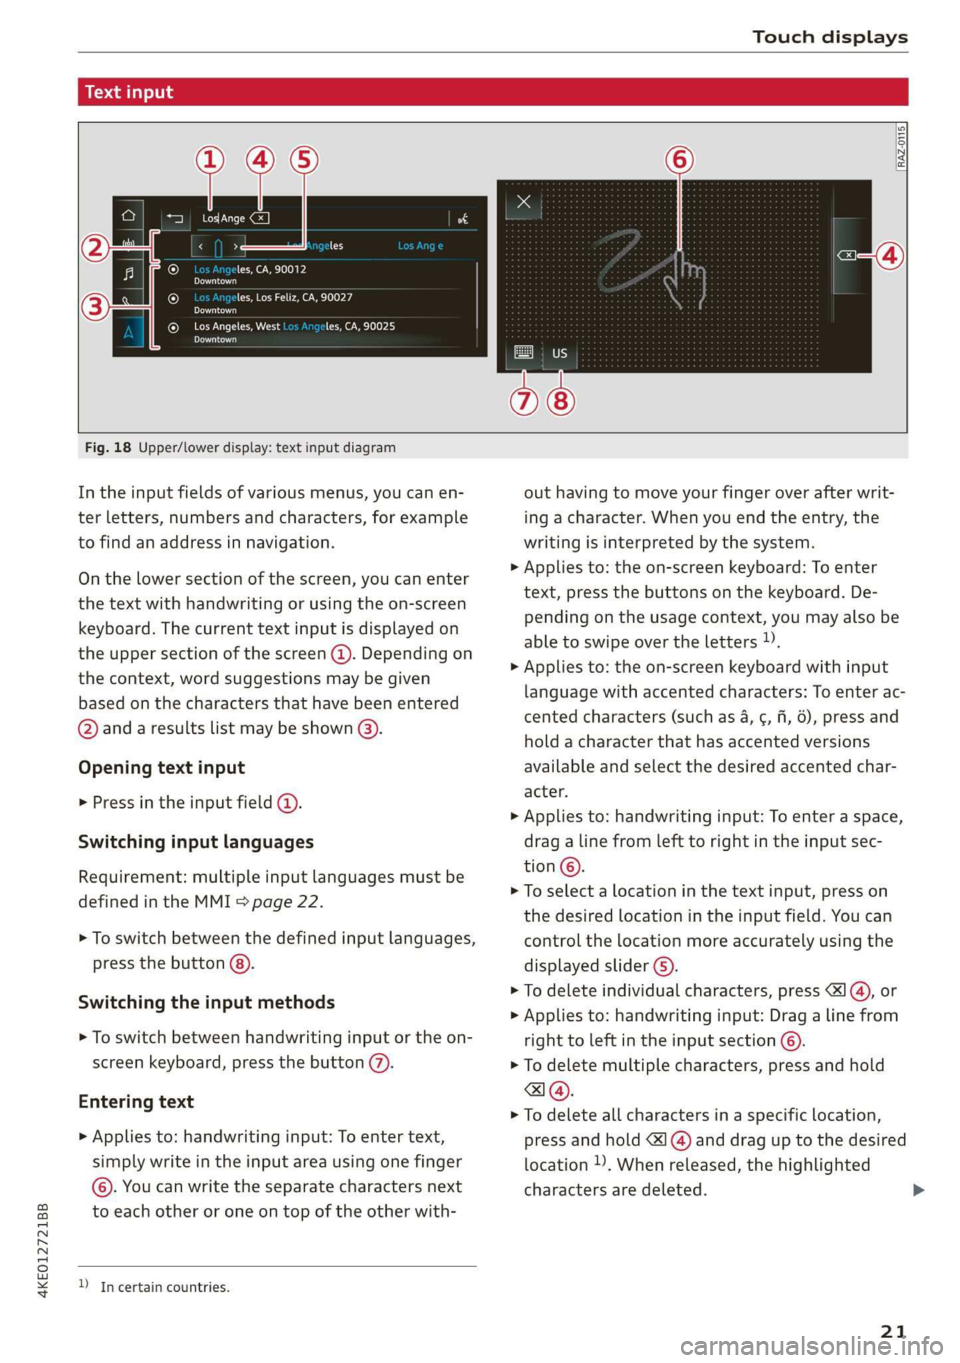
Fig. 18 Upper/lower display: text input diagram
In the input fields of various menus, you can en-
ter letters, numbers and characters, for example
to find an address in navigation.
On the lower section of the screen, you can enter
the text with handwriting or using the on-screen
keyboard. The current text input is displayed on
the upper section of the screen @). Depending on
the context, word suggestions may be given
based on the characters that have been entered
@ and a results list may be shown @).
Opening text input
> Press in the input field @.
Switching input languages
Requirement: multiple input languages must be
defined in the MMI > page 22.
> To switch between the defined input languages,
press the button @).
Switching the input methods
> To switch between handwriting input or the on-
screen keyboard, press the button (7).
Entering text
> Applies to: handwriting input: To enter text,
simply write in the input area using one finger
©. You can write the separate characters next
to each other or one on top of the other with-
D In certain countries.
out having to move your finger over after writ-
ing a character. When you end the entry, the
writing is interpreted by the system.
> Applies to: the on-screen keyboard: To enter
text, press the buttons on the keyboard. De-
pending on the usage context, you may also be
able to swipe over the letters )).
> Applies to: the on-screen keyboard with input
language with accented characters: To enter ac-
cented characters (such as 4, ¢, fi, 6), press and
hold a character that has accented versions
available and select the desired accented char-
acter.
> Applies to: handwriting input: To enter a space,
drag a line from left to right in the input sec-
tion ©.
> To select a location in the text input, press on
the desired location in the input field. You can
control the location more accurately using the
displayed slider ©).
> To delete individual characters, press
> Applies to: handwriting input: Drag a line from
right to left in the input section ©.
> To delete multiple characters, press and hold
> To delete all characters in a specific location,
press and hold <1 @) and drag up to the desired
location ). When released, the highlighted
characters are deleted.
21
Page 130 of 310
Driving information
Driving information
Speed warning system
Applies to: vehicles with speed warning system
The speed warning system helps the driver to
stay below a specified maximum speed. A warn-
ing threshold can be set in the MMI for this pur-
pose.
Once the speed slightly exceeds the stored
threshold, the speed warning system will alert
the driver with an indicator in the instrument
cluster and a warning tone. Once the speed drops
below the stored maximum speed, the indicator
will turn off.
Setting a threshold is recommended if you would
like to be reminded when you reach a certain
maximum speed. Situations where you may want
to do so include driving in a country with a gener-
al speed limit or if there is a specified maximum
speed for winter tires.
@ Tips
Regardless of the speed warning system, you
should always monitor your speed using the
speedometer and make sure you are following
the legal speed limit.
Setting the warning threshold
Applies to: vehicles with speed warning system
> Applies to: MMI: Select on the home screen:
VEHICLE > Driver assistance > (<2) > Speed
warning.
@) Tips
Specific settings are stored automatically in
the active personal profile.
Py E NY
Applies to: vehicles with speed warning system
A display appears in the instrument cluster if the
stored speed is exceeded
by Manually set XX speed limit warning
threshold exceeded
128
Camera-based traffic
sign recognition
Applies to: vehicles with camera-based traffic sign recognition
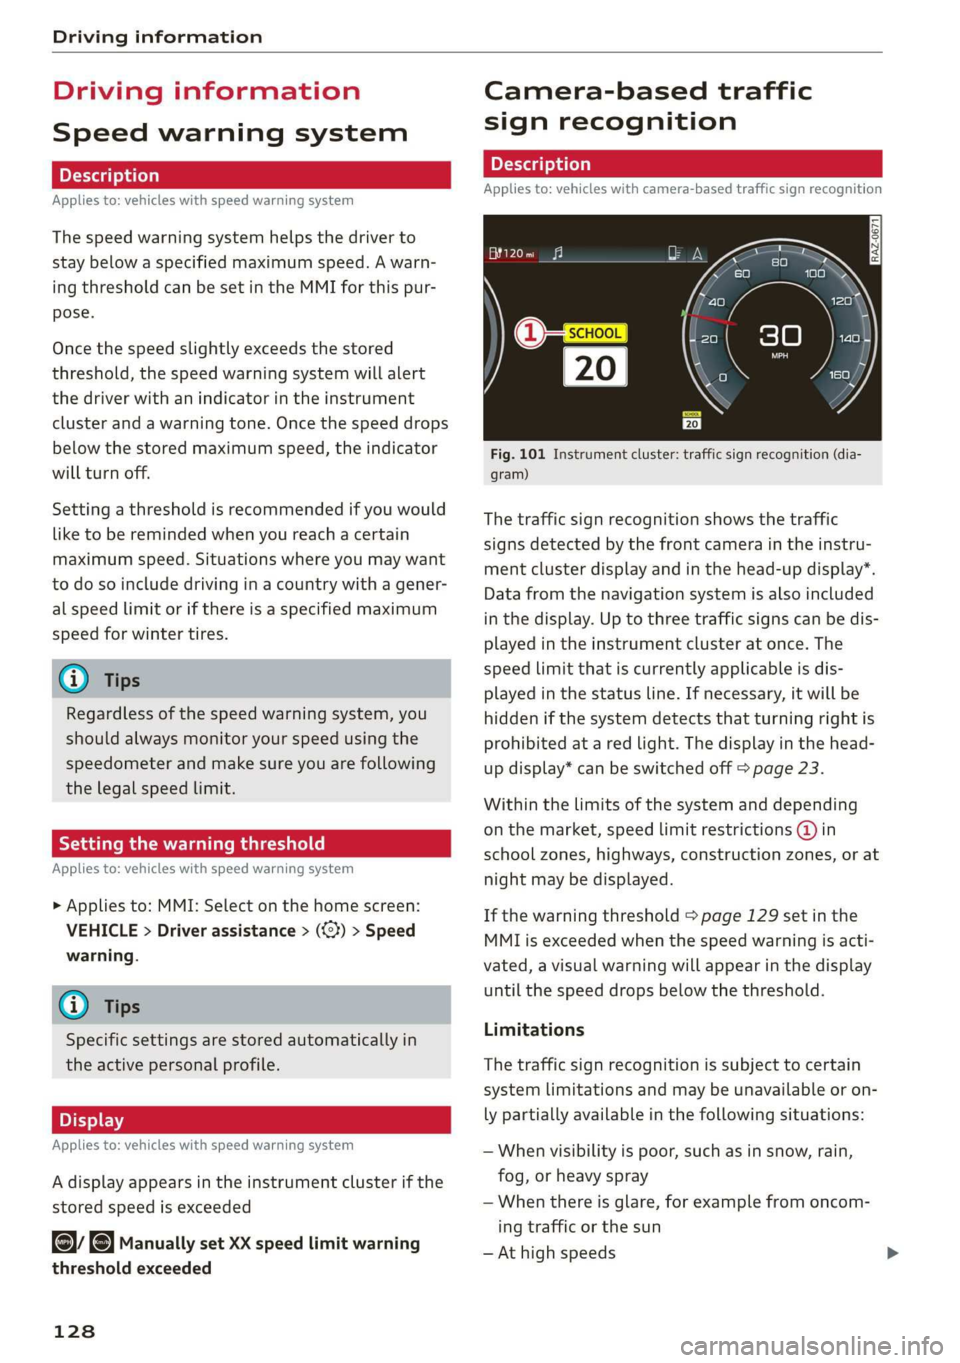
Fig. 101 Instrument cluster: traffic sign recognition (dia-
gram)
The traffic sign recognition shows the traffic
signs detected by the front camera in the instru-
ment cluster display and in the head-up display”.
Data from the navigation system is also included
in the display. Up to three traffic signs can be dis-
played in the instrument cluster at once. The
speed limit that is currently applicable is dis-
played in the status line. If necessary, it will be
hidden if the system detects that turning right is
prohibited at a red light. The display in the head-
up display* can be switched off > page 23.
Within the limits of the system and depending
on the market, speed limit restrictions @ in
school zones, highways, construction zones, or at
night may be displayed.
If the warning threshold > page 129 set in the
MMI is exceeded when the speed warning is acti-
vated, a visual warning will appear in the display
until the speed drops below the threshold.
Limitations
The traffic sign recognition is subject to certain
system limitations and may be unavailable or on-
ly partially available in the following situations:
— When visibility is poor, such as in snow, rain,
fog, or heavy spray
— When there is glare, for example from oncom-
ing traffic or the sun
— At high speeds
Page 131 of 310
4KE012721BB
Driving information
— If the camera's visual field > page 124 is cov-
ered, for example by dirt or stickers. Cleaning
information > page 263
— If the traffic signs are completely or partially
covered, for example by trees, snow, dirt, or
other vehicles
— If traffic signs do not conform to the standard
format
— If traffic signs are damaged or bent
— If traffic signs are displayed on sign holders
with electronic signs
— If the traffic signs or the roadways have
changed, and the navigation data is no longer
up-to-date
ZA\ WARNING
— Follow the safety precautions and respect
the limits of the assist systems, sensors,
and cameras > page 123.
— Under some circumstances, traffic sign rec-
ognition may not detect traffic signs correct-
ly or detect them at all. As a result, the sys-
tem may not display the correct speed limit
or any speed limit.
@ Tips
— Traffic sign recognition does not adapt your
vehicle's speed to match the speed limit.
— The display in the instrument cluster is
based on the units of measurement used for
speed in the country where the vehicle is be-
ing operated. As a result, a display of 50 in
the instrument cluster can mean either mph
or km/h, depending on the country.
Applies to: vehicles with camera-based traffic sign recognition
Accessing traffic sign recognition
> Select in the instrument cluster: vehicle func-
tions tab > Traffic signs.
Setting a traffic sign based speed warning
> Applies to: MMI: Select on the home screen:
VEHICLE > Driver assistance > (<3) > Speed
warning.
You can select a warning threshold. If exceeded,
the currently detected speed limit will be dis-
played with an exclamation point and it will flash
briefly.
@ Tips
Specific settings are stored automatically in
the active personal profile.
Messages
Applies to: vehicles with camera-based traffic sign recognition
Traffic sign recognition: currently unavaila-
ble. Camera view limited due to surroundings
The camera’s visual field is covered. Clean the
windshield.
Traffic sign recognition: currently limited.
See owner's manual
This message appears if navigation system data
is not available, for example on newly-construct-
ed roads. The speed limit display will be tempo-
rarily limited, which increases the risk of an incor-
rect display. If this message continues to appear,
drive immediately to an authorized Audi dealer or
authorized Audi Service Facility to have the mal-
function repaired.
No traffic sign information available
Depending on the area, there is no valid naviga-
tion data and no speed limits were detected. This
may also appear if there is a recommended
speed, but no speed limit (for example when
driving on and off the expressway).
Malfunction! See owner's manual
The system may not function correctly so it has
been switched off. See an authorized Audi dealer
or authorized Audi Service Facility for assistance.
Function currently unavailable. See owner's
manual
If this message appears on vehicles without cam-
era-based traffic sign recognition, then the traffic
light
information function is currently unavaila-
ble. Refer to > page 131.
129
Page 132 of 310
Driving information
Traffic light information
Applies to: vehicles with traffic light information
iS
S| >|
| ce|
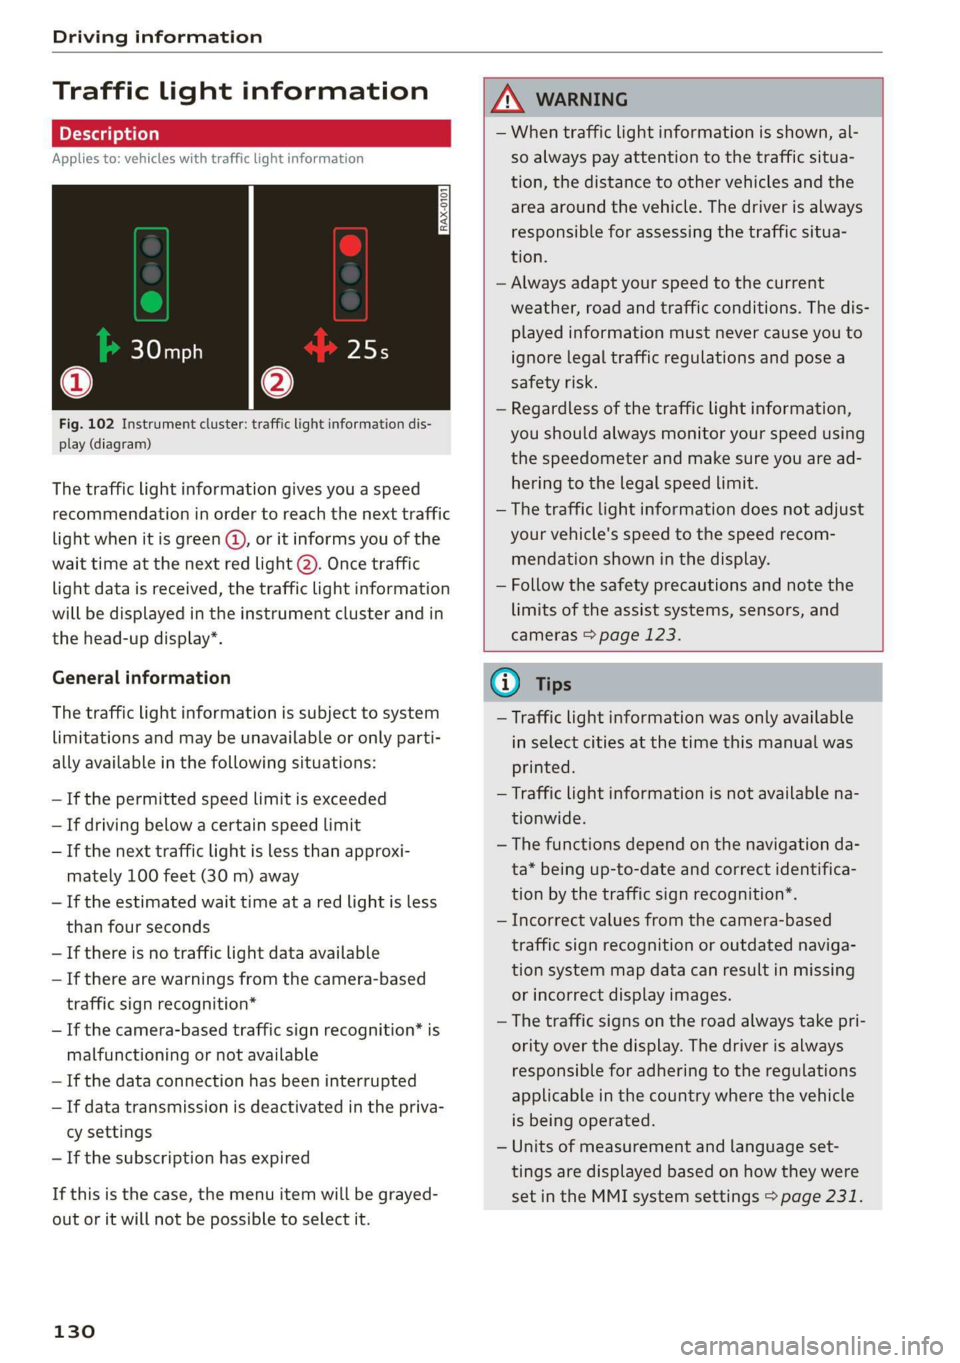
Fig. 102 Instrument cluster: traffic light information dis-
play (diagram)
The traffic light information gives you a speed
recommendation in order to reach the next traffic
light when it is green @, or it informs you of the
wait time at the next red light @). Once traffic
light data is received, the traffic light information
will be displayed in the instrument cluster and in
the head-up display*.
General information
The traffic light information is subject to system
limitations and may be unavailable or only parti-
ally available in the following situations:
— If the permitted speed limit is exceeded
— If driving below a certain speed limit
— If the next traffic light is less than approxi-
mately 100 feet (30 m) away
— If the estimated wait time at a red light is less
than four seconds
—If there is no traffic light data available
— If there are warnings from the camera-based
traffic sign recognition*
— If the camera-based traffic sign recognition* is
malfunctioning or not available
— If the data connection has been interrupted
— If data transmission is deactivated in the priva-
cy settings
— If the subscription has expired
If this is the case, the menu item will be grayed-
out or it will not be possible to select it.
130
ZA\ WARNING
— When traffic light information is shown, al-
so always pay attention to the traffic situa-
tion, the distance to other vehicles and the
area around the vehicle. The driver is always
responsible for assessing the traffic situa-
tion.
— Always adapt your speed to the current
weather, road and traffic conditions. The dis-
played information must never cause you to
ignore legal traffic regulations and pose a
safety risk.
— Regardless of the traffic light information,
you should always monitor your speed using
the speedometer and make sure you are ad-
hering to the legal speed limit.
— The traffic light information does not adjust
your vehicle's speed to the speed recom-
mendation shown in the display.
— Follow the safety precautions and note the
limits of the assist systems, sensors, and
cameras > page 123.
@) Tips
— Traffic light information was only available
in select cities at the time this manual was
printed.
— Traffic light information is not available na-
tionwide.
— The functions depend on the navigation da-
ta* being up-to-date and correct identifica-
tion by the traffic sign recognition*.
— Incorrect values from the camera-based
traffic sign recognition or outdated naviga-
tion system map data can result in missing
or incorrect display images.
— The traffic signs on the road always take pri-
ority over the display. The driver is always
responsible for adhering to the regulations
applicable in the country where the vehicle
is being operated.
— Units of measurement and language set-
tings are displayed based on how they were
set in the MMI system settings > page 231.
Page 137 of 310
4KE012721BB
Driver assistance
Changing the cruise control speed
Applies to: vehicles with cruise control system
> To increase or decrease the cruise control speed
in small increments, tap the lever up to the
first level toward @)/C) > page 134, fig. 104.
> To increase or decrease the cruise control speed
in larger increments, tap the lever up to the
second level toward ()/C).
> To increase or decrease the cruise control speed
continuously, tap and hold the lever at the first
or second level toward @)/G).
Overriding or deactivating the cruise
control speed
Applies to: vehicles with cruise control system
You can override or deactivate the cruise control
system. When you deactivate the system, your
cruise control speed will be stored and you can
resume that speed.
Requirement: the system must be switched on
and activated.
Overriding
> To temporarily override the cruise control
speed, press the accelerator pedal.
> Once you release the accelerator pedal, the sys-
tem will adjust back to the stored cruise control
speed.
If you override the cruise control system for a
long period of time, the cruise control system
will be deactivated. The indicator light is dis-
played and the cruise control speed will be saved.
Deactivating
> To deactivate the cruise control speed, press
the lever toward (2) (not locked into place)
=> page 134, fig. 104.
> Press the brake pedal.
Z\ WARNING
Resting your foot on the accelerator pedal
could override the cruise control. This will pre-
vent braking interventions by the system.
Seem Leal
Applies to: vehicles with cruise control system
When you switch the system off completely, the
cruise control speed will be deleted.
Requirement: the system must be switched on.
> To switch the system off, press the lever toward
@ (locked into place) > page 134, fig. 104, or
> Switch the ignition off.
Applies to: vehicles with cruise control system
Gk / 3) Speed control system: currently un-
available. See owner's manual
If the indicator light turns on and this message
appears, the cruise control system has been deac-
tivated. There is a temporary malfunction, for ex-
ample the brakes are overheating. Switch the
cruise control system on again later.
Efficiency assist
Applies to: vehicles with efficiency assist
Efficiency assist can assist the driver with predic-
tive information in order to reduce fuel consump-
tion. If you remove your foot from the accelera-
tor pedal, the efficiency assist can trigger recu-
peration based on the situation.
Depending on vehicle equipment, the system
may access data from the navigation system, the
camera behind the windshield, and the radar sen-
sors.
Adjusting the efficiency assist
You can adjust efficiency assist functions individ-
ually. The settings depend on the vehicle equip-
ment.
— Recuperation > page 90.
— Predictive messages inform the driver if they
should remove their foot from the accelerator
pedal in order to drive more efficiently
=> page 136.
— Predictive control uses adaptive cruise assist in
order to react automatically to situations ahead
=> page 137.
135
Page 138 of 310
Driver assistance
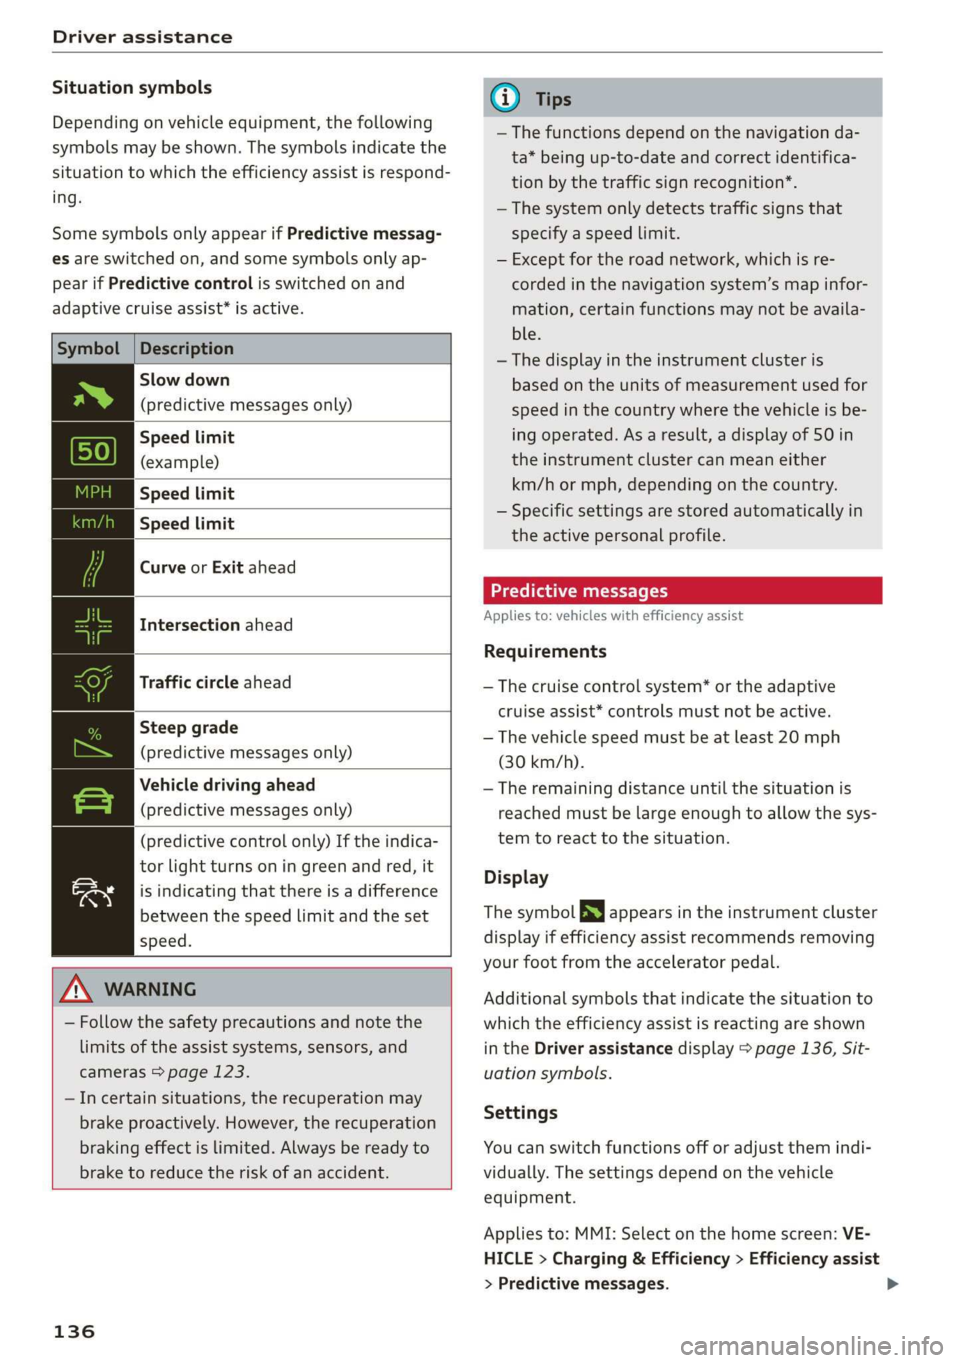
Situation symbols
Depending on vehicle equipment, the following
symbols may be shown. The symbols indicate the
situation to which the efficiency assist is respond-
ing.
Some symbols only appear if Predictive messag-
es are switched on, and some symbols only ap-
pear if Predictive control is switched on and
adaptive cruise assist* is active.
Description
Slow down
(predictive messages only)
Speed limit
(example)
Speed limit
Speed limit
Curve or Exit ahead
Intersection ahead
Traffic circle ahead
Steep grade
(predictive messages only)
Vehicle driving ahead
(predictive messages only)
(predictive control only) If the indica-
tor light turns on in green and red, it
is indicating that there is a difference
between the speed limit and the set
speed.
ZA\ WARNING
— Follow the safety precautions and note the
limits of the assist systems, sensors, and
cameras > page 123.
—Incertain situations, the recuperation may
brake proactively. However, the recuperation
braking effect is limited. Always be ready to
brake to reduce the risk of an accident.
136
G) Tips
— The functions depend on the navigation da-
ta* being up-to-date and correct identifica-
tion by the traffic sign recognition*.
— The system only detects traffic signs that
specify a speed limit.
— Except for the road network, which is re-
corded in the navigation system’s map infor-
mation, certain functions may not be availa-
ble.
— The display in the instrument cluster is
based on the units of measurement used for
speed in the country where the vehicle is be-
ing operated. As a result, a display of 50 in
the instrument cluster can mean either
km/h or mph, depending on the country.
— Specific settings are stored automatically in
the active personal profile.
Predictive messages
Applies to: vehicles with efficiency assist
Requirements
— The cruise control system* or the adaptive
cruise assist* controls must not be active.
— The vehicle speed must be at least 20 mph
(30 km/h).
— The remaining distance until the situation is
reached must be large enough to allow the sys-
tem to react to the situation.
Display
The symbol SS appears in the instrument cluster
display if efficiency assist recommends removing
your foot from the accelerator pedal.
Additional symbols that indicate the situation to
which the efficiency assist is reacting are shown
in the Driver assistance display > page 136, Sit-
uation symbols.
Settings
You can switch functions off or adjust them indi-
vidually. The settings depend on the vehicle
equipment.
Applies to: MMI: Select on the home screen: VE-
HICLE > Charging & Efficiency > Efficiency assist
> Predictive messages.
Page 140 of 310
Driver assistance
Set speed limit - Adjusts to speed limits. You can
also set With tolerance if desired. In this scenar-
io, you may fall below or exceed the set speed in
favor of increased efficiency.
Adjustment to curves along route - Can be
switched Off or be set individually from Slow to
Fast. The setting influences vehicle handling with
predictive control, for example the speed for
driving through curves.
Messages
as and a message with Adaptive cruise assist:
Predictive control is displayed when there is a
malfunction, the efficiency assist functions are
unavailable or limited.
A message that indicates the cause and possible
solution may appear with some displays. The
weather conditions may be too poor or a sensor
may be covered. Clean the area in front of the
sensors > page 124, fig. 97 and try to turn on
the systems again later.
If the malfunction remains, drive to an author-
ized Audi dealer or authorized Audi Service Facili-
ty immediately to have the malfunction correct-
ed.
along route setting to reduce the risk of an
accident.
ZA\ WARNING
— Follow the safety precautions and note the
limits of the assist systems, sensors, and
cameras > page 123.
— Pay attention to traffic and the area around
your vehicle when predictive control is
switched on. The driver is always responsible
for assessing the traffic situation.
— The system does not consider “right of way”
rules and does not respond to traffic lights,
so lack of driver attention in these situations
can increase the risk of an accident.
— The speed when driving through curves may
be different from what you as a driver would
do or may not be suitable for the weather
and road conditions. If necessary, apply the
brakes and reduce the selected speed to be
maintained in the Adjustment to curves
YD In certain countries
138
@) Tips
— Predictive control can exceed or drop below
the maximum permitted speed. The driver
is responsible for adhering to the permitted
speed limit.
— The traffic signs on the road always take pri-
ority over the display. The driver is always
responsible for adhering to the regulations
applicable in the country where the vehicle
is being operated.
— Ifa speed limit is detected, the marking @
of the set speed limit will be adjusted even
if the adaptive cruise assist is not actively
regulating.
— You may temporarily fall below or exceed
the set speed due to recuperation.
— Control by the system depends on which
adaptive cruise assist driving program is set
or on the selected Audi drive select* mode.
— After switching on the ignition and first
driving onto a freeway or similar road with-
out a speed limit, the system will regulate
the speed to 80 mph (130 km/h), Then
the system adjusts to the last speed set by
the driver.
— There is no adaptation to speed limits when
driving through highway interchanges and
when driving on or off the expressway.
— The system can fail to provide control or the
control may be faulty if the values from the
camera-based traffic sign recognition* are
incorrect or the navigation system map data
is outdated.
— When route guidance is switched on, the
system adapts to the route provided by the
navigation system. Driving without route
guidance or leaving a route can result in
faulty control.
— Specific settings are stored automatically in
the active personal profile.
Page 177 of 310
4KE012721BB
Telephone
Opening contacts
Applies to: vehicles with telephone
IS a aed Sa
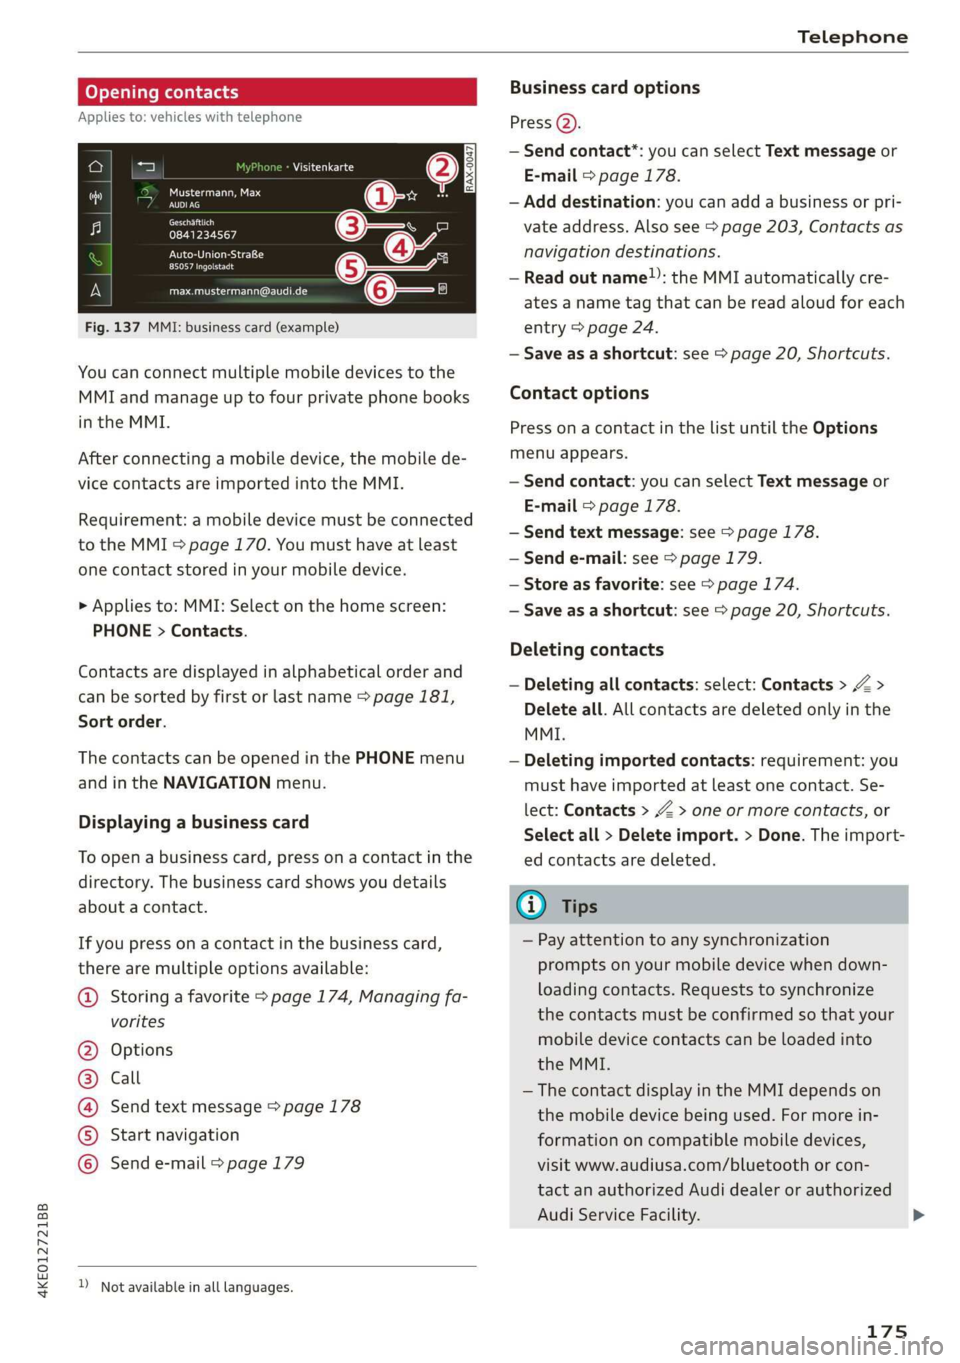
Fig. 137 MMI: business card (example)
Visitenkarte
ey
0841234567
PU esl}
Peeamect
[email protected]
You can connect multiple mobile devices to the
MMI and manage up to four private phone books
in the MMI.
After connecting a mobile device, the mobile de-
vice contacts are imported into the MMI.
Requirement: a mobile device must be connected
to the MMI > page 170. You must have at least
one contact stored in your mobile device.
> Applies to: MMI: Select on the home screen:
PHONE > Contacts.
Contacts are displayed in alphabetical order and
can be sorted by first or last name > page 181,
Sort
order.
The contacts can be opened in the PHONE menu
and in the NAVIGATION menu.
Displaying a business card
To open a business card, press on a contact in the
directory. The business card shows you details
about a contact.
If you press on a contact in the business card,
there are multiple options available:
© Storing a favorite > page 174, Managing fa-
vorites
Options
Call
Send text message > page 178
Start navigation
QOOOCO Send e-mail > page 179
) Not available in all languages.
Business card options
Press @).
— Send contact*: you can select Text message or
E-mail > page 178.
— Add destination: you can add a business or pri-
vate address. Also see > page 203, Contacts as
navigation destinations.
— Read out name”: the MMI automatically cre-
ates a name tag that can be read aloud for each
entry > page 24.
— Save as a shortcut: see > page 20, Shortcuts.
Contact options
Press on a contact in the list until the Options
menu appears.
— Send contact: you can select Text message or
E-mail > page 178.
— Send text message: see > page 178.
— Send e-mail: see > page 179.
— Store as favorite: see > page 174.
— Save as a shortcut: see > page 20, Shortcuts.
Deleting contacts
— Deleting all contacts: select: Contacts > Z >
Delete all. All contacts are deleted only in the
MMI.
— Deleting imported contacts: requirement: you
must have imported at least one contact. Se-
lect: Contacts > Z > one or more contacts, or
Select all > Delete import. > Done. The import-
ed contacts are deleted.
(i) Tips
— Pay attention to any synchronization
prompts on your mobile device when down-
loading contacts. Requests to synchronize
the contacts must be confirmed so that your
mobile device contacts can be loaded into
the MMI.
— The contact display in the MMI depends on
the mobile device being used. For more in-
formation on compatible mobile devices,
visit www.audiusa.com/bluetooth or con-
tact an authorized Audi dealer or authorized
Audi Service Facility.
175