display AUDI E-TRON 2021 Owners Manual
[x] Cancel search | Manufacturer: AUDI, Model Year: 2021, Model line: E-TRON, Model: AUDI E-TRON 2021Pages: 308, PDF Size: 83.91 MB
Page 4 of 308
Table of contents
About this Owner's Manual......
SUMIMAry: < = exe : eens: Seen cs sens
QutckeaeCe ssh: «i esis se ois a eaves @
Cockpit. ...... 0... eee eee eee eee
Indicator lights overview...........4..
Display and operation...........
Instrument cluster...............
Instrument cluster overview...........
Operating. ecccuse w+ were oo wens oo ayes 9 ¥
Adjusting the display.................
POWErMe@tel ss « » wees = 5 gees ey ewe xe
OdOMeter sic oo sisiecs a werner » ome ee irae «
Outside temperature display...........
Vehicle functions « sce. ss saes ae sees aes
Touch displays....................
General touch display operation........
Multi Media Interface................
Head-up display..................
DeSGriptlOlls « ¢ sans a ¢ wee a ¢ saws § eae
Voice recognition system........
General information..............4..
DESCRIPTION. 4 & wisevus sa stenius ow aresiue 6 ¥ renin
External voice operation..............
Global Functions’. vc. 6s css se cess
Additional function buttons...........
Starting and driving.............
Personalization..................
Luggage compartment lid.............
Child safety lock........... 00. cece eee
POWEF WINdOWS:: « x sso ¥ 2 eure 9 2 ea
Panoramic glass:n00fiecis < « svsvine so siswes «
Garage door opener...........-.00005
Lights and Vision.................
EXEROPLUGHELAG, soosece « » enscet oo snsuein © 0 asee
Interior lighting..............-...0--
NOD
OO
11
ga:
11 12 12 13 13 13
13
15
15
17
24 24
25
25
25
26
28
28
29
29 29
32 32
36 39
42 43
44
45
48
48
51
ViSIOM i & & soscone wo coasaie 3 w aeeeane © w cease ow 52
Windshield wipers...............000 54
Digital COMPdSS's s s wae se wees se ees ve 57
Sitting correctly and safely...... 59
Correct passenger seating position...... 59
Frontis@ats:. = csv 2» ewes 2 o wom ws eon © 59
SLESKIMG WHEEL eseiince 4 0 eowcene s sontone o 6 axottene 62
Head restraints...................05. 63
Safety belts's « sso: s swans 5 ¢ eeies 5 2 awn 64
Memory function.............. 00s eee 67
Airbag system...............2220005 68
Child
safety seats ..........00 eee eae 72
Storage and convenience........ 78
POWEr SOUFCES seis = = eeu 2 + cee 2 + Hes 78
Cup Rolders': « sis ss ems os ence ee eee 78
Storage and compartments............ 79
Luggage compartment............... 79
Roofirackss + ¢ sseis eevee ev ena oo ween eo 83
Warm and cold.................6. 84
Climate control system............... 84
Steering wheel heating.............-. 87
Auxiliary climate control.............- 87
Fluids in the A/C system.............. 88
Driving ........... 0. cee ee eee 90
Starting the vehicle................-. 90
When:driving jac: 2 + srcwie sv snsine oo earn vos 91
Drive system. ......... 0.0.00 .002000. 94
Brakesi: « « sia < anne 3 gene 3 x nOuR Fs cee 96
Electromechanical parking brake....... 98
Special driving situations.............. 100
Driving dynamic.................. 102
Audi drive select..............000000. 102
SUSPeNSION ss « = seus + < HeeS 4c REER x BRE 103
StOGFING « wicca x cases « 2 oresess a cae © H Lod 104
All wheel drive (quattro).............. 105
Electronic Stabilization Control......... 105
Page 6 of 308
Table of contents
Audi smartphone interface...... 226
Setup... eee eee eee eee 226
Troubleshooting wv s & wees se cows 6 bey 227
Additional settings.............. 228
System Settings: : s eens s i vows ve sews es 228
Software update...............2..-0. 229
Connected devices.............000005 230
Legalinformation................... 231
Additional information.......... 232
Brands and licenses...............--- 232
Maintenance and Care........... 233
Checking and Filling............. 233
Motor'compartment’. sc. ¢ « wcen es oes 233.
CoolingisysteM « x sisws ov sass ov somes & & ane 235
Brake fluid. ........ 0.0.0.0 c eee eee 236
Electrical system <
Battenyis ¢ «sic s 6 wen 2 9 ween oy were 2 ere 238
Windshield washer system...........- 239
Service interval display............... 239
WWINGOIS : ceciices co costes 6 a sncewvs ow oneners 0 at 241
Wheels and Tires . . 241
Tire pressure monitoring system....... 258
Care and cleaning................ 261
Generalinformation................. 261
Car washes « swe: vx awa: oo amin 0 x snanae #2 261
Cleaning and care information......... 262
Taking your vehicle out of service....... 266
Do It Yourself .................... 267
Emergency assistance........... 267
General information................. 267
Equipment............. 0c eee eee 267
Tire mobility kit..................00. 267
Replacing wheels. ........:cceeeeeees 269
Collapsible spare tire..............0.. 273
Jump starting ..............e eee eee 274
IQWING were: worms 5 cee 9 + eee + eee 274
Fuses and bulbs.................. 277
FUSES 3 2 amow 4 meme a 2 mee ay ome 2 277.
Bel DSyonsn = secaais 2s omens a orate vw acct =e aa 280
Customer information........... 281
Data privacy..................008. 281
Privacy MOtiCe « mes x x eee 2 Ree ¢ RES ¥ 281
Image recording): « « sus 2 wanes 2 2 wweem 2 2s 281
Data memories............0..00 eee ee 281
Transmitted information.............. 282
Accessories and technical
changes................ 0.0.02 eee 285
Warranty’: « + esos & + meen & ¢ eee se sees 285
Audi Literature Shop.............000- 285
Driving in other countries............. 285
Maintenance, repairs, and technical
IMOGIFICATIONS « snocue so sume = emmace # m annem 285
Accessories and parts..............-. 287
Reporting Safety Defects.............. 287
Declaration of compliance for
telecommunications equipment and
electronicisysteMms:: s = caws se waa « 2 gems 288
Technical data.................... 290
Identification data................04. 290
Vehicle datas ss nico s ves se oman evs 290
Index ...... 00.0... eee eee 292
Page 8 of 308
Quick access
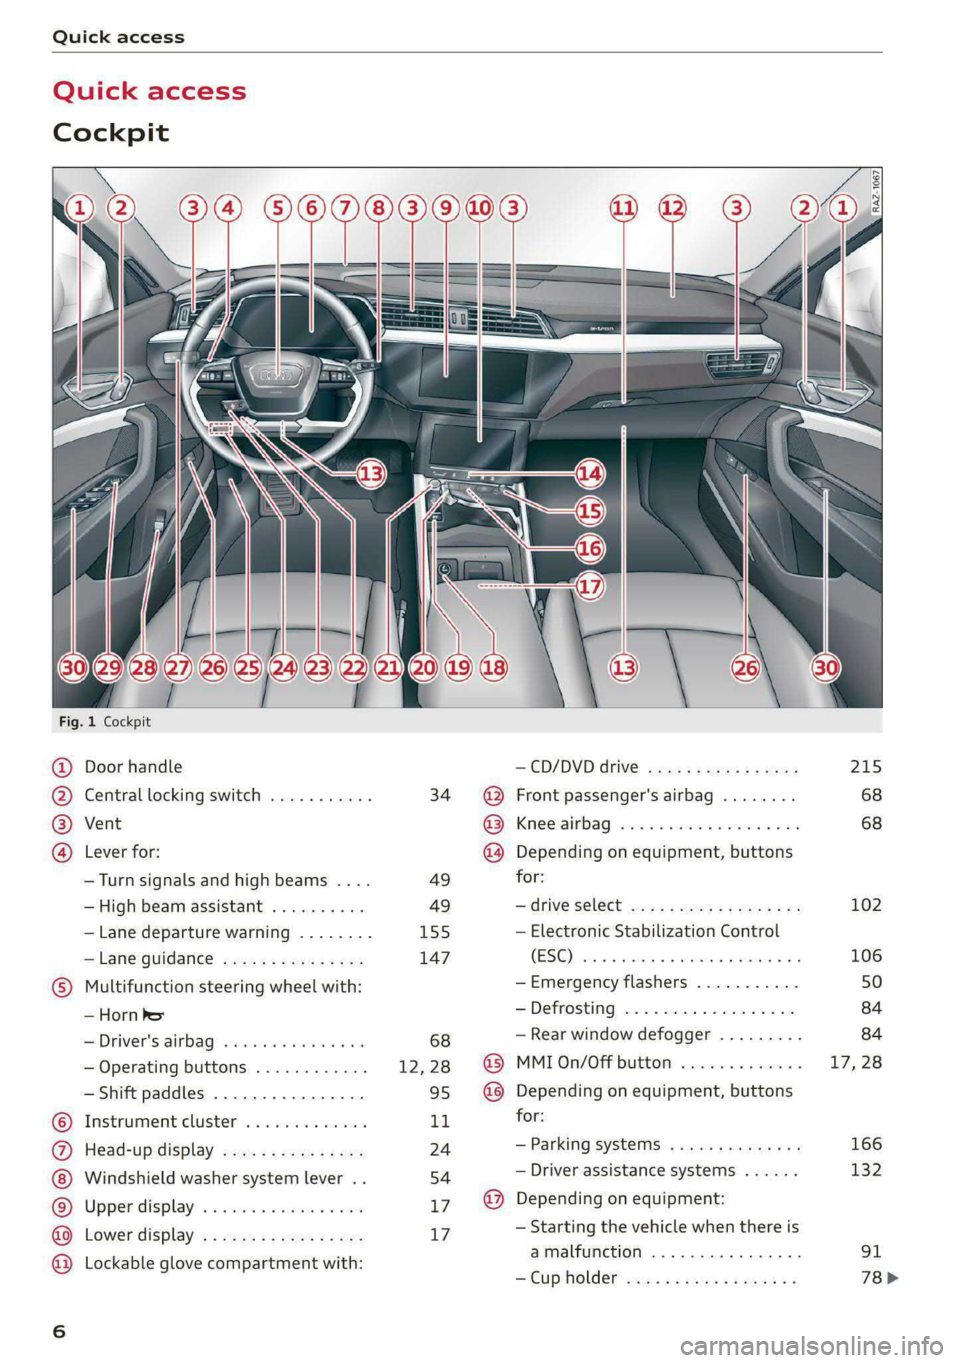
Quick access
Cockpit
Fig. 1 Cockpit
@ @ @ @
©
OO©CV®O
Door handle
Central locking switch ...........
Vent
Lever for:
—Turn signals and high beams ....
— High beam assistant ..........
— Lane departure warning ........
—Lane guidance ...............
Multifunction steering wheel with:
— Horn be
— Driver's airbag ............005
— Operating buttons ............
— Shift paddles ................
Instrument cluster .. 6.0... een
Head-up display ...............
Windshield washer system lever ..
Upper display: « = cer x seems 2 sense
Lower display .................
Lockable glove compartment with:
34
49 49
155
147
—@D/DVDIdrIVE cyeue: 5 2 ems 5 x were
@ Front passenger's airbag ........
GS Krneerairb ag, cies ss secu 2 swe © aoe
@ Depending on equipment, buttons
for:
— drive Select mex ss wamy sv emma soe
— Electronic Stabilization Control
(0) 0) ee eee
—Emergency flashers ...........
—Defrosting ..................
— Rear window defogger .........
@ MMI On/Off button .............
@ Depending on equipment, buttons
for:
— Parking systems ..............
— Driver assistance systems ......
@ Depending on equipment:
— Starting the vehicle when there is
amalfunction ............200.
—"CupHOlder casa ¢ & cows 5 o wens
215
68 68
102
106
Page 9 of 308
4KE012721BF
Quick access
— Audi musicinterface .......... 217
— Audi phone box ............... 177
Socket wz zs sews x 2 uews yo ees sve 78
@ Electromechanical parking brake
BUEtON sgsae «2 came o 2 eawa xo ees 2 98
@0 Selector lever ..............02. 92
@) [START STOP] button ............ 90
@ Steering wheel adjustment ...... 62
@) Lever for:
— Cruise control system ......... 141
— Adaptive cruise assist .......... 144
@4 Connection port for the On Board
Diagnostic System (OBD) ........ 281
@) Hood release ..............00-5 234
@8 Memory function buttons ........ 67
@) Buttons for:
SsLIQWtS | cove & & sonsaws o o amavors & & imamwas 9 0 48
—All-weather lights ............ 48
@8
Luggage compartment lid button . 39
@9 Exterior mirror adjustment ...... 52
60 Buttons for:
— Power windows .............. 43
—Child safety lock .............. 42
() Tips
Some the equipment listed here is only instal-
led in certain models or is available as an op-
tion.
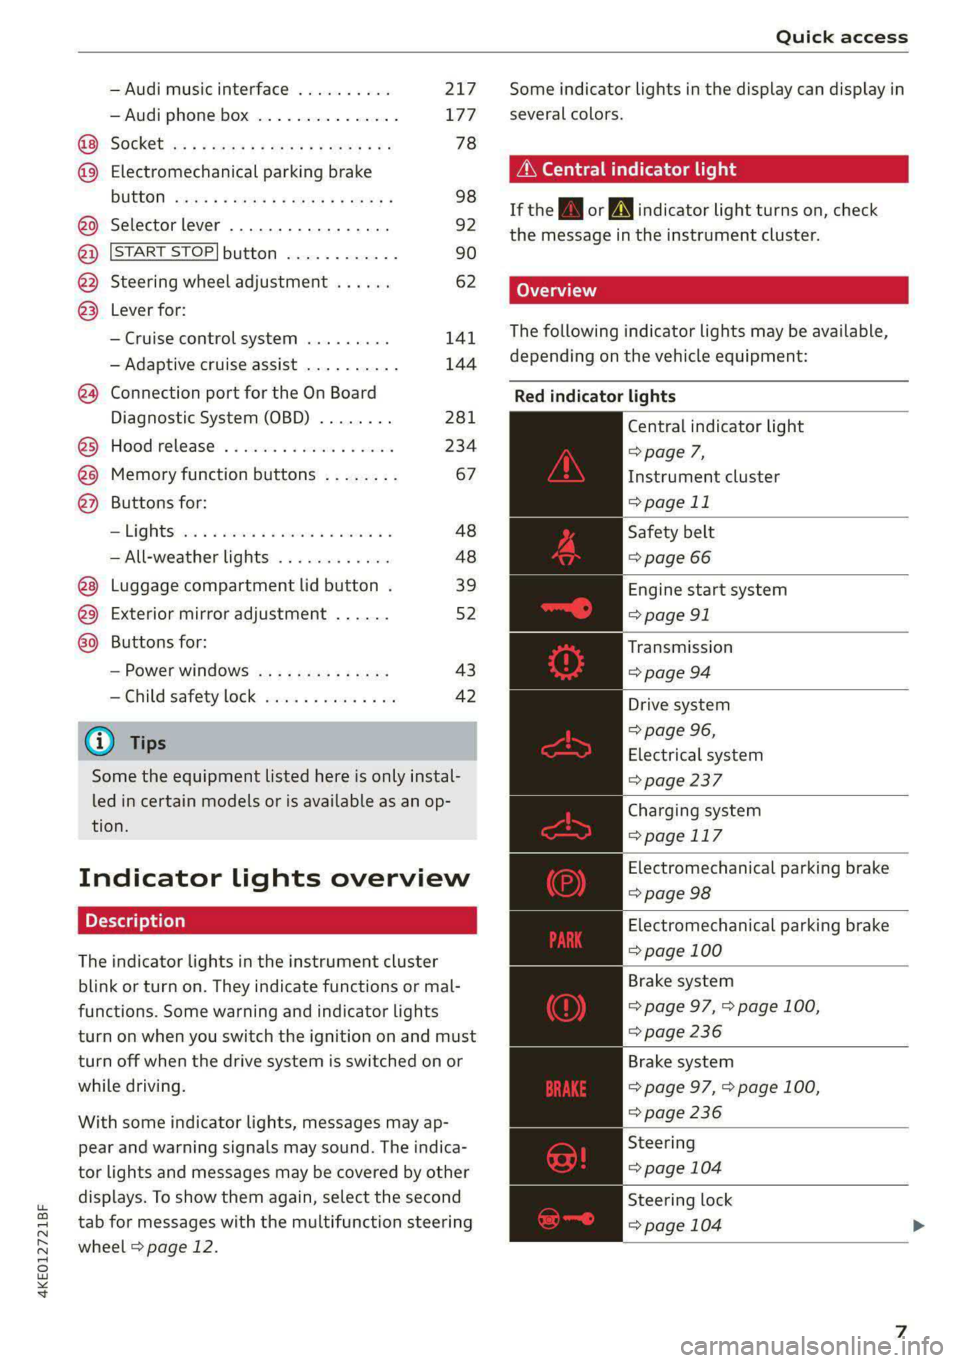
Indicator lights overview
The indicator lights in the instrument cluster
blink or turn on. They indicate functions or mal-
functions. Some warning and indicator lights
turn on when you switch the ignition on and must
turn off when the drive system is switched on or
while driving.
With some indicator lights, messages may ap-
pear and warning signals may sound. The indica-
tor lights and messages may be covered by other
displays. To show them again, select the second
tab for messages with the multifunction steering
wheel > page 12.
Some indicator lights in the display can display in
several colors.
A\ Central indicator light
If the A or indicator light turns on, check
the message in the instrument cluster.
The following indicator lights may be available,
depending on the vehicle equipment:
Red indicator lights
Central indicator light
=> page 7,
Instrument cluster
=> page 11
Safety belt
=> page 66
Engine start system
=> page 91
Transmission
=>page 94
Drive system
=> page 96,
Electrical system
=> page 237
Charging system
=>page 117
Electromechanical parking brake
=> page 98
Electromechanical parking brake
=> page 100
Brake system
=> page 97, > page 100,
=> page 236
Brake system
=> page 97, > page 100,
=> page 236
Steering
=> page 104
Steering lock
=> page 104
Page 13 of 308
4KE012721BF
Instrument cluster
Instrument cluster
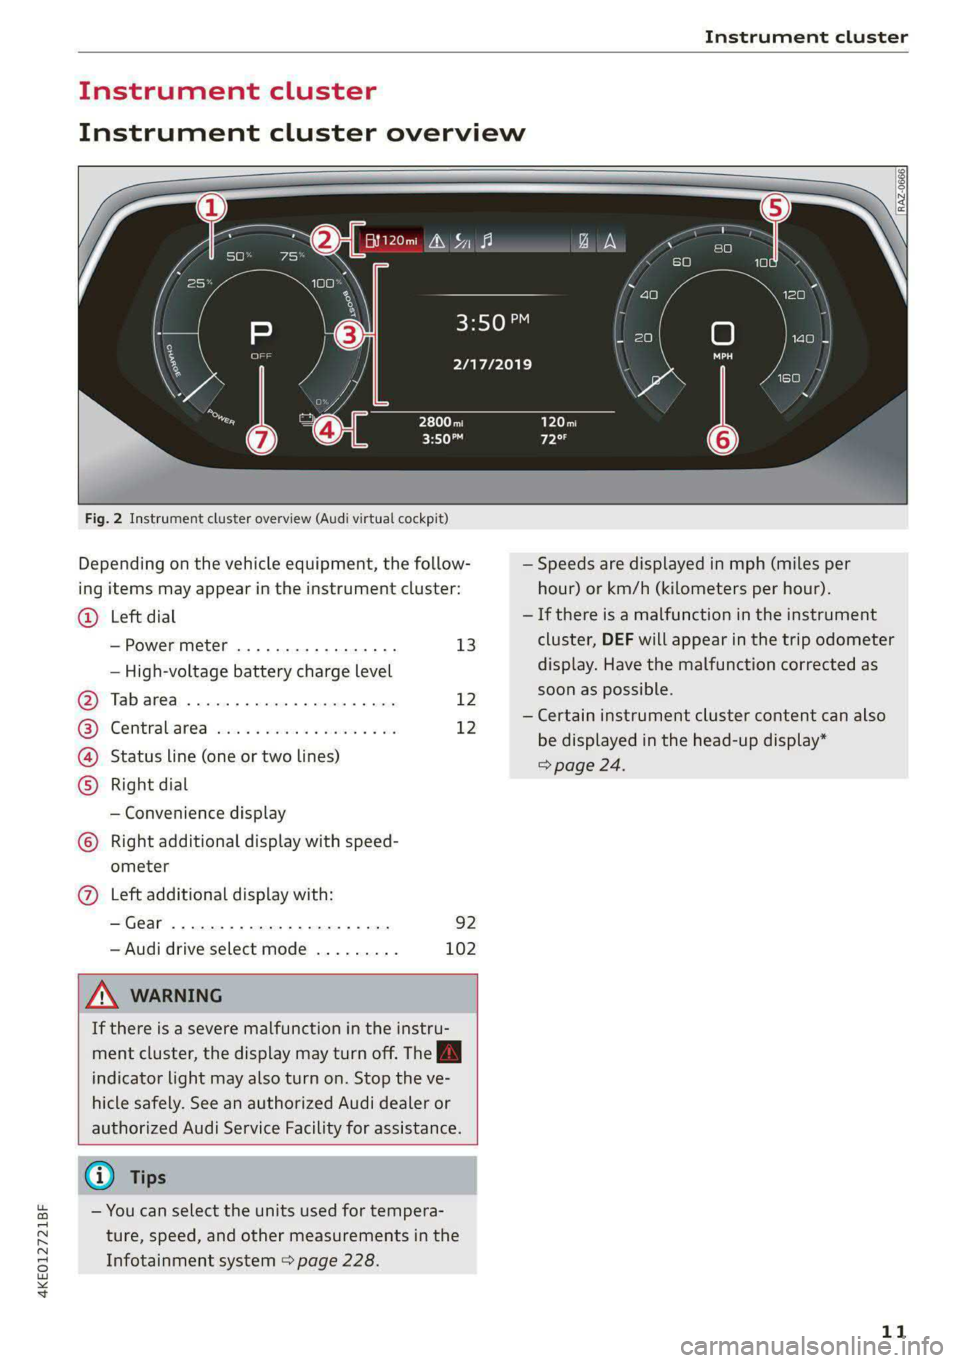
Instrument cluster overview
Fig. 2 Instrument cluster overview (Audi virtual cockpit)
Depending on the vehicle equipment, the follow-
ing items may appear in the instrument cluster:
Left dial
— Power meter ..............00. 13
©
— High-voltage battery charge level
Tabarea .... 0... eee eee 12
Centralised via as ieee s maven 6 wa 12
Status line (one or two lines)
Right dial
— Convenience display
Right additional display with speed-
COE
OLORORS)
3:50™
2/17/2019
ometer
Left additional display with:
—Gear ...... 02. eee eee eee 92
— Audi drive select mode ......... 102
ZA WARNING
If there is a severe malfunction in the instru-
ment cluster, the display may turn off. The A
indicator light may also turn on. Stop the ve-
hicle safely. See an authorized Audi dealer or
authorized Audi Service Facility for assistance.
G) Tips
— You can select the units used for tempera-
ture, speed, and other measurements in the
Infotainment system > page 228.
| zl ‘ae.
N a |
a WAi==)/)
A
— Speeds are displayed in mph (miles per
hour) or km/h (kilometers per hour).
— If there is a malfunction in the instrument
cluster, DEF will appear in the trip odometer
display. Have the malfunction corrected as
soon as possible.
— Certain instrument cluster content can also
be displayed in the head-up display*
> page 24.
11
Page 14 of 308
Instrument cluster
Operating
eH) Oe
2/17/2019
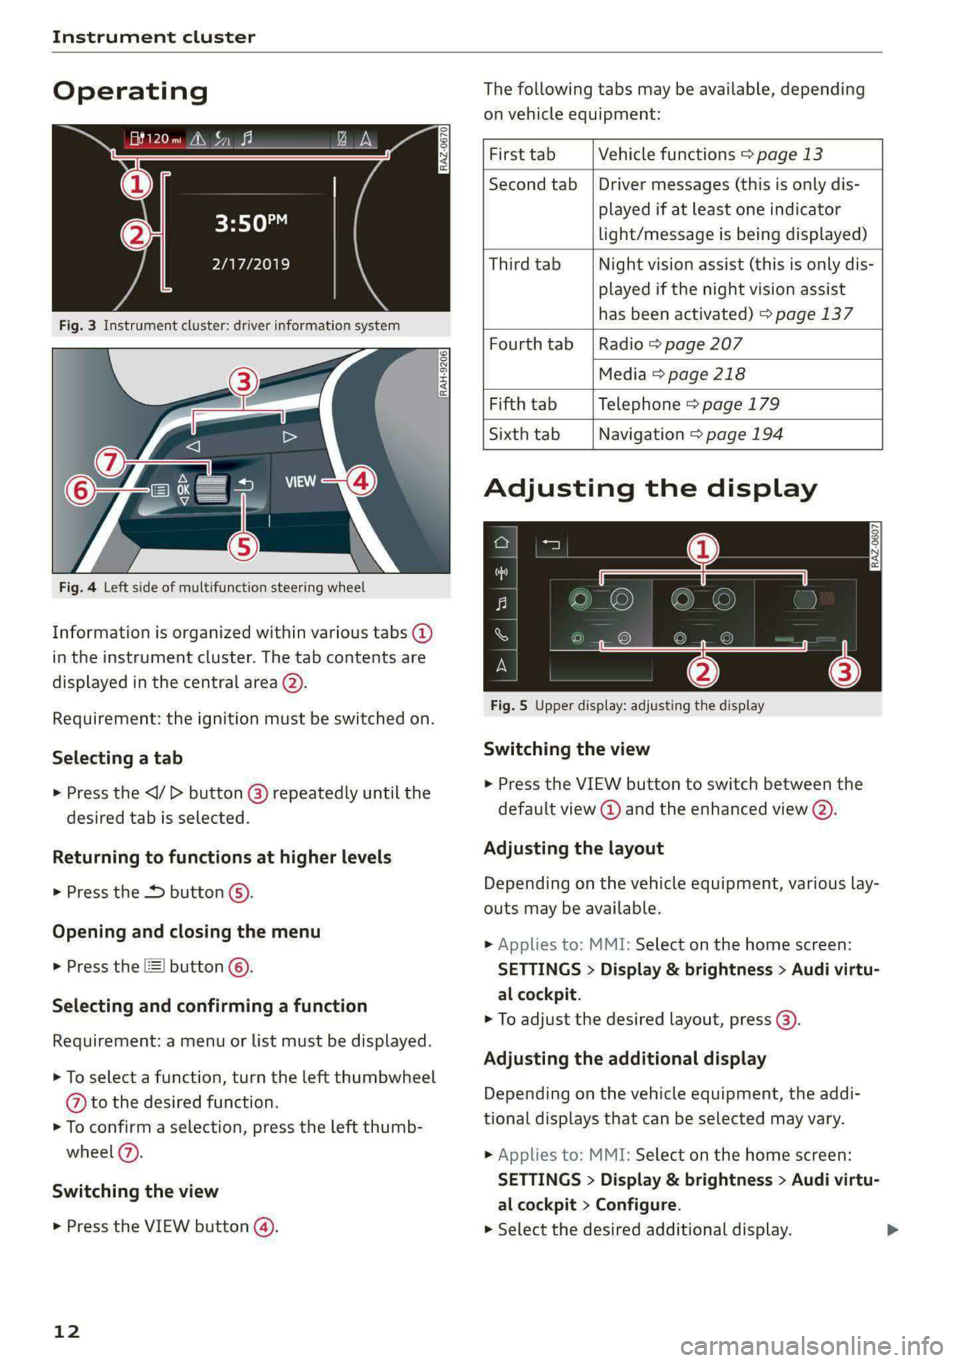
Fig. 3 Instrument cluster: driver information system
The following tabs may be available, depending
on vehicle equipment:
RAH-9206|
Fig. 4 Left side of multifunction steering wheel
Information is organized within various tabs (2)
in the instrument cluster. The tab contents are
displayed in the central area (2).
Requirement: the ignition must be switched on.
Selecting a tab
> Press the button @) repeatedly until the
desired tab is selected.
Returning to functions at higher levels
> Press the D button ©).
Opening and closing the menu
> Press the [=] button ©.
Selecting and confirming a function
Requirement: a menu or list must be displayed.
> To select a function, turn the left thumbwheel
@ to the desired function.
> To confirm a selection, press the left thumb-
wheel (2).
Switching the view
> Press the VIEW button (@).
12
First tab Vehicle functions > page 13
Second tab | Driver messages (this is only dis-
played if at least one indicator
light/message is being displayed)
Third tab Night vision assist (this is only dis-
played if the night vision assist
has been activated) > page 137
Fourth tab | Radio > page 207
Media > page 218
Fifth tab Telephone > page 179
Sixth tab Navigation > page 194
Adjusting the display
S| 3|
wea Ny S|
ce|
Fig. 5 Upper display: adjusting the display
Switching the view
>» Press the VIEW button to switch between the
default view @ and the enhanced view (2).
Adjusting the layout
Depending on the vehicle equipment, various lay-
outs may be available.
> Applies to: MMI: Select on the home screen:
SETTINGS > Display & brightness > Audi virtu-
al cockpit.
> To adjust the desired layout, press (@).
Adjusting the additional display
Depending on the vehicle equipment, the addi-
tional displays that can be selected may vary.
> Applies to: MMI: Select on the home screen:
SETTINGS > Display & brightness > Audi virtu-
al cockpit > Configure.
> Select the desired additional display.
Page 15 of 308
4KE012721BF
Instrument cluster
Reducing the display
Depending on the vehicle equipment, you can
hide the central area in the instrument cluster.
> Select on the instrument cluster: vehicle func-
tions tab > EE] button > Reduced display.
Power meter
RAZ-0574) fi
@
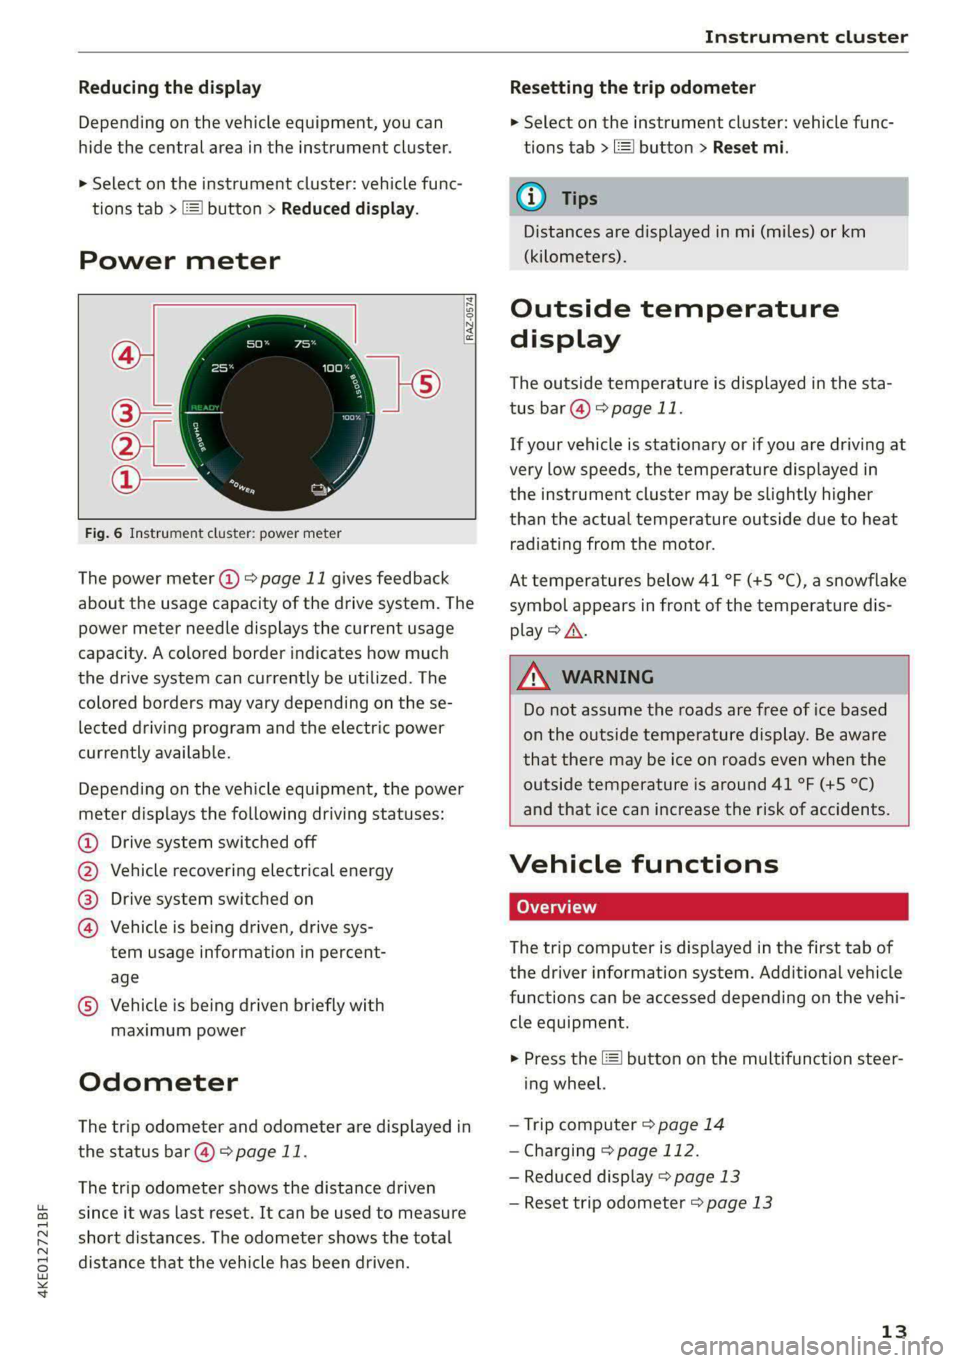
Fig. 6 Instrument cluster: power meter
The power meter @ > page 11 gives feedback
about the usage capacity of the drive system. The
power meter needle displays the current usage
capacity. A colored border indicates how much
the drive system can currently be utilized. The
colored borders may vary depending on the se-
lected driving program and the electric power
currently available.
Depending on the vehicle equipment, the power
meter displays the following driving statuses:
Drive system switched off
Vehicle recovering electrical energy
Drive system switched on
®©O&O Vehicle is being driven, drive sys-
tem usage information in percent-
age
© Vehicle is being driven briefly with
maximum power
Odometer
The trip odometer and odometer are displayed in
the status bar @) > page 11.
The trip odometer shows the distance driven
since it was last reset. It can be used to measure
short distances. The odometer shows the total
distance that the vehicle has been driven.
Resetting the trip odometer
> Select on the instrument cluster: vehicle func-
tions tab > EJ button > Reset mi.
(i) Tips
Distances are displayed in mi (miles) or km
(kilometers).
Outside temperature
display
The outside temperature is displayed in the sta-
tus bar @) > page 11.
If your vehicle is stationary or if you are driving at
very low speeds, the temperature displayed in
the instrument cluster may be slightly higher
than the actual temperature outside due to heat
radiating from the motor.
At temperatures below 41 °F (+5 °C), a snowflake
symbol appears in front of the temperature dis-
play > A\.
ZA\ WARNING
Do not assume the roads are free of ice based
on the outside temperature display. Be aware
that there may be ice on roads even when the
outside temperature is around 41 °F (+5 °C)
and that ice can increase the risk of accidents.
Vehicle functions
Coa (ai)
The trip computer is displayed in the first tab of
the driver information system. Additional vehicle
functions can be accessed depending on the vehi-
cle equipment.
> Press the E] button on the multifunction steer-
ing wheel.
— Trip computer > page 14
— Charging > page 112.
— Reduced display > page 13
— Reset trip odometer > page 13
13
Page 16 of 308
Instrument cluster
On-board computer
Resetting values to zero
Requirement: the Consumption, Short-term
memory, or Long-term memory display must be
selected.
> To reset the values in one of the memories to
zero, press and hold the left thumbwheel on
the multifunction steering wheel for one sec-
ond, or
> Select on the instrument cluster: vehicle func-
tions tab > [=] button > Reset mi.
Depending on the vehicle equipment, you can call
up the following displays in the on-board com-
puter one at a time by turning the left thumb-
wheel on the multifunction steering wheel:
— Time and date > page 228
— Range display > page 95
— Average consumption > page 14
— Short-term memory overview
— Long-term memory overview
— Driver assistance
— Traffic sign recognition and traffic light infor-
mation
Short-term memory and long-term memory
The short-term memory collects driving informa-
tion from the time the ignition is switched on un-
til it is switched off. If you continue driving within
two hours after switching the ignition off, the
new values will be included when calculating the
current trip information.
Unlike the short-term memory, the long-term
memory is not erased automatically. You can se-
lect the time period for evaluating trip informa-
tion yourself.
Average consumption
The current consumption can be shown using a
bar graph. The average consumption stored in
the short-term memory is also displayed. If the
bar
is green, your vehicle is saving energy (for ex-
ample, using recuperation).
14
G) Tips
The date, time of day, and time and date for-
mat can be set in the Infotainment system
=> page 228.
Page 17 of 308
4KE012721BF
Touch displays
General touch display
operation
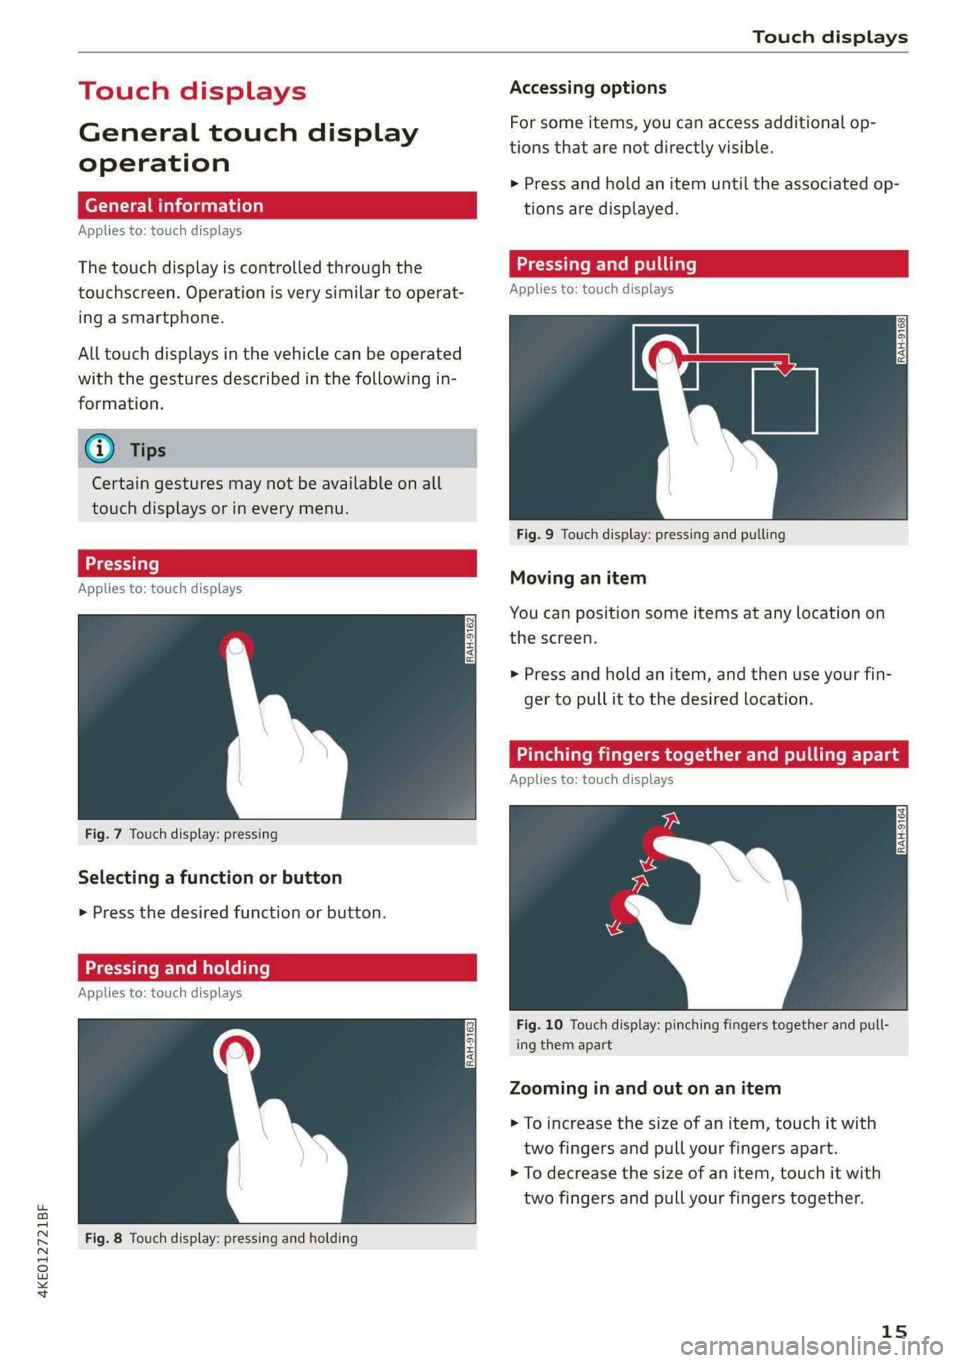
Applies to: touch displays
The touch display is controlled through the
touchscreen. Operation is very similar to operat-
ing a smartphone.
All touch displays in the vehicle can be operated
with the gestures described in the following in-
formation.
G@) Tips
Certain gestures may not be available on all
touch displays or in every menu.
Applies to: touch displays
Fig. 7 Touch display: pressing
Selecting a function or button
> Press the desired function or button.
Applies to: touch displays
Fig. 8 Touch display: pressing and holding
Accessing options
For some items, you can access additional op-
tions that are not directly visible.
> Press and hold an item until the associated op-
tions are displayed.
Applies to: touch displays
Fig. 9 Touch display: pressing and pulling
Moving an item
You can position some items at any location on
the screen.
> Press and hold an item, and then use your fin-
ger to pull it to the desired location.
Pinching fingers t
Applies to: touch displays
Fig. 10 Touch display: pinching fingers together and pull-
ing them apart
Zooming in and out on an item
> To increase the size of an item, touch it with
two fingers and pull your fingers apart.
> To decrease the size of an item, touch it with
two fingers and pull your fingers together.
15
Page 18 of 308
Touch displays
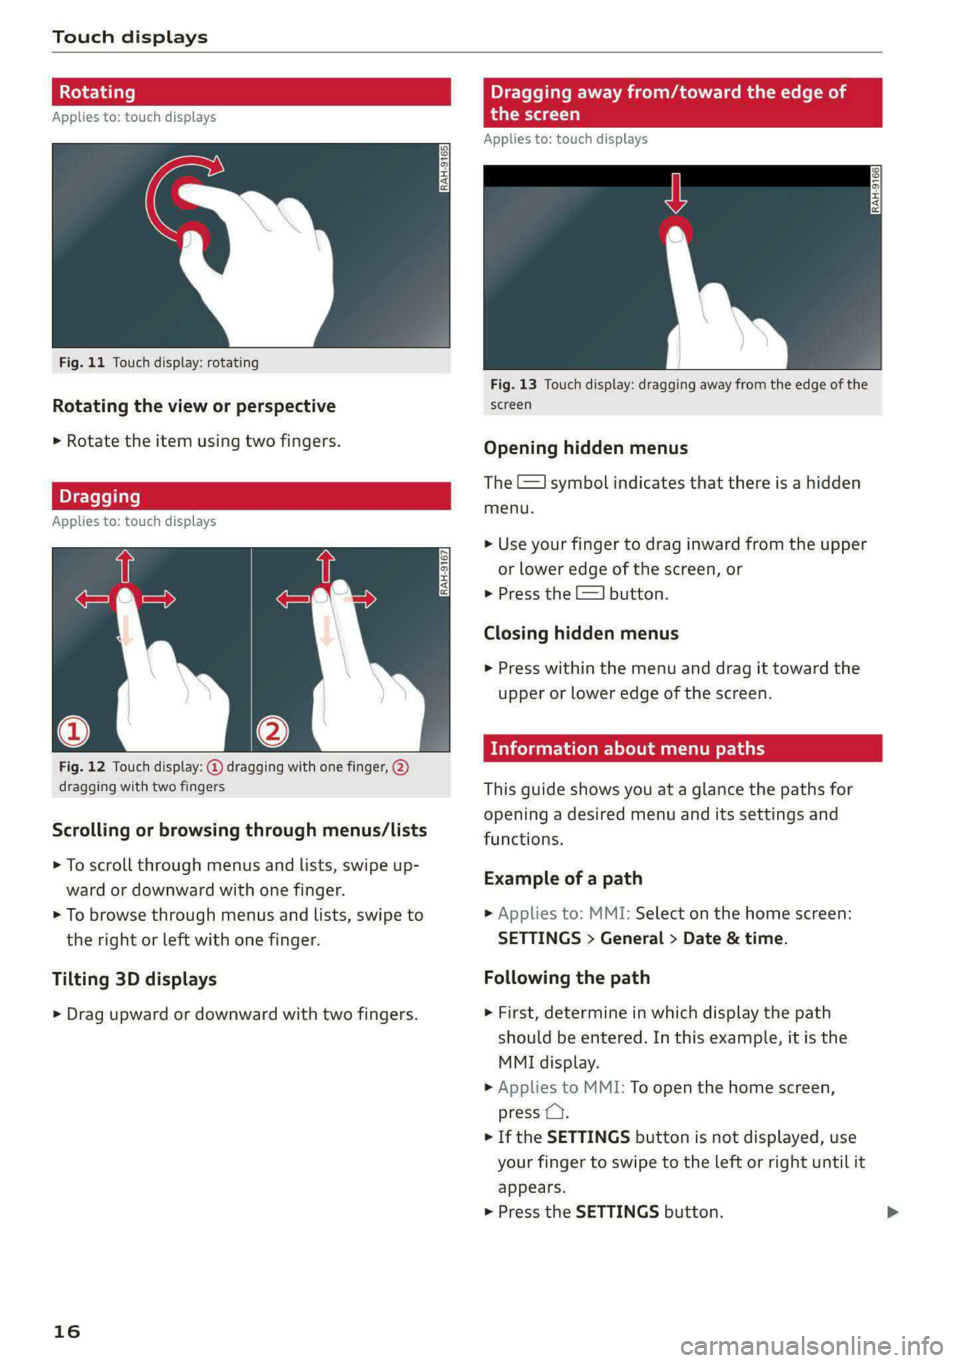
‘agging away from/toward the edge of
Applies to: touch displays e scre
Applies to: touch displays
Fig. 11 Touch display: rotating
Fig. 13 Touch display: dragging away from the edge of the
Rotating the view or perspective screen
> Rotate the item using two fingers. Opening hidden menus
The E=] symbol indicates that there is a hidden
agging menu.
Applies to: touch displays
> Use your finger to drag inward from the upper
or lower edge of the screen, or
> Press the E=] button.
Closing hidden menus
> Press within the menu and drag it toward the
upper or lower edge of the screen.
Information about menu paths
Fig. 12 Touch display: @ dragging with one finger, @
dragging with two fingers This guide shows you at a glance the paths for
opening a desired menu and its settings and
functions. Scrolling or browsing through menus/lists
> To scroll through menus and lists, swipe up-
ward or downward with one finger. Esamplw ers path
> To browse through menus and lists, swipe to » Applies to: MMI: Select on the home screen:
the right or left with one finger. SETTINGS > General > Date & time.
Tilting 3D displays Following the path
> Drag upward or downward with two fingers. » First, determine in which display the path
should be entered. In this example, it is the
MMI display.
> Applies to MMI: To open the home screen,
press C).
> If the SETTINGS button is not displayed, use
your finger to swipe to the left or right until it
appears.
> Press the SETTINGS button.
16