engine coolant AUDI Q2 2021 Owner´s Manual
[x] Cancel search | Manufacturer: AUDI, Model Year: 2021, Model line: Q2, Model: AUDI Q2 2021Pages: 364, PDF Size: 87.77 MB
Page 15 of 364
Instruments and controls
CO
<
O
rN
r>
I-I
00
19
26
14
14
- Driver information system (ana
logue instrument cluster)* ....
-Warning and indicator Lamps ..
(f)
Status line (displayed on one
or
two
lines)
(?) Reset button for trip recorder ...
(7) Speedometer/convenience display
(§)
Fuel gauge
(9) Speedometer
@
Additional display on left (two sep
arate sections in extended view)
Further warning/indicator lamps may appear in
the rev counter
(2),
in the speedometer
(f),
in the
status line (5) and above or below the central
area
@,
depending on the instrument cluster
version.
Most of the illustrations on the following pages
show the colour analogue instrument cluster*.
The display and position of the elements may be
different on the monochrome instrument cluster
or the Audi virtual cockpit*.
1) Note
- Depending on the vehicle equipment, the
instrument lighting (for dials and needles)
may be switched on when the ignition is on
and the vehicle's lights are off. The illumi
nation of the diaLs and needles is automati
cally reduced as it becomes dark outside
and is eventually switched off altogether.
This function is intended to remind the driv
er to switch on the dipped headlights in
good time.
- You can change the measurement units for
temperature or speed, etc. via the infotain
ment system
^>page
255.
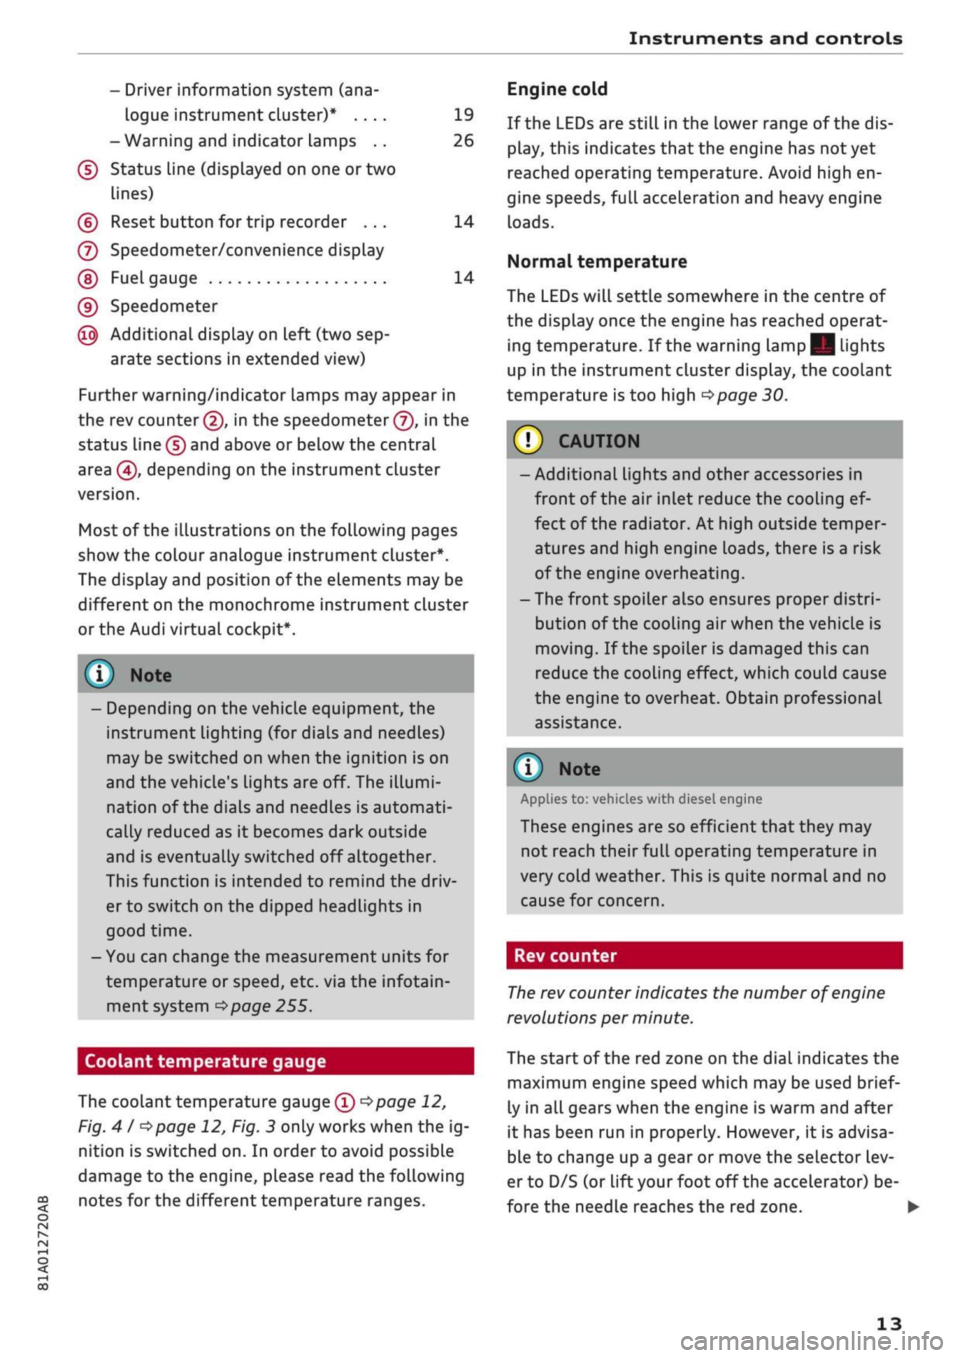
Coolant temperature gauge
The coolant temperature gauge
(T) ^>page
12,
Fig.
41 ^>page
12, Fig. 3 only works when the ig
nition is switched on. In order to avoid possible
damage to the engine, please read the following
notes for the different temperature ranges.
Engine cold
If the LEDs are still in the lower range of the dis
play, this indicates that the engine has not yet
reached operating temperature. Avoid high en
gine speeds, full acceleration and heavy engine
loads.
Normal temperature
The LEDs will settle somewhere in the centre of
the display once the engine has reached operat
ing temperature. If the warning lamp || lights
up in the instrument cluster display, the coolant
temperature is too high
<^>page
30.
© CAUTIO
- Additional lights and other accessories in
front of the air inlet reduce the cooling ef
fect of the radiator. At high outside temper
atures and high engine loads, there is a risk
of the engine overheating.
- The front spoiler also ensures proper distri
bution of the cooling air when the vehicle is
moving.
If the spoiler is damaged this can
reduce the cooling effect, which could cause
the engine to overheat. Obtain professional
assistance.
® Note
Applies to: vehicles with diesel engine
These engines are so efficient that they may
not reach their full operating temperature in
very cold weather. This is quite normal and no
cause for concern.
Rev counter
The
rev counter indicates the number of engine
revolutions per minute.
The start of the red zone on the dial indicates the
maximum engine speed which may be used brief
ly in all gears when the engine is warm and after
it has been run in properly. However, it is advisa
ble to change up a gear or move the selector lev
er to D/S (or
lift your
foot
off
the accelerator) be
fore the needle reaches the red zone. •
13
Page 32 of 364
Instruments
and
controls
The brakes
may
perform differently than usual
and
the
brake pedal may vibrate.
Drive
to
a qualified workshop without delay
and
have
the
fault rectified.
A WARNING
- Before opening
the
bonnet and checking
the
brake fluid level, observe
the
warning infor
mation
on
*$page
295,
Working
on
compo
nents
in the
engine compartment.
-
If
the brake warning lamp does
not go out,
or
if it
lights up when driving,
the
brake
flu
id level in
the
reservoir
is too low -
this
may
cause an increased accident risk. Stop
the
vehicle and
do not
drive on. Obtain profes
sional assistance.
-
If
the brake warning lamp lights
up
togeth
er with
the
ABS indicator lamp and
the
ESC
indicator lamp, this can mean that
the
con
trol function
of
the ESC/ABS
is not
working.
Input from
the
functions that stabilise
the
vehicle
is no
longer available. This could
cause
the
tail of
the vehicle
to
skid
side
ways.
Do not
drive on. Obtain professional
assistance.
(®)/0
Electro-mechanical parking brake
The warning lamp
||
lights
up
when
the
parking
brake
is
applied.
If the warning lamp
||
flashes, insufficient brak
ing force
has
been applied
or
released. Select
first gear (manual gearbox)
or
position
P
(auto
matic gearbox)
as an
additional safeguard. Make
sure that
the
warning lamp has gone
out
before
you drive
off.
2J
Parking brake!
There
is
a malfunction
in the
parking brake. Drive
to a qualified workshop soon
and
have
the
fault
rectified.
[ft]
Parking brake auto release: unavailable
If this message appears, press
the
brake pedal
and then release
the
parking brake.
If the warning lamp flashes and
the
message
ap
pears,
the
brake
may not be
strong enough
to
hold
the
vehicle. The brakes have overheated.
The vehicle can roll away, even
on a
gentle slope.
©J Parking brake is applied
If this message appears, press
the
brake pedal
and then reLease
the
parking brake
as
necessary.
For further information
on the
parking brake
refer
to
^>page
82.
•as
Cooling system
| Switch
off
engine and check coolant level.
See owner's manual
The coolant level
is too low.
Switch
off
the engine and
do not
drive on. Check
the coolant level
^>page
299.
-
If
the coolant level
is too
low, add more coolant
^>page
300. Do not
drive
on
until
the
warning
lamp has gone
out.
| Coolant temperature too high! Let engine
run with vehicle stationary
Let
the
engine cool down
by
running
it at
idling
speed
for
a
few
minutes until
the
warning lamp
goes
out.
-
Do not
drive
on if
the warning lamp does
not
disappear. Obtain professional assistance.
JgJ
Caution:
Vehicle parked
too
steep
A WARNING
- Never open
the
bonnet
if
you
can see
or
hear
steam
or
coolant escaping from
the
engine
compartment; there
is
a risk
of
being
scal
ded.
Wait until you
can no
longer see
or
hear escaping steam
or
coolant.
-The engine compartment
of
any motor
vehi
cle
is
a dangerous place. Before carrying
out
any work
in the
engine compartment, switch
off the engine and allow
it to
cool down.
Please observe
the
important safety warn
ings
^>page
295,
Working
on
components
in
the
engine compartment.
30
Page 78 of 364
Driving
©
y
Note
After the engine is stopped, the radiator fan
may remain on or turn itself back on for up to
10 minutes, even if the ignition is switched
off. This may occur for the following reasons:
- Residual heat has raised the coolant
tem
perature.
- Direct sunlight has additionally heated up
the engine compartment while the engine is
warm.
- Applies to vehicles with diesel particulate
filter: The emission control system is hot
because of the regeneration process, even
though the engine has
not
yet reached oper
ating temperature.
Starting and stopping
the engine (vehicles with
convenience key)
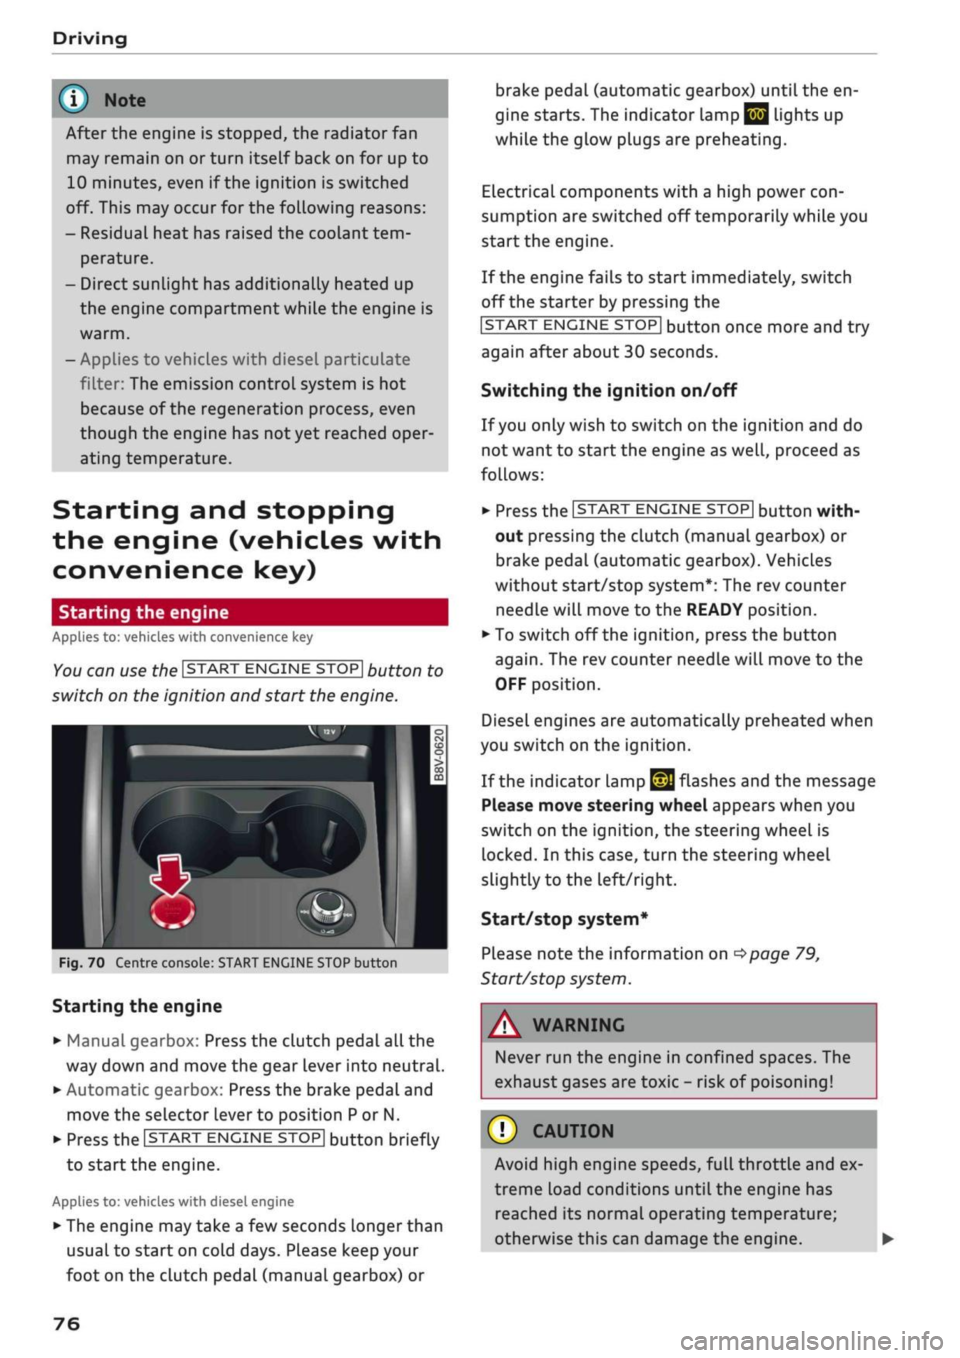
Starting the engine
Applies to: vehicles with convenience key
You can use the ISTART ENGINE STOP| button to
switch on the ignition and start the engine.
Fig.
70 Centre console: START ENGINE STOP button
Starting the engine
•
Manual gearbox: Press the clutch pedal all the
way down and move the gear lever into neutral.
•
Automatic gearbox: Press the brake pedal and
move the selector lever to position P or N.
•
Press the ISTART ENGINE
STOP!
button briefly
to start the engine.
Applies to: vehicles with diesel engine
•
The engine may take a few seconds longer than
usual to start on cold days. Please keep your
foot on the clutch pedal (manual gearbox) or
brake pedal (automatic gearbox) until the en
gine starts. The indicator Lamp
E 3
lights up
while the glow plugs are preheating.
Electrical components with a high power
con
sumption are switched off temporarily while you
start the engine.
If the engine fails to start immediately, switch
off the starter by pressing the
ISTART
ENGINE
STOPI
button once more and try
again after about 30 seconds.
Switching the ignition on/off
If you only wish to switch on the ignition and do
not want to start the engine as
well,
proceed as
follows:
•
Press the ISTART ENGINE STOP| button with
out pressing the clutch (manual gearbox) or
brake pedal (automatic gearbox). Vehicles
without start/stop system*: The rev counter
needle will move to the READY position.
•
To switch off the ignition, press the button
again.
The rev counter needle will move to the
OFF position.
Diesel engines are automatically preheated when
you switch on the ignition.
If the indicator lamp
£21
flashes and the message
Please move steering wheel appears when you
switch on the ignition, the steering wheel is
locked.
In this case, turn the steering wheel
slightly
to
the left/right.
Start/stop system*
Please note the information on
<^>page
79,
Start/stop system.
WARNING
Never run the engine in confined spaces. The
exhaust gases are toxic - risk of poisoning!
© CAUTION
Avoid high engine speeds, full throttle and ex
treme load conditions until the engine has
reached its normal operating temperature;
otherwise this can damage the engine. •
76
Page 79 of 364
Driving
CO
<
O
rN
IV
rN
t-H
o <
® For the sake of the environment
Do not warm up the engine by running it with
the car stationary. You should drive off imme
diately whenever possible. This will help avoid
unnecessary exhaust emissions.
© Note
- Any noises which may be heard when the
engine is started are quite normal and no
cause for concern.
- If
you
leave your vehicle with the ignition
switched on, it will be switched off auto
matically after
a
while. Please note that
electrical equipment such as the exterior
lighting will also be switched off.
Switching off the engine
Applies to: vehicles with convenience key
•
Stop the vehicle.
•
Automatic gearbox: Move the selector lever to
position P.
•
Press the ISTART ENGINE STOP| button
tapage
76, Fig. 70.
Steering
lock15
The steering will be locked if
you
switch off the
engine with the ISTART ENGINE STOP| button,
move the selector lever to position P (on vehicles
with automatic gearbox*) and open the driver's
door. The steering lock acts as a theft deterrent.
Emergency Off function
If necessary in an emergency, the engine can be
switched off while the vehicle is still moving at
speeds of 7 km/h and above. To switch off the
engine, press the ISTART ENGINE STOP| button
twice in quick succession or hold it in for longer
than two seconds.
A WARNING
- Never switch off the engine until the vehicle
is stationary. Otherwise you may not have
the full benefit of the brake servo and pow
er steering. You may need more strength to
steer and brake the vehicle than you nor
mally would. This would mean a greater risk
of accidents and serious injury, because you
cannot steer and brake in the normal
man
ner.
- Always take the key with you when you Leave
the vehicle. Otherwise the engine can be
started or power-operated equipment such
as the electric windows can be used. This
could result in serious injury.
- When parking, always move the selector
lever to position
P
to prevent the vehicle
from rolling back accidentally.
If the engine has been working hard for
a
long
time,
there is a risk of heat building up in the
engine compartment after the engine has
been switched off; this could cause engine
damage. For this reason, you should leave the
engine idling for about 2 minutes before
switching it off.
©
Note
After the engine is stopped, the radiator fan
may remain on or turn itself back on for up to
10 minutes, even if the ignition is switched
off. This may occur for the following reasons:
- Residual heat has raised the coolant
tem
perature.
- Direct sunlight has additionally heated up
the engine compartment while the engine is
warm.
- Applies to vehicles with diesel particulate
filter: The emission control system is hot
because of the regeneration process, even
though the engine has
not
yet reached oper
ating temperature.
Driver messages
Engine running. Warning! Switch off ignition
before leaving car
1J
This function is not available on all export versions.
77
Page 101 of 364

Towing
a
trailer
CO
< o rN
iv
rN
t-H
o < 00
have friction linings at the sides to prevent exces
sive wear. Degrease and clean the ball joint be
fore using a stabiLiser. The stabiliser can be pur
chased and installed
at
a qualified workshop.
Electronic stabilisation control
The
ESC
-
in particular in conjunction with the
trailer stabilisation system
o^page
97 - makes
it
easier to stabilise a trailer
if it
starts to skid
or
sway. You should therefore keep the
ESC
switch
ed on
at
all times.
Overheating
In hot weather, keep an eye on the coolant
tem
perature gauge
^page
13. When climbing long
hills with the engine running fast in low gear, the
coolant temperature can increase. Reduce speed
immediately
if
the needle moves to the right end
of the scale. For information on the warning
lamp
||
refer to
opage
30.
Rear carrier systems
When using rear carrier systems (e.g. bicycle
racks) on the towing bracket,
it
is important not
to exceed the maximum load.
The total weight
of
the rear carrier system and
its
load must not exceed
75
kg for this vehicle. How
ever,
it
is also important to observe the maxi
mum permissible load for the rear carrier sys
tem.
The greater the distance from the towing brack
et, the smaller the maximum permissible Load
on
the rear carrier system. For this reason, you
should secure heavy objects as near as possible
to the towing bracket.
Note the instructions provided by the manufac
turer of the rear carrier system.
Please make sure that the rear carrier system
is
approved for use on your vehicle.
l
Note
A WARNING
The use of an unsuitable rear carrier system
could cause severe damage
to
the towing
bracket. The towing bracket could then break
and cause an accident.
Degrease and clean the ball joint before using
a rear carrier system.
Removable towing
bracket
Introduction
Applies to: vehicles with removable towing bracket
Special care is required when fitting and remov
ing the towing bracket.
Fig.
84 Luggage compartment:
Ball
joint for towing brack
et (stowage example)
The removable ball joint attachment for the tow
ing bracket is stored under the floor panel or in a
separate bag on the floor of the luggage com
partment.
The ball joint can be fitted and removed by hand.
WARNING
Never use tools of any kind when fitting and
removing the ball joint. This could damage
the mechanism which locks the
ball
joint
in
place and impair its safety
-
risk of accident!
© Note
- Do not attempt to modify or repair the ball
joint or other towing bracket components.
- Should you have any difficulties when using
the towing bracket, or suspect that
it
is not
fitted properly, contact
a
qualified work
shop.
- Before setting off, always check that the
ball
joint is secured properly
Opage
101.
99
Page 299 of 364

Checking and topping up fluids
CO
rN
IV
rN
•-i
00
Emission controL
systems
Catalytic converter
Applies to: vehicles with petrol engine
The vehicle must only be used with unleaded pet
rol,
otherwise the catalytic converter will be ir
reparably damaged.
Never allow the fuel tank to run completely dry,
as the irregular supply of fuel can cause misfir
ing.
This allows unburnt fuel to enter the exhaust
system,
which can cause overheating and dam
age to the catalytic converter.
Diesel particulate filter
Applies to: vehicles with diesel engine
The diesel particulate filter can filter out almost
all soot particles contained in the exhaust gas. In
normal driving conditions the filter is self-clean
ing.
Should the self-cleaning function of the filter
not be able to operate, e.g. when the vehicle is
continuously used only for short trips, the filter
becomes obstructed with soot and the indicator
lampnf°r
the
diesel particulate filter Lights up
cépage
34.
A WARNING
The exhaust system is very hot when the
vehi
cle is being driven and after the engine has
been switched off.
- Never touch the tailpipes when they are hot
- risk of burns!
- Because of the high temperatures which can
occur in the emission controL system, do not
park the vehicle where the exhaust can
come into contact with flammable materials
under the car (e.g. on grass or at the forest
edge) - risk of fire!
- Do not apply any underseal agents in the
area around the exhaust system - risk of
fire!
Engine compartment
Working on components in the engine
compartment
Extra caution is necessary when working on com
ponents in the engine compartment.
Always be aware of the danger of injury and
scalding as well as the risk of accident or fire
when working in the engine compartment (e.g.
when checking and refilling fluids). Always ob
serve the warnings listed below and follow all
normal safety precautions. The engine compart
ment of any motor vehicle is a potentially haz
ardous area
oA-
A WARNING
- Switch off the engine.
-Switch off the ignition.
-Applythe
parking brake.
- On vehicles with manual gearbox place the
gear lever in neutral, on vehicles with auto
matic gearbox move the selector lever to
position P.
- To avoid the risk of being scalded, never
open the bonnet if
you
see steam or coolant
escaping from the engine compartment.
Wait until no steam or coolant can be seen
before opening the bonnet.
- Wait for the engine to cool down.
- Keep children away from engine compart
ment.
- Never spill fluids on a hot engine. These
flu
ids can cause a fire (e.g. radiator
anti
freeze).
- Take care not to cause short circuits in the
electrical system.
- When working in the engine compartment
be aware that the radiator fan may start
running suddenly, even if the ignition is
switched off - risk of injury!
- Do not unscrew the cap on the expansion
tank when the engine is hot. The cooling
system is under pressure.
- Protect face, hands and arms by covering
the cap with a large, thick rag to protect
against escaping coolant and steam.
295
Page 301 of 364
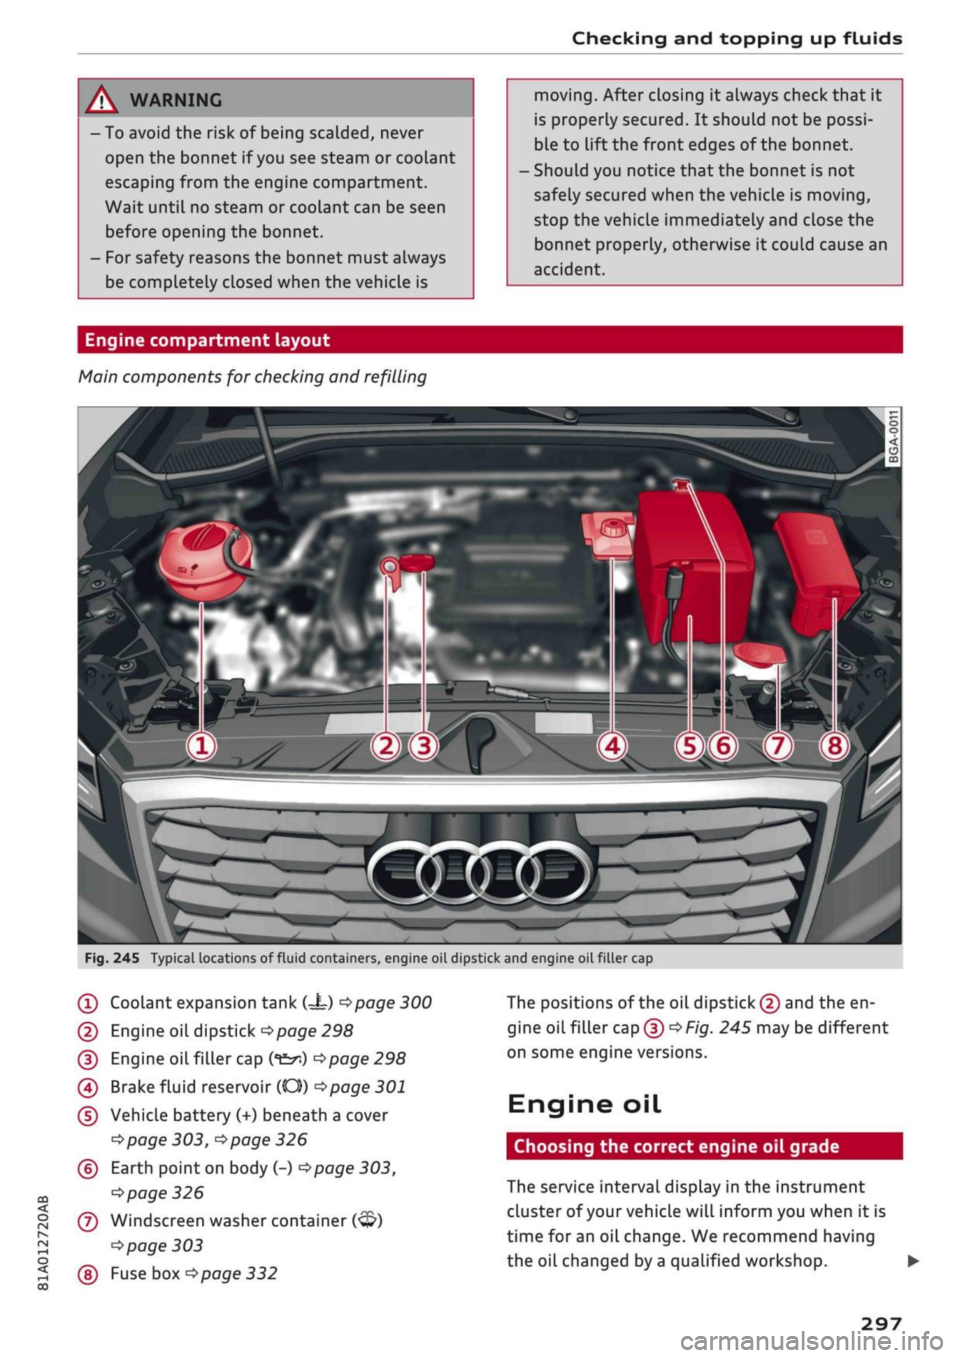
Checking and topping up fluids
A WARNING
- To avoid the risk of being scalded, never
open the bonnet if
you
see steam or coolant
escaping from the engine compartment.
Wait until no steam or coolant can be seen
before opening the bonnet.
- For safety reasons the bonnet must always
be completely closed when the vehicle is
moving.
After closing it always check that it
is properly secured. It should not be possi
ble to
lift
the front edges of the bonnet.
Should you notice that the bonnet is not
safely secured when the vehicle is moving,
stop the vehicle immediately and close the
bonnet properly, otherwise it could cause an
accident.
Engine compartment layout
Main components for checking and refilling
CO
< o rN
iv
rN
t-H
o <
?
Fig.
245 Typical locations of fluid containers, engine oil dipstick and engine
oilfiller
cap
(T)
Coolant expansion tank
C=t)
<^page
300
(2) Engine oil dipstick
Opage
298
(3) Engine
oilfiller
cap
(*&*)
Opage
298
(4) Brake fluid reservoir (CO))
^>page
301
(5) Vehicle battery (+) beneath a cover
^page
303,
^page
326
(?) Earth
point
on
body
(-)•=>page
303,
^>page
326
(7) Windscreen
washer
container
(<3?)
^>page
303
(§)
Fuse box
^page
332
The positions of the oil
dipstick
(2) and the en
gine
oilfiller
cap(D^F/'g.
245 may be different
on some engine versions.
Engine oil
Choosing the correct engine oil grade
The service interval display in the instrument
cluster of your vehicle will inform you when it is
time for an oil change. We recommend having
the oil changed by
a
qualified workshop. •
297
Page 303 of 364
Checking and topping up fluids
CO
<
O
rN
iv
rN
i—i
o <
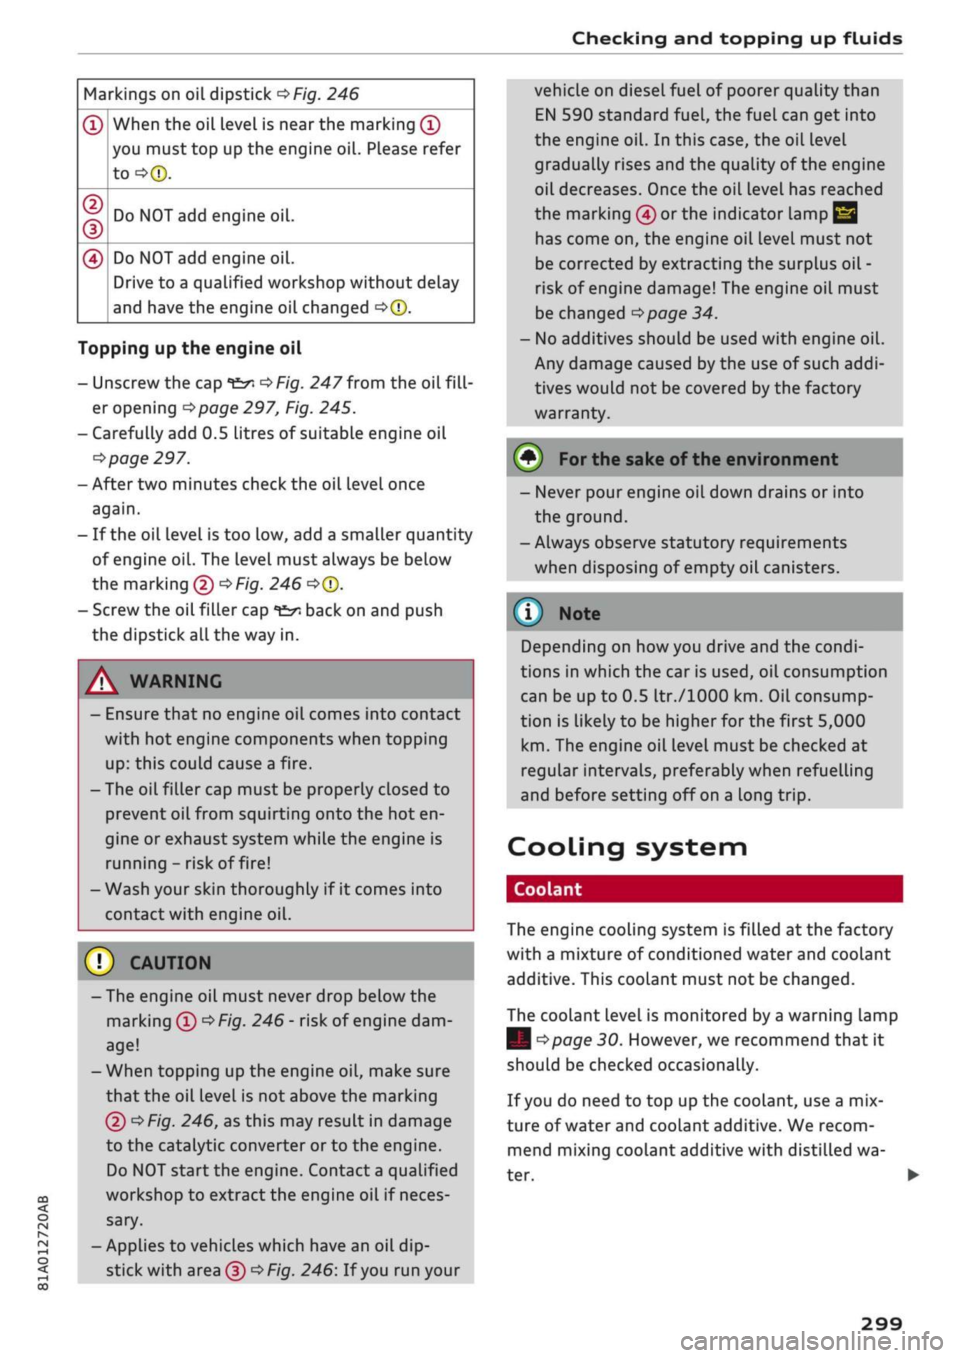
Markings on oil dipstick
^>Fig.
246
®
CD
(D
0
When the oil level is near the marking
(Î)
you must top up the engine oil. Please refer
to-=>®.
Do NOT add engine oil.
Do NOT add engine oil.
Drive to a qualified workshop without delay
and have the engine oil changed
•=>©.
Topping up the engine oil
- Unscrew the cap
"fc^
^>Fig.
247 from the
oilfill
er opening
^>page
297, Fig. 245.
-Carefully add 0.5 Litres of suitable engine oil
^>
page 297.
- After two minutes check the oil level once
again.
- If the oil level is too low, add a smaller quantity
of engine oil. The level must always be below
the marking (5)
<^Fig.
246
<=>©.
- Screw the oil filler cap
*£/;
back on and push
the dipstick all the way in.
A WARNING
- Ensure that no engine oil comes into contact
with hot engine components when topping
up:
this could cause a fire.
- The oil filler cap must be properly closed to
prevent oil from squirting onto the hot en
gine or exhaust system while the engine is
running - risk of fire!
- Wash your skin thoroughly if it comes into
contact with engine oil.
- The engine oil must never drop below the
marking®
^>Fig.
246- risk of engine dam
age!
- When topping up the engine oil, make sure
that the oil level is not above the marking
@
^Fig.
246, as this may result in damage
to the catalytic converter or to the engine.
Do NOT start the engine. Contact a qualified
workshop to extract the engine oil if neces
sary.
- Applies to vehicles which have an oil
dip
stick with area
(3)^
Fig. 246: If you run your
vehicle on diesel fuel of poorer quality than
EN 590 standard
fuel,
the fuel can get into
the engine oil. In this case, the oil level
gradually rises and the quality of the engine
oil decreases. Once the oil level has reached
the marking
@
or the indicator lamp
E
has come on, the engine oil level must not
be corrected by extracting the surplus oil -
risk
of engine damage! The engine oil must
be changed
^>page
34.
- No additives should be used with engine oil.
Any damage caused by the use of such
addi
tives would not be covered by the factory
warranty.
© For the sake of the environmen
- Never pour engine oil down drains or into
the ground.
-Always observe statutory requirements
when disposing of empty oil canisters.
© Note
Depending on
how
you drive and the condi
tions in which the car is used, oil consumption
can be up to 0.5
Itr./lOOO
km. Oil consump
tion is likely to be higher for the first 5,000
km.
The engine oil Level must be checked at
regular intervals, preferably when refuelling
and before setting off on a long trip.
Cooling system
Coolant
The engine cooling system is filled at the factory
with a mixture of conditioned water and coolant
additive. This coolant must not be changed.
The coolant level is monitored by a warning lamp
|
<^page
30. However, we recommend that it
should be checked occasionally.
If you do need to top up the coolant, use a mix
ture of water and coolant additive. We recom
mend mixing coolant additive with distilled wa
ter.
299
Page 304 of 364
Checking and topping up fluids
Coolant additive
The coolant additive contains anti-freeze and cor
rosion protection agent. Only use one of the
fol
lowing coolant additives. It is possible to mix
these additives.
Topping up coolant
Coolant additive
G13
G12++
Specification
TL774J
TL 774
G
The amount of coolant additive which needs to
be mixed with the water depends on the temper
atures to be expected in the winter season. If the
anti-freeze concentration is too Low, the coolant
can freeze and cause engine damage.
Hot regions
Cold regions
Coolant
additive
min.
40%
max. 45 %
min.
50%
max. 55 %
Frost protec
tion
min.-25°C
max. -40 °C
(T)
CAUTION
- Have your qualified workshop check the
cooling system before the winter season to
make sure that the anti-freeze concentra
tion is adequate for the conditions to be ex
pected.
This applies particularly if
you
drive
into a colder climate zone.
- To prevent damage to the engine, do not
use a different type of anti-freeze additive if
the approved type of additive is not availa
ble.
In this case use only water and bring
the coolant concentration back up to the
correct level as soon as possible by putting
in the specified additive.
- Always top up with fresh, unused coolant.
- Radiator sealants must not be added to the
coolant.
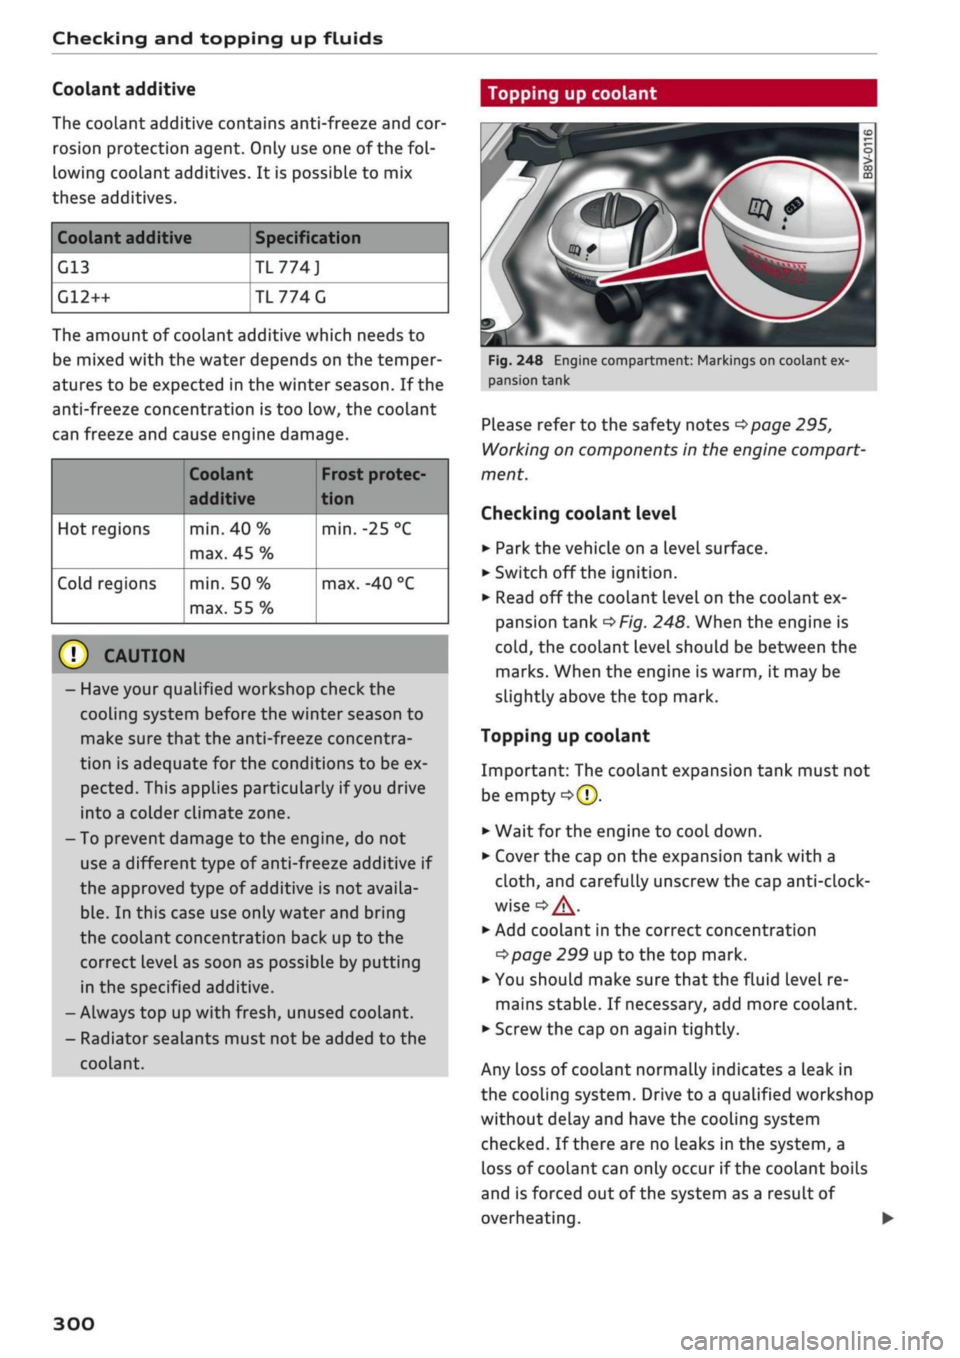
Fig.
248 Engine compartment: Markings on coolant ex
pansion tank
Please refer to the safety notes
^page
295,
Working on components in the engine compart
ment.
Checking coolant level
•
Park the vehicle on a level surface.
•
Switch off the ignition.
•
Read off the coolant level on the coolant ex
pansion tank
^>Fig.
248. When the engine is
cold,
the coolant level should be between the
marks. When the engine is warm, it may be
slightly above the top mark.
Topping up coolant
Important: The coolant expansion tank must not
be empty
•=>([).
•
Wait for the engine to cool down.
•
Cover the cap on the expansion tank with a
cloth,
and carefully unscrew the cap
anti-clock
wise
<=>
/K.
*-
Add coolant in the correct concentration
tapage
299 up to the top mark.
•
You should make sure that the fluid level re
mains stable. If necessary, add more coolant.
•
Screw the cap on again tightly.
Any loss of coolant normally indicates a Leak in
the cooling system. Drive to a qualified workshop
without delay and have the cooling system
checked.
If there are no leaks in the system, a
loss of coolant can only occur if the coolant boils
and is forced out of the system as a result of
overheating.
300
Page 305 of 364

Checking and topping up fluids
A WARNING
CO
rN
IV
rN
•-i
00
- The cooling system is under pressure. Do
not unscrew the cap on the expansion tank
when the engine is hot: you could be
scal
ded by escaping steam.
- The coolant and coolant additive can be a
health hazard. Store the coolant additive in
the original container in a safe place out of
reach of children - risk of poisoning.
- When working in the engine compartment
be aware that the radiator fan may start
running suddenly, even if the ignition is
switched off- risk of injury!
Brake fluid
© CAUTION
Do not add coolant if the expansion tank is
empty. Air could have got into the cooling
system - risk of engine damage! In this case,
do NOT drive on. Obtain professional assis
tance.
- Have your qualified workshop check the
cooling system before the winter season to
make sure that the anti-freeze concentra
tion is adequate for the conditions to be ex
pected.
This applies particularly if
you
drive
into a colder climate zone.
-To prevent damage to the engine, do not
use a different type of anti-freeze additive if
the approved type of additive is not availa
ble.
In this case use only water and bring
the coolant concentration back up to the
correct level as soon as possible by putting
in the specified additive.
- Always top up with fresh, unused coolant.
- Radiator sealants must not be added to the
coolant.
ëB
k
DOT
4
A
•9
o
o
:>
li-
Fig.
249 Engine compartment: Cap of brake fluid reservoir
Please refer to the safety notes
^page
295,
Working on components in the engine compart
ment.
Checking brake fluid level
Read off the brake fluid level on the brake fluid
reservoir
^>page
297, Fig. 245. The brake fluid
level must be between the MIN and MAX marks
<=>A.
The brake fluid
level
is also automatically moni
tored.
In right-hand drive vehicles the brake fluid reser
voir is on the other side of the engine compart
ment.
Changing brake fluid
Have the brake fluid changed regularly by a quali
fied workshop.
WARNING
-If the brake fluid Level is under the MIN
mark, the effectiveness of the brakes and
therefore the safety of the vehicle may be
impaired - risk of accident! Do not drive on.
Obtain professional assistance.
- Heavy use of the brakes may cause a vapour
lock if old brake fluid is left in the system.
This would seriously impair the effective
ness of the brakes and the safety of the car
- risk of accident!
© CAUTION
- If the brake fluid level is above the MAX
mark, brake fluid may escape via the cap on •
301