oil level AUDI Q2 2021 Owner´s Manual
[x] Cancel search | Manufacturer: AUDI, Model Year: 2021, Model line: Q2, Model: AUDI Q2 2021Pages: 364, PDF Size: 87.77 MB
Page 29 of 364
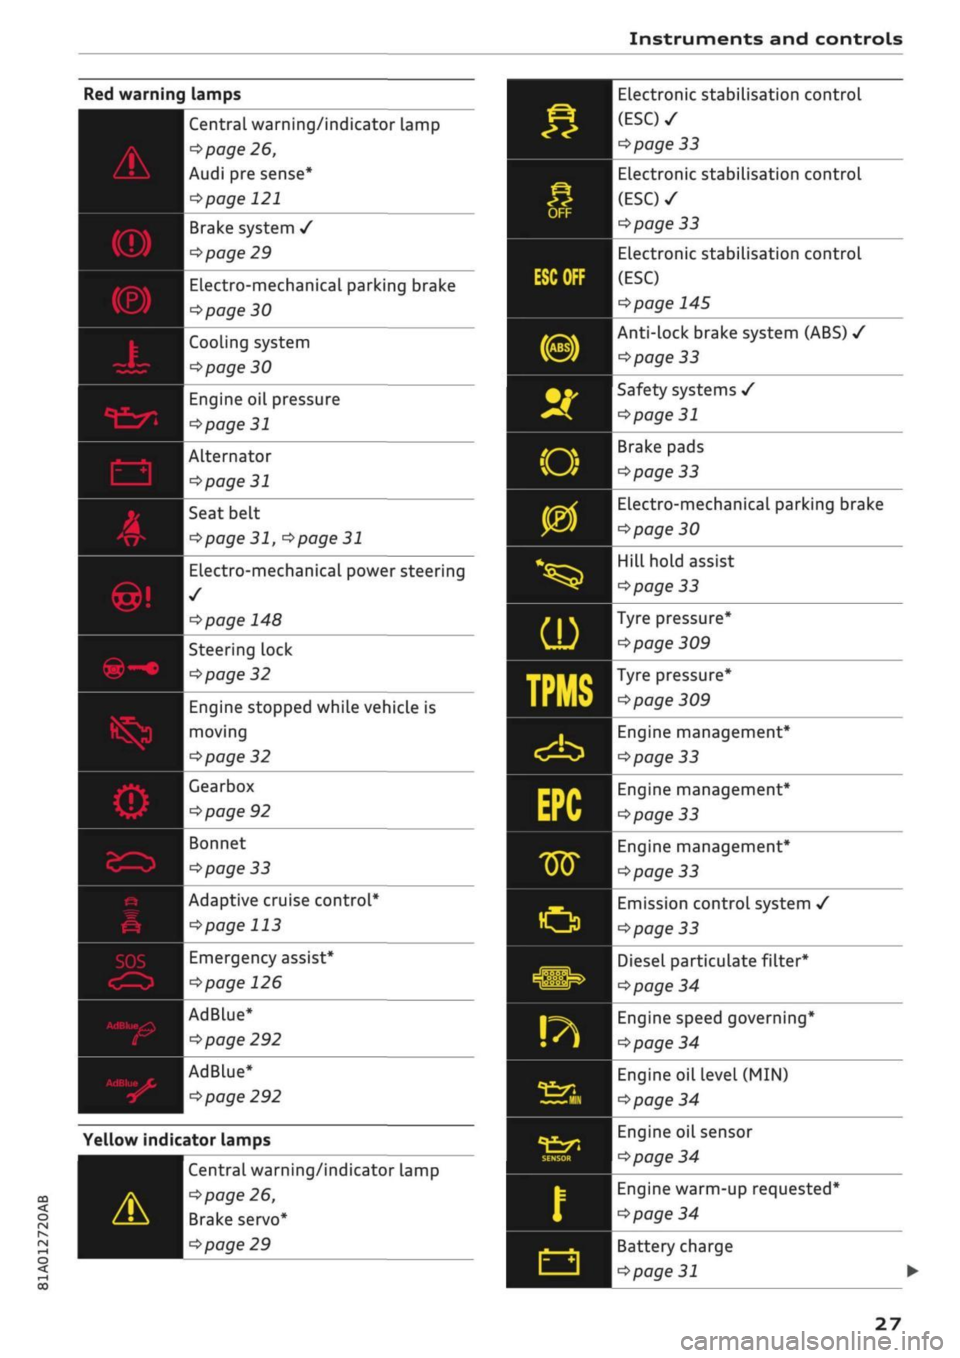
Instruments and controls
t/ï
SQ>
Central warning/indicator Lamp
•=>
page 26,
Audi pre sense*
\^>page
121
Brake system
/
^>page
29
ELectro-mechanical
parking brake
Pipage
30
| Cooling system
>page30
ngine
oil pressure
>page
31
Alternator
opage
31
| Seat belt
^>page
31,
^>page
31
Electro-mechanical power steering
1/
*$page
148
Steering lock
^>page
32
Engine stopped while vehicle is
I moving
^>page
32
Learbox
>page 92
Bonnet
^page
33
Adaptive cruise control*
cépage
113
Emergency assist*
•=>poge
126
AdBlue*
^>page
292
AdBlue*
^>page
292
Yellow indicator lamps
CO
< o rN
IV
rN
t-H
o < 00
Central warning/indicator lamp
^>
page 26,
Brake servo*
^>
page 29
Electronic stabilisation control
(ESC)
•
^>page
33
Electronic stabilisation control
(ESC)
•
^>page
33
Electronic stabilisation control
(ESC)
^>page
145
Anti-lock brake system (ABS)
•/
^>page
33
Safety systems
/
<>page 31
Brake pads
<=>page
33
Electro-mechanical parking brake
•=>page
30
Hill hold assist
<=s>page
33
Tyre
pressure*
*$page
309
Tyre pressure*
^>page
309
Engine management*
^>page
33
Engine management*
^>page
33
Engine management*
tapage
33
Emission control system
/
<=>page
33
Diesel particulate
filter*
^>page
34
Engine speed governing*
Opcrge
34
Engine oil level
(MIN)
^>page
34
Engine oil sensor
^>page
34
Engine warm-up
requested*
opage
34
Battery charge
^>page
31
27
Page 33 of 364
Instruments and controls
© CAUTION
CO
<
O
rN
iv
rN
•-i
00
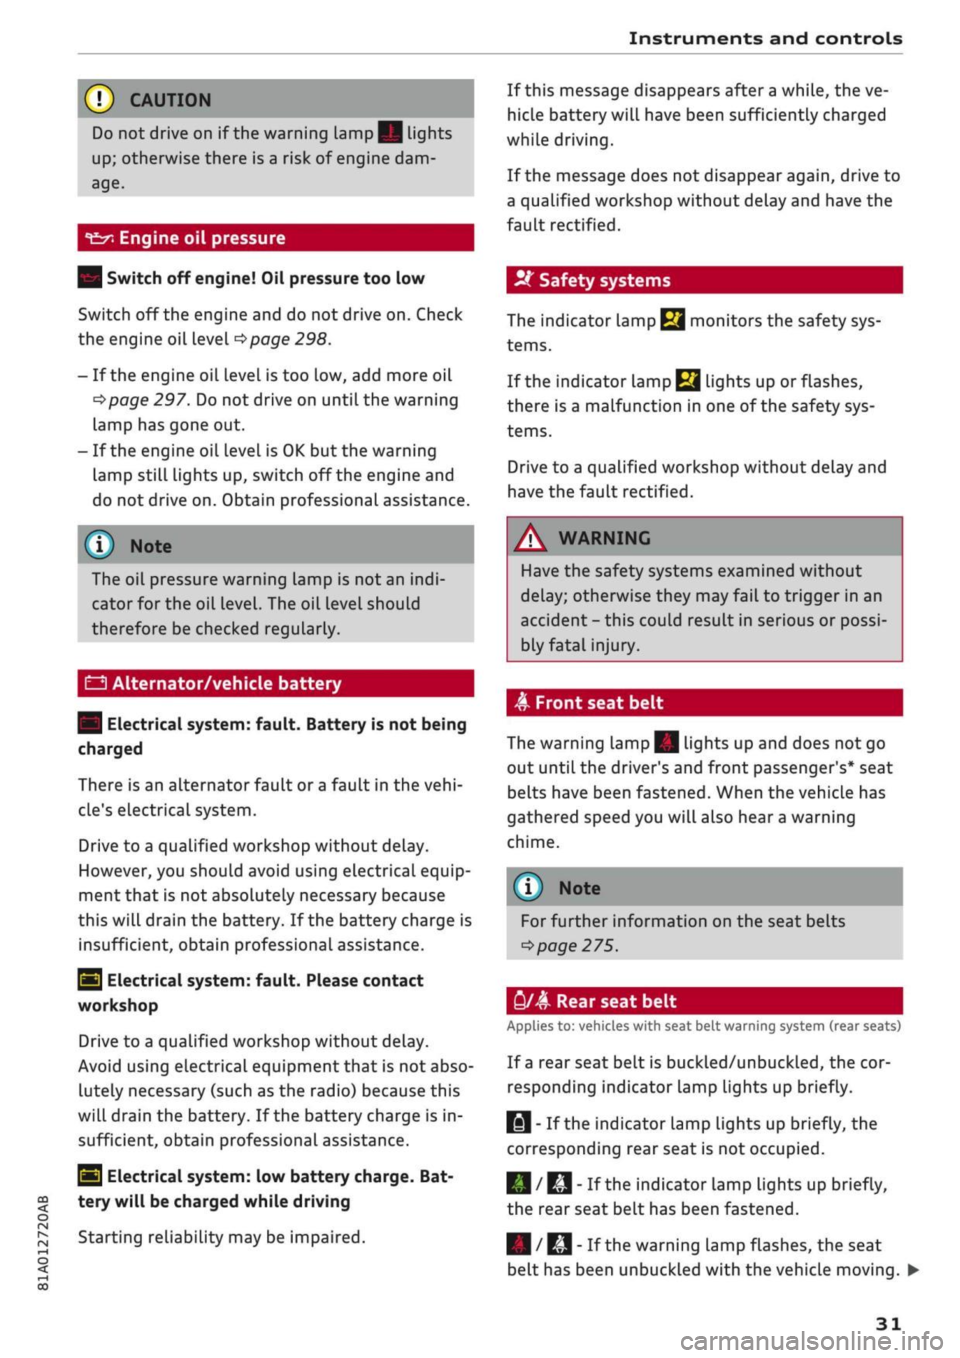
Do not drive on if the warning lamp || lights
up;
otherwise there is a risk of engine dam
age.
t^
Engine oil pressure
| Switch off engine! Oil pressure too low
Switch off the engine and do not drive on. Check
the engine oil level
^>page
298.
- If the engine oil level is too low, add more oil
tapage
297. Do not drive on until the warning
lamp has gone out.
-If the engine oil level is OK
but
the warning
lamp still lights up, switch off the engine and
do not drive on. Obtain professional assistance.
© Note
The oil pressure warning lamp is not an
indi
cator for the oil level. The oil level should
therefore be checked regularly.
C3
Alternator/vehicle battery
| Electrical system: fault. Battery is not being
charged
There is an alternator fault or a fault in the
vehi
cle's electrical system.
Drive to a qualified workshop without delay.
However, you should avoid using electrical equip
ment that is not absolutely necessary because
this will drain the battery. If the battery charge is
insufficient, obtain professional assistance.
S
Electrical system: fault. Please contact
workshop
Drive to a qualified workshop without delay.
Avoid using electrical equipment that is not abso
lutely necessary (such as the radio) because this
will drain the battery. If the battery charge is in
sufficient, obtain professional assistance.
y
Electrical system: low battery charge. Bat
tery will be charged while driving
Starting reliability may be impaired.
If this message disappears after a while, the ve
hicle battery will have been sufficiently charged
while driving.
If the message does not disappear again, drive to
a qualified workshop without delay and have the
fault rectified.
2f
Safety systems
The indicator lamp
terns.
monitors the safety sys-
If
the indicator lamp
Ej
lights up or flashes,
there is a malfunction in one of the safety sys
tems.
Drive to a qualified workshop without delay and
have the fault rectified.
A
WARNING
Have the safety systems examined without
delay; otherwise they may fail to trigger in an
accident - this could result in serious or possi
bly fatal injury.
A
Front seat belt
The warning lamp|| lights up and does not go
out until the driver's and front passenger's* seat
belts have been fastened. When the vehicle has
gathered speed you will also hear a warning
chime.
Note
For further information on the seat belts
•=>
page 275.
y/4
Rear seat belt
Applies to: vehicles with seat belt warning system (rear seats)
If a rear seat belt is buckled/unbuckled, the cor
responding indicator Lamp Lights up briefly.
||
- If the indicator lamp lights up briefly, the
corresponding rear seat is not occupied.
|/RI|-
If the indicator lamp lights up briefly,
the rear seat belt has been fastened.
| /
KJ
"
Ifthe
warning lamp flashes, the seat
belt has been unbuckled with the vehicle moving.
31
Page 36 of 364
Instruments and controls
the exhaust gas and damage the catalytic
con
verter.
Drive slowly to a qualified workshop without de
lay and have the fault rectified.
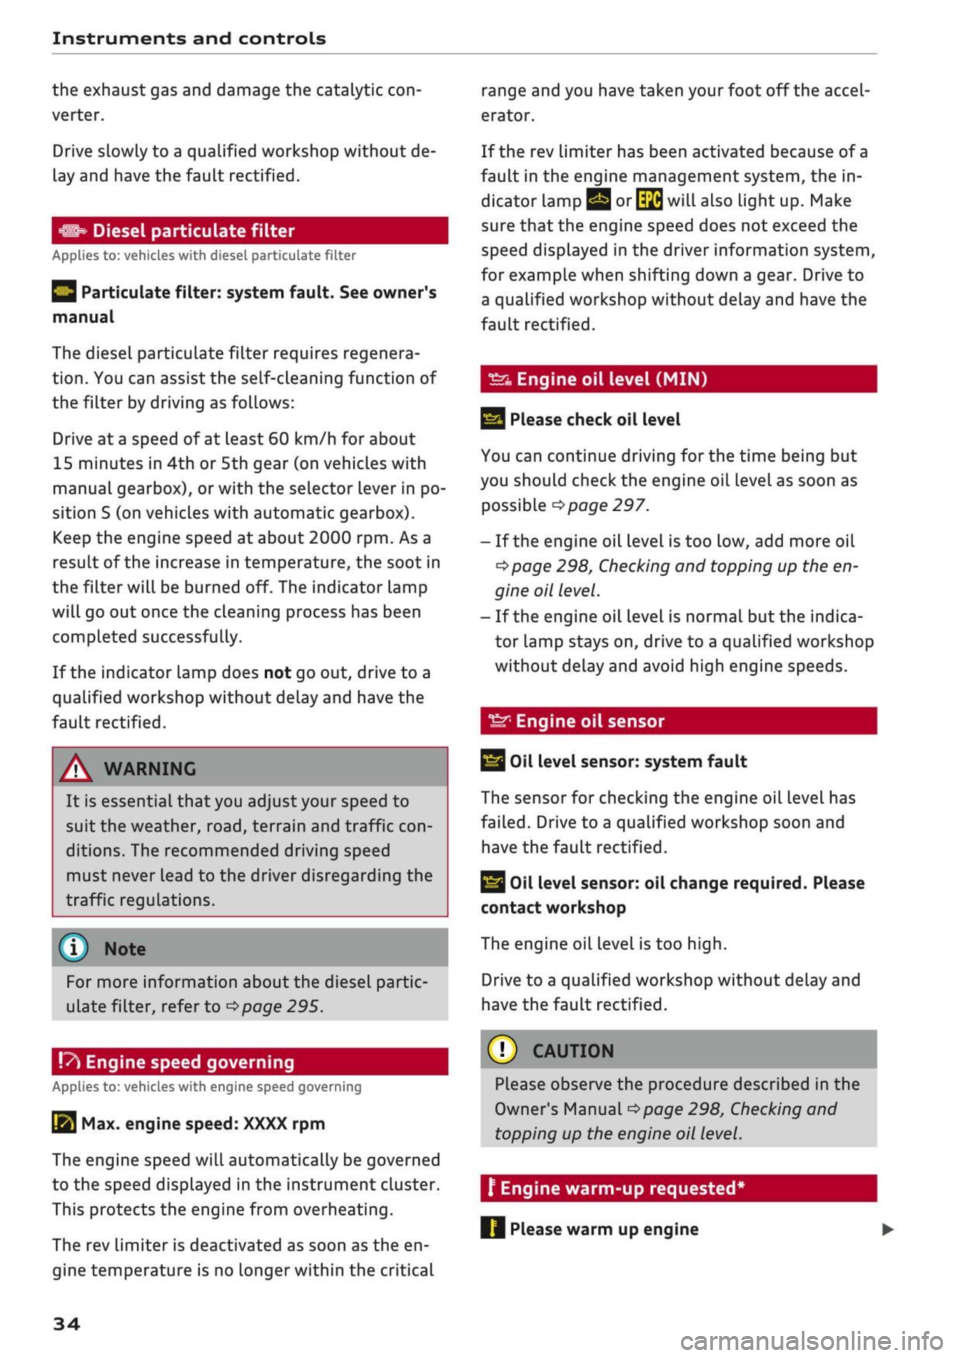
Diesel particulate filter
Applies to: vehicles with diesel particulate filter
|
Particulate filter: system fault. See owner's
manual
The diesel particulate filter requires regenera
tion.
You can assist the self-cleaning function of
the filter by driving as follows:
Drive at a speed of at least 60 km/h for about
15 minutes in 4th or 5th gear (on vehicles with
manual gearbox), or with the selector lever in po
sition S (on vehicles with automatic gearbox).
Keep the engine speed at about 2000
rpm.
As a
result of the increase in temperature, the soot in
the filter will be burned off. The indicator lamp
will go out once the cleaning process has been
completed successfully.
If the indicator lamp does not go out, drive to a
qualified workshop without delay and have the
fault rectified.
A WARNING
It is essential that you adjust your speed to
suit the weather,
road,
terrain and traffic
con
ditions. The recommended driving speed
must never lead to the driver disregarding the
traffic regulations.
(T) Note
For more information about the diesel partic
ulate filter, refer to
^>page
295.
!
»
Engine speed governing
Applies to: vehicles with engine speed governing
[51 Max. engine speed: XXXX rpm
The engine speed will automatically be governed
to the speed displayed in the instrument cluster.
This protects the engine from overheating.
The rev limiter is deactivated as soon as the en
gine temperature is no longer within the critical
range and you have taken
your
foot off the accel
erator.
If the rev limiter has been activated because of a
fault in the engine management system, the in
dicator lamp
Q or[|2g
will also light up. Make
sure that the engine speed does not exceed the
speed displayed in the driver information system,
for example when shifting down a gear. Drive to
a qualified workshop without delay and have the
fault rectified.
Engine oil level
(MIN)
23
Please check oil level
You can continue driving for the time being but
you should check the engine oil level as soon as
possible
<^page
297.
- If the engine oil level is too Low, add more oil
^>page
298, Checking and topping up the en
gine oil level.
- If the engine oil level is normal but the indica
tor lamp stays on, drive to a qualified workshop
without delay and avoid high engine speeds.
ST
Engine oil sensor
3
Oil level sensor: system fault
The sensor for checking the engine oil level has
failed.
Drive to a qualified workshop soon and
have the fault rectified.
3
Oil level sensor: oil change required. Please
contact workshop
The engine oil level is too
high.
Drive to a qualified workshop without delay and
have the fault rectified.
CAUTION
Please observe the procedure described in the
Owner's Manual
^>page
298, Checking and
topping up the engine oil level.
f Engine warm-up
requested
Please warm up engine
34
Page 37 of 364
Instruments and controls
CO
s
rN rN
•-i
00
Fuel has entered the engine oil due to low out
side temperatures or frequent short trips. Drive
until the engine is warm to allow the fuel to
evaporate out of the engine oil. When doing so,
avoid high engine speeds, full acceleration and
heavy engine loads.
m
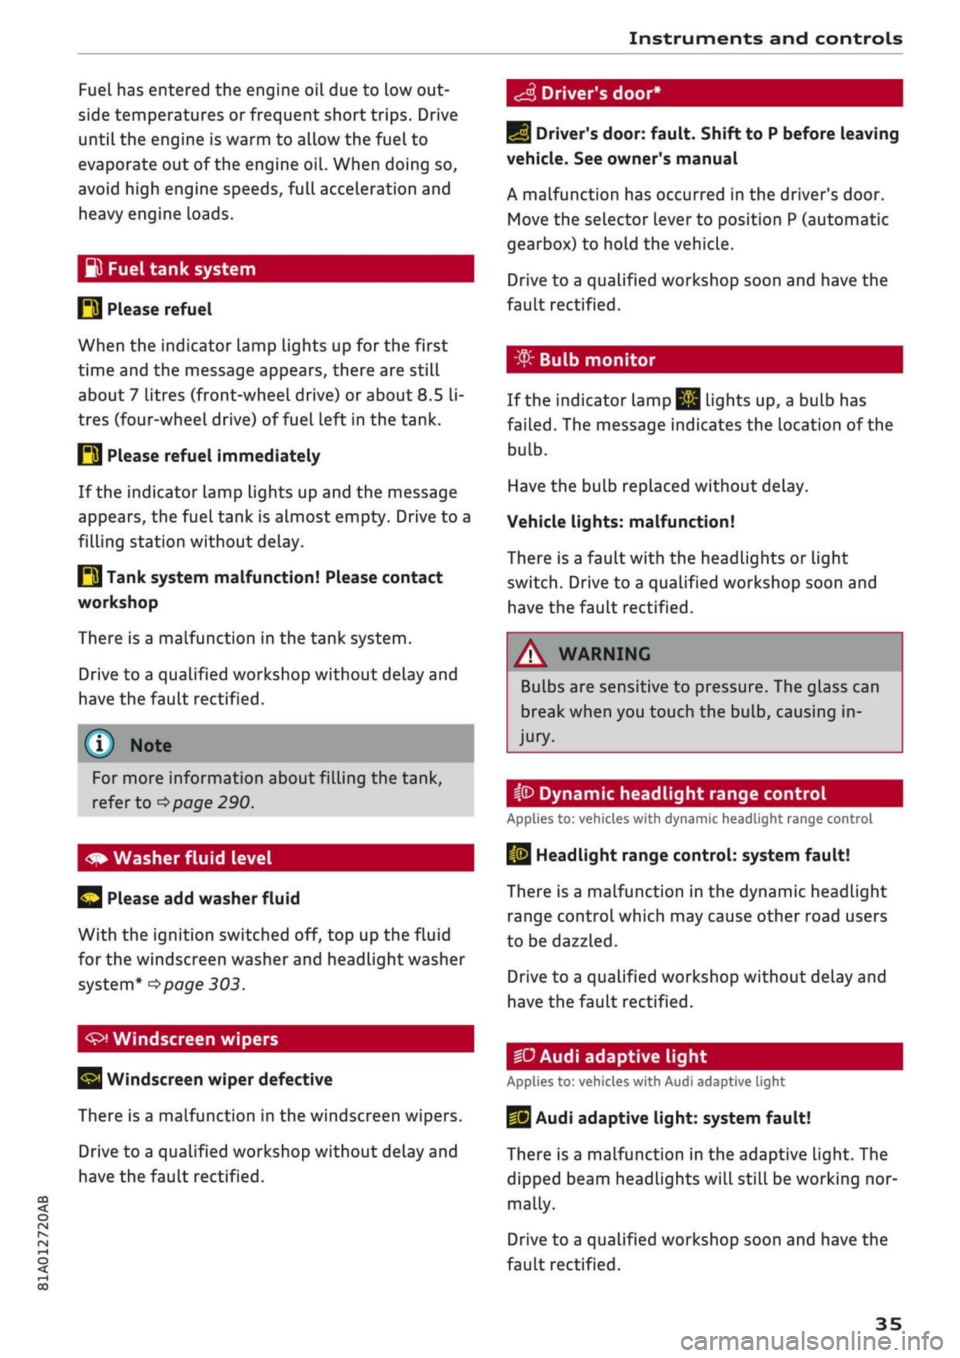
Fuel tank system
P3 Please refuel
When the indicator lamp lights up for the first
time and the message appears, there are still
about 7 litres (front-wheeL drive) or about
8.5
li
tres (four-wheel drive) of fuel left in the tank.
IM
Please refuel immediately
If the indicator lamp lights up and the message
appears, the fuel tank is almost empty. Drive to a
filling station without delay.
E3
Tank system malfunction! Please contact
workshop
There is a malfunction in the tank system.
Drive to a qualified workshop without delay and
have the fault rectified.
S
Driver's door*
For more information about filling the tank,
refer to
=>page
290.
Please add washer fluid
With the ignition switched off, top up the fluid
for the windscreen washer and headlight washer
system*
^>page
303.
Windscreen wipers
Windscreen wiper defective
There is a malfunction in the windscreen wipers.
Drive to a qualified workshop without delay and
have the fault rectified.
E]
Driver's door: fault. Shift to P before leaving
vehicle. See owner's manual
A malfunction has occurred in the driver's door.
Move the selector lever to position P (automatic
gearbox) to hold the vehicle.
Drive to a qualified workshop soon and have the
fault rectified.
-
If the indicator Lamp
jjjj
Lights up, a bulb has
failed.
The message indicates the location of the
bulb.
Have the bulb replaced without delay.
Vehicle lights: malfunction!
There is a fault with the headlights or light
switch.
Drive to a qualified workshop soon and
have the fault rectified.
/\
WARNING
Bulbs are sensitive to pressure. The glass can
break when you touch the bulb, causing in
jury.
ip
Dynamic headlight range control
Applies to: vehicles with dynamic headlight range control
13
Headlight range control: system fault!
There is a malfunction in the dynamic headlight
range control which may cause other road users
to be dazzled.
Drive to a qualified workshop without delay and
have the fault rectified.
•D
Audi adaptive light
Applies to: vehicles with Audi adaptive light
US
Audi adaptive light: system fault!
There is a malfunction in the adaptive light. The
dipped beam headlights will still be working nor
mally.
Drive to a qualified workshop soon and have the
fault rectified.
35
Page 74 of 364
Driving
Driving
General notes
Running in
A new vehicle should be run in over
a
distance of
1,500 km. For the first 1,000 km the engine
speed should not exceed 2/3 of the maximum
permissible engine speed - do not use full throt
tle and do not tow a trailer or caravan. From
1,000 to 1,500 km you can gradually increase
the engine rpm and road speed.
During its first few hours of running, the internal
friction in the engine is greater than later on
when all the moving parts have bedded down.
How the vehicle is driven for the first 1,500 km
also influences the engine quality. After this
peri
od you should continue driving at moderate en
gine speeds, in particular when the engine is
cold.
This helps to reduce wear and tear on the
engine and increases the potential mileage which
can be covered by the engine.
You should also avoid driving with the engine
speed too low. Change down to a lower gear
when the engine no longer runs "smoothly". Ex
cessively high engine speeds are prevented by an
automatic rev limiter.
A WARNING
After driving through water, mud, sludge,
etc., the braking effect can be delayed slightly
due to moisture on the discs and brake pads.
Applying the brakes carefully several times
will remove the moisture and restore the full
braking effect.
© CAUTION
- Parts of the vehicle (e.g. engine, gearbox,
running gear or electrical components) can
be badly damaged when driving through
water.
- Always switch off the start/stop system*
^>page
79 before driving through water.
© ' Note
- It is advisable to check the depth at the
deepest point before approaching the wa
ter.
- Do NOT stop the vehicle, drive in reverse or
switch off the engine before you are out of
the water.
- Bear in mind that waves created by oncom
ing traffic could exceed the permissible
wading depth of your vehicle.
- Avoid driving through salt water (corrosion).
Avoiding damage to the car
© CAUTION
Take care not to damage
Low-mounted
parts
of the car (such as the spoiler or exhaust sys
tem) on steep ramps, uneven road surfaces or
roadside kerbs, etc. This applies especially to
vehicles with low ground clearance and to all
vehicles when fully laden.
Driving through water on roads
Please note the following in order to prevent
damage to the vehicle when driving through wa
ter (e.g. on flooded roads):
- The water level must not be higher than the ve
hicle's underbody.
- Do not drive faster than walking pace.
How to improve economy and minimise
pollution
Fuel economy, environmental impact and wear
on the engine, brakes and tyres depend largely
on the way you drive the vehicle. By adopting an
economical driving style and anticipating the
traffic situation ahead, you can reduce fuel
con
sumption by 10
-15
%. The following section
gives you some tips on Lessening the impact on
the environment and reducing your operating
costs at the same time.
Anticipate well in advance
A car uses most fuel when accelerating. If
you
an
ticipate hazards and speed changes well in ad
vance,
you will need to brake less and thus accel
erate Less. Wherever possible, Let the car slow
down gradually with a gear engaged, for •
72
Page 131 of 364

Driver assist systems
CO
rN
r>
rN
•-i
00
- In certain situations, the system may not
function properly, or the functionality of the
system may be restricted. For example:
- If other vehicles are approaching very
quickly, or if
you
are overtaking other
vehicles quickly. The warning lamp may
not light up
intime.
- In poor weather conditions, such as heavy
rain,
snow or road spray.
- If
you
are travelling in very wide lanes, in
tight bends or over crests. The system
may not detect vehicles in the adjacent
lane because they are outside the area
covered by the sensors.
© CAUTION
Impacts or damage to the bumper, wheel
arches or underbody can cause misalignment
of the sensors. This can impair the functional
ity of the system. Have the systems checked
by
a
qualified workshop.
The warning lamps on the exterior mirrors
may not be properly visible if tinted foil is af
fixed to the side windows on the driver's or
passenger's side.
Switching on/off
Applies to: vehicles with Audi side assist
The
system can be switched on and off
on
the in
fotainment system.
The warning Lamps in the exterior mirrors light
up briefly each time the ignition is switched on to
indicate that the system is activated.
•
Select the following on the infotainment sys
tem:
|MENU|
button > Car
>
left control button
> Driver assist
>
Audi side assist. SeLect off to
switch off the system.
Adjusting brightness of warning lamp
Applies to: vehicles with Audi side assist
The
brightness of the warning lamp can be ad
justed on the infotainment system.
•
Select the following on the infotainment sys
tem:
|MENU|
button > Car
>
left controL button
> Driver assist
>
Audi side assist.
The brightness of the warning lamp in both the
information and warning modes is regulated au
tomatically according to the ambient Light Level.
If
you
are in very dark
or
very Light surroundings
when you adjust the brightness of the warning
lamp,
the automatic brightness control may al
ready have reached the lowest or the brightest
setting.
In such a case it is possible
that
you
won't notice a difference while you are adjusting
the brightness or that you will only notice it once
the light surroundings have changed.
Please adjust the brightness of the warning lamp
for the information mode so that it does not dis
tract you while you are looking at the road in
front. When you change the brightness, the
warning lamp on the exterior mirror will light up
briefly with the intensity set for the information
mode.
The intensity of the lamp in the warning
mode is Linked to the intensity in the information
mode and is adjusted automatically.
© Note
- The side assist is not active while the set
tings are being adjusted.
- Your personal settings are stored automati
cally and assigned to the remote control key
which is being used.
129
Page 302 of 364
Checking and topping up fluids
If
you
have to top up the oil between oil changes,
use the grades of oil specified in the table in ac
cordance with VW standards.
You will need to know whether
- the vehicLe is being serviced based on the
flexi
ble or fixed oil change service (see last service
record).
- the vehicle has a petrol or diesel engine (see
sticker on inside of fuel tank flap).
Petrol engines
Diesel engines
Oil Change Service
Flexible
VW 504 00
VW 507 00
Fixed
VW 502 00
With diesel
particulate
fil
ter:
VW 507 00
Without diesel
particulate
fil
ter:
VW 505 00
Audi recommends
ÇÇastrol
(MMMM'
FriOFSSskimL
Audi recommends LongLife high-performance
engine oil from Audi Genuine Parts
© Note
If the oil grades specified in the table are not
available, you can use one of the
folLowing
grades as a substitute. To prevent damage to
the engine, this should not be done more
than once between oil changes and no more
than 0.5 litres should be used.
- Petrol engines: ACEA A3 or API SN (API SM)
standard
- Diesel engines: ACEA C3 or API CJ-4 stand
ard
© Note
The flexible oil change service is not available
for all models in all countries.
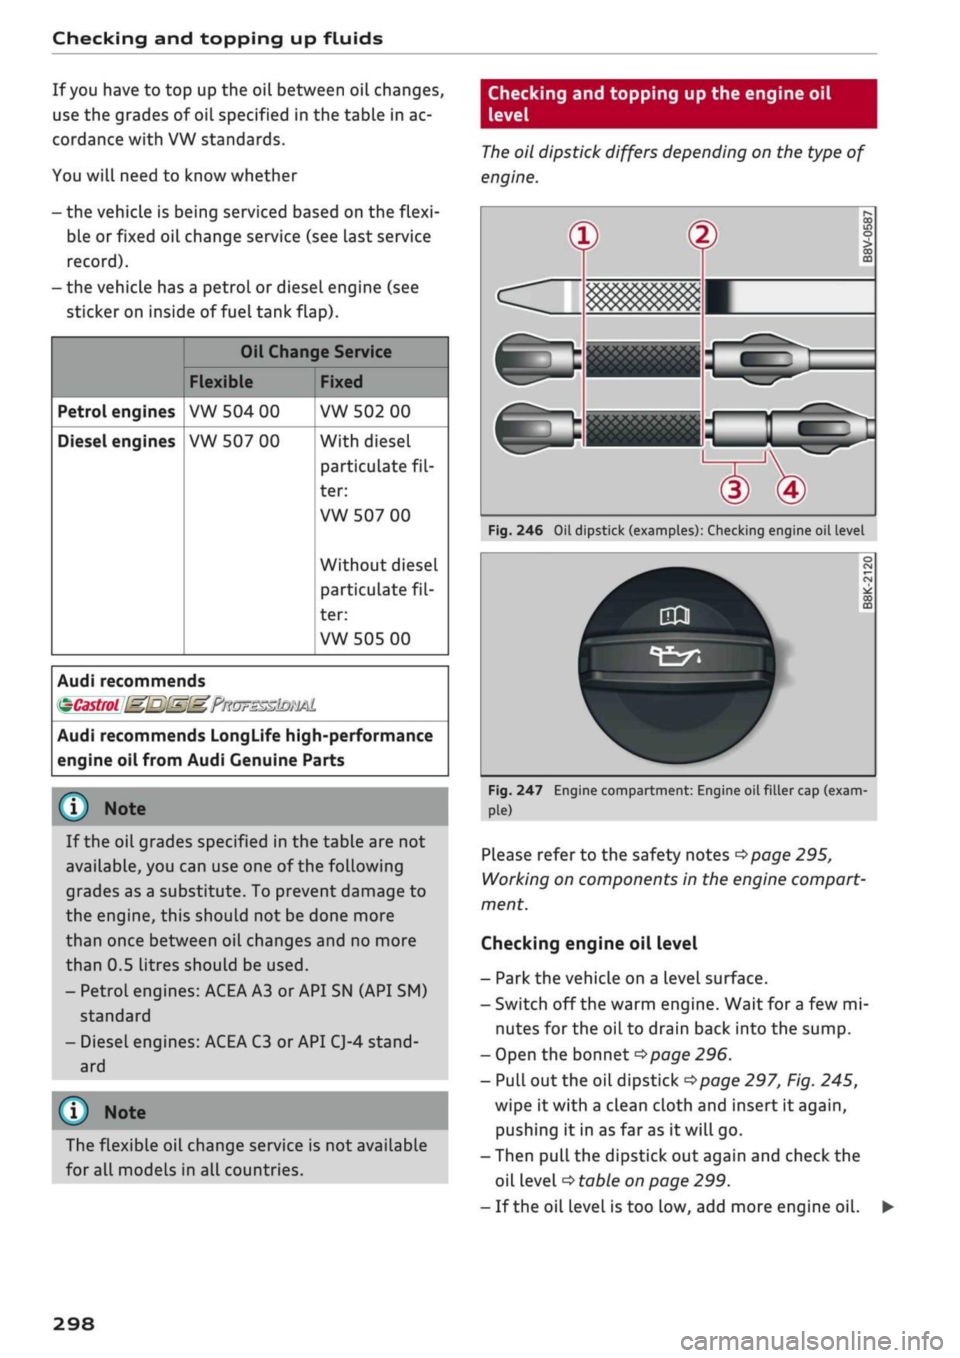
Checking and topping up the engine oil
level
The
oil dipstick differs depending on the type of
engine.
Fig.
246 Oil dipstick (examples): Checking engine oil level
Fig.
247 Engine compartment: Engine oil filler cap
(exam-
pLe)
Please refer to the safety notes
opage
295,
Working on components in the engine compart
ment.
Checking engine oil level
- Park the vehicle on a level surface.
- Switch off the warm engine. Wait for
a
few mi
nutes for the oil to drain back into the sump.
- Open the bonnet
opage
296.
-
PuLl
out the oil dipstick
^>page
297, Fig. 245,
wipe it with a clean cloth and insert it again,
pushing it in as far as it will go.
- Then pull the dipstick out again and check the
oil level
•=>
table on page 299.
- If the oil level is too Low, add more engine oil.
298
Page 303 of 364
Checking and topping up fluids
CO
<
O
rN
iv
rN
i—i
o <
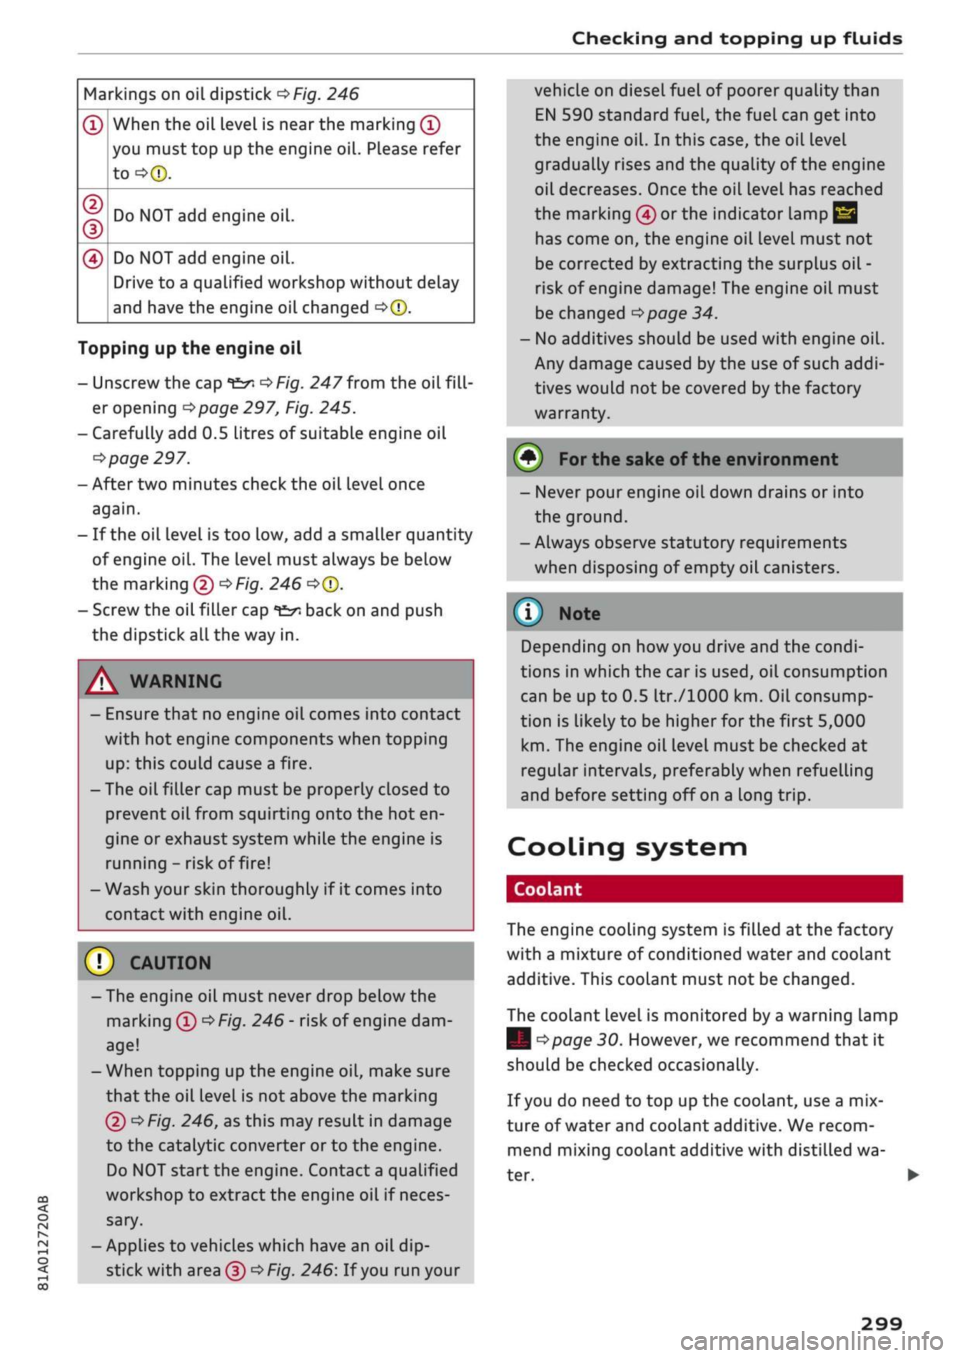
Markings on oil dipstick
^>Fig.
246
®
CD
(D
0
When the oil level is near the marking
(Î)
you must top up the engine oil. Please refer
to-=>®.
Do NOT add engine oil.
Do NOT add engine oil.
Drive to a qualified workshop without delay
and have the engine oil changed
•=>©.
Topping up the engine oil
- Unscrew the cap
"fc^
^>Fig.
247 from the
oilfill
er opening
^>page
297, Fig. 245.
-Carefully add 0.5 Litres of suitable engine oil
^>
page 297.
- After two minutes check the oil level once
again.
- If the oil level is too low, add a smaller quantity
of engine oil. The level must always be below
the marking (5)
<^Fig.
246
<=>©.
- Screw the oil filler cap
*£/;
back on and push
the dipstick all the way in.
A WARNING
- Ensure that no engine oil comes into contact
with hot engine components when topping
up:
this could cause a fire.
- The oil filler cap must be properly closed to
prevent oil from squirting onto the hot en
gine or exhaust system while the engine is
running - risk of fire!
- Wash your skin thoroughly if it comes into
contact with engine oil.
- The engine oil must never drop below the
marking®
^>Fig.
246- risk of engine dam
age!
- When topping up the engine oil, make sure
that the oil level is not above the marking
@
^Fig.
246, as this may result in damage
to the catalytic converter or to the engine.
Do NOT start the engine. Contact a qualified
workshop to extract the engine oil if neces
sary.
- Applies to vehicles which have an oil
dip
stick with area
(3)^
Fig. 246: If you run your
vehicle on diesel fuel of poorer quality than
EN 590 standard
fuel,
the fuel can get into
the engine oil. In this case, the oil level
gradually rises and the quality of the engine
oil decreases. Once the oil level has reached
the marking
@
or the indicator lamp
E
has come on, the engine oil level must not
be corrected by extracting the surplus oil -
risk
of engine damage! The engine oil must
be changed
^>page
34.
- No additives should be used with engine oil.
Any damage caused by the use of such
addi
tives would not be covered by the factory
warranty.
© For the sake of the environmen
- Never pour engine oil down drains or into
the ground.
-Always observe statutory requirements
when disposing of empty oil canisters.
© Note
Depending on
how
you drive and the condi
tions in which the car is used, oil consumption
can be up to 0.5
Itr./lOOO
km. Oil consump
tion is likely to be higher for the first 5,000
km.
The engine oil Level must be checked at
regular intervals, preferably when refuelling
and before setting off on a long trip.
Cooling system
Coolant
The engine cooling system is filled at the factory
with a mixture of conditioned water and coolant
additive. This coolant must not be changed.
The coolant level is monitored by a warning lamp
|
<^page
30. However, we recommend that it
should be checked occasionally.
If you do need to top up the coolant, use a mix
ture of water and coolant additive. We recom
mend mixing coolant additive with distilled wa
ter.
299
Page 304 of 364
Checking and topping up fluids
Coolant additive
The coolant additive contains anti-freeze and cor
rosion protection agent. Only use one of the
fol
lowing coolant additives. It is possible to mix
these additives.
Topping up coolant
Coolant additive
G13
G12++
Specification
TL774J
TL 774
G
The amount of coolant additive which needs to
be mixed with the water depends on the temper
atures to be expected in the winter season. If the
anti-freeze concentration is too Low, the coolant
can freeze and cause engine damage.
Hot regions
Cold regions
Coolant
additive
min.
40%
max. 45 %
min.
50%
max. 55 %
Frost protec
tion
min.-25°C
max. -40 °C
(T)
CAUTION
- Have your qualified workshop check the
cooling system before the winter season to
make sure that the anti-freeze concentra
tion is adequate for the conditions to be ex
pected.
This applies particularly if
you
drive
into a colder climate zone.
- To prevent damage to the engine, do not
use a different type of anti-freeze additive if
the approved type of additive is not availa
ble.
In this case use only water and bring
the coolant concentration back up to the
correct level as soon as possible by putting
in the specified additive.
- Always top up with fresh, unused coolant.
- Radiator sealants must not be added to the
coolant.
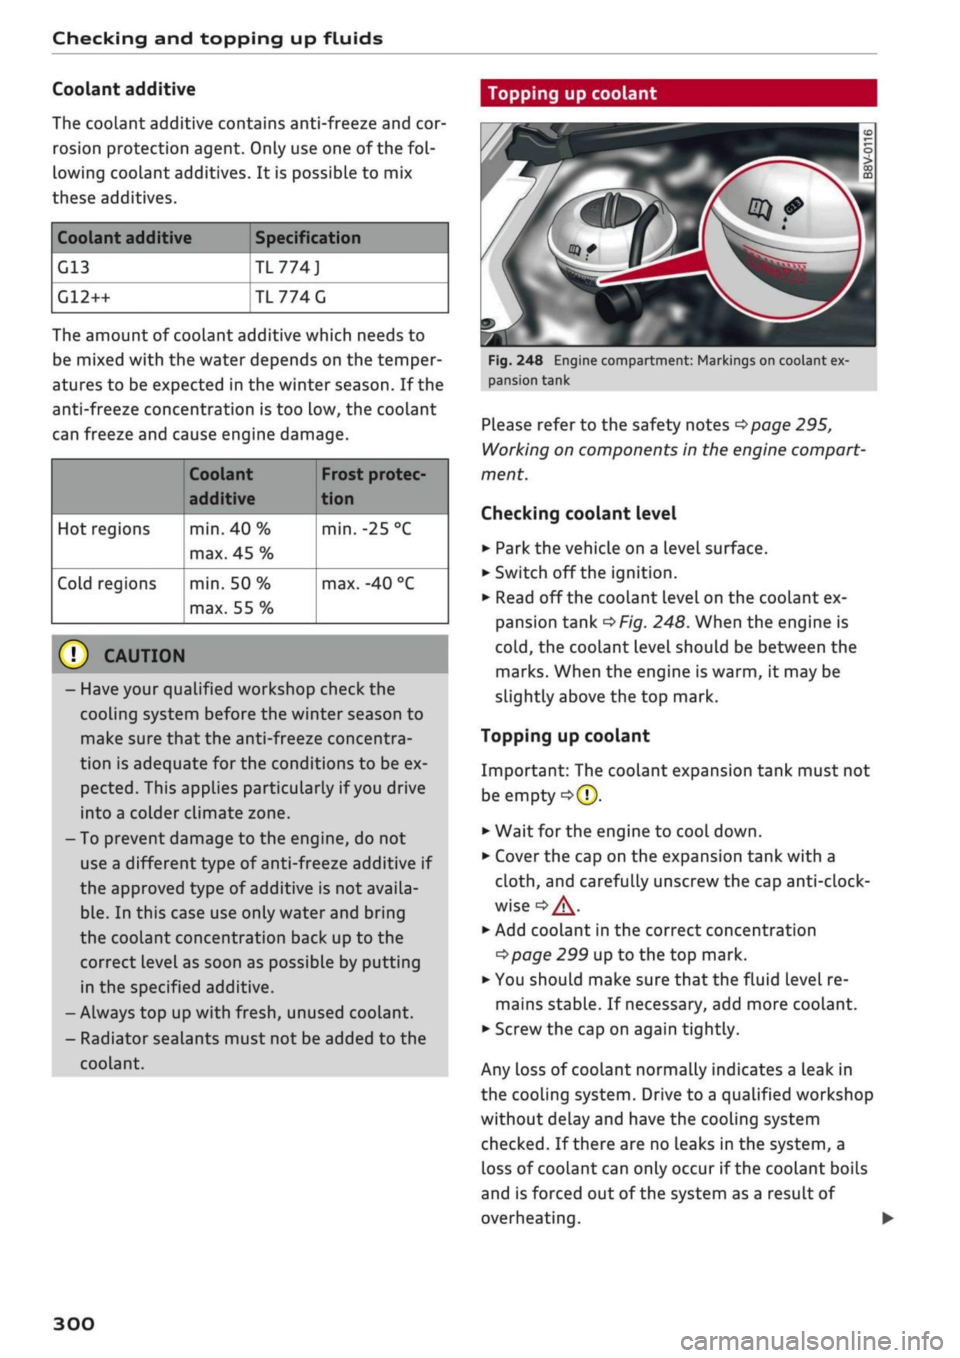
Fig.
248 Engine compartment: Markings on coolant ex
pansion tank
Please refer to the safety notes
^page
295,
Working on components in the engine compart
ment.
Checking coolant level
•
Park the vehicle on a level surface.
•
Switch off the ignition.
•
Read off the coolant level on the coolant ex
pansion tank
^>Fig.
248. When the engine is
cold,
the coolant level should be between the
marks. When the engine is warm, it may be
slightly above the top mark.
Topping up coolant
Important: The coolant expansion tank must not
be empty
•=>([).
•
Wait for the engine to cool down.
•
Cover the cap on the expansion tank with a
cloth,
and carefully unscrew the cap
anti-clock
wise
<=>
/K.
*-
Add coolant in the correct concentration
tapage
299 up to the top mark.
•
You should make sure that the fluid level re
mains stable. If necessary, add more coolant.
•
Screw the cap on again tightly.
Any loss of coolant normally indicates a Leak in
the cooling system. Drive to a qualified workshop
without delay and have the cooling system
checked.
If there are no leaks in the system, a
loss of coolant can only occur if the coolant boils
and is forced out of the system as a result of
overheating.
300
Page 308 of 364
Checking and topping up fluids
© CAUTIO
-The anti-freeze concentration must be
matched to the climate of the country in
which you are driving. If the concentration
is too
high,
damage to the car may result.
- Never put in radiator anti-freeze or other
additives.
- Never use washer fluid which contains paint
thinners or solvents as it can damage the
paintwork.
Service interval display
The
service interval display detects when the
next
service
is due
for
your vehicle.
There are two service interval dispLay levels:
- Inspection or oil change reminder: After a cer
tain mileage, a service reminder will appear in
the instrument cluster dispLay each time the ig
nition is switched on/off. The distance or time
remaining will be shown briefly.
- Inspection or oil change due: When your
vehi
cle is due for an inspection, oil change or
both,
the corresponding reminder Inspection
due!,
Oil change due! or Oil change and inspection
due!
will appear briefly after you switch the ig
nition on/off.
Checking the service intervals
On the infotainment system, you can look up the
distance and time remaining until the next oil
change or next service inspection. Select the
fol
lowing on the infotainment system:
|MENU|
but
ton > Car
>
left control button > Servicing &
checks
>
Service intervals.
Applies
to: vehicles with flexible oil change service
You cannot check the service interval on a new
vehicle until it has been driven for about 500 km.
Qualified workshops reset the service interval af
ter the oil is changed. The distance to the next oil
change is initially displayed based on the driving
profile prior to the oil change. Your own personal
driving profile is used subsequently to calculate
the remaining distance. Frequent cold starts or
short trips place extra demands on the engine oil
with the result that the oil has to be changed
more often.
Resetting the display
Your qualified workshop resets the service inter
val display after each service.
It is very important that you reset the oil change
dispLay if
you
change the oil yourself. The
next
oil
change will be due after
a
fixed service interval.
To reset the display, select the following on the
infotainment system:
|MENU|
button > Car
>
left
control button > Servicing & checks
>
Service in
tervals
>
Reset oil change interval.
(J) CAUTION
- Do not reset the oil change interval display
unless you have changed the oil.
- Keeping to the correct service intervals is
crucial for the operation, service life and re
sidual value of the vehicle (and especially
for the life of the engine). Services must al
ways be carried out promptly, even if the
mileage is Low.
304