washer fluid AUDI Q2 2021 Owner´s Manual
[x] Cancel search | Manufacturer: AUDI, Model Year: 2021, Model line: Q2, Model: AUDI Q2 2021Pages: 364, PDF Size: 87.77 MB
Page 6 of 364
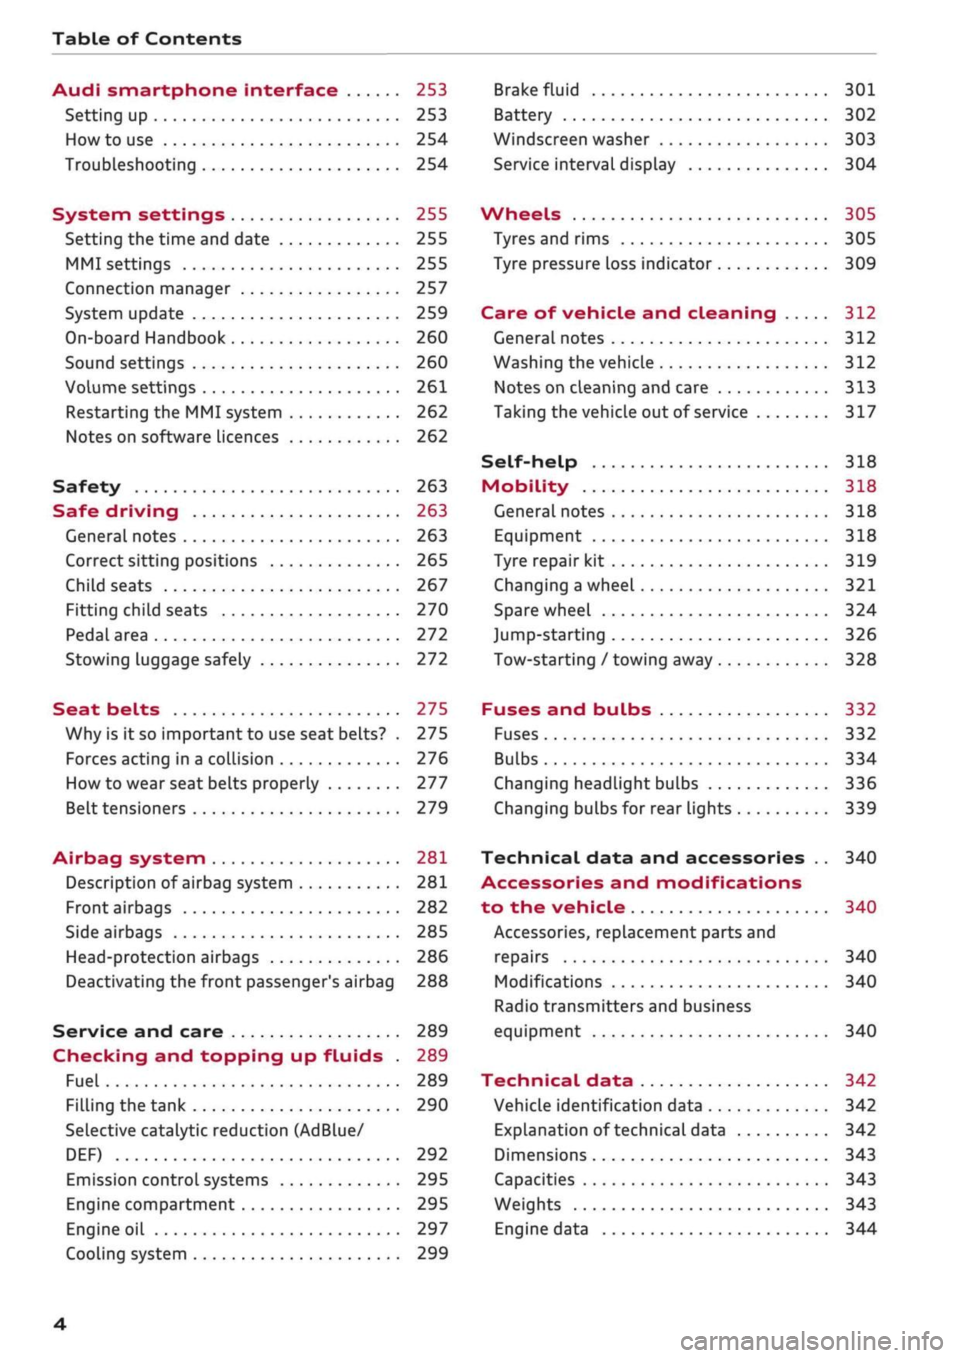
Table of Contents
Audi smartphone interface 253
Setting up
253
How to use 254
Troubleshooting 254
System settings 255
Setting the time and date 255
MMI settings 255
Connection manager 257
System update 259
On-board Handbook 260
Sound settings 260
Volume settings 261
Restarting the MMI system 262
Notes on software licences 262
Safety 263
Safe driving 263
General notes 263
Correct sitting positions 265
Child seats 267
Fitting child seats 270
Pedal area 272
Stowing luggage safely 272
Seat belts 275
Why is it so important to use seat belts? . 275
Forces acting in a collision 276
How to wear seat belts properly 277
Belt tensioners 279
Airbag system 281
Description of airbag system 281
Front airbags 282
Side airbags 285
Head-protection airbags 286
Deactivating the front passenger's airbag 288
Service and care 289
Checking and topping up fluids . 289
Fuel 289
Filling the tank 290
Selective catalytic reduction (AdBlue/
DEF) 292
Emission control systems 295
Engine compartment 295
Engine oil 297
Cooling system 299
Brake fluid 301
Battery 302
Windscreen washer 303
Service interval display 304
Wheels 305
Tyres and rims 305
Tyre pressure loss indicator 309
Care of vehicle and cleaning 312
General notes 312
Washing the vehicle 312
Notes on cleaning and care 313
Taking the vehicle out of service 317
Self-help 318
Mobility 318
General notes
318
Equipment 318
Tyre repair kit 319
Changing a wheel 321
Spare wheel 324
Jump-starting 326
Tow-starting / towing away 328
Fuses and bulbs 332
Fuses 332
Bulbs 334
Changing headlight bulbs 336
Changing bulbs for rear lights 339
Technical data and accessories .. 340
Accessories and modifications
to the vehicle 340
Accessories, replacement parts and
repairs 340
Modifications 340
Radio transmitters and business
equipment 340
Technical data 342
Vehicle identification data 342
Explanation of technical data 342
Dimensions 343
Capacities 343
Weights 343
Engine data 344
4
Page 30 of 364
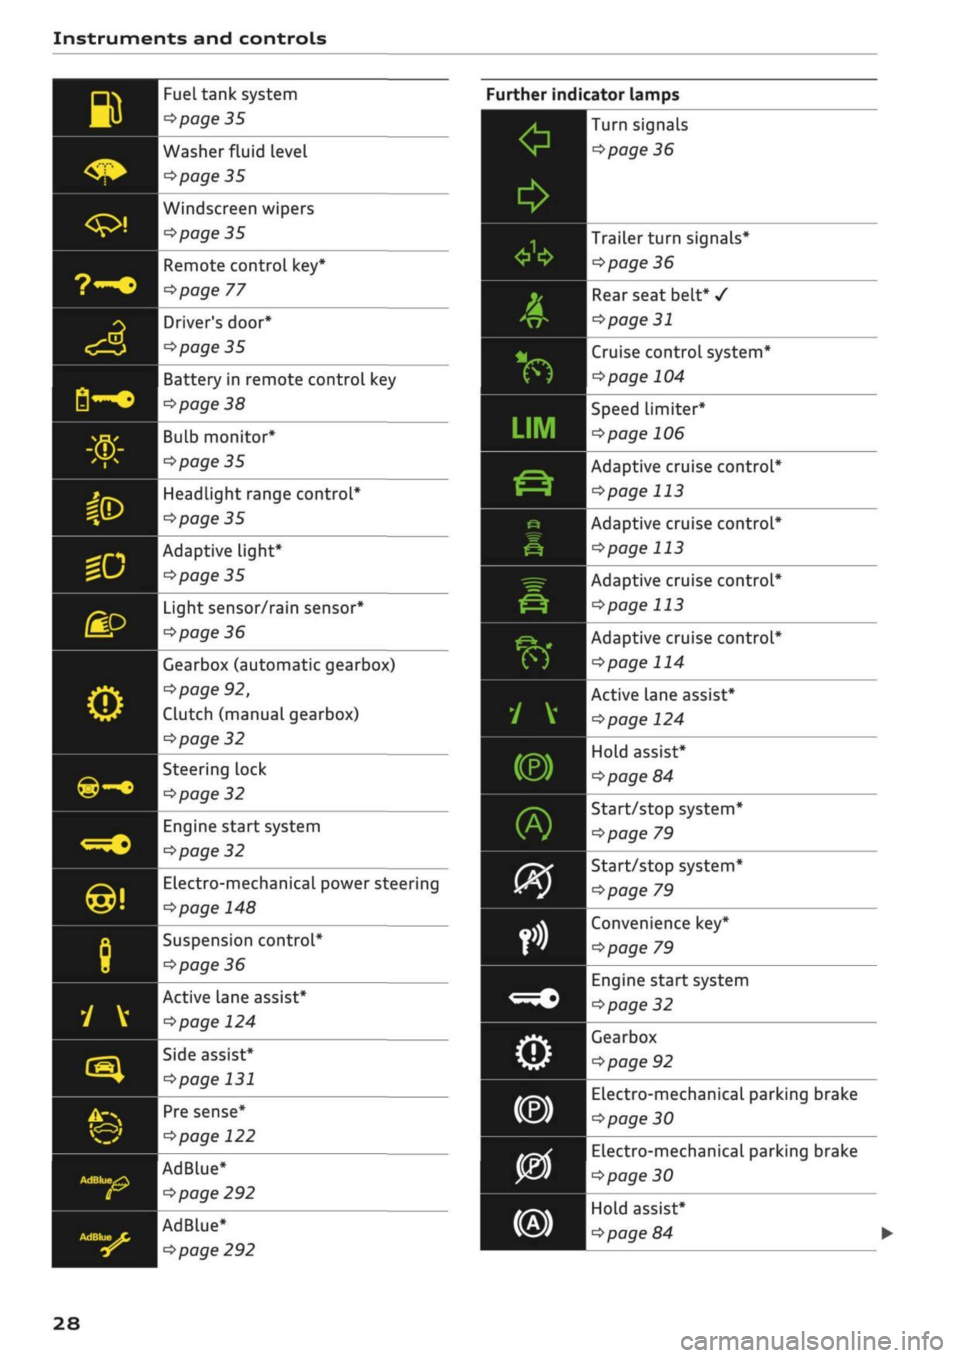
Instruments and controls
B
<$*
Fuel tank system
^page
35
Washer fluid level
^>page
35
1
Windscreen wipers
Éyal 1 ^poge
35
9~o
3
<£>
B-c
Sa
«D
Remote control key*
^>page
77
Driver's
door*
Opage
35
Battery in remote control key
^>page
38
Bulb monitor*
•=>
page 35
Headlight range control*
^>page
35
HP 1
Adaptive light*
^J |^poge35
gp
o
©-•
«•
@!
8
y
v
rs}
^* ^
v_^
AdBlue^
£2
Light sensor/rain sensor*
^>page
36
Gearbox (automatic gearbox)
^page
92,
Clutch (manual gearbox)
^>page
32
Steering lock
^>page
32
Engine start system
^>page
32
Electro-mechanical power steering
<=>page
148
Suspension control*
opage
36
Active lane assist*
\^>page
124
Side assist*
^>page
131
Pre sense*
^>page
122
AdBlue*
opage
292
AdBlue*
<^>page
292
28
Further indicator lamps
0
*
A
&
v*
f)
•
inn
LIM
jr~\.
Ë-?
e
ê
^=r
&
É?k*
f)
1 V
(®)
fi£
)
09
orit
fn
<=^c
o
Turn signals
^>page
36
Trailer turn signals*
^>page
36
Rear seat belt*
/
<3page
31
Cruise control system*
^>page
104
Speed Limiter*
ï>page
106
Adaptive cruise control*
^>page
113
Adaptive cruise control*
^>page
113
Adaptive cruise control*
^>page
113
Adaptive cruise control*
^>page
114
Active lane assist*
^>page
124
Hold assist*
^>page
84
Start/stop system*
<^page
79
Start/stop system*
^•page
79
Convenience key*
^page
79
Engine start system
<=>page
32
Gearbox
ï>page
92
Electro-mechanical parking brake
^>page
30
Electro-mechanical parking brake
^>page
30
Hold assist*
^>page
84
Page 37 of 364
Instruments and controls
CO
s
rN rN
•-i
00
Fuel has entered the engine oil due to low out
side temperatures or frequent short trips. Drive
until the engine is warm to allow the fuel to
evaporate out of the engine oil. When doing so,
avoid high engine speeds, full acceleration and
heavy engine loads.
m
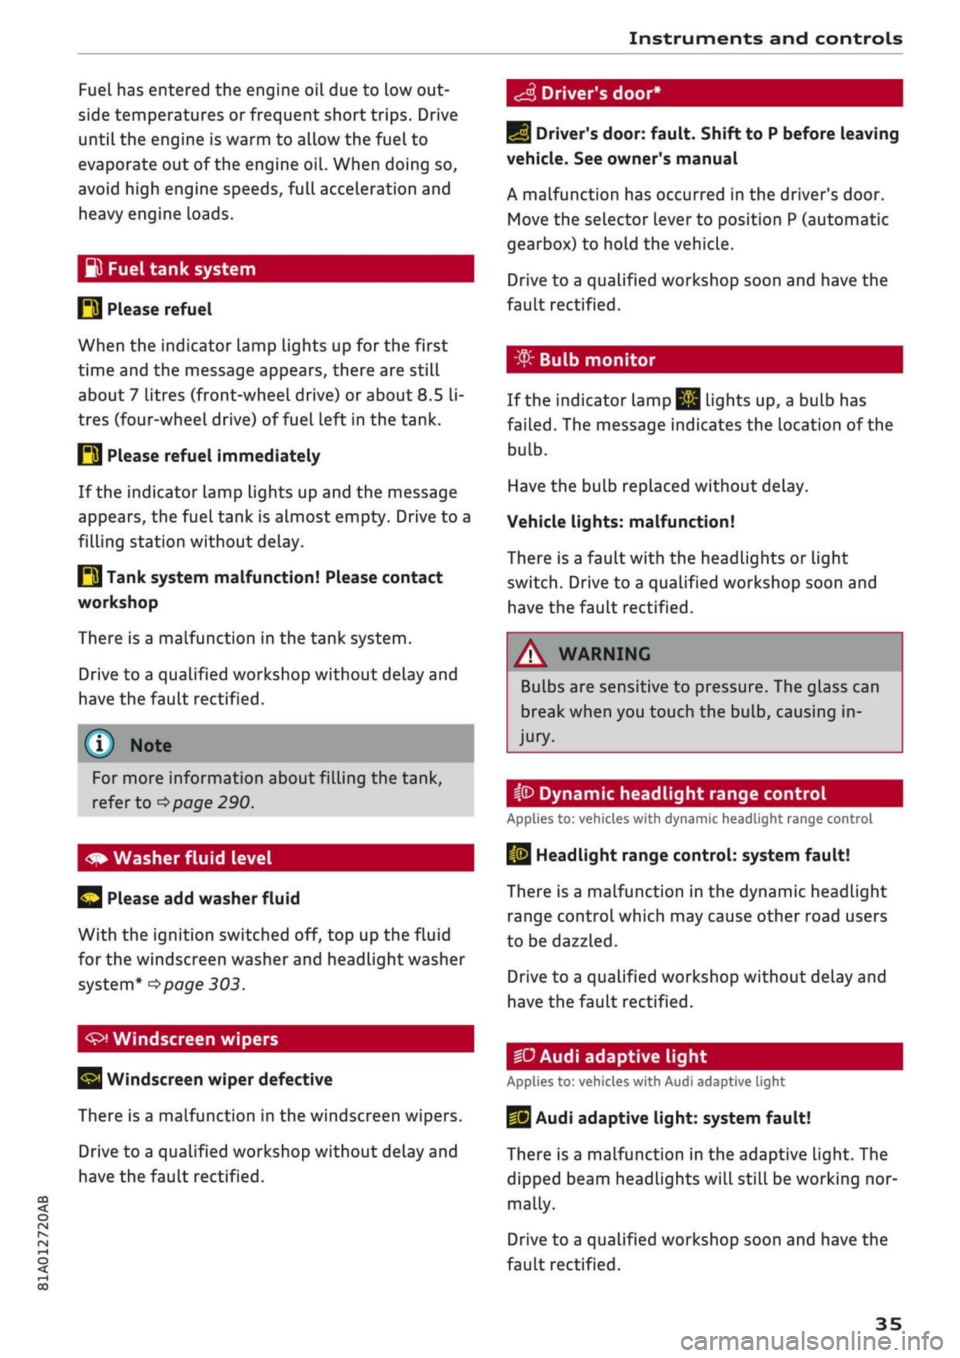
Fuel tank system
P3 Please refuel
When the indicator lamp lights up for the first
time and the message appears, there are still
about 7 litres (front-wheeL drive) or about
8.5
li
tres (four-wheel drive) of fuel left in the tank.
IM
Please refuel immediately
If the indicator lamp lights up and the message
appears, the fuel tank is almost empty. Drive to a
filling station without delay.
E3
Tank system malfunction! Please contact
workshop
There is a malfunction in the tank system.
Drive to a qualified workshop without delay and
have the fault rectified.
S
Driver's door*
For more information about filling the tank,
refer to
=>page
290.
Please add washer fluid
With the ignition switched off, top up the fluid
for the windscreen washer and headlight washer
system*
^>page
303.
Windscreen wipers
Windscreen wiper defective
There is a malfunction in the windscreen wipers.
Drive to a qualified workshop without delay and
have the fault rectified.
E]
Driver's door: fault. Shift to P before leaving
vehicle. See owner's manual
A malfunction has occurred in the driver's door.
Move the selector lever to position P (automatic
gearbox) to hold the vehicle.
Drive to a qualified workshop soon and have the
fault rectified.
-
If the indicator Lamp
jjjj
Lights up, a bulb has
failed.
The message indicates the location of the
bulb.
Have the bulb replaced without delay.
Vehicle lights: malfunction!
There is a fault with the headlights or light
switch.
Drive to a qualified workshop soon and
have the fault rectified.
/\
WARNING
Bulbs are sensitive to pressure. The glass can
break when you touch the bulb, causing in
jury.
ip
Dynamic headlight range control
Applies to: vehicles with dynamic headlight range control
13
Headlight range control: system fault!
There is a malfunction in the dynamic headlight
range control which may cause other road users
to be dazzled.
Drive to a qualified workshop without delay and
have the fault rectified.
•D
Audi adaptive light
Applies to: vehicles with Audi adaptive light
US
Audi adaptive light: system fault!
There is a malfunction in the adaptive light. The
dipped beam headlights will still be working nor
mally.
Drive to a qualified workshop soon and have the
fault rectified.
35
Page 301 of 364
Checking and topping up fluids
A WARNING
- To avoid the risk of being scalded, never
open the bonnet if
you
see steam or coolant
escaping from the engine compartment.
Wait until no steam or coolant can be seen
before opening the bonnet.
- For safety reasons the bonnet must always
be completely closed when the vehicle is
moving.
After closing it always check that it
is properly secured. It should not be possi
ble to
lift
the front edges of the bonnet.
Should you notice that the bonnet is not
safely secured when the vehicle is moving,
stop the vehicle immediately and close the
bonnet properly, otherwise it could cause an
accident.
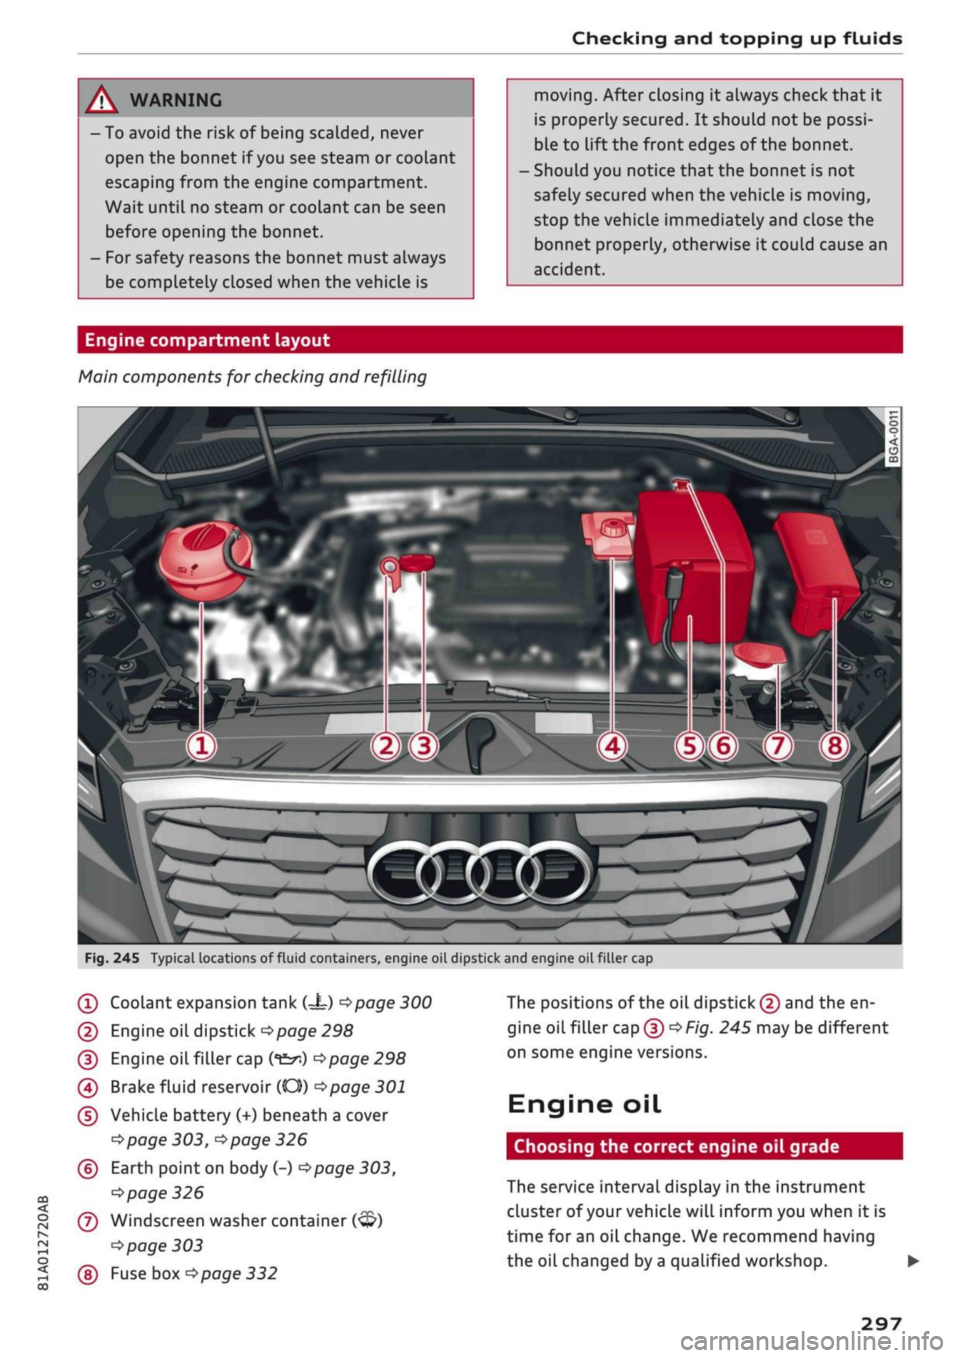
Engine compartment layout
Main components for checking and refilling
CO
< o rN
iv
rN
t-H
o <
?
Fig.
245 Typical locations of fluid containers, engine oil dipstick and engine
oilfiller
cap
(T)
Coolant expansion tank
C=t)
<^page
300
(2) Engine oil dipstick
Opage
298
(3) Engine
oilfiller
cap
(*&*)
Opage
298
(4) Brake fluid reservoir (CO))
^>page
301
(5) Vehicle battery (+) beneath a cover
^page
303,
^page
326
(?) Earth
point
on
body
(-)•=>page
303,
^>page
326
(7) Windscreen
washer
container
(<3?)
^>page
303
(§)
Fuse box
^page
332
The positions of the oil
dipstick
(2) and the en
gine
oilfiller
cap(D^F/'g.
245 may be different
on some engine versions.
Engine oil
Choosing the correct engine oil grade
The service interval display in the instrument
cluster of your vehicle will inform you when it is
time for an oil change. We recommend having
the oil changed by
a
qualified workshop. •
297
Page 307 of 364
Checking and topping up fluids
Charging the vehicle battery
CO
< o rN
iv
rN
t-H
o < 00
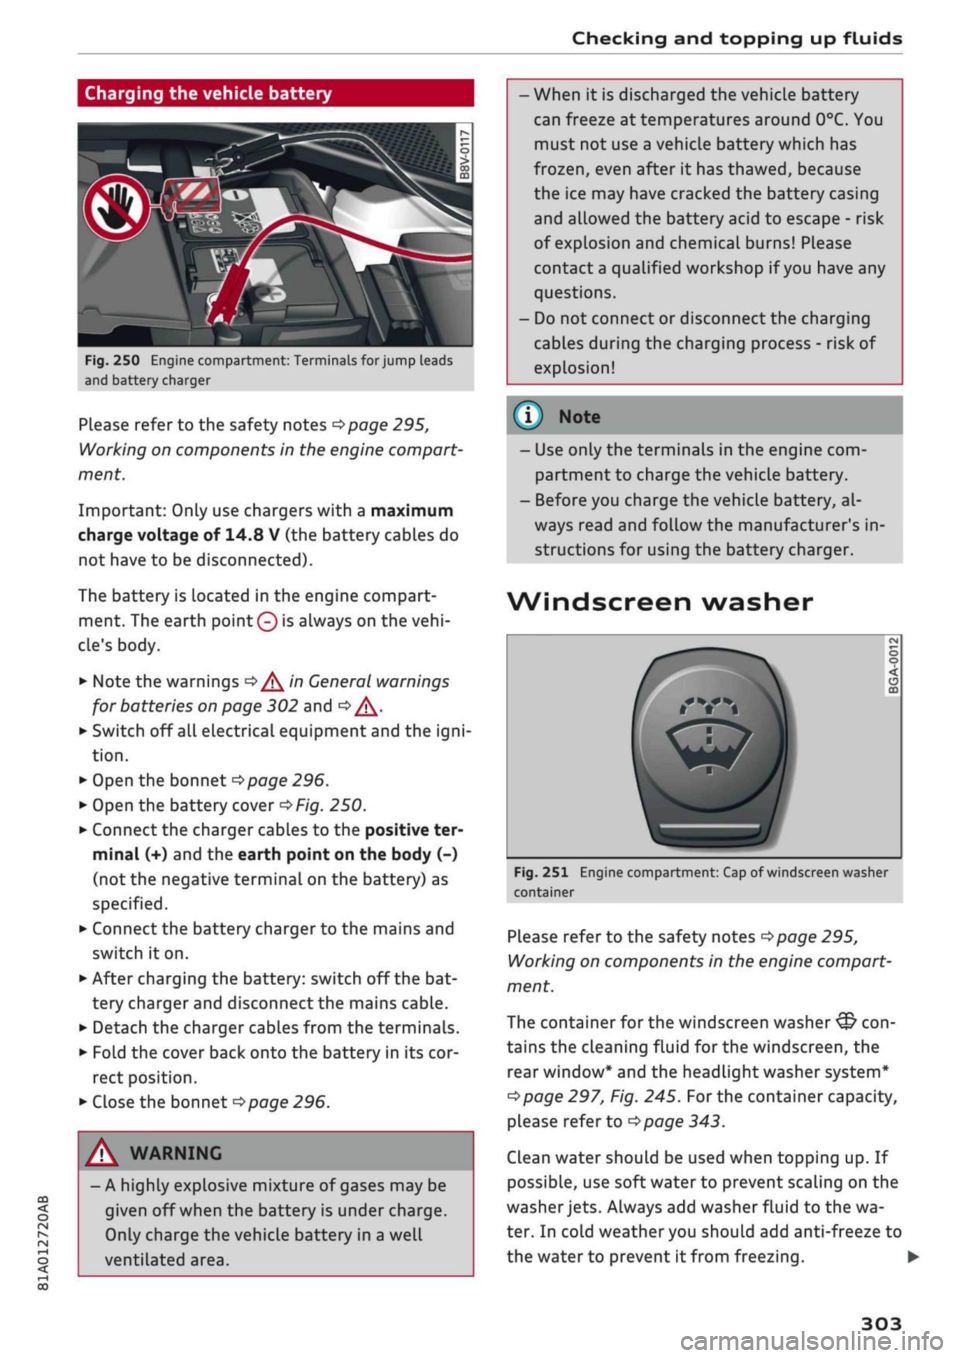
Fig.
250 Engine compartment: Terminals for jump leads
and battery charger
Please refer to the safety notes
^>page
295,
Working on components in the engine compart
ment.
Important: Only use chargers with a maximum
charge voltage of 14.8 V (the battery cables do
not have to be disconnected).
The battery is Located in the engine compart
ment. The earth
point 0
is always on the
vehi
cle's body.
•
Note the warnings
•=>/^
in General warnings
for batteries on page 302 and
Q/\.
•
Switch off all electrical equipment and the
igni
tion.
•
Open the bonnet
^>page
296.
•
Open the battery cover
^Fig.
250.
•
Connect the charger cables to the positive ter
minal (+) and the earth point on the body (-)
(not the negative terminal on the battery) as
specified.
•
Connect the battery charger to the mains and
switch it on.
•
After charging the battery: switch off the bat
tery charger and disconnect the mains cable.
•
Detach the charger cables from the terminals.
•
Fold the cover back onto the battery in its cor
rect position.
•
Close the bonnet
^>page
296.
A WARNING
- A highly explosive mixture of gases may be
given off when the battery is under charge.
Only charge the vehicle battery in a well
ventilated area.
- When it is discharged the vehicle battery
can freeze at temperatures around 0°C. You
must not use a vehicle battery which has
frozen,
even after it has thawed, because
the ice may have cracked the battery casing
and allowed the battery acid to escape - risk
of explosion and chemical burns! Please
contact
a
qualified workshop if
you
have any
questions.
- Do not connect or disconnect the charging
cables during the charging process - risk of
explosion!
© Note
- Use only the terminals in the engine com
partment to charge the vehicle battery.
- Before you charge the vehicle battery, al
ways read and follow the manufacturer's in
structions for using the battery charger.
Wind
screen washer
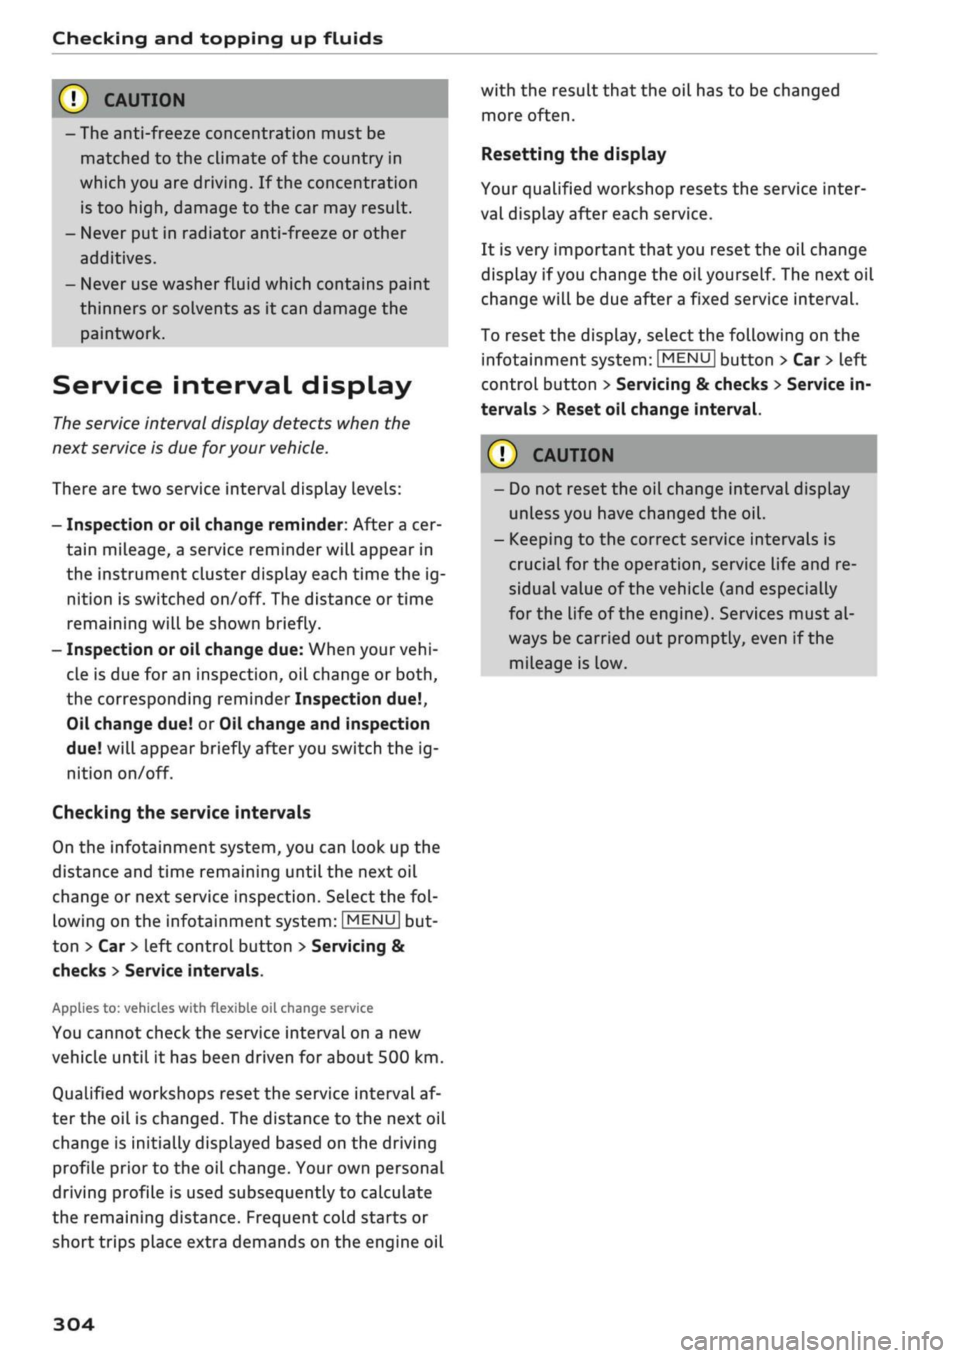
Fig.
251 Engine compartment: Cap of windscreen washer
container
Please refer to the safety notes
^>page
295,
Working on components in the engine compart
ment.
The container for the windscreen washer
&
con
tains the cleaning fluid for the windscreen, the
rear window* and the headlight washer system*
Opage
297, Fig. 245.
For
the container capacity,
please refer to
opage
343.
Clean water should be used when topping up. If
possible, use soft water to prevent scaling on the
washer
jets.
Always add washer fluid to the wa
ter. In cold weather you should add anti-freeze to
the water to prevent it from freezing. •
303
Page 308 of 364
Checking and topping up fluids
© CAUTIO
-The anti-freeze concentration must be
matched to the climate of the country in
which you are driving. If the concentration
is too
high,
damage to the car may result.
- Never put in radiator anti-freeze or other
additives.
- Never use washer fluid which contains paint
thinners or solvents as it can damage the
paintwork.
Service interval display
The
service interval display detects when the
next
service
is due
for
your vehicle.
There are two service interval dispLay levels:
- Inspection or oil change reminder: After a cer
tain mileage, a service reminder will appear in
the instrument cluster dispLay each time the ig
nition is switched on/off. The distance or time
remaining will be shown briefly.
- Inspection or oil change due: When your
vehi
cle is due for an inspection, oil change or
both,
the corresponding reminder Inspection
due!,
Oil change due! or Oil change and inspection
due!
will appear briefly after you switch the ig
nition on/off.
Checking the service intervals
On the infotainment system, you can look up the
distance and time remaining until the next oil
change or next service inspection. Select the
fol
lowing on the infotainment system:
|MENU|
but
ton > Car
>
left control button > Servicing &
checks
>
Service intervals.
Applies
to: vehicles with flexible oil change service
You cannot check the service interval on a new
vehicle until it has been driven for about 500 km.
Qualified workshops reset the service interval af
ter the oil is changed. The distance to the next oil
change is initially displayed based on the driving
profile prior to the oil change. Your own personal
driving profile is used subsequently to calculate
the remaining distance. Frequent cold starts or
short trips place extra demands on the engine oil
with the result that the oil has to be changed
more often.
Resetting the display
Your qualified workshop resets the service inter
val display after each service.
It is very important that you reset the oil change
dispLay if
you
change the oil yourself. The
next
oil
change will be due after
a
fixed service interval.
To reset the display, select the following on the
infotainment system:
|MENU|
button > Car
>
left
control button > Servicing & checks
>
Service in
tervals
>
Reset oil change interval.
(J) CAUTION
- Do not reset the oil change interval display
unless you have changed the oil.
- Keeping to the correct service intervals is
crucial for the operation, service life and re
sidual value of the vehicle (and especially
for the life of the engine). Services must al
ways be carried out promptly, even if the
mileage is Low.
304
Page 351 of 364

Index
CO
< o rN
iv
rN
t-H
o <
•H
00
Emergency braking function 82
New brake pads 147
Browser
see Media centre 244
Bulb failure
Changing bulbs 334
Bulbs,
changing 334
Buttons
Assigning functions (multi-function steering
wheel) 17
Multi-function steering wheel 15, 18
Operating unit (MMI) 152
C
Cables (USB adapter/AUX adapter) 240
Calling up media 243
Call
list 179
CalL
options 187
Capacities
AdBlue 292
Fuel
tank 343
Washer fluid reservoir 343
Caps for wheel bolts, removing 321
Car care
Washing/cleaning 312
Care
see Cleaning 312
Car phone
172,188
Catalytic converter 295
CD drive 236
Central locking system 37
Cetane number (diesel) 289
Changing settings for additional dispLay .... 19
Charging
see Power sources 60
Charging battery 242
Charging battery (mobile devices) 241
Chassis number 342
Child lock 46
DVD 246
Child seats 267
Fitting 270
Cigarette Lighter 60
Classic view 17
Cleaning 312
Cleaning/de-icing windows 314
Cleaning/treating leather 315
Cleaning Alcantara 315
Cleaning carbon parts 314, 315
Cleaning controls and displays 314
Cleaning fabrics 315
Cleaning leatherette 315
Cleaning plastic parts 314
Closing
Panorama sun roof 48
Windows 46
see also Unlocking/locking 39, 40
Closing/opening
see Unlocking/locking 39, 40
Coasting mode 91
Coat hooks 61
Colour code 342
Coming home/leaving home
see Entry/exit lights 51
Commands (speech dialogue system) 164
Compact temporary spare wheel 324
Compartments 61
Conference calls 180
Connection manager 257
Connections
see Media 234, 243
Consumption (fuel) 19, 20, 342
Contacts 185
From another directory 258
Importing/exporting 187
Memory capacity 189
Storing as a destination
216
Control buttons (MMI operation) 154
Controls and displays (overview) 10
Control units 150
Convenience key
Manual operation 79
Starting/stopping the engine 76
Unlocking/locking 39
Convenience open/close 47
Cooling mode
Automatic air conditioner 69
Manual air conditioner 67
Cooling system
Anti-freeze 299
Checking coolant level 300
347