display AUDI Q3 2015 User Guide
[x] Cancel search | Manufacturer: AUDI, Model Year: 2015, Model line: Q3, Model: AUDI Q3 2015Pages: 258, PDF Size: 64.9 MB
Page 28 of 258
26 Drive r in form ation d ispl ay
(D Note
-Only reset the oi l change display when
you have completed an o il change .
- If you d isconnect the battery term inals,
no calculatio ns can be made for the serv
ice interval display during this time and
no service rem inder will appear . Remem
ber that observing the proper service in
tervals is vitally important to extending
the life of you r vehicle, particularly the
engine, and maintaining its value. Even if
the mileage dr iven is low, the max imum
period of one year from one serv ice to
the next must not be exceeded.
On-Board Diagnostic
system (OBD)
Malfunction Indicator Lamp (MIL)
The Malfunction Ind icator Lamp (MIL) ¢'4 i n
the instrument cluster is part of the On-Board
Diagnostic (OBD II) system.
The warning/indicator light illuminates when
the ign ition is switched on and goes o ut after
the engine starts and the idle has stabilized.
Th is indicates that the MIL is working proper
l y.
If the light doe s not go out after the eng ine
is started, or illuminates wh ile you are driv
ing, a ma lfunction may exist in the engine sys
tem . If the light illuminates, the catalytic con
verter cou ld be damaged.
Continue driving
w ith reduced pow er (avoid
ing sustained high speeds and/or rapid accel
erations) and have the condition corrected.
Contact your authorized Audi dealer .
If the light ill uminates, the electronic speed
limiter may also be ma lfunctioning . For more
information
¢ page 2 7, Electronic speed
limiter.
An imp roperly clo sed fuel filler c ap m ay als o
c a u se th e M IL l ight to illuminate
¢ page 177.
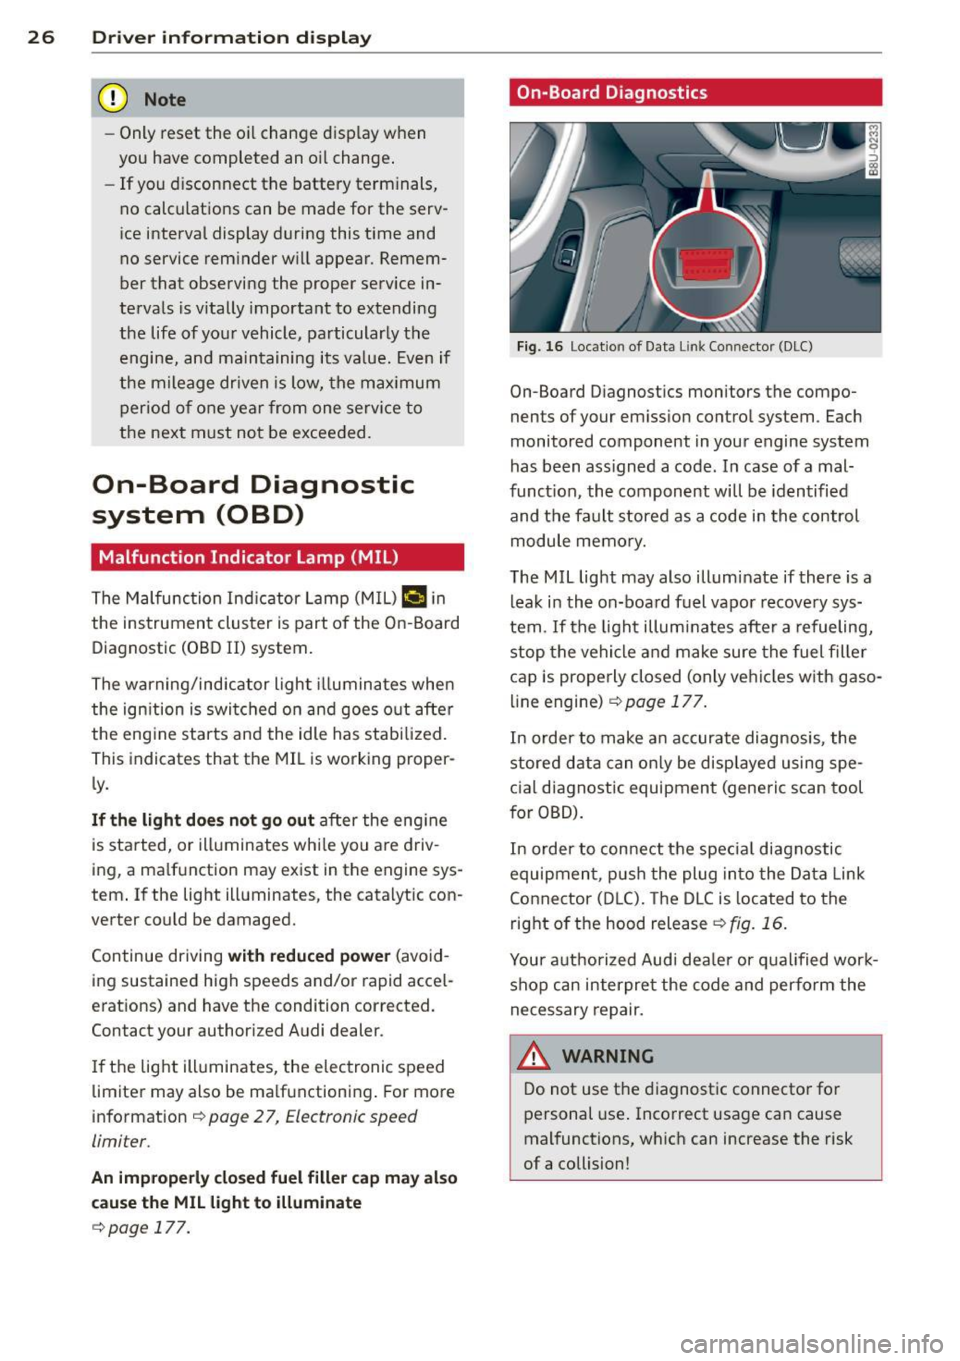
On-Board Diagnostics
Fig. 16 Locat io n of Data Li nk Conn ector (DLC)
On-Board D iagnostics monitors the compo
nents of your em ission contro l system . Each
monitored component in your engine system
has been ass igned a code . In case of a mal
funct ion, the component will be identified
and the fault stored as a code in the control
module memo ry.
The MIL light may also illuminate if there is a lea k in the on-board fuel vapor recove ry sys
tem . If the ligh t illuminates after a refueling,
stop the vehicle and make sure the fuel fille r
cap is prope rly closed (only vehicles w ith gaso
line engine) ¢
page 177.
In order to make a n accurate diagnosis, the
stored data can on ly be displayed using spe
c ial d iagnostic equipment (generic scan tool
for OBD).
In order to con nect t he special diagnostic
equipment, push the plug in to the Data Link
Connector (D LC). The D LC is located to the
right o f the hood release
<::!;> fig. 16.
Your a uthorized Audi dea le r or qua lified wor k
shop can interpret the code and perform the
necessary repair.
,&_ WARNING ~ -
Do not use t he diagnost ic connecto r fo r
personal use . Incorrect usage can cause
mal functions, wh ich can increase the risk
of a collision!
Page 31 of 258
M N M N
0 ::i co
rl I.O
"' rl
"' rl
-Do not leave children inside the vehicle
unsupervised. In an emergency it would
be impossible to open the doors from
the outside without the key.
(D Tips
- In the event of a crash with airbag de
ployment all locked doors will be auto
matically unlocked to give access to the
vehicle occupants from the outside .
- If the power lock ing system should mal
function, you can lock the driver's door
using the ign it ion key¢
page 33.
-If the power lock ing system should fail,
you can still open the fuel tank flap in an
emergency
c:> page 178.
- You are well advised not to keep valua
bles inside an unattended vehicle, visible
or not . Even a properly locked vehicle
cannot provide the security of a safe.
- If the LED in the upper edge of the driv
er's door panel comes on for about 30
seconds after the vehicle is locked, there
i s a ma lfunction in the power locking or
the anti-theft warning system. Have the
malfunction corrected by an authorized
Audi dealership or qualified repair facili
ty.
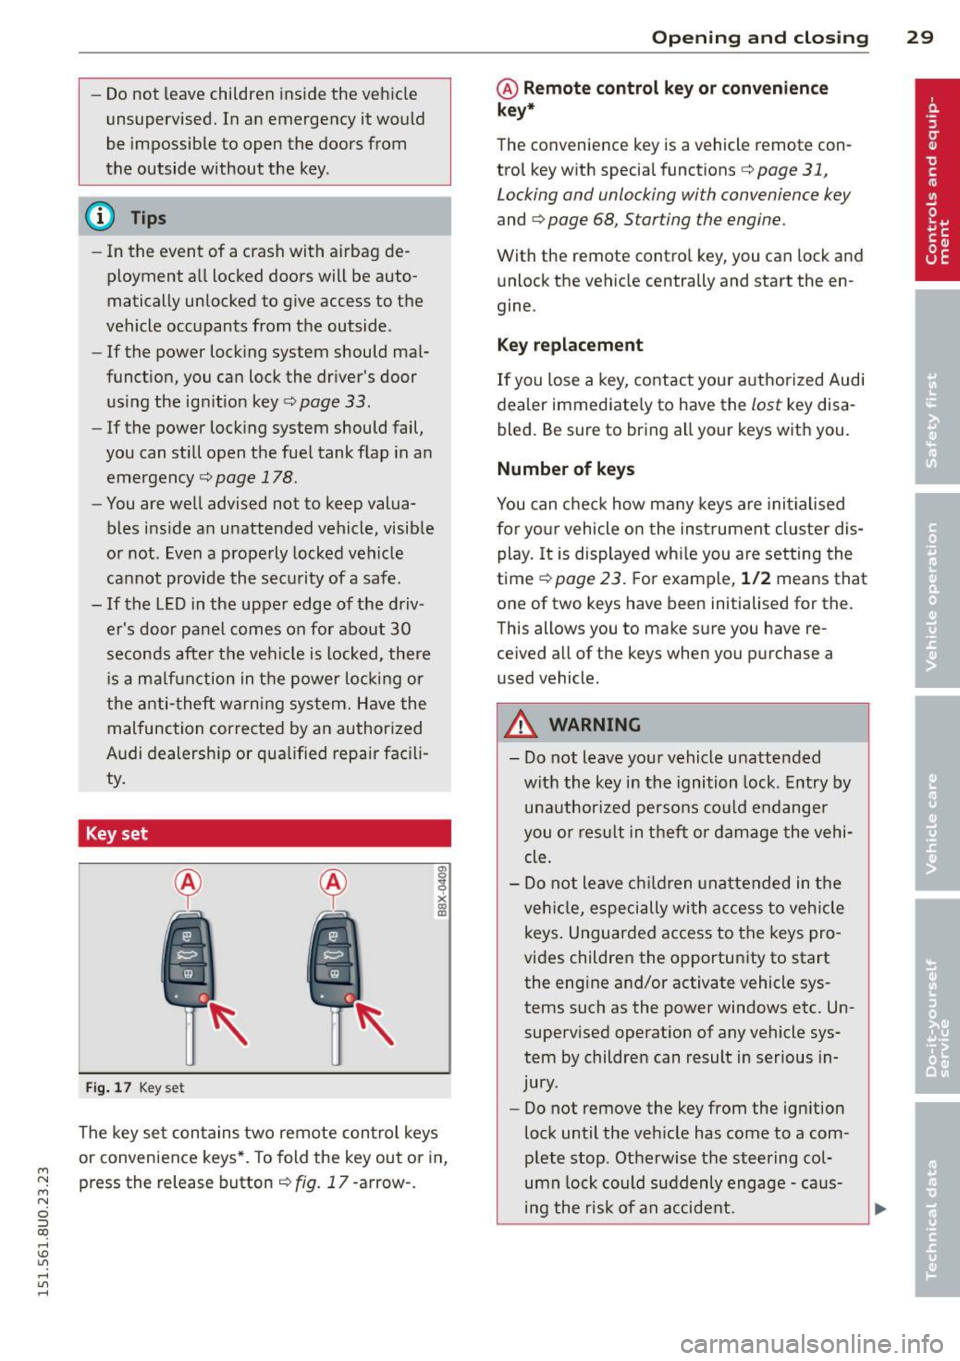
Key set
Fig. 17 Key set
The key set contains two remote control keys
or convenience keys*. To fold the key out or in,
press the release button¢
fig. 17 -arrow-.
Opening and closing 29
@ Remote control key or convenience
key*
The convenience key is a vehicle remote con
trol key with special functions
c> page 31,
Locking and unlocking with convenience key
and c> page 68, Starting the engine.
With the remote contro l key, you can lock and
unlock the vehicle centrally and start the en
gine.
Key replacement
If you lose a key, contact your authorized Audi
dealer immediate ly to have the
lost key disa
bled. Be sure to bring all your keys with you.
Number of keys
You can check how many keys are initialised
for yo ur vehicle on the instrument cluster dis
play. It is displayed wh ile you are setting the
time
c:> page 23. For example, 1/2 means that
one of two keys have been initialised for the.
This allows you to make sure you have re
ce ived all of the keys when you purchase a
u sed vehicle.
A WARNING
--
-Do not leave your vehicle unattended
with the key in the ignition lock. Entry by
unauthorized persons could endanger
you o r result in theft or damage the vehi
cle.
- Do not leave children unattended in the
veh icle, especially with access to vehicle
keys . Unguarded access to the keys pro
vides children the opportunity to start
the engine and/or activate vehicle sys
tems such as the power windows etc. Un
supervised operation of any vehicle sys
tem by children can result in serious in
jury .
- Do not remove the key from the ign ition
lock until the vehicle has come to a com
plete stop. Otherwise the steering col
umn lock could suddenly engage -caus
ing the risk of an accident.
Page 32 of 258
30 Opening and clo sing
@ Tips
- The operation of the remote contro l key
can be temporarily disrupted by interfer
ence from transmitters in the vicinity of
the veh icle work ing in the same frequen
cy range (e.g. a cell phone, radio equip
ment) .
- For security reasons, replacement keys
are on ly available from author ized Audi
dealer .
- For Decla ration of Compliance to United
States FCC a nd Industry Canada regula
t ions
9 page 24 0.
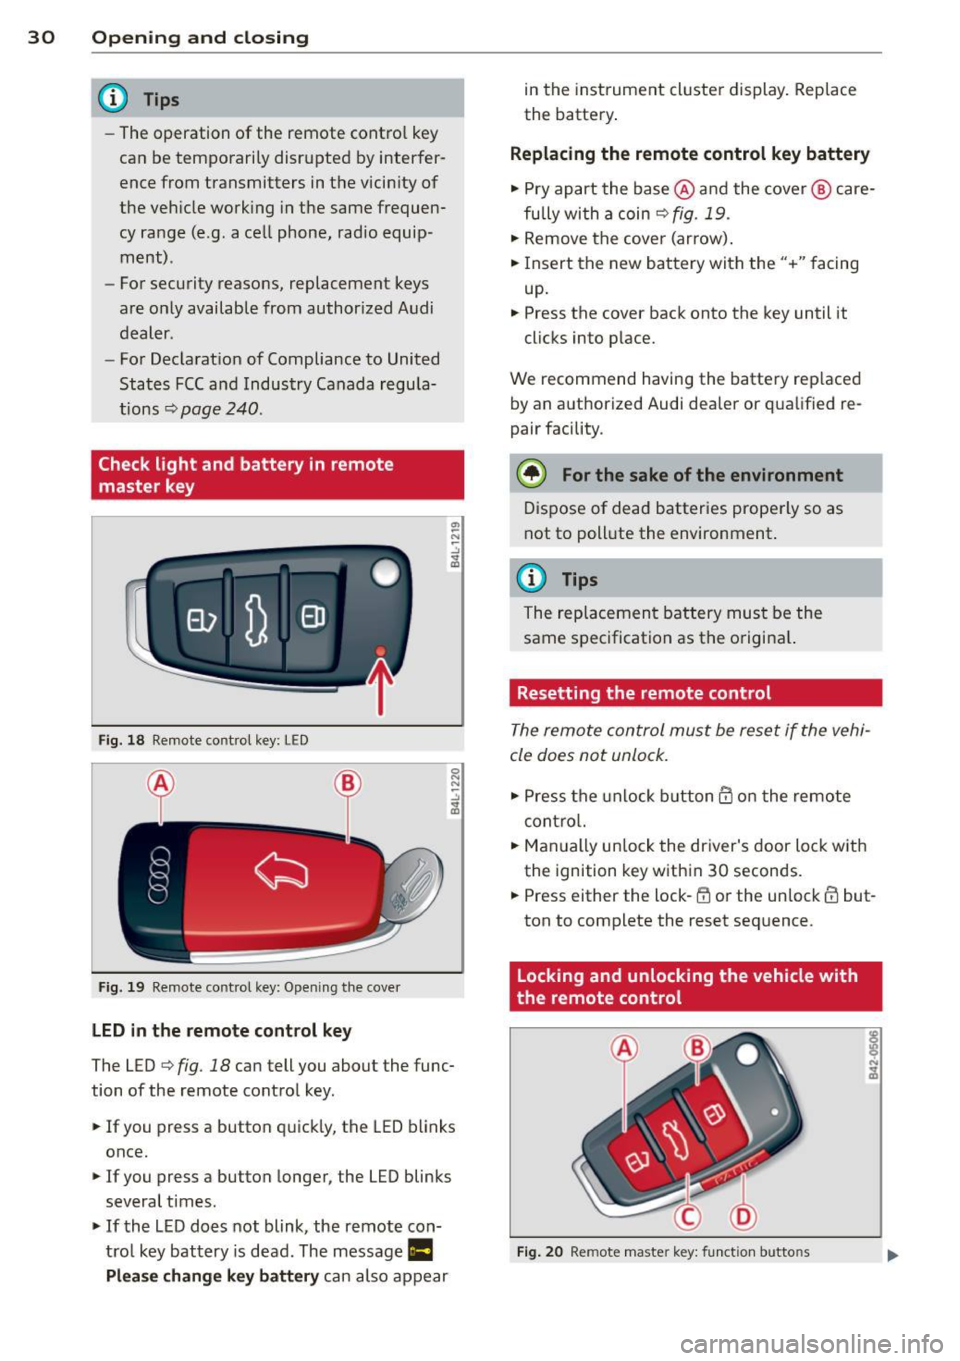
Check light and battery in remote
master key
Fig . 18 Remote co nt rol key : LE D
Fi g. 19 Remote co ntrol key: Open in g the cove r
LED in the remote cont rol key
The LED 9 fig . 18 can tell you about the func
tion of the remote contro l key .
.. If you press a button q uickl y, the LED blinks
once.
1> If you press a button longer, the LED blinks
several times .
.. If the L ED does not blink, the remote con
tro l key battery is dead. The message
Ill
Plea se change key battery can also appear in
the instrument cluster display . Rep lace
the batte ry .
Replacing the remote control key battery
.. Pry apart the base @and the cover @ care
fu lly with a coin~
fig. 19.
.,. Remove the cove r (ar row) .
.. Insert the new battery with the" +" facing
up.
.. Press the cove r back onto the key until it
clicks into p lace.
We recommend having the battery rep laced
by an a uthorized Audi dea ler or qua lified re
pair facility .
$ For the sake of the environment
Dispose of dead batteries prope rly so as
not to poll ute the environment.
(D Tips
The rep lacemen t battery mus t be the
same spec ification as the origina l.
Resetting the remote control
The remote control must be reset if the vehi
cle does not unlock .
.. Press the unlock b utton @on the re mote
contro l.
.. Man ually un lock the dr iver's door loc k with
the ignition key w ith in 30 seconds .
.. Press either the lock-~ or the unlock @ but
ton to complete the reset seq uence.
Locking and unlocking the vehicle with
the remote control
Fig . 20 Remote maste r key: funct ion butto ns
Page 43 of 258
M N M N
0 ::i co
rl I.O
"' rl
"' rl
(D Tips
-The light sensor* for headlight control is
located in the rear view mirror mount.
You should therefore not apply any stick
ers to the windshield in this area in order
to prevent malfunctions or failures.
- Some exterior lighting functions can be
ad justed
¢ page 42.
- When you switch off the ignition while
the vehicle's lights are turned on, a buz
zer sounds as long as the driver's door is
open .
- In cool or damp weather, the inside of
the headlights, turn signals and tail
lights can fog over due to the tempera
ture difference between the inside and
outside. They will clear shortly after
switching them on. This does not affect
the service life of the lighting.
- In the event of a light sensor malfunc
tion, the driver is notified in the instru
ment cluster display~
page 19 .
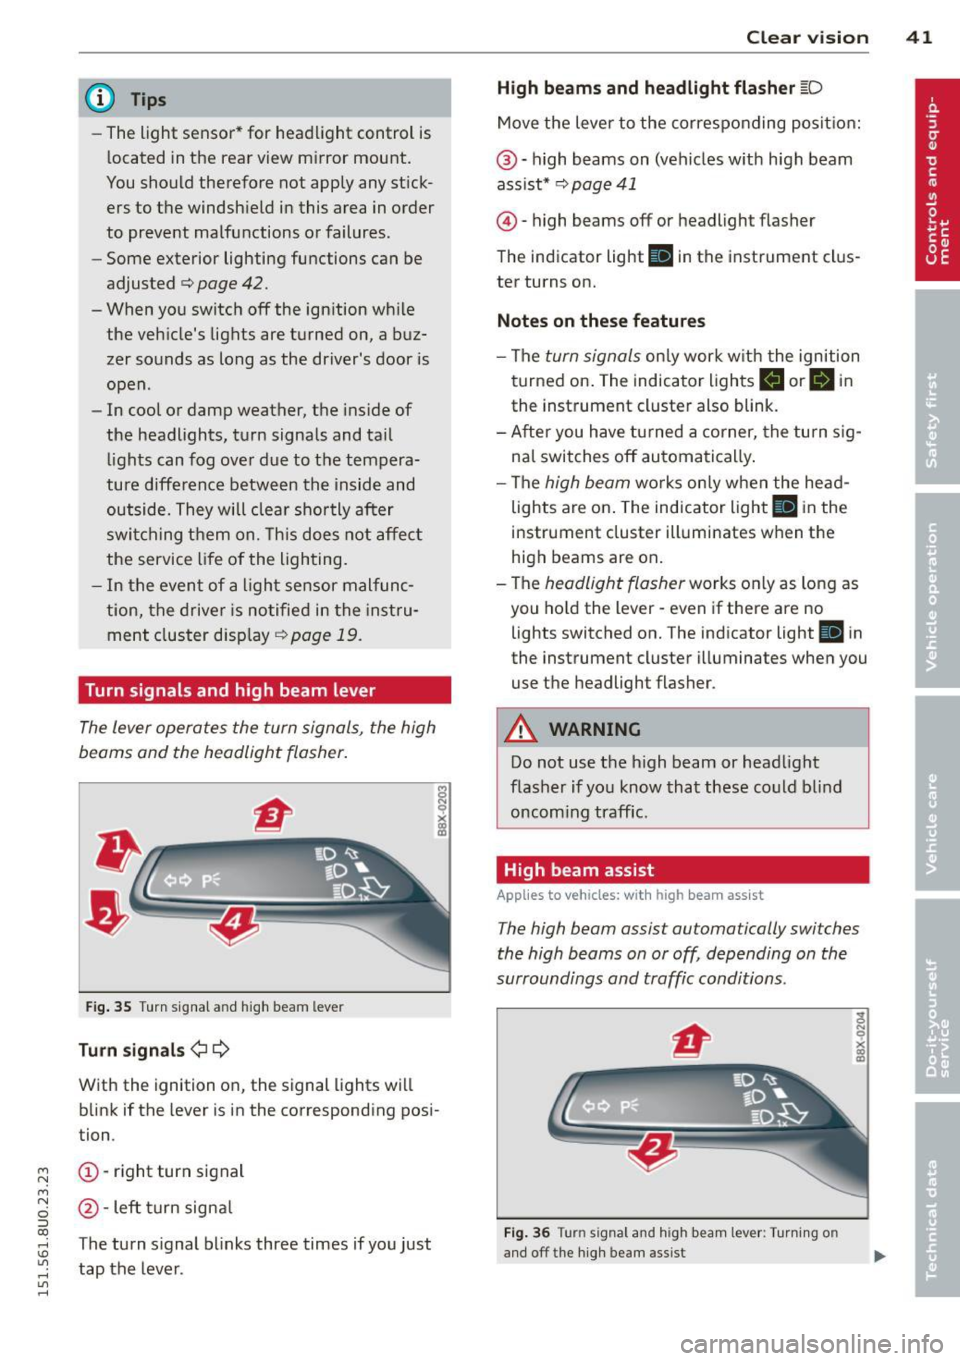
Turn signals and high beam lever
The lever operates the turn signals , the high
b eams and th e headlight flash er.
Fig. 35 Turn signal and high beam leve r
Turn signals ¢i ¢
With the ignition on, the signal lights will
blink if the lever is in the corresponding posi
tion .
(D-right turn signal
@-Left turn signal
T he turn signal blinks three times if you just
tap the lever. Clear
vision 41
High beams
and headlight flasher @:D
Move the lever to the corresponding position:
@-high beams on (vehicles with high beam
assist*
¢ page 41
@ -high be am s off or headligh t fla sher
The indicator light
Ill in the instrument clus
ter turns on.
Notes on these features
-The turn signals only work with the ignition
turned on. The indicator lights
II or Ill in
the instrument cluster also blink.
-After you have turned a corner, the turn sig
nal switches off automatically.
- The
high beam works only when the head
lights are on. The indicator light
El in the
instrument cluster illuminates when the
high beams are on.
- The
headlight flasher works only as long as
you hold the lever -even if there are no
lights switched on. The indicato r light
Iii in
the instrument cluster illuminates when you
use the headligh t flasher .
A WARNING
Do not use the high beam or headlight
flasher if you know that these could blind
oncoming traffic.
High beam assist
Applies to veh icles: w ith high beam assist
-
The high beam assist automatically switches
the high beams on or off, depending on the
surroundings and traffic conditions .
Fig. 36 Turn s ignal an d h igh beam lever : Turning o n
and off the high beam assist
Page 44 of 258
42 Clear vis ion
Activating high beam a ssi st
Requirement: The light sw itch must be in the
AUTO position, the low beam headlights must
be on.
• Press the lever into pos it ion (D in order to
activate the high beam assist . T he indicator
li gh t
IIJ turns on in the instrument cluster
display and the high b eams switch on or
off
automatica lly . The indicator light Bl turns
on if the high beams were switched on .
Switching the high beams on /off
m anuall y
Requir ement : Hig h beam assist is activated .
I f the h igh beams did not switch on/off auto
matica lly when expected, yo u may instead
switch them on/off manually:
• To switch the high beams on manually, press
the leve r into position (D. The indica tor light
El tu rns on. To switch the high beams off
again, pull the lever into position @.
• To switch the high beams
off manually after
th ey hav e tu rn ed on automatically, p ull the
lever into posi tion @.
Opera ting th e headlight fla sher
• To ope rate the flashers while the h igh beam
assist is active, pull the lever into position
@ . T he high beam assist will remain active.
Messages in the instrum ent cluster
displ ay
He adlight a ssis t: Sy stem f ault!
Drive to your a utho rized Aud i deale r immedi
ate ly to have the mal function corrected. You
can st ill switch the h igh beams on o r
off man
ua lly.
H eadlight a ssis t: Una vail able . N o C amera
v iew
The camera view is blocked, for examp le by a
sticke r or debris .
The sensor is located between the interior
rearv iew mirror and the winds hield . There
fore , do not place any stickers in th is area on
the w indshield .
A WARNING
High beam assist is only intended to assist
the driver. The drive r is still responsib le for
controll ing the headlights and switc hing
the high beams on and
off manually de
pending on t raff ic, lighting and visib ility
conditions. Fa ilu re to intervene manually
may lea d to risk of acc ident.
It may be nec
essary to operate the high beams manual
l y in the following situations, e.g.:
- For adverse weathe r condit ions such as
fog, heavy rain, blowing snow or spraying water.
- On roads where oncoming traff ic may be
partially obscured such as expressways .
- If there are individua ls on the road with
no lighting or poo r light ing, such as cy
clists.
- In tight curves and on steep slopes.
- In poorly lit are as.
- W ith st rong refle cto rs such as signs.
- If t he area of the winds hield near the
sensor is fogged ov er, dirty, icy o r cov
ered wi th a stic ker.
' Adjusting exterior lighting
The functions are selected in the radio or
MM!* .
• Select: !CARI func tion but ton > S ystems or
Car Syst ems contro l button > Ve hicle set
ting s> Exterior lighting .
Coming home (light when lea ving car )*,
Leav ing home (light when unlocking car) *
The coming home function illuminates the
area around the vehicle when the ignition is
switched
off and the dr ive r's door is open ed .
Depend ing on ve hicle equ ipment, the function
can be switched on and
off or the length of
t ime the lights remain on* can be ad justed .
T he
leaving home function illuminates the
area around the vehicle when unloc king it .
T h is func tion ca n be sw itche d on and
off .
The coming hom e and leaving home func
t ions only operate when it is dar k and the
Page 46 of 258
44 Clear vis ion
Inter ior lighting
There are other in ter ior light ing f unct ions
that are available. Individual functions can be
adj usted i n the MM I. Se lect: ICARlf unction
button >
Systems or Car Sy stems control but
ton>
Vehicle settings > Interior lighting .
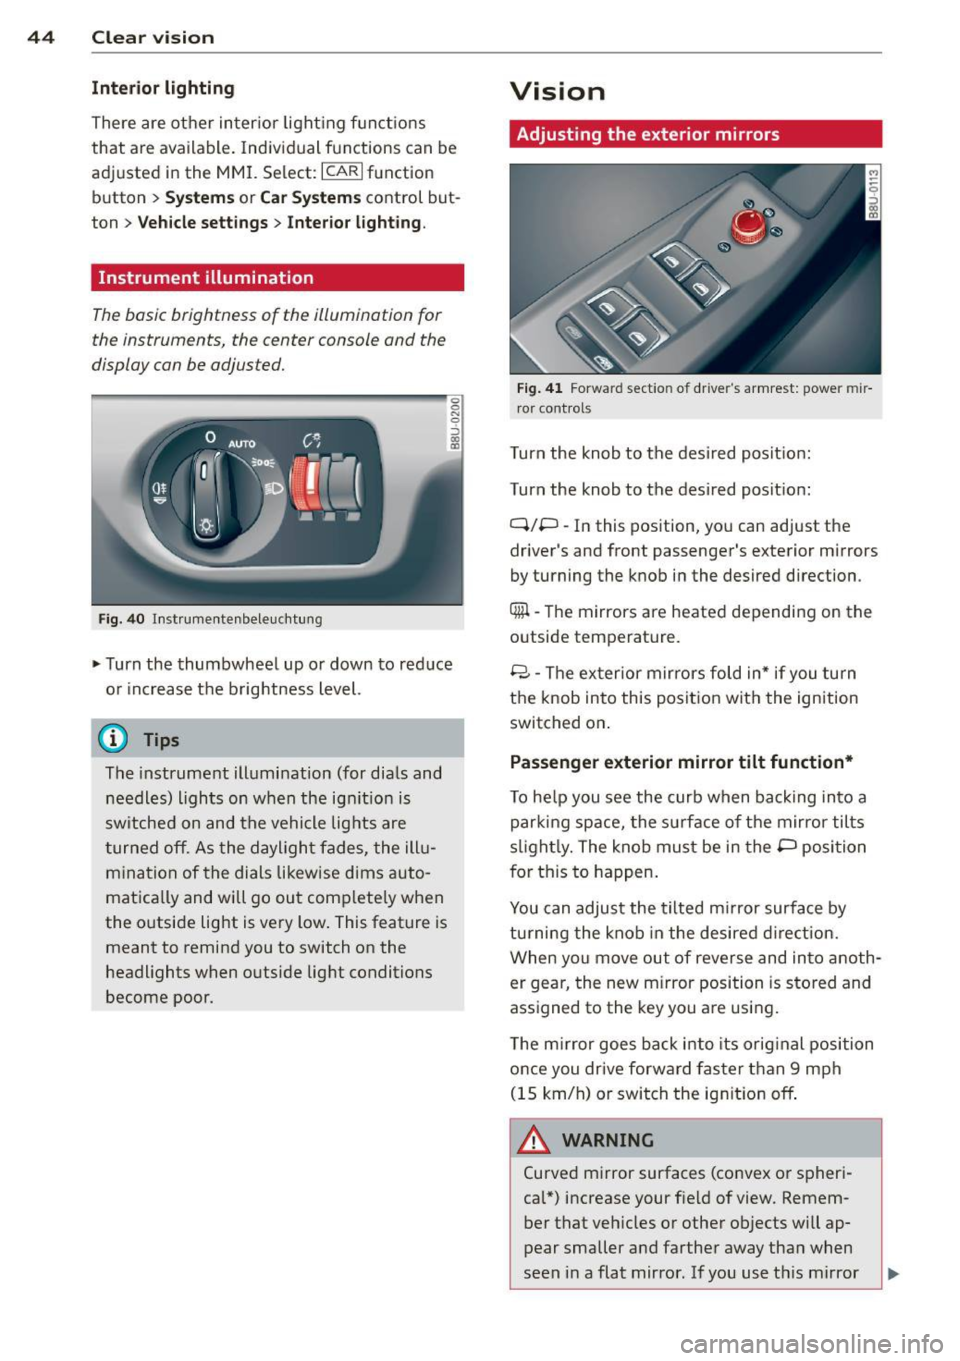
Instrument illumination
The basic brightness of the illum inat ion for
the instruments, the c enter console and the
display can be adjus ted.
F ig . 40 In st rumentenbeleu chtung
.,. Turn the thumbwhee l up or down to red uce
o r i ncrease t he brightness level.
(D Tips
The instrument ill umination (for dia ls and
needles) lights on when the ig nition is
sw itched on and the vehicle lig hts are
t urned off. As the dayligh t fades, the ill u
m ina tion of the dials likew ise dims auto
matically and will go out comp lete ly when
the outside light is very low . This feat ure is
meant to remind you to switch on the
headlights when outside lig ht conditions
become poor.
Vision
Adjusting the exterior mirrors
F ig. 41 Forwar d sect io n of dr ive r's armrest: powe r mir
r or control s
Turn the knob to the desired pos it io n:
Turn the knob to the des ired posit ion:
Q/P -In this position , yo u can adjust the
driver 's and front passenger's exterior mirrors
by turning the k nob i n the desired direction .
Qiil -The mirrors are heated depending on the
outside temperature .
8 -T he ex terior m ir rors fold in* if you turn
t h e knob into this position wit h the ignition
switched on .
Passenger exterior mirror tilt function*
To he lp you see the curb when ba ck ing into a
par king space, the surface of the mirror tilts
s li ght ly. The knob must be in the P posi tion
f or this to happen .
You can adjust the tilted m irror surface by
tu rning the knob in the desired direction.
When you move out of reverse and in to anoth
er gear, the new m irror position is s to red and
ass igned to the key you are using.
T he m irror goes ba ck i nto its orig inal position
once you dr ive forward faster than 9 mph
(15 km/h) o r swi tch the ig nition off .
A WARNING
Curved m irror surfaces (co nvex o r spheri
cal*) increase your f ie ld of view. Remem
ber that veh icles or other ob jects will ap
p ear smaller a nd farther away tha n when
seen in a flat mirror . If you use t his mi rror
-
Page 51 of 258
M N M N
0 :::i co
rl I.O
"' rl
"' rl
.. To sw itch the compass on or off, press and
hold the button @ until the compass dis
play in the mirror
~ fig . 48 appears or disap
pears.
The digital compass only works when the igni
tion is on . The directions are indicated with
abbreviations:
N (north), NE (northeast), E
(east), SE (southeast), S (south), SW (south
west),
W (west) , NW (northwest) .
(D Tips
To prevent inaccurate compass readings,
do not bring any remote controls, electri
cal devices or meta llic objects nea r the
m irror .
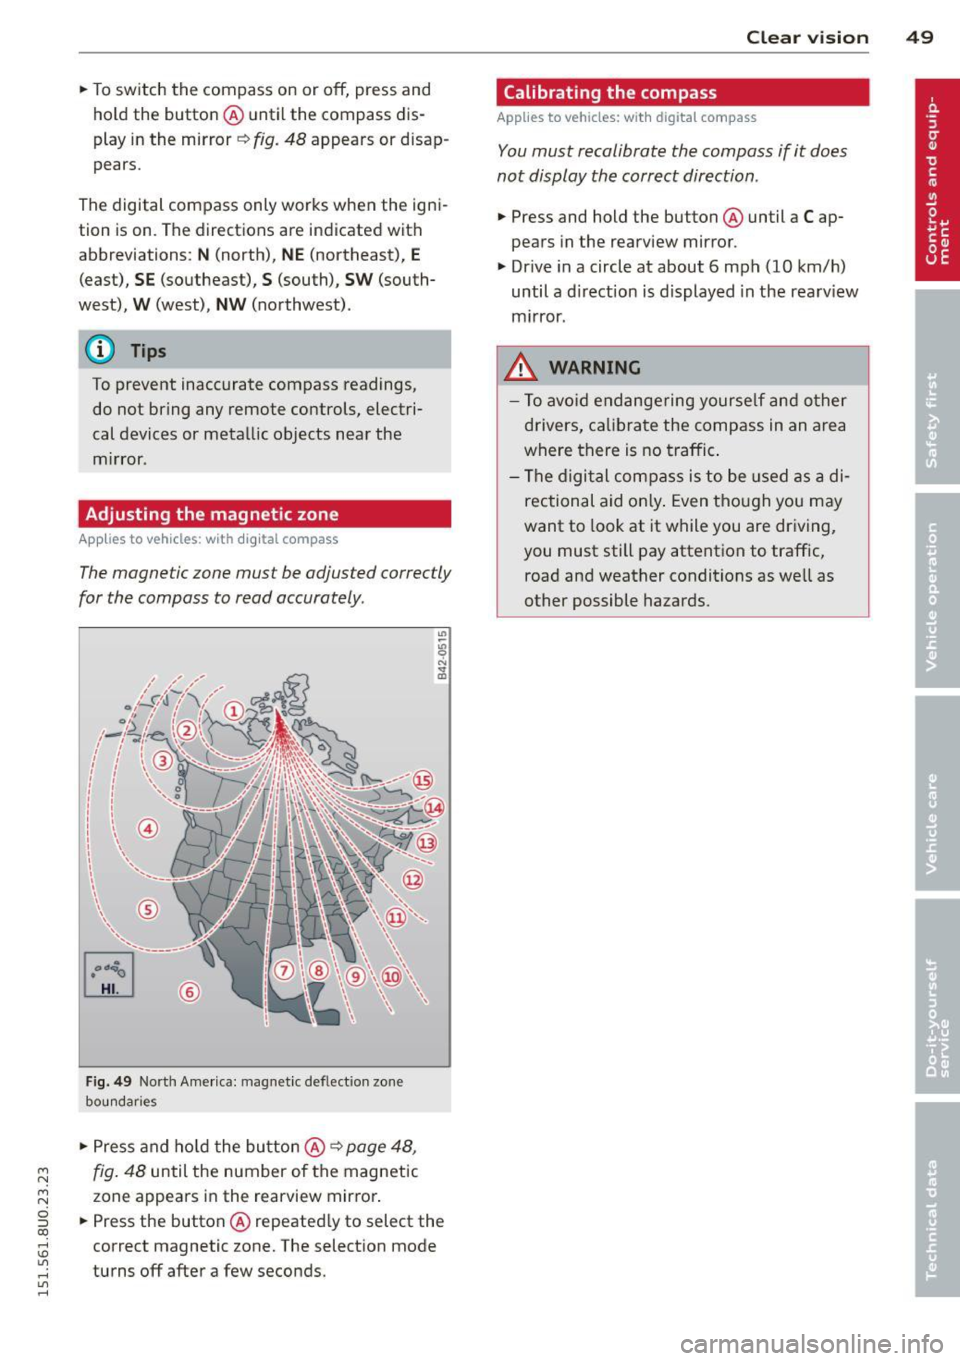
Adjusting the magnetic zone
Applies to vehicles : wit h dig ital compass
The magnetic zone must be adju sted correctly
for the compass to read accurately .
~
[mJ ®
Fig . 4 9 No rt h A meri ca: magne tic de flect ion zo ne
bo undar ies
.. Press and ho ld the bu tton @ ~page 48,
fig . 48
until the number of the magnetic
zone appears in the rearview mir ror .
.. Press the button @ repeated ly to select the
correct magnetic zone. The selection mode
turns off after a few seconds. Clear vi
sion 49
Calibrating the compass
Applies to veh icles: w it h dig ita l compass
You must recalibrate the compass if it does
not display the correct direction .
.. Press and hold the button @ until a Cap
pears in the rearview mirror .
.. Dr ive in a circle at about 6 mph (10 km/h)
until a d irection is displayed in the rearv iew
m irror .
.&_ WARNING
- To avo id end ange rin g yourse lf and other
drivers, ca libra te the comp ass in an a rea
where there is no traffic .
- Th e digi tal com pass is to be used as a di
rectional aid on ly . Even tho ugh you may
want to look at it while you are driving,
you must still pay attention to traffic, road and weather conditions as we ll as
other possible hazards.
Page 57 of 258
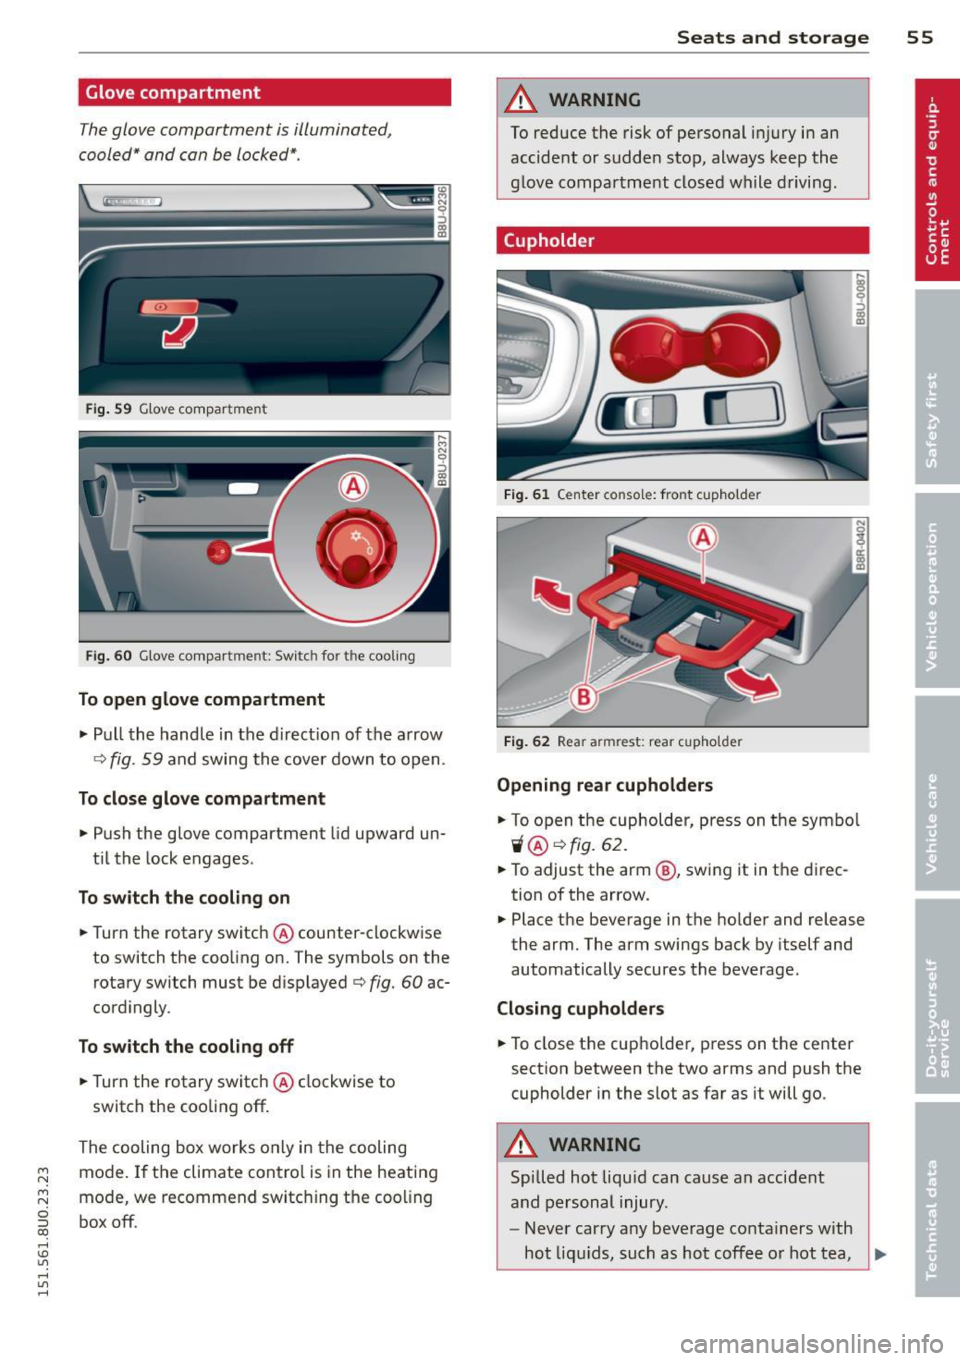
Glove compartment
The glove compartment is illuminated,
cooled" and can be locked*.
Fig . 59 Glove compartment
Fi g. 60 Glove compartment: Switc h for the cooling
To open glove compartment
~ Pull the handle in the direction of the arrow
¢
fig. 59 and swing the cover down to open.
To close glove compartment
~ Push the glove compartment lid upward un
t il the lock engages .
To switch the cooling on
~ Turn the rotary switch @ counter-clockwise
to switch the cooling on. The symbols on the
rotary switch must be displayed ¢
fig. 60 ac
cordingly .
To switch the cooling off
~ Turn the rotary switch @ clockwise to
switch the cooling off.
The cooling box works only in the cooling
~ mode. If the climate contro l is in the heating
M N
0 ::i co
rl I.O
"' rl
"' rl
mode, we recommend switching the cooling
box off.
Seats and storage 55
A WARNING
To reduce the risk of personal injury in an
accident or sudden stop, always keep the
glove compartment closed while driving.
(upholder
Fig. 61 Center console: front cupho lde r
Fig. 62 Rear arm rest: rear cupho lder
Opening rear cupholders
~ To open the cupholder, press on the symbo l
i/@ ¢fig. 62.
~ To adjust the arm @, swing it in the direc
tion of the arrow.
~ Place the beverage in the holder and release
the arm. The arm swings back by itself and
automatically secures the beverage.
Closing cupholders
~ To close the cupholder, press on the center
section between the two arms and push the
cupholder in the slot as far as it will go .
A WARNING
Spilled hot liqu id can cause an accident
and personal injury.
- Never carry any beverage conta iners with
hot liquids, such as hot coffee or hot tea,
II>-
Page 67 of 258
M N
M N
0 ::i co ,...., \!) 1.1'1 ,...., 1.1'1 ,....,
0 Adjusting the temperature
Separate temperatures can be selected for the
driver's and front passenger's side using the
left and right rotary controls . The tempera
ture can be adjusted between +60
°F (+16 °C)
and +84 °F (+28 °C) . Outside this range, LO or
HI will appear on the air conditioner display .
In the two extreme settings the air condition
er operates continuously with maximum cool
ing or heating output, and the temperature is
not regulated automatically.
[:]1 (±] Adjusting the airflow
You can adjust the volume of air delivery man
ually to suit your individual requirements.
Press the
IAUTOI button for automatic blower
regulat ion .
~/1 :J!/l~ I Adjusting the air distribution
You can direct the flow of air manually to se
lected outlets. The buttons can be operated
e ither separately or in combination . Press the
IAUTOI button for automat ic air distribution.
J Adjusting the seat heating
When you press the button, the seat heating
is switched on at level 3 (the highest level) .
The LEDs indicate the temperature level. To
reduce the temperature, press the button
again . T o switch off the seat heating, press
the button repeatedly unti l all the LEDs have
gone out.
The seat heating automatically switches from level 3 to level 2 after 10 minutes .
I@ F RON T! Switching the defroster on/off
The windscreen and s ide windows are defrost
ed or demisted as quickly as possible . The air
output is increased to maximum and most of
the air comes out of the outlets below the
windscreen . The air recirculation mode is de
activated. The temperature should be set to
+ 72
°F (22 °() or higher.
The defroster is switched off when the
I AUTO I
button is pressed .
Warm and cold 65
!iii! REAR ! Switching the rear window
heating on/off
The rear window heating operates only when
the engine is running and switches off auto
matically after about 10 minutes.
Synchronisat ion
By pressing and ho lding the IAU TO j button,
you can set the temperature of the front pas
senger's side to the temperature of the driv
er's side. The synchronisation is deactivated as
soon as the temperature on the front pas
senger's s ide is changed .
Air outlets
The thumbwhee ls can be used to open and
close the air outlets in the center and on ei
ther side of the dashboard and rear center
console . The lever in the center of the outlets
can be used to adjust the direction of air flow.
Changing the temperature units
The temperature display can be switched be
tween
° F and 0C. Press and hold the 1- ·1 but
ton ¢
fig. 72 and turn the rotary control on
the driver's s ide to+ for 3 seconds.
A WARNING
- Do not use the recirculation for extended
periods of time. The windows could fog
up since no fresh air can enter the vehi
cle. If the windows fog up, press the air
recir culation button again immediately
to switch off the air recirculation func
tion or se lect defrost .
- Individ uals w ith reduced sensitivity to
pain or temperature could develop burns
when using the seat heating function. To
red uce the risk of injury, these individu
als should not use seat heating .
(D Note
To avoid damage to the heating elements
in the seats, do not kneel on the seats or
place heavy loads on a small area of the
seat.
Page 71 of 258
M N M N
0 ::i co
rl I.O
"' ,....,
"' rl
@ Tips
-After starting a cold engine, there may
be a brief period of increased noise be
cause the oil pressure must first build up
i n the hydraulic valve adjusters . This is
norma l and not a cause for concern .
Switching engine off
Applies to vehicles: with conven ience key
• Bring your veh icle to a complete stop .
• Move the selecto r lever to the P or N posi
t ion.
• Press the
!S TA RT ENGINE S TO PI button
~ pag e 68, fig. 75.
Steering lock
The steering locks when you turn the engine
off us ing the
I START ENGIN E STOP I button
and ope n the dr iver 's door. The locked stee r
i n g helps preven t vehicle theft.
Emergenc y Off functi on
If necessary in an emergency, the engine can
be sw itched off while the vehicle is st ill mov
ing. Press the
I S TAR T ENG IN E ST OPI button
tw ice in quick succession or ho ld it in for lon
ger than two seconds .
_& WARNING
-Never t urn off the engine before the ve
h icle has come to a complete stop . The
full function of the brake booster and the power steering is not guaranteed. You
must use more force to turn or brake if
necessary . Because you cannot steer and
brake as you usually would, this could
lead to crashes and serious injur ies .
- For safety reasons, you should always
park your vehicle with the se lector lever
in P. Otherwise, the ve hicl e co uld inad
vertent ly roll away.
- The rad iator fan can continue to run for
up to 10 min utes even after you have
t urned off the eng ine and removed the
ignition key . The radiator fan can also
turn on again if the engine coolant heats
On th e road 69
up because of intense sunlight or heat
bui ld-up in the engine compartment.
- Always take the key with you whenever
you leave your vehicle. Otherwise, the
engine could be started or electrical
equipment such as the power windows
could be operated . This can lead to seri
ous injury.
(D Note
If the engine has been under heavy load
for an extended period, heat bu ilds up in
the eng ine compartment after the engi ne
i s sw itched off - there is a r isk of damag ing
the engine . A llow the engine to run at idle
for about two minutes before switching it
off .
Starting the engine after a malfunction
Applies to vehicles: wit h convenience key
If the remote control key battery is exhausted
or if radio interference or a system malfunc
tion o ccurs, extra steps may be necessary in
order to start the engine .
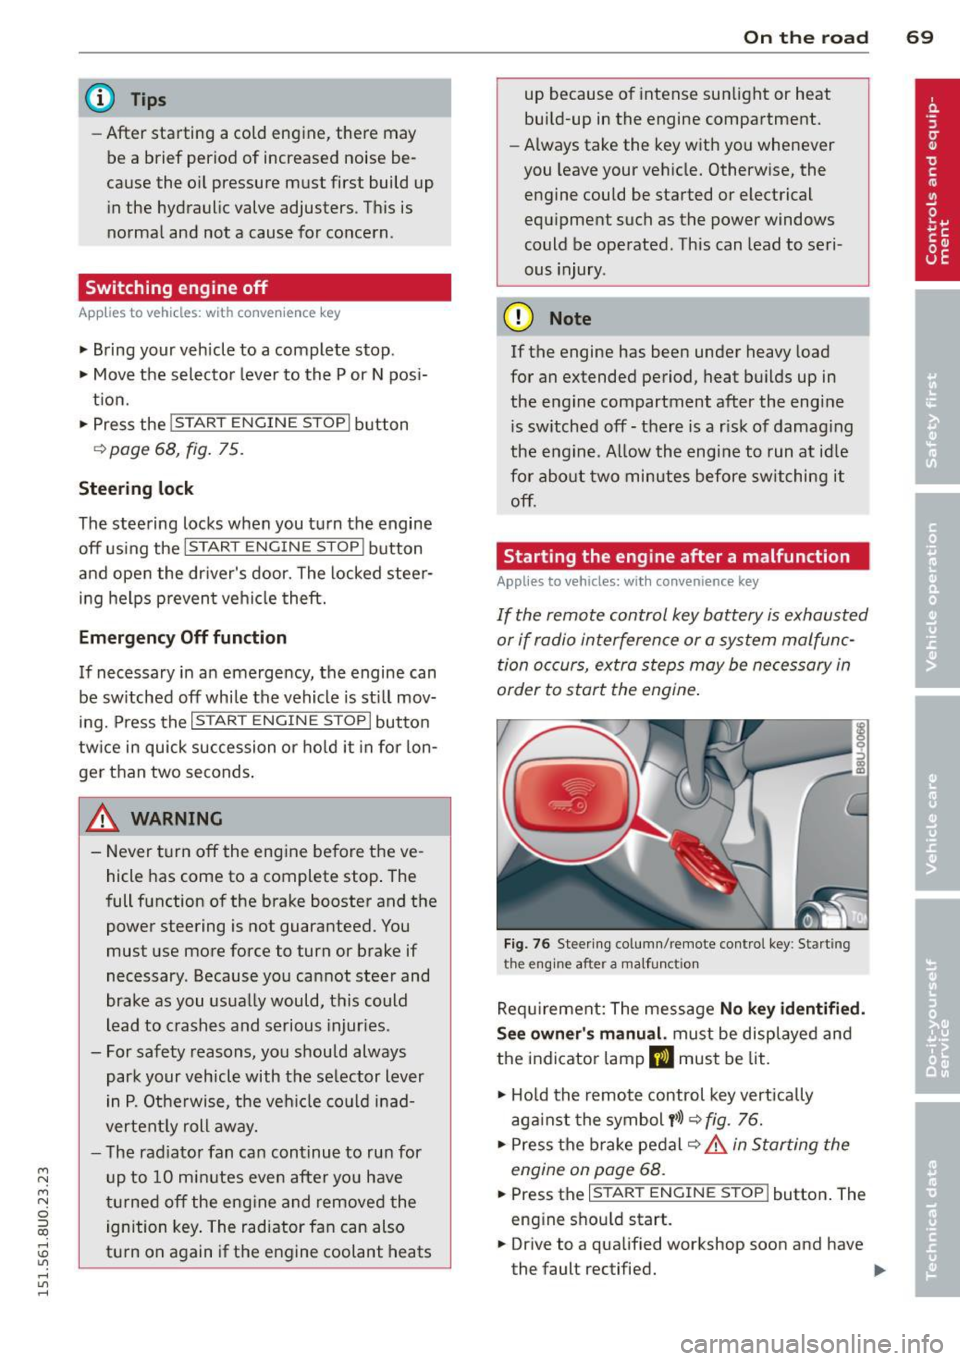
Fig. 76 Steer ing co lumn/remote contro l key : Start ing
t he en gi ne a fter a m alfu ncti on
Requ irement: The message No k ey identifi ed.
S ee owner' s manu al.
must be displayed and
the indicator lamp
m must be lit .
• Ho ld the remote control key vertically
aga inst the symbol
y >l) ~ fig . 76.
• Press the b rake pedal ~.&.
in Starting the
engin e on page 68 .
• Press the ~ I s =T -A -R =T ~ E= N~ G~IN ~ E-s=T -O ~ P~I button. The
eng ine shou ld start.
• Drive to a qualified workshop soon and h ave
the faul t rectified. .-