stop start AUDI Q3 2016 User Guide
[x] Cancel search | Manufacturer: AUDI, Model Year: 2016, Model line: Q3, Model: AUDI Q3 2016Pages: 252, PDF Size: 62.81 MB
Page 73 of 252
.... N
c:i ::J CX)
.... I.Cl U"I
N I.Cl ......
.. Drive to an authorized A udi dealer or author
ized Audi Service Facility immediately to have
the malfunction corrected.
@ Tips
You can view the message again by pressi ng
the
I START E NGINE STOP! button.
Driver messages
Turn off ignit ion. Battery di scharging
This message appears and a war ning tone sounds
if you open the driver's doo r whe n the ignition is
sw itched on.
Pr ess brake pedal to start engine
This message appears if you do not step on the
brake pedal to start the eng ine on a vehicle with
a n automatic transm ission .
Please engage Nor P.
This message appears when starting or stopping
the eng ine and Nor Pis not engaged. The engine
will not start/stop.
Ill Is key in the vehicle ?
The indicator light turns on and this message ap
pea rs if the conven ience key* was removed from
the veh icle when the eng ine was runn ing. If t he
conven ience key is no longer in the vehicle, you
cannot switch the ignition on or start the engine
once yo u stop it. Yo u also ca nnot lock the vehicle
from the outside.
Shift to P , vehicle can roll away . Doors can only
be locked in P.
This message appea rs fo r safe ty re asons a long
with a warn ing sound if the se lector lever is not
e ng aged in P a fter swi tching the ignition off.
Move the selector lever to the P positio n. Other
wise the vehicle is not protected from rolling and
it cannot be loc ked.
DJ No key identified . See owner's manual.
This message appears if the re is no convenience
key * in side the veh icle or if the system does not
r ecognize the key. The conve nience key may not
be re cognized, for examp le, i f it is cove red by an
D rivi ng
obje ct that disrupts the signa l (such as a br ie f
case), or if the key battery is wea k. E lectronic de
vices such as cell phones can a lso inte rfere with
the signal.
T o still be able to start or stop the engine, re fer
to
¢ page 70.
Electromechanical
parking brake
Operating
The electromechanical parking brake replaces
the hand brake.
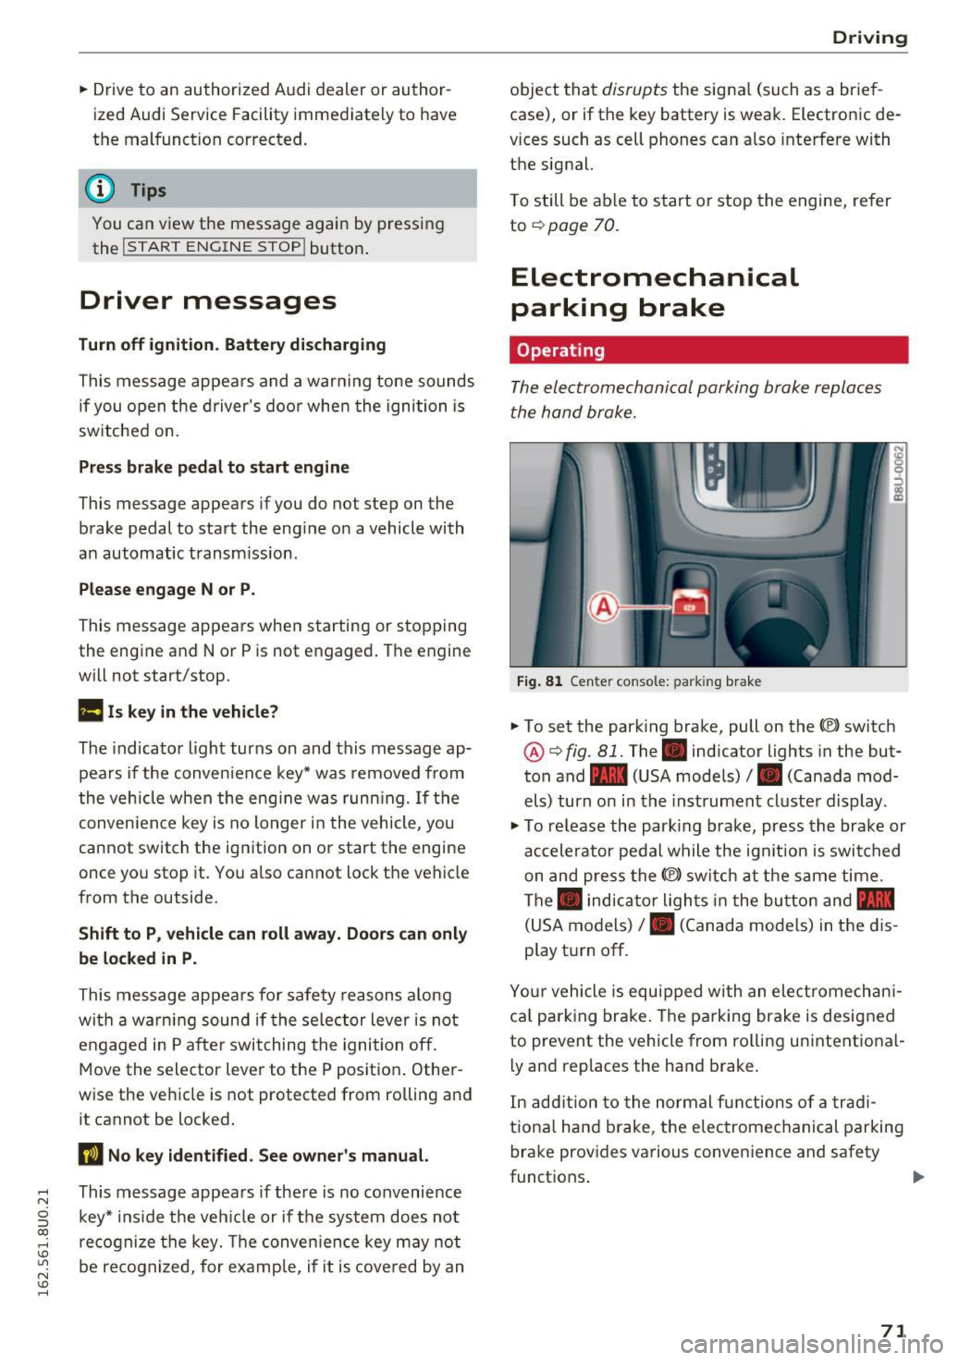
Fi g. 81 Center console: parking brake
.. To set the park ing brake, pull on the(®) switch
@¢ fig. 81. The . indicator lights in the but
ton and - (USA models)/ . (Canada mod
els) turn o n in the ins trument cluste r display.
.,. To re lease the park ing brake, press the brake or
ac celerator pedal w hile the ign it ion is switched
on and press the(®) switch at the s ame time.
The . indicator ligh ts in t he bu tton and -
(USA models)/ . (Canada mode ls) in the dis
play t urn off.
Yo ur vehicle is equipped with an elect romechan i
ca l p a rk ing brake . The pa rking brake is designed
to prevent the vehicle from ro lling un intent ional
ly and replaces the hand brake.
In add ition to the normal f unctions of a tra d i
t iona l h and b rake, t he elec tromec hanical parking
bra ke prov ides various conven ience and safety
functions .
71
Page 74 of 252
Driving
When start ing from a stop
- T he in tegr al hi ll sta rt as sis t helps y ou when
driving by automatically releasing the park ing
brake¢
page 72, Starting from a stop.
- When starting on incl ines, the hill start assist
prevents the vehicle from unintentionally roll
ing back . The braking force
of the parking brake
is only released if sufficient drive power has
been built up at the wheels.
Em erg enc y bra ke f unction
An emergency braking functions ens ures that the
vehicle can be s lowed down even if the
normal
brakes fail¢ page 73, Emergency braking
function.
,&. WARNING
- Do not press the accelerator pedal inadver
tently when the veh icle is stationary and the
engine is running and a gear is selected.
Otherwise t he vehicle w ill start to move im
med iate ly and could result in a c rash.
- If the power supply fa ils, the released park
ing bra ke can no longe r engage. In th is
case, pa rk the veh icle on leve l ground and
sec ure it by placing the selector lever in the
P position. See an author ized Audi dealer or
authorized Aud i Service Faci lity for assis
tance .
(D Tips
-If the parking b rake is set while the ignition
i s sw itched off, the. indicator light in the
b utton and -(USA models) /. (Cana
da models) will turn off after a certain
amount of time.
- Occasiona l noises when the parking brake is
set and re leased are normal and are not a
cause for concern.
- When the vehicle is parked, the parking
brake goes thro ugh a self-test cycle at reg u
l ar intervals. Any no ises assoc iated with this
are normal.
- If there is a power fa ilure, the parking brake
will not set if it is re leased, and it will not
release if it is set¢,&. See an authorized
72
-
Audi dealer or author ized Audi Service Fa
cility for assistance.
Parking
.. Press the brake pedal to stop the veh icle.
.. To set the park ing brake, pull on the© switch.
.. Select the P position .
.. Turn the engine off¢,& .
.. Turn the steering wheel when par king on in
cl ines so that the wheels w ill roll into the cu rb
if the vehicle starts moving.
,&. WARNING
- Always take the veh icle key with yo u when
leaving the vehicle, even for a short period
of time. This applies part icularly when chil
dren remain in the vehicle. Otherwise chil
dren could start the engine, release the
parking brake or operate electrical equip
ment such as power w indows, which in
creases the risk of an accident.
-
- No one should remain in the veh icle w hen it
is locked, especially ch ild ren. Locked doors
make it more difficult for emergency work
ers to get into the veh icle, wh ich puts lives
at risk.
Starting from a stop
The start assist function ensures that the park
ing broke is released automatically upon start
ing.
Stopping and setting the parking brake
.. To set the park ing brake, pull on the(®) switch.
Starting and automat ically r elea sing the
parking brake
.. When you press the acce lerator pedal, the
parking brake is automat ica lly re leased and
your vehicle beg ins to move .
When stopping at a traffic signa l or stopping in
c ity traff ic, the parking brake can be applied . The
vehicle does not have to be held with the brake pedal. The park ing brake elim inates the tendency
to c reep when a se lector lever position is engag-
ed. As soon as yo u press t he accelerator pedal,
1J1>
Page 75 of 252
the parking brake releases automatically and the
vehicle starts to move.
Starting on hills
When start ing on inclines, the hill start ass ist
prevents the vehicle from unintentionally roll ing
back. The braking force of the parking brake is
only released if sufficient drive power has been
bui lt up at the whee ls.
(D Tips
For safety reasons, the parking brake is re
leased automatically only when the driver's
safety belt is fastened and the driver's door is
locked.
Starting to drive with a trailer
To prevent rolling back unintentionally on an in
cline, do the following:
.. Keep pulling the<®> switch and press the acce l
erator pedal. The parking brake stays applied
and prevents the vehicle from ro lling backward.
.. You can re lease the<®> switch once you are sure
that you are transferring enough dr iving force
to the whee ls by pressing the accelerator pedal.
Depending on the weight of the rig (vehicle and
trailer) and the severity of the incline, you may
roll backwards as you start.
Hill hold
A ppl ies to vehicles: with H ill Hol d
Hill hold makes it easier to start on hills .
Requirement: The driver's door must be closed,
the seat belt must be buckled and the engine
must be running.
The system is activated when the brake pedal is
p ressed
for a few seconds.
To prevent the vehicle from roll ing back when
starting, the brake power is held for a brief mo
ment after releasing the brake pedal. During this
~ time, you can easi ly begin to move you r vehicle .
ci ::, co ,....,
A WARNING
- The intelligent technology of Hill Hold can
not overcome the limitat ions imposed by
natural physical laws. The increased comfort
offered by Hill Hold should not cause you to
take safety risks.
- Hill Hold cannot hold the vehicle in all hill
start situations (for example, if the g round
is slippery or icy).
- If you do not beg in moving immediately af
ter releasing the brake peda l, the vehicle
could begin to roll backward under certain
circumstances . Press the brake pedal or set
the parking brake immediately.
-If the engine "stalls", press the brake pedal
or set the parking bra ke immediate ly.
- To prevent the vehicle from roll ing back un
intentionally when starting in s top-and-go
traffic, keep the brake pedal pressed for a
few seconds before driving off .
(D Tips
You can find out if your vehicle is eq uipped
wi th Hill Hold by checking at an authorized
Audi dealer or authorized Audi Service Facili
ty.
Emergency braking function
This is used if the conventional brake system
fails or locks up.
.,. To brake your veh icle using the parking brake in
an emergency, pu ll the(®) switch and keep it
pulled.
.. The braking stops as soon as you release the<®>
switch or acce lerate .
If you pu ll the(®) switch and hold it above a
speed of about 5 mph (8 km/h) , the emergency
braking function is activated. The vehicle brakes
at all four whee ls by activating the braking hy
draulics. The brake performance is similar to
heavy brak ing .
c::> .&.
In order not to activate the emergency brake
function by mistake, a warning tone (buzzer)
sounds when the(®) switch is pulled. As soon as .,.
73
Page 76 of 252
Driving
the<®> switch is released, or the accelerator pedal is depressed, emergency braking stops.
A WARNING
Emergency braking should only be used in an
emergency, when the normal brake pedal has
failed or the brake pedal is obstructed. During
emergency braking, your vehicle will brake
similar to heavy braking . ESC and the associ·
ated components (ABS, ASR, EDL) cannot
overcome the laws of physics. In corners and
when road or weather conditions are bad, a
full brake application can cause the vehicle to
skid or the rear end to break away, which in
creases the risk of an accident.
Speed warning system
Introduction
Applies to vehicles: with speed warning system
The speed warning sy stem helps you to stay un
der a specified maximum speed.
The speed warning system warns you if you are
exceeding the maximum speed that you have set .
You will hear a warning tone when your speed ex
ceeds the stored value by approximately 3 mph
(3 km/h) . The indicator light
101 (USA models)/
llll (Canada models) and the Speed limit warn
ing exceeded.
message appear in the instrument
cluster display at the same time . T hP
(Cl / t•j in
dicator light turns off when the speed decreases
below the stored maximum speed.
Setting a threshold is recommended if you would
like to be reminded when you reach a certain
maximum speed. Situations where you may want
to do so include driving in a country with a gener
al speed limit or if there is a specified maximum
speed fo r winter tires.
@ Tips
Regardless of the speed warning system, you
should always monitor your speed using the
speedometer and make sure you are following
the legal speed limit.
74
Setting the threshold
Applies to vehicles: with speed warn ing system
You can set, change and delete the warning
threshold in the Infotainment system .
.. Select: !CAR ! function button> (Car) systems*
control but ton > Driver assist> Speed warning .
You can set any threshold between 20 mph
(30 km/h) and 150 mph (240 km/h). Settings
can each be adjusted in increments of S mph (10 km/h) .
Cruise control system
Switching on
Applies to vehicles: with cruise control system
The cruise control system makes it possible to
drive at a constant speed starting at 20 mph
(30kmlh).
0
f
~
0
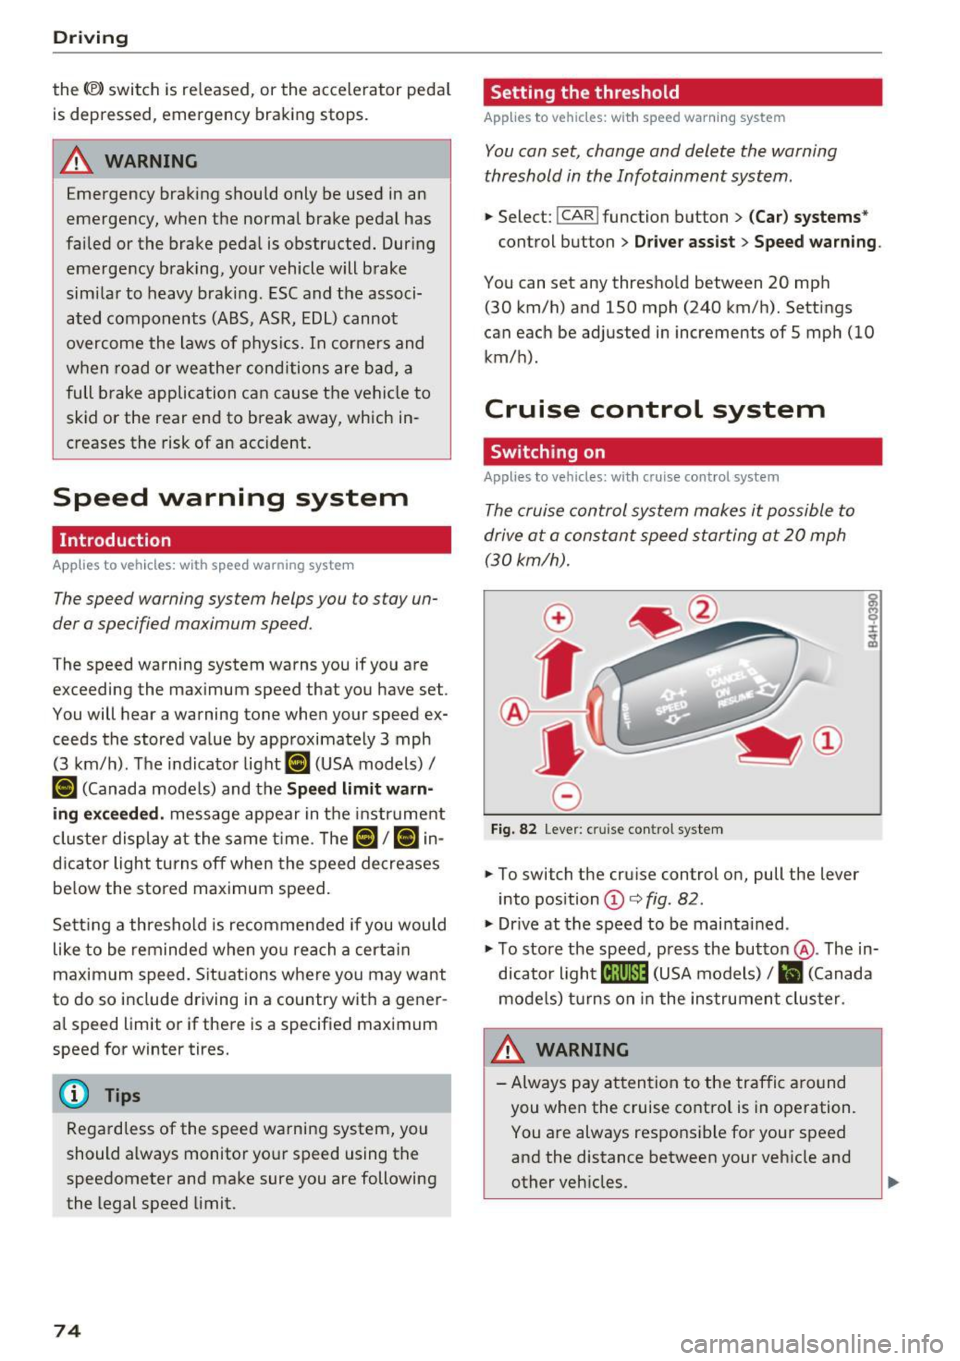
Fig. 82 Lever: cruise con trol system
.. To switch the cruise control on, pull the lever
into position
© c:> fig . 82 .
"'Drive at the speed to be maintained .
"' To store the speed, press the button @. The in
dicator light
[ij;(tj~i~ (USA models) / Bl (Canada
models) turns on in the instrument cluster .
&_ WARNING
-Always pay attention to the traffic around
you when the cruise control is in operation. You are always responsible for your speed
and the distance between your vehicle and
other vehicles .
.
Page 85 of 252
.... N
c:i ::J CX)
.... I.Cl U"I
N I.Cl ......
,&_ WARNING
Read and follow all WARNINGS¢ A in Driv
ing tips on page 84.
(D Note
Coasting downhill w ith the transm ission in N
and the engine not running will result in dam
age to the automatic transmission and possi
bly the catalytic converter.
@ Tips
- If you accidentally select N while driving,
take your foot off the accelerator pedal and
wait for the engine to slow down to idle be
fore selecting Dor S.
- If there is a power failure, the selector lever
will not move out of the P position. The
emergency release can be used if this hap
pens
¢ page 86.
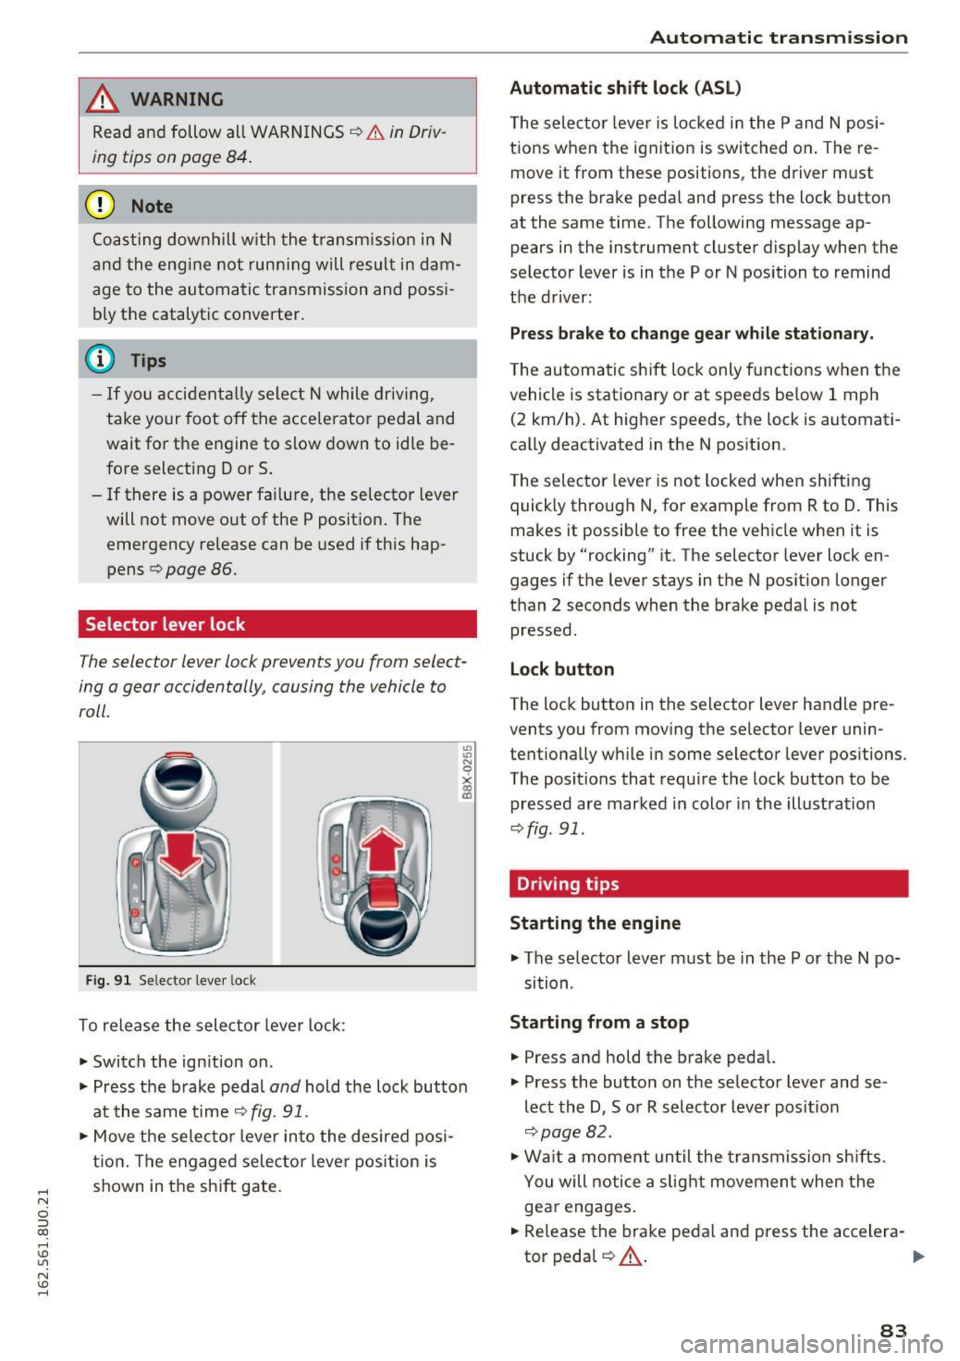
Selector lever lock
The selector lever lock prevents you from select
ing o gear occidentally, causing the vehicle to
roll.
Fig. 91 Selecto r lever loc k
To release the selector lever lock:
• Switch the ign ition on .
• Press the b rake peda l
and hold the lock button
at the same time ¢
fig. 91.
• Move the selector lever into the desired posi
tion. The engaged selecto r lever position is
shown in the shift gate .
-
Automatic transmission
Automatic shift lock (ASL)
The selec tor lever is locked in the P and N posi
tions when the ignit ion is switched on. The re
move it from these positions , the driver m ust
press the brake pedal and press the lock button
at the same time. The following message ap
pears in the instrument cluster display when the
selector lever is in the P or N position to remind
the driver:
Press brake to change gear while stationary.
The automatic shift lock only funct ions when the
vehicle is stat ionary o r at speeds be low 1 mph
(2 km/h). At higher speeds, the lock is automati
cally deactivated in the N position.
The selector lever is not locked when shifting
quick ly through N, for example from R to D. This
makes it possible to free the vehicle when it is
stuck by "rocking" it. The selector lever lock en
gages if the lever stays in the N position longer
than 2 seco nds when the brake pedal is not
pressed.
Lock button
The lock button in the selector lever handle pre
vents you from moving the selector lever unin
tentionally while in some selector lever positions.
The positions that require the lock button to be
pressed are marked in color in the illustration
¢fig . 91.
Driving tips
Starting the engine
• The se lector lever must be in the P or the N po
sit ion.
Starting from a stop
• Press and hold the brake pedal.
• Press the button on the selector lever and se
lect the D , Sor R selector lever posit ion
¢page 82.
• Wait a moment until the transmission shifts.
You will notice a slight movement when the
gear engages.
• Release the brake pedal and press the accelera-
tor pedal
QA - .,..
83
Page 86 of 252
Automatic transmissio n
Stopp ing temporarily
.,. Press the b rake peda l to stop the vehicle, fo r
example at a traffic light. Do not press the ac
ce lerator peda l when doing this.
... To prevent the vehicle from rolling when you
start driving, set the parking brake when stop
ping on steep inclines ¢
,&..
.,. The park ing brake w il l release automatically
and the vehicle will start moving once you press
the accelerator pedal.
Stopp ing /park ing
If the selector lever is not in the P posit ion when
you open the driver's door, the vehicle could roll.
The message
S hift to P and turn off ign it ion ,
otherwi se vehicle can roll awa y
appears.
.,. Press and hold the brake pedal
c> ,&. .
.,. Set the parking brake.
.,. To engage the P selector lever posit ion, press
the button on the selector lever and sh ift into
the P position
i:> page 82.
Stopp ing on an incline
.,. Always press the brake peda l to hold the vehi
cle in place and prevent it from "rolling back"
c> ,&. . Do not try to prevent the vehicle from
"ro lling back" when a gear is engaged by in
c reasing the eng ine speed
i:> 0.
Starting on a hill
.,. Set the parking brake.
.,. Se lect the D posit ion .
.,. Press t he accelerator pedal carefully . If you r
safety belt is fastened, the pa rking brake is au
tomat ica lly released a nd your ve hicle beg ins to
move .
Unde r ce rtain c ircumstances, such as driv ing in
the mountains, it may be usef ul to sw itch tempo
rarily to the manua l shift program in o rde r to ad
just the gea rs to the d riving conditions by hand
i:>page 85 .
On inclines, act ivate the park ing brake first and
then move the se lector lever to the P pos it ion
c>page 72. This prevents the lo cking mechanism
from being loaded too heav ily and w ill make i t
easier to move the se lec tor lever out of the P po
sition.
84
A WARNING
- The vehicle can also ro ll when the eng ine is
stopped.
- Unintended vehicle movement can cause se
rious injury.
- Never leave your veh icle with the engine
running while in gear. If you must leave
your veh icle w hen the engine is r unning, ac
tivate t he pa rking brake a nd move the selec
tor lever to P .
- Power is still transmitted to the wheels
when the engine is running at idle . To p re
vent the vehicle from "creeping", yo u m ust
keep your foo t on t he b rake when the en
g in e is ru nning and the selector lever is in D/
Sor R or "tiptronic" mode is se lected .
- Do not press the a cce le ra to r peda l when
changing the se lec to r l ever posi tion while
the vehicle is s ta tionary and the engine is
r u nning .
- Never sh ift into R or P whi le driving.
- Before d riving down a s teep sl ope, redu ce
your spee d and sh ift into a lower gea r w ith
"t i ptronic" .
- Do not ride the brakes or press the bra ke
pedal too of ten o r too long when dr iv ing
down a hi ll. Constant braking ca uses the
brakes to ove rheat and substantially re
duces brak ing performance, increases b rak
ing d istance or causes comp lete failure of
the brake system.
- To prevent the veh icle from rol ling back
when stopp ing on inclines, always hold it in
place with the brake peda l or park ing brake .
- Never hold the vehicle on an incline with a
slipping clutch. The clutch opens automati
cally when it becomes too hot from the
overload. An ind icator lam p. illumina tes
and a dr iver message appears¢
page 86
w hen t he clu tch is overloade d.
- If the e ngine must rema in running, never
have a ny driving posi tion engaged when
checking unde r th e hood. Make s ure these
lec to r l ever has secu rely eng aged an d is
loc ked in P with the parking b rake set
Page 87 of 252
.... N
c:i ::J CX)
.... I.Cl U"I
N I.Cl ......
c> page 177. Otherwise, any increase in en
gine speed may set the vehicle in motion,
even with the parking brake applied.
(D Note
- When stopping on an incline, do not try to
hold the vehicle in place by pressing the ac
celerator pedal whi le a driv ing gear is se
lected. This can cause the automatic trans
mission to overheat and can damage it . Set
the parking brake or press the brake pedal
to prevent the vehicle from ro lling.
- Allow ing the vehicle to roll when the eng ine
i s stopped and the selector lever is in
N po
s ition w ill damage the automatic transm is
s ion because i t is not lubricated under those
ci rc u ms tances.
- The transmiss ion can over heat and be dam
aged under certain driving and traffic co ndi
t ions s uch as frequent starts, creeping for a
l ong time, or stop -and -go traffic. When the
• indicator light turns on, stop the vehicle
at the next opportunity and let the trans
mission cool down
c> page 86.
@ Tips
For safety reasons, the parking brake is re
leased automatically only when the driver 's
safety belt is fastened and the dr iver 's door is
locked.
Hill descent control
Hill descent control assists the driver when dr iv
ing down hills.
Hill descent contro l is activated wh en th e se lec
tor lever is in the D or S position and you p ress
the b rake pedal. The transm ission automat ically
select s a gear that i s suitable for the incline . H ill
descent control tries to maintain the speed ach
ieved at the time of braking, within phys ical and
techn ical limitations . If may st ill be necessary to
adj ust the speed with the b rake pedal.
Hill descent control switches off once the hill lev
e ls out or you press the accelerator pedal.
Aut oma tic tr ansm iss ion
A WARNING
-Hill descent control cannot overcome physical
limitat io ns, so it may not be able to ma intain
a constant speed under all conditions . Always
be ready to app ly the brakes .
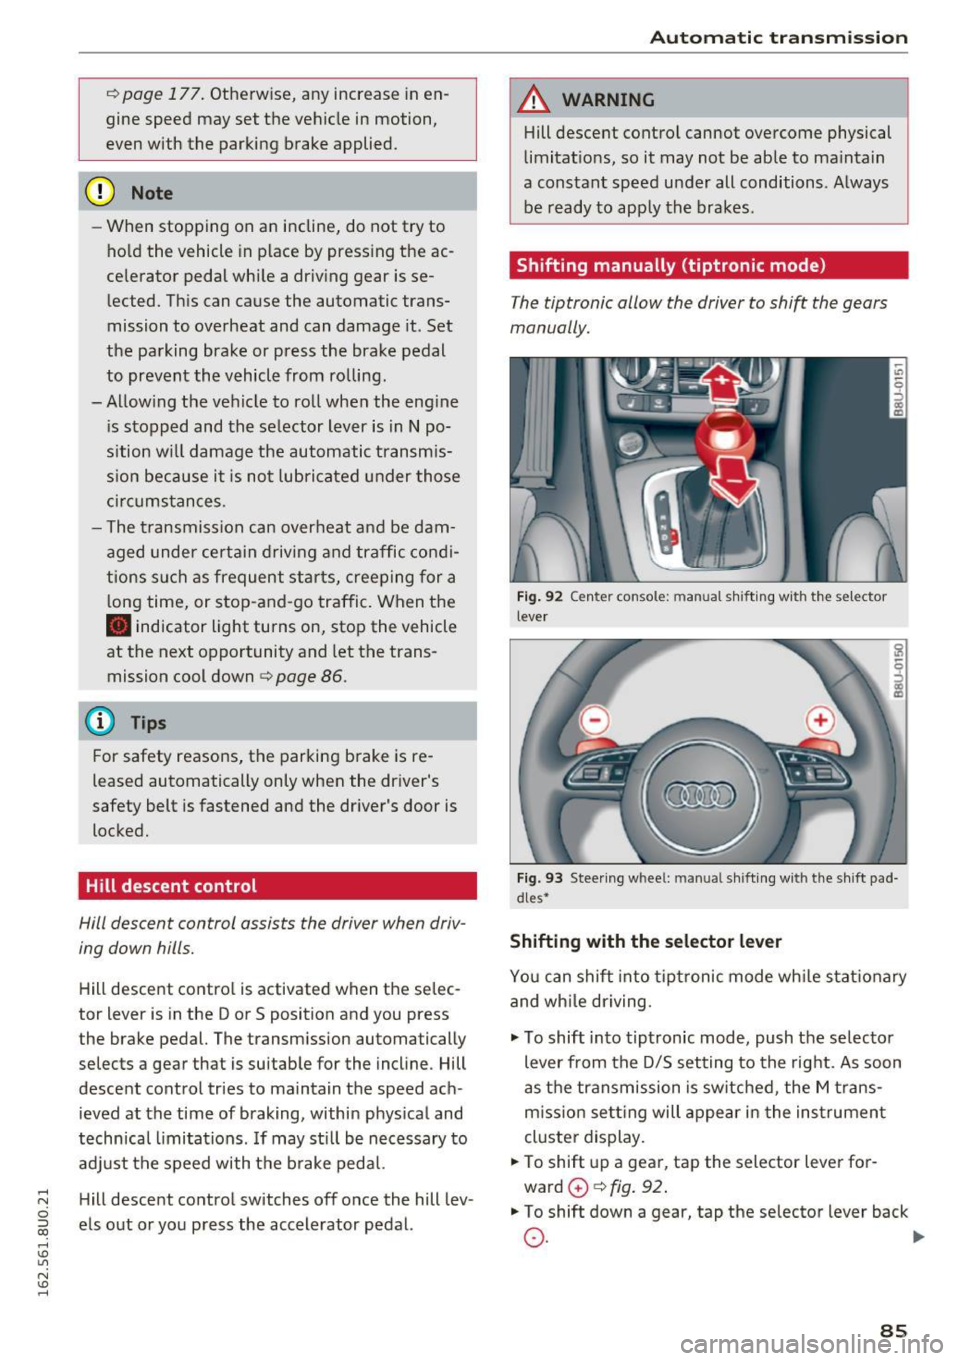
Shifting manually (tiptronic mode)
The tiptronic allow the driver to shi~ the gears
manually.
F ig. 92 Cente r con so le: m anu al shi ft ing w ith t he sel ect or
leve r
Fig . 93 Stee ring w hee l: manual s hift ing w ith the shi ft pad
d les•
Shifting with the selector lever
You can shift into tip tronic mode wh ile stat iona ry
and wh ile driving.
"' To shift into tiptronic mode, push the selecto r
lever from the D/S setting to the right. As soon
as the transmission is switched , the M trans
m iss ion se tting will appear in the ins trument
cluste r display.
"' To shift up a gea r, tap the selector lever for
ward
0 c> fig . 92 .
"'To shift down a gea r, tap the se lector lever back
0 . ~
85
Page 95 of 252
•Backup and align yo ur vehicle so the b lue area
@ borders on the rear end of the vehicle be
hind you or on the parking space line
¢ A in
General information on page
91, c> (D in Gen
eral information on page
91. The blue area rep
resents an extension of the veh icle's outline by
approximately 16
ft. (5 meters) to the rear . T he
long side of the blue area shou ld be on the
cu rb. The entire b lue area must fit in to the
parking space.
• Wi th the veh icle stopped, tu rn the steer ing
whee l to the right as far as it wi ll go.
• Back up into the parking spot. As soon as the
blue curve
c> fig. 106 is near the c urb c> A in
General information on page
91, c> (D in Gen
eral information on page
91. Stop the vehicle.
• With the veh icle stopped, turn the steer ing
wheel to the left as far as it will go .
• Cont inue to back i nto the pa rking space unt il
the vehi cle is par ked pa rallel to the curb
c> A
in General information on page 91, c> (D in
General information on page
91. @ marks the
rea r bumper. Stop the vehicle, at the latest,
when the red orientation line@ borders an ob
ject. Keep an eye on the front of your vehicle whi le doing this.
Par king ne xt to obstacle s
If th ere is an obstacle (such as a wall) next to the
pa rking space, position the vehicle so there is
more space on that side . Position the long side of
the blue s urface so that there is sufficient space
from the obstacle. The surface must not be
touching . Yo u will also need to start tur ning the
steer ing whee l earlier . The blue curve
c> fig. 106
must not touch the obstacle and should have suf
fic ient room.
(D Note
Keep enoug h distance from the curb to avoid
damage to the rims .
(D Tips
The left or right or ie ntation lines and surfaces
w ill be displayed, depending on the turn sig-
na l being used. Parking
sy
stem s
Adjusting the display
and the warning tones
App lies to vehicles : wit h parking syste m plus with rearview
came ra
The display and warning tones can be adjusted in
the Infotainment.
• Select: the I CAR ! funct ion button > (Car) sys
tems *
control b utton > Dr iver assist > Par king
aid .
Display
On* -An optical display is shown for the parking
system p lus, a rearview camera image is shown
for parking system p lus with rearview camera*.
Off -When t he pa rking system is sw itched off,
on ly aud ible signals are g iven.
Warning tones
Front volume -Volume for the front area
Rear volume -Volume for the rear area
Front frequency -Frequency for the front area
Rear frequency -Frequency for the rear a rea
Entertainment volum e -When the parking sys
tem is turned o n, the vo lume of the audio/v ideo
source is lowered .
The newly ad justed va lue is given br iefly from the
cor respond ing s ignal generator .
(D Tips
- The warn ing tones can also be adjusted di
rectly from the visual d isplay or the rearview
came ra image* . S imply press the
Settings
cont rol but ton .
- Changed settings are activated w hen the
park ing system is sw itched on again.
- The settings are automatically stored and
assigned to the remote control key that is in
use.
Error messages
Applies to vehicles: wit h parking system pl us with rearview
ca mera
The re is an error in the system if the LED in the
Pw .A button is blinking and you hear a cont in uo us ll>
93
Page 168 of 252
Trailer mod e
Weight d istribution
Towing a loaded trailer with an empty car res ults
in a high ly unstable distribution of weight . If this
cannot be avoided, drive at very low speeds on ly
to avoid the risk of losing steering control.
A "balanced" rig is easie r to operate and con trol.
This means that the tow vehicle should be loaded
to the extent possible and permissible, while
keeping the trai le r as light as possib le under the
circumstances. Whenever possible, transfer
some cargo to the luggage compartment of the
tow vehicle while observ ing tongue load requ ire
ments and vehicle loading considerat ions.
Spee d
The higher the speed, the more difficult it be
comes for the driver to contro l the rig. Do not
drive at the maximum permiss ible speed. Reduce
your speed even more if load, weather or w ind
conditions are unfavorable - part icularly when
goi ng downhill.
Reduce veh icle speed
immediatel y if the tra iler
shows the slightest sign of swaying .
Do not try
to stop the sway ing by acc ele rating .
Observe speed lim its. In some areas, speeds for
veh icles towing trailers are lower than for regular
ve hicles.
A lways app ly brakes early. When driving down
h ill, shift into a lower gear to use the engine
braking effect to slow the veh icle. Use of the
brakes alone can cause them to overheat and fail.
Coolant temp era ture
The coolant temperature gauge¢ page 10 must
be observed carefully. If the needle moves close
to the upper end of the scale, reduce speed im mediately and/or turn off the air conditioner.
If the coo lant temperature warning light in the
instr ument cluster starts flashing., pull off
the road, stop and let the engine
idle for about
two minutes to prevent heat bu ild-up.
A WARNING
Anyone not proper ly restrained in a moving
vehicle is at a much greater risk in an acci-
166
-
dent . Never let anyone ride in your car who is
not properly wear ing the restraints provided
by Audi.
Trailer mode notes
Important to know
You r vehicle handles differently when towing a
trailer because o f th e additiona l weight and dif
ferent weight distribution. Safety, performance
and economy will g reatly depend on how carefu l
l y you load your trai ler and operate your rig.
Before yo u actually tow your trailer, pract ice
turning, stopping and backing up in an area away
from traffic . Keep practicing unti l you have be
come complete ly familiar w ith the way your vehi
cle-tra iler combination behaves and responds.
Backing up is difficult and requires practice .
Backing up with a trailer genera lly requires steer
ing action opposite to that when backing up your
vehicle without a trailer.
Maintain a greater distance between your vehicle
and the one in fro nt of you . You will need more
room to stop. To compensate for the trailer, you
will need a larger than normal turning radius.
When passing, remember that you cannot accel erate as fast as you normally wo uld beca use of
the added load. Make sure you have enough room
to pass. After passing, allow p lenty of room for
your trailer before changing lanes again.
Avoid jerky starts, sharp turns or rapid lane
changes.
@ Tips
- Do not tow a trailer du ring the break-in peri
od of your vehicle.
- If you tow a trai le r, your Au di may requi re
more frequent maintenance due to the ex
t ra load ¢
page 232.
Page 169 of 252
Parking on a slope
Do not pork on a slope with a trailer. If it cannot
be avoided, do so only ofter doing the following:
When parking:
.. Apply the foot brake .
.. Have someone place chocks under both the ve
hicle and the trailer wheels .
.. With chocks in place, slowly release the brakes
until the wheel chocks absorb the load .
.. Turn the wheels towards the curb .
.. Apply the parking brake .
.. Move the selector lever to P.
When restarting after parking:
.. Apply the foot brake .
.. Start the engine .
.. Move the selecto r lever to D/S .
.,. Release the parking brake and slowly pull out
and away from the wheel chocks .
.. Stop and have someone retrieve the wheel
chocks.
(D Tips
If you move the selector lever of the automat
ic transmission to P before applying the park
ing brake and before blocking the wheels, you
may have to use more force later to move the
lever out of the P position.
Trailer mode
167