ECU AUDI Q3 2016 Owner's Guide
[x] Cancel search | Manufacturer: AUDI, Model Year: 2016, Model line: Q3, Model: AUDI Q3 2016Pages: 252, PDF Size: 62.81 MB
Page 166 of 252
Trailer mod e
Trailer mode
Driving with a trailer
General information
Your Audi was designed primarily for passenger
transportation.
If you plan to tow a trailer, please remember that
the additional load will affect durability, economy and performance.
Trailer towing not only places more stress on the
vehicle, it also calls for more concentration from
the driver.
F or this reason, always follow the operating and
driving instructions provided and use common
sense.
Technical requirements
Tr aile r hitch
Use a weight-carrying hitch conforming to the
gross trailer weight. The hitch must be suitable
for your veh icle and trailer and must be mounted
securely on the vehicle's chassis at a technically
sound
location . Use only a trailer hitch with a re
movable ball mount . Always check w ith the t rail
er hitch man ufact urer to make su re that you are
using the co rrect hitch .
Do not use a bump er hit ch .
The hitch must be installed in such a way that it
does not interfere with the impact -absorbing
bumper system. No mod ificat ions should be
made to the vehicle exhaust and brake systems .
From t ime to t ime, check that a ll hitch mount ing
bolts rema in securely fastened.
When you are not tow ing a tra iler, remove the
tra iler hitch ba ll mount . This prevents the hitch
from caus ing damage shou ld your veh icle be
s truck from be hind ¢
,&..
Trailer brakes
If your trailer is equipped with a brak ing system,
check to be sure that it conforms to all regula
tions .
164
The trailer hydraulic brake system must not be
directly connected to the vehicle's hydraulic
brake system ¢&. .
Safety chains
Always use safety chains between you r vehicle
and the trailer.
Trailer lights
Traile r lights must meet all regulations . Be sure
to check w ith your author ized Audi dealer for cor
r ec t wiring , switches, and relays.
M irrors
If you are unable to see the traffic behind you us
ing the regular outs ide mirrors, then you
must in
stall extended mirrors . It is important that you
always have clear vision to the rear.
.&_ WARNING
- If a tra ile r has e lectr ica l brakes p lease no te
t hat these brakes are not activated by the
factory-fit ted contro l unit -risk of accident!
- After removing the trai ler hitch, do not
store it in your vehicle. In case of sudden
braking, the hitch co uld fly forward and in
jure you or yo ur passengers.
- Never install a "we ight distribu ting" or
"load eq ualizing" trailer hitch on your vehi
cle. The vehicle was not designed for these
kinds of trailer hitches. The hitch attach ment can fail, caus ing the tra iler to tear
loose from the vehicle.
- The Gross Vehicle Weight Rating for your
veh icle, found on the safety compliance la
be l on the driver's s ide B-pillar, must never
be exceeded under any circumstances . Ex
ceed ing the Gross Vehicle Weight Rat ing of
your veh icle is likely to damage yo ur vehicle,
and such damage will not be covered by
your Limited New Vehicle Warranty . Exceed
ing the Gross Vehicle Weight Rating will al
so change the performance and handling
characteristics of your vehicle, which could
cause a crash result ing in serious injury or
death.
Page 167 of 252
Operating instructions
6" r-2
~·~
1/2"
1·1/2"
ill
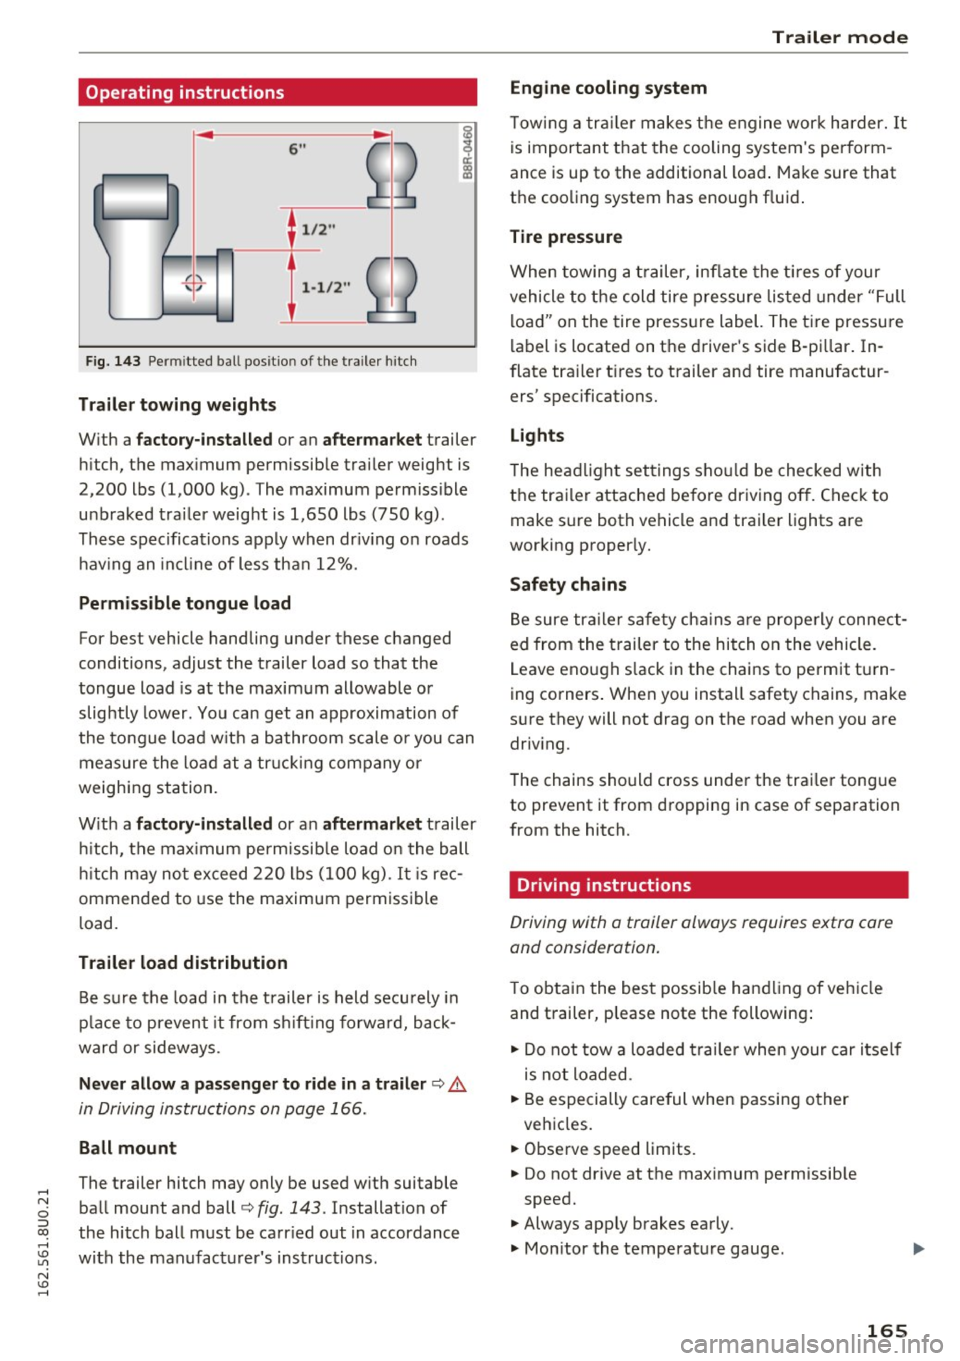
Fig. 143 Permitted ball pos ition of the trailer hitch
Trailer towing weights
With a
factory-installed or an aftermarket trailer
hitch, the maximum permissib le trailer weight is
2,200 lbs (1,000 kg). The maximum permiss ible
unbraked trailer weight is 1,650 lbs (750 kg).
These specifications apply when dr iv ing on roads
h av ing an incl ine of less than 12%.
Permissible tongue load
For best vehicle handling under these changed
conditions, adjust the trailer load so that the
tongue load is at the maximum allowable or
slightly lower. You can get an approximation of
the tongue load w ith a bathroom scale o r you can
measure the load at a trucking company or
weighing station.
With a
factory-installed or an aftermarket trailer
hit ch, the maximum permissib le load on the ball
hitch may not exceed 220 lbs (100 kg).
It is rec
ommended to use the maximum permissible
l oad.
Trailer load distribution Be sure the load in the trailer is held securely in
place to prevent it from s hiftin g forward, back
ward or sideways.
Never allow a passenger to ride in a trailer ¢.&.
in Driving instructions on page 166.
Ball mount
The trailer hitch may only be used w ith suitable
ball mount and ball¢
fig. 143. Installation of
the hitch ball must be carr ied out in accordance
with the manufacturer's instructions.
Trailer mode
Engine cooling system
To wing a trailer makes the engine work harder. It
is important that the cooling system's perform
ance is up to the additional load . Make sure that
the cooling system has enough fluid .
Tire pressure
When towing a trailer, inflate the tires of your
vehicle to th e cold tire pressure lis ted under "Full
load" on the tire pressure label. The tire pressu re
label is located on the driver's side B-pi llar . In
flate trailer t ires to trailer and tire manufactur
ers' specifications.
Lights
T he headlight settings shou ld be checked with
the trai ler attached before driving off. Check to
make s ure both vehicle and trailer lights are
working properly.
Safety chains
Be sure trailer safety chains are properly connect
ed from the trailer to the hitch on the vehicle.
Leave enough s lack in the chains to permit turn
ing corners . When you install safety chains, make
sure they will not drag on the road when you are
driv ing.
The chains should cross under the trai ler tongue
to prevent it from dropping in case of separation
from the hitch.
Driving instructions
Driving with o trailer always requires extra core
and consideration .
To obtain the best possib le handling of vehicle
and trailer, p lease note the following:
.. Do not tow a loaded trailer when your car itself
is not loaded.
.. Be especially care ful when passing other
vehicles .
.. Observe speed limits.
.. Do not drive at the maximum permissib le
speed.
.. Always apply brakes early.
.. Mon itor the temperature gauge .
165
Page 179 of 252
.... N
c:i ::J CX)
.... I.Cl U"I
N I.Cl ......
Checking and Filling Hood
Opening the hood
The hood is released from the interior.
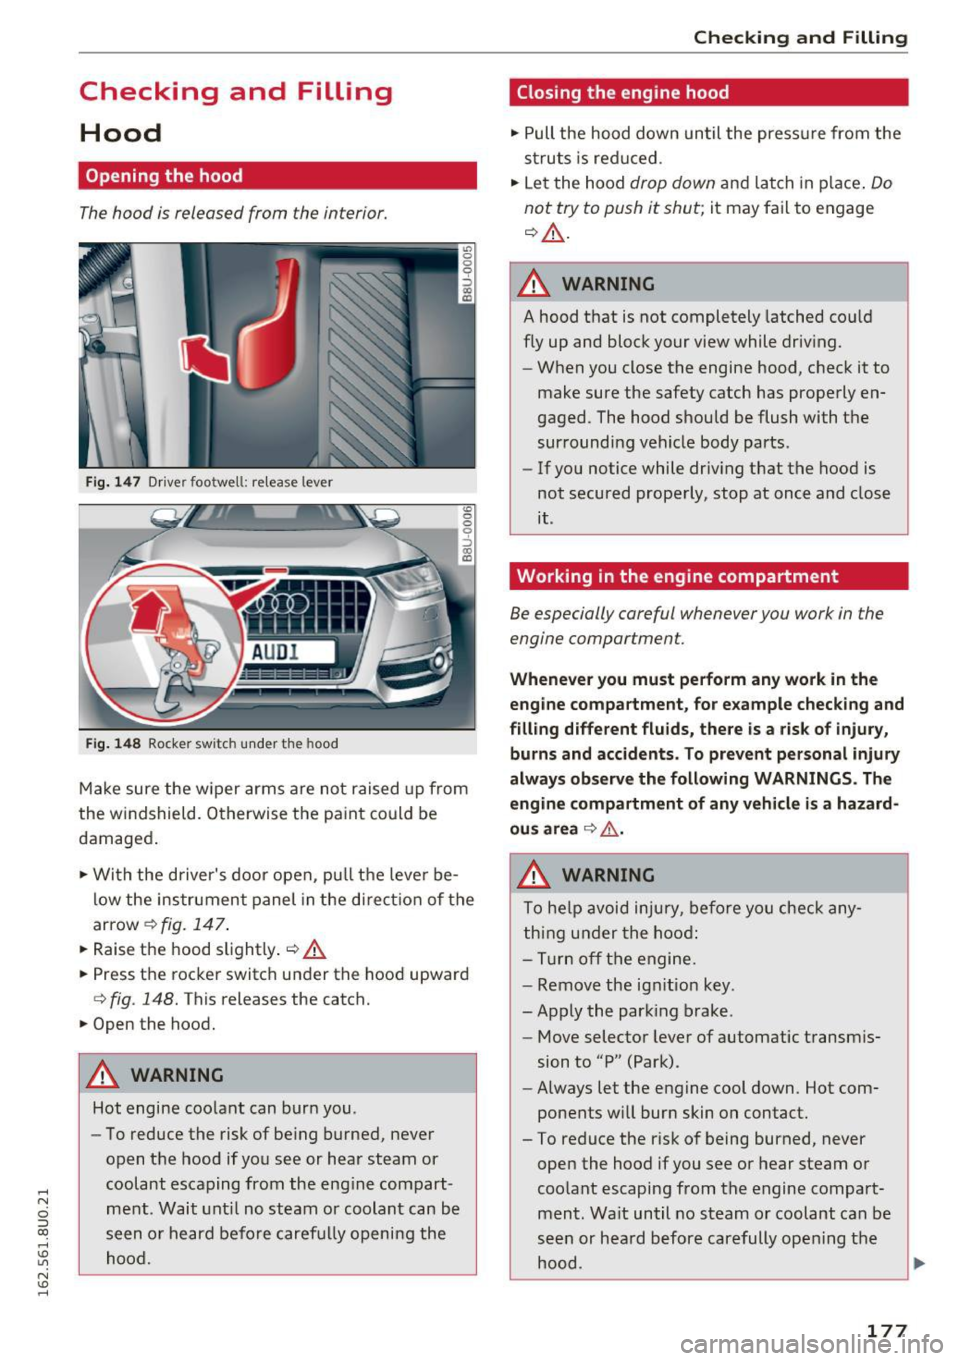
Fig. 147 Driver footwell: release lever
Fig. 14 8 Rocke r switch under t he hood
<0 0 0
0
::,
"' CD
Make sure the w iper arms are not raised up from
the w indshield. O therwise the paint coul d be
damaged .
.,. Wi th the d river's doo r open, p ull th e leve r be
l ow the ins trument panel in the direct io n of the
arrow¢
fig. 1 47.
.,. Raise the hood s lightly . q &.
.,. Press t he roc ker switc h under the hood upward
Q fig. 148. This releases the catch.
.,. Open the hood.
A WARNING
Hot engine coolant can burn you.
- To reduce the risk of be ing burned, never
open t he hood if you see or hear steam or
coolant escaping from the eng ine compart
me nt. Wait unt il no steam or coolant can be
seen o r he ard before caref ully opening the
hood.
Checking and Filling
Closing the engine hood
., Pull the hood down until the press ure from the
s tr uts is red uced .
.,. Le t the hood
drop down and lat ch in p lace . Do
not try to push it shut;
it may fail to engage
q &_ .
A WARNING
A hood that is not completely latched co uld
fly up and block your view while driv ing.
- When you close the engine hood, check it to
make sure the safety catch has prope rly en
gaged. The hood should be flush with th e
sur rounding veh icle body parts.
- If you notice while driv ing that the hood is
not secured prope rly, stop at once and close
it .
Working in the engine compartment
Be especially careful whenever you work in the
engine compartment.
-
Whenever you must pe rform any work in the
eng ine compartment , for e xample check ing and
filling diff erent fluids, there is a ris k of injury,
burns and accidents. To prevent personal injury
always ob serv e the following WARNINGS . Th e
engine compartment of any veh icle is a hazard
ou s area
q .&. .
A WARNING
To he lp avoid injury, before yo u check any
t hing under the hoo d:
- Turn off the engi ne .
- Remove the ign ition key.
- Apply the park ing brake .
- Move selector lever of automatic transmis-
sion to "P" (Park).
- Always let the engine cool down. Hot com
ponents w ill bur n skin on contact.
-
-To reduce the risk of being burned, never
open the hood if you see or hear steam or
coo lant escaping from the engine compart
ment. Wa it until no steam o r coolant can be
seen or hea rd before carefully opening the
hood.
177
Page 183 of 252
.... N
c:i ::J CX)
.... I.Cl U"I
N I.Cl ......
-If yo u have the impression your engine con
sumes excessive amounts of oil, we recom
mend that you consu lt an autho rized Aud i
dealer to have the cause of your concern
properly d iagnosed . Keep in mind that the
accurate measurement of oil consumption
r equ ires great care and may take some
time . An authorized Audi dea ler has instruc
tions about how to measure oil consump
tion a ccura tely .
Checking the engine oil level
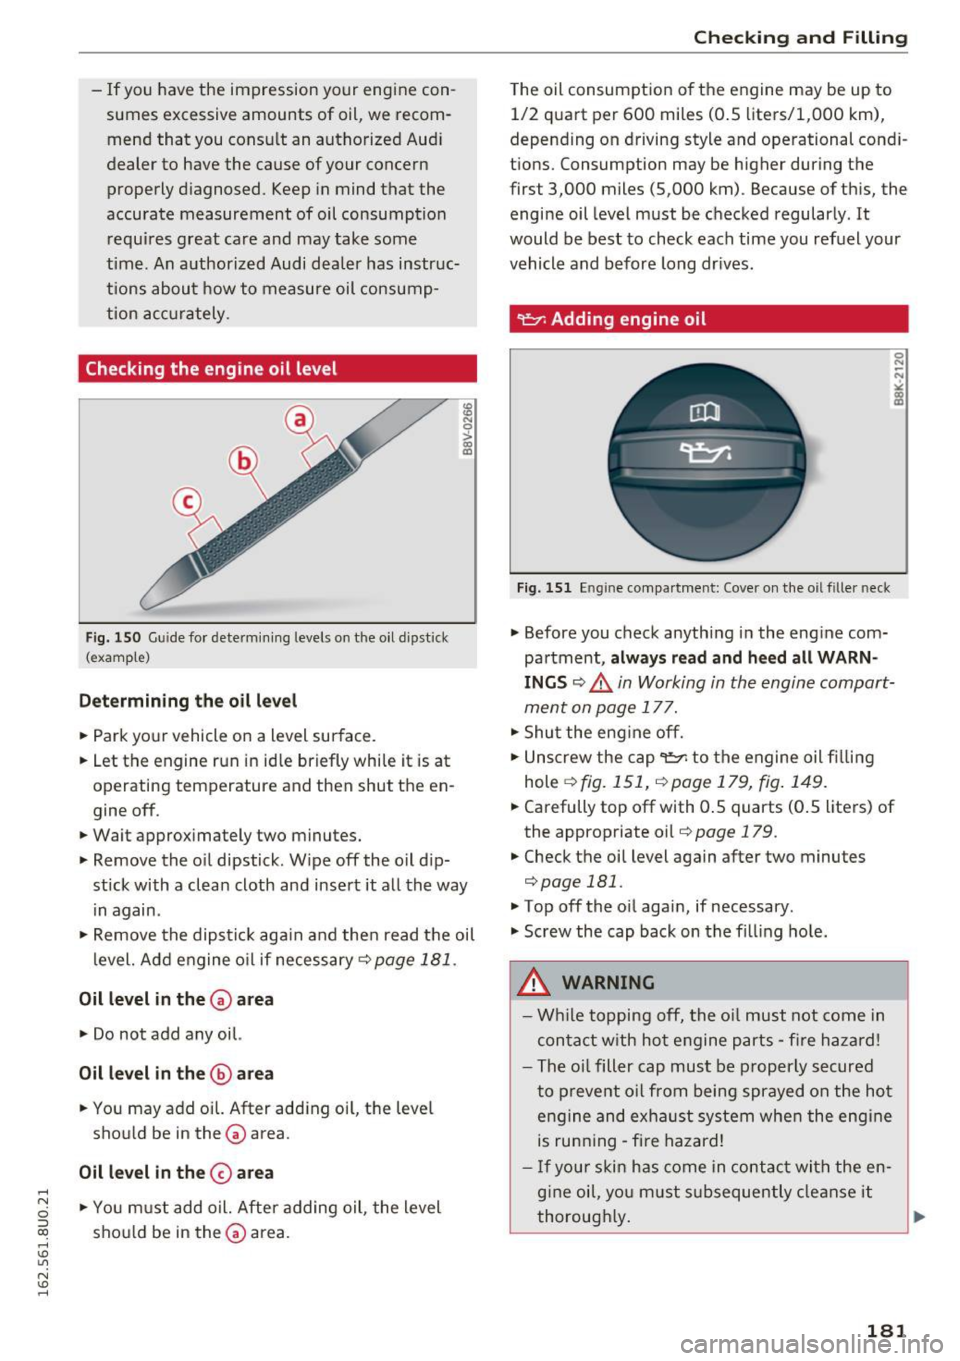
Fig . 1 50 G uide fo r d ete rm ini ng le v e ls on t he o il d ips tic k
(exam ple)
Det ermining the oil level
.,. Park yo ur veh icle on a level su rface .
.. Let the engine run in id le briefly while it is at
operating t emperature and then shut the en
gine off .
.. Wait approx imately two minutes.
.. Remove the o il dipstick . W ipe off the oil d ip
stick with a clean cloth and insert it all the way
in again .
.,. Remove the dipstic k aga in a nd then read the oil
level. Add e ngine o il if necessary
r=;, page 181.
Oil level in the~ area
.. Do not add any oil.
Oil level in the @ area
.. You may add o il. After add ing oi l, the leve l
sho uld be in the
G) area.
Oil l evel in the@ area
.,. Yo u m ust add o il. After adding oil , the level
should be in the
G) area.
Checking and Filling
T he oil consumpt ion of the engine may be up to
1/2 quart per 600 miles (0 .5 liters/1,000 km),
depending on driving style and ope rational cond i
tions. Consumption may be higher during the
first 3,000 miles (5,000 km) . Because of th is, the
engine oil level must be checked regularly . It
would be best to check each time you refuel your
vehicle and before long dr ives.
~ Adding engine oil
Fi g. 15 1 En g in e co mpa rtm ent: Cove r on the oil f iller nec k
.. Before you check anything in the eng ine com
partment,
always read and heed all WARN
INGS ¢ &. in Working in the engine compart
ment on page 177 .
.,. Shu t the eng ine off .
.,. Unscrew the cap~ to the engine oil fi lling
hole
r=;, fig. 151, r=;,page 179, fig . 149 .
.. Carefully top off with 0 . 5 quarts (0 .5 liters) of
the appropriate oil¢
page 179 .
.. Check the oi l level again after two minutes
¢page 181.
.. Top off the o il aga in, if necessary .
.,. Screw the cap back on the fi lling ho le .
_& WARNING
- W hile topping off, the o il must not come in
con ta ct with hot e ngine parts - fi re hazard!
- The oi l filler cap must be p rop erly secured
to p revent o il from being sprayed on the hot
engine and exha ust system whe n the eng ine
is ru nning -fi re haz ard!
- If you r skin has come in contac t wit h the en
g in e oil, yo u m ust s ubsequently clea nse i t
thoroug hly.
~
181
Page 213 of 252
.... N
c:i ::J CX)
.... I.Cl U"I
N I.Cl ......
Emergency assistance
General information
.. Park the vehicle as far as poss ible from moving
traffic in the event of a flat tire. In the event of
a flat tire, park the vehicle on a level surface. It
you are on a steep incline, be especially careful.
.. Set the parking brake .
.. Switch the emergency flashe rs on .
.. Put on a reflective vest, if available .
.. Set up the warn ing triang le, if available .
.. Have the passengers exi t the veh icle. They
sho uld move to a safe place, for example be
hind a guard rail.
_& WARNING
Pay attention to the steps above . They are for
your protection and the for the safety of other drivers.
_& WARNING
Improper use of the vehicle jack can cause se
rious personal injuries.
- Never use the screw driver hex head to
t ighten whee l bolts, since the bolts cannot
attain the necessary tighten ing torque if you
use the hex head, potentially causing an ac
c ident.
- The factory-supplied jack is intended only
for your vehicle model. Under no circum
stances should it be used to lift heavy
vehicles o r other loads; yo u ris k inju ring
yo urself.
- Never start the engine when the vehicle is
ra ised, which could cause a n accident.
- Support the veh icle secure ly with app ropr i
a te s tan ds if wor k is to be performed under
neath t he vehicle; otherwise, the re is a po
tent ial ris k for i njur y.
- Never use the jack s upplied with yo ur Audi
on another vehicle, pa rtic ularly o n a heav ie r
one. The jack is only suitable for u se on the
vehicle it came wit h.
Emergen cy a ssis tanc e
Vehicle tool kit
Fig. 161 Lu ggage compa rtment: cargo floor cover fo lded
u pwa rd
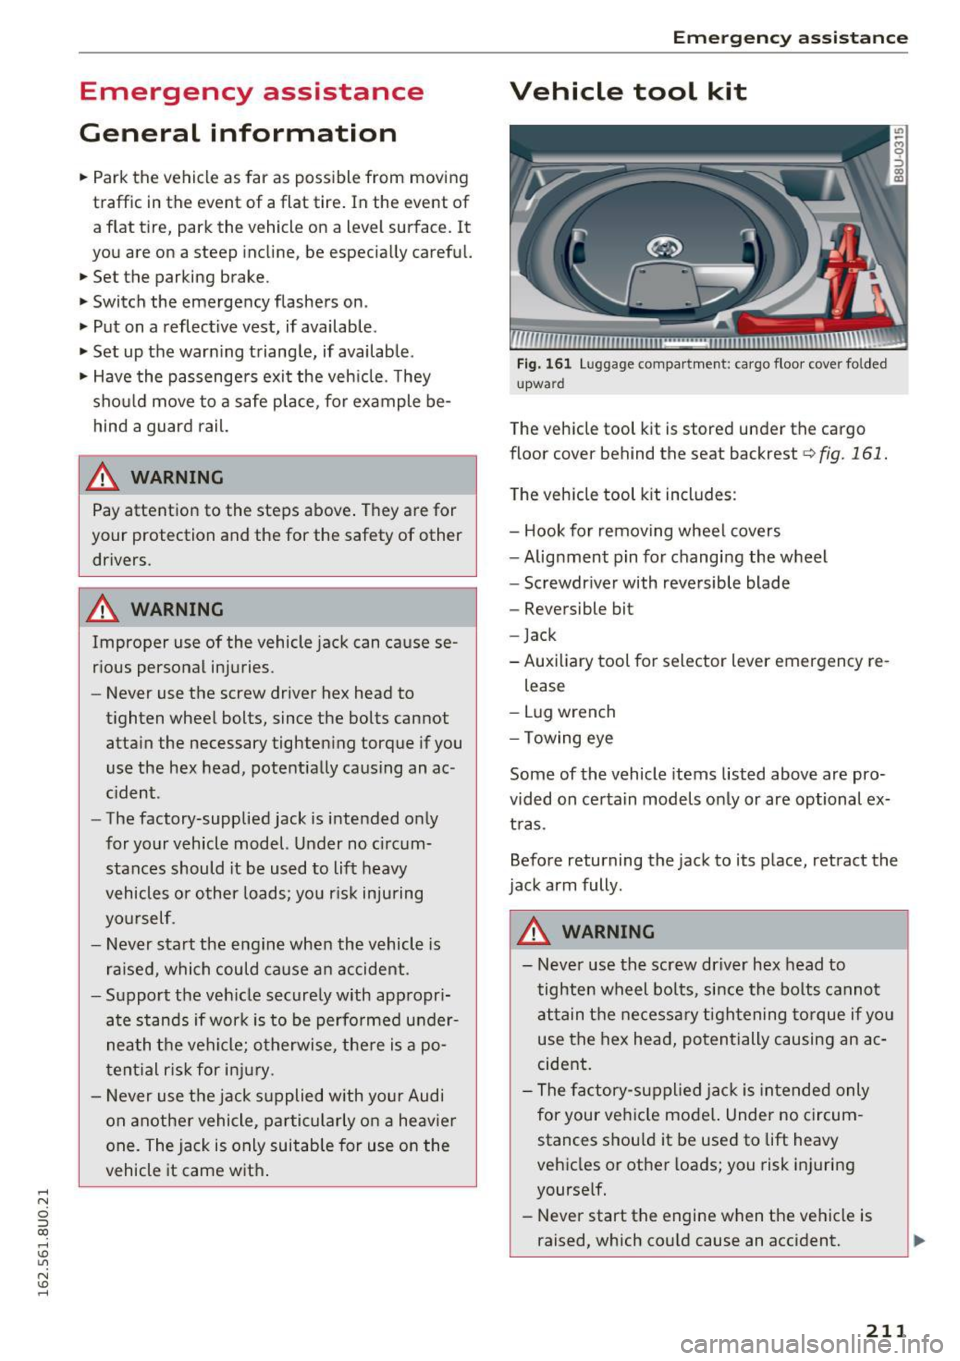
The vehicle tool kit is stored under the cargo
floor cover behind the seat backrest
q fig. 161.
The veh icle tool k it includes :
- Hook for remov ing wheel covers
- Alig nment pin for changing the w heel
- Screwdr iver with reversible blade
- Reversible bit
- Jack
- Auxiliary tool for selector lever emergency re -
lease
- Lug wrench
- Towing eye
Some of the vehicle items listed above are pro
vided on certa in models on ly or are optional ex
t ras.
Befo re returning the jack to its place, retract the
jack arm fully .
_& WARNING
---= -
-Never use the screw driver hex head to
tighten wheel bo lts, since the bolts cannot
at tain t he necess ary tightening to rque if yo u
use the hex head, po ten tially causing an ac
cident.
- T he factory-su pplied jac k is in tended only
for your ve hicle mode l. Under no circum
stances shou ld it be used to lift heavy
ve hicles or othe r loads; you risk injuring
yourse lf .
- Never start the engine when the ve hicle is
raised, which cou ld cause an accident .
211
Page 214 of 252
Emergency assistance
-Support the vehicle securely with appropri
ate stands if work is to be performed under
neath the vehicle; otherwise, there is a po
tential risk for injury .
(D Tips
The vehicle jack* in your vehicle is mainte
nance-free.
Folding chocks
Applies to veh icles: with folding chocks
The folding chocks ore part of the on board tool
kit.
---
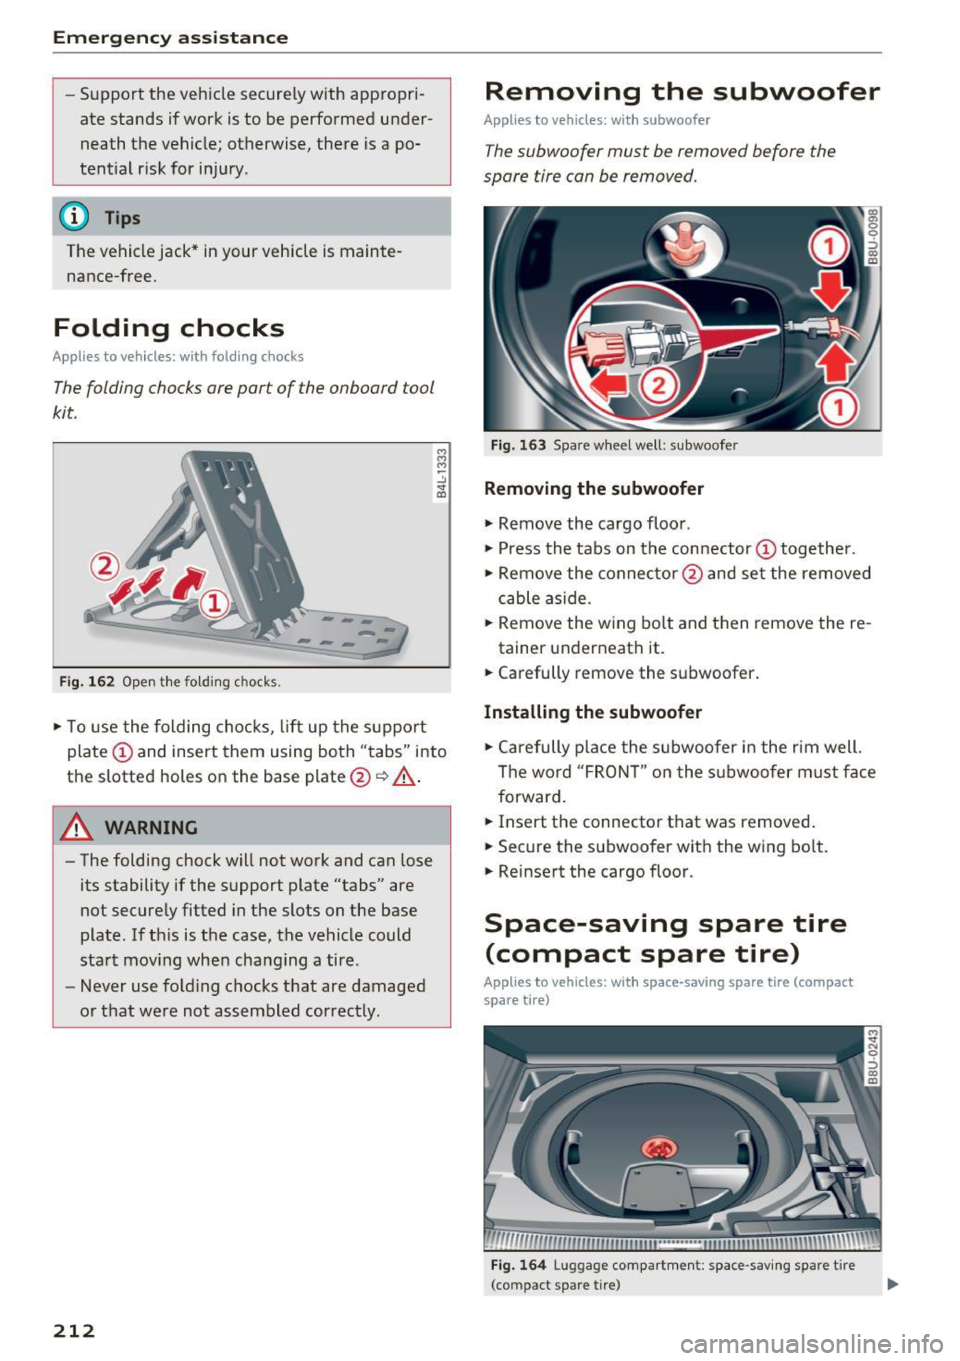
Fig. 162 Open the folding c hocks.
• To use the folding chocks, lift up the support
plate (!) and insert them using both "tabs" into
the slotted holes on the base plate@¢.&_ .
8_ WARNING
-The folding chock will not work and can lose
its stability if the support plate "tabs" are
not securely fitted in the slots on the base
plate. If th is is the case, the vehicle could
start moving when changing a tire.
- Never use fold ing chocks that are damaged
or that were not assembled correctly.
212
Removing the subwoofer
Appl ies to vehicles: with subwoofer
The subwoofer must be removed before the
spare tire can be removed.
Fig. 163 Spare wheel well: subwoofe r
Removing the subwoofer
• Remove the cargo floor .
• Press the tabs on the connector(!) together.
• Remove the connector @and set the removed
cable aside .
• Remove the wing bolt and then remove the re-
tainer underneath it.
• Carefully remove the subwoofer.
Installing the subwoofer
• Carefully place the subwoofer in the rim well.
The word "FRON T" on the subwoofer must face
forward.
• Insert the connector that was removed.
• Secure the subwoofer with the wing bolt.
• Reinsert the cargo floor .
Space-saving spare tire
(compact spare tire)
Applies to vehicles: with space-saving spare tire (compact
spare tire)
Fig. 164 Luggage compartment: space -sav ing spare t ire
(compact spare tire)
Page 218 of 252
Emerg ency assis ta nce
Raising the vehicle
The vehicle must be li~ed with the jack first be
fore the wheel can be removed .
Fig. 168 Sill panels : mark in gs
Fig. 169 Sill : pos itio nin g th e ve hicle jack
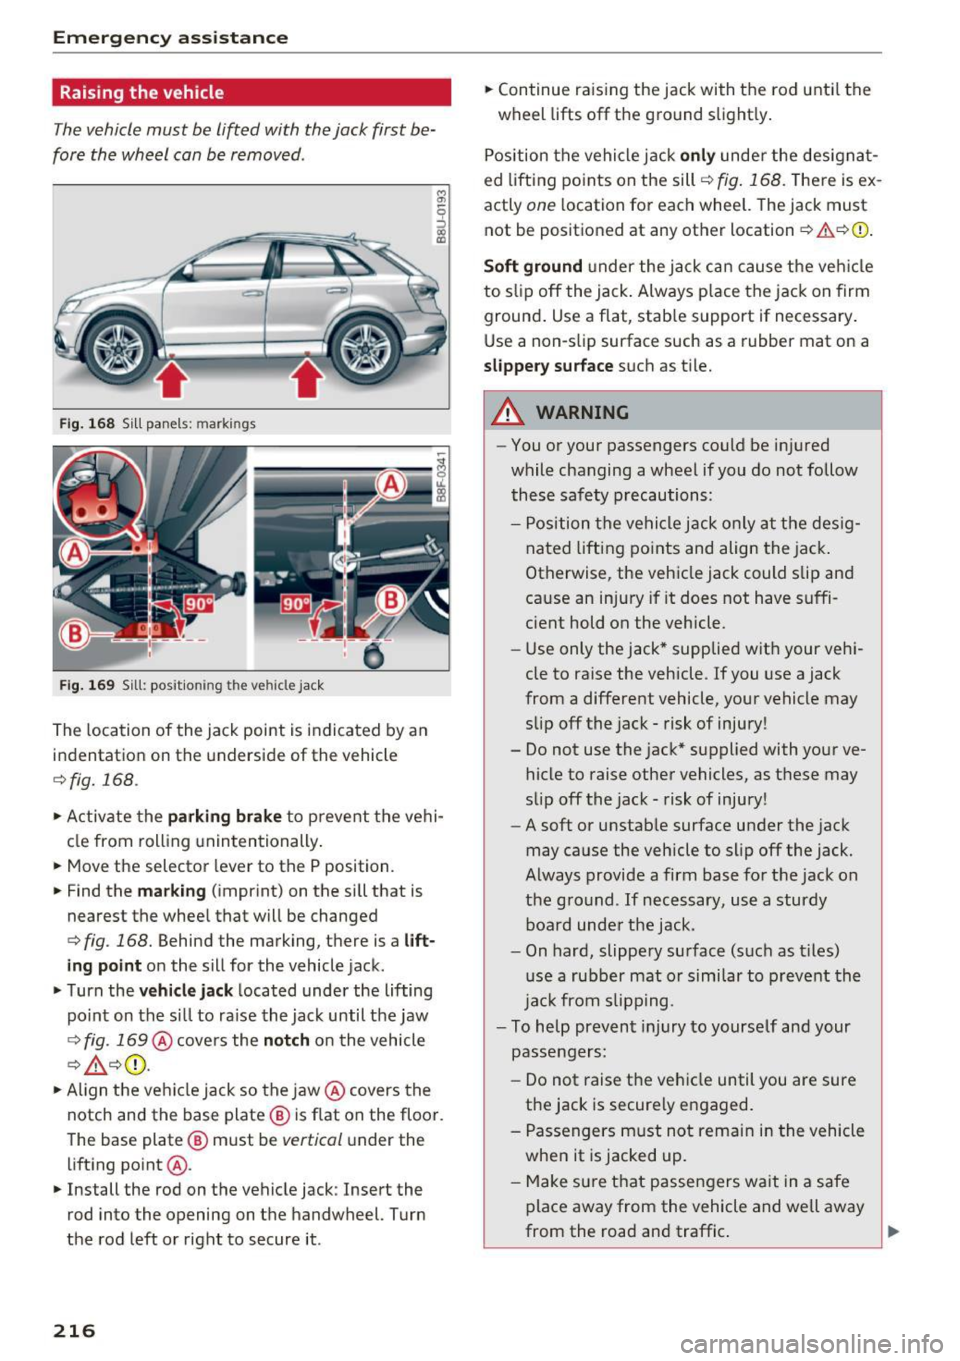
The location of the jack point is indicated by an
indentation on the underside of the vehicle
¢ fig. 168 .
,.. Activate the parking brake to prevent the vehi
cle from rolling unintentionally .
,.. Move the selector lever to the P position.
,.. Find the
m arki ng (imprint) on the sill that is
nearest the wheel that will be changed
c> fig . 168. Behind the marking, there is a li ft
i ng po int
on the sill for the vehicle jack.
,.. Turn the
veh icl e jack located under the lifting
point on the s ill to ra ise the jack until the jaw
c> fig . 169 @cove rs the no tch on the vehicle
c> ,&. ¢0.
,.. Align the vehicle jack so the jaw @covers the
notch and the base plate @ is flat on the floor .
The base plate @ must be
vertical under the
lifting point @.
,.. Install the rod on the vehicle jack : Insert the
rod into the opening on the handwheel. Turn
the rod left or right to secure it .
216
,.. Continue raising the jack with the rod until the
wheel lifts off the ground slight ly.
Position the vehicle jack
only under the designat
ed lifting points on the sill
c> fig. 168. T here is ex
actly
one l ocation fo r each wheel. The jack must
not be positioned at any other location
c> ,1. ¢(D .
So ft gr ound under the jack can cause the ve hicle
to slip off the jack . Always p lace the jack on firm
ground. Use a flat, stab le support if necessary .
Use a non-slip surface such as a rubber mat on a
s lipp ery s urface such as tile.
A WARNING -
-You or your passengers could be injured
while changing a wheel if you do not follow
these safety precautions:
- Position the vehicle jack only at the des ig
nated lifting points and align the jack .
Otherwise, the vehicle jack could slip and
cause an injury if it does not have suffi
cient hold on the vehicle.
- Use only the jack* supplied w ith your veh i
cle to raise the vehicle . If you use a jack
from a different vehicle, your vehicle may
slip off the jack - risk of injury!
- Do not use the jack* supplied with your ve
hicle to raise other vehicles, as these may
slip off the jack - risk of injury!
- A soft or unstab le surface under the jack
may cause the vehicle to slip off the jack.
Always provide a firm base for the jack on
the gro und .
If necessary, use a sturdy
board unde r the jack.
- On hard, slippery surface (such as t iles)
use a rubber mat or similar to prevent the
jac k from slipp ing .
- To help prevent injury to yourself and your
passengers:
- Do not raise the vehicle until you are sure
the jack is securely engaged.
- Passengers must not rema in in the vehicle
when it is jacked up.
- Make sure that passengers wait in a safe
place away from the vehicle and well away
from the road and traffic . .,_
Page 220 of 252
Emergency assistance
- The wheel bolts should be clean and easy to
turn. Check for di rt and cor ros ion on the
mating s urfaces o f both the whee l an d the
h ub. Remove all dirt from t hese surfaces be
fo re remo unt ing t he wheel.
Tires with unidirectional tread design
Tires with unidirectional tread design must be
mounted with their tread pattern pointed in the
right direction.
Using a spare tire with a tread pattern intended for use in a specific direction
W hen us ing a spare ti re with a tread patte rn in
tended for use in a specific d irection, please note
the following:
- The direct ion o f rotat ion is marked by an
arrow
on the s ide of the t ire .
-If the spare tire has to be installed in the incor
rect d irection, use the spare tire only tempora
rily s ince the tire w ill not be ab le to achieve its
optimum pe rformance c haracter istics with re
gard to aq uaplaning, noise and wear .
- We recommend that you pay particular atten
tion to this fact during wet weathe r and that
yo u ad just yo ur speed to match road condi
t ions.
- Replace t he flat t ire with a new one and have it
i ns ta lled on yo ur vehicle as soon as possible to
r esto re t he handling advantages of a unidi re c
t ion al ti re.
Notes on wheel changing
Please read the info rm ation ¢ page 198, New
tires or wheels
i f you are goin g to use a s pare tire
which is d ifferent from the tires on yo ur vehicle.
Afte r you change a tire:
-Check the tire pressure on the spare immedi
ately after installation .
- Have the wheel bolt tightening torque
checked with a torque wrench as soon as pos
sible by your authorized Audi dealer or quali
fied workshop .
218
-With steel and alloy wheel rims, the wheel
bolts are cor rectly tightened at a torque of
105 ft lbs. (140 Nm).
- If you notice that the wheel bolts are corroded
and difficult to turn while changing a tire,
they should be replaced before you check the
t ightening torque.
- Replace the flat tire with a new one and have
it installed on your vehicle as soon as poss i
ble. Remount the wheel cover.
Until then , drive with extra care and at reduced
speeds.
A WARNING
- If you are going to equip yo ur vehicle with
tires or r ims which diffe r from those which
we re facto ry insta lled, the n be su re to read
t he informa tion ¢
page 198, New tires or
wheels.
-Always make sure the damag ed wheel or
eve n a flat tire and t he jack and tool kit ar e
prope rly se cured in t he lu ggage comp art
me nt an d ar e no t loose in the passenge r
compa rtment.
- In an accide nt or sudde n maneuver they
co uld fly forw ard, i njuring an yon e in t he ve
h icle.
- Always s to re d amaged w hee l, jack a nd to ols
secure ly i n t he lug gage co m pa rtm ent. O th
erwise, in an a cci den t or sudden maneuve r
they cou ld fly forwar d, causing injury to pas
senge rs in the ve hicle.
(D Note
D o no t use co mm ercia lly availabl e tire se al
a nts . Ot herwise, t he e lectr ic al components of
the tire p ress ure monitor ing system * will no
l onge r wor k properly and t he sensor for t he
tire pressure monitoring system * w ill have to
be replaced by qualifie d wo rks hop.
-
Page 227 of 252
.... N
c:i ::J CX)
.... I.Cl U"I
N I.Cl ......
-The battery cell lock ing screws must be
t ightened secure ly.
- Befo re yo u check anything in the en gine
compartment, a lways read and heed a ll
WARNINGS
¢ page 177.
(D Note
Imp ro per hook -u p of jum pe r cables can r uin
the gene rato r.
-Always con nect POSIT NE
(+ ) to POSITI VE
(+ ), and NEGATIVE( -) to NEGATIVE( -)
ground post of the battery manager contro l
u nit .
- Check that all sc rew p lugs on the batter y
ce lls are screwed in firmly . If not, t ighten
pl ugs prior to connecting clamp on negative
batte ry te rminal.
- Please note t hat the procedure fo r con nect
i ng a jumper cab le as desc ribed above ap
p lies specif ica lly to the case of yo ur vehicle
being jump start ed. Wh en you are giv ing a
ju mp sta rt to anothe r vehicle, do
not con
n ec t t he neg ative (-) ca b le to the negative
( -) t ermina l on the disch arged b attery @
¢
fig. 175. In ste ad , secure ly connec t the
negative( -) ca b le to either a solid me tal
com ponent th at is f irm ly bolted to the e n
gine block o r to t he engine block i tsel f. If
the battery that is be ing c ha rged does not
vent to the outs ide, escap ing batte ry ga s
could ignite and exp lode!
Towing with a tow truck
General hints
Your Audi requires s pecial handling for towing .
The following informa tion is to be used by com
mercia l tow tr uck operators who know how to op
e ra te the ir equip men t safely.
- Ne ver tow your Audi, towing will cause dam
age to the engine and transmission .
- Never wrap the safety chains or winch cables
around the brake lines.
- To prevent unnecessary damage, your Audi
must be transported with a flat bed truck .
Emergency situations
-To load the vehicle on to the flat bed , use the
towing loop found in the vehicle tools and at
tach to the front or rear anchorage
¢ page 225 and ¢ page 226.
A WARNING
A veh icle being towed is not safe for passen
ge rs. Neve r allow a nyo ne to ride in a vehicle
b eing towed, for any reason .
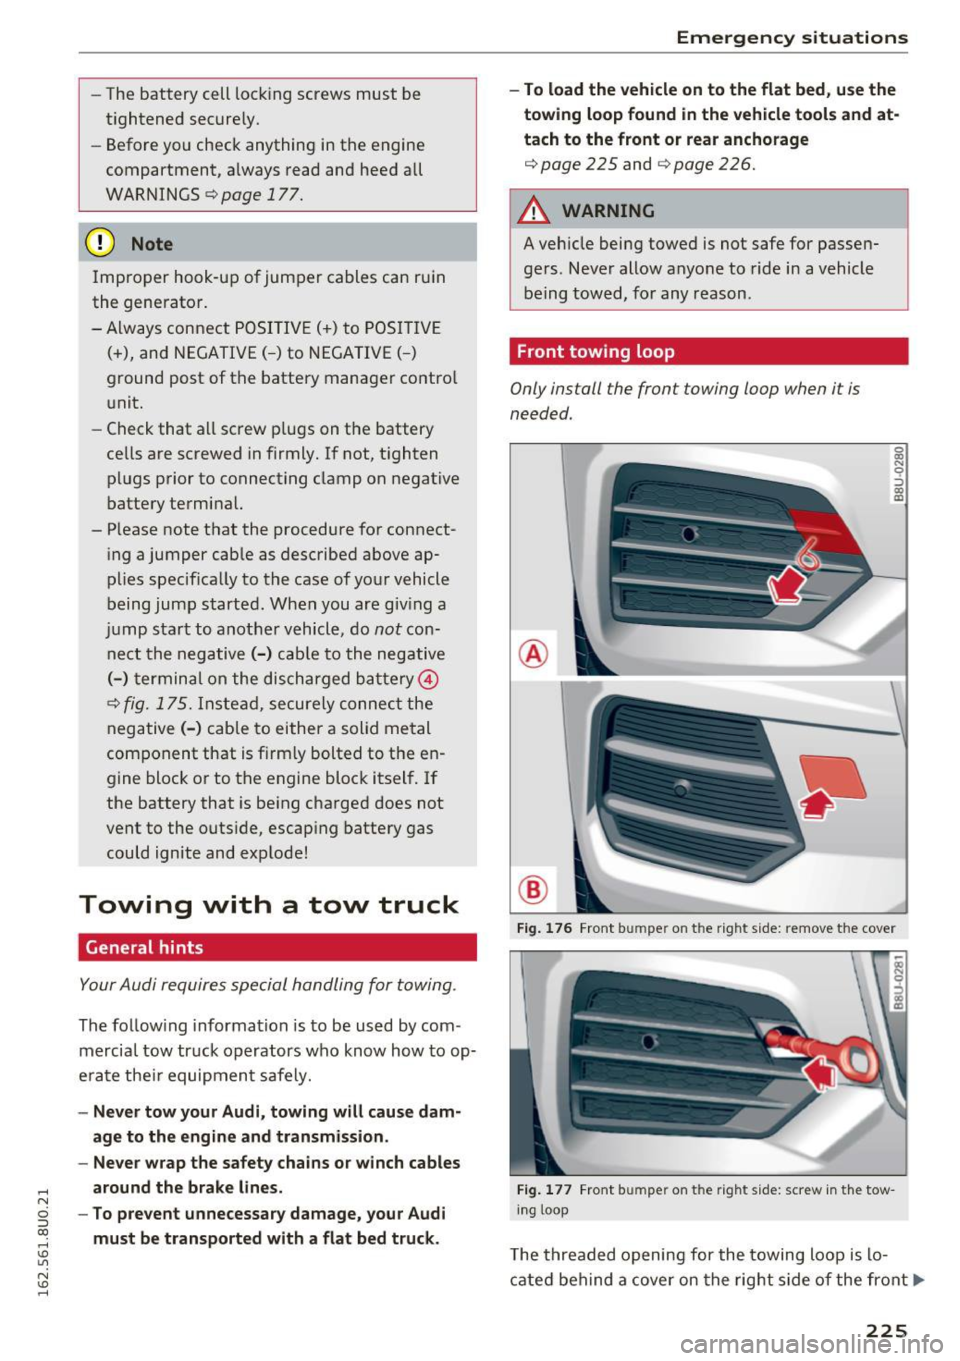
Front towing loop
Only ins tall the front towing loop when i t is
needed .
®
®
-
0 0) N 9 ::>
gi
Fig. 176 Front bum pe r o n th e rig "h t side : remove t he co ver
Fi g. 177 Fron t bum per o n th e right sid e: screw in t he tow
in g loop
The threaded opening for the towing loop i s lo
cate d be hind a cove r on t he rig ht side of the front .,.
225
Page 229 of 252
.... N
c:i ::J CX)
.... I.Cl U"I
N I.Cl ......
Front hook up
• Align the vehicle w ith the centerline of the car
earner ramp .
• Attach the winch hook to the front towline eye
previously installed.
Rear hook up
• Al ign the vehicle w ith the centerline of the car
carr ier ramp .
• Attach the winch hook to the rear towline eye
previously installed.
@ Tips
Check carefully to make sure the hook-up is
secure befo re moving the car up the flatbed
truck ramp.
Raising the vehicle
Lifting with workshop hoist and with floor
jack
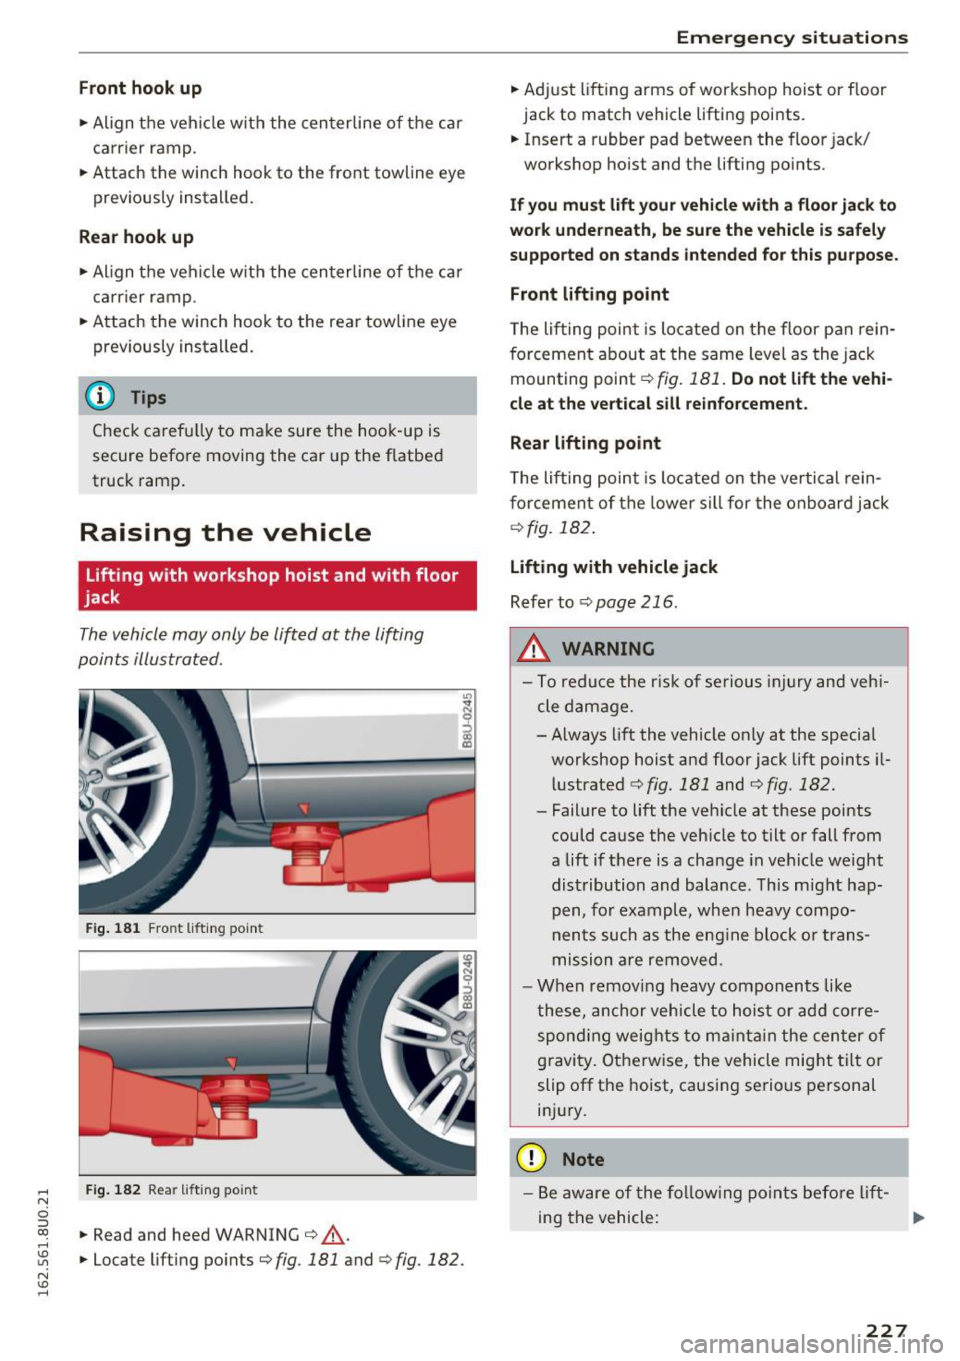
The vehicle may only be lifted at the lifting
points illustrated.
Fig. 181 Front lifting point
F ig . 182 Rear lifting point
• Read and heed WARNING¢,&..
I
• Locate lifting points ¢fig.181 and ¢ fig. 182.
Emergency situations
• Adjust lifting arms of workshop hoist or floor
jack to match vehicle lifting points .
• Insert a rubber pad between the floor jack/
workshop hoist and the lifting points .
If you must lift your vehicle with a floor jack to
work underneath, be sure the vehicle is safely
supported on stands intended for this purpose .
Front lifting point
T he lifting point is located on the floor pan rein
forcement about at the same level as the jack
mounting point ¢
fig. 181. Do not lift the vehi
cle at the vertical sill reinforcement .
Rear lifting point
The lifting point is located on the vertical rein
forcement of the lower sill for the on board jack
¢fig . 182.
Lifting with vehicle jack
Refer to¢ page 216.
&_ WARNING
- To reduce the risk of se rious injury and vehi
cle damage.
- Always lift the vehicle on ly at the special
workshop hoist and floor jack lift points il
lustrated ¢
fig. 181 and ¢ fig. 182.
- Failure to lift the vehicle at these points
could cause the vehicle to tilt or fall from
a lift if there is a change in vehicle weight
distribution and balance . This might hap
pen, for example, when heavy compo
nents such as the engine block or trans
mission are removed.
- When remov ing heavy components like
these, anchor vehicle to hoist or add corre
sponding weights to maintain the center of
gravity. Otherw ise, the vehicle might tilt or
slip off the hoist, causing serious personal
injury .
([) Note
-Be aware of the following points before lift-
ing the vehicle: ..,_
227