seats AUDI Q3 2018 Owners Manual
[x] Cancel search | Manufacturer: AUDI, Model Year: 2018, Model line: Q3, Model: AUDI Q3 2018Pages: 230, PDF Size: 57.03 MB
Page 4 of 230
Table of contents
About this Owner's Manual ... .. .
Cockpit ... .. ............... .... .. .
Cockpit overview ................ .
Controls at a glance ... .......... .. .. .
Instruments and indicator lights
Instruments .... ... .......... .. .. .. .
Indicator lights .. .. .......... .. .. .. .
On-Board Diagnostic System (OBD) .. .. . 4
6
6
6
8
8
10
17
Drive r information system . . . . . . 18
Overview . . . . . . . . . . . . . . . . . . . . . . . . . . . 18
Operation . . . . . . . . . . . . . . . . . . . . . . . . . . 18
On-board computer . . . . . . . . . . . . . . . . . . 19
Efficiency program . . . . . . . . . . . . . . . . . . . 20
Starting and driving . . . . . . . . . . . . . 22
Op en ing and clo sing . . . . . . . . . . . . . 22
Central locking . . . . . . . . . . . . . . . . . . . . . . 22
Luggage compartment lid . . . . . . . . . . . . . 27
Ch ild safety lock . . . . . . . . . . . . . . . . . . . . . 30
Po wer wi ndows . . . . . . . . . . . . . . . . . . . . . 30
Panorama gla ss roof .......... .... ...
31
Lights and Vi sion . . . . . . . . . . . . . . . . . 33
E xterio r lighting . . . . . . . . . . . . . . . . . . . . . 33
I n terior lighting . . . . . . . . . . . . . . . . . . . . . 35
V1s1on . . . . . . . . . . . . . . . . . . . . . . . . . . . . . 36
Windshield wipers . . . . . . . . . . . . . . . . . . . 38
Dig ital compass . . . . . . . . . . . . . . . . . . . . .
40
Seats and storage . . . . . . . . . . . . . . . . 42
General information . . . . . . . . . . . . . . . . . 42
Front seats . . . . . . . . . . . . . . . . . . . . . . . . . 42
H ead restra ints . . . . . . . . . . . . . . . . . . . . . 43
Sockets . . . . . . . . . . . . . . . . . . . . . . . . . . . . 44
Storage . . . . . . . . . . . . . . . . . . . . . . . . . . . . 45
L uggage compartment . . . . . . . . . . . . . . . 46
Roof rack . . . . . . . . . . . . . . . . . . . . . . . . . . 49
Warm and cold .. .. .. ... ..... .. .. . 51
Climate control system . . . . . . . . . . . . . . . 51
Driving .. .. .. .. ... .. .. ..... ... .. .. . 57
General information . . . . . . . . . . . . . . . . . 57
Steering . . . . . . . . . . . . . . . . . . . . . . . . . . . 59
2
Starting and stopping the eng ine
(vehicles with an ignition lock) . . . . . . . . . 60
Starting and stopping the eng ine
(vehicles with a convenience key) ..... . .
Messages ..... .. .. .. ............. . .
E le ctromechanical parking brake ...... .
Start ing from a stop .. ........ ..... . .
D rivi ng offroad . .. ... ...... ....... .. .
Automatic transmission
61
63
63
65
65
66
Trailer towing . . . . . . . . . . . . . . . . . . . . 73
Driving with a trailer
Driver assistance .. ..... ......... .
A ss istance sy stem s .. .. ... ... .. . .
Speed warning system . .. ........... . .
Cruise control system .... .......... . .
Audi side assist .. .. .. .. . .......... . .
Audi drive select .... ... .. .......... . .
Park ing system s
General information
Rear parking system
Parking system plus ... ............. . .
Rearv iew camera ... .. .. ........... . .
Adjusting the display and the warning
tones ........ ... ... ...... ....... .. .
Error messages .. ... ...... ....... .. .
T ra ile r hitch . .. .. .. .. ... ... .... ... . .
Intelligent Technology ....... .. .
Electronic stabilization control (ESC) .. . .
Brakes ...... .. .. .. .. ... .......... . .
El ectrome chanical steering ........... .
A ll wheel drive (quattro) .. .......... . .
Energy management .. ... .......... . .
Notice about data recorded by the Event
Data Recorder and vehicle contro l
modules .. .... .. .. .. .. ........... . . 73
76
76
76
76
78
80
82
82
83
83
84
87
88
88
89
89
91
93
93
94
95
Safety first . . . . . . . . . . . . . . . . . . . . . . . 97
Driving safety . . . . . . . . . . . . . . . . . . . . 97
Bas ics . . . . . . . . . . . . . . . . . . . . . . . . . . . . . 97
Correct passenger seat ing positions . . . . . 98
Pedal area . . . . . . . . . . . . . . . . . . . . . . . . . .
101
Stor ing cargo correctly . . . . . . . . . . . . . . . 102
Reporting Safety Defects . . . . . . . . . . . . . . 104
Page 5 of 230
0 co ......
"' ,-...
"' ...... 0 0 :::,
00
Safety belts . . . . . . . . . . . . . . . . . . . . . . 106
General information . . . . . . . . . . . . . . . . . 106
Why use safety belts? . . . . . . . . . . . . . . . . 107
Safety belts . . . . . . . . . . . . . . . . . . . . . . . . 109
Belt tensioners . . . . . . . . . . . . . . . . . . . . . . 112
Airbag system . . . . . . . . . . . . . . . . . . . . 114
Important information . . . . . . . . . . . . . . . 114
Front a irbags . . . . . . . . . . . . . . . . . . . . . . . 118
M on itor ing the Advanced Airbag System . 124
Side airbags . . . . . . . . . . . . . . . . . . . . . . . . 128
S ide curtai n airbags . . . . . . . . . . . . . . . . . . 131
Child safety . . . . . . . . . . . . . . . . . . . . . . 134
I mpor tant info rmation . . . . . . . . . . . . . . . 134
C hi ld safety seats . . . . . . . . . . . . . . . . . . . . 14 0
Secur ing c hild safety sea ts . . . . . . . . . . . . 14 4
L ATCH system ( lowe r anchorages and
tethers for chi ldren) . . . . . . . . . . . . . . . . . 14 7
Additional information . . . . . . . . . . . . . . . 151
Maintenance and Care . . . . . . . . . . . 152
Checking and Filling . . . . . . . . . . . . . 152
F ue l ... .. .... ............... .. ..... 152
Refueling . . . . . . . . . . . . . . . . . . . . . . . . . . 153
Cata lytic converter . . . . . . . . . . . . . . . . . . . 155
Eng ine compartment . . . . . . . . . . . . . . . . . 155
E ng ine oil . . . . . . . . . . . . . . . . . . . . . . . . . . 158
Cooling system . . . . . . . . . . . . . . . . . . . . . . 162
B ra ke flu id . . . . . . . . . . . . . . . . . . . . . . . . . 163
B at tery . . . . . . . . . . . . . . . . . . . . . . . . . . . . 163
W indshield was her system . . . . . . . . . . . . 165
Service inte rval display . . . . . . . . . . . . . . . 165
Wheels ..... .. ... ..... ... .. .. .... . 166
Wheels and Tires . . . . . . . . . . . . . . . . . . . . 166
Tire press ure monitoring system 183
Care and cleaning . . . . . . . . . . . . . . . . 185
General information . . . . . . . . . . . . . . . . . 185
Ca r washes . . . . . . . . . . . . . . . . . . . . . . . . . 185
C leaning and care information . . . . . . . . . 186
Placing your veh icle out of service . . . . . . 190
Do It Yourself . . . . . . . . . . . . . . . . . . . . 191
Emergency assistance . . . . . . . . . . . 191
General information . . . . . . . . . . . . . . . . . 191
Equipment . . . . . . . . . . . . . . . . . . . . . . . . . 191
Table of contents
Replacing wheels . . . . . . . . . . . . . . . . . . . . 191
Spare tire . . . . . . . . . . . . . . . . . . . . . . . . . . 197
Fuses and bulbs . . . . . . . . . . . . . . . . . . 199
E lectrica l fuses . . . . . . . . . . . . . . . . . . . . . . 199
B ul bs . . . . . . . . . . . . . . . . . . . . . . . . . . . . . . 201
Emergency situations . . . . . . . . . . . . 203
Genera l . . . . . . . . . . . . . . . . . . . . . . . . . . . . 203
Start ing by p ush ing or tow ing . . . . . . . . . . 203
Start ing with jumper cables . . . . . . . . . . . 203
U se of jumper cables . . . . . . . . . . . . . . . . . 204
Tow ing with a tow t ruck . . . . . . . . . . . . . . 20S
Raising the vehicle . . . . . . . . . . . . . . . . . . . 207
Accessories and Technical Data . 209
Technical data . . . . . . . . . . . . . . . . . . . . 209
Vehicle spec ificat ions . . . . . . . . . . . . . . . . 209
Notes about technical da ta . . . . . . . . . . . . 209
Weights . . . . . . . . . . . . . . . . . . . . . . . . . . . 209
D imens ions. ... .. .. .... .. .... ... .. .. 2 10
Capacities . . . . . . . . . . . . . . . . . . . . . . . . . . 210
Gasoli ne engines . . . . . . . . . . . . . . . . . . . . 211
Consumer Information . . . . . . . . . . 2 12
War ranty coverages . . . . . . . . . . . . . . . . . . 212
Operating you r vehicle outside the U.S.A.
or Canada . . . . . . . . . . . . . . . . . . . . . . . . . . 212
Audi Service Repair Manuals and
Literat ure . . . . . . . . . . . . . . . . . . . . . . . . . . 212
Maintenance ...... .... ........... ... 212
Accessor ies and techn ica l changes . . . . . . 214
De claration of comp liance for
te lecommunications equipmen t and
ele ctroni c sys tems . ... ... ..... ... .. .. 21S
Index . . . . . . . . . . . . . . . . . . . . . . . . . . . . . 2 16
3
Page 44 of 230
Sea ts and stor age
Seats and storage
General information
A WARNING
See c::> page 9 7, Driving safety for important
information, tips, suggestions and warnings
that you should read and follow for your own
safety and the safety of yo ur passengers .
Front seats
Manual seat adjustment
Appl ies to vehicles with manual adiustable seats
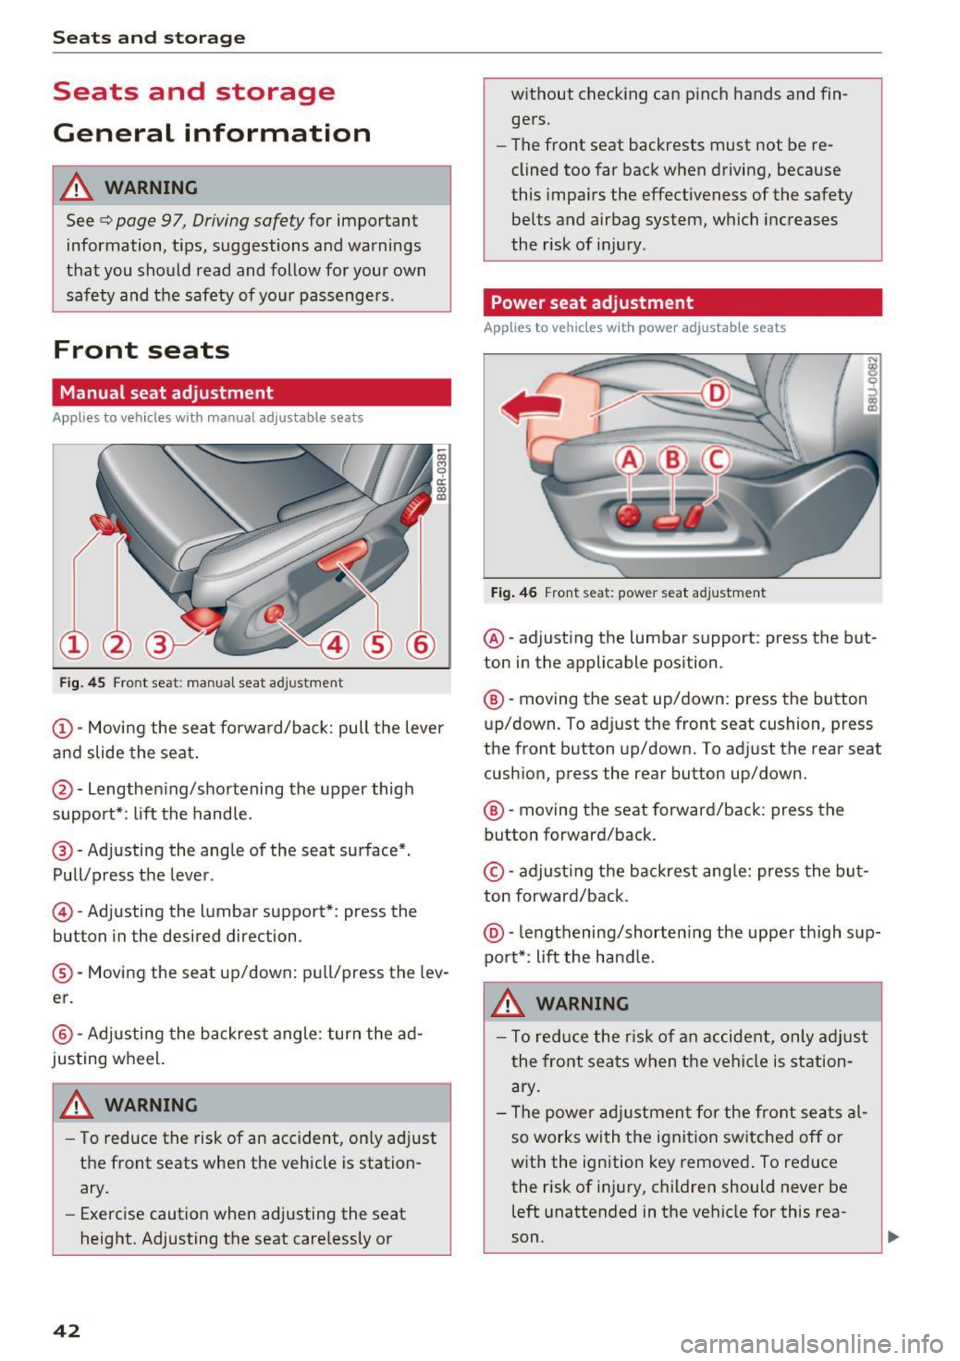
Fig. 45 Front seat: manual seat ad justme nt
@ -Moving the seat fo rward/back: pull the lever
and slide the seat.
@ -Lengthening/shortening the upper thigh
support*: lift the handle.
@ -Adjusting the angle of the seat surface*.
Pull/press the lever.
© -Adjusting the lumbar support*: press the
button in the desired direction .
®-Moving the seat up/down: pull/press the lev
er.
@ -Adjusting the backrest angle : turn the ad
justing wheel.
WARNING
- To reduce the risk of an accident, on ly adjust
the front seats when the vehicle is station
ary.
- Exercise caution when adjusting the seat
height. Adjusting the seat care lessly or
42
w ithout checking can p inch hands and fin
gers.
- The front seat backrests must not be re
clined too far back when driving, because
this impa irs the effectiveness of the safety
belts and airbag system, which increases
the risk of inj ury .
Power seat adjustment
App lies to vehicles w it h power adjustab le seats
Fig . 46 Front seat: power seat adjustment
@ -adjusting the lumbar support : press the but
ton in the applicable position.
® -moving the seat up/down: press the button
up/down. To adjust the front seat cushion, press
the front button up/down. To adjust the rear seat
cushion, press the rear button up/down.
® -moving the seat forward/back : press the
button forward/back.
© -adjust ing the backrest ang le: press the bu t
ton forward/back .
@-leng thening/shorten ing the uppe r thigh sup
port*: li ft the hand le.
A WARNING
- To reduce the r is k of an accident, only adjust
the front seats when t he vehicle is station
ary .
- The power adj ustment for the front seats al
so works wi th the ignit ion sw itched off or
with the ignition key removed . To reduce
the risk of injury, children should never be
left unattended in the vehicle for this rea
son .
Page 45 of 230
a
co
...... N r--. N .-< 0 0 ::, co
-Exercise caution when adjusting the seat
height. Unsupervised or careless seat ad
justment can pinch fingers or hands, which
increases the risk of injury .
- The front seat backrests must not be re
clined too far back when driving, because
this impairs the effectiveness of the safety
belts and airbag system, which increases
the risk of injury.
- To minimize the risk of injury during sudden
braking or a collision, the driver and the
front passenger must not drive or r ide with
the backrest in the reclined position. The
safety belts and airbag system can only pro
vide the greatest protection possible when
the backrests are in the upright position and
the safety belts are worn correctly. The more a backrest is reclined, the greater the
risk of injury due to an incorrect seating po
sition and safety belt position .
Front center armrest
Applie s to vehicles with a front center armrest
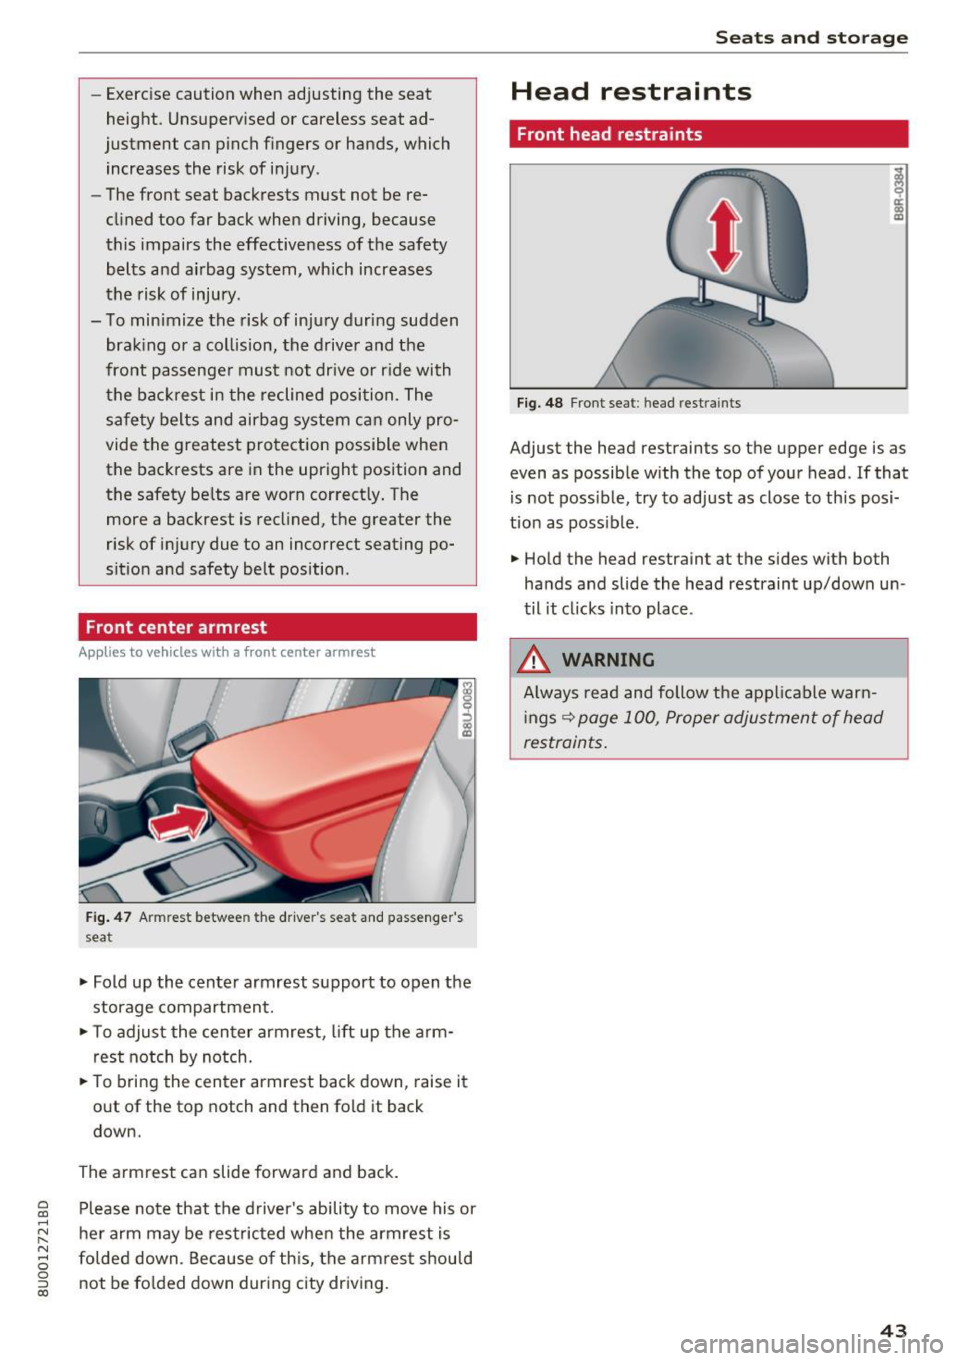
Fig. 47 Armrest between the driver's seat and passenger's
seat
.,. Fold up the center armrest support to open the
storage compartment.
.,. To adjust the center armrest, lift up the arm
rest notch by notch .
.,. To bring the center armrest back down, raise it
out of the top notch and then fold it back
down.
The armrest can slide forward and back. Please note that the driver 's ability to move his or
her arm may be restricted when the armrest is
folded down. Because of this, the armrest should
not be folded down during city driving.
Seats and storage
Head restraints
Front head restraints
Fig. 48 Front seat: head restraints
Adjust the head restraints so the upper edge is as
even as possible with the top of your head . If that
is not possible, try to adjust as close to this posi
tion as poss ible .
.,. Hold the head restraint at the sides with both
hands and slide the head restraint up/down un
til it clicks into place .
_& WARNING
Always read and follow the applicable warn
ings
~ page 100, Proper adjustment of head
restraints.
.
43
Page 46 of 230
Sea ts and stor age
Rear head restraints
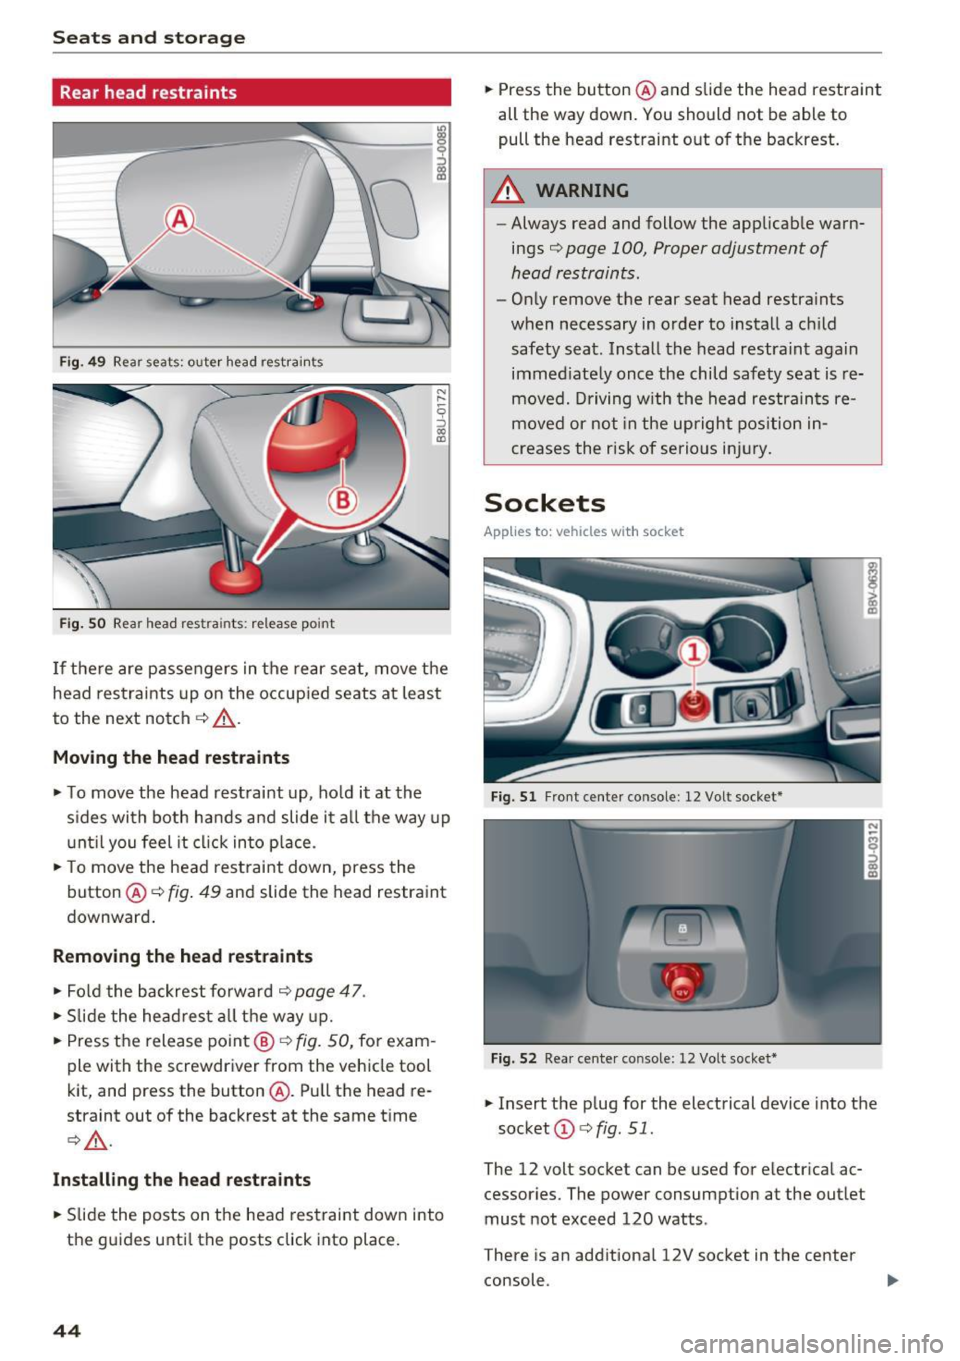
Fig . 4 9 Rear seat s: oute r head restra ints
Fig . SO Rear head res tra ints: re lease po int
I f the re are passengers in the rear seat, move t he
head restrai nts up on the occup ied seats at least
to the next notch
c::> _&. .
Moving th e head restraints
• To move the head rest raint up, ho ld it at the
s ides with both hands and slide it a ll the way up
u nt il you feel it cl ick in to p lace .
• To move the head restraint down, press the
button @
c::> fig. 49 and slide the head restraint
downward .
Removing th e head restraints
• Fol d the backrest forwa rd c::> page 47 .
• Slide the head res t all the way up.
• Press the release point @
c::> fig. SO, for exam
ple with the screwdriver from the vehicle tool
kit, and press the button @. Pull the head re
straint out of the backrest at the same t ime
¢ _&. .
Install ing the h ead rest ra ints
• Slide the posts on the head restraint down into
the guides unti l th e posts click into place.
44
• Press the button @ and slide the head restraint
all the way down. You should not be abl e to
pull the head restraint o ut of the backrest.
A WARNING
- Always read and follow the applicab le warn
ings
c> page 100, Proper adjustment of
head restraints.
- On ly remove the rear seat head restra ints
when necessary in order to install a ch ild
safety sea t. Install the head restraint again
immed iate ly once the child safety seat is re
moved. Driving w ith the head restrain ts re
moved or not in the upright pos ition i n
creases the risk of serious inj ury.
Sockets
App lies to : vehicles wit h socket
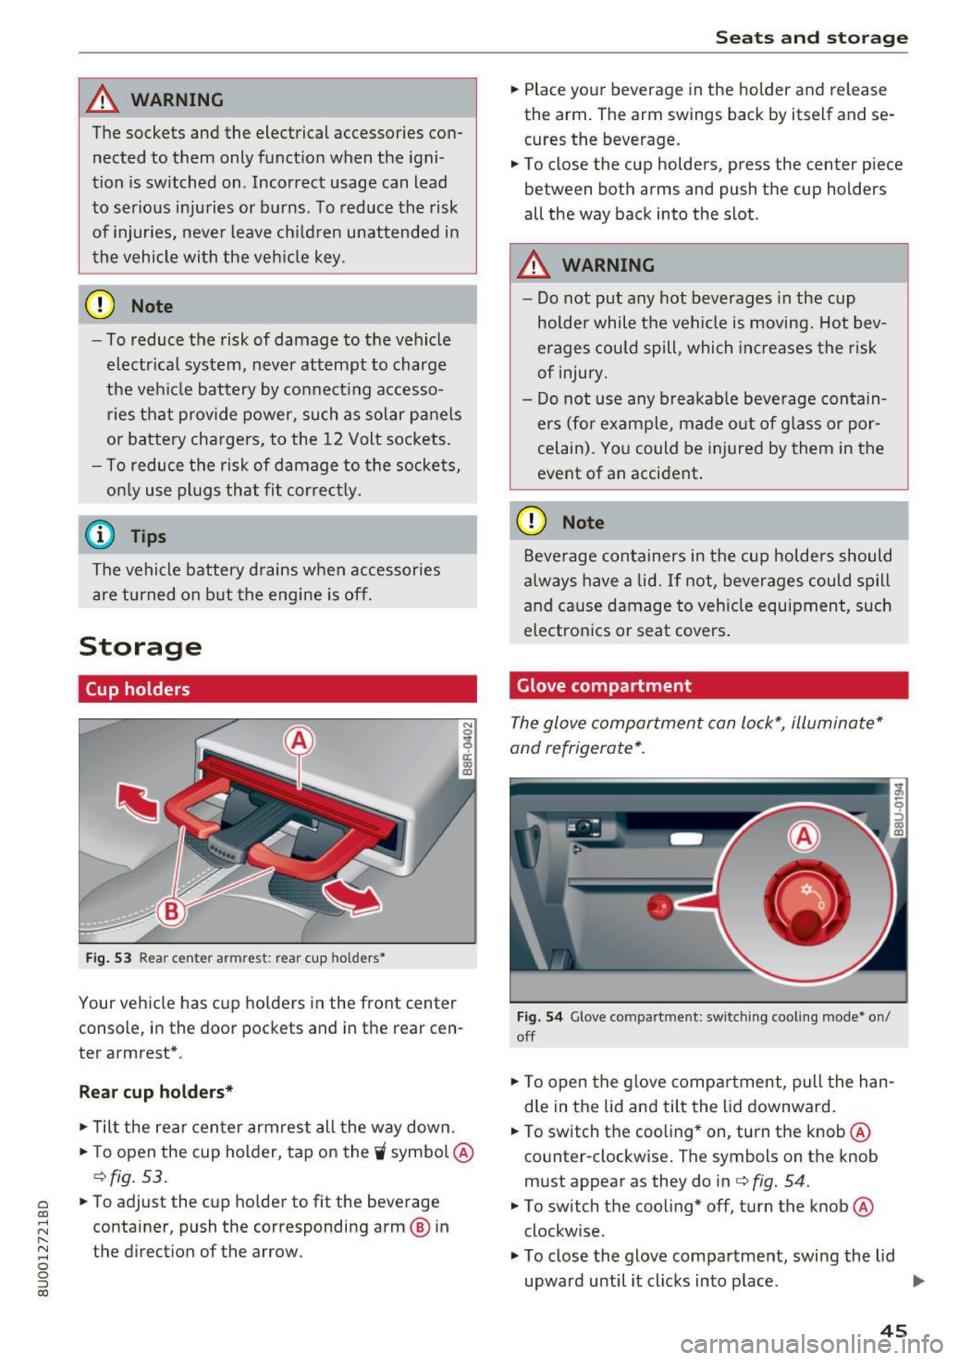
Fig. 51 Front cente r co nso le : 12 Volt socket*
Fi g. 5 2 Rea r cen te r co nsole: 12 Vol t socket*
• Insert the p lug for the electrical device into the
socket @
c> fig. 51.
The 12 volt socket can be used for electr ica l ac
cessories. The power consumption at the outlet
must not exceed 120 watts .
T here is an additiona l 12V socket in the center
console .
Page 47 of 230
a
co
...... N r--. N .-< 0 0 ::, co
A WARNING
The sockets and the electrical accessories connected to them only funct ion when the igni
tion is switched on . Incorrect usage can lead
to ser ious injuries or b urns . To reduce the risk
of injur ies, neve r leave child ren unat tended i n
t he vehicle with the veh icle key .
CD Note
-To reduce the risk of damage to the vehicle
electrical system, never attempt to charge
the veh icle bat tery by connect ing accesso
ries that prov ide power, such as solar pa ne ls
or battery chargers, to the 12 Volt sockets.
- To reduce the risk of damage to the sockets,
on ly use plugs that fit cor rect ly.
@ Tips
The vehicle battery d rains when accessories
are turned on b ut the engine is off .
Storage
Cup holders
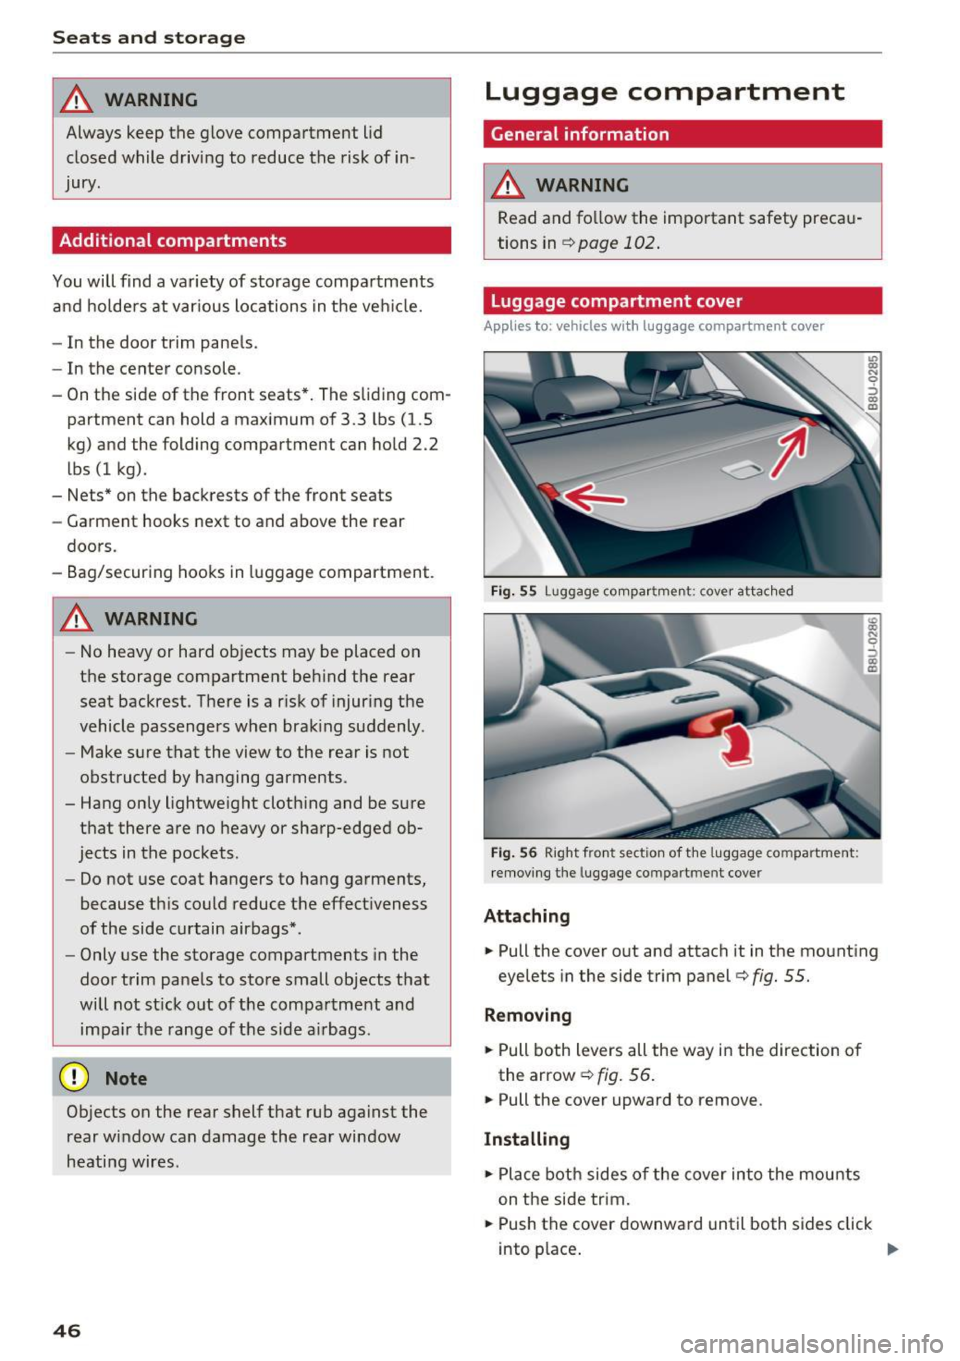
Fig. 53 Rea r ce nter a rmrest: rea r cup holders•
Your vehicle has cup holders in the front center
console, in the door pockets and in the rear cen
ter armrest *.
Rear cup holder s*
.. Til t the rear center armrest all the way down .
.. To open the cup holder, tap on the
'i symbo l@
c:::> fig. 53.
.. To adjust the cup ho lder to fit the beverage
container, push the corresponding arm @ in
the direction of the arrow .
Seats and storage
.. Place your beverage in the holder and release
the arm. The arm swings back by itself and se
cures the beverage.
.. To close the cup holders , press the center piece
between both arms and push the cup holders
all the way back into the slot .
A WARNING
--
-Do not put any hot beverages in the cup
holder while the vehicle is moving. Hot bev
erages could spill, which increases the risk
of injury.
- Do not use any b reakab le beve rage contain
e rs (for example, made out of g lass or por
celain). Yo u could be injured by them in the
event of an accident .
CD Note
Beverage containers in the cup holders should
a lways have a lid.
If not, beverages could spill
and cause damage to veh icle equipment, such
electron ics or seat covers .
Glove compartment
The glove compartment can lock*, illuminate*
and refrigerate* .
Fig. 54 G love co mpart m en t: sw itching cooling mode * on /
off
.. To open the glove compa rtment, pull the han
d le in the lid and tilt the lid downward .
.. To switch the cooling* on, turn the knob@·
co unter -clockwise . T he symbols on the knob
must appear as they do in c:::>
fig. 54.
.. To switch the cooling* off, turn the knob @
clockw ise .
.. To close the glove compartment, swing the lid
upward until it clicks in to p lace . ..,.
45
Page 48 of 230
Sea ts and stor age
_&. WARNING
Always keep the glove compartment l id
closed while driv ing to reduce the risk of in
jury.
Additional compartment s
You will find a variety of storage compartments
and holde rs at var ious locations in the veh icle.
- In the door trim panels .
- In the center console .
- On the side of the front seats*. The sliding com-
partment can hold a maximum of 3.3 lbs (1.5
kg) and the folding compartment can hold 2.2
lbs (1 kg).
- Nets* on the backrests of the front seats
- Garment hooks next to and above the rear
doors.
- Bag/securing hooks in luggage compartment.
_&. WARNING
- No heavy or hard objects may be placed on
the storage compartment behind the rear
seat backrest. There is a risk of injur ing the
vehicle passengers when brak ing suddenly .
- Make sure that the view to the rear is not
obstructed by hanging garments .
- Hang only lightweight clothing and be sure that there are no heavy or sharp-edged ob
jects in the pockets .
- Do not use coat hangers to hang garments,
because th is could reduce the effectiveness
of the side curtain airbags* .
- Only use the storage compartments in the
door trim panels to store small objects that
will not st ick o ut of the compartment and
impa ir the range of the side a irbags .
(D Note
Objects on the rear shelf that rub against the
rear window can damage the rear window
heating wires .
46
Luggage compartment
General information
_&. WARNING
Read and follow the important safety precau
tions in ¢page
102.
Luggage compartment cover
Applies to: vehicles with luggage compartment cover
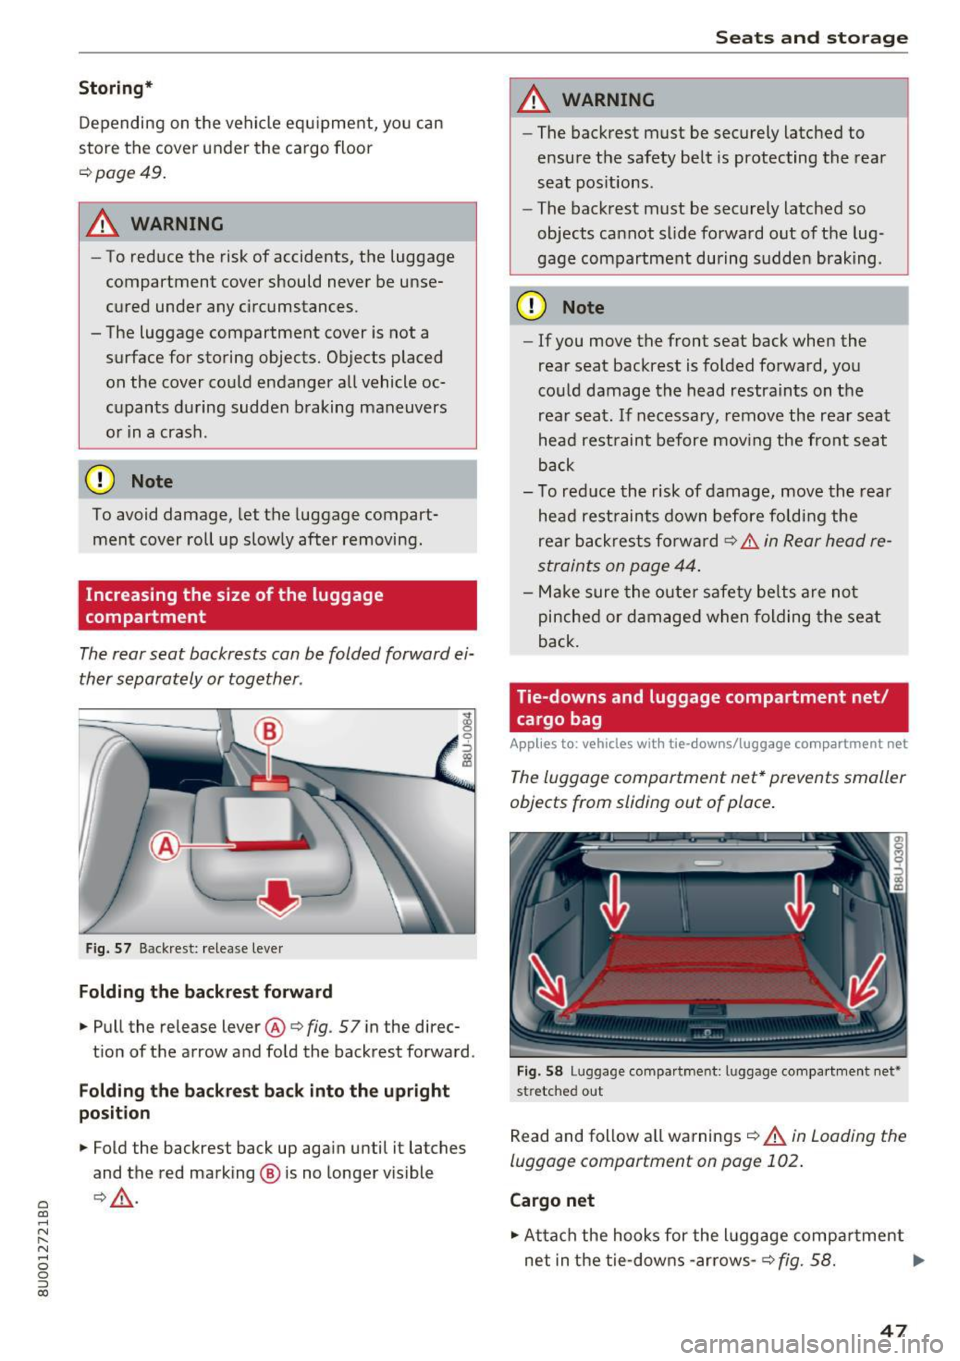
Fig . 55 Lug gage co mpar tmen t: c over attac hed
Fig . 56 Right fron t sec tio n of the luggage co m partment:
remov ing the luggage co mpartm ent cove r
Attaching
-
.. Pull the cover out and attach it in the mounting
eyelets in the side trim panel ¢
fig. 55.
Removing
.. Pull both levers all the way in the direction of
the arrow ¢
fig. 56 .
.. Pull the cover upward to remove .
Installing
.. Place both sides of the cover into the mounts
on the side trim .
.. Push the cover downward until both sides click
into p lace .
Page 49 of 230
a
co
...... N r--. N .... 0 0 ::, co
Storing* Depending on the vehicle equ ipment, yo u can
store the cover under the cargo floor
Q page49.
.&_ WARNING
- To reduce the risk of accidents, the luggage
compartment cover should never be unse
cured under any circumstances .
- The luggage compartment cover is not a surface for storing objects. Objects placed on the cover co uld endanger a ll vehicle oc
c u pan ts during sudden braking maneuvers
o r in a crash.
CD Note
To avoid damage , let t he luggage compart
ment cover roll up slow ly after removing .
Increasing the size of the luggage
compartment
The rear seat backrests can be folded forward e i
ther s eparately or together .
Fig . 57 Backrest: re lease leve r
Folding the backrest forward
.,. Pull the release lever@Q
fig. 57 in the direc-
t ion of the arrow and fo ld the backrest forward .
Folding the backrest back into the upright
position
.,. Fold the backrest back up aga in until it latches
and the red marking ® is no longe r visible
Q _& .
Seats and storag e
.&_ WARNING
-~
-The backrest must be secure ly latched to
e nsu re the safety belt is protecting the rea r
seat pos itions .
- The bac krest must be securely latched so
objects cannot slide fo rwa rd out of the lug
gage compartment during sudde n braking .
CD Note
-If you move the front seat back when the
rear seat backrest is fo lded fo rwa rd, yo u
could damage the head restraints on the
rear seat . If necessary, remove the rear seat
hea d rest raint before mov ing the front seat
back
- To red uce the risk of damage, move the rea r
hea d res train ts down before f oldi ng the
rea r back res ts fo rw ar d Q
.&. in Rear head re
straint s on page 44.
- Make sure the o uter sa fety be lts are not
pinche d or d am aged when fol din g th e seat
back.
Tie-downs and luggage compartment net /
cargo bag
Applies to : vehicles with tie-downs/luggage compartment net
The luggage compartment net* prevents smaller
objects from sliding out of place .
Fig. 58 Luggage co mpa rt me nt: lu ggage compa rtme nt net •
st retc hed o ut
Read and follow a ll warn ings Q .& in Loading the
luggage compartment on page 102 .
Cargo net
.,. At ta ch the hoo ks for the l uggage compa rtment
net in t he tie -dow ns -ar rows-
Q fig. 58. ..,
47
Page 51 of 230
a
co
...... N r--. N .-< 0 0 ::, co
Loading
• Press the release button in the luggage com
partment
c:> fig. 61 and fold the pass-through
toward the front.
• Push the ski bag through the op ening from the
luggage compartment . T he zipper must face
toward the rear
c:> ,& .
Securing
• Stick the strap @on th e bag in the center belt
latch
@ c:> fig. 62.
• Tighten and secure the strap©
A WARNING
-The ski sack is intended only for the trans
portation of skis and other light objects. To
reduce the risk of serious personal injury,
never transport heavy or pointed objects in
the ski sack.
- When braking rapidly or during an accident ,
the load could be displaced and cause injury
to occupants.
- Sharp edges on the load must be covered
for protection. Always fasten the belt tight ly around the sack and its contents
c:>fig . 62.
- For safety reasons, do not transport more
than two pairs of skis in the ski sack .
- You must secure the ski sack with the strap
after loading.
- Make sure all objects that you are transport
ing in the pass-through are secured. Other
wise they could slide around during sudden
braking maneuvers and cause injury .
(D Tips
-Only fold the bag up if it is dry.
- When transporting skis or snowboards, tighten the securing strap between the
bindings.
- Lay skis in the bag with the points facing
forward and snowboards and ski pole points
facing the rear.
-
Seats and storage
Reversible cargo floor
Applies to: vehicles with reversible cargo floor
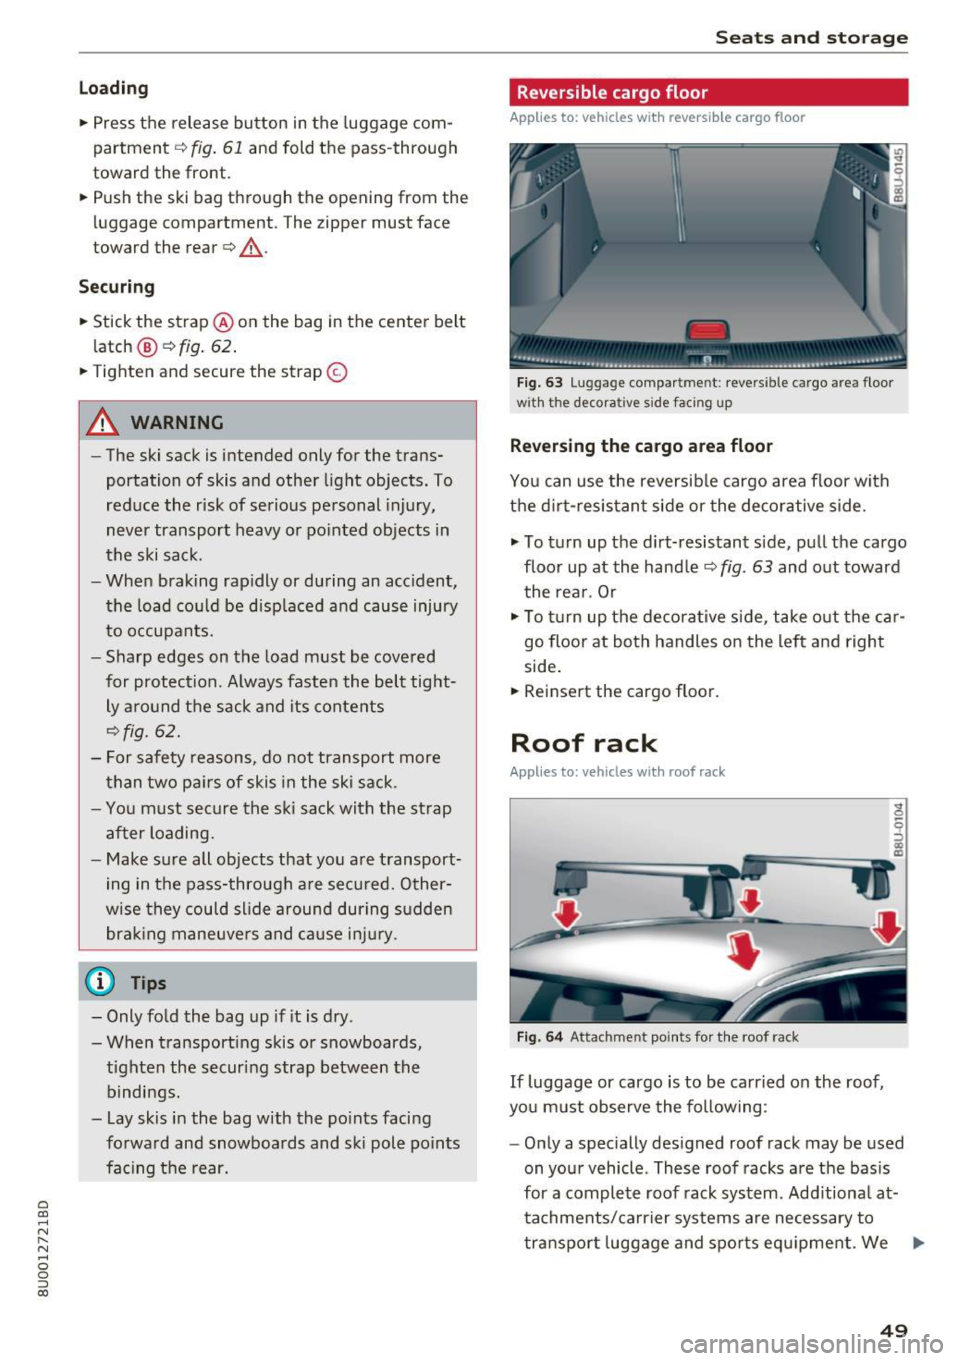
Fig. 63 Lug gag e compar tmen t: reve rs ibl e ca rgo area floor
w ith the decora tive s ide faci ng up
Reversing the cargo area floor
You can use the reversible cargo area floor with
the dirt-resistant side or the decorative side .
.,. To turn up the dirt-resistant side, pull the cargo
floor up at the handle
c:> fig . 63 and out toward
the rear . Or
.,. To turn up the decorative side , take out the car
go floor at both handles on the left and right
side.
• Reinsert the cargo floor.
Roof rack
Applies to: vehicles with roof rack
Fig. 64 Attac hme nt point s for the roof rack
If luggage or cargo is to be carried on the roof,
you must observe the following :
- Only a specially designed roof rack may be used
on your vehicle . These roof racks are the basis
for a complete roof rack system. Additional at
tachments/carrier systems are necessary to
transport luggage and sports equipment. We ..,.
49
Page 55 of 230
0 co ......
"' ,....
"' ...... 0 0 :::,
00
I n the@ setting, the windshield and side win
dows are defrosted or cleared of condensation as
qu ickly as possible. The rec irculat ion mode
switches off, but can be act ivated again manually
by pressing the~ button.
You can open or close the center and rear vents in
the cockpit and the vents in the rear center con
sole us ing the r idged thumbwhee ls. The levers
adjust the direction of the airflow from the vents.
To keep the front side windows from fogging up
in damp weather, we recommend opening the
side air vents and tilting them to the side.
~ R ecirc ulation mo de
In recircu lation mode, the a ir inside the vehicle is
circu lated and fi ltered. This prevents the unfil
tered air outside the vehicle from entering the
vehicle interior . Switching recircu lation mode on
when dr iving through a tunnel or when sitting in
traffic is recommended
¢ .&, . If recirculation
mode is sw itched on before the eng ine starts, it
will be switched off automatically after approx i
mate ly 20 minutes.
Recirculation mode is switched off in the defrost
setting®.
QW R ea r win dow defogger
The rear window defogger only operates when
the eng ine is running. It switches off automati-
Warm and c old
ca lly after approximately 10 to 20 minutes, de
pending on the outside temperature .
J Seat heating*
You can adjust the left and right heated seat
temperature using the left/right thumbwheel.
T he seat heating is switched off when the leve l is
set to 0.
A WARNING .-==-
- You sho uld not use the recircu lation mode
for an extended period since no fresh air is
drawn in. When the A/C system* is sw itched
off, the windows can fog up, which increas
es the risk of an acc ident.
- Individuals w ith reduced sensit ivity to pa in
or temperature could develop burns when
using the seat heat ing* function . To reduce
the r isk of inju ry, these individua ls sho uld
not use seat heating*.
Q) Note
To avoid damaging the seat heat ing* ele
ments, do not kneel on the seats o r place
heavy pressure on one area of the seat .
53