four wheel drive AUDI Q3 2019 Owners Manual
[x] Cancel search | Manufacturer: AUDI, Model Year: 2019, Model line: Q3, Model: AUDI Q3 2019Pages: 280, PDF Size: 72.73 MB
Page 14 of 280
Instrument cluster
— You can select the units used for tempera-
ture, speed, and other measurements
=> page 195.
— Speeds are displayed in mph (miles per
hour) or km/h (kilometers per hour).
— If there is a malfunction in the instrument
cluster, DEF will appear in the trip odometer
display. Have the malfunction corrected as
soon as possible.
Operating
eH) hee
12/5/2018
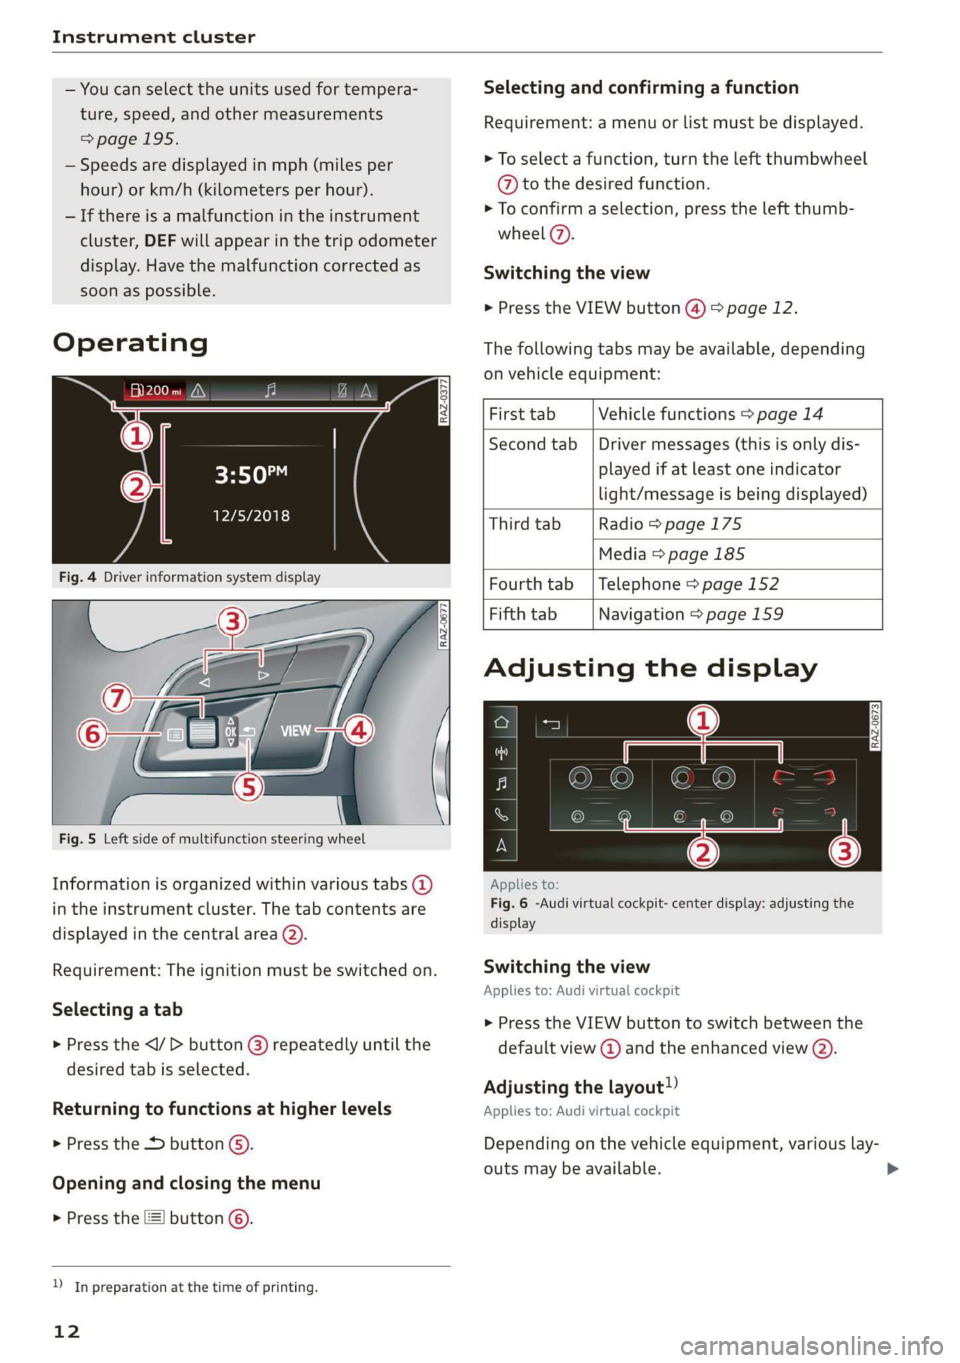
Selecting and confirming a function
Requirement: a menu or list must be displayed.
> To select a function, turn the left thumbwheel
@ to the desired function.
> To confirm a selection, press the left thumb-
wheel (7).
Switching the view
> Press the VIEW button @) > page 12.
The following tabs may be available, depending
on vehicle equipment:
First tab Vehicle functions > page 14
Second tab | Driver messages (this is only dis-
played if at least one indicator
light/message is being displayed)
Third tab Radio > page 175
Media
> page 185
Fig. 4 Driver information system display Fourth tab | Telephone > page 152
Fifth tab Navigation > page 159
Fig. 5 Left side of multifunction steering wheel
Information is organized within various tabs @)
in the instrument cluster. The tab contents are
displayed in the central area (2).
Requirement: The ignition must be switched on.
Selecting a tab
> Press the button @) repeatedly until the
desired tab is selected.
Returning to functions at higher levels
> Press the 5 button @).
Opening and closing the menu
> Press the [=] button ©.
) In preparation at the time of printing.
12
Adjusting the display
S|
IS Ny S| cc
Applies to:
Fig. 6 -Audi virtual cockpit- center display: adjusting the
display
Switching the view
Applies to: Audi virtual cockpit
> Press the VIEW button to switch between the
default view @ and the enhanced view (2).
Adjusting the layout!)
Applies to: Audi virtual cockpit
Depending on the vehicle equipment, various lay-
outs may be available.
Page 87 of 280
83A012721BA
Driving
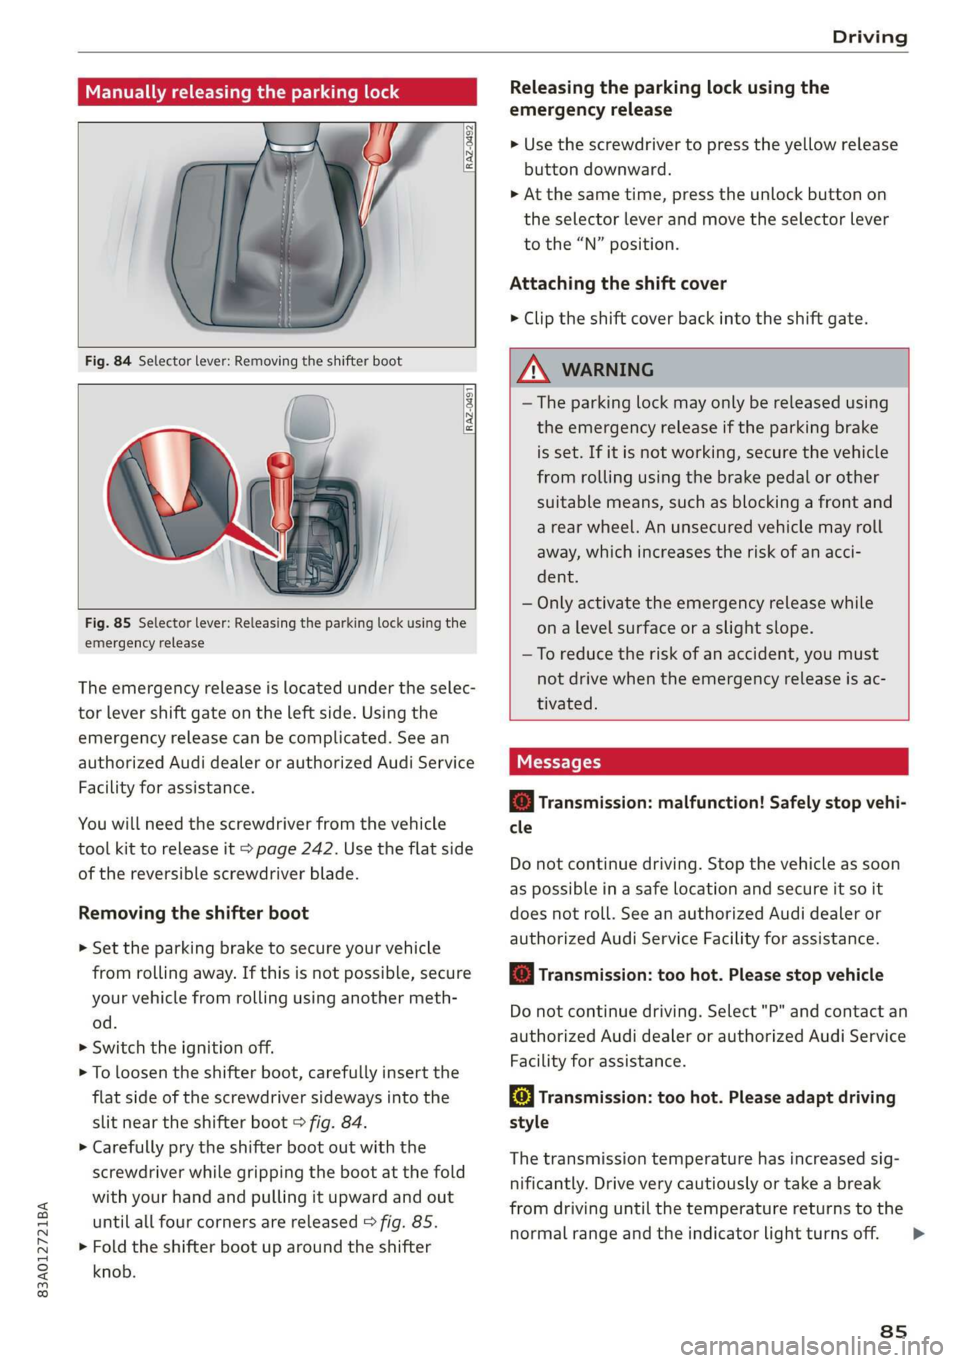
Manually releasing the parking lock
RAZ-0492
Releasing the parking lock using the
emergency release
> Use the screwdriver to press the yellow release
button downward.
> At the same time, press the unlock button on
the
selector lever and move the selector lever
to the “N” position.
Attaching the shift cover
> Clip the shift cover back into the shift gate.
RAZ-0497
Fig. 85 Selector lever: Releasing the parking lock using the
emergency release
The emergency release is located under the selec-
tor lever shift gate on the left side. Using the
emergency release can be complicated. See an
authorized Audi dealer or authorized Audi Service
Facility for assistance.
You will need the screwdriver from the vehicle
tool kit to release it > page 242. Use the flat side
of the reversible screwdriver blade.
Removing the shifter boot
> Set the parking brake to secure your vehicle
from rolling away. If this is not possible, secure
your vehicle from rolling using another meth-
od.
> Switch the ignition off.
> To loosen the shifter boot, carefully insert the
flat side of the screwdriver sideways into the
slit near the shifter boot > fig. 84.
> Carefully pry the shifter boot out with the
screwdriver while gripping the boot at the fold
with your hand and pulling it upward and out
until all four corners are released > fig. 85.
> Fold the shifter boot up around the shifter
knob.
/\ WARNING
— The parking lock may only be released using
the emergency release if the parking brake
is set. If it is not working, secure the vehicle
from rolling using the brake pedal or other
suitable means, such as blocking a front and
a rear wheel. An unsecured vehicle may roll
away, which increases the risk of an acci-
dent.
— Only activate the emergency release while
ona level surface or a slight slope.
—To reduce the risk of an accident, you must
not drive when the emergency release is ac-
tivated.
& Transmission: malfunction! Safely stop vehi-
cle
Do not continue driving. Stop the vehicle as soon
as possible in a safe location and secure it so it
does not roll. See an authorized Audi dealer or
authorized Audi Service Facility for assistance.
& Transmission: too hot. Please stop vehicle
Do not continue driving. Select "P" and contact an
authorized Audi dealer or authorized Audi Service
Facility for assistance.
fl Transmission: too hot. Please adapt driving
style
The transmission temperature has increased sig-
nificantly. Drive very cautiously or take a break
from driving until the temperature returns to the
normal range and the indicator light turns off.
8s
>
Page 96 of 280
Driving
If necessary, use the following functions:
— Audi drive select* offroad mode > page 96
— Hill descent assist* > page 94
— Limit ESC > page 99
Z\ WARNING
Only drive in terrain that is suitable for the ve-
hicle and your driving ability.
@ For the sake of the environment
Avoid actions that are damaging to the envi-
ronment. Show respect for the natural envi-
ronment and remain on marked routes.
@) Tips
Clean your vehicle after driving offroad. Dirt
and stones falling off your vehicle can affect
other road users.
Driving through water
If you must drive through water, follow these in-
structions:
— Check the stability of the ground, the current,
and the water depth. If the ground is unstable,
there is a strong current, or there are waves,
the water must only reach up to the lower edge
of the body at the most.
— Deactivate the Start/Stop system*.
— Drive carefully and no faster than at walking
speeds to prevent the front of the vehicle from
creating waves, because they could splash
above the lower edge of the body. Oncoming
vehicles could also create waves.
— Do not stop the vehicle while in the water.
— Drive in reverse.
— Do not turn the engine off.
ZA\ WARNING
After driving through water, press the brake
pedal carefully to dry the brakes so that the
full braking effect will be restored.
@) Note
Vehicle components such as the engine, drive
system, suspension, or electrical system, can
94
be severely damaged by driving through wa-
ter.
G) Tips
If possible, avoid driving through salt water
because it increases the risk of corrosion. Use
fresh water to clean any vehicle components
that come into contact with salt water.
Hill descent assist
Applies to: vehicles with hill hold assist
The “@ button is located above the selector lever
in the center console. It lights up when the sys-
tem is turned on.
Hill descent assist can assist you when driving
down hills by maintaining a constant vehicle
speed by automatically braking all four wheels.
You can adjust the speed using the accelerator
and brake pedals. The regulation depends on the
hill and the vehicle speed.
> Switching on: press “2.
> Switching off: press “2 again.
Active regulation
Regulation begins shortly after you start driving
and is possible at speeds up to approximately 19
mph (30 km/h) and on hills that have an approxi-
mately 10-60% grade. If these conditions are
met, regulation will be activated and the I indi-
cator light will turn on.
Ready mode
If one of the requirements for active regulation is
not met, the system will be in ready mode. The
indicator
light will turn on. Once the require-
ments are met again, the system will be able to
provide active regulation again.
Applies to: vehicles without Audi drive select: If
you exceed approximately 37 mph (60 km/h), the
system will switch off automatically.
Z\ WARNING
— Be ready to apply the brakes at all times
when using the hill hold assist.
— Always adjust the speed to the visibility,
weather, road, and traffic conditions. The >
Page 101 of 280
83A012721BA
Driving dynamic
brake assist system may react with increased sen-
sitivity.
Anti-Slip Regulation (ASR)
ASR reduces drive power when the drive wheels
begin spinning and adapts the power to the road
conditions. This makes it easier to start, acceler-
ate and drive up hills.
Electronic Differential Lock (EDL)
The EDL applies the brakes to wheels that are
slipping and transfers the drive power to the oth-
er wheels. This function is not available at higher
speeds.
In extreme cases, EDL automatically switches off
to keep the brake on the braked wheel from over-
heating. The vehicle is still working correctly. EDL
will switch on again automatically when condi-
tions have returned to normal.
Power steering
The ESC can also support vehicle stability
through steering.
Selective wheel torque control
Selective wheel torque control is used when driv-
ing on curves. Braking is targeted toward the
wheels on the inside of the curve as needed. This
allows more precise driving in curves.
Automatic post-collision braking system
The automatic post-collision braking system can
help to reduce the risk of sliding and of addition-
al collisions after an accident. If the airbag con-
trol module detects a collision, the vehicle is
braked by the ESC.
The vehicle does not brake automatically if:
— The driver presses the accelerator pedal, or
— the braking force generated by the pressed
brake pedal is greater than the braking force
that
would be initiated by the system, or
— the ESC, the brake system or the vehicle electri-
cal system are not functioning.
physical laws. This is especially important on
slippery or wet roads. If the systems begin
acting to stabilize your vehicle, you should
immediately alter your speed to match the
road and traffic conditions. Do not let the in-
creased safety provided tempt you into tak-
ing risks. This could increase your risk of a
collision.
— Please note the risk of a collision increases
when driving fast, especially through curves
and on slippery or wet roads, and when driv-
ing too close to objects ahead. The ESC and
its integrated systems cannot always pre-
vent collisions - there is still a risk of acci-
dents!
— Accelerate carefully when driving on
smooth, slippery surfaces such as ice and
snow. The drive wheels can spin even when
these control systems are installed and this
can affect driving stability and increase the
ZA WARNING
— The ESC and its integrated systems cannot
overcome the limits imposed by natural
risk of a collision.
G) Tips
— The ABS and ASR only function correctly
when all four wheels have a similar wear
condition. Different tire sizes can lead to a
reduction in engine power.
— You may hear noises when the systems de-
scribed are working.
The So button is located above the selector lev-
er in the center console.
The ESC is automatically switched on when the
ignition is switched on. It may make sense in
some situations to limit the ESC so that the
wheels can spin:
— Rocking the vehicle to free it when it is stuck
— Driving in deep snow, on unpaved ground, or
with snow chains
— Driving downhill while braking on loose ground
— Driving with axle articulation
Limiting ESC (Offroad mode)
—To limit the ESD, press the £20 button briefly.
The B indicator light turns on.
99
>
Page 225 of 280
83A012721BA
Wheels
by the tire manufacturer. This in-
formation is used to contact con-
sumers if a tire defect requires a
recall.
Vehicle capacity weight
means the rated cargo and lug-
gage load plus 150 lbs. (68 kilo-
grams) times the vehicle's desig-
nated seating capacity.
Vehicle maximum load on the
tire
means that load on an individual
tire that is determined by distrib-
uting to each axle its share of the
maximum loaded vehicle weight
and dividing by two.
Vehicle normal load on the tire
means that load on an individual
tire that is determined by distrib-
uting to each axle its share of the
curb weight, accessory weight,
and normal occupant weight (dis-
tributed in accordance with > ta-
ble on page 228) and dividing by
two.
Occupant loading and distri-
bution for vehicle normal load
for various designated seating
capacities
Refer to the tire inflation pressure
label > page 226, fig. 152 for the
number of seating positions. Re-
fer to the table > table on
page 228 for the number of peo-
ple that correspond to the vehicle
normal load.
New tires or wheels
Audi recommends having all work
on tires or wheels performed by
an authorized Audi dealer or au-
thorized Audi Service Facility.
These facilities have the proper
knowledge and are equipped with
the required tools and replace-
ment parts.
>New tires do not yet have the
optimum gripping properties.
Drive carefully and at moderate
speeds for the first 350 miles
(500 km) with new tires.
> Only use tires with the same de-
sign, size (rolling circumfer-
ence), and as close to the same
tread pattern as possible on all
four wheels.
>Do not replace tires individually.
At least replace both tires on the
same axle at the same time.
> Audi recommends that you use
Audi Original Tires. If you would
like to use different tires, please
note that the tires may perform >
223
Page 226 of 280
Wheels
differently even if they are the
same size > A.
>If you would like to equip your
vehicle with a tire/rim combina-
tion that is different from what
was installed at the factory, con-
sult with an authorized Audi
dealer or authorized Audi Service
Facility before making a pur-
chase > A.
Because the spare tire® is differ-
ent from the regular tires instal-
led on the vehicle (such as winter
tires or wide tires), only use the
spare tire* temporarily in case of
emergency and drive carefully
while it is in use. It should be re-
placed with a regular tire as soon
as possible.
Applies to: vehicles with all wheel
drive: all four wheels must be
equipped with tires that are the
same brand and have the same
construction and tread pattern so
that the drive system is not dam-
aged by different wheel speeds.
For this reason, in case of emer-
gency, only use a spare tire* that
is the same circumference as the
regular tires.
224
Z\ WARNING
—Only use tire/rim combina-
tions and suitable wheel bolts
that have been approved by
Audi. Otherwise, damage to
the vehicle and an accident
could result.
—For technical reasons, it is not
possible to use tires from oth-
er vehicles - in some cases,
you cannot even use tires from
the same vehicle model.
—Make sure that the tires you
select have enough clearance
to the vehicle. Replacement
tires should not be chosen
simply based on the nominal
size, because tires with a dif-
ferent construction can differ
greatly even if they are the
same size. If there is not
enough clearance, the tires or
the vehicle can be damaged
and this can reduce driving
safety and increase the risk of
an accident.
—Only use tires that are more
than six years old when abso-
lutely necessary and drive
carefully when doing so.
—Do not use run-flat tires on
your vehicle. Using them when
Page 233 of 280
83A012721BA
Wheels
ZA\ WARNING
Wheel bolts that are tightened or repaired in-
correctly can become loose and result in loss
of vehicle control, which increases the risk of
an accident. For the correct tightening specifi-
cation, see > page 245, Finishing.
— Always keep the wheel bolts and the threads
in the wheel hub clean and free of grease.
— Only use wheel bolts that fit the rim.
— Always have damaged rims repaired by an
authorized Audi dealer or authorized Audi
Service Facility. Never repair or disassemble
rims yourself, because this increases the risk
of an accident.
Loose wheel warning
Applies to: vehicles with loose wheel warning
Within the limits of the system, the loose wheel
warning in the instrument cluster warns you if
one or more wheels are loose.
Using the ABS sensors, the loose wheel warning
system compares the vibration characteristics of
the individual tires. If one or more wheels are
loose, it will be indicated in the instrument clus-
ter display with the fi indicator light and a mes-
sage. If only one wheel is affected, the location
of that wheel will be indicated.
Messages
fi Wheel bolts loose. Please safely stop the ve-
hicle and check all wheel bolts!
Loose wheel warning for at least one wheel > A\.
Check the wheel bolts on all wheels with the
wheel wrench (vehicle tool kit). Have the tighten-
ing specification checked as soon as possible with
a torque wrench. Drive carefully until then. For
the correct tightening specification, see
=> page 245, Finishing.
fi Wheel assessment active. Please continue
driving carefully
After this message appears and you have checked
the wheel bolts, the assessment phase begins
when the vehicle is in motion. This may take sev-
eral minutes.
fi Loose wheel warning: malfunction! See
owner's manual
There is a system malfunction. Drive immediately
to an authorized Audi dealer or authorized Audi
Service Facility to have the malfunction repaired.
Z\ WARNING
Wheel bolts that are tightened incorrectly can
become loose and result in loss of vehicle con-
trol, which increases the risk of an accident.
— If a message appears, reduce your speed im-
mediately and avoid any hard steering or
braking maneuvers. Stop as soon as possible
and check the wheel bolts.
— Check your wheels for damage. Have the
damaged wheels checked and/or replaced
immediately by an authorized Audi dealer or
authorized Audi Service Facility.
— Under certain conditions (such as a sporty
driving style, winter conditions, or unpaved
roads), the message may be delayed.
— The driver is responsible for ensuring that
the wheels are attached correctly.
(i) Tips
— The loose wheel warning system can also
stop working when there is an ESC malfunc-
tion.
— Using snow chains may result in a system
malfunction.
Winter tires significantly improve the vehicle's
handling when driving in winter conditions. Be-
cause of their construction (width, compound,
tread pattern), summer tires provide less traction
on ice and snow.
> Use winter tires on all four wheels.
> Only use winter tires that are approved for your
vehicle.
>» Please note that the maximum permitted
speed may be lower with winter tires > A\ in
General information on page 216. An author-
ized Audi dealer or authorized Audi Service Fa-
cility can inform you about the maximum per-
mitted speed for your tires.
231
>
Page 236 of 280
Wheels
check your tires as soon as possible, and inflate
them to the proper pressure. Driving ona signifi-
cantly under-inflated tire causes the tire to over-
heat and can lead to tire failure. Under-inflation
also reduces fuel efficiency and tire tread life,
and may affect the vehicle's handling and stop-
ping
ability.
Please note that the TPMS is not a substitute for
proper tire maintenance, and it is the driver's re-
sponsibility to maintain correct tire pressure,
even if under-inflation has not reached the level
to trigger illumination of the TPMS low tire pres-
sure telltale.
Your vehicle has also been equipped with a TPMS
malfunction indicator to indicate when the sys-
tem is not operating properly. The TPMS mal-
function indicator is combined with the low tire
pressure telltale. When the system detects a
malfunction, the telltale will flash for approxi-
mately one minute and then remain continuously
illuminated. This sequence will continue upon
subsequent vehicle start-ups as long as the mal-
function exists.
When the malfunction indicator is illuminated,
the system may not be able to detect or signal
low tire pressure as intended. TPMS malfunctions
may occur for a variety of reasons, including the
installation of replacement or alternate tires or
wheels on the vehicle that prevent the TPMS
from functioning properly. Always check the
TPMS malfunction telltale after replacing one or
more tires or wheels on your vehicle to ensure
that the replacement or alternate tires and
wheels allow the TPMS to continue to function
properly.
If the tire pressure monitoring indicator
appears
The tire pressure indicator in the instrument
cluster informs you if the tire pressure is too low
or if there is a system malfunction.
Using the ABS sensors, the tire pressure monitor-
ing system compares the tire tread circumference
and vibration characteristics of the individual
tires. If the pressure changes in one or more
tires, this is indicated in the instrument cluster
234
display with an indicator light @ and a message.
If only one tire is affected, the location of that
tire will be indicated.
The tire pressures must be stored again each
time you change the pressures (switching be-
tween partial and full load pressure) or after
changing or replacing a tire on your vehicle
=> page 235. The tire pressure monitoring system
only monitors the tire pressure you have stored.
Refer to the tire pressure label for the recom-
mended tire pressure for your vehicle
=> page 226, fig. 152.
Tire tread circumference and vibration character-
istics can change and cause a tire pressure warn-
ing if:
—the tire pressure in one or more tires is too low
— The tires have structural damage
— the tire was replaced or the tire pressure was
changed and it was not stored > page 235
— Tires that are only partially used are replaced
with new tires
Indicator lights
@ - Loss of pressure in at least one tire > A\.
Check the tires and replace or repair if necessary.
Check and correct the pressures of all four tires
and store the pressure again > page 235.
/TPMS| (Tire Pressure Monitoring System) Tire pres-
sure: malfunction! See owner's manual. If i
appears after switching the ignition on or while
driving and the @ indicator light in the instru-
ment cluster blinks for approximately one minute
and then stays on, there is system malfunction.
Try to store the correct tire pressures
= page 235. In some cases, you must drive for
several minutes after storing the pressures until
the indicator light turns off. If the indicator light
does turn off or turns on again after a short peri-
od of time, drive to an authorized Audi dealer or
authorized Audi Service Facility immediately to
have the malfunction corrected.
ZA\ WARNING
— If the tire pressure indicator appears in the
display, reduce your speed immediately and
avoid any hard steering or braking
Page 237 of 280
83A012721BA
Wheels
maneuvers. Stop as soon as possible and
check the tires and their pressure.
— The driver is responsible for maintaining the
correct tire pressure. You must check the
tire pressure regularly.
— Under certain conditions (such as a sporty
driving style, winter conditions or unpaved
roads), the tire pressure monitoring system
indicator may be delayed.
@ Tips
— The tire pressure monitoring system can al-
so stop working when there is an ESC mal-
function.
— Using snow chains may result in a system
malfunction.
— The tire pressure monitoring system in your
Audi was calibrated with “Audi Original
Tires” > page 223. Using these tires is rec-
ommended.
Storing tire pressures
If the tire pressure changes or a tire is replaced,
it must be confirmed in the system.
> Before storing the tire pressures, make sure the
tire pressures in all four tires meet the speci-
fied values and are adapted to the load
=> page 226.
> Switch the ignition on.
> Select on the home screen: VEHICLE > Settings
& Service > Tire pressure monitoring > Store
tire pressure > Yes, store now.
@) Tips
Do not store the tire pressures if snow chains
are installed.
235