language AUDI Q3 2019 Owners Manual
[x] Cancel search | Manufacturer: AUDI, Model Year: 2019, Model line: Q3, Model: AUDI Q3 2019Pages: 280, PDF Size: 72.73 MB
Page 20 of 280
Touch display
> If the Date & time button is not displayed,
swipe upward or downward with one finger un-
til it appears.
> Press the Date & time button.
@ Tips
If a menu or symbol is in parentheses in the
path, for example, (General) or (423), then it is
an optional menu item that does not need to
be used in every system.
Settings
> Applies to MMI: Select on the home screen:
SETTINGS > Display & brightness > MMI.
Possible settings:
— Brightness
— Audio feedback during touch input
Multi Media Interface
sic laitet inmate)
Audi recommends performing certain Infotain-
ment system functions, such as entering a desti-
nation, only when the vehicle is stationary. Al-
ways remember: Take a break from using your In-
fotainment system if needed for the benefit of
your safety and the safety of others on the road.
ZA\ WARNING
Only use the Infotainment system when road,
traffic, weather, and visibility conditions per-
mit and always in a way that allows you to
maintain complete control over your vehicle.
@ Tips
Certain functions are not available while driv-
ing.
Switching on or off
Switching the MMI on or off
> To switch the MMI off, press and hold the vol-
ume knob > page 26, fig. 20 until all Infotain-
ment functions are switched off.
18
> To switch the MMI on, press the volume knob.
Restarting the MMI
> Press and hold the volume knob for at least 10
seconds.
Switching the center display on or off
> To switch the center display off, press [Jin the
notification center > page 20.
> To switch the center display on, touch the dis-
play or press LwJagain.
Introduction
You can display and operate Infotainment system
and vehicle functions using the touch display in
the Multi Media Interface, abbreviated MMI.
Configuration wizard
After starting for the first time, the configuration
wizard helps you to set up the vehicle, for exam-
ple to set the desired system language and con-
nect a telephone.
> Follow the instructions in the center display.
> Applies to: MMI: To access the configuration
wizard at a later time, select on the home
screen: HELP > Configuration wizard.
Tool tips
Tool
tips are displayed on the center display after
starting for the first time. They introduce various
MMI functions to you.
> Follow the instructions in the center display.
> Applies to: MMI: To access the tool tips at a lat-
er time, select on the home screen: SETTINGS
> Help > Show tool tips.
> Applies to: MMI: To receive additional tool tips,
select on the home screen: HELP > Tool tips >
Basic information or Expert information.
Page 24 of 280
Touch display
acalileltia
pee
les
ae
Downtown
Coa
Downtown
Los Angeles, W
Pea)
> oo
RAZ-0700!
J John Smith ©)
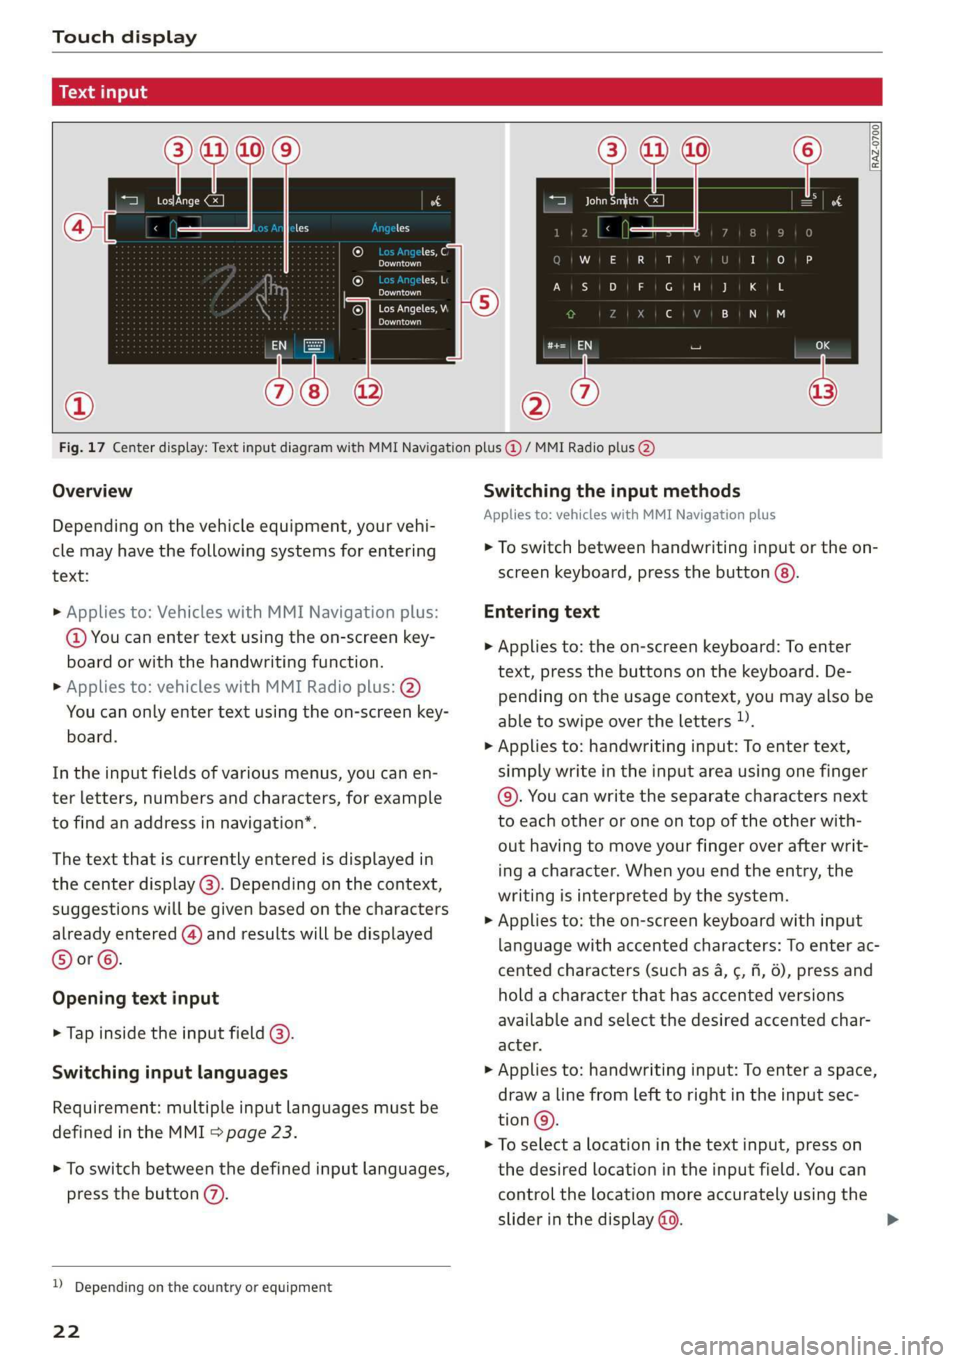
Fig. 17 Center display: Text input diagram with MMI Navigation plus @ / MMI Radio plus @)
Overview
Depending on the vehicle equipment, your vehi-
cle may have the following systems for entering
text:
> Applies to: Vehicles with MMI Navigation plus:
@ You can enter text using the on-screen key-
board or with the handwriting function.
> Applies to: vehicles with MMI Radio plus: @)
You can only enter text using the on-screen key-
board.
In the input fields of various menus, you can en-
ter letters, numbers and characters, for example
to find an address in navigation’.
The text that is currently entered is displayed in
the center display @). Depending on the context,
suggestions will be given based on the characters
already entered () and results will be displayed
®or©.
Opening text input
> Tap inside the input field @).
Switching input languages
Requirement: multiple input languages must be
defined in the MMI > page 23.
> To switch between the defined input languages,
press the button (7).
) Depending on the country or equipment
22
Switching the input methods
Applies to: vehicles with MMI Navigation plus
> To switch between handwriting input or the on-
screen keyboard, press the button (8).
Entering text
> Applies to: the on-screen keyboard: To enter
text, press the buttons on the keyboard. De-
pending on the usage context, you may also be
able to swipe over the letters )).
> Applies to: handwriting input: To enter text,
simply write in the input area using one finger
©. You can write the separate characters next
to each other or one on top of the other with-
out having to move your finger over after writ-
ing a character. When you end the entry, the
writing is interpreted by the system.
> Applies to: the on-screen keyboard with input
language with accented characters: To enter ac-
cented characters (such as 4, ¢, fi, 6), press and
hold a character that has accented versions
available and select the desired accented char-
acter.
> Applies to: handwriting input: To enter a space,
draw a line from left to right in the input sec-
tion@.
> To select a location in the text input, press on
the desired location in the input field. You can
control the location more accurately using the
slider in the display @0.
Page 25 of 280
![AUDI Q3 2019 Owners Manual 83A012721BA
Touch display
> To delete individual characters, press &] @, or
> Applies to: handwriting input: Draw a line from
right to Left in the input section @).
> To delete multiple charac AUDI Q3 2019 Owners Manual 83A012721BA
Touch display
> To delete individual characters, press &] @, or
> Applies to: handwriting input: Draw a line from
right to Left in the input section @).
> To delete multiple charac](/img/6/57626/w960_57626-24.png)
83A012721BA
Touch display
> To delete individual characters, press &] @, or
> Applies to: handwriting input: Draw a line from
right to Left in the input section @).
> To delete multiple characters, press and hold
> To delete all characters in a specific location,
press and hold
location ). When released, the highlighted
characters are deleted.
Applying suggested words or entries from
the results list
Applies to: vehicles with MMI Navigation plus
> To accept a suggested word (@) or entry from
the results list ©), press on it.
> To display more content in the results list, drag
your finger upward or downward on the screen.
> To expand the results list, press the button @
or drag it to the desired position.
Selecting entries from the results list
Applies to: vehicles with MMI Radio plus
> To display the results list, press the button ©)
or @.
> To display more content in the results list, drag
your finger upward or downward on the screen.
Setting the input language or keyboard
layout
» Select on the home screen: SETTINGS > Lan-
guage & keyboard > Keyboard.
> To define additional input languages, press the
© button.
> To change the keyboard layout for an input lan-
guage, press >. For example, you can select be-
tween QWERTZ and QWERTY.
2) Depending on the country or equipment
23
Page 26 of 280
Voice operation
Voice operation
General information
You can operate many functions in the vehicle
easily using voice commands.
Using the voice operation system effectively
> Speak clearly and distinctly at a normal volume.
Speak louder when driving faster.
> Emphasize the words in the commands evenly
and do not leave long pauses.
> Close the doors, the windows, and the sunroof*
to reduce background noise. Make sure that
passengers are not speaking when you are giv-
ing a voice command.
> Do not direct the vents toward the hands-free
microphone, which is in the roof headliner near
the front interior lights.
> Only the driver should speak to the system, be-
cause the handsfree microphone is aimed to-
ward this seating position.
ZA\ WARNING
— Direct your full attention to driving. As the
driver, you have complete responsibility for
safety in traffic. Only use the functions in
such a way that you always maintain com-
plete control over your vehicle in all traffic
situations.
— Do not use voice operation in emergencies
because your voice may change in stressful
situations. The system may take longer to
dial the number or may not be able to dial it
at all. Dial the emergency number manually.
@ Tips
There are no voice guidance* prompts when a
dialog is active.
24
Voice recognition system
Applies to: vehicles with voice recognition system
See
Dat)
Where is a
Connect
Diala
coy
Es
ea
cog
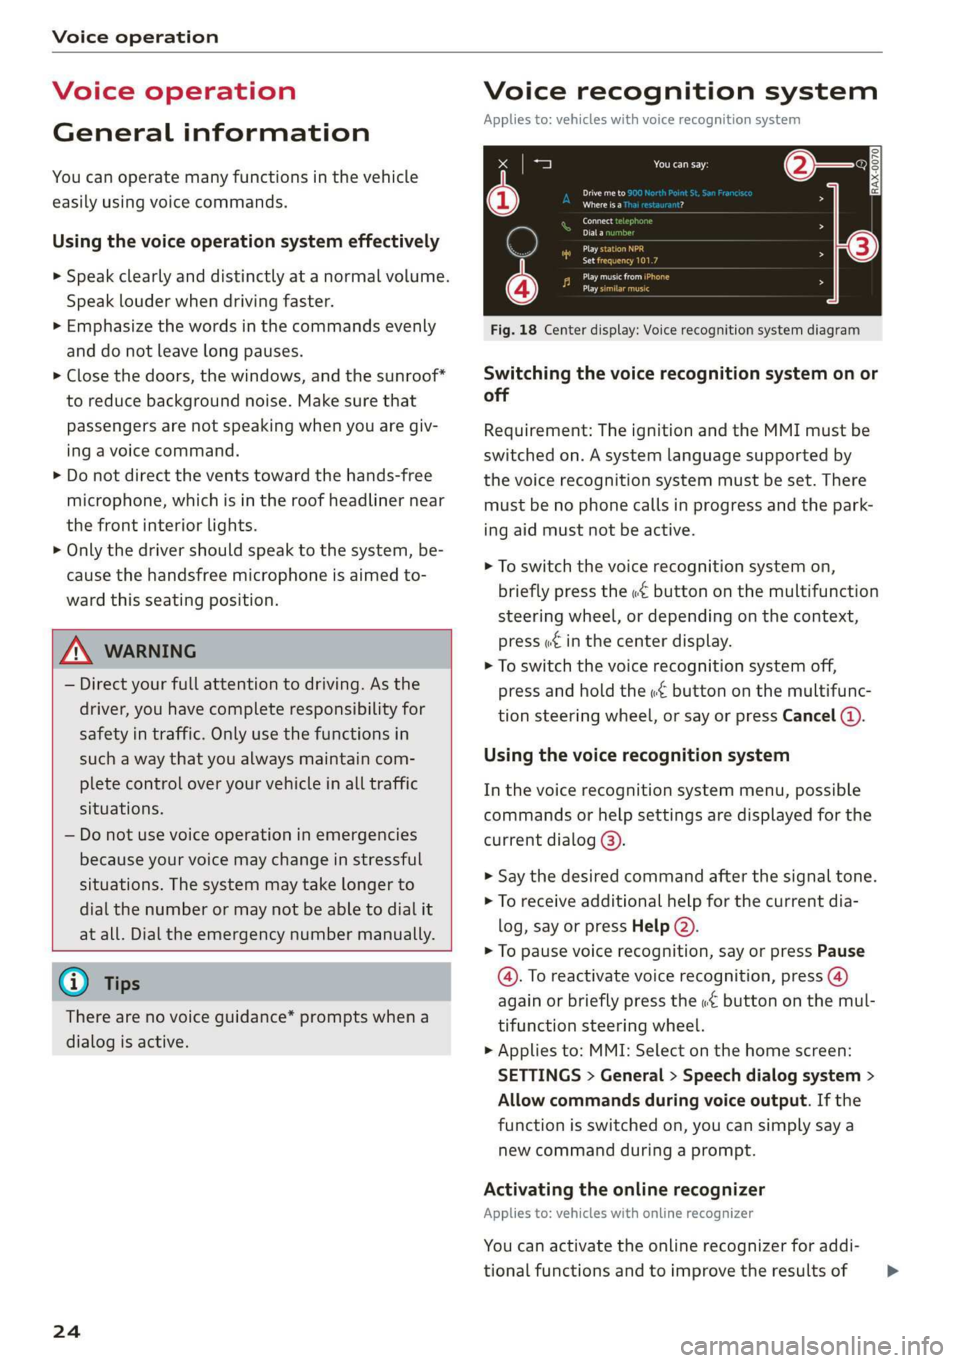
Fig. 18 Center display: Voice recognition system diagram
Switching the voice recognition system on or
off
Requirement: The ignition and the MMI must be
switched on. A system language supported by
the voice recognition system must be set. There
must be no phone calls in progress and the park-
ing aid must not be active.
> To switch the voice recognition system on,
briefly press the «€ button on the multifunction
steering wheel, or depending on the context,
press w£ in the center display.
> To switch the voice recognition system off,
press and hold the « button on the multifunc-
tion steering wheel, or say or press Cancel (a).
Using the voice recognition system
In the voice recognition system menu, possible
commands or help settings are displayed for the
current dialog @).
> Say the desired command after the signal tone.
> To receive additional help for the current dia-
log, say or press Help (2).
> To pause voice recognition, say or press Pause
@. To reactivate voice recognition, press (@)
again or briefly press the «€ button on the mul-
tifunction steering wheel.
> Applies to: MMI: Select on the home screen:
SETTINGS > General > Speech dialog system >
Allow commands during voice output. If the
function is switched on, you can simply say a
new command during a prompt.
Activating the online recognizer
Applies to: vehicles with online recognizer
You can activate the online recognizer for addi-
tional functions and to improve the results of >
Page 111 of 280
83A012721BA
Driving information
If this is the case, the menu item will be grayed-
out or it will not be possible to select it.
Z\ WARNING
— When traffic light information is shown, al-
so always pay attention to the traffic situa-
tion, the distance to other vehicles and the
area around the vehicle. The driver is always
responsible for assessing the traffic situa-
tion.
— Always adapt your speed to the current
weather, road and traffic conditions. The dis-
played information must never cause you to
ignore legal traffic regulations and pose a
safety risk.
— Regardless of the traffic light information,
you should always monitor your speed using
the speedometer and make sure you are ad-
hering to the legal speed limit.
— The traffic light information does not adjust
your vehicle's speed to the speed recom-
mendation shown in the display.
— Follow the safety precautions and note the
limits of the assist systems, sensors, and
cameras > page 104.
@) Tips
— Traffic light information was only available
in select cities at the time this manual was
printed.
— Traffic light information is not available na-
tionwide.
— These functions depend on how up-to-date
the navigation data’ is.
— Outdated map content in the navigation
system can cause information on the display
to be omitted or incorrect.
— Certain traffic lights can automatically ad-
just to the current traffic situation. If this
occurs, the display of traffic light informa-
tion can change suddenly.
— The traffic signs on the road always take pri-
ority over the display. The driver is always
responsible for adhering to the regulations
applicable in the country where the vehicle
is being operated.
— Units of measurement and language set-
tings are displayed based on how they were
set in the MMI system settings > page 195.
Applies to: vehicles with traffic light information
Switching traffic light information on and
off
The system and be switched on and off in the
MMI.
> Applies to: MMI: Select on the home screen:
VEHICLE > Driver assistance > Traffic light in-
formation.
Accessing traffic light information
> Select in the instrument cluster: Vehicle func-
tions tab > Traffic signs.
@) Tips
If another tab or another function is selected
in the instrument cluster, the traffic light in-
formation will appear in the status bar on the
instrument cluster.
WEE Te
Applies to: vehicles with traffic light information
Malfunction! See owner's manual
The system could not be configured, for example
due to a network malfunction. Switch the igni-
tion off and shut down the vehicle to restart the
system. Wait several minutes until the vehicle
has shut down completely and then switch the
ignition back on.
Function currently unavailable. See owner's
manual
There is a temporary system malfunction. Check
if one or more of the following situations applies
and correct the issue if necessary:
— Traffic light information is switched off
— Data transmission is deactivated
— There is no valid license
— Traffic light information is not available in that
area
109
Page 147 of 280
83A012721BA
Telephone
Accessing contacts
Requirement: A mobile device must be connected
to the MMI > page 140. You must have at least
one contact stored in your mobile device.
> Applies to: MMI: Select on the home screen:
PHONE > Contacts.
Contacts are displayed in alphabetical order and
can be sorted by first or last name > page 151,
Sort
order.
Displaying a business card
To open a business card, press on a contact in the
directory. The business card shows you details
about a contact.
If you press on a contact in the business card,
there are multiple options available:
@ Storing a favorite > page 144, Managing fa-
vorites
Options
Call
Send text message > page 147
Start navigation
©QOOOCO Send e-mail > page 149
Business card options
Press 2).
— Send contact*: you can select Text message or
E-mail > page 147.
— Add destination: you can add a business or pri-
vate address > page 168, Contacts as naviga-
tion destinations.
— Read out name”: The MMI automatically cre-
ates a name tag for each contact, which can be
read out by the MMI = page 24.
— Save as a shortcut > page 21, Shortcuts.
Contact options
Press on a contact in the list until the Options
menu appears.
— Send contact: you can select Text message or
E-mail > page 147.
— Send text message > page 147.
— Send e-mail > page 149.
) Not available in all languages.
— Store as favorite > page 144.
— Save as a shortcut > page 21, Shortcuts.
Deleting contacts
— Delete all contacts: Select: Contacts > Z > De-
lete all. All contacts are deleted only in the
MMI.
— Deleting imported contacts: Requirement: you
must have imported at least one contact. Se-
lect: Contacts > Z > one or more contacts, or
Select all > Delete import. > Done. The import-
ed contacts are deleted.
G) Tips
— Pay attention to any synchronization
prompts on your mobile device when down-
loading contacts. Requests to synchronize
the contacts must be confirmed so that your
mobile device contacts can be loaded into
the MMI.
— The contact display in the MMI depends on
the mobile device being used. For more in-
formation on compatible mobile devices,
visit www.audiusa.com/bluetooth or con-
tact an authorized Audi dealer or authorized
Audi Service Facility.
— Only the contacts of the mobile device being
actively used are displayed.
— The contacts from the mobile device may
not be transferred in alphabetical order. If
there are too many entries, contacts with
different first letters may be missing in the
MMI.
— If contacts are loaded from the mobile de-
vice into the MMI, the contacts on the SIM
card will no longer be displayed in the MMI.
— The contacts in the local MMI memory are
always visible and can be accessed by other
users.
— After switching off the ignition and exiting
the vehicle, the mobile device directory will
be loaded when the MMI is started again if
the mobile device is within range and the
Bluetooth function is switched on in the mo-
bile device and the MMI.
145
Page 150 of 280
Telephone
Requirement: your mobile device must be con-
nected to the MMI via Bluetooth Message Access
Profile (MAP) > page 140.
> Applies to: MMI: Select on the home screen:
MESSAGES > (=) > Text message (SIM)*/text
message (telephone 1)/text message (tele-
phone 2)*.
Inboxes
— New text message: press on a template in the
list or dictate a text message. Press Add and
select one or more recipients from your con-
tacts. To remove a recipient, press Delete. Press
Send.
— Inbox: displays all received text messages.
— Sent: displays all sent text messages.
— Outbox: displays all text messages to be sent.
— Drafts*: text messages that have not been sent
yet by the mobile device are displayed on the
MMI.
— Deleted*: deleted text messages are displayed.
— User-defined*: folders defined by the user are
transferred from your mobile device.
Message options
The following options are available when you se-
lect a text message:
— Read out* the text message).
— Reply: a reply can be sent to the selected mes-
sage in the Inbox.
—To switch to the previous or the next message,
press < or >.
— More: options.
When you press More, the following options are
available:
— Call: Requirement: a number must be stored.
You
can call the contact.
— Forward: the selected text message can be for-
warded to other recipients. Text can also be
added before sending.
— Navigate: Requirement: the contact must have
a navigation address stored with it in the direc-
tory. You can start route guidance.
D_ Not available in all languages.
2) Function is not supported on all mobile devices.
148
— Extract numbers: Requirement: the message
must contain a number. You can extract a num-
ber from a text message.
— Send again: Requirement: the text message
must be in the Outbox. The selected text mes-
sage can be resent.
Press
on an entry in the Inbox until the Options
menu appears.
— Reply: a reply can be sent to the selected mes-
sage in the Inbox.
— Forward: the selected text message can be for-
warded to other recipients. Text can also be
added before sending.
Settings
Press ©}.
— Automatically forward text message to mobile
device*2): when this function is switched on,
text messages will be automatically stored on
your mobile device.
— New text message notification: when this
function is switched on, you will be notified
when new text messages are received. New text
messages are indicated with an envelope Min
the MMI status bar.
— Text message center*: the number for the text
message center of your cell phone service pro-
vider is displayed. If no number has been stor-
ed yet, you can enter the text message center
number. You can obtain more information from
your cell phone service provider.
— Delete text messages from SIM card": if the
memory capacity on the SIM card is full, an en-
velope with a line through it is displayed in the
MMI status bar. You can continue to send text
messages, but you cannot receive new text
messages. To delete all sent text messages
from the SIM card, select All sent messages. To
delete all read text messages from the SIM
card, select All read messages.
Delete text message
Select: a mailbox > Z > one or more text mes-
sages > Delete > Done.
Page 151 of 280
83A012721BA
Telephone
@) Tips
— Please note that you may have to activate
the receiving and sending of text messages
depending on the SIM card being used (for
example, when using a multi-SIM). You can
obtain more information from your mobile
device service provider or from your mobile
device user guide.
— For more information on compatible mobile
devices, visit www.audiusa.com/bluetooth
or contact an authorized Audi dealer or au-
thorized Audi Service Facility.
— You need a mobile device with Message Ac-
cess Profile that also supports the sending
function to be able to send text messages
through the MMI.
— Messages that are deleted in the MMI are
also deleted in the mobile device automati-
cally.
— Only new received messages may be dis-
played depending on your mobile device.
Applies to: vehicles with telephone
Depending on the type of mobile device being
used, you may be able to receive and send e-
mails through the MMI.
Requirement: your mobile device must be con-
nected to the MMI via Bluetooth Message Access
Profile (MAP) = page 140. You can find out if
your mobile device supports this function by
checking your mobile device owner's manual.
> Applies to: MMI: Select on the home screen:
MESSAGES > (:=) > e-mail (telephone 1)/e-
mail (telephone 2)*.
Inboxes
— New e-mail: press on a template in the list.
Press Add and select one or more recipients
from your contacts. To remove one or all recipi-
ents, press Delete. Press Send.
— Inbox: All received e-mails are displayed. To up-
date the list, press Q.
— Sent: displays all sent e-mails.
) Not available in all languages.
— Outbox: displays all e-mails to be sent.
— Drafts: e-mails that have not been sent yet are
displayed.
— Deleted: deleted e-mails are displayed.
— User-defined*: folders defined by the user are
transferred from your mobile device.
Message options
The following options are available when you se-
lect an e-mail:
— Read out* the e-mail).
— Reply: A reply can be sent for the selected e-
mail in the Inbox.
— To switch to the previous or the next message,
press or >.
— More: Options
When you press More, the following options may
be displayed depending on your mobile device
and the applicable mail folder:
— Call: Requirement: a number must be stored.
You can call the contact.
— Forward: the selected e-mail can be forwarded
to other recipients. Text can also be added be-
fore sending.
— Extract e-mail add.: you can extract the e-mail
address from an e-mail.
— Navigate: Requirement: the contact must have
a navigation address stored with it in the direc-
tory. You can start route guidance.
— Extract numbers: Requirement: the text in the
e-mail must contain a number. You can extract
a number from an e-mail.
— Show all recipients*: you can display the recipi-
ents of an e-mail.
— Show attachmts.”: you can display a list of at-
tachments to an e-mail.
— Send again: the selected e-mail in the Outbox
and Sent mailboxes can be sent again.
Press on an entry in the Inbox until the Options
menu appears.
— Reply: a reply can be sent to the selected e-
mail.
149
Page 180 of 280
Radio
> To delete a preset, select: Z > select one or
more stations or Select all > Delete > (Done).
Requirement: the presets list must be displayed.
At least two favorites must be stored.
> To move a preset, press Z. Touch the symbol
and move the entry to the desired position.
Press Done.
Smart favorites
Applies to: vehicles with smart favorites
SiriusXM channels are stored in the presets as
smart favorites with the »% symbol. After switch-
ing the ignition and the MMI on, the smart favor-
ites store radio programs at a specific time. Press
ona smart favorite. You have the following op-
tions:
— Pause/Start: press |I/D.
— Selecting the previous or next track: press !I<
or >i.
— Going to the beginning of a recording or live
program: press and hold !I< or >i.
— Setting the playback point: you can adjust the
playback position using the knob.
— Going to a live program: press Lvé).
Applies to: vehicles with Audi connect Infotainment and on-
line radio
You can listen to various radio stations or pod-
casts on the Internet using online radio.
Requirement: The MMI must be connected to the
Internet > page 154, Audi connect.
> Applies to: MMI: Select on the home screen:
RADIO > Source > Online.
The following functions are available in the on-
line radio menu:
— Search: you only can search for online radio sta-
tions in this search. You can search for station
names and categories.
— Last played station: the station that was
played last will start playing.
— Top stations: select a station from the list of
popular online radio stations.
178
— Filtering the list: Select: © > (select a catego-
ry) > select a station name. The following cate-
gories are available:
— Countries
— Genres
— Languages
Other categories may be available depending on
the country and vehicle equipment.
Podcasts
— Applies to: MMI: Select on the home screen:
RADIO > Source > Online > Podcasts.
The following functions are available:
— Listening to a podcast: select: ag podcast >a
podcast episode.
— Search: press 2.
The following functions are available in the pod-
cast playback view:
— Displaying the podcast episodes: press List.
— Starting or stopping the podcast: press P orl.
— Previous or next podcast: press K/D\, or use one
finger to drag the center of the display to the
left or right.
— Changing the playback point: you can adjust
the playback position using the knob.
— Displaying the online radio menu: press 58.
— Switching to radio: press Source. The sources
in the Radio menu are displayed.
Podcast favorites
You can store podcasts in the Podcast favorites.
Storing a podcast favorite: requirement: the
podcast playback view must be displayed. Press
yy, or press Save podcast in the options
=> page 180, Options.
Requirement: at least one entry must be stored
in the Podcast favorites.
— Listening to a podcast favorite: press on the
desired podcast.
— Browsing podcast favorites: use your finger to
swipe to the Left or right.
— Displaying all podcast favorites: press All.
— Deleting a favorite: Select: All > Z > select one
or more podcasts or Select all > Delete >
(Done).
Page 193 of 280
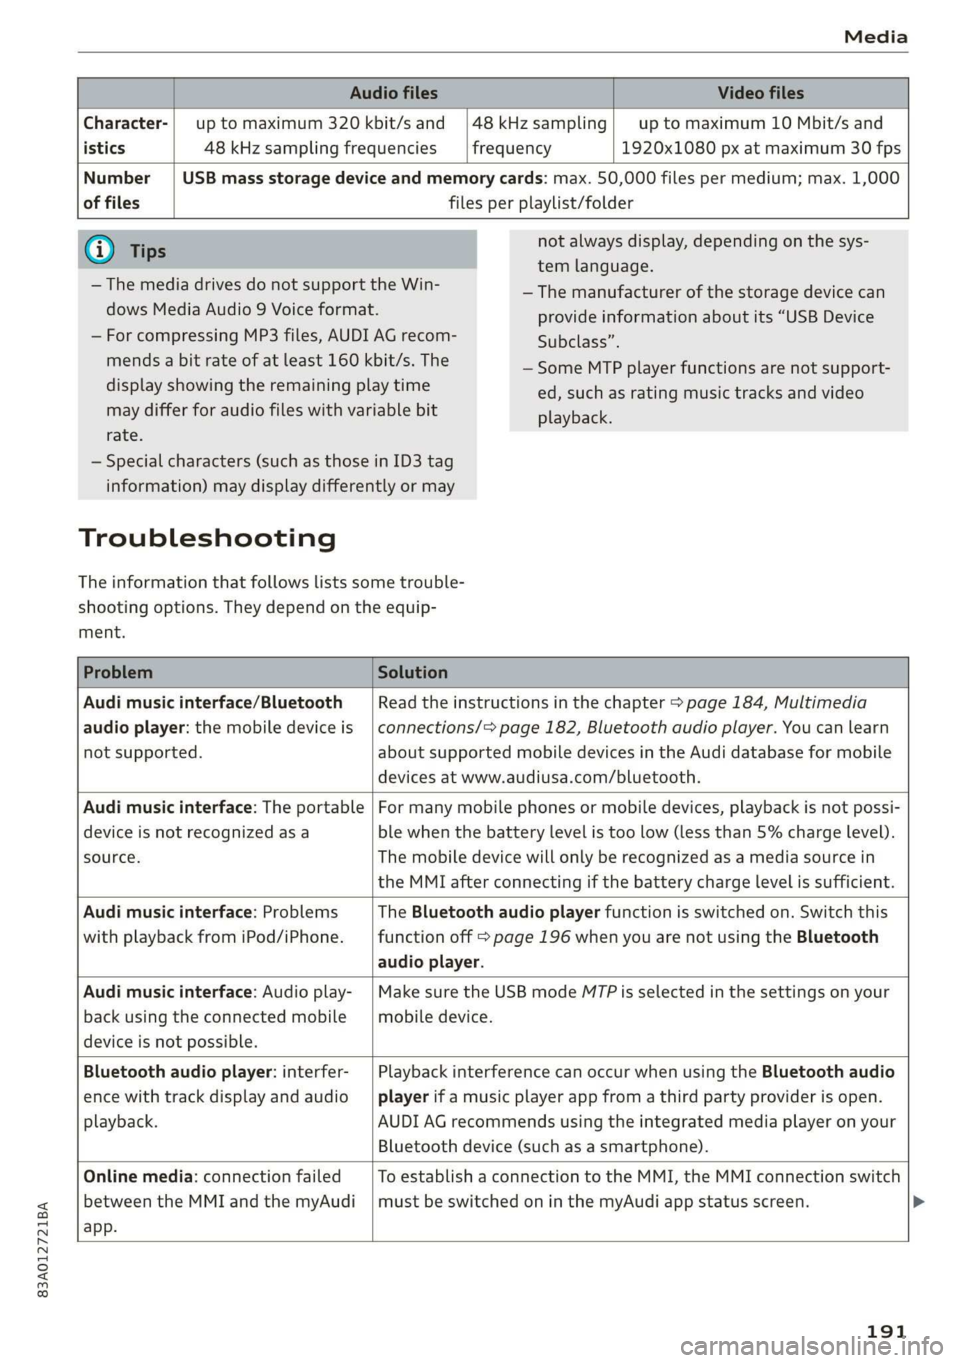
83A012721BA
Media
Audio files Video files
Character-| up to maximum 320 kbit/s and |48kHzsampling| up to maximum 10 Mbit/s and
istics 48 kHz sampling frequencies frequency 1920x1080 px at maximum 30 fps
Number | USB mass storage device and memory cards: max. 50,000 files per medium; max. 1,000
of files files per playlist/folder
G) Tips
— The media drives do not support the Win-
dows Media Audio 9 Voice format.
— For compressing MP3 files, AUDI AG recom-
mends a bit rate of at least 160 kbit/s. The
display showing the remaining play time
may differ for audio files with variable bit
rate.
not always display, depending on the sys-
tem language.
— The manufacturer of the storage device can
provide information about its “USB Device
Subclass”.
— Some MTP player functions are not support-
ed, such as rating music tracks and video
playback.
— Special characters (such as those in ID3 tag
information) may display differently or may
Troubleshooting
The information that follows lists some trouble-
shooting options. They depend on the equip-
ment.
Problem Solution
Audi music interface/Bluetooth
audio player: the mobile device is
not supported.
Read the instructions in the chapter > page 184, Multimedia
connections/=> page 182, Bluetooth audio player. You can learn
about supported mobile devices in the Audi database for mobile
devices at www.audiusa.com/bluetooth.
Audi music interface: The portable
device is not recognized as a
source.
For many mobile phones or mobile devices, playback is not possi-
ble when the battery level is too low (less than 5% charge level).
The mobile device will only be recognized as a media source in
the MMI after connecting if the battery charge level is sufficient.
Audi music interface: Problems
with playback from iPod/iPhone.
The Bluetooth audio player function is switched on. Switch this
function off > page 196 when you are not using the Bluetooth
audio player.
Audi music interface: Audio play-
back using the connected mobile
device is not possible.
Make sure the USB mode M7P is selected in the settings on your
mobile device.
Bluetooth audio player: interfer-
ence with track display and audio
playback.
Playback interference can occur when using the Bluetooth audio
player if a music player app from a third party provider is open.
AUDI AG recommends using the integrated media player on your
Bluetooth device (such as a smartphone).
Online media: connection failed
between the MMI and the myAudi
app.
To establish a connection to the MMI, the MMI connection switch
must be switched on in the myAudi app status screen.
191