weight AUDI Q3 2019 Owners Manual
[x] Cancel search | Manufacturer: AUDI, Model Year: 2019, Model line: Q3, Model: AUDI Q3 2019Pages: 280, PDF Size: 72.73 MB
Page 37 of 280
83A012721BA
Opening and closing
— Always close and lock the luggage compart-
ment lid and the doors when the vehicle is
not in use. Otherwise someone such as a
child could enter the vehicle through the
luggage compartment and become locked
inside it. To reduce the risk of injury, do not
allow children to play in or around the vehi-
cle.
—To reduce the risk of injuries by pinching,
make sure that no one is in the operating
area of the luggage compartment lid, in-
cluding the hinge areas and the upper and
lower edge of the luggage compartment lid.
—
After closing the luggage compartment lid,
make sure that it is latched. The luggage
compartment lid could open suddenly while
driving, which would increase the risk of an
accident.
— Never drive with the luggage compartment
lid ajar or open, because poisonous gases
from the surrounding area can enter the ve-
hicle interior and increase the risk of asphyx-
iation.
— Applies to: vehicles with power-operated or
sensor-controlled luggage compartment lid:
If there is a luggage rack (such as a bicycle
rack) on the luggage compartment lid, the
luggage compartment lid may not open
completely under certain circumstances or it
could close by itself if open due to the extra
weight. Therefore, the open luggage com-
partment lid must be given additional sup-
port or the cargo must first be removed
from the luggage rack.
— Applies to: vehicles with power-operated or
sensor-controlled luggage compartment lid:
Pay careful attention when closing the lug-
gage compartment lid. Otherwise, you could
cause serious injury to yourself or others de-
spite the pinch protection.
Q) Note
The luggage compartment lid can bump into
objects such as the garage ceiling when open-
ing and become damaged.
G) Tips
When the vehicle is locked, the luggage com-
partment lid can be unlocked separately by
pressing the << button on the vehicle key.
The luggage compartment lid locks automati-
cally when it is closed again.
Opening and closing the luggage
compartment lid
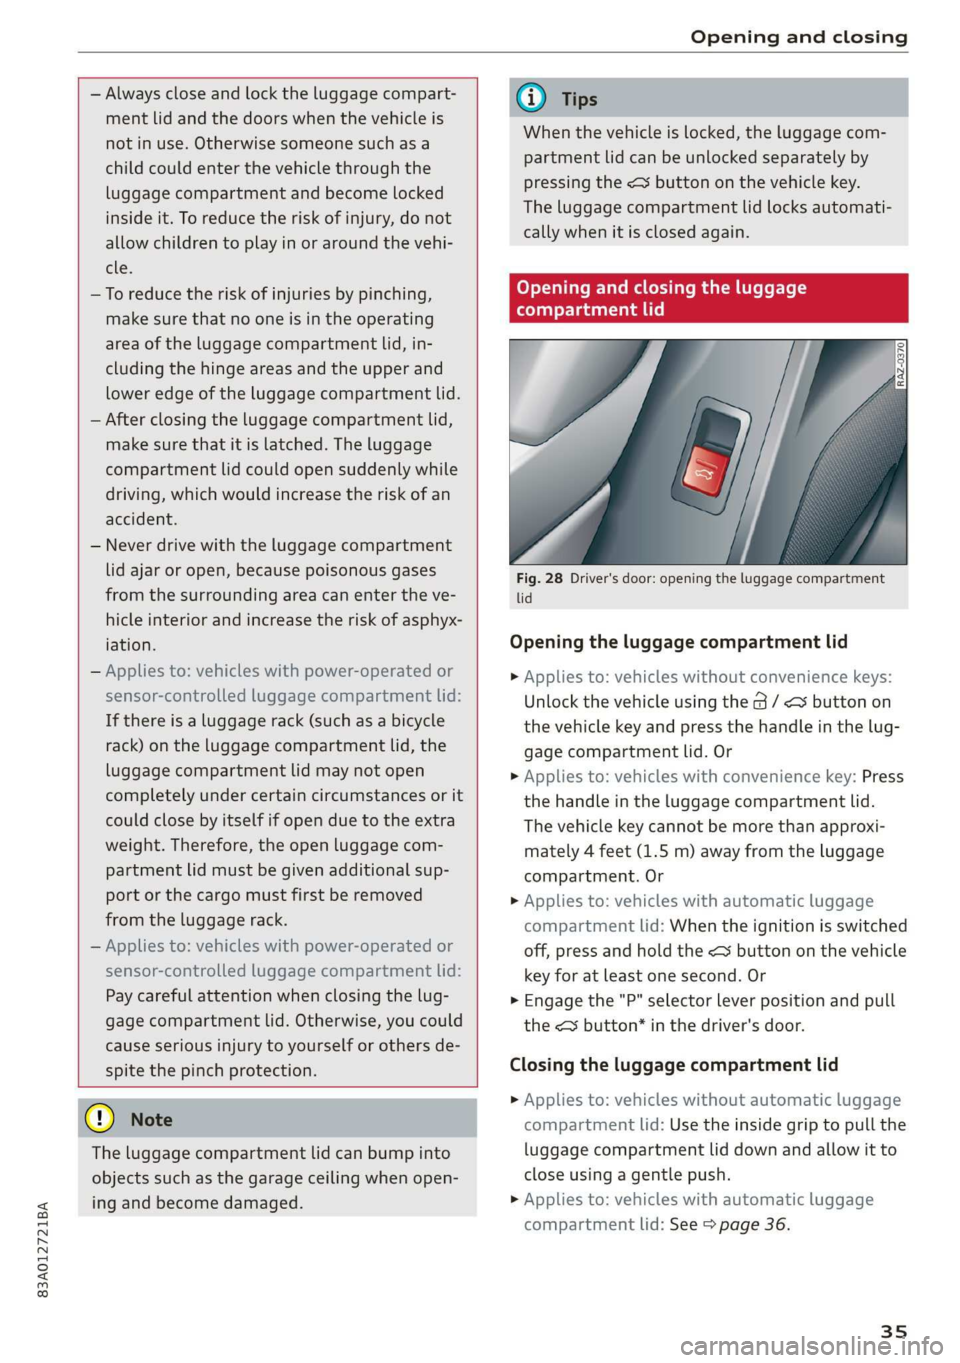
Fig. 28 Driver's door: opening the luggage compartment
lid
Opening the luggage compartment lid
> Applies to: vehicles without convenience keys:
Unlock the vehicle using the G / < button on
the vehicle key and press the handle in the lug-
gage compartment lid. Or
> Applies to: vehicles with convenience key: Press
the handle in the luggage compartment lid.
The vehicle key cannot be more than approxi-
mately 4 feet (1.5 m) away from the luggage
compartment. Or
> Applies to: vehicles with automatic luggage
compartment lid: When the ignition is switched
off, press and hold the <3 button on the vehicle
key for at least one second. Or
> Engage the "P" selector lever position and pull
the << button’ in the driver's door.
Closing the luggage compartment lid
> Applies to: vehicles without automatic luggage
compartment lid: Use the inside grip to pull the
luggage compartment lid down and allow it to
close using a gentle push.
> Applies to: vehicles with automatic luggage
compartment lid: See > page 36.
35
Page 60 of 280
Sitting correctly and safely
> Insert a suitable tool such as the the vehicle key
or mechanical key into the release point on the
base (@) and press the button (2). Pull the head
restraint out of the backrest at the same time
> AZ in General information on page 57.
Installing the headrests
Applies to: vehicles with removable head restraints
> Fold the backrest forward slightly > page 75.
> Slide the posts on the head restraint down into
the guides until the posts click into place.
> Press the button @) and slide the head restraint
all the way down. It should not be possible to
remove the head restraint from the backrest
without pressing the button.
Safety belts
Each seat is equipped with a three-point safety
belt. Safety belts that are worn correctly are the
most effective way to reduce the risk of serious or
fatal injuries in a collision. Therefore, wear your
safety belt correctly and make sure that all vehi-
cle passengers are also wearing their safety belts
correctly when the vehicle is moving.
Even though your vehicle is equipped with an air-
bag system, every vehicle passenger must still al-
ways wear the appropriate safety belt. In addi-
tion to their normal protective function, safety
belts also hold vehicle occupants in the correct
seating position in the event of a collision so that
the airbags can deploy correctly and provide addi-
tional protection. Safety belts provide protection
during collisions when the airbags do not deploy
or if they have already deployed.
Z\ WARNING
The risk of serious or fatal injury increases if
the safety belt is not fastened, if it is worn in-
correctly, or if it is damaged.
— All vehicle occupants, including the driver,
must fasten their safety belts correctly be-
fore every trip and must always keep their
safety belts fastened during the trip, regard-
less of whether the seat is equipped with an
airbag or not. This also applies to children
58
that are seated in a child safety seat that is
appropriate for their weight and age and
that is secured with a safety belt.
In the event of a collision, vehicle occupants
that are not wearing safety belts could be
propelled through the vehicle interior and
collide with vehicle components, such as the
steering wheel, instrument panel, wind-
shield, or doors. In some situations, vehicle
occupants could also be ejected from the ve-
hicle. Vehicle occupants in the rear seats
who do not wear safety belts not only en-
danger themselves, but also other people in
the vehicle.
Only one person may be fastened with a
safety belt at a time. Never secure more
than one person, including children, with a
single safety belt.
Never allow children or infants to ride on an-
other person's lap and be belted into the
safety belt with them.
Insert the belt buckle only in the belt latch
belonging to the corresponding seat, so that
the protective function is not impaired.
To ensure the maximum protective function
of the safety belts, all vehicle passengers
must sit in the correct seating position
=> page 53.
Check the condition of your vehicle’s safety
belts regularly. If you find damage to the
belt webbing, the belt connections, the re-
tractor, or the buckle, have the damaged
safety belt replaced by an authorized Audi
dealer or authorized Audi Service Facility.
The safety belts must not be removed or
modified in any way. Do not attempt to re-
pair the safety belts yourself.
Safety belts that are strained during an acci-
dent, and thus stretched, must be replaced
by an authorized Audi dealer or authorized
Audi Service Facility.
Page 63 of 280
83A012721BA
Sitting correctly and safely
Additional safety belt functions
Safety belt retractor
The safety belts are equipped with an automatic
belt retractor. This automatic retractor allows the
safety belt to be pulled all the way out when the
belt is pulled slowly. However, the automatic re-
tractor locks during sudden braking maneuvers.
It also locks the belts when accelerating, driving
uphill, and driving around curves.
Belt force limiter
Safety belts with belt force limiters reduce the
force placed on the body by the safety belts dur-
ing a collision.
Safety belt pretensioners
In certain driving situations, safety belts may be
tightened with reversible belt tensioners when
you start driving. If the safety belt is too loose, it
will be tightened so that the belt will rest closer
to the body.
In some collisions, pyrotechnic belt tensioners
may secure the safety belts so that they cannot
loosen. This reduces forward movement by the
vehicle passengers.
ZA WARNING
The pyrotechnic system can only provide pro-
tection during one collision. If the pyrotechnic
belt tensioners deploy, the pretensioning sys-
tem must be replaced by an authorized Audi
dealer or authorized Audi Service Facility.
G) Tips
Smoke may be released when pyrotechnic belt
tensioners deploy. This is not a sign of a vehi-
cle fire.
Airbag system
ZA WARNING
— If you have not fastened your safety belt,
you are in an incorrect seating position, or
you are too close to the airbag system, the
airbag system will not be able to protect
you. This increases the risk of serious or fa-
tal injuries. Make sure that every vehicle
passenger has their safety belt correctly fas-
tened and is sitting in a correct seating posi-
tion > page 53. This is necessary regardless
of whether the seat is equipped with an air-
bag or not.
Never place your feet on the instrument
panel, out of the window, or on the seat sur-
faces. Never bend forward or lean on the
door or the side window. Keep as far as pos-
sible from the airbags so that they will not
be obstructed in the event that the airbags
deploy. Otherwise, serious and possibly fatal
injuries can occur if the airbags deploy.
People, animals, or objects between the
passengers and the airbag system can inter-
fere with the correct deployment of the air-
bag or can be thrown through the vehicle in-
terior, increasing the risk of serious or fatal
injuries. Make sure that nothing is located
between the vehicle occupants and the air-
bag system. Do not secure or transport any
objects within the deployment zone of the
airbag systems, especially on the steering
wheel, on the instrument panel, on the
doors, on the windows, or in the footwell.
Never put stickers on the airbag system cov-
ers or cover them with any objects.
Only lightweight clothing should be hung
from the garment hooks in the vehicle. Do
not use clothes hangers to hang clothing.
The pockets of the clothing must not con-
tain any heavy, breakable, or sharp-edged
objects. This could impair the effectiveness
of the side curtain airbags.
You must not use seat or protective covers
that are not specifically approved for use on
Audi seats with side airbags. Since the side
airbags deploy from the seat backrest, such
covers could impair the protective function
of the side airbags.
Damage to the original seat covers in the
side airbag deployment area must always be
repaired by an authorized Audi dealer or au-
thorized Audi Service Facility.
61
Page 68 of 280
Sitting correctly and safely
injury. Always secure child safety seats on
the rear seats. If special circumstances re-
quire the use of a child safety seat on the
front passenger's seat, always make sure
that PASSENGER AIR BAG OFF &%; re-
mains on while driving. If
PASSENGER AIR BAG OFF #%, does not
turn on, remove the child safety seat and in-
stall it again according to the child safety
seat manufacturer instructions. If
PASSENGER AIR BAG OFF &%; still does
not turn on, the front passenger's seat must
not be used. Drive to an authorized Audi
dealer or authorized Audi Service Facility
and have the airbag system inspected.
— Fluids, electronic devices, or mechanical
damage on the front passenger's seat may
cause the front passenger seat occupant de-
tection to malfunction. The system may
then incorrectly detect if the front passeng-
er's seat is occupied. As a result, it could de-
ploy the front passenger’s airbag incorrectly
or fail to deploy it, which increases the risk
of serious or fatal injury. Make sure that no
wet objects (such as a wet hand towel) and
no fluids come into contact with the front
passenger's seat cushion. If the front pas-
senger's seat becomes wet, dry it immedi-
ately. Make sure no electronic devices (such
as a laptop or a retrofitted seat heater) are
on the front passenger's seat. Do not trans-
port any objects on or under the front pas-
senger's seat.
— Seat covers or protective covers may prevent
the advanced airbag system from correctly
detecting child safety seats or passengers in
the front passenger's seat. You must not use
seat covers or protective covers on the front
passenger's seat that are not specifically ap-
proved for use on Audi seats with an ad-
vanced airbag system.
Child safety seats
General information
When installing and using child safety seats, fol-
low the information in this Owner's Manual, the
applicable state and federal regulations, and the
66
manufacturer instructions for the child safety
seat.
You can also obtain useful and current informa-
tion from the following sources:
U.S. National Highway Traffic Safety Adminis-
tration
http://www.nhtsa.gov
http://www.safercar.gov
National SAFE KIDS Campaign
http://www.safekids.org
SafetyBeltSafe U.S.A.
http://www.carseat.org
Transport Canada Information Centre
http://www.tc.gc.ca/roadsafety
Audi Customer Experience Center
https://www.audiusa.com/help/contact-us
https://www.audi.ca/ca/web/en/models/layer/
contact.html
Z\ WARNING
To reduce the risk of serious or fatal injuries,
children must always be secured in the vehicle
with a child safety seat that is appropriate for
their body size, weight, and age.
— Children ages 12 and under must be trans-
ported using the appropriate child safety
seat. Note differences in regulations be-
tween states and countries.
— Child safety seats secured incorrectly in the
vehicle may cause serious or fatal injuries in
the event of an accident. Always secure the
child safety seat according to the manufac-
turer instructions.
— Children or babies must not under any cir-
cumstances be held on the lap of the driver
or other passengers while driving.
— Do not secure more than one child in a child
safety seat.
— Never allow a child to sit in a child safety
seat unsupervised.
— Never allow children to ride unsecured in the
vehicle or to stand or kneel on the seats
while driving. In the event of an accident, a
child could be propelled through the vehicle.
Page 69 of 280
83A012721BA
Sitting correctly and safely
This can cause serious or fatal injuries for
the child and passengers.
— If children use an incorrect seating position
while driving, they have a higher risk of in-
jury during a sudden braking maneuver or
accident. This especially applies to children
in the front passenger's seat or children who
have their head near the side airbag deploy-
ment area, if the airbag system is deployed
during an accident. This incorrect seating
position can cause severe or even fatal inju-
ries.
— Make sure there is enough space in front of
the child in the child safety seat. If necessa-
ry, adjust the angle and position of the seat
in front of the child safety seat.
— The rear side of a forward-facing child safety
seat should be positioned as close as possi-
ble to the backrest on the vehicle seat. If the
head restraints make it difficult to install a
child safety seat, adjust or remove them
=> page 57. Reinstall the head restraints im-
mediately once the child safety seat has
been removed.
— Always make sure that the backrest on the
seat where the child safety seat is installed
is securely locked in place and cannot move
forward. Otherwise, the backrest where the
child safety seat is secured could move for-
ward in the event of an accident or other
emergency situation.
— NEVER use a rear-facing child safety seat on
a seat with an ACTIVATED FRONT AIRBAG;
this could cause DEATH or SERIOUS INJU-
RIES to a CHILD.
— Always secure child safety seats on the
rear seats. If exceptional circumstances re-
quire the child safety seat to be placed on
the front passenger's seat, then the front
passenger's airbag must be deactivated.
Always make sure that
PASSENGER AIR BAG OFF %; remains
on while driving. If
PASSENGER AIR BAG OFF %; does not
turn on, remove the child safety seat and
install it again according to the child safe-
ty seat manufacturer instructions. If
PASSENGER AIR BAG OFF #¥%; still
does not turn on, the front passenger's
seat must not be used. Drive to an author-
ized Audi dealer or authorized Audi Service
Facility and have the airbag system in-
spected.
— If you must use a forward-facing child safety
seat on the front passenger's seat, move the
seat as far back as possible so that it is as
far as possible from the front passenger's
airbag. While doing this, make sure the seat
can be adjusted all the way. A child in a child
safety seat on the front passenger's seat can
receive a severe impact if the front passeng-
er's airbag deploys, which increases the risk
of serious or fatal injury.
— Replace the child safety seat after an acci-
dent because there could be damage that is
not visible.
— Even if a child is not sitting in the child safe-
ty seat, the child safety seat must be se-
cured. An unsecured child safety seat may
be thrown through the vehicle interior dur-
ing sudden braking maneuvers or an acci-
dent.
Correct positioning for children
Always secure children in a child safety seat de-
signed for the body size, weight, and age of the
child.
You can secure child safety seats in your vehicle
using the lower LATCH anchors or the safety
belts. You can also secure child safety seats to
the top tether anchor. Depending on the child
safety seat, it may also be necessary to secure it
to the top tether anchor. In Canada, securing for-
ward-facing child safety seats to the top tether
anchors is required by law.
Always transport children in the rear seats
Accident statistics show that children that are se-
cured correctly in the rear seats are safer than in
front seats. Always transport children in suitable
child safety seats secured on the rear seats.
67
>
Page 71 of 280
83A012721BA
Sitting correctly and safely
> Activate the child safety lock > page 38.
» Remove the cover* from both lower LATCH an-
chors.
> If you secure a child safety seat to the rear seat,
secure any unused safety belts that are within
reach of the child > A\ in Securing child safety
seats with a safety belt on page 70.
> Secure the child safety seat according to the
child safety seat manufacturer instructions.
> Pull on the child safety seat to check if both
sides are engaged correctly in the LATCH an-
chors.
> If possible, also secure the child safety seat to
the respective top tether anchor in the vehicle
=> page 69.
_Z\ WARNING
The LATCH anchors in the vehicle are only de-
signed for child safety seats with the LATCH
system. To reduce the risk of serious or fatal
injury, never secure other child restraint sys-
tems, belts, or objects to the anchors.
@ Tips
The LATCH anchors are designed for a total
weight (child and child safety seat combined)
up to 65 lbs (29 kg). If the total weight is
greater than this, the child safety seat must
be secured with the vehicle safety belt.
Additionally securing a child safety seat to
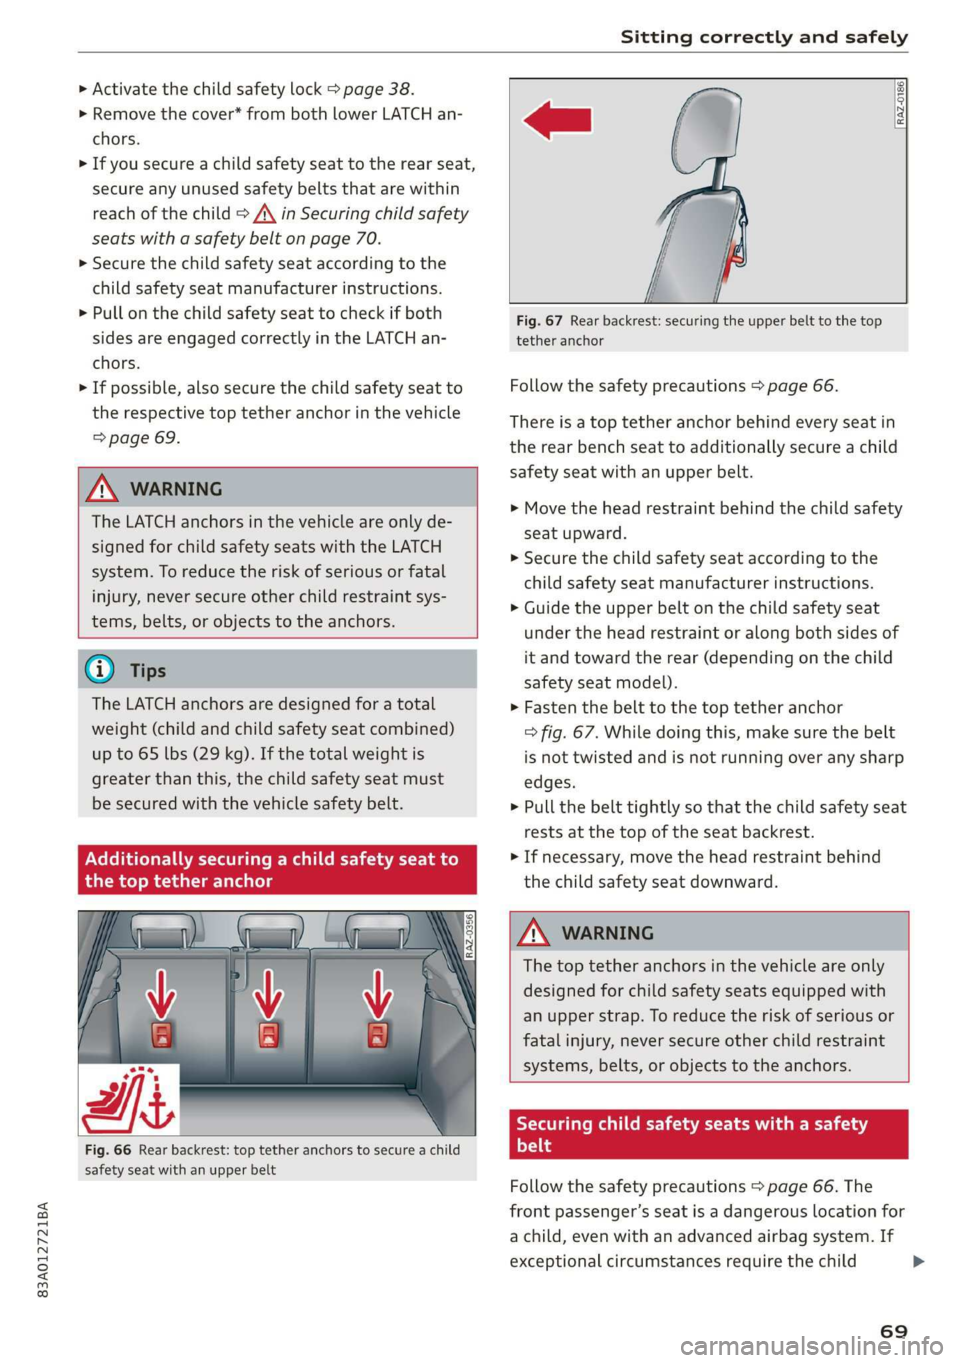
Adat-M ee) edat-lerlale
Fig. 66 Rear backrest: top tether anchors to secure a child
safety seat with an upper belt
RAZ-0186.
Fig. 67 Rear backrest: securing the upper belt to the top
tether anchor
Follow the safety precautions > page 66.
There is a top tether anchor behind every seat in
the rear bench seat to additionally secure a child
safety seat with an upper belt.
> Move the head restraint behind the child safety
seat upward.
>» Secure the child safety seat according to the
child safety seat manufacturer instructions.
> Guide the upper belt on the child safety seat
under the head restraint or along both sides of
it and toward the rear (depending on the child
safety seat model).
> Fasten the belt to the top tether anchor
> fig. 67. While doing this, make sure the belt
is not twisted and is not running over any sharp
edges.
> Pull the belt tightly so that the child safety seat
rests at the top of the seat backrest.
> If necessary, move the head restraint behind
the child safety seat downward.
Z\ WARNING
The top tether anchors in the vehicle are only
designed for child safety seats equipped with
an upper strap. To reduce the risk of serious or
fatal injury, never secure other child restraint
systems, belts, or objects to the anchors.
Securing child safety seats with a safety
Prot
Follow the safety precautions > page 66. The
front passenger’s seat is a dangerous location for
a child, even with an advanced airbag system. If
exceptional circumstances require the child
69
Page 75 of 280
83A012721BA
Stowing and using
could spill and cause damage to the vehicle
equipment.
Additional storage
You will find a variety of storage compartments
and holders at various locations in the vehicle.
— Glove compartment: The glove compartment
can be locked* using the vehicle key > page 32.
— Holders for a notepad and a pen in the glove
compartment
— Storage compartment in the cockpit on the
driver's side
— Storage compartments in the door trim panel
— Storage compartment* under the left front seat
— Storage compartment under the front center
armrest*
— Storage compartment* under the right front
seat
— Net* behind the front seats
— Storage compartment* at the end of the rear
center console
— Garment hooks in the rear
— Storage compartments next to the rear bench
seat
— Bag hooks* in the luggage compartment
ZA WARNING
—To reduce the risk of injury, make sure all
storage compartments are always closed
while driving.
— Loose objects can be thrown around the ve-
hicle interior during sudden driving or brak-
ing maneuvers, which increases the risk of
an accident. Store objects securely while
driving.
— Only use the storage compartments in the
door trim panels to store small objects that
will not stick out of the compartment and
impair the range of the side airbags.
— Only lightweight clothing should be hung
from the garment hooks in the vehicle. The
pockets of the clothing must not contain any
heavy, breakable, or sharp-edged objects.
Such objects endanger vehicle occupants
and increase the risk of injury during sudden
driving or braking maneuvers or in an acci-
dent, especially if the airbags deploy.
— Make sure your view toward the rear is not
blocked, for example by hanging clothing or
objects in the vehicle.
G) Tips
Applies to: vehicles with Wi-Fi:Do not place
any metal objects in the storage compart-
ment* on the end of the rear center console,
because they could impair the Wi-Fi antenna
function.
Luggage compartment
General information
All pieces of luggage or objects must be securely
fastened in the luggage compartment. Note the
following to maintain good vehicle handling:
> Distribute the load evenly in the luggage com-
partment.
> Stow heavy luggage as far forward in the lug-
gage compartment as possible.
» Use non-elastic cords attached to the tie-downs
to secure objects.
ZA WARNING
— The luggage compartment cover must al-
ways be securely fastened when in use to re-
duce the risk of an accident.
— The storage compartment must not be used
to transport heavy objects, hard objects, or
animals. Such objects endanger vehicle oc-
cupants and increase the risk of injury dur-
ing sudden driving or braking maneuvers or
in an accident.
— Loose objects can be thrown around the ve-
hicle interior during sudden driving or brak-
ing maneuvers, which increases the risk of
an accident. Always stow objects securely in
the luggage compartment and secure them
at the tie-downs. Use straps suitable for
heavy objects.
—If pieces of luggage or objects are secured
to the tie-downs with unsuitable or dam-
aged straps, this can increase the risk of
73
Page 76 of 280
Stowing and using
injury during braking maneuvers or acci-
dents.
— When transporting heavy objects, the vehi-
cle characteristics will change due to the
shift in the center of gravity, which increases
the risk of an accident. You may need to
adapt your driving style and speed to the
current conditions.
— The cargo net is only strong enough to se-
cure light objects. Heavy objects are not ade-
quately secured. Attempting to secure heavy
objects increases the risk of injury.
— Never exceed the permitted axle and load
and vehicle weight > page 264.
— Never secure a child safety seat to the tie-
downs.
— Never leave your vehicle unattended, espe-
cially if the luggage compartment lid is
open. Children could enter the luggage com-
partment and close the luggage compart-
ment lid from the inside. This creates the
risk of fatal injury, since the children would
be locked in and may not be able to escape
by themselves.
— Do not allow children to play in or on the ve-
hicle. Close and lock the luggage compart-
ment lid as well as all other doors when you
leave
the vehicle.
— Never transport passengers in the luggage
compartment. Every passenger must be cor-
rectly secured with the safety belts in the
vehicle > page 58.
—To reduce the risk of accidents, the luggage
compartment cover should never be unse-
cured
under any circumstances.
— Be careful when releasing the backrest and
folding
it forward. To reduce the risk of be-
ing pinched, pay attention and check when
folding backrests forward.
— The backrest must be securely latched so
objects cannot slide forward out of the lug-
gage compartment during sudden braking.
— The backrest must be latched securely to en-
sure that the safety belt is protecting the
center seating position.
— Always pull forward on the backrest to make
sure it is check if it is correctly locked in
place.
74
@) Note
—To reduce the risk of damage, move the rear
head restraints down > page 57 before fold-
ing the rear backrests forward.
— Objects should be removed from the rear
bench seat to protect the backrest from
damage.
— If you move the front seat back when the
rear seat backrest is folded forward, you
could damage the head restraints on the
rear seat.
— Make sure that the heating grid strips for
the rear window defogger are not damaged
by abrasive objects.
G) Tips
— The tire pressure must be adapted to the
load > page 226.
— You can purchase straps at specialty stores.
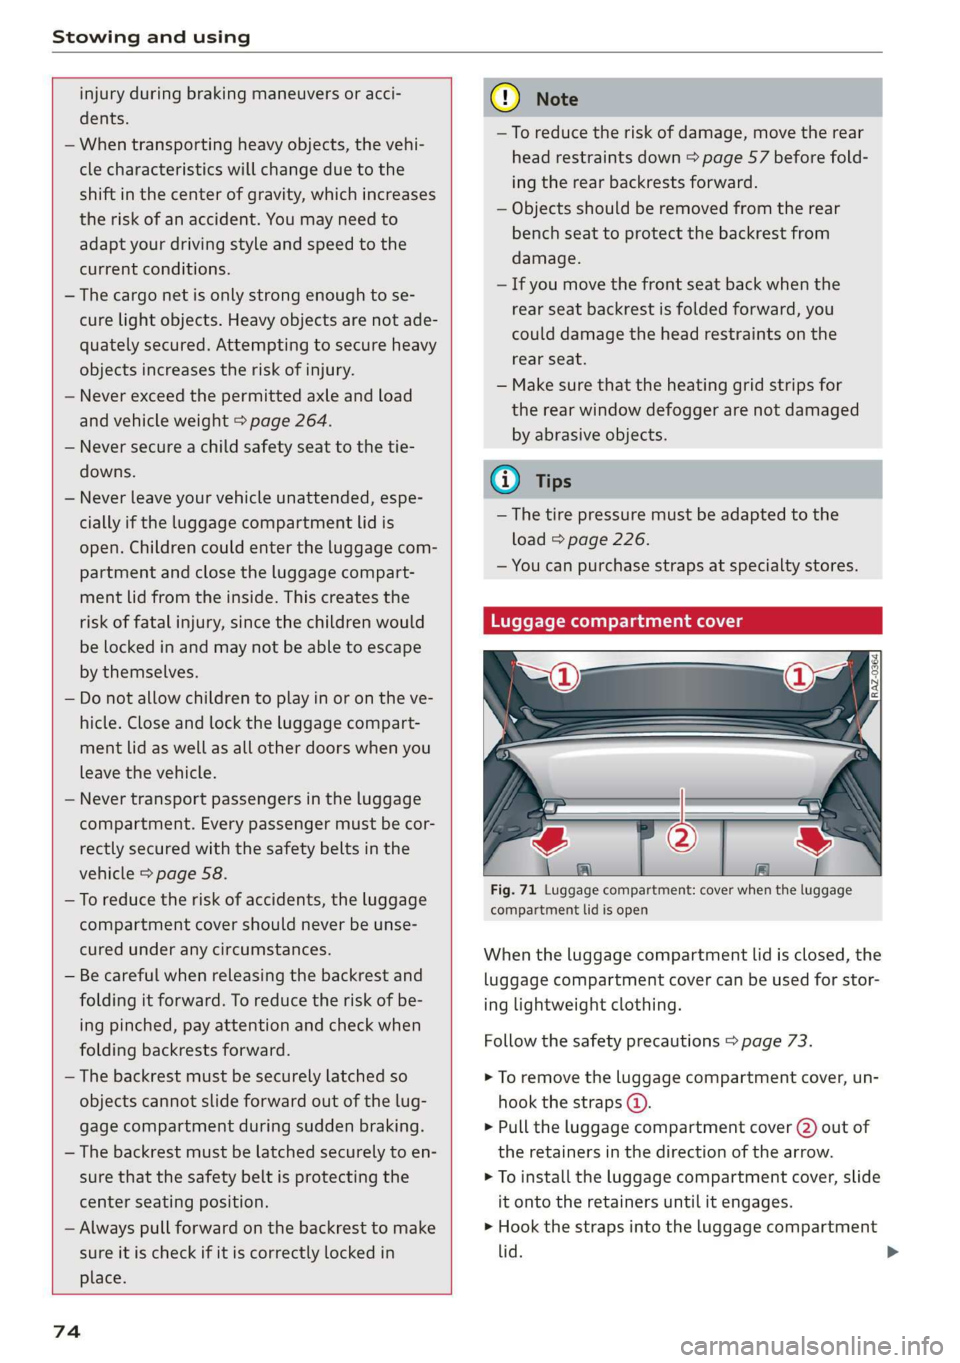
eye TE Tel-eetedaal SLA ie
\|_« ma.
Fig. 71 Luggage compartment: cover when the luggage
compartment lid is open
When the luggage compartment lid is closed, the
luggage compartment cover can be used for stor-
ing lightweight clothing.
Follow the safety precautions > page 73.
> To remove the luggage compartment cover, un-
hook the straps @).
> Pull the luggage compartment cover (2) out of
the retainers in the direction of the arrow.
> To install the luggage compartment cover, slide
it onto the retainers until it engages.
> Hook the straps into the luggage compartment
lid.
Page 78 of 280
Stowing and using
Double cargo floor mend roof racks and attachments from the Au-
Applies to: vehicles with double cargo floor di Genuine Accessories program.
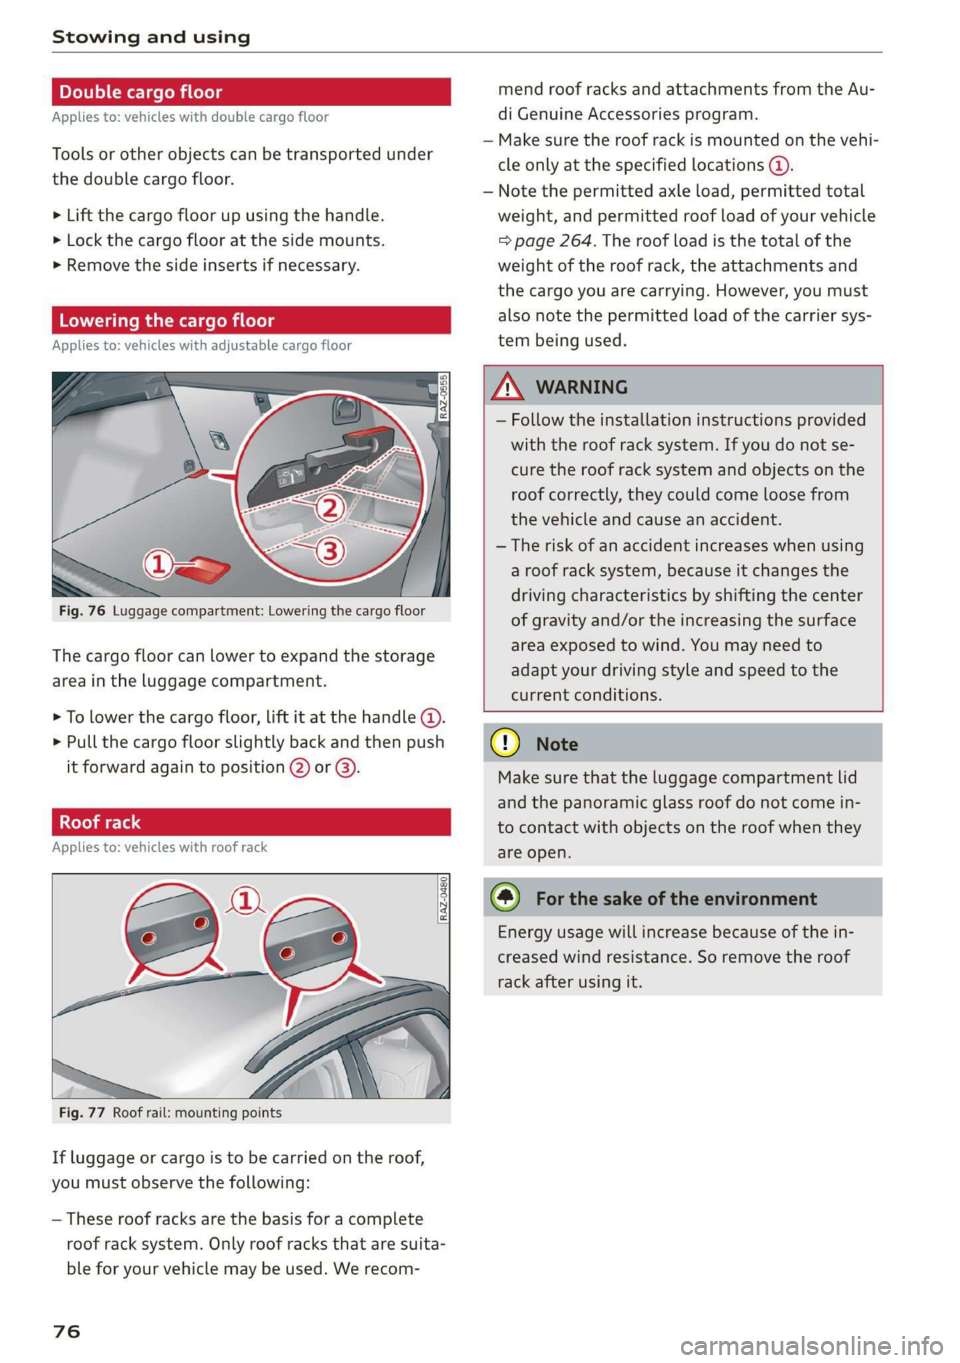
— Make sure the roof rack is mounted on the vehi-
cle only at the specified locations @).
— Note the permitted axle load, permitted total
Tools or other objects can be transported under
the double cargo floor.
> Lift the cargo floor up using the handle. weight, and permitted roof load of your vehicle
>» Lock the cargo floor at the side mounts. => page 264. The roof load is the total of the
> Remove the side inserts if necessary. weight of the roof rack, the attachments and
the cargo you are carrying. However, you must
Lowering the cargo floor also note the permitted load of the carrier sys-
Applies to: vehicles with adjustable cargo floor tem being used.
— Follow the installation instructions provided
with the roof rack system. If you do not se-
cure the roof rack system and objects on the
roof correctly, they could come loose from
the vehicle and cause an accident.
— The risk of an accident increases when using
a roof rack system, because it changes the
driving characteristics by shifting the center
of gravity and/or the increasing the surface
area exposed to wind. You may need to
adapt your driving style and speed to the
current conditions.
Fig. 76 Luggage compartment: Lowering the cargo floor
The cargo floor can lower to expand the storage
area in the luggage compartment.
> To lower the cargo floor, lift it at the handle (4).
> Pull the cargo floor slightly back and then push © Nte
it forward again to position @) or @). Make sure that the luggage compartment lid
and the panoramic glass roof do not come in-
to contact with objects on the roof when they
Applies to: vehicles with roof rack are open.
Energy usage will increase because of the in-
creased wind resistance. So remove the roof
rack after using it.
Fig. 77 Roof rail: mounting points
If luggage or cargo is to be carried on the roof,
you must observe the following:
— These roof racks are the basis for a complete
roof rack system. Only roof racks that are suita-
ble for your vehicle may be used. We recom-
76
Page 89 of 280
83A012721BA
Driving
— Turn off electrical equipment that is not need-
ed, for example seat heating*.
— Anticipate upcoming traffic situations while
driving to avoid unnecessary acceleration and
braking.
— Avoid driving at high speeds.
— Avoid adding extra weight to the vehicle if pos-
sible, for example by not leaving roof racks or
bike racks installed when they are not needed.
— Make sure the tire pressure is correct.
— Have maintenance performed regularly on the
vehicle.
— Do not let the engine run while the vehicle
parked.
— Do not drive with winter tires during the summ-
er.
— Use the Start/Stop system.
— Utilize the engine braking effect.
— Avoid driving short distances when possible.
@ Tips
The amount of noise produced by the vehicle
can increase significantly when driving with a
sporty style. Show respect to others around
you and the environment with the way you op-
erate your vehicle, especially at night.
Energy management
Your vehicle is equipped with an intelligent ener-
gy management system for distributing electrici-
ty. This significantly improves the starting ability
and increases the vehicle battery life.
@ Tips
— If you drive short distances frequently, the
vehicle battery may not charge enough
while driving. As a result, convenience func-
tions for electrical equipment may be tem-
porarily unavailable.
— The vehicle battery will gradually drain if
the vehicle is not driven for long periods of
time, or if electrical equipment is used
when the engine is not running. To ensure
that the vehicle can still be started, the
electrical equipment will be reduced or
switched off.
B Drive system: malfunction! Safely stop vehi-
cle
There is a malfunction in the drive system. The
brake
booster and the power steering may stop
working. Stop the vehicle immediately or as soon
as possible and do not continue driving. Have the
problem corrected by an authorized Audi dealer
or authorized Audi Service Facility.
B Drive system: malfunction! Please contact
Service
There is a malfunction in the drive system. Drive
slowly to an authorized Audi dealer or authorized
Audi Service Facility to have the malfunction cor-
rected.
Start/Stop system
Applies to: vehicles with Start/Stop system
The Start/Stop system can help increase fuel
economy and reduce CO2 emissions.
In Start/Stop mode, the engine shuts off auto-
matically when stopped, for example at a traffic
light. The ignition and important assist systems
such as power steering and the brake booster will
remain available during the Stop phase. The en-
gine will restart automatically when needed.
The Start/Stop system is automatically activated
once the ignition is switched on.
Basic requirements
— The driver's door and hood must be closed.
—"P","N", or"D" must be engaged.
— The steering wheel must not be turned far in ei-
ther direction.
— The vehicle must have driven faster than 2 mph
(3 km/h) since the last time it stopped.
—The vehicle is not in trailer mode.
@) Note
Always switch the Start/Stop system off when
driving through water > page 88. >
87