navigation AUDI Q3 2020 Owners Manual
[x] Cancel search | Manufacturer: AUDI, Model Year: 2020, Model line: Q3, Model: AUDI Q3 2020Pages: 278, PDF Size: 72.66 MB
Page 5 of 278
83A012721BB
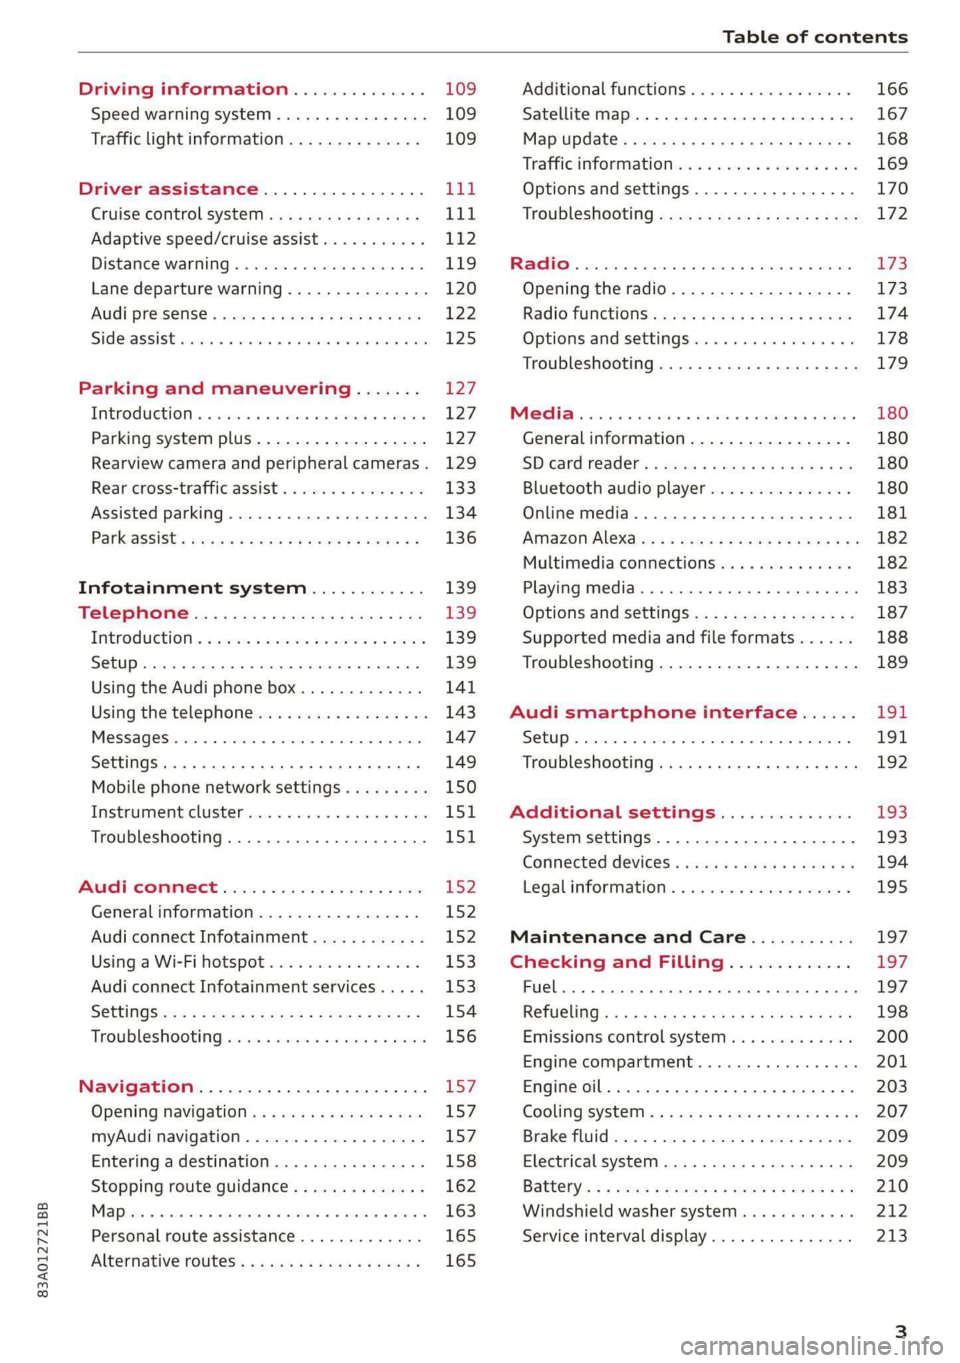
Table of contents
Driving information.............. 109
Speed warning system.........-..000- 109
Traffic light information.............. 109
Driver assistance................. Ut
Cruise control systeM.......... 000 eee 111
Adaptive speed/cruise assist........... 112
Distance warning.................005 119
Lane departure warning............... 120
AUdi PrOSONsSe & seis + 2 mews 2» nee 2 oem 122
Sid erassiStsasis so sae o x mnewsae 9 o, sea wo ame 125
Parking and maneuvering....... 127
IMEROMUCKION s sive wo oxsuaee sa onawams «+ states 127
Parking system plus...............04. 127
Rearview camera and peripheral cameras. 129
Rear cross-traffic assist... .......00.4.. 133
Assisted parking .............0.00005- 134
Parkeassist': wwe x 2 noup a 2 seyen 4 @ aoe & 136
Infotainment system............ 139
TeEl@PHOHE.« . < cce5 ce hens cb eee ee tee 139
IMEFOMUERION « = cece © 2 sorase w a swaiaies 2S wesw 139
Setup... eee eee 139
Using the Audi phone box............. 141
Using the telephoné:s. ¢ « weiss ¢ wes ve ae 143
MESSAGCS ssn. < + sxeusns © 5 sneniens «6 saereee @ ot sane 147
SettingS ... 6... cece cece eee eee eee 149
Mobile phone network settings......... 150
Instrument cluster.............2..00. 151
Troubleshooting...............00000- 151
Aud! CONMMECE «oi. 6 sees se cee ve oe 152
Generalinformation................. 152
Audi connect Infotainment............ 152
Using a Wi-Fi hotspot...............- 153
Audi connect Infotainment services..... 153
SOttinGSiecs « « sees ¢ » sees s Sees : Hew 154
Troubleshooting sss < v-aew w ¥ waren wo ssanve 156
Navigation........................ 157
Opening navigation.................. 157
myAudi navigation.................0. 157
Entering adestination................ 158
Stopping route guidance.............. 162
Ma Pine = = cxowins + x cvovne w a cttenete + © onnatts 7 mats 163
Personal route assistance............. 165
Alternative routes...............0005 165
Additional functions................. 166
Satellite map.......... cece eee 167
Map update’: « saas ¢ » exaw gs aves ce eae 168
Trafficinformationivc « © asec «a cmon © a wae 169
Options and settings...............0. 170
Troubleshooting «<< <= eccn ss yews sp es 172
Radio... .. cece eee 173
Opening the radio................... 173
Radio functions sss. s ease ss eeen es wean 174
Options and settings...............0. 178
Troubleshooting..................5-. 179
PASTS cesses 6 aswsne w : anavinn a © auncina wo eowrene 180
General information................. 180
SDicard readers « exes « ¢ sama « avew 6 e pers 180
Bluetooth audio player............... 180
Online media..................0000. 181
IAMAZOnAleXales: 2 ¢ saves « ¢ qos & a anes g 2: 182
Multimedia connections.............. 182
Playing media..............00- eee 183
Options and settings................. 187
Supported media and file formats...... 188
Troubleshooting.................0005 189
Audi smartphone interface...... 194.
SOCLUP « came oo samen + 4 ean 3 2 tame & sano 191
Troubleshooting............0-eeee eee 192
Additional settings.............. 193
System settings...................0. 193
Connected devices «vias si eae sc geap ae 194
Legal information. . ce. . 2 ene. se cron 195
Maintenance and Care........... 197
Checking and Filling............. 197
Fuel... cee eee eee 197
RetuelinGiccs + « xcs ss heen so Ree v oe 198
Emissions control system............. 200
Engine compartment................. 201
Engineoil...... 2... eee eee eee 203
CoolingsysSteM’'s « seems se canes sv eases yo we 207
BrakerPluidian. « onansss = ciesnes © sewome a = sme 209
Electrical system. .......-...00--005 209
Battery’: + « sss 2 s see 1 6 seek go eee eb 210
Windshield washer system............ 212
Service interval display............... 213
Page 14 of 278
Instrument cluster
@) Tips
— The following pages primarily show illustra-
tions of the Audi virtual cockpit plus*. The
display or location of the items that are
shown may vary on the different versions of
the instrument cluster.
— You can select the units used for tempera-
ture, speed, and other measurements
=> page 193.
— Speeds are displayed in mph (miles per
hour) or km/h (kilometers per hour).
— If there is a malfunction in the instrument
cluster, DEF will appear in the trip odometer
display. Have the malfunction corrected as
soon as possible.
Operating
3:50™
12/5/2018
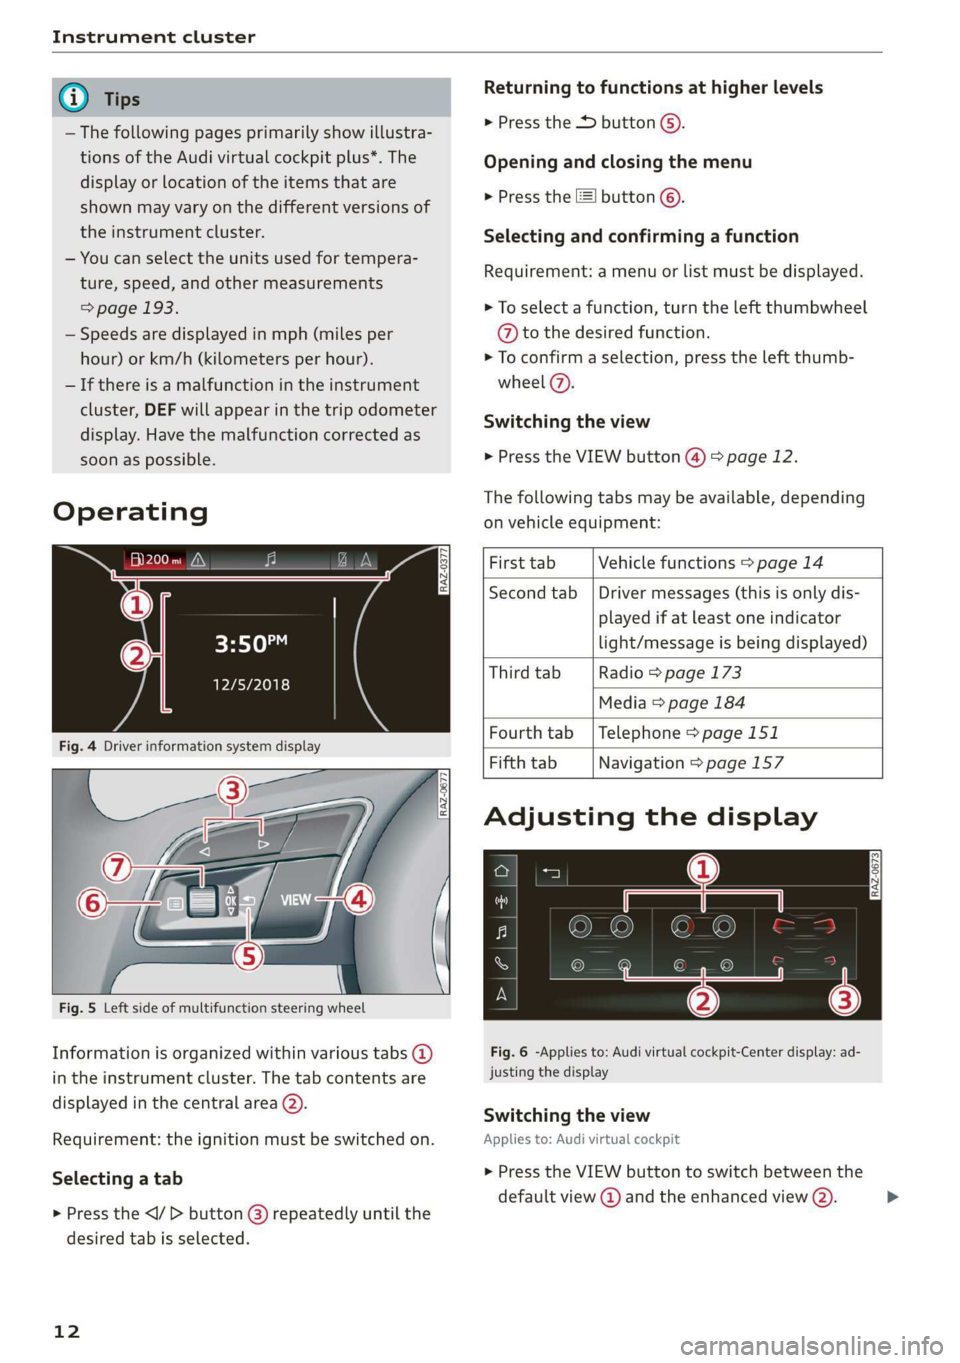
Fig. 4 Driver information system display
5
he Ny | cc
Fig. 5 Left side of multifunction steering wheel
Information is organized within various tabs @)
in the instrument cluster. The tab contents are
displayed in the central area (2).
Requirement: the ignition must be switched on.
Selecting a tab
> Press the button @) repeatedly until the
desired tab is selected.
12
Returning to functions at higher levels
> Press the button @).
Opening and closing the menu
> Press the =] button ©.
Selecting and confirming a function
Requirement: a menu or list must be displayed.
> To select a function, turn the left thumbwheel
@ to the desired function.
> To confirm a selection, press the left thumb-
wheel (7).
Switching the view
> Press the VIEW button (4) > page 12.
The following tabs may be available, depending
on vehicle equipment:
First tab Vehicle functions > page 14
Second tab | Driver messages (this is only dis-
played if at least one indicator
light/message is being displayed)
Third tab Radio > page 173
Media > page 184
Fourth tab | Telephone > page 151
Fifth tab Navigation > page 157
Adjusting the display
Fig. 6 -Applies to: Audi virtual cockpit-Center display: ad-
justing the display
Switching the view
Applies to: Audi virtual cockpit
> Press the VIEW button to switch between the
default view @ and the enhanced view (2).
Page 23 of 278
83A012721BB
Touch display
> If there are more than four notifications in the
notification center, the older notifications will
be hidden. To display the older notifications,
drag
your finger upward on the screen.
Setting displayed content
You can set whether some notifications should be
displayed.
> To set the displayed content, press ©, or
> Applies to MMI: Select on the home screen:
SETTINGS > Notifications.
>» Select and confirm which notifications should
be displayed.
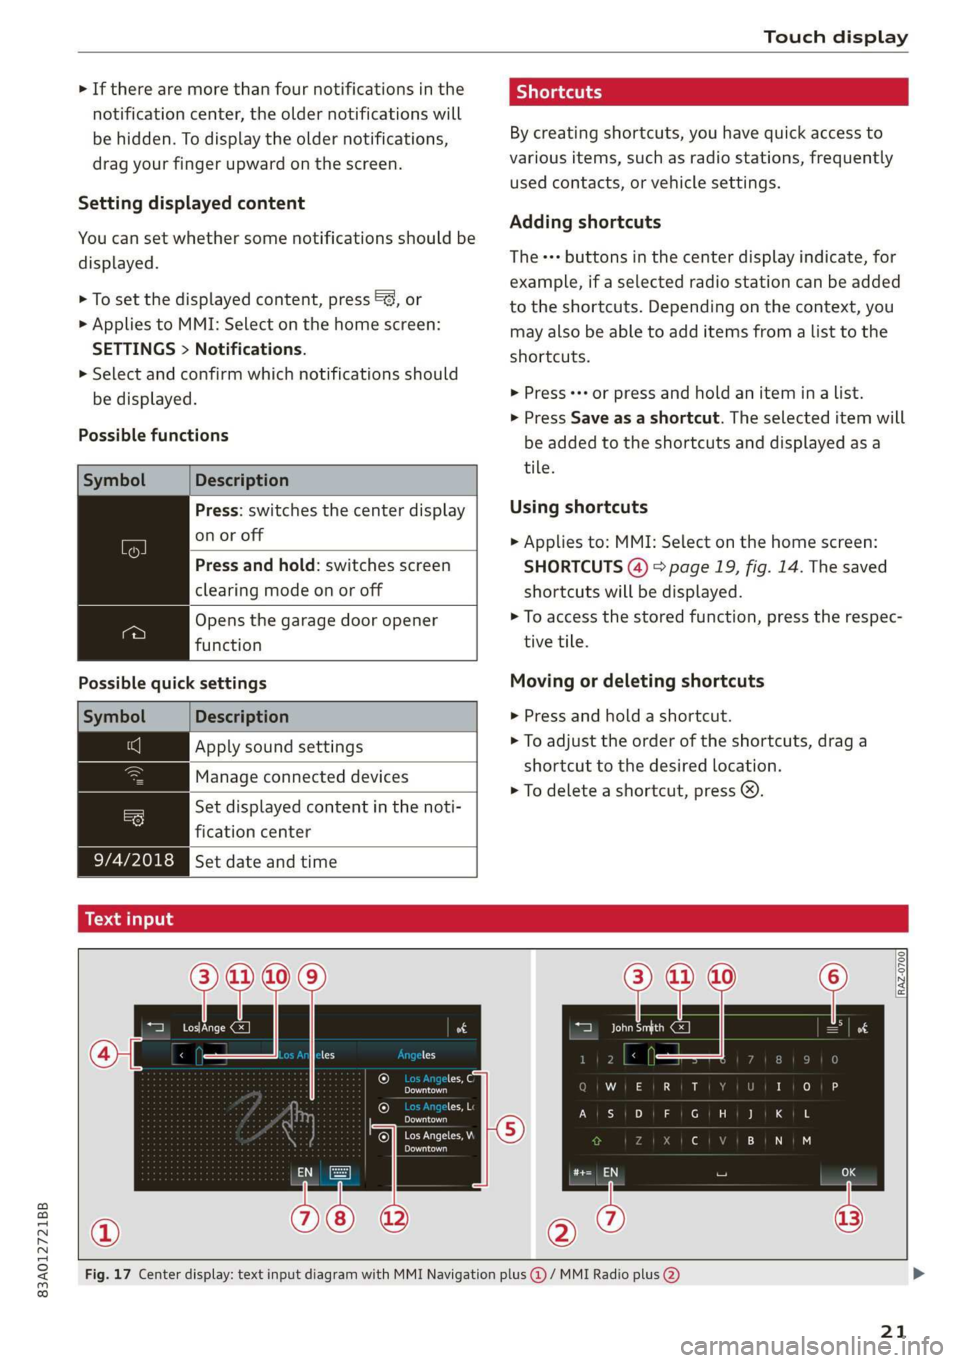
Possible functions
Description
Press: switches the center display
on or off
Press and hold: switches screen
clearing mode on or off
Opens the garage door opener
function
Possible quick settings
Description
Apply sound settings
Manage connected devices
Set displayed content in the noti-
fication center
EZYASEM Set dateandtime ——_——i|
Shortcuts
By creating shortcuts, you have quick access to
various items, such as radio stations, frequently
used contacts, or vehicle settings.
Adding shortcuts
The +++ buttons in the center display indicate, for
example, if a selected radio station can be added
to the shortcuts. Depending on the context, you
may also be able to add items from a list to the
shortcuts.
> Press +++ or press and hold an item ina list.
>» Press Save as a shortcut. The selected item will
be added to the shortcuts and displayed as a
tile.
Using shortcuts
> Applies to: MMI: Select on the home screen:
SHORTCUTS (4) > page 19, fig. 14. The saved
shortcuts will be displayed.
> To access the stored function, press the respec-
tive tile.
Moving or deleting shortcuts
> Press and hold a shortcut.
> To adjust the order of the shortcuts, drag a
shortcut to the desired location.
> To delete a shortcut, press ©.
acetal hg
be ure
< les
he
Downtown
oan
Downtown
eee
Pern
RAZ-0700.
Fig. 17 Center display: text input diagram with MMI Navigation plus @) / MMI Radio plus @)
21
Page 24 of 278
Touch display
Overview
Depending on the vehicle equipment, your vehi-
cle may have the following systems for entering
text:
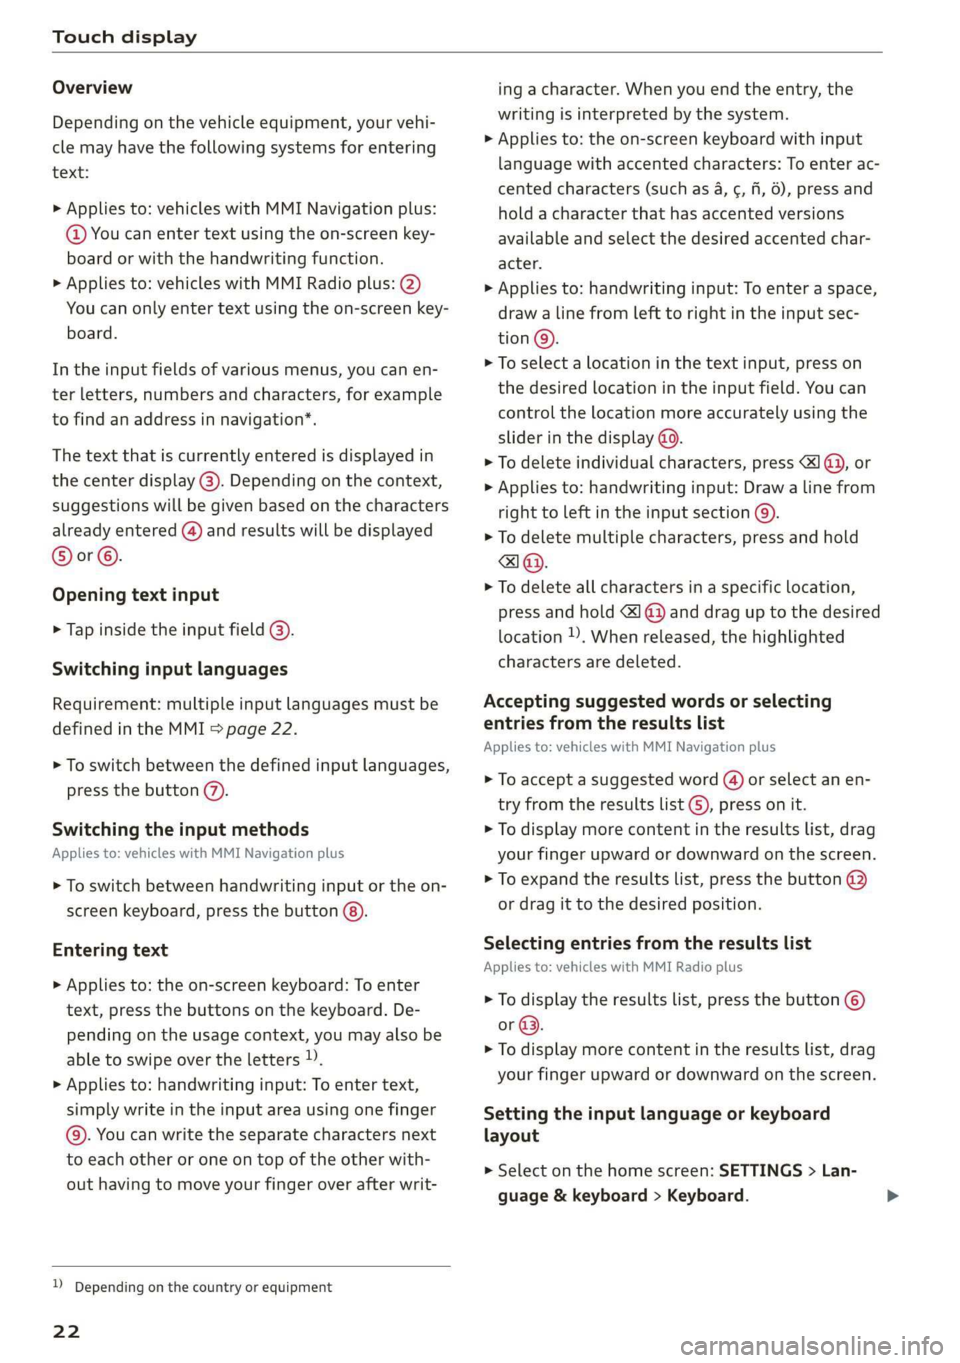
> Applies to: vehicles with MMI Navigation plus:
@ You can enter text using the on-screen key-
board or with the handwriting function.
> Applies to: vehicles with MMI Radio plus: @)
You can only enter text using the on-screen key-
board.
In the input fields of various menus, you can en-
ter letters, numbers and characters, for example
to find an address in navigation*.
The text that is currently entered is displayed in
the center display @). Depending on the context,
suggestions will be given based on the characters
already entered () and results will be displayed
®or©.
Opening text input
> Tap inside the input field @).
Switching input languages
Requirement: multiple input languages must be
defined in the MMI > page 22.
> To switch between the defined input languages,
press the button (7).
Switching the input methods
Applies to: vehicles with MMI Navigation plus
> To switch between handwriting input or the on-
screen keyboard, press the button @).
Entering text
> Applies to: the on-screen keyboard: To enter
text, press the buttons on the keyboard. De-
pending on the usage context, you may also be
able to swipe over the letters )).
>
Applies to: handwriting input: To enter text,
simply write in the input area using one finger
©. You can write the separate characters next
to each other or one on top of the other with-
out having to move your finger over after writ-
D Depending on the country or equipment
22
ing a character. When you end the entry, the
writing is interpreted by the system.
> Applies to: the on-screen keyboard with input
language with accented characters: To enter ac-
cented characters (such as 4, ¢, ff, 6), press and
hold a character that has accented versions
available and select the desired accented char-
acter.
> Applies to: handwriting input: To enter a space,
draw a line from left to right in the input sec-
tion®.
> To select a location in the text input, press on
the desired location in the input field. You can
control the location more accurately using the
slider in the display @9.
> To delete individual characters, press I @, or
> Applies to: handwriting input: Draw a line from
right to left in the input section @).
> To delete multiple characters, press and hold
> To delete all characters in a specific location,
press and hold <1 @) and drag up to the desired
location ), When released, the highlighted
characters are deleted.
Accepting suggested words or selecting
entries from the results list
Applies to: vehicles with MMI Navigation plus
> To accept a suggested word (4) or select an en-
try from the results list ©), press on it.
> To display more content in the results list, drag
your finger upward or downward on the screen.
> To expand the results list, press the button @
or drag it to the desired position.
Selecting entries from the results list
Applies to: vehicles with MMI Radio plus
> To display the results list, press the button ©
or @.
> To display more content in the results list, drag
your finger upward or downward on the screen.
Setting the input language or keyboard
layout
> Select on the home screen: SETTINGS > Lan-
guage & keyboard > Keyboard.
Page 112 of 278
Driving information
ZA WARNING
— When traffic light information is shown, al-
so always pay attention to the traffic situa-
tion, the distance to other vehicles and the
area around the vehicle. The driver is always
responsible for assessing the traffic situa-
tion.
— Always adapt your speed to the current
weather, road and traffic conditions. The dis-
played information must never cause you to
ignore legal traffic regulations and pose a
safety risk.
— Regardless of the traffic light information,
you should always monitor your speed using
the speedometer and make sure you are ad-
hering to the legal speed limit.
— The traffic light information does not adjust
your vehicle's speed to the speed recom-
mendation shown in the display.
— Follow the safety precautions and note the
limits of the assist systems, sensors, and
cameras > page 105.
@ Tips
— Traffic light information was only available
in select cities at the time this manual was
printed.
— Traffic light information is not available na-
tionwide.
— These functions depend on how up-to-date
the navigation data’ is.
— Outdated map content in the navigation
system* can cause information on the dis-
play to be omitted or incorrect.
— Certain traffic lights can automatically ad-
just to the current traffic situation. If this
occurs, the display of traffic light informa-
tion can change suddenly.
— The traffic signs on the road always take pri-
ority over the display. The driver is always
responsible for adhering to the regulations
applicable in the country where the vehicle
is being operated.
— Units of measurement and language set-
tings are displayed based on how they were
set in the MMI system settings > page 193.
110
Applies to: vehicles with traffic light information
Switching traffic light information on and
off
The system and be switched on and off in the
MMI.
> Applies to: MMI: Select on the home screen:
VEHICLE > Driver assistance > Traffic light in-
formation.
Accessing traffic light information
> Select in the instrument cluster: vehicle func-
tions tab > Traffic signs.
G) Tips
If another tab or another function is selected
in the instrument cluster, the traffic light in-
formation will appear in the status bar on the
instrument cluster.
Messages
Applies to: vehicles with traffic light information
Malfunction! See owner's manual
The system could not be configured, for example
due to a network malfunction. Switch the igni-
tion off and shut down the vehicle to restart the
system. Wait several minutes until the vehicle
has shut down completely and then switch the
ignition back on.
Function currently unavailable. See owner's
manual
There is a temporary system malfunction. Check
if one or more of the following situations applies
and correct the issue if necessary:
— Traffic light information is switched off
— Data transmission is deactivated
— There is no valid license
— Traffic light information is not available in that
area
Page 146 of 278
Telephone
Managing favorites
Applies to: vehicles with telephone
You can store the desired number for a contact as
a shortcut in the favorites list.
Accessing favorites
> Applies to: MMI: Select on the home screen:
PHONE > Favorites.
Storing an existing phone number as a
favorite:
> Press Call list.
> Press and hold a contact in the list until the Op-
tions menu appears.
> Press Store as favorite. The favorite has been
stored. will appear briefly.
Deleting stored favorites
> Select: Favorites > Z > one or multiple favor-
ites or Select all > Delete > (Done).
@) Tips
If there are multiple mobile devices, you can
create separate favorites in the MMI for each
mobile device.
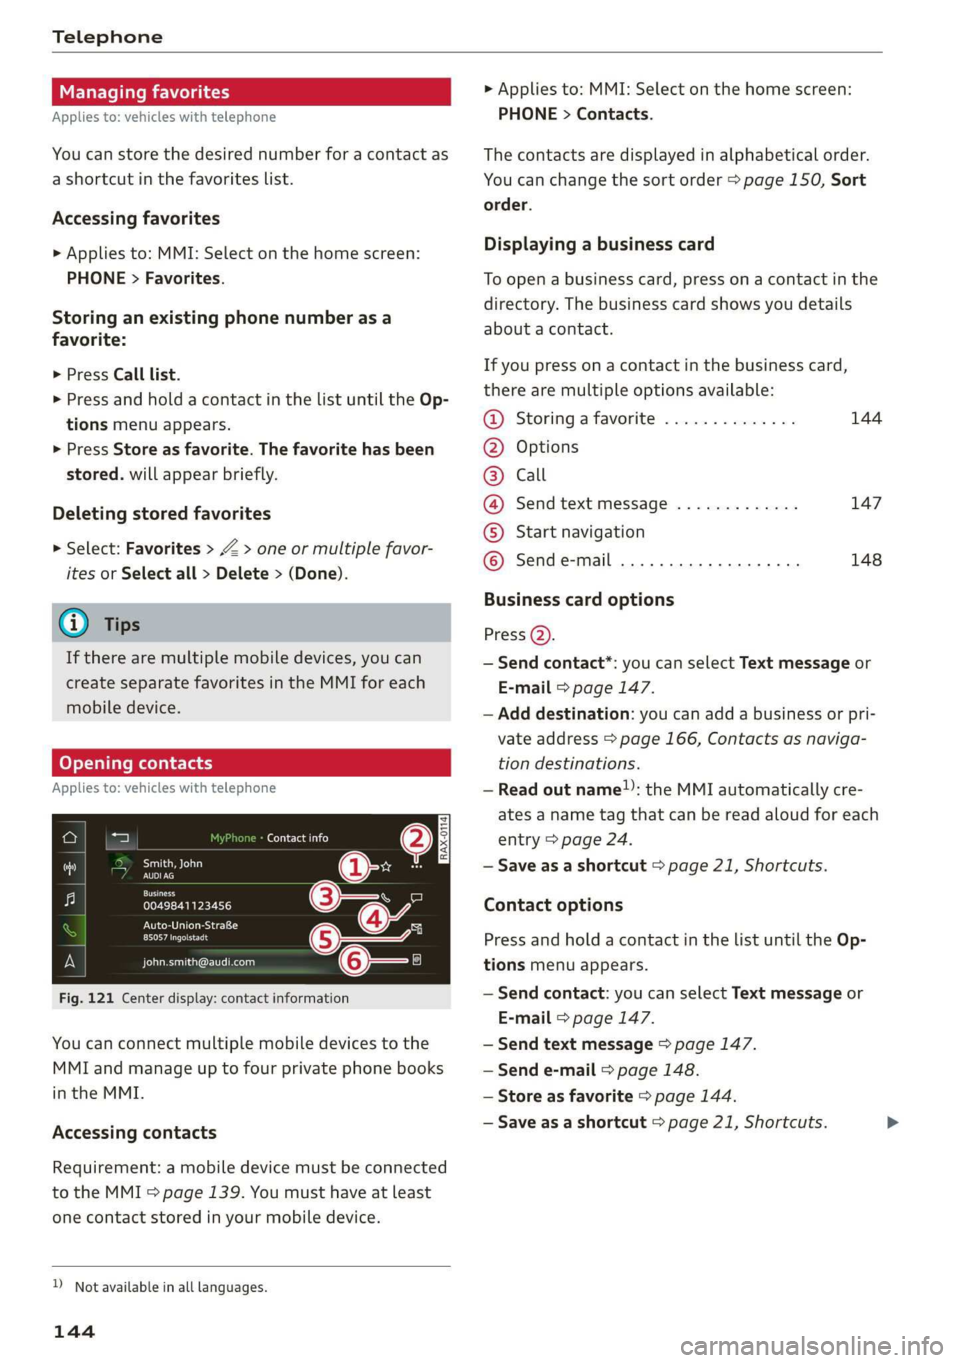
Opening contacts
Applies to: vehicles with telephone
(enced)
eu os ;
or
Business ©=
0049841123456
PMU esac}
Poeanect
ones Reel)
Fig. 121 Center display: contact information
You can connect multiple mobile devices to the
MMI and manage up to four private phone books
in the MMI.
Accessing contacts
Requirement: a mobile device must be connected
to the MMI > page 139. You must have at least
one contact stored in your mobile device.
) Not available in all languages.
144
> Applies to: MMI: Select on the home screen:
PHONE > Contacts.
The contacts are displayed in alphabetical order.
You can change the sort order > page 150, Sort
order.
Displaying a business card
To open a business card, press on a contact in the
directory. The business card shows you details
about a contact.
If you press on a contact in the business card,
there are multiple options available:
@ Storinga favorite .............. 144
@® Options
© Call
@ Send text message ............. 147
© Start navigation
© Sende-mail ...............000. 148
Business card options
Press Q).
— Send contact*: you can select Text message or
E-mail > page 147.
— Add destination: you can add a business or pri-
vate address > page 166, Contacts as naviga-
tion destinations.
— Read out name: the MMI automatically cre-
ates a name tag that can be read aloud for each
entry > page 24.
— Save asa shortcut > page 21, Shortcuts.
Contact options
Press and hold a contact in the list until the Op-
tions menu appears.
— Send contact: you can select Text message or
E-mail > page 147.
— Send text message > page 147.
— Send e-mail > page 148.
— Store as favorite > page 144.
— Save as a shortcut > page 21, Shortcuts.
Page 149 of 278
83A012721BB
Telephone
Messages
Text messages
Applies to: vehicles with telephone
Depending on the mobile device being used and
the mobile network contract, you may be able to
receive and send text messages using the MMI.
Requirement: your mobile device must be con-
nected to the MMI via Bluetooth Message Access
Profile (Bluetooth MAP) > page 139.
> Applies to: MMI: Select on the home screen:
MESSAGES > (=) > Text message (SIM card)*/
text message (phone 1)/text message (phone
2)*,
Inboxes
— New text message: press on a template in the
list or dictate a text message. Press Add and
select one or more recipients from your con-
tacts. To remove a recipient, press Delete. Press
Send.
— Inbox: displays all received text messages.
— Sent: displays all sent text messages.
— Outbox": displays all text messages to be sent.
— Drafts*: text messages that have not been sent
yet by the mobile device are displayed on the
MMI.
— Deleted*: deleted text messages are displayed.
— User-defined*: folders defined by the user are
transferred from your mobile device.
Message options
The following options are available when you se-
lect a text message:
— Read out* the text message).
— Reply: a reply can be sent to the selected mes-
sage in the Inbox.
— To switch to the previous or the next message,
press < or >.
— More: options
D_ Not available in all languages.
2) Function is not supported on all mobile devices.
When you press More, the following options are
available:
— Call: Requirement: a number must be stored.
You
can call the contact.
— Forward: the selected text message can be for-
warded to other recipients. Text can also be
added before sending.
— Navigate: Requirement: the contact must have
a navigation address stored with it in the direc-
tory. You can start route guidance.
— Extract numbers: Requirement: the message
must contain a number. You can extract a num-
ber from a text message.
— Send again: Requirement: the text message
must be in the Outbox. The selected text mes-
sage can be resent.
Press
and hold an entry in the Inbox until the Op-
tions menu appears.
— Reply: a reply can be sent to the selected mes-
sage in the Inbox.
— Forward: the selected text message can be for-
warded to other recipients. Text can also be
added before sending.
Settings
Press ©},
— Automatically forward text message to mobile
device*2): when this function is switched on,
text messages will be automatically stored on
your mobile device.
— New text message notification: when this
function is switched on, you will be notified
when new text messages are received. New text
messages are indicated with an envelope Min
the MMI status bar.
— Text message center*: the number for the text
message center of your cell phone service pro-
vider is displayed. If no number has been stor-
ed yet, you can enter the text message center
number.
— Delete text messages from SIM card”: if the
memory capacity on the SIM card is full, an en-
velope with a line through it is displayed in the
MMI status bar. You can continue to send text >
147
Page 150 of 278
Telephone
messages, but you cannot receive new text
messages. To delete all sent text messages
from the SIM card, select All sent messages. To
delete all read text messages from the SIM
card, select All read messages.
Delete text message
Select: a mailbox > Z > one or more text mes-
sages > Delete > Done.
@ Tips
— Please note that you may have to activate
the receiving and sending of text messages
depending on the SIM card being used (for
example, when using a multi-SIM).
— Messages that are deleted in the MMI are
also deleted in the mobile device automati-
cally.
— Only new received messages may be dis-
played depending on your mobile device.
Applies to: vehicles with telephone
Depending on the type of mobile device being
used, you may be able to receive and send e-
mails through the MMI.
Requirement: your mobile device must be con-
nected to the MMI via Bluetooth Message Access
Profile (Bluetooth MAP) > page 139.
> Applies to: MMI: Select on the home screen:
MESSAGES > (:=) > e-mail (phone 1)/e-mail
(phone 2)*.
Inboxes
— New e-mail: press on a template in the list.
Press Add and select one or more recipients
from your contacts. To remove one or all recipi-
ents, press Delete. Press Send.
— Inbox: displays all received e-mails. To update
the list, press OQ.
— Sent: displays all sent e-mails.
— Outbox: displays all e-mails to be sent.
— Drafts: e-mails that have not been sent yet are
displayed.
) Not available in all languages.
148
— Deleted*: deleted e-mails are displayed.
— User-defined*: folders defined by the user are
transferred from your mobile device.
Message options
The following options are available when you se-
lect an e-mail:
— Read out* the e-mail).
— Reply: a reply can be sent to the selected e-mail
in the Inbox.
— To switch to the previous or the next message,
press or >.
— More: options
When you press More, the following options may
be displayed depending on your mobile device
and the applicable mail folder:
— Call: Requirement: a number must be stored.
You can call the contact.
— Forward: the selected e-mail can be forwarded
to other recipients. Text can also be added be-
fore sending.
— Extract e-mail add.: you can extract the e-mail
address from an e-mail.
— Navigate: Requirement: the contact must have
a navigation address stored with it in the direc-
tory. You can start route guidance.
— Extract numbers: Requirement: the text in the
e-mail must contain a number. You can extract
a number from an e-mail.
— Show all recipients*: you can display the recipi-
ents of an e-mail.
— Show attachmts.”: you can display a list of at-
tachments to an e-mail.
— Send again: the selected e-mail in the Outbox
and Sent mailboxes can be sent again.
Press and hold an entry in the Inbox until the Op-
tions menu appears.
— Reply: a reply can be sent to the selected e-
mail.
— Reply all: a reply can be sent for the selected e-
mail and it will be sent to all of the entered re-
cipients.
— Forward: the selected e-mail can be forwarded
to different recipients.
Page 159 of 278
83A012721BB
Navigation
Navigation
Opening navigation
Applies to: vehicles with navigation system
The navigation system directs you to your desti-
nation, around traffic incidents, and on alterna-
tive routes, if desired.
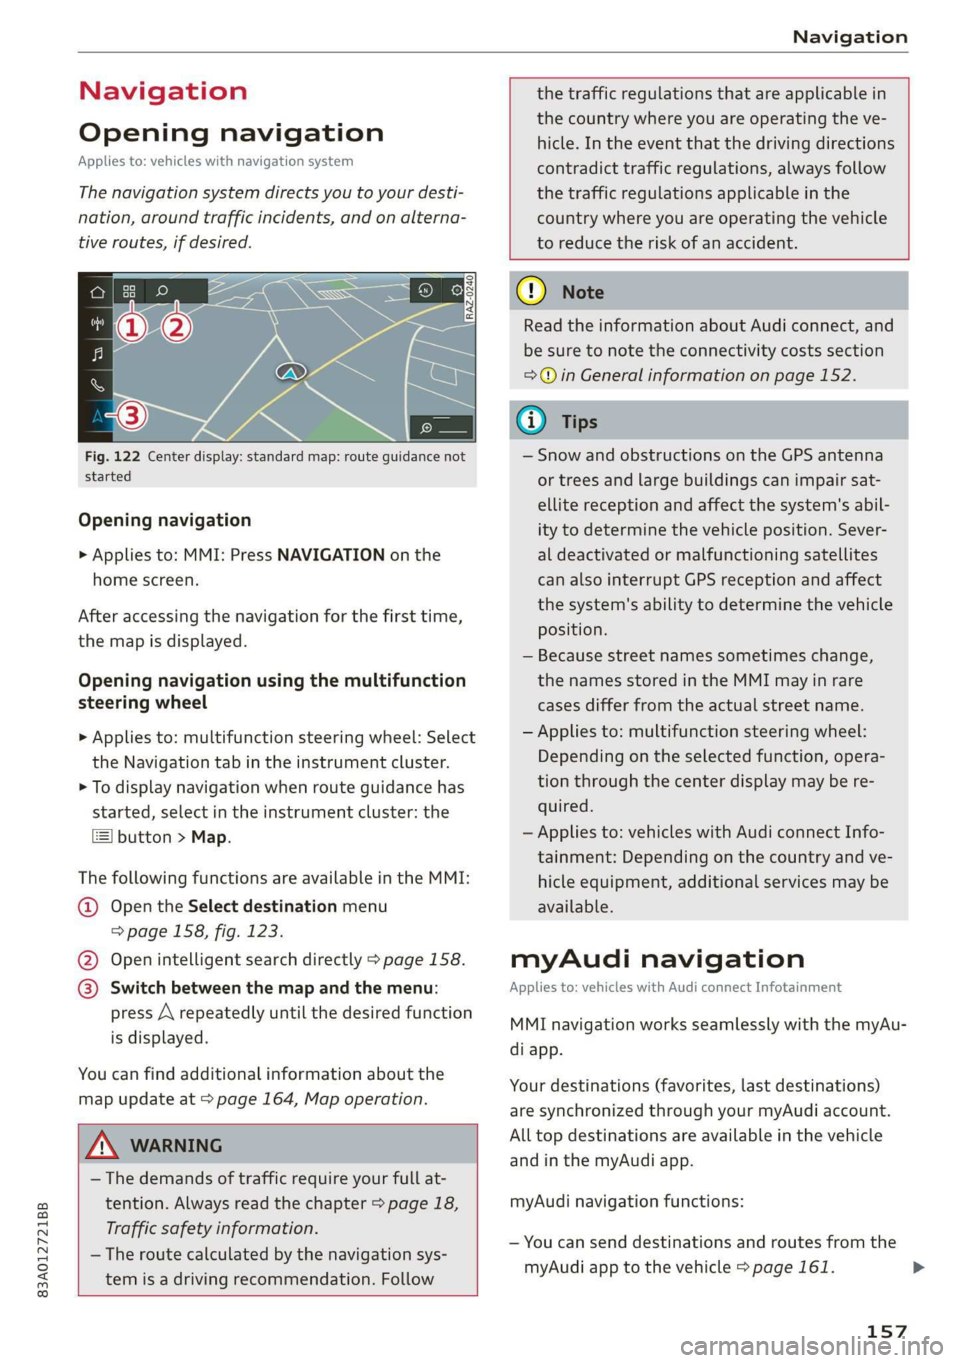
Fig. 122 Center display: standard map: route guidance not
started
Opening navigation
> Applies to: MMI: Press NAVIGATION on the
home screen.
After accessing the navigation for the first time,
the map is displayed.
Opening navigation using the multifunction
steering wheel
> Applies to: multifunction steering wheel: Select
the Navigation tab in the instrument cluster.
> To display navigation when route guidance has
started, select in the instrument cluster: the
button > Map.
The following functions are available in the MMI:
@ Open the Select destination menu
=> page 158, fig. 123.
@ Open intelligent search directly > page 158.
@ Switch between the map and the menu:
press A repeatedly until the desired function
is displayed.
You can find additional information about the
map update at > page 164, Map operation.
the traffic regulations that are applicable in
the country where you are operating the ve-
hicle. In the event that the driving directions
contradict traffic regulations, always follow
the traffic regulations applicable in the
country where you are operating the vehicle
to reduce the risk of an accident.
ZX WARNING
— The demands of traffic require your full at-
tention. Always read the chapter > page 18,
Traffic safety information.
— The route calculated by the navigation sys-
tem is a driving recommendation. Follow
@) Note
Read the information about Audi connect, and
be sure to note the connectivity costs section
=>@ in General information on page 152.
iG) Tips
— Snow and obstructions on the GPS antenna
or trees and large buildings can impair sat-
ellite reception and affect the system's abil-
ity to determine the vehicle position. Sever-
al deactivated or malfunctioning satellites
can also interrupt GPS reception and affect
the system's ability to determine the vehicle
position.
— Because street names sometimes change,
the names stored in the MMI may in rare
cases differ from the actual street name.
— Applies to: multifunction steering wheel:
Depending on the selected function, opera-
tion through the center display may be re-
quired.
— Applies to: vehicles with Audi connect Info-
tainment: Depending on the country and ve-
hicle equipment, additional services may be
available.
myAudi navigation
Applies to: vehicles with Audi connect Infotainment
MMI navigation works seamlessly with the myAu-
di app.
Your destinations (favorites, last destinations)
are synchronized through your myAudi account.
All top destinations are available in the vehicle
and
in the myAudi app.
myAudi navigation functions:
— You can send destinations and routes from the
myAudi app to the vehicle > page 161.
157
>
Page 160 of 278
Navigation
— Active route guidance in the myAudi app can be
continued in the MMI.
— Depending on the situation, it may be possible
to continue active route guidance from the MMI
in the myAudi app to continue navigating to the
destination after leaving the vehicle.
@) Note
Read the information about Audi connect, and
be sure to note the connectivity costs section
=@ in General information on page 152.
Entering a destination
Select destination
Applies to: vehicles with navigation system
Cea Courler)
Ee) ©
_— 2
Pec eee Eesinre
ne a Gocco
ined entered Pid
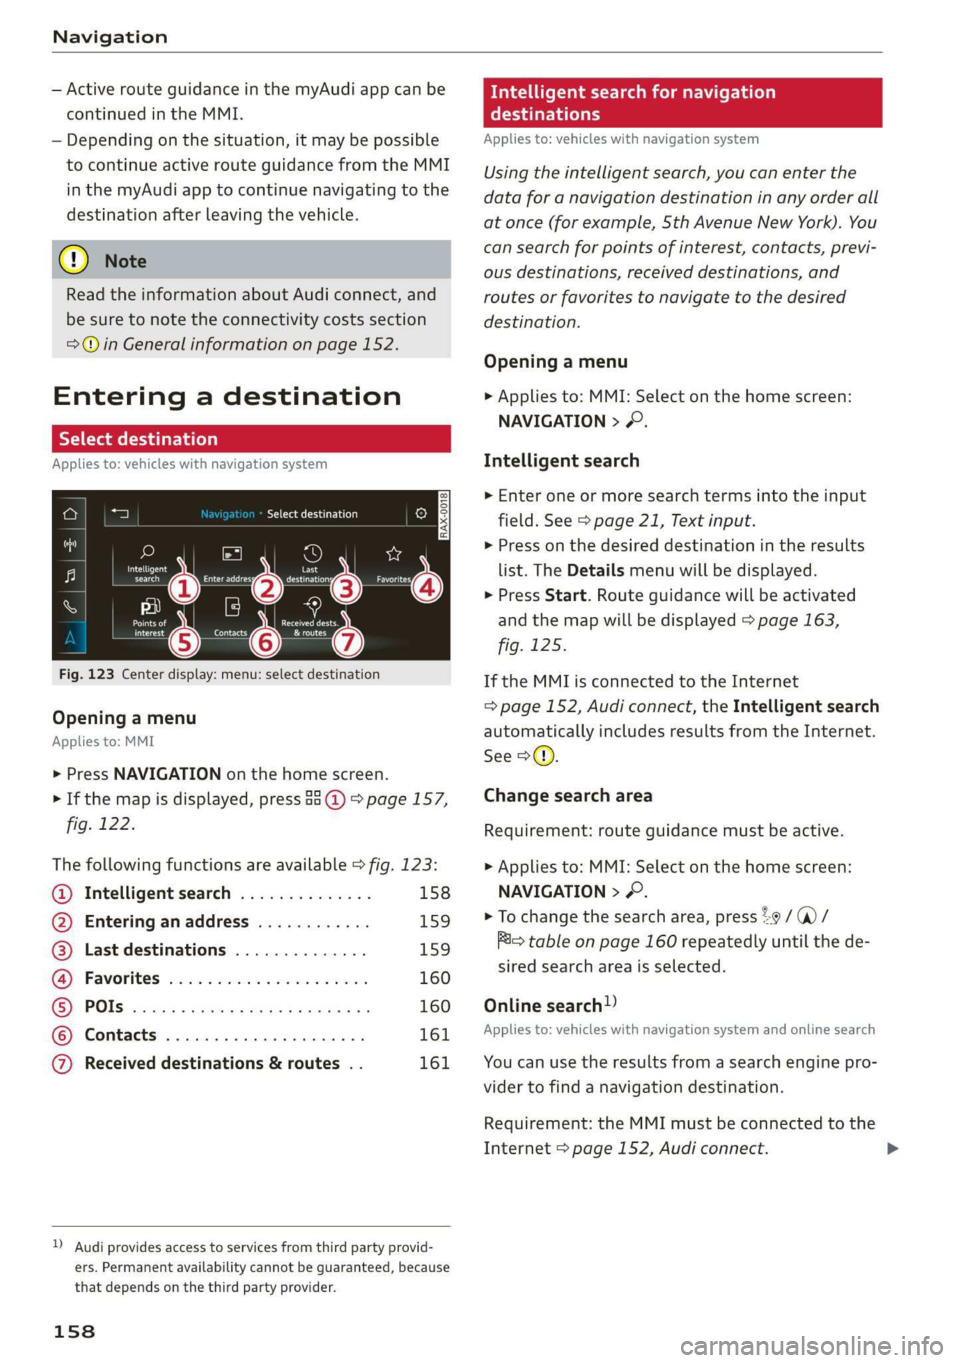
Fig. 123 Center display: menu: select destination
Opening a menu
Applies to: MMI
> Press NAVIGATION on the home screen.
> If the map is displayed, press aa (@) > page 157,
fig. 122.
The following functions are available > fig. 123:
@ Intelligent search .............. 158
@ Entering anaddress ............ 159
@) Last destinations .............. 159
G@® Favorites cess 2 cscs ses sy wes 160
© POls.... 160
© Contacts 161
@ Received destinations & routes . . 161
)) Audi provides access to services from third party provid-
ers. Permanent availability cannot be guaranteed, because
that depends on the third party provider.
158
eas search for navigation
era
Applies to: vehicles with navigation system
Using the intelligent search, you can enter the
data for a navigation destination in any order all
at once (for example, Sth Avenue New York). You
can search for points of interest, contacts, previ-
ous destinations, received destinations, and
routes or favorites to navigate to the desired
destination.
Opening a menu
> Applies to: MMI: Select on the home screen:
NAVIGATION > &.
Intelligent search
» Enter one or more search terms into the input
field. See > page 21, Text input.
> Press on the desired destination in the results
list. The Details menu will be displayed.
> Press Start. Route guidance will be activated
and the map will be displayed > page 163,
fig. 125.
If the MMI is connected to the Internet
=> page 152, Audi connect, the Intelligent search
automatically includes results from the Internet.
See >©.
Change search area
Requirement: route guidance must be active.
> Applies to: MMI: Select on the home screen:
NAVIGATION > 2.
> To change the search area, press %9 / (a)/
i= table on page 160 repeatedly until the de-
sired search area is selected.
Online search!)
Applies to: vehicles with navigation system and online search
You can use the results from a search engine pro-
vider to find a navigation destination.
Requirement: the MMI must be connected to the
Internet > page 152, Audi connect.