change wheel AUDI Q3 2020 Owners Manual
[x] Cancel search | Manufacturer: AUDI, Model Year: 2020, Model line: Q3, Model: AUDI Q3 2020Pages: 278, PDF Size: 72.66 MB
Page 26 of 278
Voice operation
Voice operation
General information
You can operate many functions in the vehicle
easily using voice commands.
Using the voice operation system effectively
> Speak clearly and distinctly at a normal volume.
Speak louder when driving faster.
> Emphasize the words in the commands evenly
and do not leave long pauses.
> Close the doors, the windows, and the sunroof*
to reduce background noise. Make sure that
passengers are not speaking when you are giv-
ing a voice command.
> Do not direct the vents toward the hands-free
microphone, which is in the roof headliner near
the front interior lights.
> Only the driver should speak to the system, be-
cause the handsfree microphone is aimed to-
ward this seating position.
ZA\ WARNING
— Direct your full attention to driving. As the
driver, you have complete responsibility for
safety in traffic. Only use the functions in
such a way that you always maintain com-
plete control over your vehicle in all traffic
situations.
— Do not use voice operation in emergencies
because your voice may change in stressful
situations. The system may take longer to
dial the number or may not be able to dial it
at all. Dial the emergency number manually.
@ Tips
There are no voice guidance* prompts when a
dialog is active.
24
Voice recognition system
Applies to: vehicles with voice recognition system
See
Dat)
Where is a
Connect
Diala
coy
Es
ea
cog
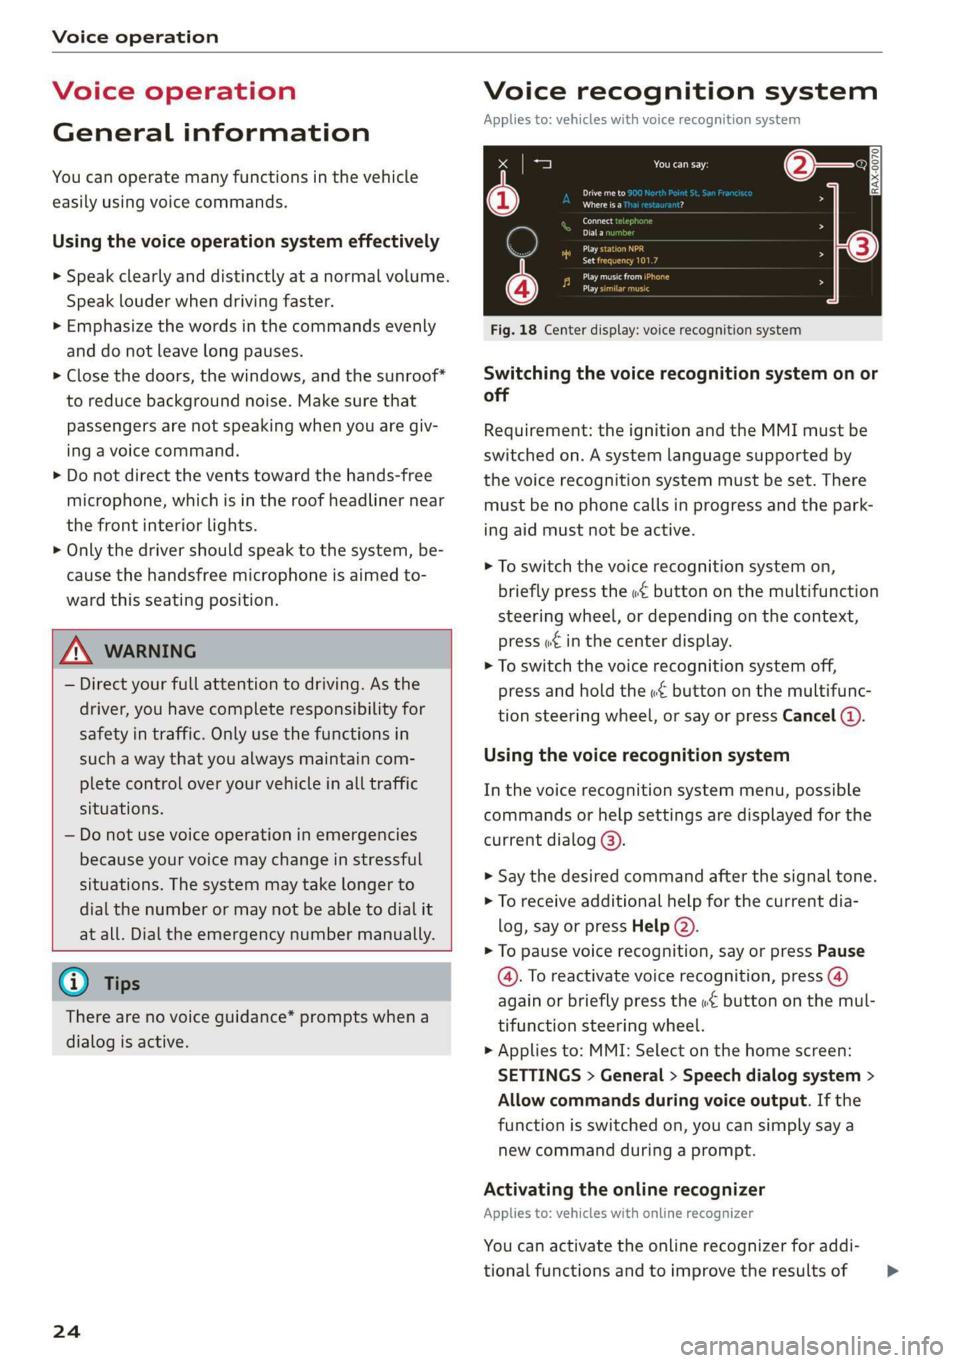
Fig. 18 Center display: voice recognition system
Switching the voice recognition system on or
off
Requirement: the ignition and the MMI must be
switched on. A system language supported by
the voice recognition system must be set. There
must be no phone calls in progress and the park-
ing aid must not be active.
> To switch the voice recognition system on,
briefly press the «€ button on the multifunction
steering wheel, or depending on the context,
press w¢ in the center display.
> To switch the voice recognition system off,
press and hold the « button on the multifunc-
tion steering wheel, or say or press Cancel ().
Using the voice recognition system
In the voice recognition system menu, possible
commands or help settings are displayed for the
current dialog @).
> Say the desired command after the signal tone.
> To receive additional help for the current dia-
log, say or press Help (2).
> To pause voice recognition, say or press Pause
@. To reactivate voice recognition, press (@)
again or briefly press the «€ button on the mul-
tifunction steering wheel.
> Applies to: MMI: Select on the home screen:
SETTINGS > General > Speech dialog system >
Allow commands during voice output. If the
function is switched on, you can simply say a
new command during a prompt.
Activating the online recognizer
Applies to: vehicles with online recognizer
You can activate the online recognizer for addi-
tional functions and to improve the results of >
Page 60 of 278

Sitting correctly and safely
— Push the lever upward firmly so that the
steering wheel position does not change un-
intentionally while driving, which would
increase the risk of an accident.
Head restraints
eT r e eerie)
Applies to: vehicles with adjustable head restraints
B4G-0454
Fig. 54 Correctly adjusted head restraints
Make sure that:
— The upper edge of the head restraint is as even
as possible with the top of your head
— The head restraint is as close as possible to the
back of the head
— The head restraints in any occupied rear seats
are all the way up
ZA WARNING
— There is one head restraint for each seat. All
vehicle occupants must adjust the head re-
straint correctly before every trip. Having
head restraints that are not adjusted cor-
rectly or not installed in the vehicle increas-
es the risk of a neck injury during sudden or
unexpected driving or braking maneuvers or
in a collision.
— Only remove the rear seat head restraints if
it is necessary to install a child safety seat
=> page 67. Stow the removed head re-
straints securely, for example in the luggage
compartment. Reinstall the head restraints
immediately once the child safety seat has
been removed. Driving without head re-
straints increases the risk of serious neck in-
juries.
58
Front head restraints
Applies to: vehicles with adjustable head restraints
[RAZ-0683|
Fig. 55 Front seat: adjusting the head restraint
Adjusting the head restraints
> To adjust the head restraint upward or forward,
slide it until it locks into place.
> To adjust the head restraint downward or back-
ward, press the button on the side and slide the
head restraint. Release the button and slide the
head restraint farther until it locks into place.
Rear head restraints
Applies to: vehicles with adjustable head restraints
Fig. 56 Rear seat: operating the head restraints
Adjusting the head restraints
> To adjust the head restraint upward, slide it un-
til it locks into place.
> To adjust the head restraint all the way up or
down, press the button @) and slide the head
restraint. Release the button and slide the head
restraint farther until it locks into place.
Removing the headrests
> Fold the backrest forward slightly > page 76.
> Move the head restraint upward all the way.
> Insert a suitable object, such as the the extend-
ed vehicle key or mechanical key, into the >
Page 68 of 278

Sitting correctly and safely
— The electrical capacity is the same as or greater
than the electrical capacity of a typical adult
The passenger's airbag is deactivated if:
— The electrical capacity is lower than the thresh-
old stored in the control module
— The electrical capacity is the same as or less
than the electrical capacity of a typical one-
year-old child in a child safety seat that has
been used for certification in accordance with
FMVSS 208
If the front passenger's airbag is activated, the
PASSENGER AIR BAG ON @ indicator light
will turn on. If the front passenger's airbag is de-
activated, the PASSENGER AIR BAG OFF #;
indicator light will turn on.
The deployment force of the front airbags adapts
based on whether or not the safety belt is used
and the distance between the seat and the steer-
ing wheel/instrument panel. For example, if a
person is too close to the front airbag, the front
airbag will deploy with less force to help reduce
the risk of injury.
Meaning of PASSENGER AIR BAG OFF 3; ON
® indicator light
When the ignition is switched on, the system de-
tects whether the front passenger's seat is occu-
pied. PASSENGER AIR BAG OFF #; ON @
will turn on for several seconds during this proc-
ess. Then it will indicate whether the front pas-
senger's airbag is activated or deactivated.
— PASSENGER AIR BAG OFF #%;: the front
passenger's airbag is deactivated and will not
deploy in the event of an accident.
— PASSENGER AIR BAG ON ®:: the front pas-
senger's airbag is activated and could deploy in
the event of an accident.
If a change to the occupancy status of the front
passenger's seat is detected
PASSENGER AIR BAG OFF #; ON ®@ will
flash for several seconds and will then display the
status of the front passenger's airbag.
Always make sure the indicator light corresponds
to the occupancy of the front passenger's seat.
66
— An adult or individual of similar size in the
front passenger's seat: the front passenger's
airbag must be activated, so
PASSENGER AIR BAG ON @ must remain
on.
— An individual of smaller size (for example, an
adolescent or small adult) in the front pas-
senger's seat: the front passenger's airbag
must be activated, so
PASSENGER AIR BAG ON ® must remain
on.
— Child in a child safety seat on the front pas-
senger's seat: the front passenger's airbag
must be deactivated, so
PASSENGER AIR BAG OFF #; must remain
on.
— Front passenger's seat not occupied: the front
passenger's airbag must be deactivated, so
PASSENGER AIR BAG OFF #; must remain
on.
ZA\ WARNING
— An adult or a person with a small stature
(such as a young person or small adult) seat-
ed on the front passenger's seat will not be
protected by the passenger's airbag in the
event of a collision if the passenger's airbag
is deactivated. This increases the risk of in-
jury and death. Always make sure that
PASSENGER AIR BAG ON ®@ remains on
while driving. If
PASSENGER AIR BAG ON @ does not
turn on, make sure the front passenger is
sitting correctly in the seat > page 54 and
that there are no objects covering the front
passenger's seat (such as blankets or pil-
lows). If PASSENGER AIR BAG ON ®
still does not turn on, the front passenger's
seat must not be used. Drive to an author-
ized Audi dealer or authorized Audi Service
Facility and have the airbag system inspect-
ed.
—Achild ina child safety seat on the front
passenger's seat - especially in a rear-facing
child safety seat - can receive a severe im-
pact if the front passenger's airbag deploys,
which increases the risk of serious or fatal
injury. Always secure child safety seats on
Page 100 of 278

Driving dynamic
the driving situation. The settings depend on the
selected Audi drive select* mode.
Ground clearance
The vehicle height and clearance can be influ-
enced by the following factors:
— Change in temperature
— Change in load
ZA\ WARNING
To reduce the risk of injury, make sure no one
gets pinched when the vehicle level is chang-
ing, for example when cleaning the under-
body or the wheel housings.
©) Note
Always make sure there is enough clearance
above and below the vehicle. This is especially
important for entrances with height restric-
tions, for example, before driving into under-
ground garages. You could also scrape the
ground when driving over the edges of curbs
or on steep ramps, which could damage your
vehicle.
Werle
| 8 | Suspension: malfunction! You can continue
driving\
There is a malfunction. See an authorized Audi
dealer or authorized Audi Service Facility for as-
sistance.
Steering
Electromechanical steering supports the driver's
steering movements by electronically adapting
the power steering depending on the vehicle
speed. The settings depend on the selected Audi
drive select* mode.
Progressive steering
Applies to: vehicles with progressive steering
The driving dynamic and driving stability are in-
creased by the steering ratio based on the steer-
98
ing wheel angle. The steering is very direct when
the steering wheel angle is sharp, and indirect
when the angle is low. This enables comfortable
maneuvering and a precise steering response at
higher driving speeds.
Messages
a Steering: malfunction! Please stop vehicle
The power steering may have failed. Adapt your
driving style immediately to compensate for the
fact that it may be more difficult to turn the
steering wheel, and stop your vehicle in a safe lo-
cation as soon as possible. Do not continue driv-
ing. See an authorized Audi dealer or authorized
Audi Service Facility for assistance.
|@—e| Steering: malfunction! Please stop vehicle
There is a malfunction in the electronic steering
lock. You cannot turn the ignition on. Do not tow
your vehicle because it cannot be steered. See an
authorized Audi dealer or authorized Audi Service
Facility for assistance.
a Steering: malfunction! You can continue
driving
There is a malfunction. Steering may be more dif-
ficult or more sensitive. Adapt your driving style.
Have the steering system checked immediately
by an authorized Audi dealer or authorized Audi
Service Facility. Please note that the red indicator
light may turn on after restarting the engine. Do
not continue driving if it does.
|e —e| Steering lock: malfunction! Please contact
Service
There is a malfunction in the electronic steering
lock. Drive immediately to an authorized Audi
dealer or authorized Audi Service Facility to have
the malfunction repaired.
ZA\ WARNING
Do not tow your vehicle if there is a malfunc-
tion in the electronic steering lock because
this increases the risk of an accident. >
Page 109 of 278
83A012721BB
Assist systems
@) Tips
— The coverage areas of the sensors > fig. 85
are diagrams and do not represent a true-
to-scale image of the sensor ranges. The ra-
dar sensors are designed to detect the left
and right adjacent lanes when the road
lanes are the normal width.
— The sensors and the areas around them
must not be obstructed because this can im-
pair the function of the systems that de-
pend on them. Make sure that the sensors
are free of snow, ice, and other deposits. Do
not use any accessories, stickers, or other
objects that extend into the range of the
sensors.
— Do not use a license plate bracket different
from the one installed by the factory in the
front of the vehicle, because it may impair
the function of some systems.
— The sensors can shift from an accident,
manual force, impacts, or from damage to
the radiator grill, bumper, wheel housing,
or underbody. Do not continue using the as-
sistance systems if the sensors have shifted,
because this is unsafe. Have an authorized
Audi dealer or authorized Audi Service Fa-
cility check their function.
— The function of the sensors may be limited
when light and visibility conditions are poor,
for example when driving into a tunnel,
when there is glare, or when there are re-
flective objects.
— External ultrasonic sensors, such as those in
other vehicles, can interfere with the sen-
sors.
—The side area ©)* is detected and evaluated
when passing. There may have been
changes to the surrounding area after
switching the ignition off and on again, af-
ter opening the doors, or if the vehicle is left
stationary for a period of time. In this case,
the area will appear black until the area has
been detected and evaluated.
— For an explanation on conformity with the
FCC regulations in the United States and the
Industry Canada regulations, see
=> page 259.
CO Vane Mey (TAU
[RAzZ-0211
[RAZ-0381
Fig. 88 Diagram: coverage area of the rearview camera
The assist systems analyze the data from various
cameras installed in the vehicle. Depending on
the vehicle equipment, the following cameras to
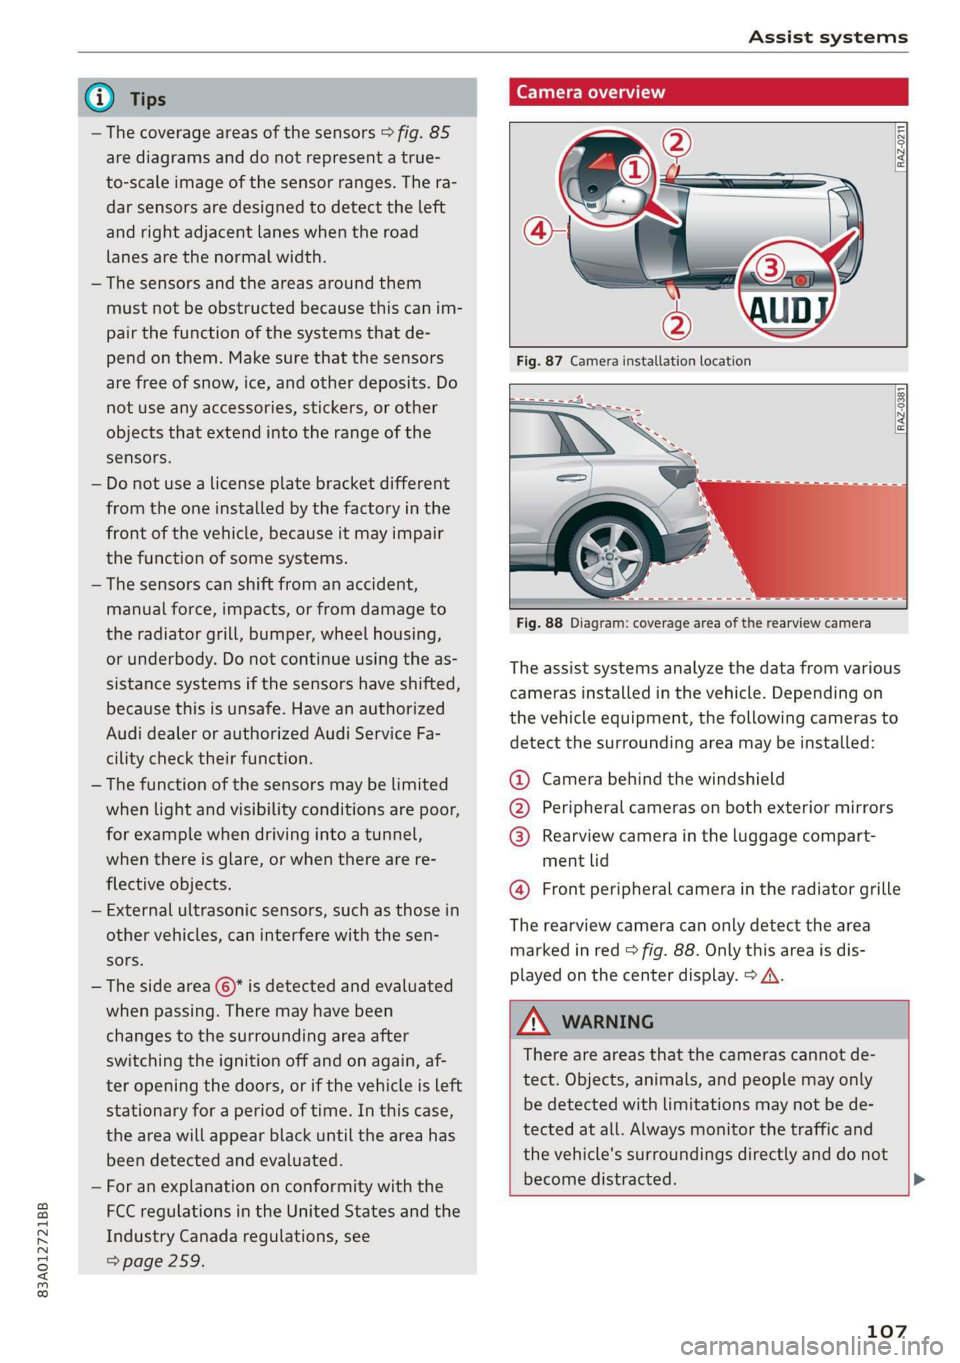
detect the surrounding area may be installed:
@ Camera behind the windshield
@ Peripheral cameras on both exterior mirrors
@ Rearview camera in the luggage compart-
ment lid
@ Front peripheral camera in the radiator grille
The rearview camera can only detect the area
marked in red > fig. 88. Only this area is dis-
played on the center display. > A\.
ZA WARNING
There are areas that the cameras cannot de-
tect. Objects, animals, and people may only
be detected with limitations may not be de-
tected at all. Always monitor the traffic and
the vehicle's surroundings directly and do not
become distracted. >
107
Page 115 of 278

83A012721BB
Driver assistance
In stop-and-go traffic, the vehicle may brake to a
full stop and then may also start driving again
automatically under certain conditions.
Follow the safety precautions and note the
limits of the assist systems, sensors, and
cameras > page 105.
For an explanation on conformity with the
FCC regulations in the United States and the
Industry Canada regulations, see > page 259.
Applies to: vehicles with adaptive cruise assist
B8V-0630
Fig. 91 Example: vehicle changing lanes and stationary ve-
hicle
Fig. 92 Example: driving into a curve
In some situations, the adaptive cruise assist
function is limited and you must assume control
of the vehicle when necessary, for example by ap-
plying the brakes.
— If a vehicle that was already detected (@ turns
or changes lanes, the adaptive cruise assist will
react to the vehicle ahead of it @).
— When driving into a curve > fig. 92 and out of a
curve, the adaptive cruise assist may react to a
vehicle in the adjacent lane and apply the
brakes. You can override the system by pressing
the accelerator pedal briefly.
— The adaptive cruise assist works with the vari-
ous sensors and cameras in the vehicle.
Vehicles can only be detected once they are
within the area and range covered by the sen-
sors > page 106.
— When driving around tight curves, a vehicle
driving ahead that was previously detected may
no longer be detected, and the adaptive cruise
assist may accelerate unexpectedly.
— The adaptive cruise assist does not react toa
stationary vehicle in the same lane if the sys-
tem expects that you can easily drive around
the stationary vehicle by turning the steering
wheel.
— The adaptive cruise assist may not react to sta-
tionary obstacles, such as the end of a traffic
jam, especially at high speeds.
— The adaptive cruise assist has a limited ability
to detect vehicles that are a short distance
ahead, off to the side of your vehicle, or moving
into your lane.
— Objects that are difficult to detect, such as mo-
torcycles, vehicles with high ground clearance,
or vehicles with an overhanging load, may be
detected late or not detected at all.
— The adaptive cruise assist does not respond to
people, animals, or objects that are crossing or
approaching from the opposite direction.
Follow the safety precautions and note the
limits of the assist systems, sensors, and
cameras > page 105.
113
Page 118 of 278
Driver assistance
responsible for controlling the vehicle. The
driver is especially responsible for braking,
starting to drive, controlling the speed, and
maintaining the distance to other vehicles.
— Turn on the adaptive cruise assist only if the
surrounding conditions permit it. Always
adapt your driving style to the current visu-
al, weather, road, and traffic conditions.
— Switch the adaptive cruise assist off tempo-
rarily when driving in turning lanes or high-
way exits. This prevents the vehicle from ac-
celerating to the stored speed when in these
situations.
ZA WARNING
If you press the SETK2) button when driving
at speeds below 20 mph (30 km/h), then 20
mph (30 km/h) will be set because that is the
minimum speed that can be set. If no vehicle
is detected ahead of you, the vehicle will ac-
celerate up to that speed.
@ Tips
— Always keep your hands on the steering
wheel. The driver is always responsible for
adhering to the regulations applicable in
the country where the vehicle is being oper-
ated.
— If you switch the ignition or the adaptive
cruise assist off, the stored speed is erased
for safety reasons.
— When the adaptive cruise assist is switched
on, the ESC and the ASR are switched on au-
tomatically.
— The system cannot be switched off if the
road exceeds the maximum possible grade
for safe operation.
— If you signal to pass and the adaptive cruise
assist suggests a passing maneuver, the
adaptive cruise assist will accelerate just be-
fore changing lanes to shorten the distance
to the vehicle driving ahead.
116
Setting the distance
Applies to: vehicles with adaptive cruise assist
B4M-0234
Fig. 97 Operating lever: setting the distance
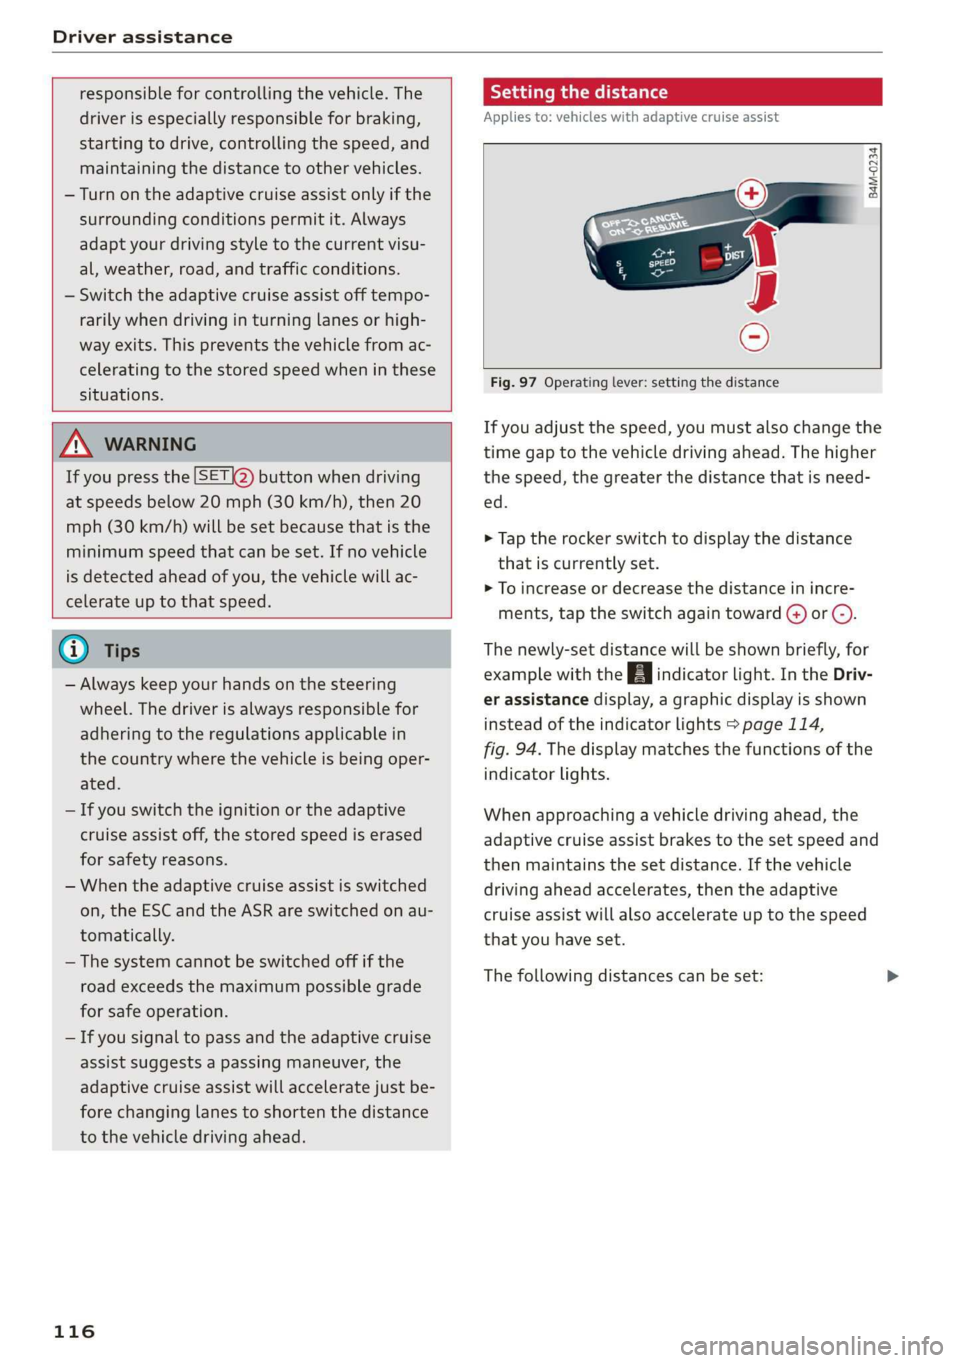
If you adjust the speed, you must also change the
time gap to the vehicle driving ahead. The higher
the speed, the greater the distance that is need-
ed.
> Tap the rocker switch to display the distance
that is currently set.
> To increase or decrease the distance in incre-
ments, tap the switch again toward G) or ().
The newly-set distance will be shown briefly, for
example with the indicator light. In the Driv-
er assistance display, a graphic display is shown
instead of the indicator lights > page 114,
fig. 94. The display matches the functions of the
indicator lights.
When approaching a vehicle driving ahead, the
adaptive cruise assist brakes to the set speed and
then maintains the set distance. If the vehicle
driving ahead accelerates, then the adaptive
cruise assist will also accelerate up to the speed
that you have set.
The following distances can be set:
Page 122 of 278
Driver assistance
Image in the Driver assistance display
Applies to: vehicles with adaptive cruise assist
The display only appears if the Driver assistance
display is selected on the on-board computer
=> page 14 and the adaptive cruise assist is not
actively controlling the vehicle.
@ Detected vehicle driving ahead
@ Use the markings to help you estimate the
distance to an obstacle. Each marking repre-
sents approximately one second.
@®) Set warning threshold. Depending on the set-
tings, the display will be colored in from the
bottom to the top.
@ You will be warned as soon as you fall below
the set distance.
Adjusting the distance warning
The system can be switched on or off in the MMI
and you can customize the distance warning
threshold. The settings depend on the vehicle
equipment.
— Applies to: MMI: Select on the home screen:
VEHICLE > Driver assistance > Distance warn-
ing.
Messages
irk or is displayed when there is a malfunc-
tion, the distance warning functions may be un-
available or may be limited.
A message that indicates the cause and possible
solution may appear with some displays. The
weather conditions may be too poor or a sensor
may be covered. Clean the area in front of the
sensors > page 106, fig. 86 and try to turn on
the systems again later.
If the malfunction remains, drive to an author-
ized Audi dealer or authorized Audi Service Facili-
ty immediately to have the malfunction correct-
ed.
Z\ WARNING
Follow the safety precautions and note the
limits of the assist systems, sensors, and
cameras > page 105.
120
G) Tips
— The driver is always responsible for adhering
to the regulations applicable in the country
where the vehicle is being operated.
— You may fall below the warning threshold
briefly when passing or when quickly ap-
proaching a vehicle driving ahead. There is
no warning in this scenario. A warning is giv-
en only if you fall below the warning thresh-
old for an extended period of time.
Lane departure warning
General information
Applies to: vehicles with lane departure warning
The lane departure warning can detect lane
marker lines within the limits of the system. If
you are approaching a detected lane marker and
it appears likely that you will leave the lane, the
system can warn you with corrective steering and
a steering wheel vibration, if necessary.
The system functions in the speed range of ap-
proximately 40 mph - 155 mph (65 km/h -
250 km/h).
Applies to: vehicles with lane departure warning
and without side assist: Even if the system is
ready, it will not warn you if you activate a turn
signal before crossing the lane marker line. In
this case, it assumes that you are changing lanes
intentionally.
Applies to: vehicles with lane departure warning
in combination with side assist: If the turn signal
is activated, the lane departure warning is ready,
and a lane change has been classified as critical
by the lane departure warning due to vehicles
traveling beside you or due to approaching
vehicles, then a noticeable corrective steering
movement will occur briefly before exiting the
lane. This will attempt to keep your vehicle in the
lane.
Z\ WARNING
Follow the safety precautions and note the
limits of the assist systems, sensors, and
cameras > page 105.
Page 159 of 278
83A012721BB
Navigation
Navigation
Opening navigation
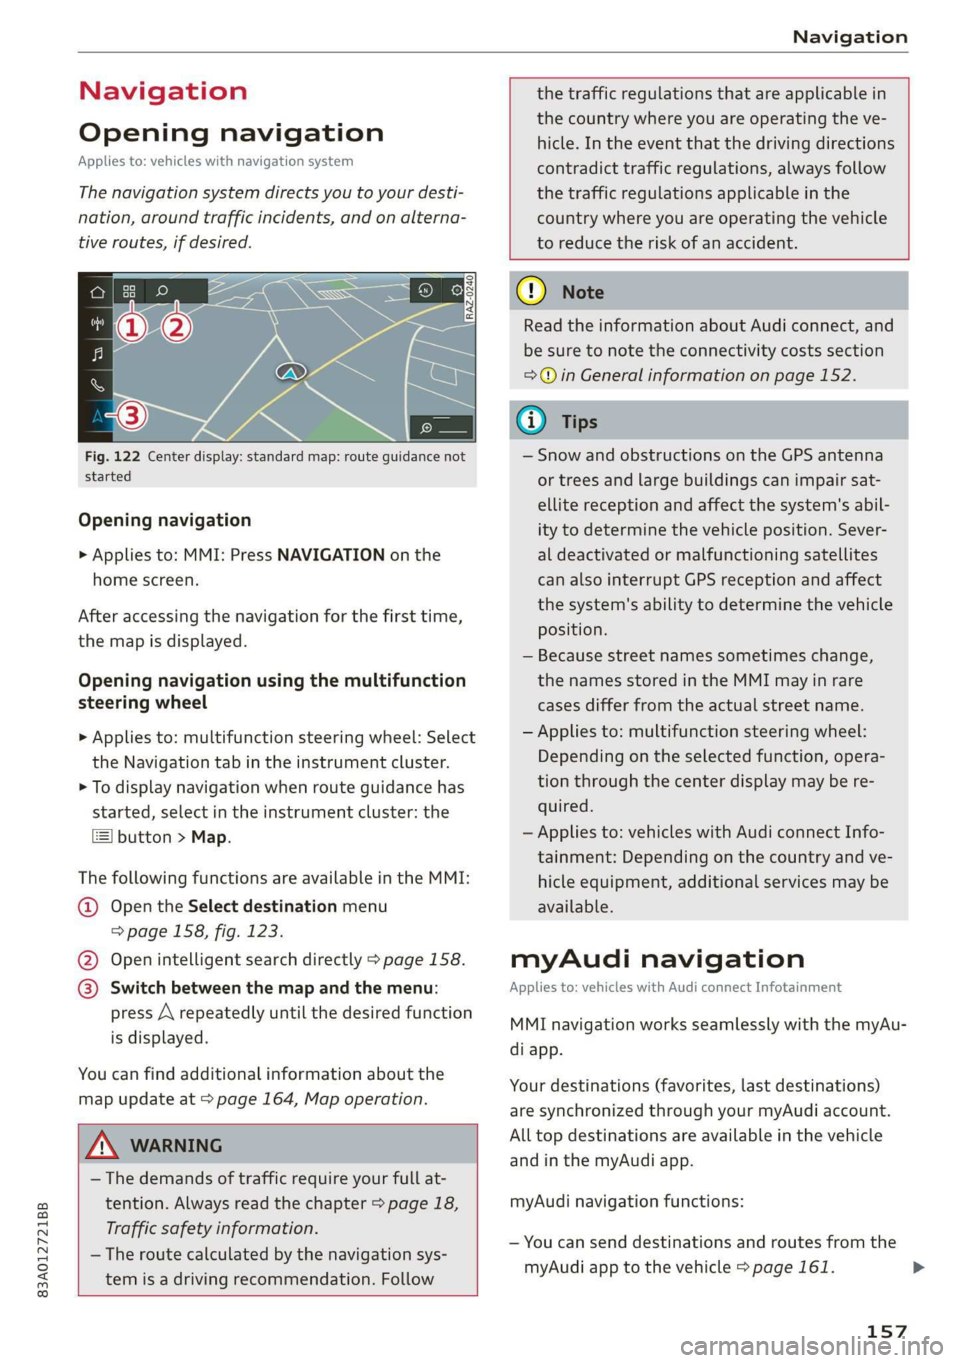
Applies to: vehicles with navigation system
The navigation system directs you to your desti-
nation, around traffic incidents, and on alterna-
tive routes, if desired.
Fig. 122 Center display: standard map: route guidance not
started
Opening navigation
> Applies to: MMI: Press NAVIGATION on the
home screen.
After accessing the navigation for the first time,
the map is displayed.
Opening navigation using the multifunction
steering wheel
> Applies to: multifunction steering wheel: Select
the Navigation tab in the instrument cluster.
> To display navigation when route guidance has
started, select in the instrument cluster: the
button > Map.
The following functions are available in the MMI:
@ Open the Select destination menu
=> page 158, fig. 123.
@ Open intelligent search directly > page 158.
@ Switch between the map and the menu:
press A repeatedly until the desired function
is displayed.
You can find additional information about the
map update at > page 164, Map operation.
the traffic regulations that are applicable in
the country where you are operating the ve-
hicle. In the event that the driving directions
contradict traffic regulations, always follow
the traffic regulations applicable in the
country where you are operating the vehicle
to reduce the risk of an accident.
ZX WARNING
— The demands of traffic require your full at-
tention. Always read the chapter > page 18,
Traffic safety information.
— The route calculated by the navigation sys-
tem is a driving recommendation. Follow
@) Note
Read the information about Audi connect, and
be sure to note the connectivity costs section
=>@ in General information on page 152.
iG) Tips
— Snow and obstructions on the GPS antenna
or trees and large buildings can impair sat-
ellite reception and affect the system's abil-
ity to determine the vehicle position. Sever-
al deactivated or malfunctioning satellites
can also interrupt GPS reception and affect
the system's ability to determine the vehicle
position.
— Because street names sometimes change,
the names stored in the MMI may in rare
cases differ from the actual street name.
— Applies to: multifunction steering wheel:
Depending on the selected function, opera-
tion through the center display may be re-
quired.
— Applies to: vehicles with Audi connect Info-
tainment: Depending on the country and ve-
hicle equipment, additional services may be
available.
myAudi navigation
Applies to: vehicles with Audi connect Infotainment
MMI navigation works seamlessly with the myAu-
di app.
Your destinations (favorites, last destinations)
are synchronized through your myAudi account.
All top destinations are available in the vehicle
and
in the myAudi app.
myAudi navigation functions:
— You can send destinations and routes from the
myAudi app to the vehicle > page 161.
157
>
Page 161 of 278
83A012721BB
Navigation
> Applies to: MMI: Select on the home screen:
NAVIGATION > © >G.
> Enter one or more search terms into the input
field.
> The search engine provider shows suggestions
£ to narrow down the search.
> Press on suggestions until the desired destina-
tion appears in the results list. If necessary, use
one finger to swipe upward or downward until
the suggestions © or destinations 9 appear.
> Press on the desired destination 9. The Details
menu will be displayed.
> Press Start.
Route guidance will be activated and the map will
be displayed. > page 163, fig. 125
@) Note
Read the information about Audi connect, and
be sure to note the connectivity costs section
=@ in General information on page 152.
@) Tips
— The MMI input suggestions depend on the
last navigated destinations.
— The navigation system always searches for
the fastest route. You can find information
on alternative routes under > page 165.
uate REL Lee)
Applies to: vehicles with navigation system
As an alternative to the intelligent search, you
can also enter an address in stages.
Opening a menu
> Applies to: MMI: Select on the home screen:
NAVIGATION > (G8) > Enter address.
Enter a destination using an address
> Press on the respective input field and enter an
address.
> Press on Apply. The Details menu will be dis-
played.
> Press Start.
Route guidance will be activated and the map will
be displayed > page 163, fig. 125.
Destination entry for a street intersection
Requirement: you must have entered a street.
> Select: Intersection > enter a street > Start.
Loading previous destinations
Applies to: vehicles with navigation system
Your last destinations and routes can be loaded
directly as a navigation destination.
As soon as you start route guidance, the destina-
tion is automatically saved in the last destina-
tions. Your previous destinations are marked with
the © symbol.
If you have met the requirements for myAudi
navigation, your previous destinations will be
synchronized with your myAudi account
=> page 157.
Accessing previous destinations
> Applies to: MMI: Select on the home screen:
NAVIGATION > (68) > Last destinations > select
a desired destination > Start.
> Applies to: multifunction steering wheel: Select
in the instrument cluster: Navigation tab > [|
button > Last destinations > desired destina-
tion.
Changing and loading a previous destination
> Applies to: MMI: Select on the home screen:
NAVIGATION > (88) > Last destinations > Z >
¥ > change the address > Use address > Start.
Restore last tour
Requirement: a route with at least two stopovers
must have already been canceled.
Your last route is labeled with the ® symbol.
> Applies to: MMI: Select on the home screen:
NAVIGATION > (68) > Last destinations > Re-
store last tour. Route guidance will start imme-
diately.
Deleting previous destinations
> Applies to: MMI: Select on the home screen:
NAVIGATION > (Gs) > Last destinations > Z >
select one or more entries or Select all > Delete
> (Done).
159
>