four wheel drive AUDI Q3 2020 Owners Manual
[x] Cancel search | Manufacturer: AUDI, Model Year: 2020, Model line: Q3, Model: AUDI Q3 2020Pages: 278, PDF Size: 72.66 MB
Page 14 of 278
Instrument cluster
@) Tips
— The following pages primarily show illustra-
tions of the Audi virtual cockpit plus*. The
display or location of the items that are
shown may vary on the different versions of
the instrument cluster.
— You can select the units used for tempera-
ture, speed, and other measurements
=> page 193.
— Speeds are displayed in mph (miles per
hour) or km/h (kilometers per hour).
— If there is a malfunction in the instrument
cluster, DEF will appear in the trip odometer
display. Have the malfunction corrected as
soon as possible.
Operating
3:50™
12/5/2018
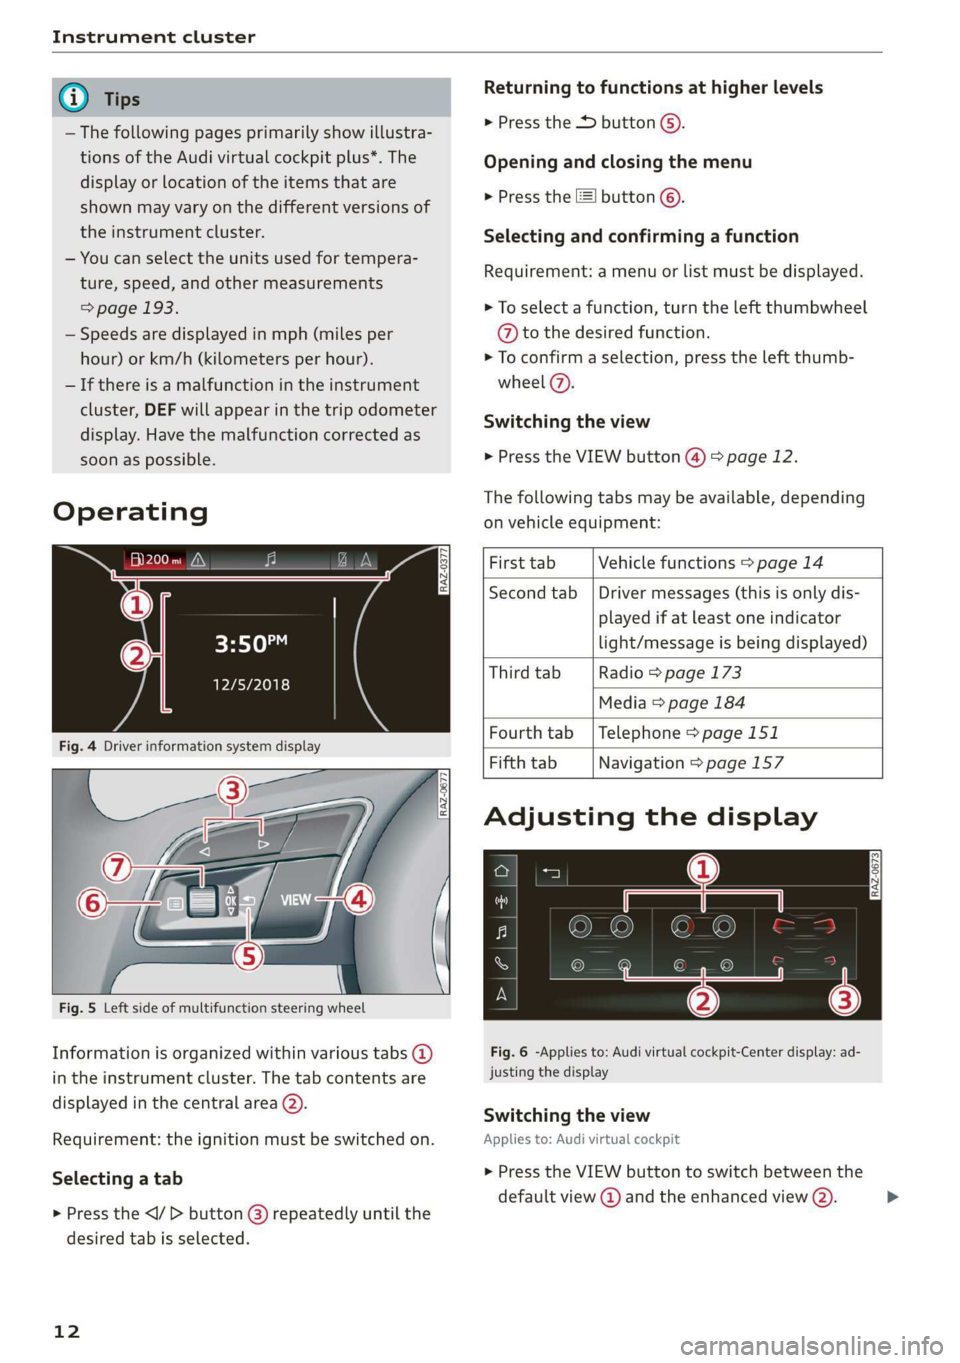
Fig. 4 Driver information system display
5
he Ny | cc
Fig. 5 Left side of multifunction steering wheel
Information is organized within various tabs @)
in the instrument cluster. The tab contents are
displayed in the central area (2).
Requirement: the ignition must be switched on.
Selecting a tab
> Press the button @) repeatedly until the
desired tab is selected.
12
Returning to functions at higher levels
> Press the button @).
Opening and closing the menu
> Press the =] button ©.
Selecting and confirming a function
Requirement: a menu or list must be displayed.
> To select a function, turn the left thumbwheel
@ to the desired function.
> To confirm a selection, press the left thumb-
wheel (7).
Switching the view
> Press the VIEW button (4) > page 12.
The following tabs may be available, depending
on vehicle equipment:
First tab Vehicle functions > page 14
Second tab | Driver messages (this is only dis-
played if at least one indicator
light/message is being displayed)
Third tab Radio > page 173
Media > page 184
Fourth tab | Telephone > page 151
Fifth tab Navigation > page 157
Adjusting the display
Fig. 6 -Applies to: Audi virtual cockpit-Center display: ad-
justing the display
Switching the view
Applies to: Audi virtual cockpit
> Press the VIEW button to switch between the
default view @ and the enhanced view (2).
Page 89 of 278
83A012721BB
Driving
If you stop using the shift paddles temporarily,
the transmission will switch back to automatic
mode. To keep shifting manually, tilt the selector
lever toward the front passenger's side.
@ Tips
— The transmission only allows manual shift-
ing when the engine speed is within the per-
mitted range.
— The transmission automatically shifts up or
down before critical engine speed is
reached.
Accelerator pedal
You can accelerate the vehicle using the accelera-
tor pedal. If you press the accelerator pedal all
the way down, the engine’s full power will be
used and you will reach maximum acceleration,
also called “kick-down”.
ZX WARNING
The driving wheels could spin and the vehicle
could swerve on slick or slippery road surfaces
when using kick-down, which increases the
risk of an accident.
Manually releasing the parking lock
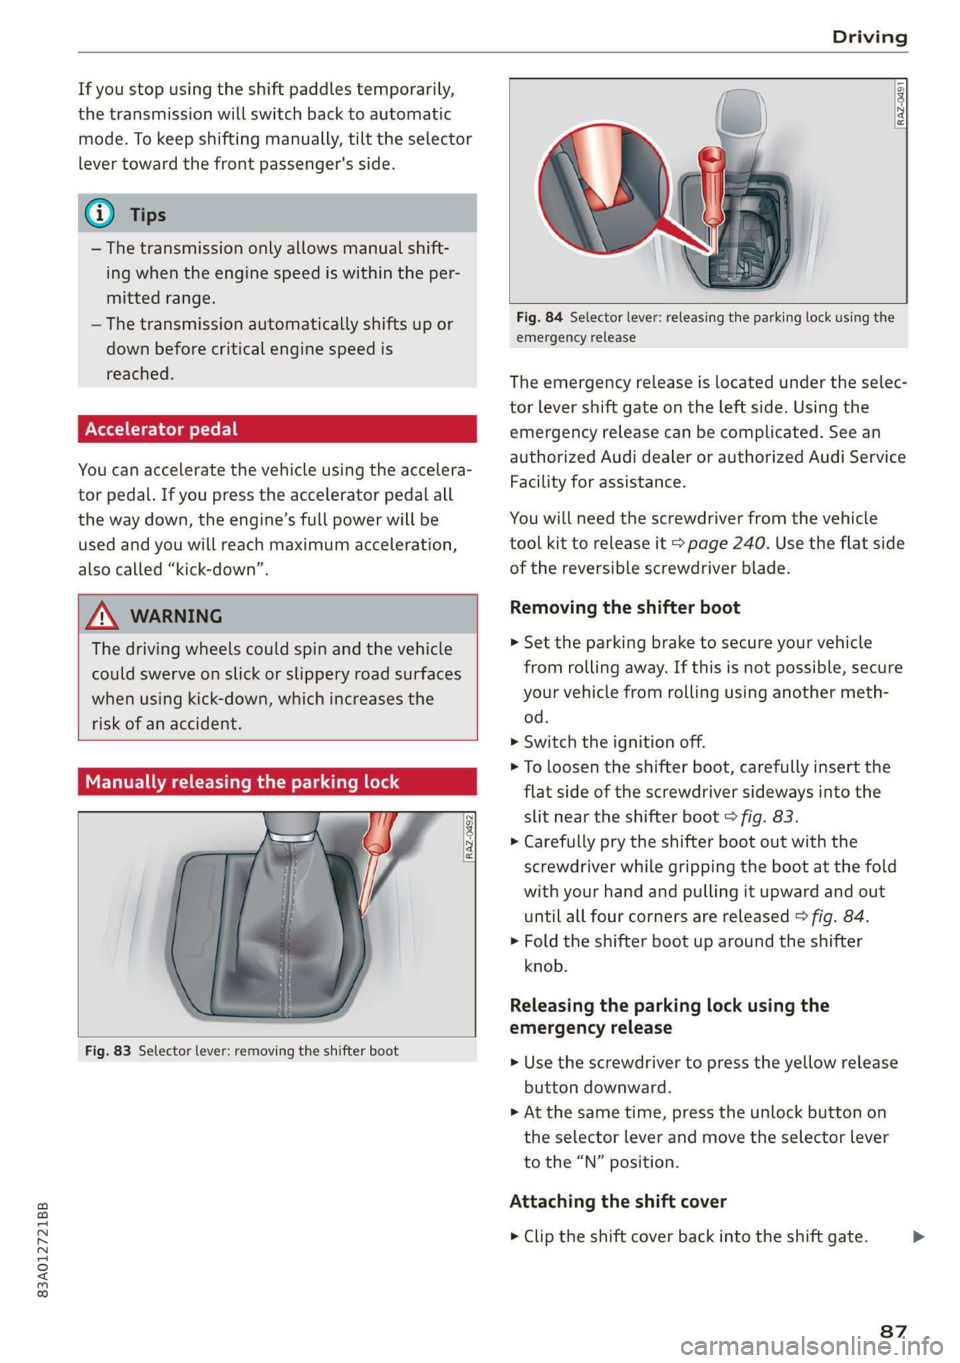
Fig. 83 Selector lever: removing the shifter boot
RAZ-0491 le
Fig. 84 Selector lever: releasing the parking lock using the
emergency release
The emergency release is located under the selec-
tor lever shift gate on the left side. Using the
emergency release can be complicated. See an
authorized Audi dealer or authorized Audi Service
Facility for assistance.
You will need the screwdriver from the vehicle
tool kit to release it > page 240. Use the flat side
of the reversible screwdriver blade.
Removing the shifter boot
> Set the parking brake to secure your vehicle
from rolling away. If this is not possible, secure
your vehicle from rolling using another meth-
od.
> Switch the ignition off.
> To loosen the shifter boot, carefully insert the
flat side of the screwdriver sideways into the
slit near the shifter boot > fig. 83.
> Carefully pry the shifter boot out with the
screwdriver while gripping the boot at the fold
with your hand and pulling it upward and out
until all four corners are released > fig. 84.
> Fold the shifter boot up around the shifter
knob.
Releasing the parking lock using the
emergency release
> Use the screwdriver to press the yellow release
button downward.
> At the same time, press the unlock button on
the selector lever and move the selector lever
to the “N” position.
Attaching the shift cover
> Clip the shift cover back into the shift gate.
87
>
Page 97 of 278

83A012721BB
Driving
must immediately start steering in the di-
rection of the downward slope to reduce the
risk of an accident.
— Always be ready to brake when using the hill
descent control function.
tice LM dial)
Your vehicle is not an offroad vehicle. Note the
following points when driving offroad:
— Drive slowly and carefully.
—To reduce the risk of underbody damage, pay
attention to the vehicle's ground clearance and
drive across raised areas of the ground with the
wheels on one side of the vehicle, instead of al-
lowing the center of the vehicle to pass over the
raised areas.
—To reduce the risk of becoming stuck, drive
through sandy or swampy areas at a steady
speed and without stopping, if possible.
If necessary, use the following functions:
— Audi drive select* Offroad mode > page 97
— Hill descent assist* > page 95
— Limit ESC > page 100
ZA\ WARNING
Only drive in terrain that is suitable for the ve-
hicle and your driving ability.
@ For the sake of the environment
Avoid actions that are damaging to the envi-
ronment. Show respect for the natural envi-
ronment and remain on marked routes.
@) Tips
Clean your vehicle after driving offroad. Dirt
and stones falling off your vehicle can affect
other road users.
Driving through water
If you must drive through water, follow these in-
structions:
— Check the stability of the ground, the current,
and the water depth. If the ground is unstable,
there is a strong current, or there are waves,
the water must only reach up to the lower edge
of the body at the most.
— Deactivate the Start/Stop system*.
— Drive carefully and no faster than at walking
speeds to prevent the front of the vehicle from
creating waves, because they could splash
above the lower edge of the body. Oncoming
vehicles could also create waves.
— Do not stop the vehicle while in the water.
— Drive in reverse.
— Do not turn the engine off.
ZA\ WARNING
After driving through water, press the brake
pedal carefully to dry the brakes so that the
full braking effect will be restored.
@) Note
Vehicle components such as the engine, drive
system, suspension, or electrical system, can
be severely damaged by driving through wa-
tera
@) Tips
If possible, avoid driving through salt water
because it increases the risk of corrosion. Use
fresh water to clean any vehicle components
that come into contact with salt water.
Hill descent assist
Applies to: vehicles with hill hold assist
The “& button is located above the selector lever
in the center console. It lights up when the sys-
tem is turned on.
Hill descent assist can assist you when driving
down hills by maintaining a constant vehicle
speed by automatically braking all four wheels.
You can adjust the speed using the accelerator
and brake pedals. The regulation depends on the
hill and the vehicle speed.
> Switching on: press “2.
> Switching off: press “ again.
Active regulation
Regulation begins shortly after you start driving
and is possible at speeds up to approximately 19 >
95
Page 102 of 278
Driving dynamic
brake assist system may react with increased sen-
sitivity.
Anti-Slip Regulation (ASR)
ASR reduces drive power when the wheels begin
spinning and adapts the power to the road condi-
tions. This will increase the driving stability.
Electronic Differential Lock (EDL)
The EDL applies the brakes to wheels that are
slipping and transfers the drive power to the oth-
er wheels. This function is not available at higher
speeds.
In extreme cases, EDL automatically switches off
to keep the brake on the braked wheel from over-
heating. The vehicle is still functioning correctly.
EDL will switch on again automatically when con-
ditions have returned to normal.
Power steering
The ESC can also support vehicle stability
through steering.
Selective wheel torque control
Selective wheel torque control is used when driv-
ing on curves. Braking is targeted toward the
wheels on the inside of the curve as needed. This
allows more precise driving in curves.
Automatic post-collision braking system
The automatic post-collision braking system can
help to reduce the risk of sliding and of addition-
al collisions after an accident. If the airbag con-
trol module detects a collision, the vehicle is
braked by the ESC.
The vehicle does not brake automatically if one of
the following occurs:
— The driver presses the accelerator pedal, or
— The braking force generated by the pressed
brake pedal is greater than the braking force
that
would be initiated by the system
— The ESC, the brake system, or the vehicle elec-
trical system is not functioning
physical laws. This is especially important on
slippery or wet roads. If the systems begin
acting to stabilize your vehicle, you should
immediately alter your speed to match the
road and traffic conditions. Do not let the in-
creased safety provided tempt you into tak-
ing risks. This could increase your risk of a
collision.
— Please note the risk of a collision increases
when driving fast, especially through curves
and on slippery or wet roads, and when driv-
ing too close to objects ahead. There is still
a risk of accidents because the ESC and its
integrated systems cannot always prevent
collisions.
— Accelerate carefully when driving on
smooth, slippery surfaces such as ice and
snow. The drive wheels can spin even when
these control systems are installed and this
can affect driving stability and increase the
ZA WARNING
— The ESC and its integrated systems cannot
overcome the limits imposed by natural
100
risk of a collision.
@) Tips
— The ABS and ASR only function correctly
when all four wheels have a similar wear
condition. Different tire sizes can lead toa
reduction in engine power.
— You may hear noises when the systems de-
scribed are working.
The So button is located above the selector lev-
er in the center console.
The ESC is automatically switched on when the
ignition is switched on. It may make sense in
some situations to limit the ESC so that the
wheels can spin:
— Rocking the vehicle to free it when it is stuck
— Driving in deep snow, on unpaved ground, or
with snow chains
— Driving downhill while braking on loose ground
— Driving with axle articulation
Limiting ESC (Offroad mode)
—To limit the ESD, press the £20 button briefly.
The Fj indicator light turns on.
Page 223 of 278
83A012721BB
Wheels
by the tire manufacturer. This in-
formation is used to contact con-
sumers if a tire defect requires a
recall.
Vehicle capacity weight
means the rated cargo and lug-
gage load plus 150 lbs. (68 kilo-
grams) times the vehicle's desig-
nated seating capacity.
Vehicle maximum load on the
tire
means that load on an individual
tire that is determined by distrib-
uting to each axle its share of the
maximum loaded vehicle weight
and dividing by two.
Vehicle normal load on the tire
means that load on an individual
tire that is determined by distrib-
uting to each axle its share of the
curb weight, accessory weight,
and normal occupant weight (dis-
tributed in accordance with > ta-
ble on page 226) and dividing by
two.
Occupant loading and distri-
bution for vehicle normal load
for various designated seating
capacities
Refer to the tire inflation pressure
label > page 224, fig. 151 for the
number of seating positions. Re-
fer to the table > table on
page 226 for the number of peo-
ple that correspond to the vehicle
normal load.
New tires or wheels
Audi recommends having all work
on tires or wheels performed by
an authorized Audi dealer or au-
thorized Audi Service Facility.
These facilities have the proper
knowledge and are equipped with
the required tools and replace-
ment parts.
>New tires do not yet have the
optimal gripping properties.
Drive carefully and at moderate
speeds for the first 350 miles
(500 km) with new tires.
> Only use tires with the same de-
sign, size (rolling circumfer-
ence), and as close to the same
tread pattern as possible on all
four wheels.
>Do not replace tires individually.
At least replace both tires on the
same axle at the same time.
> Audi recommends that you use
Audi Original Tires. If you would
like to use different tires, please
note that the tires may perform >
221
Page 224 of 278
Wheels
differently even if they are the
same size > A.
>If you would like to equip your
vehicle with a tire and rim com-
bination that is different from
what was installed at the facto-
ry, consult with an authorized
Audi dealer or authorized Audi
Service Facility before making a
purchase > A.
Because the spare tire® is differ-
ent from the regular tires instal-
led on the vehicle (such as winter
tires or wide tires), only use the
spare tire* temporarily in case of
emergency and drive carefully
while it is in use. It should be re-
placed with a regular tire as soon
as possible.
Applies to: vehicles with all wheel
drive: All four wheels must be
equipped with tires that are the
same brand and have the same
construction and tread pattern so
that the drive system is not dam-
aged by different wheel speeds.
For this reason, in case of emer-
gency, only use a spare tire* that
is the same circumference as the
regular tires.
222
Z\ WARNING
—Only use tire/rim combina-
tions and suitable wheel bolts
that have been approved by
Audi. Otherwise, damage to
the vehicle and an accident
could result.
—For technical reasons, it is not
possible to use tires from oth-
er vehicles. In some cases, you
cannot even use tires from the
same vehicle model.
—Make sure that the tires you
select have enough clearance
to the vehicle. Replacement
tires should not be chosen
simply based on the nominal
size, because tires with a dif-
ferent construction can differ
greatly even if they are the
same size. If there is not
enough clearance, the tires or
the vehicle can be damaged
and this can reduce driving
safety and increase the risk of
an accident.
—Only use tires that are more
than six years old when abso-
lutely necessary and drive
carefully when doing so.
—Do not use run-flat tires on
your vehicle. Using them when
Page 235 of 278

83A012721BB
Wheels
— Tires that are only partially used are replaced
with new tires
Indicator lights
@ - Loss of pressure in at least one tire > A\.
Check the tires and replace or repair if necessary.
Check and correct the pressures of all four tires
and store the pressure again > page 233.
ia (Tire Pressure Monitoring System) Tire pres-
sure: malfunction! See owner's manual. if
appears after switching the ignition on or while
driving and the @ indicator light in the instru-
ment cluster blinks for approximately one minute
and then stays on, there is system malfunction.
Try to store the correct tire pressures
=> page 233. In some cases, you must drive for
several minutes after storing the pressures until
the indicator light turns off. If the indicator light
does turn off or turns on again after a short peri-
od of time, drive to an authorized Audi dealer or
authorized Audi Service Facility immediately to
have the malfunction corrected.
ZA WARNING
— If the tire pressure indicator appears in the
display, reduce your speed immediately and
avoid any hard steering or braking maneu-
vers. Stop as soon as possible and check the
tires and their pressure.
— The driver is responsible for maintaining the
correct tire pressure. You must check the
tire pressure regularly.
— Under certain conditions (such as a sporty
driving style, winter conditions, or unpaved
roads), the tire pressure monitoring system
indicator may be delayed.
(i) Tips
—The tire pressure monitoring system can al-
so stop working when there is an ESC mal-
function.
— Using snow chains may result in a system
malfunction.
—The tire pressure monitoring system in your
Audi was calibrated with “Audi Original
Tires” > page 221. Using these tires is rec-
ommended.
Storing tire pressures
If the tire pressure changes or a tire is replaced,
it must be confirmed in the system.
> Before storing the tire pressures, make sure the
tire pressures in all four tires meet the speci-
fied values and are adapted to the load
=> page 224.
> Switch the ignition on.
> Select on the home screen: VEHICLE > Settings
& Service > Tire pressure monitoring > Store
tire pressure > Yes, store now.
(i) Tips
Do not store the tire pressures if snow chains
are installed.
233